Ashton Windows:
A Cross-Referenced Toe-Up Sock Recipe by Karen Martin Kepner

Contents
3 About this Pattern 4 Preliminary Notes 5 Cable and Lattice Stitch Chart & Key 5 Round-By-Round Instructions Part 1: Toe Construction 6 Casting On 7 Five Toe Patterns Part 2: Heel Patterns 7 Three Heel Patterns
Part 3: Cuffs and Binding Off
8 Hour Glass Rib 9 Simple Rib Variations 9 Three Bind Off Techniques 9 Part 4: Putting It All Together Planning & Knitting Your Socks
An Appendix
11 An Alternate Cable Chart
About this Pattern or Recipe
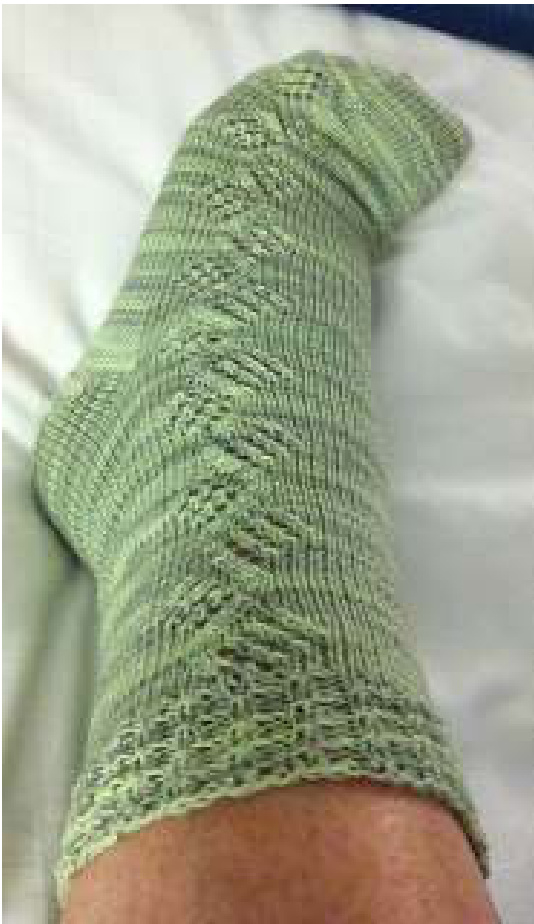
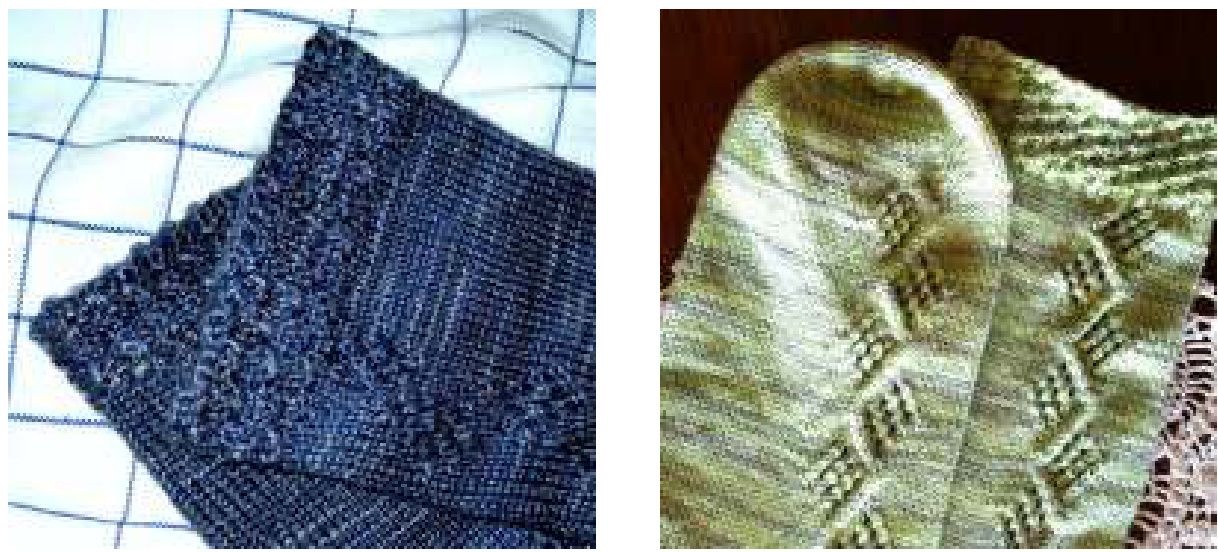
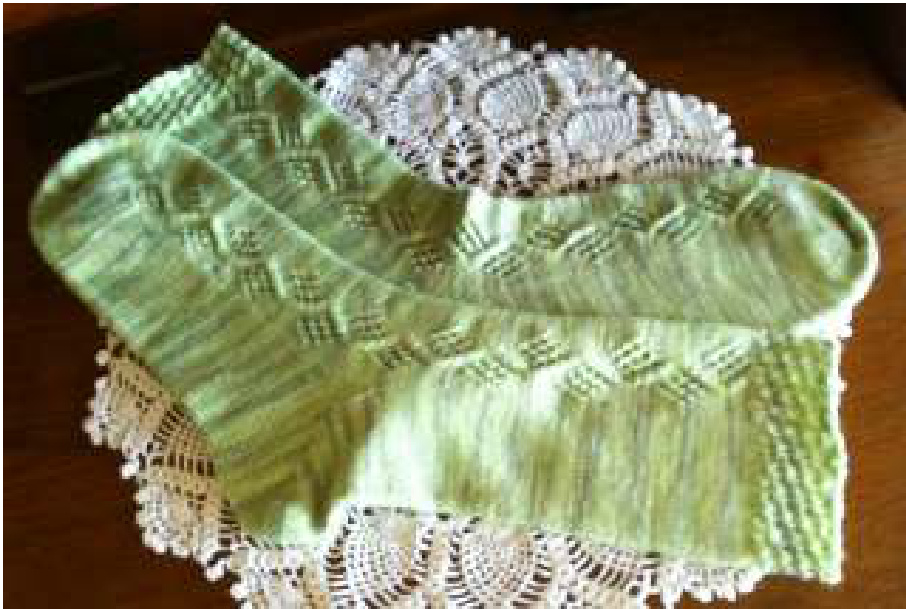
ock knitters come to a project with all kinds of preferences. Some prefer to follow a pattern from beginning to end and not deviate much from the instructions provided. New sock knitters tend to approach their projects this way. Other knitters, especially experienced ones, use just the stitch pattern or idea on the main part of the sock and choose their own favorite toe, heel, and cuff construction methods. Most other sock knitters fall between these two extremes. This recipe suggests some options which I believe any knitter could try, ending up with a great pair of socks, and learning a few new tricks in the process. The options include toes, heels, and cuffs that I have found, used, and loved, by sifting through the myriad of free sock knitting resources available. One could consult books and other published patterns in the knitters' marketplace for ideas and techniques, but, there are so many wonderful knitters who have made their methods available at no cost, that I wanted to collect a few of those ideas and share them with folks in some sort of coherent fashion, all in one place, and, in the process, thank these designers for their kind contributions to the art of sock knitting. This pattern is named for a friend and fellow sock knitter, Lynne Ashton, who loved to teach others how to knit socks. The cable and lattice motif on the sock reminds me of Tudor windows supported by a vine climbing its way up the sock leg. Lynne succumbed to cancer in October of 2011 and this recipe is a tribute to her generosity, patience, and teacher's heart. Lynne wrote a sock pattern for a KAL on Ravelry (Appalachian Socks aka Purly Bottoms) which she led in the late summer of 2010. Toe and heel options from Lynne are my starting point with this recipe. In addition, I have chosen several other toe, heel, and cuff options and attempted to provide guidance as to how to incorporate these into a successful sock. There are lots of other methods not included in this list of options, but these make a good start. This recipe assumes that the knitter has a general knowledge of sock construction. For those who require more guidance I whole-heartedly refer them to Lynne's sock pattern mentioned above and referenced below. The nature of this recipe causes this document to have a lot of pages. You need not print out the entire thing but only those pages that are relevant to your project. Moreover, being crossreferenced, I have provided links to the original sources for casting on, as well as toes, heels, and cuffs or bind-off methods, rather than reproducing them here. You will need to visit each of those links and find the information that you need for use in your own project. I have, for example, copies of favorite toes and heels from among those attached to this recipe, which I have printed out for my own use. These copies have a permanent home in my sock knitting project bag for easy reference on future projects. So you will need to do some initial research of your own to plan how you would like to knit your socks. Preliminary Notes: Choices, Yarn Requirements, Needles, Tools, and Bauge \* Please read through the entire pattern before beginning to knit! You have some planning to do first, but it will be worth your time and effort. Promise! \*A toe-up pattern can be adapted to most any weight of yarn but fingering weight yarn is recommended here; a 1o0 g skein of yarn is mostly likely sufficient for this particular project. Moreover, a solid or semi-solid colorway is also recommended, or a yarn with either very long color changes or a gradient style yarn, so that the detail of the stitch pattern doesn't get lost in a riot of competing colors and textures. \* I recommend using Magic Loop or 2 circular needles for these socks, though, once above the toe, a knitter could shift to double pointed needles if desired. The stitch pattern is not directional and could easily be adapted for top-down knitting, but I will not discuss how to do that in this recipe. Anyone who chooses is free to knit these socks top-down on their own. \* I prefer to knit socks at a fairly tight gauge, for both durability and stitch definition. The blue sample was knitted with a merino-tencel blend yarn on a pair of 2.5 mm circular needles at a gauge of 9 stitches/inch. I worked with 64 stitches around the foot and increased to 70 stitches above the heel around the leg and cuff. The pistachio green sample was knitted with a merino nylon blend with 2 mm short circular needles at a gauge of 10 stitches/inch and 72 stitches throughout. The number of stitches you work with can be anticipated with a few initial measurements and calculations, then adjusted once you knit the toe itself and try it on. XYou will also need a cable needle, several stitch markers, a tape measure, and a tapestry needle to weave in the ends. Because two stitches are carried over one stitch in this pattern a cable needle is helpful. Some yarns will more easily lend themselves to cabling without a needle if you desire to try this and there are tutorial videos on YouTube that can show you how. Yarns that are slippery or on the splitty side may not lend themselves as easily to working without a cable needle. I rather enjoy using a cable needle; I am old, fond friends with mine because we have tackled many projects together over the years.
Cable and Lattice Pattern
The stitch pattern was worked along the outside of each foot, one stitch in from the end of the instep needle. Each sock is a mirror image of the other. Everything else is simple stockinette stitch until you reach the cuff. A chart, stitch key, and round-by-round instructions follow.
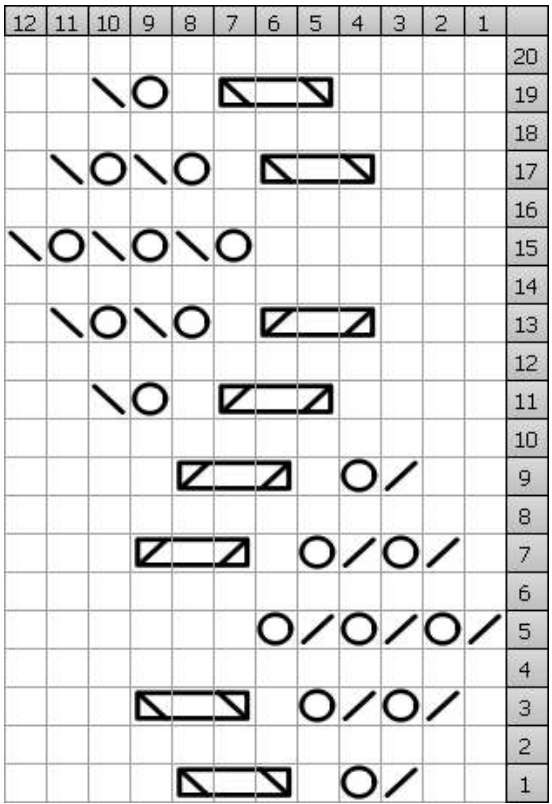
Panel of 12 stitches with a 20 row repeat
Cable Stitch Notes:
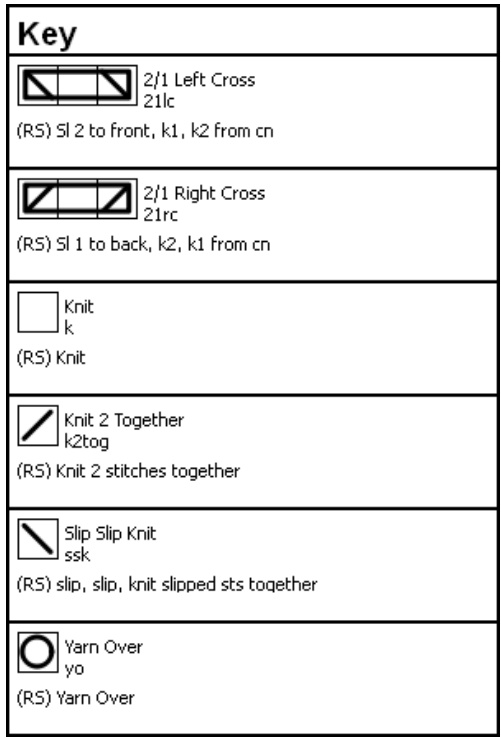
21lc slip 2 stitches onto cable needle and hold in front; knit 1, knit 2 from cable needle 21rc slip 1 stitch onto cable needle and hold in back; knit 2, knit 1 from cable needle
Round by Round Instructions for the Cable and Lattice Motif:
(Refer to Key, above right, for general stitch instructions) R1 k2, k2tog, yo, k1, 21lc, k4 R2 k12 R3 k1, k2tog, yo, k2tog, yo, k1, 21lc, k3 R4 k12 R5 k2tog, yo, k2tog, yo, k2tog, yo, k6 R6 k12 R7 k1, k2tog, yo, k2tog, yo, k1, 21rc, k3 R8 k12 R9 k2, k2tog, yo, k1, 21rc, k4 R10 k12 R11 k4, 21rc, k1, yo, ssk, k2 R12 k12 R13 k3, 21rc, k1, yo, ssk, yo, ssk, k1 R14 k12 R15 k6, yo, ssk, yo, ssk, yo, ssk R16 k12 R17 k3, 21lc, k1, yo, ssk, yo, ssk, k1 R18 k12 R19 k4, 21lc, k1, yo, ssk, k2 R20k12
Part 1: Toe Construction
Two Cast-On Options
A. Judy's Magic Cast-On is what I tend to use most often. Here is a link to Judy's Blog: http://www.persistentillusion.com/blogblog/techniques/magic-cast-on/magic-cast-on-2 And here a link to a YouTube Tutorial which Judy made for this cast on method: http://www.youtube.com/watch?v=1pmxRDz-cwo B. The Turkish Cast-On was favored by Lynne Ashton and she made a video tutorial for her KAL in 2010 which you can find here: http://www.youtube.com/watch?v=qyz119fe-uc
Five Toe Patterns
A. The Seam Free Rounded Toe for a toe-up sock by Lynne Ashton is found on Ravelry at this link: http://www.ravelry.com/patterns/library/seam-free-rounded-toe-for-a-toeup-sock B. A variation of this Rounded Toe by Lynne Ashton is found in her Appalachian Sock available on Ravelry here: http://www.ravelry.com/patterns/library/appalachian-socksaka-purly-bottoms This one has the smooth stockinette stitches on the inside and they continue along the entire length of the sock's sole for comfort. I think the Tailored Toe (aka, an Anatomically Correct Toe) devised by Alexandra Richards, aka, underdutchskies, has a wonderful fit for toes shaped like mine and works well with patterns like Ashton Windows that make it easy to tell which sock was made for which foot. You can find this toe on her blog: http://underdutchskies.com/?p=555 This is the toe used for the blue socks on the cover page of this pattern D. A Classic Wedge-Shaped Toe is described by Wendy D. Johnson in her Sunrise Socks Pattern: http://media.wendyknits.net/media/sunrise-socks.pdf. This is a no-fuss, straight forward method, similar to many toe-up sock patterns one finds. E. The Gusset Toe is a recipe I tend to use a lot for my own socks. Upon request, I jotted down this method and have made it available as a free Ravelry Download. You can find it here: http://www.ravelry.com/patterns/library/karendidits-gusset-toe. This is the toe used for the pistachio green socks also pictured in these pages.
Part 2: Beel Construction
I do not have delicate ankles! I often find that 64 stitches gives a perfect fit for my foot but that I need more room above the heel, generally 72 stitches. I tend to use a heel with some sort of gusset to work the increases I need for a better fit in the leg.
Three Heel Patterns
Each heel mentioned below is unique. Knowing just when to begin making your gusset or when to start knitting short rows will vary from heel to heel. Guidelines are given to help you determine how many inches from the tip of the toe you should begin knitting this part of your sock. With experience you will learn what works well for the heel method you select. A. The Gusset and Heel Flap from Lynne's Appalachian (Purly Bottoms) Sock is a simple and roomy method for turning a heel. Lynne provides detailed instructions for working this heel: http://www.ravelry.com/patterns/library/appalachian-socks-aka-purly-bottoms Lynne specifies that you are to knit until the sock is long enough to reach the middle of the arch of your foot. This will, of course, be different for each person. Trying on your sock is very important with this method. B. The Fleegle Heel is a great alternative to a heel with a flap. It looks sleek and the fit is roomy. This heel was used in the blue socks. A good fitting sock for me needs to be about 9.5 to 9.75 inches long in the foot. A good-fitting Fleegle Heel for me ends up being about 4.25 inches from where the increases begin to the end of the heel when the sock is lying flat. I started to make the gusset at 2.25" from the cast on (9.5 - 4.25 = 2.25) This will most likely be a bit different for you. Do consult her instructions for your own guidance. They are found on Fleegle's Blog: http://fleeglesblog.blogspot.com/2006/11/leegles-toe-up-no-flap-no-hassle-sock.html C. The Toe-Up Mini Flap and Gusset Short Row Heel by FluffyKnitterDeb is a very slick compromise between the tailored look of a short-row heel and the roomier fit of a sock with a gusset and flap. I confess this is my favorite heel method and it was used on the pistachio green socks. A good fitting mini-flap and gusset short row heel for me is about 3 inches from the beginning of the gusset to the hinge of the heel, and I typically make a 4 to 6 st gusset. You can access this via the Ravelry link here: ww.ravelry.com/patterns/library/toe-up-mini-flap-and-gusset-short-row-hee
A Note About Working Short Row Heels
There are all sorts of methods of working short rows, the most common, perhaps, being the classic Wrap and Turn (W&T) technique. You can find all kinds of tutorials online for how to work this kind of short row heel. I, however, use another method which, in my opinion, is much neater looking. That technique is thoroughly described in Charisa Martin Cairn's, "Lifestyle Toe Up Socks - No Swatch Needed," found here on Ravelry: http://www.ravelry.com/patterns/library/lifestyle-toe-up-socks---no-swatch-needed I use this short row method most all the time with great success. I highly recommend it. So, when making a Mini Flap and Gusset heel, I bracket off the gusset stitches I have added with stitch markers, and only turn the heel along the stitches between the markers. I then remove the markers when I am ready to make the mini flap itself.
Part 3: Sock Cuffs & Binding Off
Several Cuff Options
A. Hourglass Rib This requires a multiple of six stitches so adjust stitch count accordingly in the stockinette section of a round before you get to the cuff. R 1 [P, k, yo, k, p, k2], repeat around R 2 [P, k, ssk, p, k2tog front then again back before dropping those two sts off the needle], repeat around R 3 [P, k2, p, k, yo, k], repeat around R 4 [P, K2tog front then back, p, k, ssk], repeat around Repeat these four rounds. Tips: Keep yarn tension loose when working the k2tog front/back. When knitting 2 together through the back, it often helps if you open the stitches up with the needle tips before wrapping the yarn around the RH needle Remember that the stitch count increases in Rounds 1 & 3 but returns to normal in Rounds 2 & 4.
B.Simple Rib Variations 2 X 1 Rib: [k2, p1], rep (multiple of three sts) 1 X 1 Rib: [k1, p1] rep (even no. of sts) 1 X 1 Rib, Twisted: [k1tbl, p1] rep (even no of sts) 2 X 2 rib: [k2, p2] rep (multiple of four sts)
Binding Off
A. Jeny's Surprisingly Stretchy Bind Off, first exploded onto the scene when it appeared in Knitty, Fall 2009. This is the one I tend to use unless a pattern specifically instructs me to use a different method. The following Ravelry link will allow you to access either the original Knitty article or a helpful video tutorial on YouTube: http://www.ravelry.com/patterns/library/ienys-surprisingly-stretchy-bind-off B. The Russian Bind Off is another stretchy alternative often used. A YouTube Tutorial may be found here: http://www.youtube.com/watch?v= Dr ZrmZvnk C.Elizabeth Zimmermans Sewn Bind Off is also used by some sock knitters. A YouTube Tutorial may be found here: http://www.youtube.com/watch?v=DM40GtSq6aU
Part 4: Putting It All Together
In this section you willfirst do your homework and plan your sock project, taking notes if necessary. You will start knitting by making the toe of your choice and knit about an inch beyond the completed toe to check the fit. If it is too small or too large, now is the time to adjust your knitting. Toe-Up Socks are knit to fit. It's much easier to restart with only a few inches than a whole foot. Try it on and see what you think! Again, I refer you to Lynne Ashton's Appalachian Socks if you need guidance in creating a sock foot that fits you. The entire pattern is written in an easy tutorial style intended to teach those new to toe up sock knitting. http://www.ravelry.com/patterns/library/appalachian-socks-akapurly-bottoms When you have knitted your toe and are ready to begin the foot with the cable and lattice pattern on the instep, you have a choice of where to insert this motif. For the motif to wind its way up the outside of each foot you will knit right and left socks that are mirror images of each other. For the left sock, knit the first stitch on the instep needle, place a marker, knit 12 sts, place a marker and knit to the end. On the next round, begin working the cable and lattice motif on the stitches between the markets with row 1 of the chart. For the right sock, knit across the instep needle to the last 13 sts, place a marker, knit 12 sts, place a marker and knit the final stitch. On the next round begin working the motif on the stitches between the markers; begin with row 9 of the chart. Knit your foot on these stitches until it measures the proper length before you reach what your desired heel method requires. Follow heel instructions on your sole needle and continue knitting the instep stitches according to the established pattern. When your heel is complete, resume knitting in the round and motor on up your leg to the desired length. Knit your cuff according to your preferences, bind off, weave in your end bit of yarn, and cast on your other sock!
An Appendix
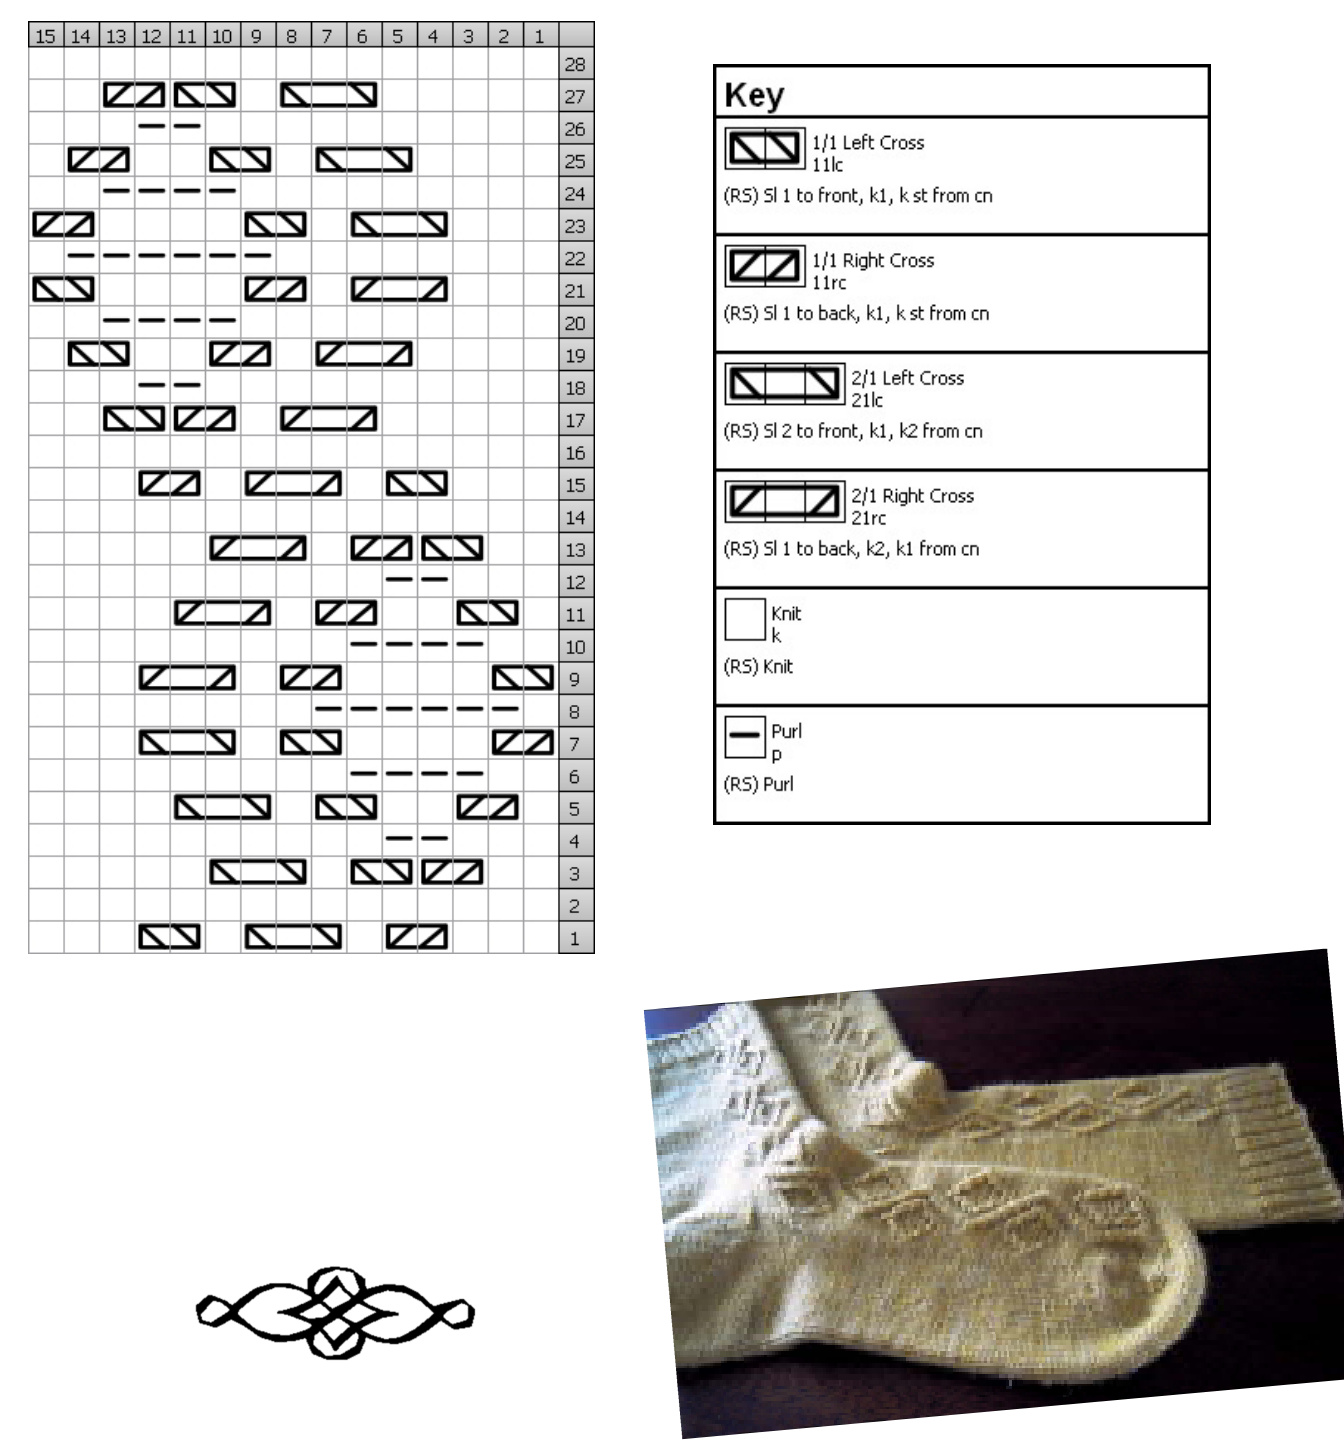
Because the lacy lattice motif is rather feminine, I experimented with a simple diamond instead of the lattice thinking it might be more appealing to men or to those who do not favor lace. The following chart is offered as an alternative. It is more angular and is worked over more stitches and rounds, due to the twisted stitches that outline the diamonds.
Ashton Windows with a Twist