Appalachian Sock - aka Purly Bottoms
By Lynne Ashton
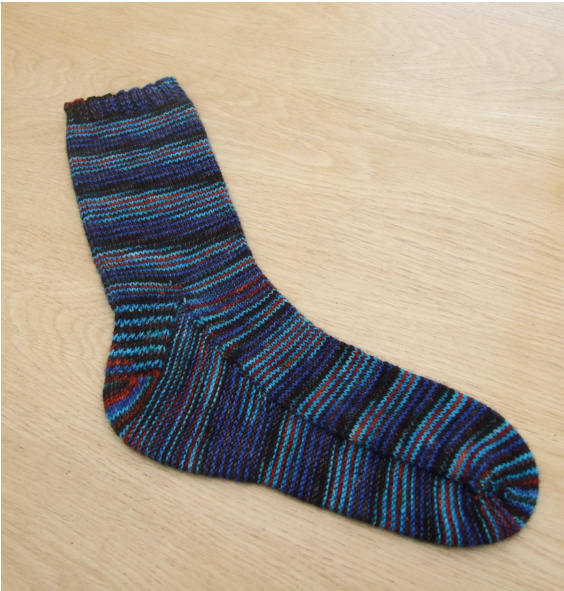
This sock came about from a KAL I led on my friend Toni Loftus' Shop Appalachian Yarns Inc board on Ravelry. I've named the sock after the KAL $\circledast$ The KAL had all sorts of knitters joining in. Some had lots of experience and some had none at all. It was a lovely friendly, sharing KAL and everyone who asked (over 100 people!) received a copy of this pattern with lots of notes included. I promised to clear some of the chat out and publish once the KAL was finished. The last tips and discussions for this KAL when out last week so here is the pattern. Important points $\circledast$ Read the pattern all the way through before you start Toe-up's are Knit to fi....ry them on as you go This pattern is just that a pattern, the socks are yours, so make changes if you want to. Try the socks on! Here is the link to a Turkish Cast-on demo video I made on YouTube http://www.youtube.com/watch?v=qyz119fe-uc These sample socks were made in the medium size using: The Knitting Goddess 4 ply $75\%$ Merino $25\%$ Nylon sock yarn, colour The Med. This yarn is 3.5oz/100gm yielding 465 yds/425m (All the photos are of these socks)
First things first
Measure your feet! Measurements: make a note of the measurements here Length of your foot from the tip of the longest toe to the back of your hee... Distance around your foot at the widest part .ins/cm (Usually around the ball of your foot and over the top of your foot behind your toes) If your feet are very different in measurement then measure both.
You will need:
Yarn: - 1 skein of 4ply sock yarn 3.5/4oz - 100/113gm, 440yd - 400m - If your feet are particularly long or you like your socks almost or actually knee length then get 2 skeins. Divide your yarn into 2 equal weight balls/cakes. Can I suggest that you make a loose knot in the end of each yarn cake/ball about 9 yds from the end. The finishing end not the end you will start knitting with. This is so you can make both socks at the same time and the knot? We'll come to that! Needle: - US 1.5/Metric 2.5mm circular needle (min $32^{\prime\prime}$ cable) $\times\,2$ (if this is not possible don't worry just have one). Make a swatch! You may need anything from 2mm to 2.75mm needle to get to gauge. Notions: - Large eyed yarn sewing needle and a larger single needle to cast off with maybe a Us 3/Metric 3.25mm Gauge: - 8sts = 1" roughly - I say roughly because within half a st is fine, but 2 or 3 sts different will cause your sock to be the wrong size

Abbreviations N1 - needle one the top of foot K - knit st(s) - stitch(es) Sl - slip the next st PM - place marker N2 - needle two the sole of foot P- purl kfb - knit into the front and the back of the stitch k2tog - knit 2 sts together. Right leaning decrease. SSK - Slip, slip knit - Slip the next st knitwise from the left to the right needle, then slip the next st the same way. Put the tip of the left needle into the front of both sts and knit through back of the loops. Left leaningdecrease. M1 - make 1 stitch by lifting the bar between the st on the right hand needle and the next st on the left hand needle, onto the left hand needle and knitting it through the back of the loop. W&T - wrap and turn. On a Knit row - Bring yarn to front of work between needles (as if to purl), slip next stitch to right-hand needle, bring yarn around this stitch to back of work (as if to knit), slip stitch back to left-hand needle. Now turn your work to begin working back in the other direction. On a Purl row - Bring yarn to back of work between needles (as if to knit), slip next stitch to right-hand needle, bring yarn around this stitch to front of work (as if to purl), slip stitch back to left-hand needle. Now turn your work to begin working back in the other direction.
Sock sizes
Look at the measurements you made around your foot and then match to the nearest in the sizes shown. Small Medium Large 8"> 9"> 10"> 20.5cm > 23 cm> 25.5cm > Once you have decided on the correct size to use you need to stick with this size throughout. The length of your sock can be adjusted before you reach the gusset and there are details further on for this.
PATTERN
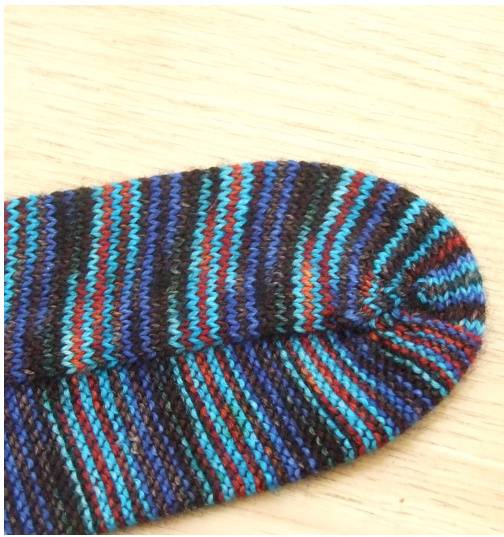
SECTION ONE Cast-on (I use Turkish Cast-on, but obviously you use the Toe-up cast -on you feel most comfortable with). Small/Med/Large - 11/14/18 initial wraps. This will produce the total numbers of 22/28/36 starting sts. This being divided as 11/14/18 sts on each needle. Work one round knittingall stitches. At the start of each needle give the first 2 sts a firm tug so that ladders don't appear. Ok, now remember Needle 1 (N1) is top of foot and Needle 2 (N2) is sole of foot. You might like to mark with a piece of yarn or a safety pin or a stitch marker the front of foot Work Toe as follows: Total stitches Round 1 N1: K1, M1, knit to last st, M1, K1 N2: P1, kfb, purl to last 2 sts, kfb, P1 26/32/40 Round 2 N1: K3, M1, knit to last 3 sts, M1, K3 N2: P3, kfb, purl to last 4 sts, kfb, P3 30/36/44 Round 3 N1: K1, M1, knit to last st, M1, K1 N2: P1, kfb, purl to last 2 sts, kfb, P1 34/40/48 Round 4 N1: K3, M1, knit to last 3 sts, M1, K3 N2: P3, kfb, purl to last 4 sts, kfb, P3 38/44/52 Round 5 N1: knit all sts. and N2: purl all sts Round 6 N1: K1, M1, knit to last st, M1, K1 N2: P1, kfb, purl to last 2 sts, kfb, P1 42/48/56 Round 7 N1: K3, M1, knit to last 3 sts, M1, K3 N2: P3, kfb, purl to last 4 sts, kfb, P3 46/52/60 Round 8 N1: knit all sts. and N2: purl all sts. Round 9 N1: K1, M1, knit to last st, M1, K1 N2: P1, kfb, purl to last 2 sts, kfb, P1 50/56/64 Round 10 N1: K3, M1, knit to last 3 sts, M1, K3 N2: P3, kfb, purl to last 4 sts, kfb, P3 54/60/68 Round 11 N1: knit all sts. and N2: purl all sts. Round 12 N1: knit all sts. and N2: purl all sts. :ound 13 N1: K1, M1, knit to last st, M1, K1 N2: P1, kfb, purl to last 2 sts, kfb, P1 What you should now have is a Toe with a Stocking Stitch top and a Reverse Stocking Stitch sole. This Toe should have no seams and be rounded. The inside of the sole should be Stocking Stitch. This means that there is nothing to rub your toes and a flat smooth surface to walk on. \*\*\*\*
OK onwards we go. You are now going to work the foot without any more increases. N2: Purl all stitches. Work the sock until the total length from cast on is about $3"$ ...try the sock on! Socks should be snug, not tight or flappy loose. If you have to frog or adjust it is better that you do it now as it won't be so upsetting! Foot Length -This sizing is just to get the length right, don't change the width size or your stitch count will be off. Small Medium Large 8"> 9"> 10"> 20.5cm > 23cm> 25.5 > Repeat this round until the sock is long enough to reach the middle of the arch of your foot. This is roughly $(4.5^{\prime\prime}/11.5c m)$ $5"$ /13cm)(5.5"/14cm) less in length than your foot. So if your foot length .S $9.5^{\prime\prime}/24c m$ long then continue until the sock is $4.5^{\prime\prime}/10c m$ long. Just to reiterate this point, this is an "average" pattern and although the above measurements work for most people, they don't work for everyone. Try your sock on, if (without over stretching it) it comes to the middle of the arch of your foot then you're at the correct length to start the Gusset....if not, work until it does. \$\$\$ Have we forgotten about the second sock? No, of course we haven't! You have choices! You can leave the start of the second sock until the first is finished or if you have 2 needles You can start your second sock on your second needle when you reach $\scriptstyle{\star\star\star\star}$ on the first sock or You can start your second sock on your second needle when you reach $^{\Phi\Phi\Phi}$ on your first sock.
SECTION TWO
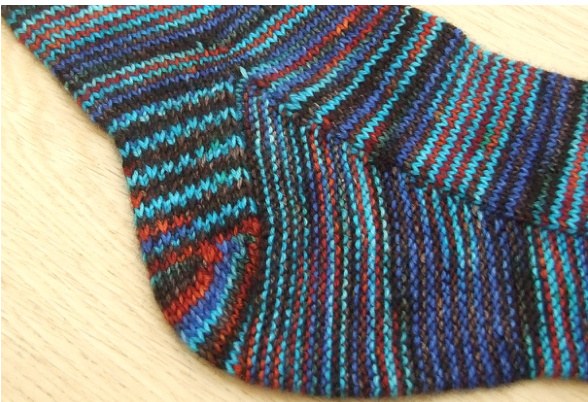
We are now going to increase on the sole of the foot to make a gusset. A gusset is there to make sure we can get the sock on over our instep and ankles. Not all sock patterns have gussets, this onedoes. Remember N1 is the top of the foot and N2 is the sole and soon the heel. GUSSET - work the gusset appropriate for the width size Round 1 N1: (these will be the front/instep stitches): Knit as normal. N2: (these will be the sole/heel stitches): P1, kfb, purl to last 2 stitches, kfb, P1. Round 2 N1: Knit all sts N2 : Purl all sts. Repeat Rounds 1 and 2 an additional 10/14/16 times. End with a Round 2. N2 now has 51/62/70 sts. Round 3 N1 only: Knit all stitches. (Don't miss this round out!) Now we are ready to work the heel shaping. HEEL You will now work back and forth just on the stitches on N2. You will not work the stitches on N1 until indicated and you will not start knitting in the round again until indicated. Turn heel as follows: The heel is worked in stocking stitch - no more purl bumps on the outside. N2 only: Row 1: (RS) K37/46/52, W&T Row 2: P24/30/34, W&T Row 3: K22/28/32, W&T Row 4: P 20/26/30, W&T Row 5: K 18/24/28, W&T Row 6: P 16/22/26,W&T Row 7: K 14/20/24, W&T Row 8: P 12/18/22, W&T Row 9: K 10/16/20, W&T Row 10: P 8/14/18, W&T Row 11: K 12/16, W&T Row 12: P 10/14, W&T Row 13: K 12, W&T Row 14: P 10, W&T ALLsizes: You will have just completed a wrong-side (purl) row. On the right side, knit to the end of N2. Knit across instep stitches on N1.
HEEL FLAP
This is where you are going to reduce the gusset stitches and connect them to the heel flap. The heel flap is worked by knitting back and forth on the heel stitches on N2. I do not pick-up the wraps. Do not work on the stitches on N1 N2 only: Row 1: (RS): K13/16/18, PM, K23/29/33, SSK, PM, turn Row 2: (WS): \*SL 1 (purl wise), $\mathsf{P1^{\star}}$ to st before M, remove marker and P2TOG the 2 sts that were either side of the marker, turn Row 3: (RS): SL 1(knit wise), Knit to M, remove marker and SSK the 2 sts that were either side of the marker, turn You are reducing the side (gusset) stitches each time you P2TOG or SSK. Repeat Rows 2-3 until you work the last side st at the end of a Row 3 (knit row). I have said above to remove the markers, because I think it is clear where you P2TOG or SSK, if it is not clear to you put the markers back in, but remember to keep moving them. $\circledast$ You now start knitting in the round again. Remember to give the first 2 sts on both needles a good firm tug now to ensure no holes or ladders. Round 1 N1: Knit all stitches N2: K2tog, then knit to end, (this clears the last of the gusset stitches) N2 now holds 24/32/36 sts.
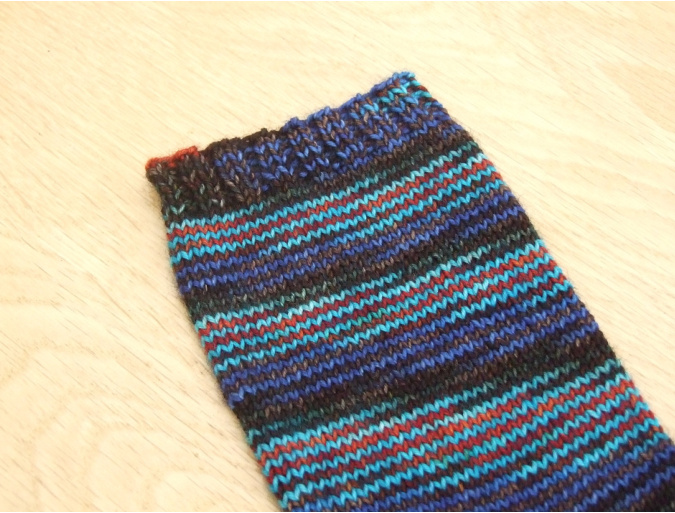
The small size has less stitches than originally on N2. This is because I found folk with small feet had narrow ankles too. SECTION THREE LEG Yay! You are on the home straight now! ALL SIZES Round 1 N1 and N2 Knit across all sts. %%%% mark this round for ease of measuring. Most folk will now just knit until the sock is long enough..can I suggest you knit about an 1"/2.5cm and try the sock on again...if the leg is tighter or looser than you would like, now is the time to adjust. Now knit every round on both needles, without shaping, until either the sock measures $5"$ oryour desired length from %%%% Remember that knot I asked you to put in the end of your yarn? Well when you find it you will have enough yarn left to knit the cuff (as stated in this pattern) and cast off. So you can knit your leg until you get to the knot or stop at 5"or knit a shorter sock - it is entirely up to you. They are your socks!
CUFF
Work 6 rounds of $z\times z$ rib. If you prefer a longer rib then make one! Cast off in pattern - loosely - using a slightly larger needle to help you if necessary.
I hope you've enjoyed knitting these socks. XX


