Plain Jane Creations
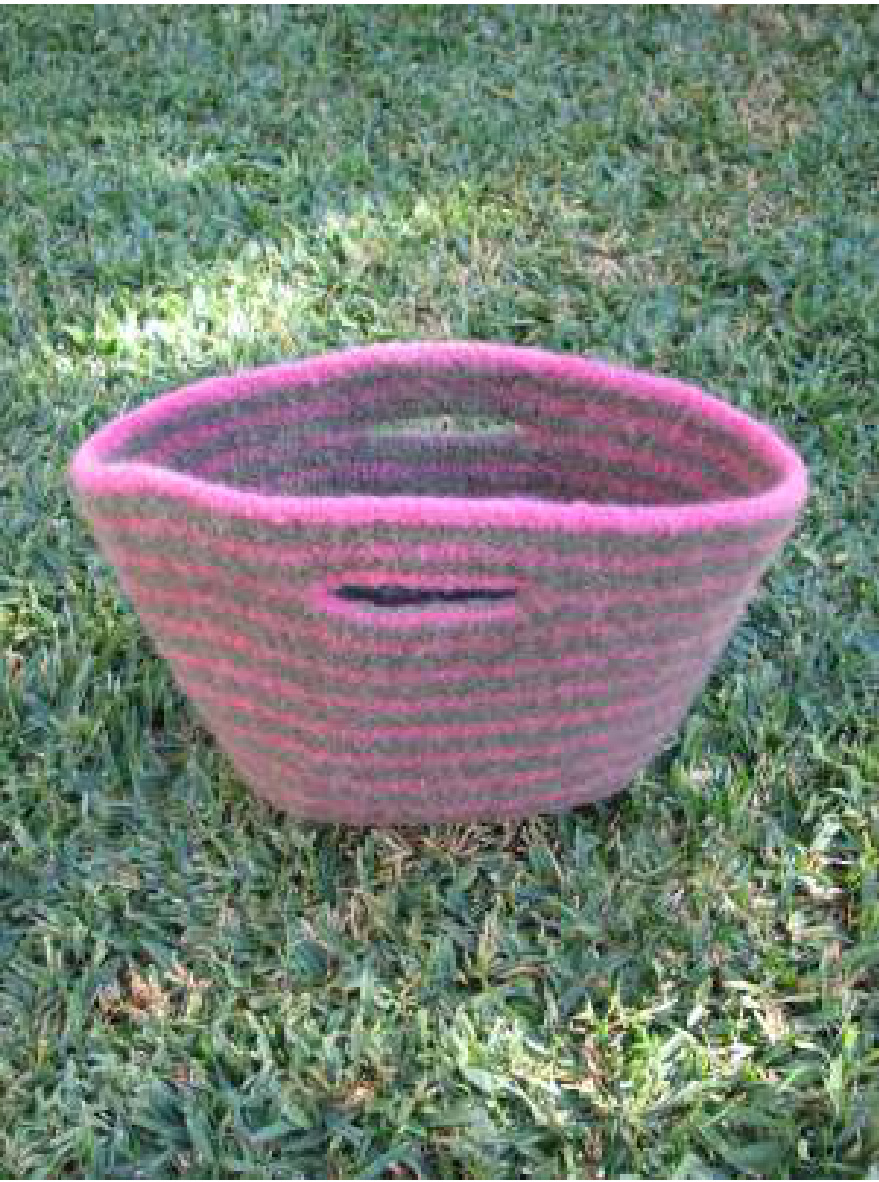
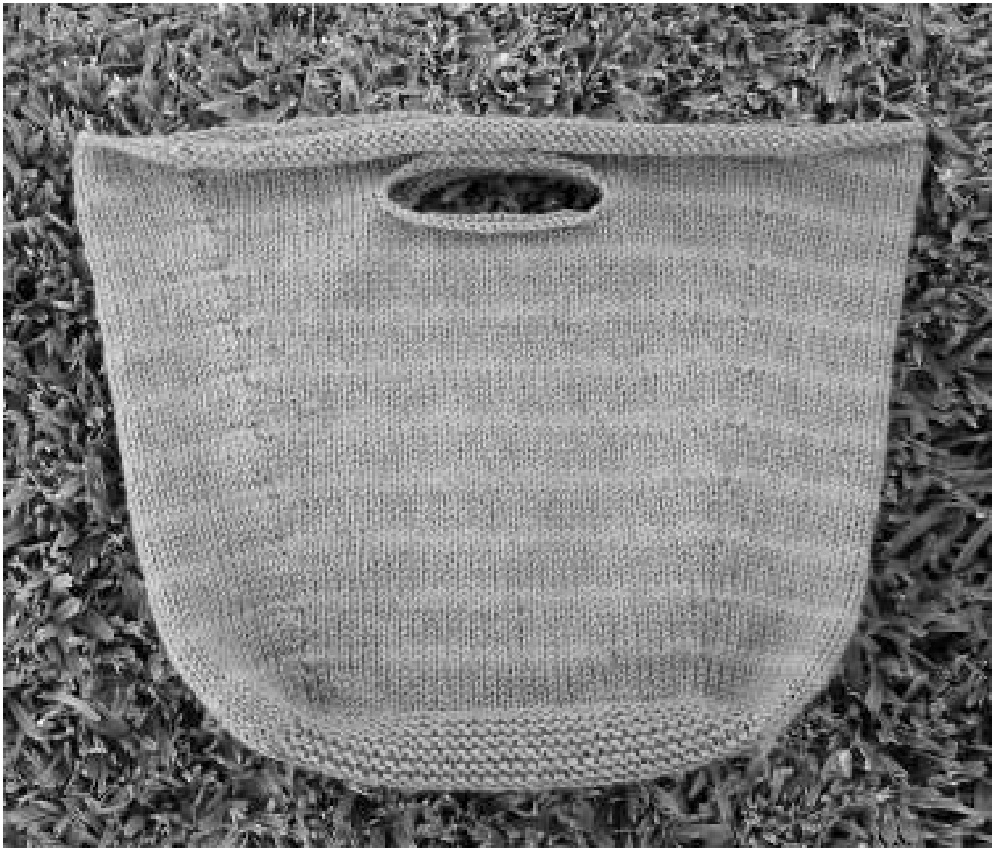
Knitted and Felted Handbag #2
@ 2007 by Lisa Ashton Australia Ihope youenjy makingthis prjctandthankyouforyoursupport.leaserememberthecontentsofthis patt are protectedby coprightand yu must not reproduceitby any means, inclding photocoping ormakig and selling the item for personal gain.
Knitted and Felted Handbag #2
Designed by Lisa Ashton @2007 Please allwme the rghttoeamalving fromcreating andwrting mypatts You wil need to choose 3 colours for your bag 3 ballsforthe Main Colour (MC - khaki) and 1 ballfor Contrast (C- deep pink) to make your bag in the same stripe pattern as sample. Irecommend Panda 8 ply Woolbale $50g$ and 9 i m (double kniting weight) wool asit felts beautifully. Do not buy superwashed wool as it wil not fet. If you want to work thebag in colourwith nostriping you willneed4 ballsof wool.
80cm long 5.5mm or UlSA size 9 circular knitting needle
scissors or snips lead pencil 4 stitch markers (These can be loops of woolor small plastic rings thatft over your needles that are used to mark the 4 corners and are slipped from left needle to right needle each time you come across one) Large tapestry needle for sewing in threads after knittin is completed.
Tension should be17 stitches and 22 rows to 10cm on 5.5mm needles. If you knit looserthan this you may require more wool but your bag willstillfelt beautifuly. To begin cast on 30 stitches using whichever method you choose using the main colour (MC) with the circular needles. Knit27rsfgarrtith nkitpurws,thisretafosthaseofth Next leaving the 30 stitches on your needle place a stith marker that is different to the others (tie on a bit of coloured wool onto one maker so youwill now thsis the begining o the row) on youright nedle and then knit up 25 stitches across the next short side of the rectangle. \*/ knit up the knot on the edge of each ridge and then the Stran in betwen these knots, there are 13 knots and 12 gaps so 25 sitches are easy to pick up. Place next stitch markerthen knit up 3 stitchesalong yourcast on edge, place next stitch markerand then knitup 25 stitches onotherhort side ofrectangle, placelaststitch markerandthen knit across the 30 stitchesthat are onyour left needle. You wil now have 110 stitches on your needle and be at the beginning of your next row. The odd stith marker designatesthe beginning of a new row and the other markers help you findthe corners of the bag where you willbe increasing oshape the bag The rest of the bag is worked in stocking stitch smooth knittng and because you are working on circular needles cvery rowwilbe knit, not one row knit and one rowpuras youwould if youwere knittingona pairof needles, bonu! Counting the row you have just completed knit 7 rows with your main colour. Change toyourContrast (C) colourby tyingito yourmain colourlse to the needle with a secure knot.\*Don't breakoffyourman couryouwil ealetcarry ituperrowfpinalthewayuthbagandthsamewil e possiblrthmanclurjustdontllitttYuanfcor tiffat eerylhagebutieats a lot o tilsto sew in before felting! The next row is an increase row and it is as follows. Slip the first stitch marker across onto right needle, Knit 25 stitches, slip second stitch marker across onto right needle, Knit into the front and then the back of the next stitch, Knit 28 stitches then Knit into the front and then the back of the next stitch, repeat this for the other halfof this row, so you wilffectivl have added stitches to the row ith ach row of incrasing. Knit one more row with yourcontrast colourthencary yourmaincolouruptobeginknitting again. Knit 5 rows of main colour These 7 rows form the strpe patern for the entire bag and the first row of yourcontrast colouristhe increase row every time and the only thing that willchange is the number of stitches between the $2^{n d}$ and $3^{r d}$ markers and also the 4 and I markers, wth every nreasthiswillgoupby two ic.the nxt increacrow there wll e $30$ stitchesto knit between the frst and last stitches into which you wil work your increases. If you are only working in one colour then you wouldn't change colour but continue knitting after the first 7 rows, increase inext rowasabove, and thenevery 7 rwafterthat continue knittin untilyouhavecomleted increase rows and then 6 more rows of plain kntting which wilbe 63 rows total from where you picked up around rectangle and you willhave 142 stitches. Continue knitting until you have completed $\mathfrak{s}$ repeats ofthe stripe paten finishing with 5 rowsof yourMcolourand you wil have 142 stitches on your needle.
Handle Opening
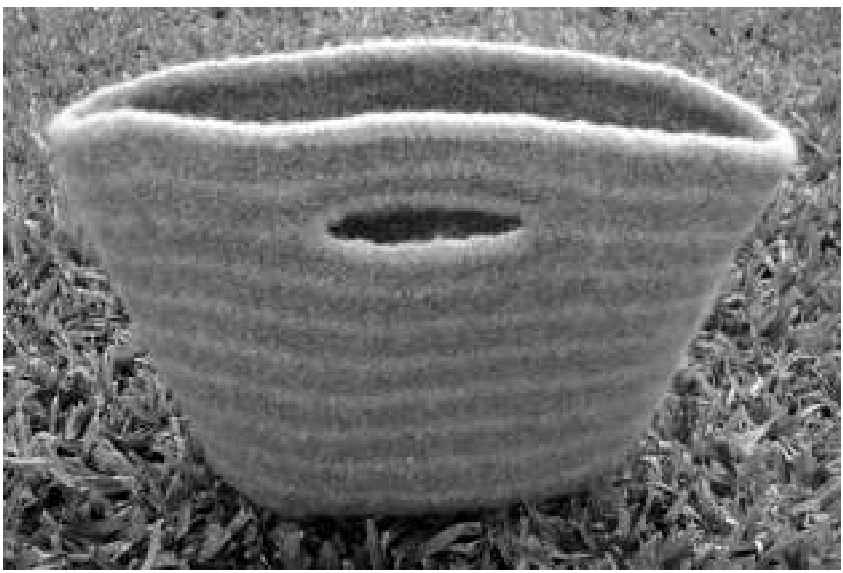
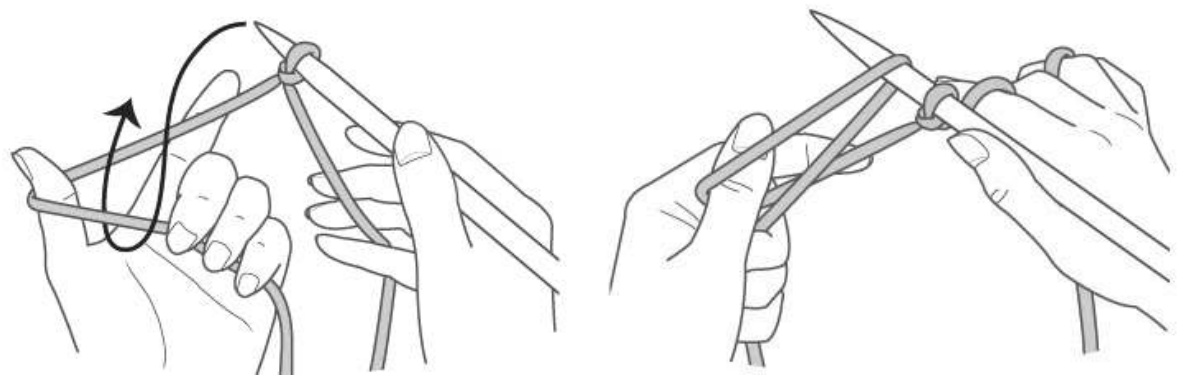
Next with your C colour you will work the handle opening over next two rows. The first row is also an increase row so those instructions willbe included as well. RowOne Slip the first stitch markeracross onto right neede, Knit 25 stithes, lip second stith markeracross onto right needle,Knit into the front and then the back of the next stitch,Knit 13 stitches then Cast Off 20 stitches Knit the remaining 12 stitches, then Knit into the front and then the back of the last stitch before the stitch marker, repcat this for the other hlf of the row untl you are back at the beginning of the row. Slip the first stitch marker across onto the right needle, Knit 25 stitches, slip second stith marker across onto right needle, Knit 15 stitches then Cast On with the backward loop method shown below, Knit 1 stitches, repeat this forthe otherhalfof the row until you are back at the beginning of therow.
Change colour and continue with 5 rows of M colour, 2 rows of Ccolour, 5 rows of Mcolourand then 2 rows of C colour making sure you contiue increasing every irst row of yourC coluras before the handle opening. You wil now have 154 stitches.
Cast off in C colour.
For those working in one colour, work the handle opening over two rows as described above then work 14 more rows making sure you continue to increase as before in every 7th row and you wil have 15 stitches. Cast of.
Bag finishing
Tighten allreef knots where you changed colours. Darn in all these ends under the loops of 6 or 7 corresponding coloured stitches. Tie off the final cast offstitch by securing it to the first cast off stitch then darn in the end. Trim all long tails after darning.
Washing Machine Felting
This is how I fet all $\mathfrak{m}\mathfrak{y}$ knitig Take abefore photo nowif you want orome measurements soyou can seehow muchit changes. My bag after felting was approximately $1\,\uparrow\,^{\,\uparrow}$ wide $b y\ 7\ 1/2"\ (28c m\times19c m)\ h i g h$ which is about a $1/3$ smaller than before felting. Set your machine on the longest wash it wil do, HOT wash and COLD rinse, on the lowest waterlevel you can, place a pair of jeans or some heavy item of non fHuffing lothing and one capful of wool wash (Ma's Woolwash or Sofly are two that I have used) and your knitted item right side out. on't use alingerie bag to protect your knited item you want to treat itvery badly withaitation, rubbin and ht water so it wlfelt beautifuly. Ikeep an eye on the wash cycle, check thatit is felting every 5 minutes or so, when the hot wash is complete wind it back to the start, top u the ht water and let it go again, $\mathrm{b}_{y}$ thec end of the scond hot wash whichisbtween 15-20 minutes I find that the felting is good. When you can see no stitch definition and the item feels lovely and thick with nice even texture letthe machine carry on and rinse theitem thoroughly in cold water and spin out althe excess water. If you have a front loader and you can't open it during the cycle just do a shorteritial wash of say 1 minutes in HOT water and then a cold rinse, then you can check it at the end of the whole cyle and you can always do anthertilltisfeltedcomletlReadyourmachinebooktochek onthelngthofthewashing sectionof the cyl and this wilguide youfor your setting.Remember youare trying tobe aroughas possible when you are machine felting, don'tuse the wollens gentle cycle! Nowget the itm ut and pullit into shape, don't be toogentle it is very strong and very pliable now. Place inanicuwamspttryusuisandiyouareesprate youcanusethdyeutitana to control the shape with the dryer. Ifyouwant youcangive thedrieditmagood steam preswith theirnandthenletit standtocompletely dy. Now you have yourvery own original handbag and you wil be the envy ofall yourfriends.


