Kepler
A free pattern from Emily at Fathom Harvill (http:/fathomharvill.typepad.com/). All rights reserved, copyright 2005.
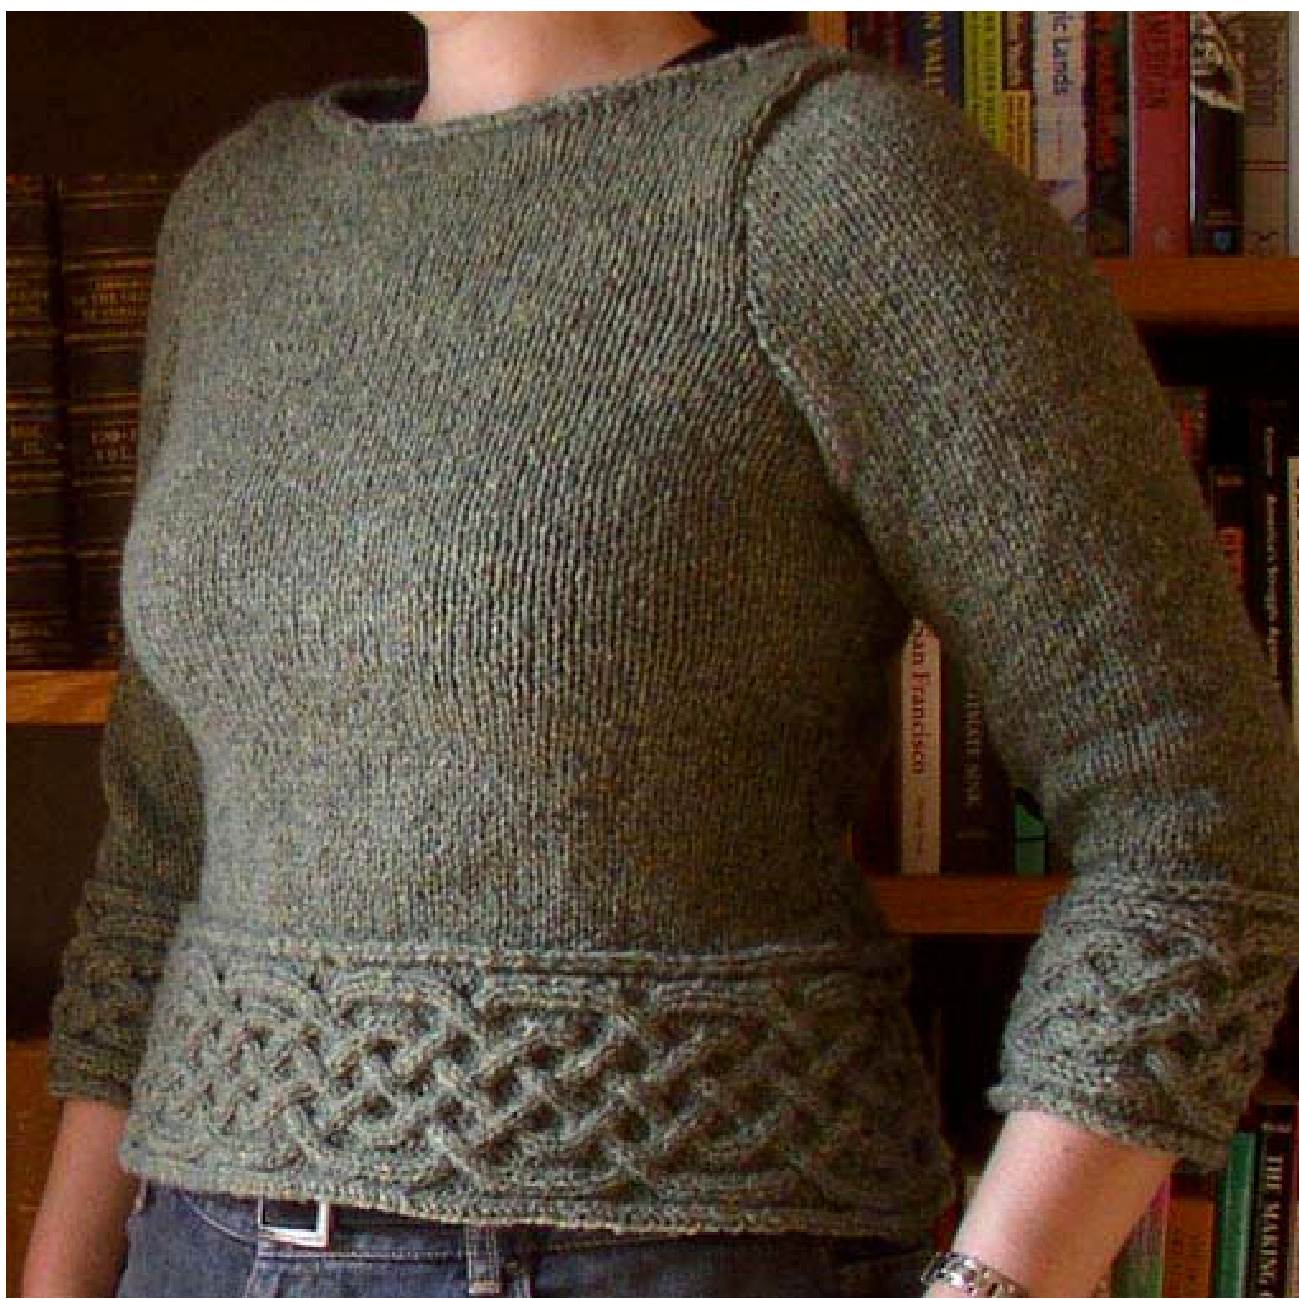
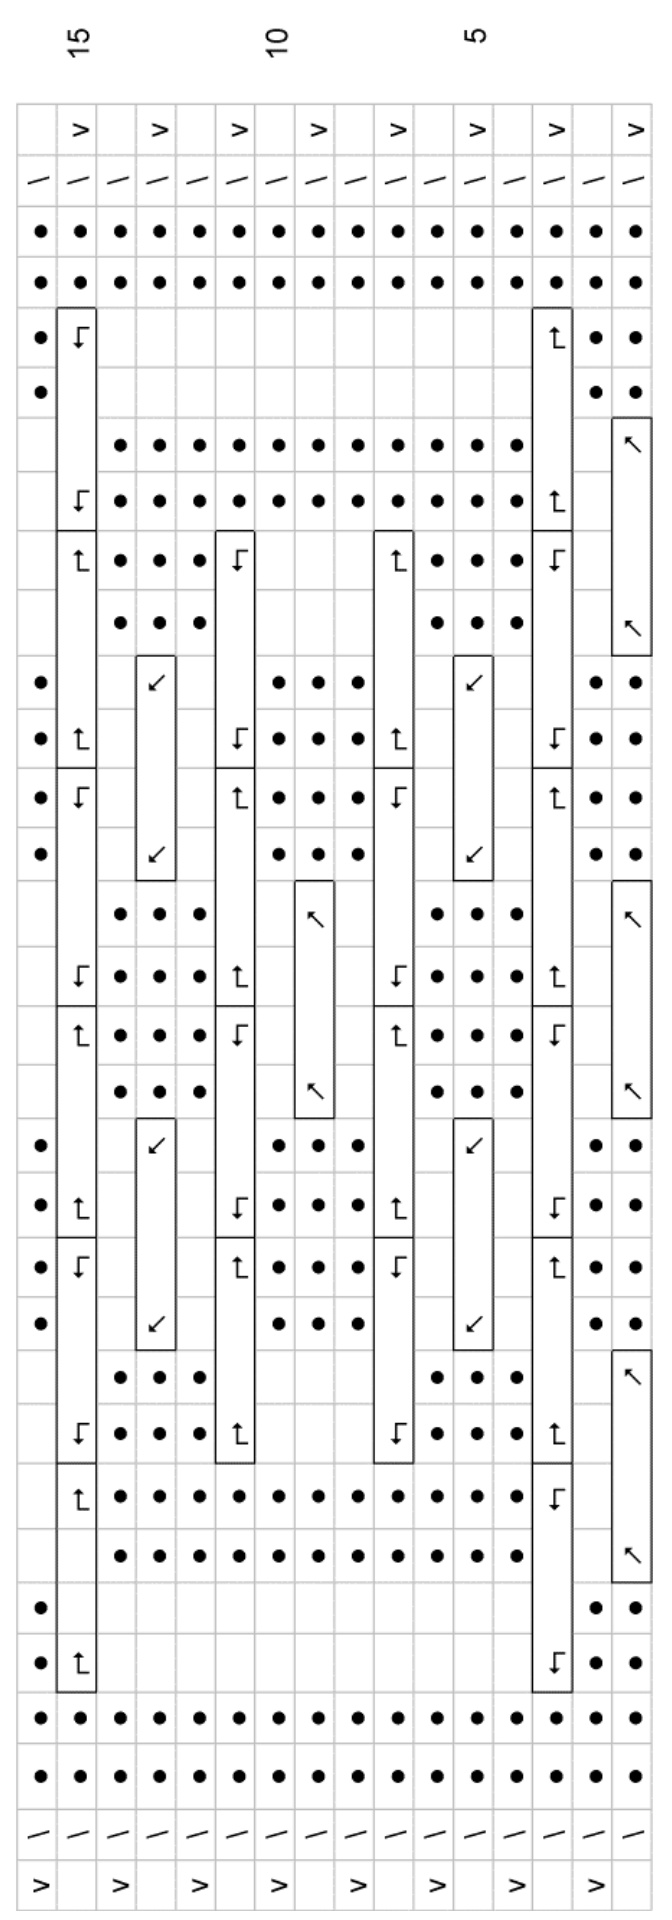
This pattern is intermediate level Sometimes in Aran sweaters, the beauty of an individual cable gets lots in the complexity of the entire piece. Much as I love Arans, sometimes I want to concentrate on just one especially pretty or favorite cable pattern, like the celtic braid shown here. I've designed the cable to orbit the body in a new way, allowing for a more streamlined, bodyconscious shape. Except for the cable bands, the sweater is very simple, with a boatneck finished with low-profile applied I-cord. The cable bands are knit first, then stitches are picked up along the length of the band to create the hem of the sleeves and body of the sweater. Feel free to substitute my chosen cable pattern for your personal favorite, if you wish. Remember that a difference in the cable band's width willresult in a change in the sweater's length, though-- i necessary add extra rows of stockinette after the pick-up row.
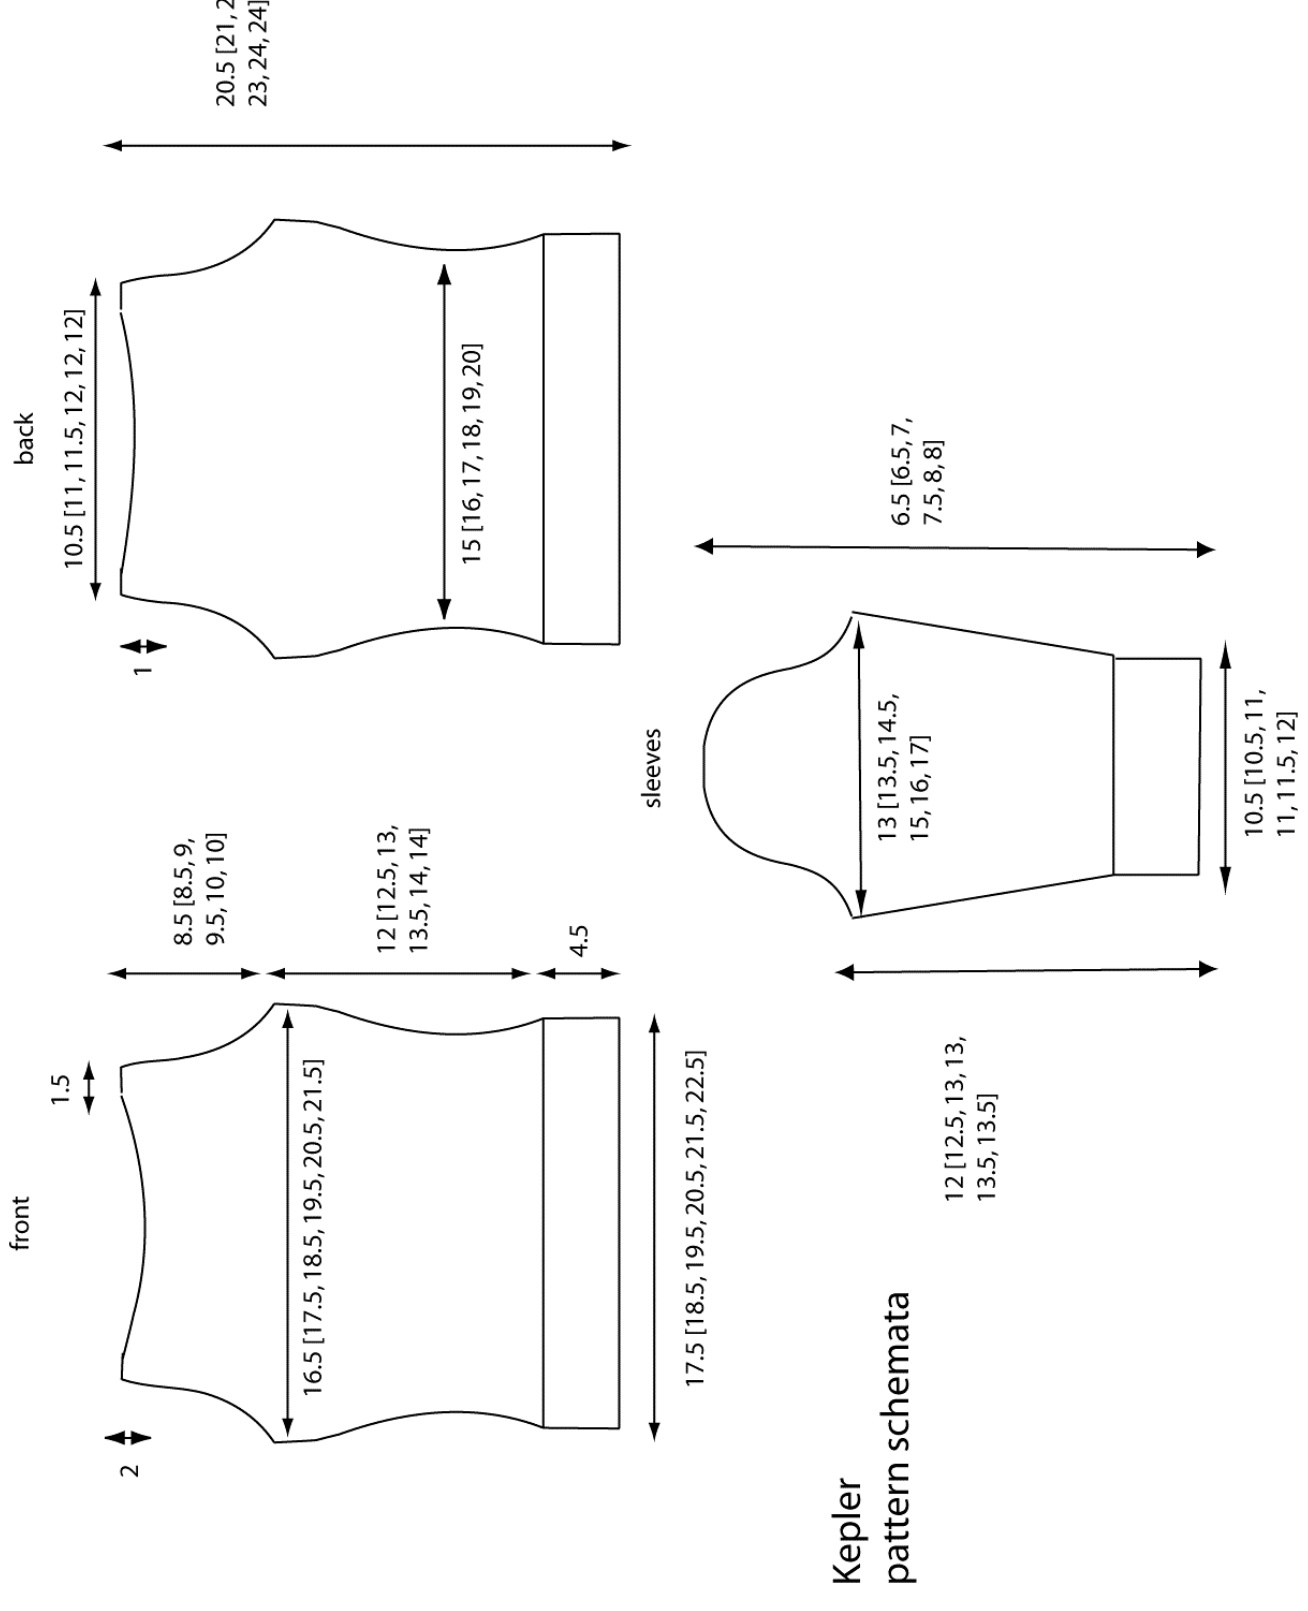
SIZE XS [S, M, L, XL, XXL]. (shown in size M)
FINISHED MEASUREMENTS Bust: 33 [35, 37, 39, 41, 43] inches Length: 21 [21.5, 22, 22.5, 23, 23] inches
MAIERIALS
Jamieson's Shetland Heather Aran (this yarn was formerly called Soft Shetland) $[100\%$ wool; 101 yds/50g]; color: 1070, "Woodnymph" (this color is discontinued, but the new color 808, Pippin" is close); 8 [8, 9, 9, 10, 10] balls. 1 set #9 needles 1 set #8 double-point needles Cable needle Stitch holder Stitch markers 15-20 safety pins or separating stitch markers Tapestry needle GAUGE 16 sts/ 22 rows ${=}4$ inches st st with #9 needles DIRECTIONS Cable bands 2 CO 32 sts. Work 2 seam rows as foll. (RS): sl 1 st kwise, kltbl, $[\mathfrak{p}4,14]$ 3 times, p4, kltbl, k1. (WS): sl 1 st pwise, pltbl, [k4, p4] 3 times, k4, pltbl, pl. Begin cable chart at row 1 (cable chart is at the end ofthis pattern). Repeat entire cable chart until band measures 10.5 [10.5, 10.75, 10.75, 11, 11] inches. Work 2 seam rows as above. BO allsts in patt. Final length 10.5 [10.5, 11, 11, 11.5, 12] inches. Make 2. Hip bands: K as above but repeat cable chart until band measures 17 [18, 19, 20, 21, 22] inches. Final length 17.5 [18.5, 19.5, 20.5, 21.5, 22.5] inches. Make 2.
Sleeves
Pick up row:
Place one safety pin or separating stitch marker every two inches along length of band edge. With WS facing, pick up stitches in the third stitch (the first WS k st) in from the edge to hide picked up stitches on RS of garment. Pick up 8 sts evenly spaced over every two inch interval or portion thereof for 42 [42, 44, 44, 46, 48] sts. Work even in st st for 0.5 inches. Beg incs on next RS row: inc 1 st each end of every RS row 3 [3,3, 4, 4, 4], then every 8 [8, 8, 6, 6, 6] rows to 52 [54, 58, 60, 64, 68] sts. Work even until piece measures 12 [12.5, 13, 13, 13.5, 13.5] inches.
Shape shoulder:
BO 4 [4, 5,5, 5, 6] at beg of next two rows. Dec 1 st each end of foll2 [2, 2,3, 3, 3] rws, then every RS row until 34 [34, 36, 38, 40, 40] sts rem. Work 4 rows even. Dec 1 st each end of every RS row 3 [3, 3, 4, 4, 5] times, then dec 1 st each end ofevery row until 16 sts rem. BO all rem sts.
Front
Work pick up row as for sleeves. 70 [74, 78, 82, 86, 90] sts. Beg waist shaping on next RS row: dec 1 st each end of every row 3 times, then every 3 [4, 4, 4, 5, 5] rows 2 times to 60 [64, 68, 72, 76, 80] sts. Work 4[6, 6, 8, 8, 10] rows even in st st. Beg bust shaping on next RS row: inc 1 st each end of next row, then every 6 [7, 7, 7, 8, 8] rows to 66 [70, 74, 78, 82, 86] sts. Work even until piece measures 12 [12.5, 13, 13.5, 14, 14] inches. Beg armhole shaping next RS row: BO 4 [4, 5, 5, 5, 6] sts at beg of next 2 rows. Dec 1 st each end of foll 5 [5, 6, 7, 7, 7] rws, then every RS row until 42 [44, 46, 48, 48, 50] sts rem. Work even until piece measures 20 inches. Beg neckline shaping next RS row: k 14 [15, 15, 16, 16, 16] sts, B0 center 14 [14, 16, 16, 16, 18] sts, k rem 14 [15, 15, 16, 16, 16] sts. Place stitches from one side on stitch holder and work each side of neckline separately. BO 4 sts at next RS neck edge 0 [0, 0, 1, 1, 0] times, BO 3 sts at next RS neck edge 1 [2, 2, 1, 1, 2] times, BO 2 sts at next RS neck edge once, and BO 1 st next RS neck edge once. 6 [6, 6, 6, 6, 7] sts rem on needle. Work even until entire piece measures 20.5 [21, 22, 23, 24, 24] inches. BO all rem sts. Reverse all shaping to work other side of neckline.
Back
Work as for front through armhole shaping. 42 [44, 46, 48, 48, 50] sts on needle. Work even until piece measures 19.5 [20, 21, 22, 23, 23] inches. Beg neckline shaping next RS row: k 7[7, 8, 9, 9, 9] sts, B0 28 [30, 30, 30, 30, 32] sts, k7[7, 8, 9, 9, 9] sts. Place stitches from one side on stitch holder and work each side of neckline separately. BO 0 [0, 1, 1, 2, 2] sts at RS neck edge once, then BO 1 RS neck edge once. Work straight until entire piece measures 20.5 [21, 22, 23, 24, 24] inches. BO rem 6 [6, 6, 6, 6, 7] sts.

FINISHING
Block all pieces to specified sizes. Sew shoulder seams. Set sleeve caps into body and pin in place, making sure to create a smooth line. Because this sweater has narrow shoulders, it is important to try on the sweater and make sure the sleeve caps are correctly placed before sewing. Sew sleeves to body. Use backstitch to sew side seams, making sure to maintain an even and smooth seam at all cable bands. Collar: Place one safety pin or separating stitch marker every two inches along length of band edge. Using two #7 dpns and with RS facing, make Elizabeth Zimmerman's applied i-cord edging as foll: CO 3 sts. K 3 sts with a second dpn, slide them to the other end of that needle and repeat once. Next row: k 3 sts, pick up 1 st through RS of neckline at left shoulder seam (4 sts on needle). Slide sts to the other end of the needle, then $\textrm{k}2$ k2tog, pick up one stitch through RS of neckline. Repeat this step around entire neckline, picking up 8 sts evenly spaced over each 2 inches and being careful to maintain i-cord gauge. Graft end of applied i-cord edging to CO using kitchener stitch. Block finished garment. 5 ss s a q o ss o sis u ss ixu d yo o quo u u uo sis d 0 L L5