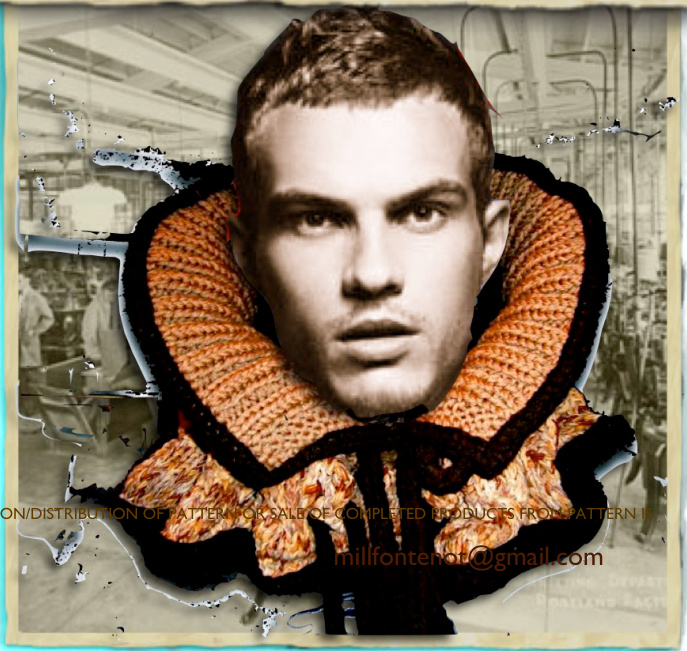
Knitting Mill
Have you ever deamed a yarn "hideous" and "unusabie, opened up a magazine or website only to discover something amazing knitted in the exact same yarn? I sure have! You then reach a very humbling resignation--the problem wasn't with the medium, but with the lack of your imagination and creativity. 1 drew from that learning experience when I recently found a few skeins of ribbon yarn in my stash I had purchased several years ago on clearance post the big novelty yarn phase. I was determined to challenge myself--to push my design abilities to the limit. The end result was something I love and I'm excited to share with all of you. "The only real mistake is the one from which we learn nothing.' - John Powell
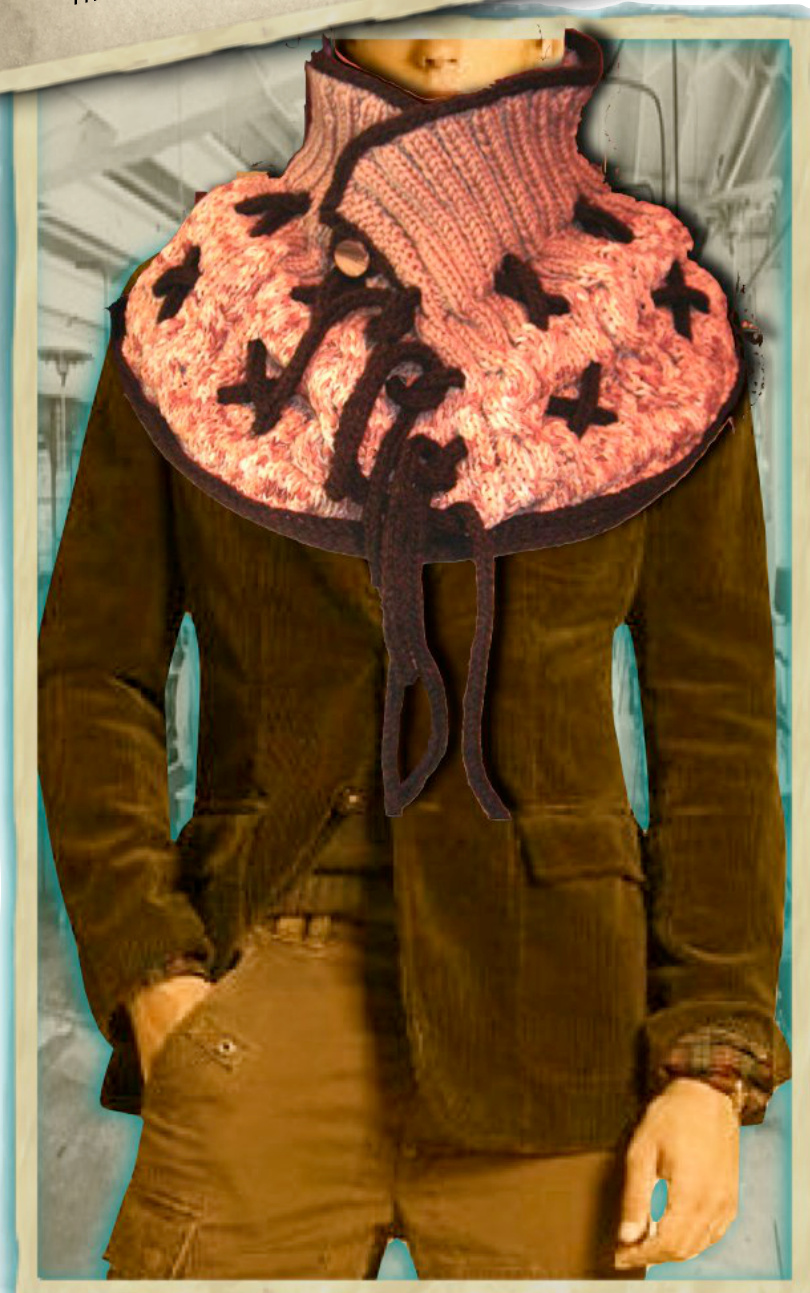
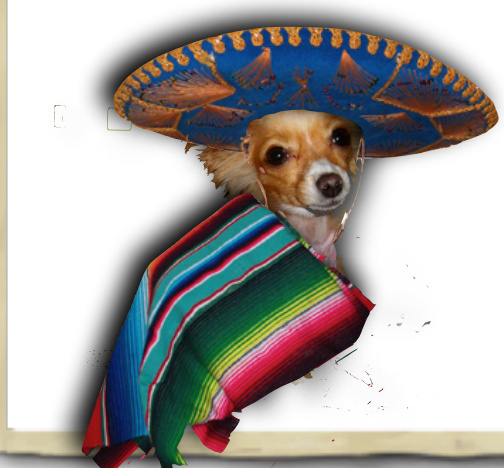
CAPUCHA del DESIERTO

Sizing. One size fits all
Gauge
14 sts = 4"/10cm in stockinette with bulky wt. yarn & US II (8 mm) needle
Sticks
US Size 9 (5.5 mm) DPN's US Size 9 (5.5 mm) 16" or 24" circular US Size II (8 mm) 24" circular
Fiber
-Moda Dea Ticker Tape @ 68 yards/50 grams suede (3) skeins -KnitPicks Swish DK @ 123 yards/50 grams nutmeg (3) skein -Lion Brand Wool Ease Chunky 153 yards/140 grams walnut (l) skein
Lagniappe
-Blunt tapestry needle -Stitch markers -I" button -Needle and sewing thread
Techniques Used
-Knitting in the round -lncreases -Decreases -icord, applied icord, lcord BO\* -2x2 ribbing\* -Cabling\* -Short row shaping\* \* See instructional appendix
PATTERN NOTES
The capucha is knit from the bottom, up, in the round to the collar. The remainder of the garment is knit back and forth in rows before binding off in bulky wool using the icord bind off technique. The bottom contrasting border is added at the end utilizing the applied i-cord technique. I'm going to level with you up front, the ties require an epic amount of i-cord! Set yourself up with a pot of coffee or your favorite wine (l'm partial to a Chilean merlot), a good movie and it won't be such a daunting task. In all seriousness, it goes much faster than you might think. lIf you REALLY hate making i-cord, consider using ribbon, parachord, leather or home dec cording; the sky's the limit really. You can substitute a multi colored bulky wt. yarn (yarn council cat. 5) for the ribbon yarn to match gauge. Please refer to the attached Appendix for stitch descriptions, additional instruction, resources, etc.
Let's knit something!
BODY
With size 11 circular needle & ribbon yarn, CO 180 sts using the long tail cast on. PM, and being careful not to twist CO sts, join in the round. RNDS 1-10: K all rounds. Now we are going to knit the first eyelet round and set up for the cables...
BODY CONT'D
RND 11: \*K2, YO, SSK, K2, K2tog, YO, K2, P2, C6F, P2. Repeat from \* around. RNDS 12-18: \*K10, P2, K6,P2. Repeat from \* around. RND 19: Repeat rnd 11. RNDS 20-26: Repeat rnds 12-18. RND 27: \*K2, YO, SSK, K2tog, K2tog, YO, K2, P2, C6F, P2. Repeat from \* around. After completion of rnd 27, change to merino DK doubled. NOTE: I chose to use a DK wt yarn doubled because I had a ton of it in the right color in my stash. However, it did prove functional as it produced a very lofty, soft fabric. You can substitute a bulky wt. yarn knitted single stranded if you prefer. RNDS 28-31: \*K9, P2, K6, P2. Repeat from \* around. RND 32: \*K1, SSK, K3, K2tog, K1, P2, K10, P2. Repeat from \* around. RND 33: \*K7, P2, K6, P2. Repeat from \* around.
BODY CONT'D
RND 34: \*K1, SSK, K1, K2tog, K1, P2, K6, P2. Repeat from \* around. RND 35: \*K1, work CDD (see Appx.), K1, P2, C6F, P2. Repeat from \* around. RND 36: \*K1,YO, K1, YO, K1, P2, K2, P2, K2, P2. Repeat from \* around. RND 37: K2, Pfb, K2, P2, K2, P2, K2, P2. Repeat from \* around. Remove marker and K3 more sts. PM. We will now begin working back and forth in rows of 2X2 ribbing beginning and ending each row with 3 stitches in garter stitch (knitting every row)...
COLLAR
ROW 1 (RS): K3, (P2, K2) around to last 5 sts. P2, K3. Remove marker. Turn. ROW 2 (WS): K5, P2, K2 to last 5 sts. K5. Turn. ROW 3 (RS): K3, P2, (K2, P2) to last 3 sts. K3. Turn. ROWS 4-13: Repeat ROWS 2&3 five more times.
SHORT ROW SHAPING (Optional)
NOTE: I chose to include short row "wedges" at either end of the collar to create weighted, more substantial collar points. (see graphic) While you can choose to knit the collar without them, it will make for a much more polished, professional looking garment. If you've never done short rows before--no worries--I'll walk you through it! The method we will use is really easy. It's also a great technique to have in your needle work repertoire and can make a BlG difference in
the customization and fit when applying it to sweaters, jackets, necklines, bustlines, leggings, etc. It's also a very common way to work the heels and toes of socks.
If you choose to be a big chicken (just kidding), and don't want to work the short rows, continue in the established pattern for 5 more rows ending with Row 2. Skip the rest of the instructions in this section, and I'll meet you back up at the I-cord BO. ROW 15: Repeat ROW 2.Turn. SHORT ROW (SR) 1: K3, (P2, K2) 8 times. P2, K1, move working yarn forward (yf) between needles, sl next st purlwise, yarn back (yb). Replace previously slipped st back to left needle, tip-to-tip. Turn leaving the remaining sts unworked. SR 2: P1, (K2, P2) 8 times, K5. Turn. SR 3: K3, P2, (K2, P2) 7 times, K1, yf, sl next st purlwise, yb, replace previously slipped st back to left needle. Turn. SR 4: P1, (K2, P2) 7 times, K5. Turn. SR 5: K3, P2, (K2, P2) 6 times, K1, yf, sl next st purlwise, yb, replace previously slipped st back to left needle. Turn. SR 6: P1, (K2, P2) 6 times, K5. Turn. First set of short rows are now completed! ROW 16: K3, P2, (K2, P2) across to last 3 sts, K3. Turn. NOTE: When you get to the 3 wrapped K sts from short rows, insert rt needle tip into the wrap from bottom then in the st knitwise. Then complete the st as normal.

SANS SHORTROWS

SR 1: K5, (P2, K2) 8 times, P1, yb, sl next st purlwise, yf, replace previously slipped st back to left needle, tip to tip. Turn. SR 2: K1, (P2, K2) 8 times, P2, K3. Turn. SR 3: K5, (P2, K2) 7 times, P1, yb, sl next st purlwise, yf, replace previously slipped st back to left needle tip-to-tip. Turn. SR 4: K1, (P2, K2) 7 times, P2, K3. Turn. SR 5: K5, (P2, K2) 6 times, P1, yb, sl next st purlwise, yf, replace previously slipped st back to left needle, tip-to-tip. Turn. SR 6: K1, (P2, K2) 6 times, P2, K3. Turn.
Second set of short rows are now completed!
ROW 17 (WS): Switching to size 9 circular, K5, P across row to last 5 sts., K5. NOTE: When you get to the 3 wrapped P sts from short rows, sl the wrapped st purlwise to rt needle. Insert the left needle tip into the wrap from the bottom, slipping it to the left needle. Return the previously slipped st to the left needle and purl the st and it's wrap together. This maneuver assures the wrap is hidden from the RS. Break yarn and set piece aside whithout removing the circular needle.
I-CORD BIND OFF
We will now work the contrasting I-cord edging while binding off at the same time... STEP 1: With 2 size 9 DPN's and bulky contrasting wool, CO 3 sts with your cast on method of choice. K3 as you would for the first round of a regular icord. STEP 2: Without turning, slip the 3 sts purlwise to the circular needle of the last st knitted on the collar. NOTE: you will now have the circular needle in your left hand with the last round of sts and a size 9 DPN in the right hand. STEP 3: K 2 sts of the bulky contrasting wool, K the next 2 sts (the last st of the contrasting bulky wool with the first st of the collar) together through the back loop (K2tog tbl). Your first collar st is now bound Off. STEP 4: Slip the 3 sts on the DPN purlwise back to the circular needle. STEP 5: K2, K2tog tbl. Repeat steps 4&5 to the end of the row. STEP 6: Work 2 rounds of I-cord with the contrasting bulky wool only for the corner. Now we will be working down the vertical edge of the collar "v" utilizing the applied Icord technique. It's nearly the same as the Icord bind off with one extra step. From here on you will be using 2 of the size 9 DPN's.
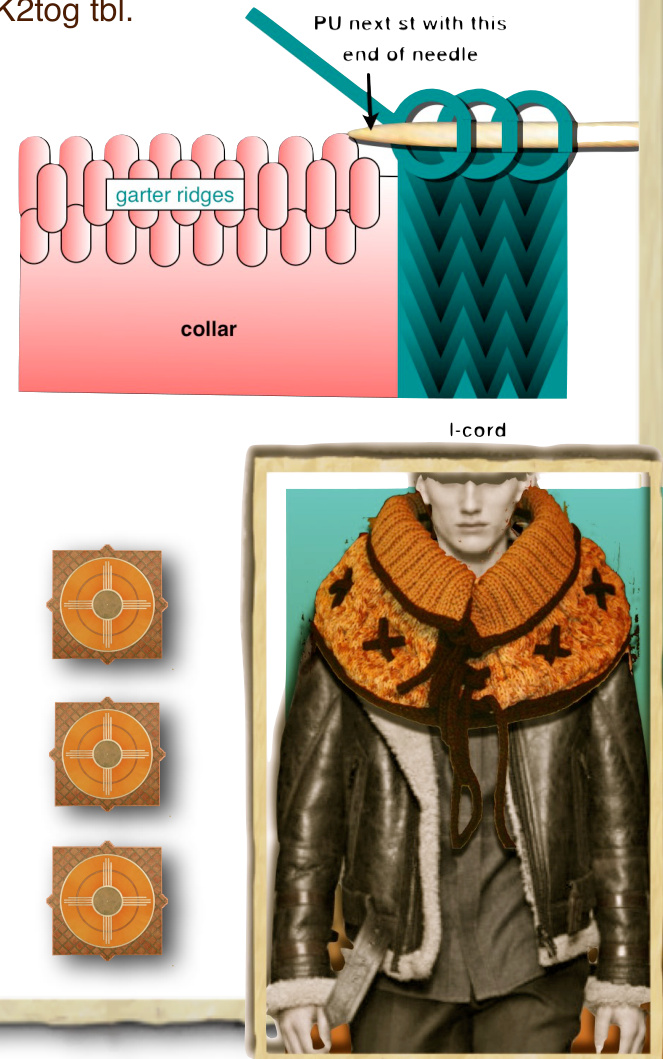
STEP 1: PU 1 garter stitch ridge with the left side of the DPN with the 3 I-cord sts. (see graphic). Slide the DPN to the left, K2,

Repeat step 1 until you reach the bottom of the “V". At the bottom of the "V,” instead of picking up 1 st with the left side of the DPN, PU 2 sts, K2, K3tog tbl (one bulky yarn st & 2 picked up sts at bottom of the "v"). Repeat STEP 1 for the adjacent edge. After picking up the last garter ridge st, work one round of regular I-cord. Break yarn leaving a 6" tail and weave beginning and end of I-cord together.
I-CORD TIES (make 4)
With bulky wt. contrasting yarn and 2 size 9 DPN's, CO 3 sts using your cast on method of choice (l used long tail). RND 1: K3. Without turning work, slide sts to the opposite end of the needle and K3 stretching working yarn across the back. Repeat rnd 1 until i-cord measures approximately 42" from beginning or desired length (you can't say I didn't warn you!). Bind off & weave in yarn tails.
APPLIEDICORD BOTTOM BORDER
Using 2 size 9 DPN's and the bulky wt. yarn, CO 4 sts, K4. With RS of garment facing and holding the bottom CO edge upside down, insert the left tip of the DPN containing the 3 sts into the outer loop CO st from the bottom. Slide the DPN to the left as you normally would for I-cord, and K the first 3 sts. K the last I-cord stitch together with the st you picked up from the main piece tbl. PU the next st on the main piece with the left tip of the DPN, slide the sts to the right end of the needle, K4, K2tog tbl. Repeat around.
After knitting the last K2tog tbl with the last free CO st, break yarn leaving a 6" tail and weave the beginning and end of the I-cord together.
FINISHING
Weave in all loose ends.
BUTTONLOOP
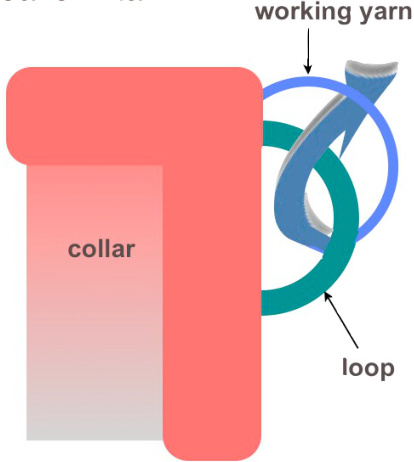
Thread a darning needle with a length of bulky wt. yarn approx. 48" long. Join the yarn to the right, inner I-cord edge of the collar "V" about 1" from the top. Pull the yarn until you have 2 equal lengths either side of the I-cord edging. Thread the other yarn end as we will work with the yarn doubled. Insert needle through the I-cord edging about an inch down leaving enough slack in the loop to place your button through. Insert the yarn through the loop back to front, and through the space between the top of the button loop and working yarn (see graphic). Pull taught, forming a knot and slide the knot to the base of the loop. Repeat until the entire loop is covered. Break yarn, secure to the l-cord edging and weave in tail.
Weave I-cord ties through eyelets using the photos as a guide. Sew button at the junction between ROwS 27&28 at thebase of5thKcolumn rib from the collar edge (see photos).
INSTRUCTIONALAPPENDIX
STITCH DEFINITIONS
'C6F
WITH CN - place next 3 sts. on a cable needle and hold in front of work. K3. K3 sts on hold fromcable needle. wITHoUT CN - sl next 3 sts purlwise from left needle to right needle. K3 sts from left needle. Place left needle tip into the front of the 3 sts previously slipped, purlwise. Pinching the bottom of the first 3 sts on the right needle, slide out right needle from the 3 knittied sts and the three slipped sts. Placing right needle behind left, place tip of right needle into the 3 knitted sts purlwise and K the 3 next sts on left needle. CDD: (CENTERED DOUBLE DECREASE) - slip next 2 sts together knitwise, K1, pass both slipped sts over the stitch just knit on the right needle.
2X2 RIBBING
ROW 1 - (K2, P2) repeat across ending with P2. Turn. 米 Repeat Row 1 knitting the knits & purling the purls for pattern.
ONLINE RESOURCES
SHORT ROWS http://techknitting.blogspot.com/2009/10/short-rows-method.html I-CHORD http://www.youtube.com/watch?v=iJOs 2TBwCQ WAPPLIED I-CHORD (Here the knitter uses a SSK instead of K2tog tbl as in pattern. I find you get a better result in the bulky wt. yarn with the latter method.) Part 2 http://www.youtube.com/watch?v=fGuBZUHCwSk I-CHORD BIND OFF http://www.youtube.com/watch?v=KEbaZ6COOYk CABLING WITHOUT A CABLE NEEDLE http://www.youtube.com/watch?v=-6DB6WhAKvY KNITTING BASICS www.knittinghelp.com SEWING BUTTON LOOP http://ysolda.com/support/pictorial-guides/sewn-button-loops/
Thank you so much for your purchase of this pattern! I hope you enjoy knitting the cowl as much as I enjoyed designing it. If you have any questions/concerns or you just want to say, “Hey Mill, how YoU doin'!" please do not hesitate in contacting me at the email address below or on Ravelry (unsername: Millard). 'd love to hear from you! Now, go and knit something! Mill & Suki