\~ Recipe for a rustic jacket \~

\~ by Mona NicLeoid
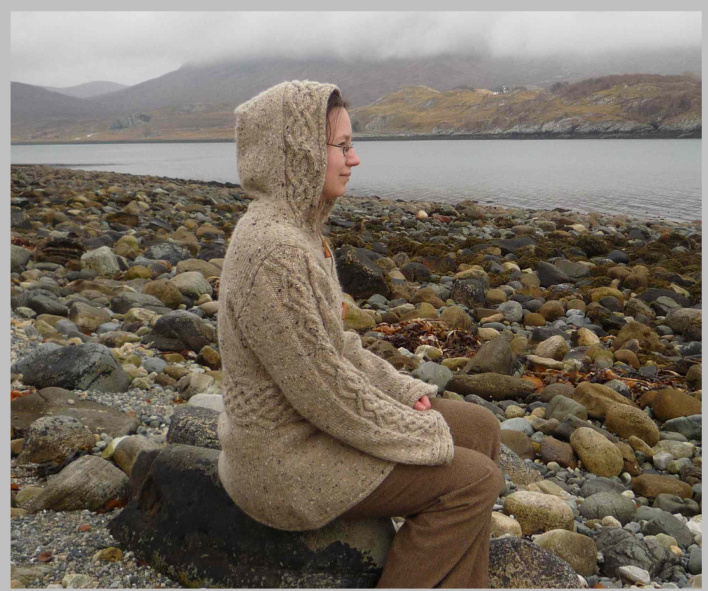
Hello and welcome! :-) Knit this jacket in your individual size and with your favourite yarn. No specific tension/gauge required. No swatching required! Start right away and figure it out as you go. Have fun!

This is not a standard pattern with minute instructions for specific sizes. It is a construction recipe with detailed information on how to adapt this jacket to your measurements and preferred yarn. Rustic wool yarns of medium to bulkier weight (14 to 22 sts per 10 cm/ 4") are recommended for the result to look similar to the original which was knitted in Studio Donegal Aran Tweed.
\~ Story \~
The original design of this jacket was inspired by a "Robin Hood" themed KAL in the "Folklore and Fairy Tales" group on Ravelry (however I didn't really get started on it until long after that KAL was finished). It is dedicated to the Horned God of the Forest, thence the name of the design :-) Even before my own project was finished, people started asking me for a pattern, but at first I was reluctant because I wanted this to remain a unique item. However, it made me realise how many people find it difficult to design their own garments, so I decided to make this into a more general tutorial for the construction of such jacket. This way, everybody can make their own unique versions of it! This pattern is free for personal use and you may share it freely, as long as you do not alter it or claim it is yours. If you want to translate it into another language for other people to use, please contact me so that I can be involved in the process. In keeping with the spirit of the original design, if you like the pattern please consider making a small donation to a local organisation that cares for forests, woodland or similar natural areas.
\~ How to use this recipe \~
Especially if you are a beginner, it is recommended that you read through the complete tutorial once before you start, to get a general idea of what to expect. The instructions use a number of standard abbreviations which are all listed on page 3. The following skills are required and are not explained in detail (techniques in parentheses not essential and can be substituted): Knitting and purling; cables; picking up stitcbes; basic decreases / increases; short rows [Mattress stitcb; tbree needle bind off i-cord] Don't worry - it is entirely possible to knit this jacket even if some of the listed techniques are new to you. Check your knitting books, online tutorials or Youtube for the techniques you need to learn. The Ravelry forums are always a great resource, too! :-) One last thing: Please consider the environment! Most probably you will not need to print this complete tutorial. You will make your own notes and calculations anyway, so just print what you definitely need.
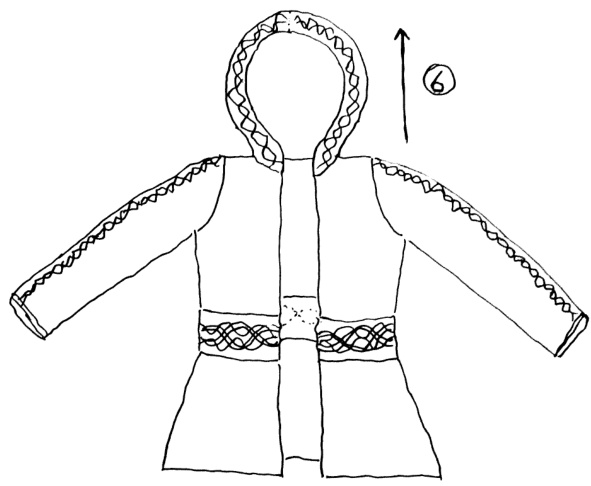
\~ Sequence of work \~
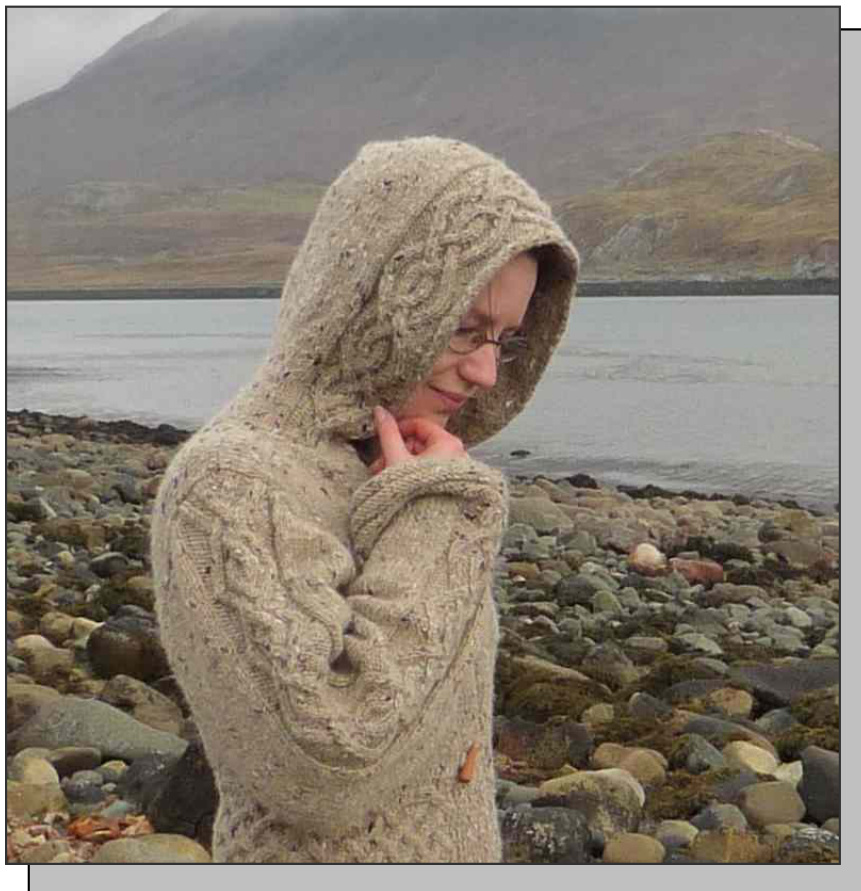
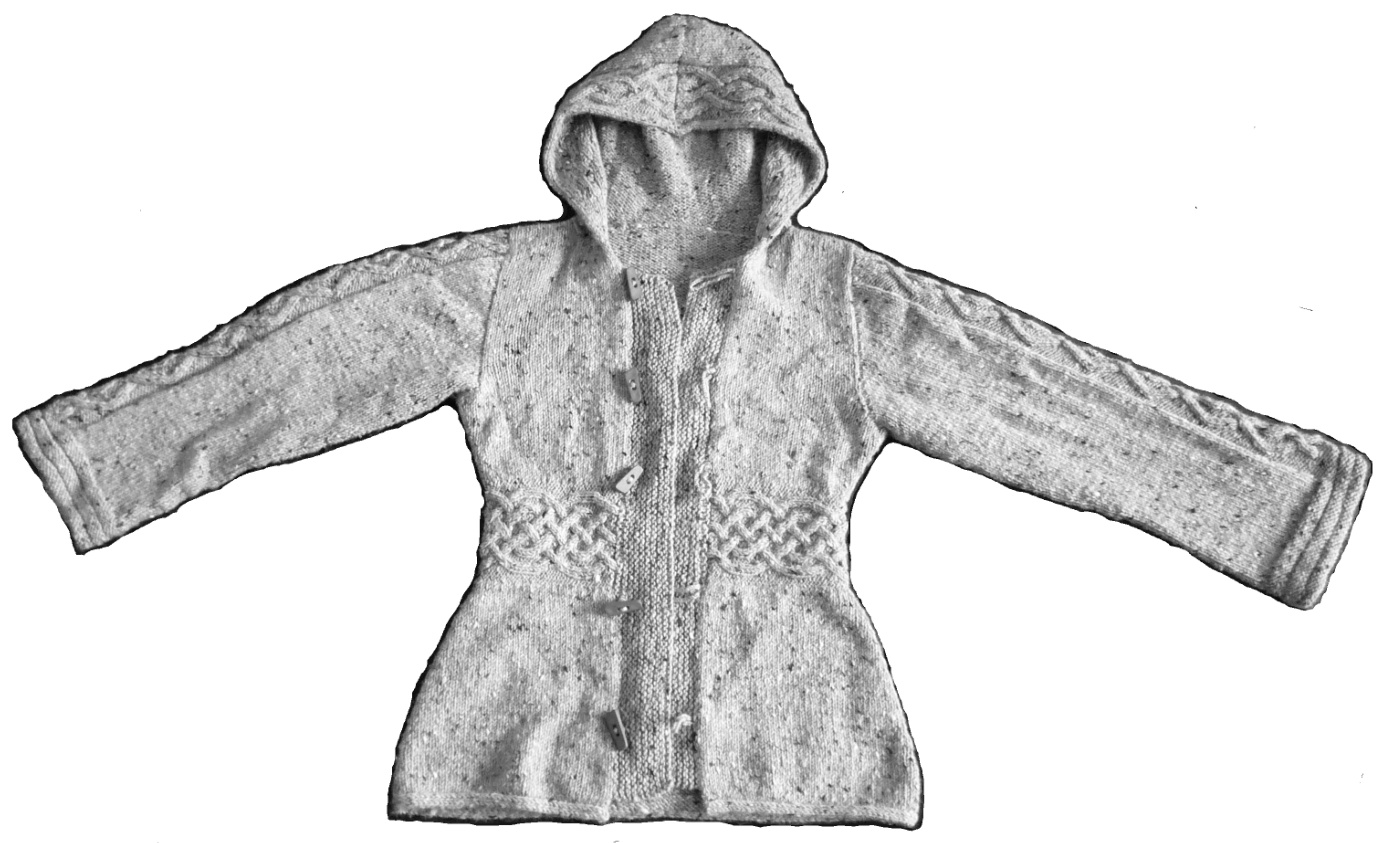
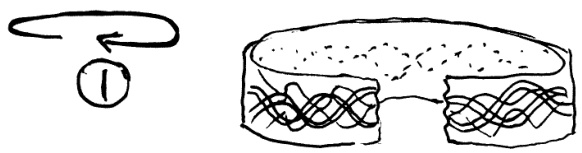
1) Knit cabled waist band 2) Pick up stitches along one edge of waist band and knit lower fronts and back 3) Pick up stitches along other edge of waist band and knit to bust 4) Shape armholes and knit to shoulders, close shoulder seams 5) Pick up stitches for sleeves, shape sleeve caps with short rows, knit down to cuffs 6) Pick up stitches along neckline, knit hood, seam at top 7) Pick up stitches along front edges, knit button bands and attach fastenings 8) Optional: Add cuff and hood lining For some of you, this might suffice to get started :-) For everybody else, each step is explained in detail in its own chapter below. Most chapters contain maths examples in framed boxes to clarify the general explanations in the text. The sketches at the top of each chapter will make it easy to identify where you are, and the photos show relevant details from my own jacket. Every chapter ends with a conclusion in bold cursive to sum up the most important hints and tips. The appendix contains a selection of cable patterns suitable for the waist band, sleeves and hood.
\~ Abbreviations used \~
k = knit p = purl st(s) = stitch(es) st st = stockinette stitch ssk = left-slanting decrease k2tog = right-slanting decrease M1L = left-slanting increase M1R = right-slanting increase
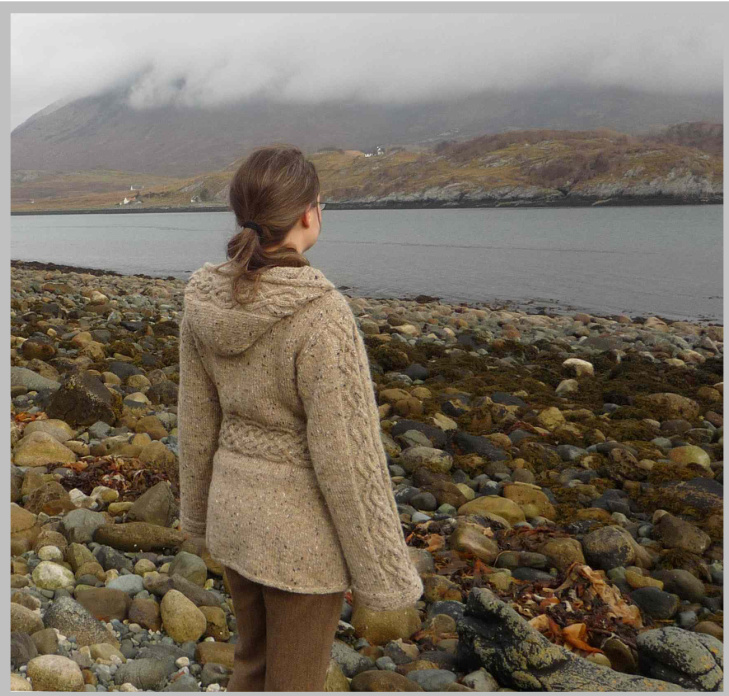
Choose a cable pattern you like and which you think will be suitable for the waist band. As tension is notoriously difficult to predict with heavily cabled stitch patterns, just be prepared to play around with a couple of cables until you find one that comes out the desired width. For a neat waist band, the cabled stitches should be framed by two purl stitches on each side on every row (there will be more purl stitches when the cables curve inwards), and two knit stitches should be added on each side as an edge from which to pick up stitches later. This means, the set up of the waist band should be: k2, p2, (cable pattern), p2, k2 The waist band in the original jacket is about 11 cm / 41/2 " wide and bas 28 stitcbes per row. The length of the cabled band is determined by your waist circumference plus desired ease (consider what you will typicall be wearing under the jacket!), and by how wide you want the front gap, i.e. the button band, to be. While working on the waist band, you should also keep in mind that for the sake of symmetry you will want to end at the same point in the pattern at which you have started (i.e. complete a certain number of full vertical pattern repeats), so that the front ends of the waist band, which will be prominet to the left and right of the front fastening, will look symmetrical (mirrored). You might want to pause and measure once you have finished one or two vertical repeats of the cable pattern, to calculate the possible total length from there. Alternatively, when you have almost reached half of your desired length, check where you are in the pattern and make sure you will be able to complete a full pattern repeat at the end. Consider that you may easily make up for an inch or two by adjusting the width of the front gap, or by tweaking the cable pattern at the centre back. Havefun!Remember, thecabledwaistbandwill beprominent detail onyourfinished jacket.Do take your time to find a cable pattern you really like and that works for your desired width and circumference.Complex cables can be slow to Work, but keep in mind how beautiful it will look!
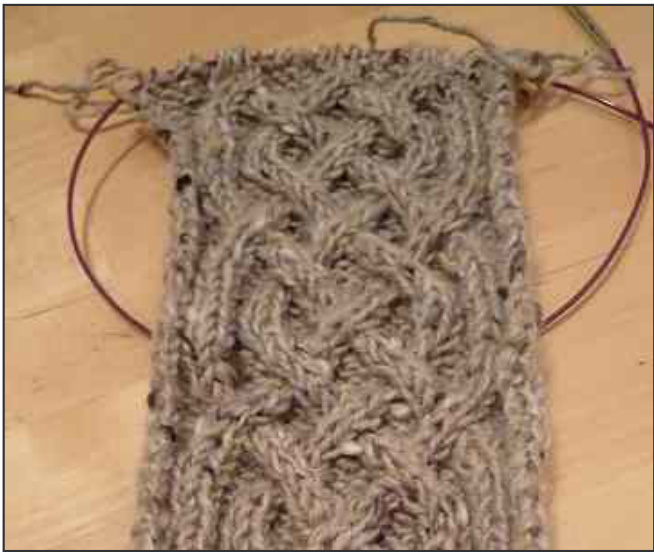
When you have reached the desired length of your waist band, cast offloosely.It doesn't matter if the cast on and cast off edges flare out or look a bitmessytheywillbehiddenbehindthebutton orbuttonholeband anyway.
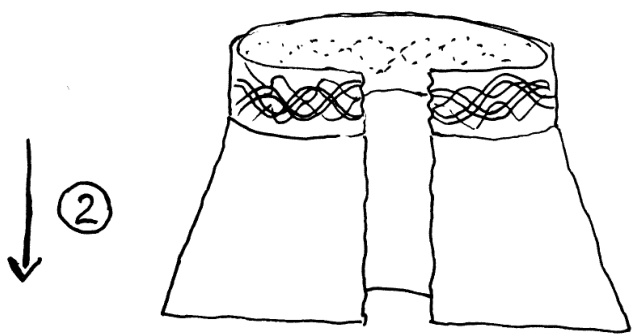
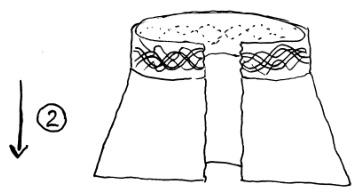
2 : Lower fronts and back Once the cabled waist band is finished, pick up stitches along one of the long edges at a ratio of 3 stitches from 4 rows onto a sufficiently long circular needle (or several ones). Then lay the piece out flat with the right side down and fold the two ends in towards the centre, as you would with the finished jacket, keeping the desired width of the front gap in mind. This way you can determine which of the picked up stitches belong to the back and which to the fronts of the jacket. You can put in little loops of contrasting waste yarn to mark the side seam points. Obviously, the two side seams should be at symmetrical points in the waist cable pattern, so this is what you should pay attention to when laying it out. If you do not have exactly the same number of picked up stitches for both front pieces, this can easily be adjusted on the next row. You can either knit the lower fronts and back as one piece, working back and forth in one long row from one front edge to the other; or you can work each piece separately, putting the rest of the stitches on hold or working with three balls of yarn simultaneously. If you want to work the complete lower body as one piece, you should include ,fake seams" at the sides for a neater shape, by working one or two stitches in reverse stockinette there. If you want to work the three pieces separately and seam them later, you need one additional edge stitch at the side edges of each piece, so that you can sew them neatly and without puckering. You can add these edge stitches on the following row, by making one stitch to each side of the side seam markers. In tbe original jacket, I worked the back and front pieces separately,becauseIprefer the look andfel ofreal seams in a beavier knitwear item. I already knew this when I picked up my stitcbes along tbe waist band, therefore I included enougb stitcbes in the spots that would become the side edges, so thbat I already bad the necessary edge stitches for seaming. The following applies to both versions alike: Knit a couple of cm / approx 2", until you can comfortably measure your row and stitch tension/gauge. Now get out your pencil and calculator - you need to decide how long you want the lower body to be, and how wide you want it to be at the bottom. You will be adding width to the existing piece(s) by increasing stitches to the left and right of the ,fake seams" (if you are working back and fronts as one piece) or at the outer edges of the fronts and back piece (if you are working them as separate pieces). Increases are typically worked every couple of rows, with the other rows in between worked straight. Find out how many stitches you need to add in total to reach your desired width at the bottom. Divide this number by two to find out how many increase rows you will have to work. (Alternatively, determine desired circumference and divide by four - just don't mix these two things up! Width is what you get when you lay your garment flat and measure across. Circumference is what you get when you put it on and measure all the way around. Width is balf of circumference. Both are suitable ways to determine your required measurements.) Determine how many rows you will need for your desired length from waist band to bottom edge. Divide this number by your number of increase rows, to find out how many rows you will have in between increases.
Maths example:
Example tension/gauge: 20 sts / 30 rows = 10 cm or 4"' square → 2 sts / 3 rows = 1cm, or 5 sts / 7.5 rows = 1" A) Width below waist band: 36 cm / 141/2 "= 72 sts B) Desired width at bottom: 56 cm / 221/2 " = 112 sts C) Desired length of lower body: 20 cm / 8" D) Additional stitches needed fto reach bottom width: B minus A = 40 sts across back E) Increase rows needed to acquire the desired width: D divided by 2 = 20 F) Rows needed for desired length: row gauge per 1 cm / 1' multiplied by C = 60 G) Spacing of increase rows: F divided by E = 3 → This means the increases need to be worked every third row, 20 times. If you are working back and fronts as one piece, an increase row should look like this: \*K to 1 st before "fake seam", M1L, k1, p1, k1, M1R, repeat once more from \* If you are working back and fronts separately, increase rows are as follows. On left front: K to 1 sts before end of row, M1L, k1 On right front: K1, M1R, k to end of row On back: K1, M1R, K to 1 sts before end of row, M1L, k1. Keepin mind to makeyour jacket really comfortable, the bottom shouldn't be too tight and should flare out nicely around the hip. You can make it as long or short as you want, but below hip to upper thigh length is probably best for an outdoor garment that is supposed to keep you warm.

When you have reached the desired length, work a bottom edge of your choice. This can be as simple as a couple of garter stitch rows, or as elaborate as an i-cord bind off. If you don't want to decide on this right now or if you are still unsure about the total length, just put the live stitches on hold on a piece of waste yarn or a spare needle cable. You can always finish the bottom edge later, when you have completed the shoulders and have a better impression of the overallfit. If you have knitted the front and back pieces separatelyclosethesideseamswithmattress stitch. If you want to add an i-cord edge, close the sideseamsfirst!
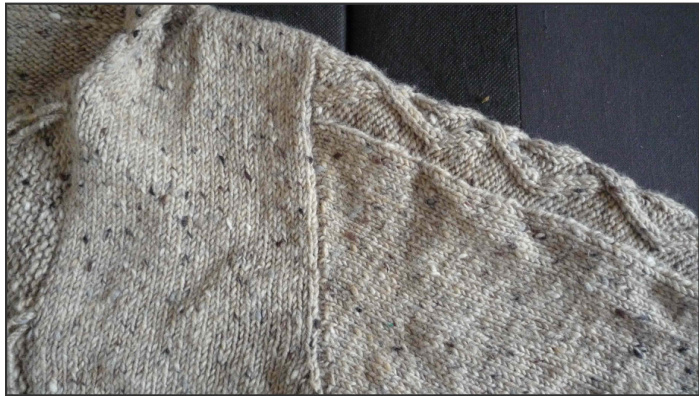
3 : Upper fronts and back to armholes
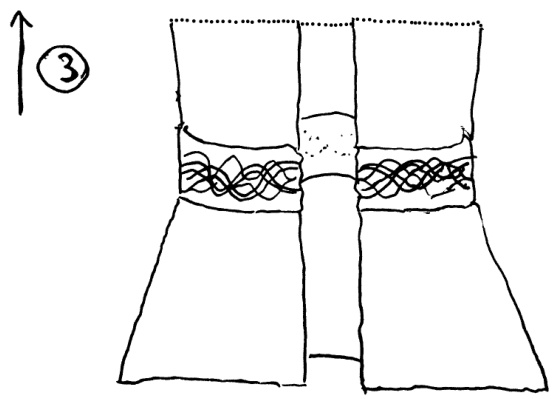
Pick up stitches along the other long edge of the cable waist band, just like for the bottom part. Again, determine which stitches belong to the fronts and back respectively, and decide whether to knit the three pieces separately or all in one with fake seams. Determine your required bust width and the length you will need up to the underarm - keep in mind this is an outdoor garment and you will probably wear it over another sweater, so don't make the armholes and the bust too tight. If in doubt, compare with the measurements of another well-fitting outdoor garment, like a coat or parka. Calculate the required number of rows and the necessary increases, just like you did for the bottom. Increases are worked the same way, too. If you are unsure about this, you can use the math example from above, and substitute bust width for bottom width, and length to underarm for length to bottom edge. Remember, width = half of circumference, so if you are accustomed to measuring your bust all around, divide this number by two! When you have reached the desired length to the underarm/bust, you will have to bind off and decrease a couple of stitches at each end of the back and at the outer end of each front, to form the base of the armholes. In case you are knitting the back and fronts as one continuous piece, you will also have to split them a this point and work them separately to the shoulders (see details below). The number of stitches you want to get rid off at the armholes depends a bit on your desired width at the shoulders. Typically, about 3-5 cm / 11/2-2" worth of stitches are taken out at each side of both front and back, with about 2/s of these stitches bound off immediately, and the rest of them decreased on the following right side rows, to make a nice curving armhole. In the original jacket, I bound off 6 stitcbes, and decreased one stitch each on tbe following 3 rigbt side rows. Detailed explanation how to bind off and decrease those stitches below. If you are working back and fronts separately Back: On a right side row, bind off your required number of stitches (= 2/ of the total number of stitches you want to get rid of at each side!) at the beginning of the row, knit to end of row. On following wrong side row, bind off your required number of stitches at the beginning of the row, purl to end of row. On following right side row, knit first stitch, ssk, knit to three stitches before end of row, k2tog, knit last stitch. Purl all stitches on wrong side row. Repeat the last two rows until you have decreased as many stitches as you want. To continue to shoulder, see chapter 4 below. Left front: On a right side row, bind off your required number of stitches (= 2/ of the total number of stitches you want to get rid of at each side!) at the beginning of the row, knit to end of row. Purl all stitches on wrong side row. On following right side row, knit first stitch, ssk, knit to end of row. Purl all stitches on wrong side row. Repeat the last two rows until you have decreased as many stitches as you want. To continue to shoulder, see chapter 4 below. Right front: On a wrong() side row, bind off your required number of stitches (= 2/s of the total number of stitches you want to get rid of at each side!) at the beginning of the row, purl to end of row. On following right side row, knit to three stitches before end of row, k2tog, knit last stitch. Purl all stitches on wrong side row. Repeat the last two rows until you have decreased as many stitches as you want. To continue to shoulder, see chapter 4 below. If you are working back and fronts as one piece: Knit to first side seam, turn work around and leave rest of stitches untouched (you can also transfer them to a spare needle cable of piece of waste yarn). On wrong side row, bind off your required number of stitches (= 2/s of the total number of stitches you want to get rid of at each side!), purl to end of row. On following right side row, knit to three stitches before end of front piece (the gap where you have bound off your stitches), k2tog, knit last stitch. Purl all stitches on wrong side row. Repeat the last two rows until you have decreased as many stitches as you want. To continue to shoulder, see below. Best leave these stitches aside and complete the back first before returning to the front pieces. Join a new ball of yarn for the back, continuing with the interrupted right side row. Bind off your required number of stitches (= 2/ of the total number of stitches you want to get rid of at each sidel!), knit second side seam. On following wrong side row, bind off your required number of stitches, purl to end of back piece (the gap where you have bound off your stitches at the other side seam). On following right side row, knit first stitch, ssk, knit to three stitches before end of back piece, k2tog, knit last stitch. Purl all stitches on wrong side row. Repeat the last two rows until you have decreased as many stitches as you want. To continue to shoulder, see chapter 4 below. Join a new ball of yarn for the left front, continuing with the interrupted right side row. Bind off your required number of stitches (= 2/ of the total number of stitches you want to get rid of at each side!), knit to end of row. Purl all stitches on wrong side row. On following right side row, knit first stitch, ssk, knit to end of row. Purl all stitches on wrong side row. Repeat the last two rows until you have decreased as many stitches as you want. To continue to shoulder, see chapter 4 below. Handling threeneedles and three balls ofyarn dangling from your knitting project can be a bit of a hassle, especially if you want to try the jacket on while working on it. If you are knitting it in separate piecesfrom the waist band, you can either omplete the back all the way up to the shoulders before you start on the front pieces, or you canknit all pieces up to the armholes and closethesideseamswithmattressstitchbefore you continue.The latter makes it a bit easier to try the jacket on and determine the total length needed.
4 : Armholes to shoulders:

For small to medium bust sizes it is usually possible to knit straight up to the shoulders without any further decreases. For larger bust sizes, and especially if your shoulders are narrow, some decreases may be necessary so you do not end up with oversized shoulders. Measure your shoulder width or that of another jacket Or coat, and compare this with the current back width of your project above the armhole decreases. If the difference is more than approx 5 cm / 2", you should work regular decreases at the edges of the back piece and at the outer edge of each front piece. Remember the increases you worked on the lower body towards the hip, and on the upper body towards the bust? This is similar, only that you decrease a stitch instead of increasing one. If you want to do this, you need to determine the necessary length to the shoulders before you continue, either by comparing with another garment , or you can try the jacket on and hold it up to your back and bust (maybe someone can help you with that). Substract the desired shoulder width from the current back width - the resulting stitch number divided by 2 is A. Calculate the number of rows necessary for the desired length to shoulder, this is B. Divide B by A, to find out how many rows you will have in between increases.
Maths example:
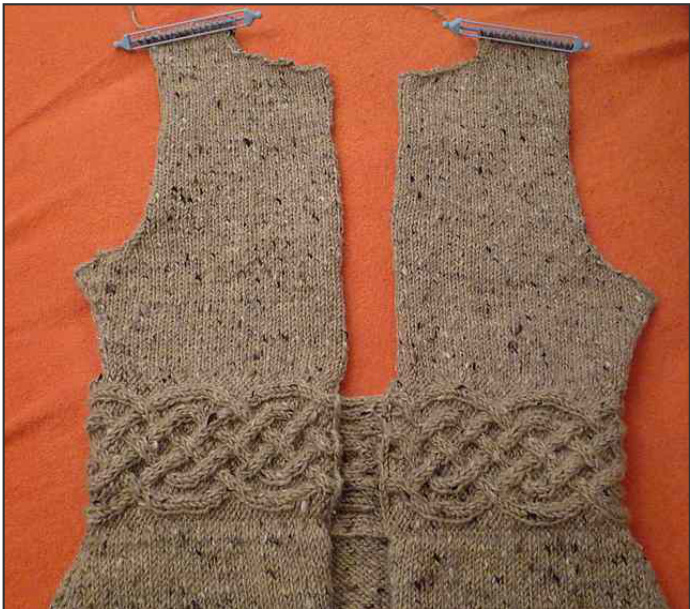
(This is the only one not taken from my original jacket. I am using a fictitious example but still at the same tension/gauge of 20 sts / 30 rows = 10 cm / 4") Current back width: 50 cm / 20" Required shoulder width: 34 cm / 131/2 " Width to be taken out: 16 cm / 61/2 " -> 32 divided by 2 = 16 = A Required length to shoulder: 24 cm / 91/2 " -> 72 rows = B 72 / 16 = 4.5 As you cannot do decreases on every 41/zth row, you would do them alternatingly on every 4th and 6th row. The decreases are worked as k1, ssk after an armhole edge and k2tog, k1 before an armhole edge, similarly to the previous increases. Please note that these decreases are not mentioned in the following instructions anymore. If you do not need any decreases towards the shoulders, you can knit all pieces straight up and check the length by trying it on as you go. It is recommended that you complete the back first (although the picture shows that I did the fronts first), because the length is easier to determine there, and then you can simpy knit the fronts to the same length. If you have a big bust, you might consider adding bust darts in the fronts (not covered in this tutorial).
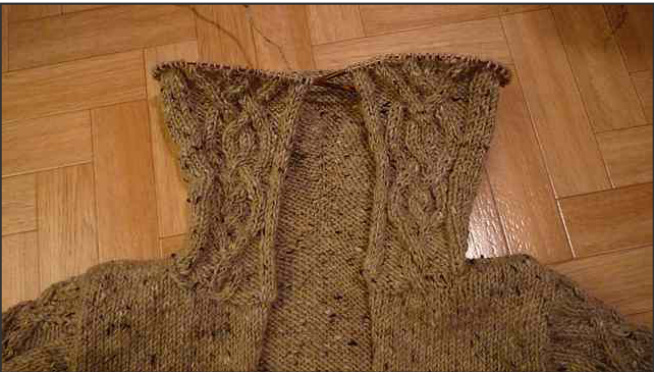
Upper back to shoulders:
Knit until you have reached the height where you want your back neckline to sit. (Remember that this is an outdoor jacket and you will later join a hood. The back neckline should not sit too low or the hood will look funny. If in doubt, compare with a similar garment, e.g. a hooded coat or parka. Typically the back neckline is not more than 1-2 cm / less than an inch below the shoulder seams.) At this point you will have to split the stitches into three portions: the middle half will be bound off for the neckline, and the ones to the left and right of that will be worked for a couple more rows up to the top of the shoulders. Decreases at the inner edges of these two shoulder strips will make the neckline curve nicely. On a right side row, work 1/4 of the stitches, then turn and ignore the rest of the stitches (you can put them on hold on a spare needle cable or piece of waste yarn). On following wrong side row, purl one stitch, p2tog, purl to end of row. On following right side row, knit to the three last stitches of this portion, k2tog, k1, turn. Repeat this until you have reached the desired length to shoulder. You can either cast the remaining shoulder stitches off, Or keep the live stitches on a holder. Cast-off edges can be sewn from the wrong side, live stitches can be joined by a three-needle bind off. For a heavier garment like this, I prefer casting off and seaming the shoulders because it makes them sturdier.
Upper fronts to shoulders Using the back piece as a model, knit the two front pieces to the same length, but make the neckline a bit lower. As this is an outdoor garment, you do not want the neckline to sit too low, but you do not want it to suffocate you either. Take a note of the row difference between the front and back neckline, i.e. how many rows the front neckline lacks in comparison to the back neckline. You will need this number later when you knit the hood. In the original jacket, the front neckline is about 5 cm / 2" below the shoulder seam. Whenyou havefinishedbothback andfronts and you are happy with the overall size and fit, close the shoulder seams from the wrong side, then sit back and take a deep breath.You have already completedmorethanhalfofthejacket!:-)

5 : Sleeves The sleeves are joined directly to the body by picking up stitches around the armholes. Basic sleeve caps are shaped with short rows and an underarm gusset to ensure a comfortable fit. As the sleeves are meant to be loose-fitting and casual, you could omit the short row shaping altogether and just do basic drop shoulder (= T-shaped) sleeves. However I find this creates some unnecessary and annoying bulk around the upper arms, especially with heavier yarns, so I prefer a little bit of shaping. Don't worry, it is not difficult at all. First of all you need to choose a cable pattern for the sleeves. You can use the waist cable again, but it might be too wide. For many cable patterns there are several similar versions with varying widths. In the original jacket, I used a pattern similar to tbe waist cable, but sligbtly narrower (18 sts \~ 8 cm / 3") Pick up stitches around the armhole at a ratio of 2 sts from 3 rows along the vertical edges and 1 st from every cast off underarm stitch, starting at centre of underarm and working all the way around to top of shoulder and down to centre of underarm. This will be your start/end of round. Now count your stitches and check if you have an equal number on each side between shoulder point and centre of underarm. It does not matter if there is a small difference, you can always increase or decrease a stitch or two later. The most important thing while picking up stitches around an armhole is that you get a neat edge especially at the underarm corners. You can always take care of the exact number of stitches later. To set up your sleeve cap, divide your total number of stitches by three. The result will be the number of stitches you will start with at the top of the sleeve cap. The cable band should cover approx 1/2 to %/s of these stitches. Maths example: 90 stitches picked up around armhole: 39 on each side and 12 underarm stitches. 90 divided by 3 = 30 stitches for top of sleeve cap (this number is used as A in instructions below) 6 st st - 18 sts cable - 6 st st On first row after pick up round, knit 2/ of your total number of stitches, turn. Purl back A stitches for your top of sleeve cap. On the next RS row, start working cable pattern in the centre of this portion of stitches. At the same time, knit one more stitch at each end of each row (both RS and WS) from the previously picked up stitches, until you have added all but the underarm stitches, then on a RS row knit to end of row all at once. Now start working in the round, continuing cable pattern on top of sleeve as established. Keep in mind that when working a cable pattern in the round, every other round is a "no pattern" round equivalent to a WS row when working flat!
Optional underarm gusset: On first full round after completion of sleeve cap short rows, when you reach underarm stitches towards end of round, work 1st and 2nd underarm stitch as ssk, knit to two last underarm stitches, k2tog. Repeat this on every other round until there are no more stitches left in between the ssk and k2tog. This way you create a small triangle in the armpit which reduces some of the armhole width towards the sleeve. Continue working the sleeve in the round with the cable pattern on top.
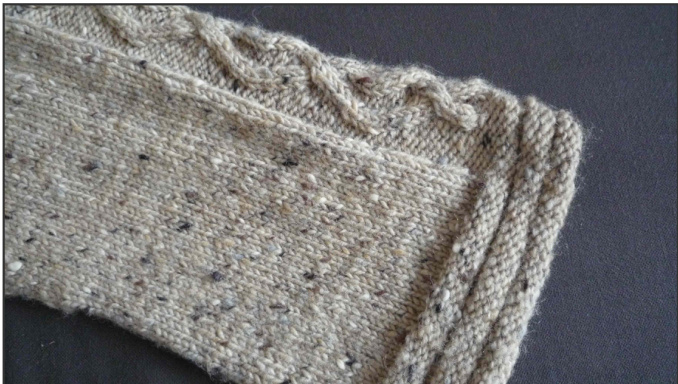
The nifty thing about top down sleeves is that you can try the jacket on as you go and check the length and width very easily. As this jacket is meant to be worn as an outer layer, your sleeves need to be wide and long enough so you can still movecomfortably.What aboutmakingthemextra wide and long so you can snuggle up and warm yourhandsinthem? Depending on how wide your sleeves are once you have joined in the round after the sleeve cap, you might want to include several decreases as follows: K1, k2tog, knit to 3 sts before end of round, ssk, k1. Work this decrease round in regular intervals every 3 or 4 cm / 1or 1 % " Towards the sleeve cuffs, youmightwant to considertweakingthecableabitforanice ending,but that isnotessential.You canfinish the sleeve with a ribbed cuff, a couple of garter rounds, a folded hem or any other edging you like. Working the same edging as on the bottom of the body often looks particularly neat.
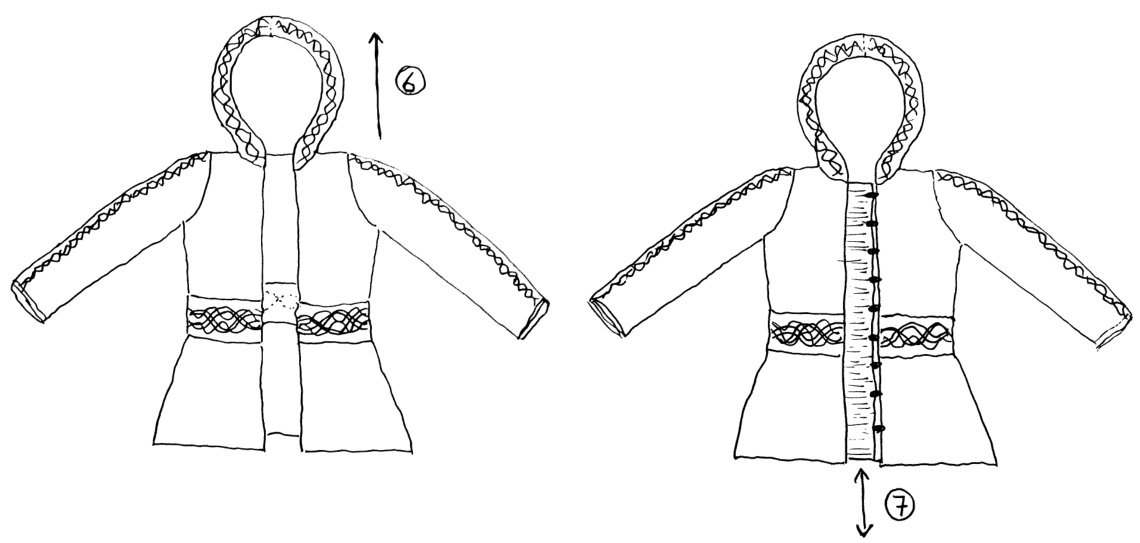
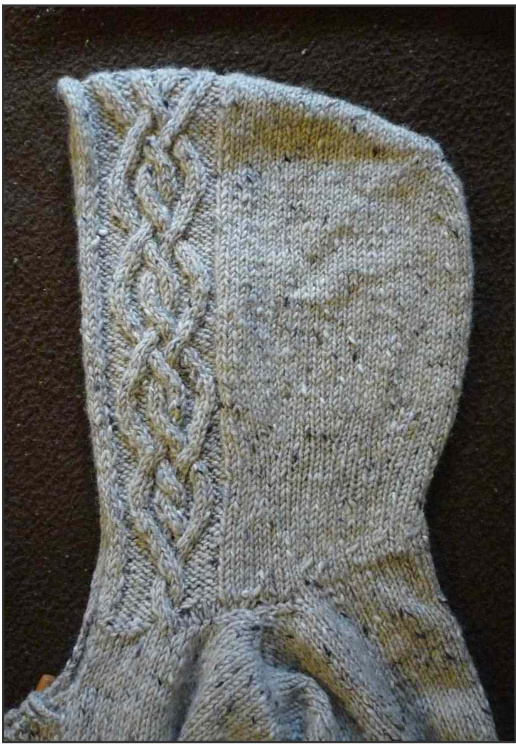
6 :Hood Most hoods are knitted by picking up stitches all around the neckline, knitting up straight, folding this piece of fabric in half at the top and seaming it. That is a very basic method which creates the typical shape of a "fairy point" hood. Unfortunately that kind of hood does not have a very elaborate fit, and especially tends to pull at the front neckline because of the weight of the hood fabric and because of the typical height difference between the front and back neckline. Also, the ,fairy point" shape creates a lot of empty space in the top back of the hood. For the hood on this jacket, I did the following things to improve the shape: Short row shaping at the base of the hood, to even out the difference between front and back neckline. · Some decreases and increases at the lower back of the hood, for a more fitted shape. · Decreases towards the back top and short rows along the upper edge for a more subtle top. Apart from that, the hood also has a cable band and a built in i-cord edge. So there is a lot going on at the same time, and I recommend writing out your own row by row directions which you can tick off so you do not get lost. Below I am going to describe each aspect of the hood design separately and give hints on how to make your own measurements and calculactions, as a starting point to set up your own hood. Read through paragraphs a) to e) before starting your hood! You need to consider all these bits before you can begin to knit. Your first step, in any case, is to pick up stitches around the neckline, at a ratio of one stitch from every cast off stitch and approx 2 sts from 3 rows on the sloping edges. It is helpful to mark the shoulder points (where your shoulder seams are) with loops of waste yarn, and to check if you have an equal number of stitches on each front part. You can mark the portion of stitches needed for the cable band, too.
a) Short row shaping at the base of the hood:
Count the difference of rows between your front and back neckline. (Remember when you knit the upper back and fronts - how many rows below the back neckline did you stop for the front neckline? This is the number you need here!) Divide this number by two, the result is A. Count the number of stitches you have just picked up from the front edge to the shoulder point, this is B. Divide B by A, the result is C. Maths example: 12 rows difference between front and back neckline. A=6 24 sts picked up on front = B. 24 / 6 = 4. This is C. Starting at the right front edge, knit C stitches, turn, purl back. On next RS row, knit 2xC stitches, turn, purl back. Repeat these two rows, adding C stitches on every RS row until you have reached the shoulder point, then continue across the back and to the end of the row. Now, starting at the left front edge, purl C stitches, turn, knit back. On next WS row, purl 2xC stitches, turn, knit back. Repeat this, adding C stitches on every WS row until you have reached the shoulder point, then knit to end of row on RS. Purl back across complete row.
b) Shaping at lower back of hood:
(This is not essential, but makes for a nicer shape with a closer fit around the back of the neck and a slight bulge above that.) After the short row shaping is done, on a RS row decrease a number of stitches that equals approx 2-3 cm / around 1" in width, evenly spaced across the back of the hood, i.e. between the shoulder points. After a number of rows that equals 3-4 cm / approx 11/2 " in length, increase a number of stitches that equals approx 1.5-2 cm / 1/2 -3/4 " in width, evenly spaced across the back of the hood, and the same again after another 1-2 cm / 1/2 -3/4 " in length. Continue straight as established with i-cord and cable band at beginning and end of rows.
Shaping at hood top:
(This is not essential either but makes for a softened top. There will still be a point but it will not be as striking as in a basic hood with no shaping) An average hood for a female adult should be about 30-35 cm /12-14" high (from shoulder point to top).
At about 5 cm / 2" below intended total length, start working decreases at centre back. Do you remember the little underarm gusset on the sleeves? This is just the same thing: On RS row, work to 3-4 cm / 1-11/2" before centre back, ssk, knit to centre back and same number of sts beyond, k2tog. Repeat this on every other round until there are no more stitches left in between the ssk and k2tog. On next RS row, start shaping hood top with short rows, as follows: Figure out how many rows you need for 3 cm. Round this to an even number and divide by 2, the result is A. Count stitches from behind cable band to centre back, this number is B. Divide B by A, the result is C.
Maths example:
For 3 cm I need 9 rows, rounded to 10. A = 5. 15 sts from behind cable band to centre back = B. On RS row, work to C sts before centre back, turn, work back to end of row. On next RS row, work to C sts before last turn, turn, work back to end of row. Repeat this until you have only C sts to knit after cable band, turn, work back to end of row. On next RS row work all across to end of row. On next WS row, work to C sts before centre back, turn, work back to end of row. On next WS row, work to C sts before last turn, turn, work back to end of row. Repeat this until you have only C sts to purl after cable band, turn, work back to end of row. On next WS row work all across to end of row. During all this, i-cord and cable band are worked as established. Your cable pattern for the hood should fit nicely into the front of the neckline, so again you may want to look for a slightly narrower cable than on the sleeves. In the original jacket I used a cable with 16 sts \~ 6 cm / 21/2" There is a space of 2 cm I 3/4 " to tbe shoulder point.
eBuilt in i-cord edge:
(If you think this is too much, the i-cord edging can also be added separately after the hood is finished. The advantage of built in i-cord is that you don't have to add it after finishing ;-) Thbe i-cord on the original jacket was worked over 4 sts On RS row: Knit 4 sts each at beginning and end of row On WS row: Slip 4 sts each at beginning and end of row, purlwise with yarn in front. Pull working yarn tight before purling next stitch. As you are in fact only knitting these stitches on every other row, add short rows on the i-cord only every couple of rows, as follows: On RS row, knit first 4 sts, slip these sts back to left needle, knit 4 sts again, pulling working yarn tight when knitting first stitch. Repeat for 4 sts at end of row.
Now get yourself a drink! ;-) Then read through a) to e) again and write out your own directions for your hood. At the base of the hood, the i-cord edging and cable band start right away on the first row being continued while you are working the neckline short rows. After that, once you are working completerowsbackandforth,thebackneck shaping takes place.You should try the hood on before starting on the top shaping, to check the length. When you are approaching the top, you might want to try to tweak the cable pattern in a way for the two edges meet to nicely at the top seam. Once you have reached your desired length and finished the short row shaping on the top, fold the hoodinatthecenterback. Join the two ends of the i-cord by grafting the stitches together. Then join the rest of the stitchesby threeneedlebind offfrom theWS. Now it's time to celebrate! Look, it's a jacket! :-) If you had not finished the bottom edge of the body before, you can do this now. As mentioned above, using the same edging on the body and sleevesmakesforaneatcleanlook.

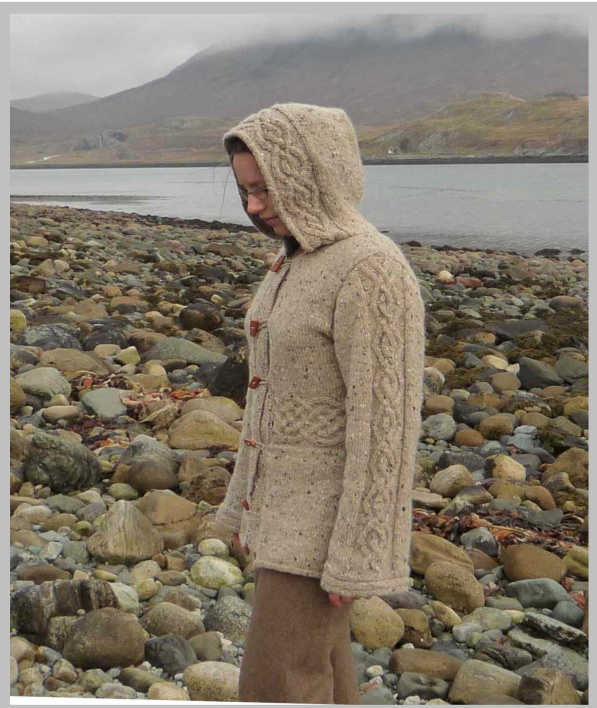
7 : Button bands and fastenings Your jacket still has a front gap which needs to be closed. There are various methods to knit button(hole) bands, I am just going to describe a very basic one (which I did on the original jacket) and another more elaborate one (which I wanted to do but never actually got around to doing). If you want normal buttons, you need buttonholes in one of the bands, worked after approx %3 of the total width of one of the bands. If you want toggles and loops like in the original jacket, these should be placed towards the inner edges of the bands, so that the two layers of fabric will overlap when you fasten the toggles.
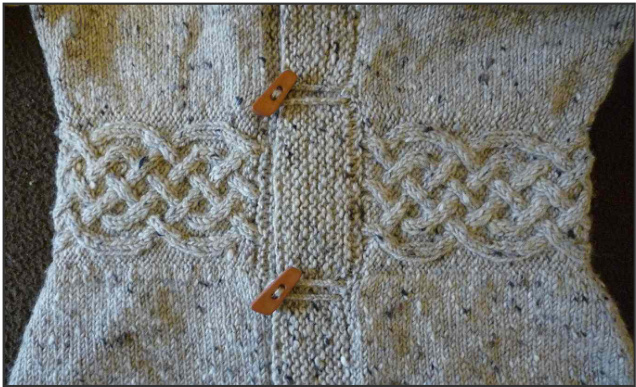
The loops in tbe original jacket are simple braided cords. I pusbed tbe ends tbrougb some boles at tbe base of the garter stitch band and secured tbem on tbe wrong side.
a) Basic garter stitch bands:
Pick up stitches along the front edges at a ratio of approx 3 sts from 5 rows. Work in garter stitch for the necessary length to close the front gap. Cast off, taking care not to pull the stitches too tight. b)Folded ribbed band: Pick up stitches along the front edges at a ratio of approx 1 st from 2 rows. Work in k1p1 ribbing for the necessary length to close the front gap. Purl one RS row (or knit one WS row), then continue in ribbing for the same number of rows again. Fold to the inside along purl ridge and either join to pick up edge while casting off, or cast off normally and then sew in place. Both kinds of front edges would also look lovely in a matching finer yarn, especially if your jacket is made from a bulkier material. In that case however, you need to knit an extra tension/gauge swatch with the finer yarn first, to figure out at what ratio to pick up stitches from the front edges.
8 : Cuff and hood lining
This is another thing I have never gotten around to doing on the original jacket, although I had intended it. For a neater finishing of the sleeve cuffs and hood, knit a lining in a finer and maybe softer yarn: a) Sleeves: Do not cast off at the sleeve cuffs but join contrast yarn. Purl first round, adjusting number of stitches to a circumference that is a tiny bit smaller than the outer sleeve. Knit for 5 cm /2", cast off loosely. Fold to inside along purl ridge and stitch in place. b) Hood: With contrast yarn, pick up stitches along inner edge of hood (figure out stitch ratio before). Knit to a length that covers the width of the cable band. Cast off loosely and stitch in place.
Appendix \~ A selection of cable charts
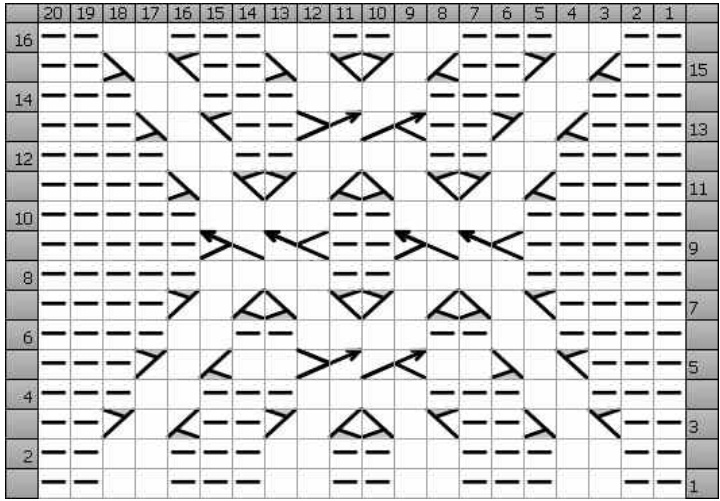
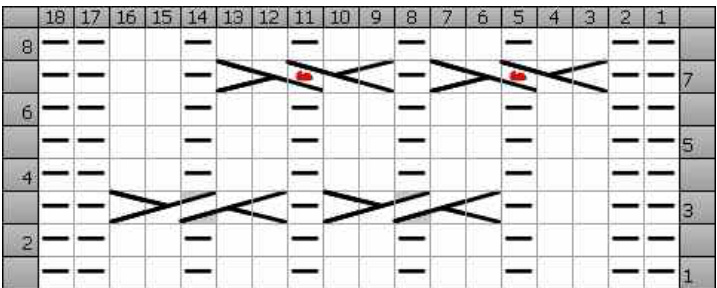
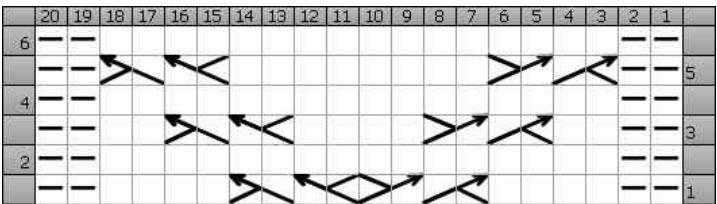
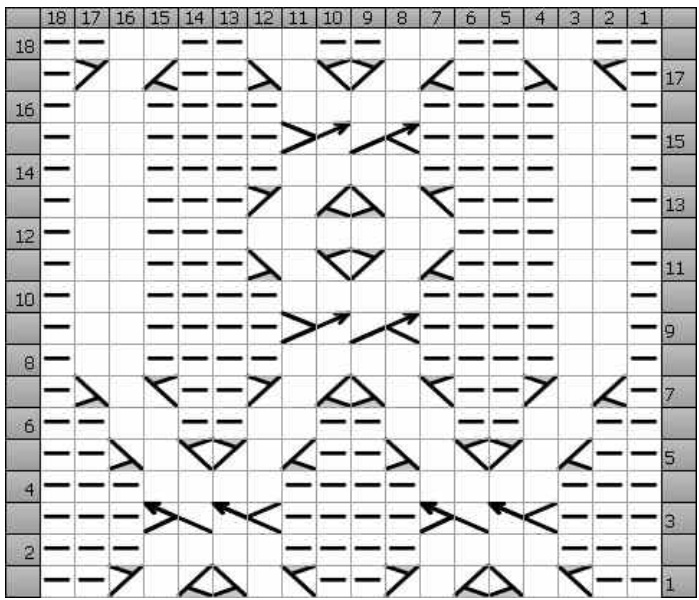
cable chart legend

no symbol = k on RS, p on WS 1 = p on RS, k on WS 2 = cross k2 over p1 left to right 3 = cross k2 over p1 right to left 4 = cross k2 over k2 left to right 5 = cross k2 over k2 right to left 6 = cross k2 over k2 left to right with p1 in the middle 7 = cross k2 over k2 right to left with p1 in the middle


