@Jennifer Adair, 2013 All rights reserved Design, text, and photography by ennifer Adair email@JenniferAdair.com IndigoKiwi.com IndigoKiwi on Ravelry Release 3.0, July 2013 Information Use: You have the right to share all information in this document for personal or commercial use, but not the document itself. If you would like to use all or part of the document for teaching purposes, please contact me to make arrangements. Personal Use: Purchase of this document includes the right to reproduce it in any manner you choose, so long as the reproduction is for your personal use only. It also includes sharing an excerpt for non-commercial use if the following credit is included: Photos and text courtesy of Jennifer Adair. Commercial Use: No commercial use of this document is included with its purchase.

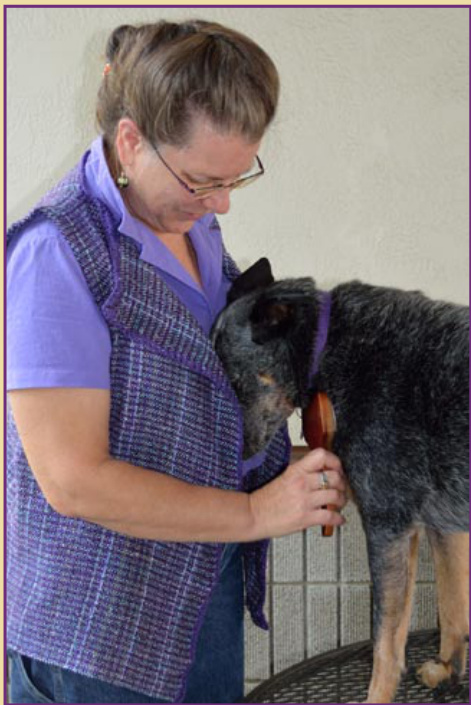
Gathering blue heeler undercoat from Zeke, my fiber buddy.

The concept of chaordic knitting has been developing for a long time. I started talking about writing a book on the methods three years ago. Then in early December 2012 I sat down at the computer to do something, don't remember what, and a few hours later realized that several pages had come pouring out. I strongly recommend at least skimming Chapter 1, Introducing Chaordic Knitting and Chapter 3, Knitting Techniques before starting a project. For the sake of readability, I have not repeated the following in the text or knitting patterns. Unless otherwise directed: Begin and end all rows with a knit or purl as appropriate. Work pattern repeat for entire row, ending with a completed repeat, and knit or purl any remaining stitches. Maintain stitch count, matching each decrease with an increase.

Release3.0 This release is published for sale on Ravelry. It contains (hopefully!) all of the technique sections in final form. It is being used to test Uptown Gaiters, which is not included in this release ofthe book. Side-to-Side Vest and Tie Shaw/will be tested and released later this year.

To the Ravelry community:
Casey, Jessica, Christina, Mary-Heather, Sarah, and Bob. You built. We came. The world changed. To my friends who modeled for the book: Vange Johnson Penelope Mercedes Lorenziano Troy Berggren Lacey Aiden Deal
Thank You & Printing 1o2
CatBordhi, so that's how you do an ebook. And a nice sock heel. And a real moebius. And ... SchrouderKnits, 30,000 posts and counting, bursting with knitting wisdom and humor. And special thanks to Aiden's grandmother Darcy for that big smile on his face!
To the Ravelry pattern testers:
catdragon, darnys, dollyBambas, donnaknitsdolls, FiaKnit, fiberdiversions, glennabutts, HaveTooMuchYarn, JStockert, KnititKim, Lumberjill, lyonesset, miti-mom, NScioli, olivetree, piperredfern, prizebird, rfnorton, rmoule, roketsientist33, saus-e, vangibabe, yukachan08 The book just wouldn't be the same without you!

The only thing that should be outside the standard margins on a printer are the color bands at the right of each page and a few color blocks that extend to the edge, such as on the next page. The color bands distinguish each chapter, making it easier to navigate by thumbnails. There is also a solid color page at the start of each chapter. Every page is listed in the two Table of Contents, one for techniques, one for patterns.
Content: Techniques & Concepts 1o3
About Austrian Cast On 4o31 Austrian Cast On 4o32 Judy's Magic Cast On 433 Figure 8 Cast On 434 Jennifer'sCabledBindOff4o35 EZ'sSewnBind Off 4o36 3-Needle Bind Off 4o37 Joan's Chain St3NBO4o38 Thank You & Printing 12 Content: Techniques & Concepts 103 Content: Patterns 1o4 History ofthe Concept 15 Chaordic Knitting Defined 16 Framing Chaos 1o7 Contrast 1o8 Grandmothers & Purl Bumps 19 K/Ps, P/Slips, Stitch Patterns 1o10 Repetition & Scale 1o11
Stitches & Abbreviations 5o39
Stash & Manage Yarn 2o12
Abbreviations 5o40 Edge Stitch, I-cord, K1Below 5o41 Slip Stitches 5o42 Dip Stitches 543 StitchPatterns5o45 Garter Ridges 546 Brioche 5o47 Acquiring Stash 2o13 Managing Stash 2o14 Spit Joins, Cakes, & Knots 215 Choosing Yarns 216 Choosing Yarns, cont. 217 Combos, Monos, & Multis 2o18
Gallery 648
Knitting Techniques 3o19
What Next? 649 Train Your Eye 320 Edges & Shaping 321 Pick Up & Knit Overview 322 Pick Up Step by Step 323 Pick Up Example 324 Steeks 325 Yarn Tails: Now What? 3o26 Understanding Fulling 3027 The Fulling Process 328 Odds & Ends 329
Chaordic Mitts 1-50 Notes, Tools, & Mitt Stats 1-51 Marker Placement 1-52 Yarn 1-53 DIY Pattern 1-54 Fringe Pattern 1-55 AutumnPattern 1-56 Do A Little Dance Pattern1-57
ZigZagZ 2=58
Notes, Tools, & Yarn 2-59 Pattern 2-60
Fantasia 361
Notes, Tools, & Yarn 3=62 Pattern 3-63 Pattern, cont. 3-64
Ditty Bag 4-65
Notes 4-66 Pick Up Bottom, Insert Handles 4-67 Tools & Yarn 4-68 Tall Bag Pattern 4-69 Short Bag Pattern 4-70 Short Bag Pattern, cont. 4-71
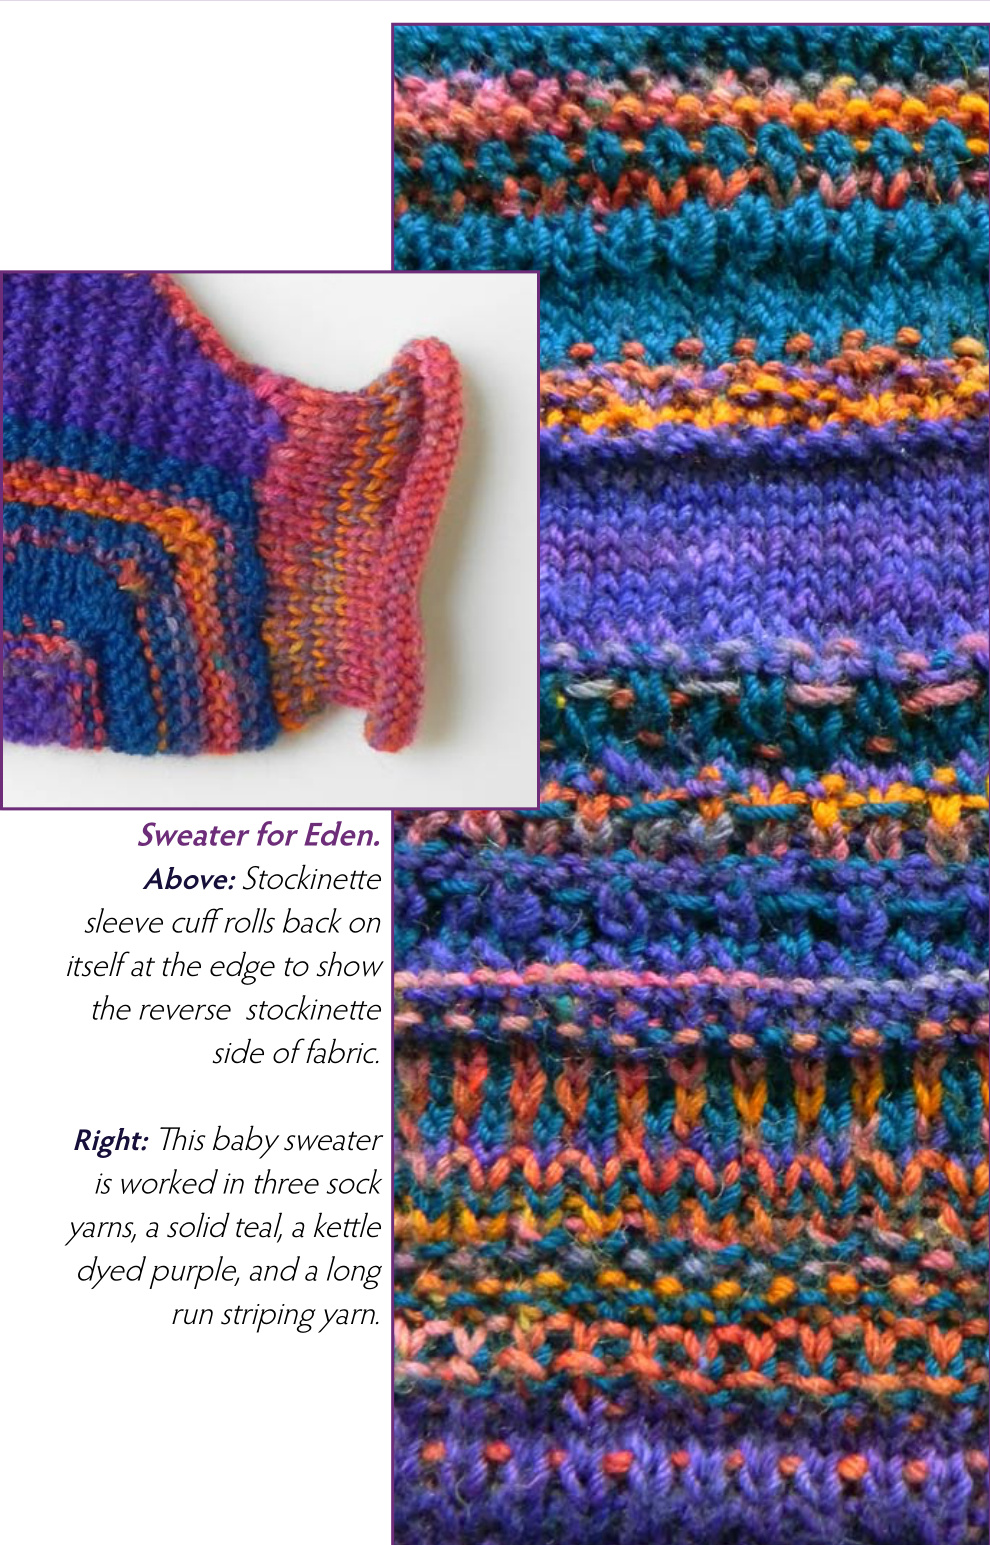
Sweater for Eden 5-72
Notes, Tools, & Yarn 5=73 Schematic 5-74 Pattern 5-75 Pattern, cont. 5-76 Uptown Gaiters 6=77 Side-to-Side Vest 7=78 Tie Shawl 8=79 Pattern Notes A-80
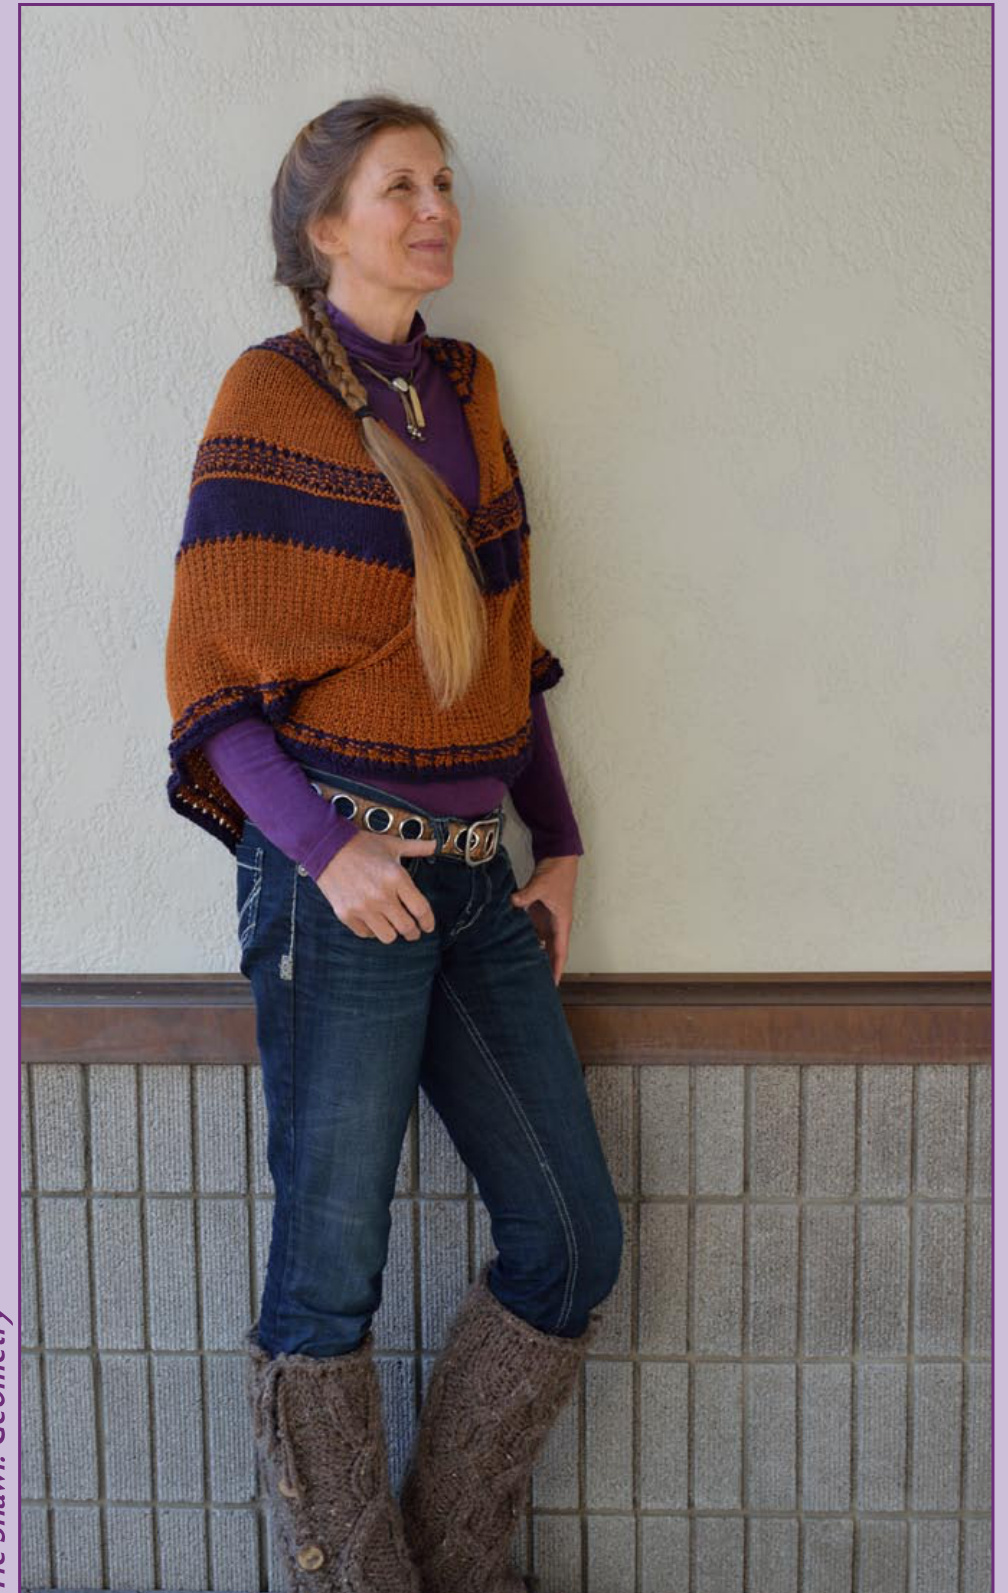
Tie Shawl: Grey Pinstripe haord, coined by Dee Hock in his book, Birth of the Chaordic Age, is a combination of the words chaos and order. Chaos nurtures and supports the creative budding of ideas. Order helps those ideas to flower and become fruit. Too much order stifles creativity; too much chaos prevents getting anything finished. In the natural world, chaos and order coexistence in a yin yang balance, with neither dominating. Human beings, with our busy minds, must relearn how to balance between those extremes. Chaos is messy; it is not pleasing to the eye. Patterns, aka order, are pleasing. So what makes a pattern, and how do we get there without too many rules?

everal factors brought about this concept: a beautiful hand spun yarn I wanted to use symmetrically in a sweater, a love of color and creativity and the edges where things meet, and a firm belief that the last two yards of a skein could be made into something beautiful.
SweaterforEden
This book is about creating fabric using chaordic knitting. Garment design is discussed only as it relates to chaordic work. Several knitting and yarn management techniques are included, many of which also apply to any type of knitting. Basic knowledge (knit, purl, basic decreases and increases, which end of the sticks to hold) is assumed. After knitting for fifty years I'm starting to follow the twists and turns of yarn through fabric. Knitting is one of those human endeavors whose very simplicity is the foundation for apparently limitless complexity. I think of Chaordic Knitting as a travel guide with a slightly different perspective on knitting. To begin the journey, grab several balls of yarn and some needles, cast on 25 stitches, and follow the prime rule: Pick a new yarn and stitch pattern at the beginning of most rows. You may be surprised at the result.
Working Freestyle
Chaordic knitting is a color and texture method that uses a simple rule to create freestyle fabric using a wide range of garment patterns.
The Prime Rule
Pick a new yarn and stitch pattern at the beginning of most rows.
It's Corollary
Use basic stitches like knits, purls, yarn overs, and decreases to make up each short stitch pattern.
The Caveats
You must measure the length of fabric rather than counting rows. Garments with complex shaping are not good candidates for all over use of chaordic knitting. You may be caught in the just-onemore-row trap, which can only be escaped at least one hour after bedtime. Using Chaordic Knitting Chaordic knitting can be used for a whole garment. It can also be used with many designers patterns, to enhance a sleeve, sweater yoke, or hat. Even a narrow band can take a simple shawl to a new level, one that lets your creativity shine through. My goal in writing this book is to share the techniques. To keep the language simple, I often use the imperative: Do this, do that. What I really mean is try this and see how it works for you.
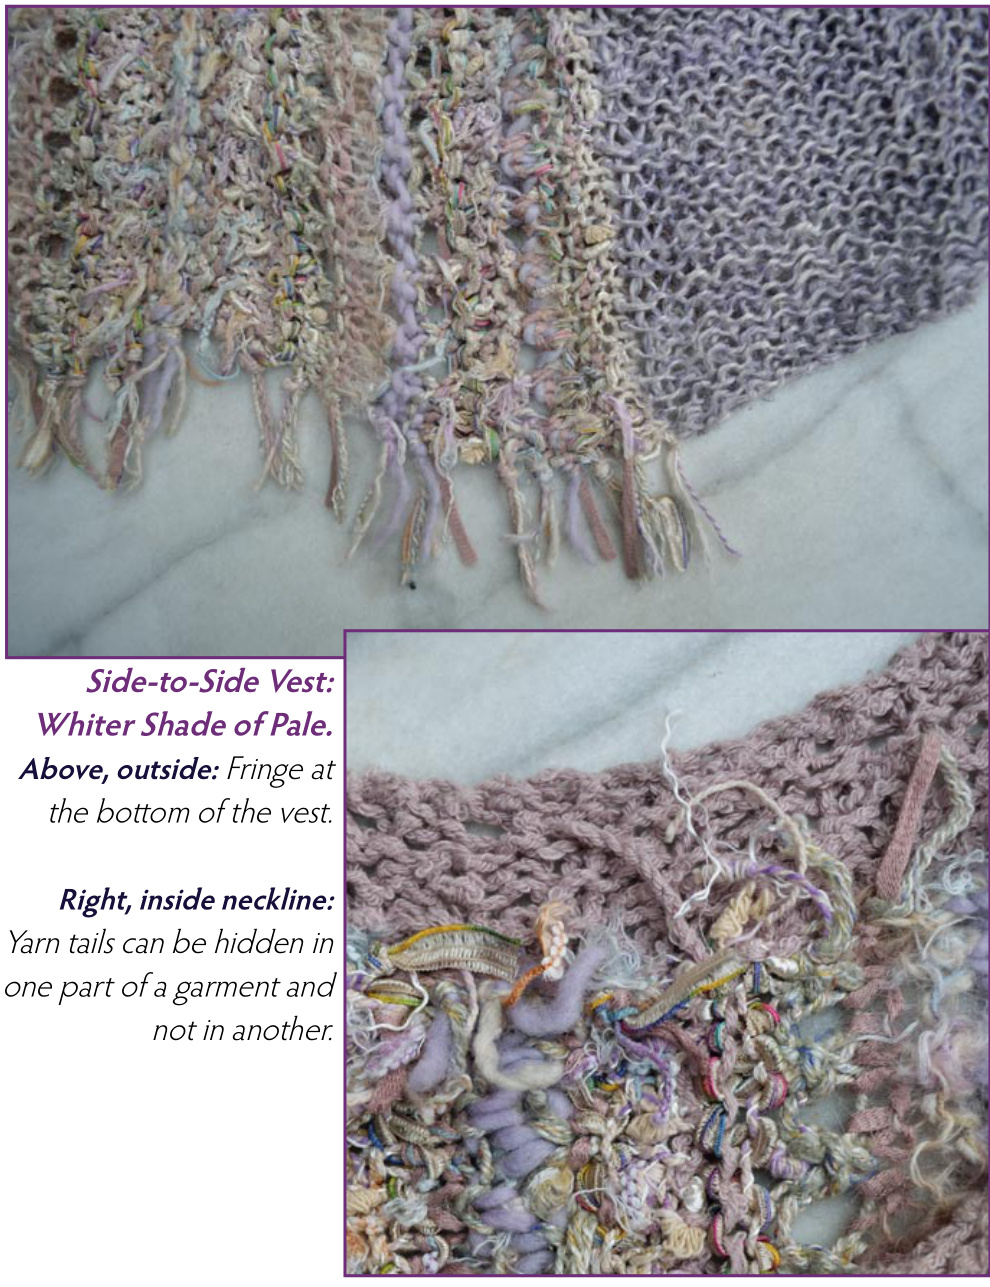
Side-to-SideVest:WhiterShadeofPale. Just like we have realized that it only takes a couple of rules for a flock of two million starlings to wheel in flight as one, it only takes a couple of rules to make incredibly complex looking knitted fabric.
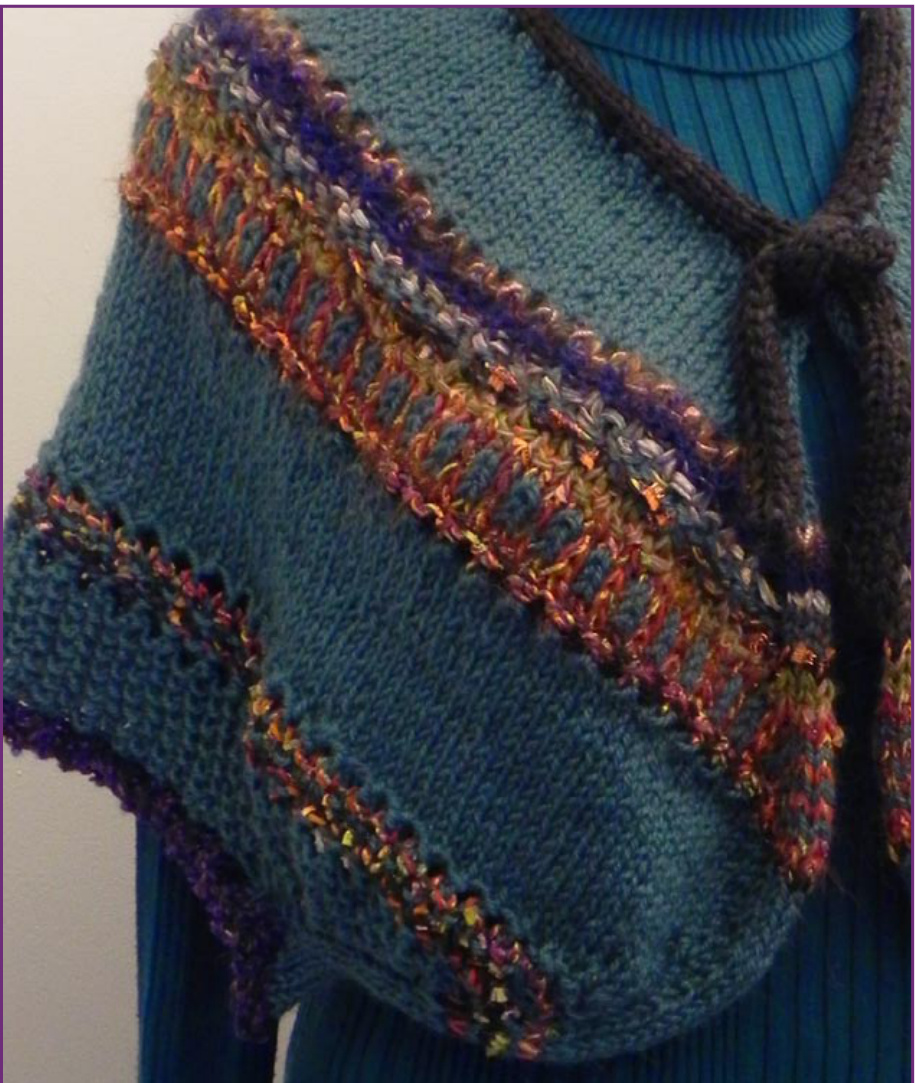
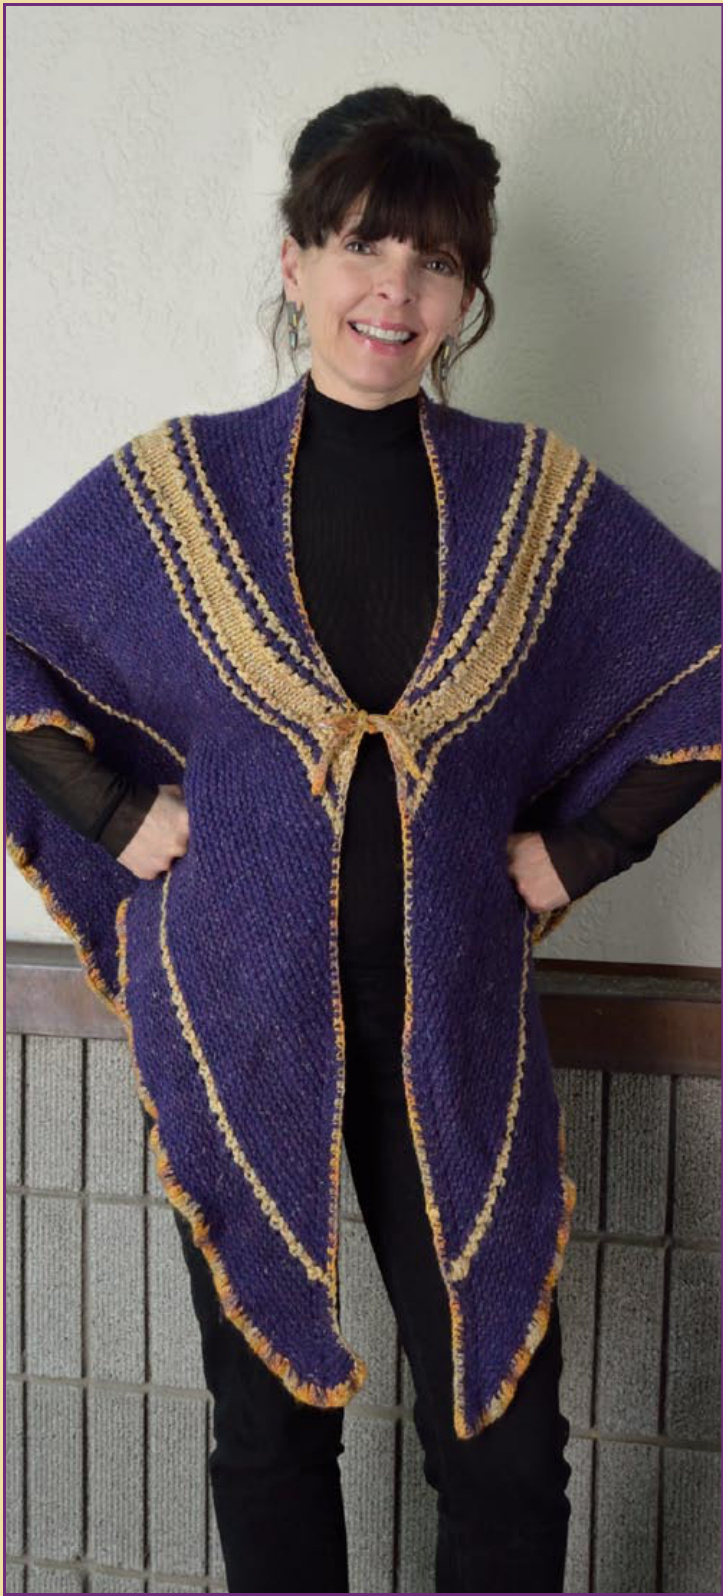
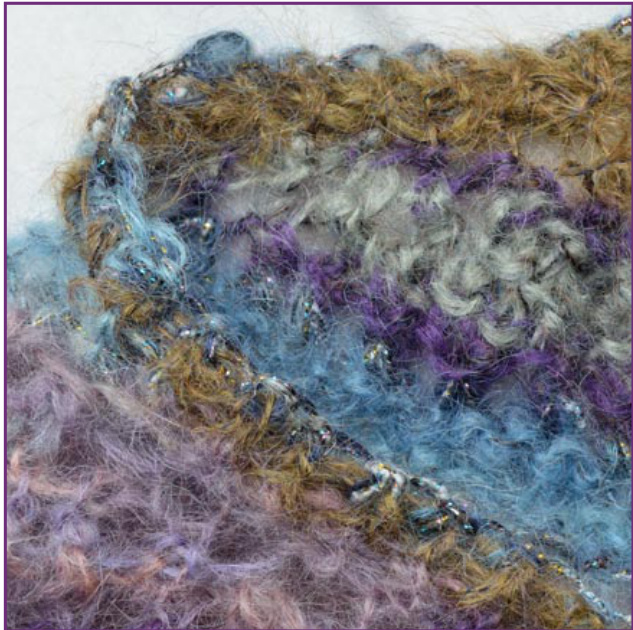
Fantasia. The black tie at the neckline, rolled border at the front, and bind off worked in purple define the edges of this shawl. Wide bands of turquoise stockinette and seed stitch establish rhythm, order, and texture. Starting the frst chaordic band at the shoulder line is flattering on most people.
Make A Border
Putting a frame on a picture is like putting a border on a garden bed in a lawn; it defines the edge or boundary between two objects. Both things can be wild and crazy, but the frame brings in organization and order. The end result is enjoyable chaos, instead of an urge to get out the lawn mower and string trimmer. Imagine an unframed painting on a solid color wall: not so bad. Now picture the same unframed painting on a busy wallpaper: not so good.
Give A Resting Place
In the fabric, solid color bands help frame the chaordic work between them, while serving the additional purpose of giving the eye a resting place.
Use Garment Frames
The garment design itself also provides opportunities to make frames. Solid color borders and collars are used for structure and to improve fit and wearability, but they also corral the chaordic knitting.
Add Definition
A bulky, bright yarn in a garter ridge makes an outstanding pinstripe, which can also add definition to the line of the garment. The garment construction integrates the framing into the knitting, beginning with the neckline tie worked in stockinette, which rolls on itself. When the tie is long enough, stitches are picked up along its edge and the shawl is worked to the bottom. The integral stockinette front band covers the yarn tails without weaving them in. The bind off yarn is thick compared with the other yarns, forming a strong edge line.
Tie Shawl: Geometry.
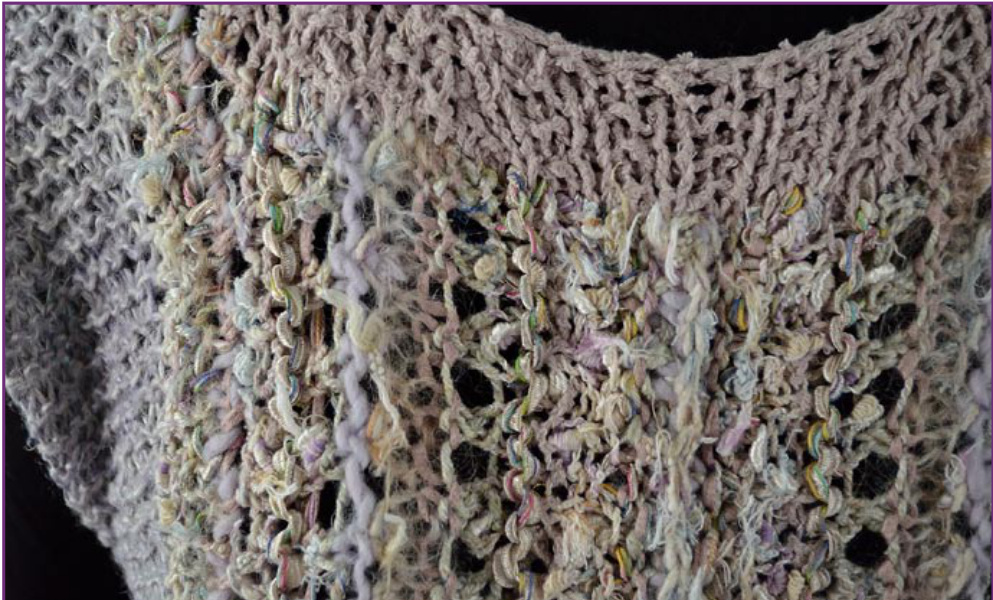
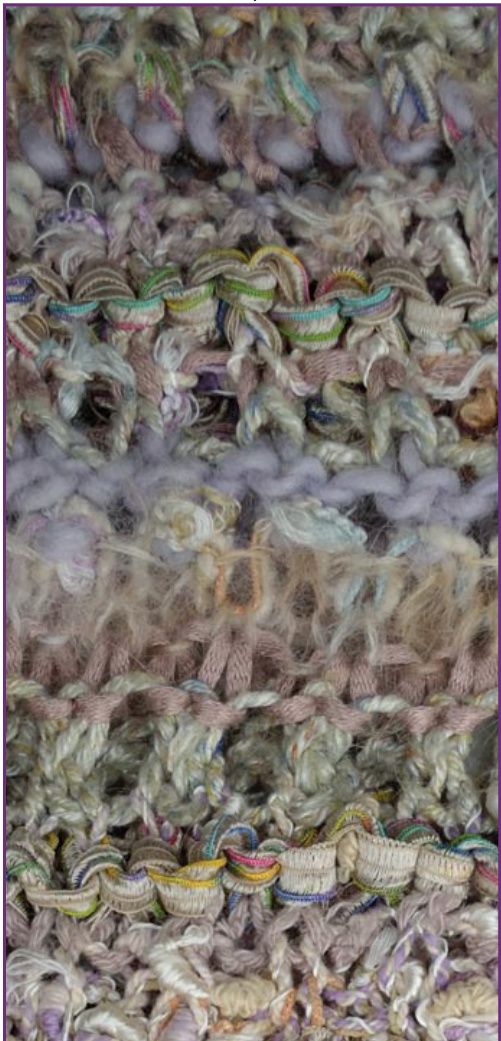
This tie shawl is worked in just two colors using a variety of stitch patterns. Simple bands of stockinette and broken rib separate and frame the chaordic knitting. Side-to-Side Vest: Whiter ShadeofPale. Contrast can come from a muted palate and several different yarn textures. The middle fuzzy area includes a lace mohair. The thin lines of color are in a shiny ribbon.
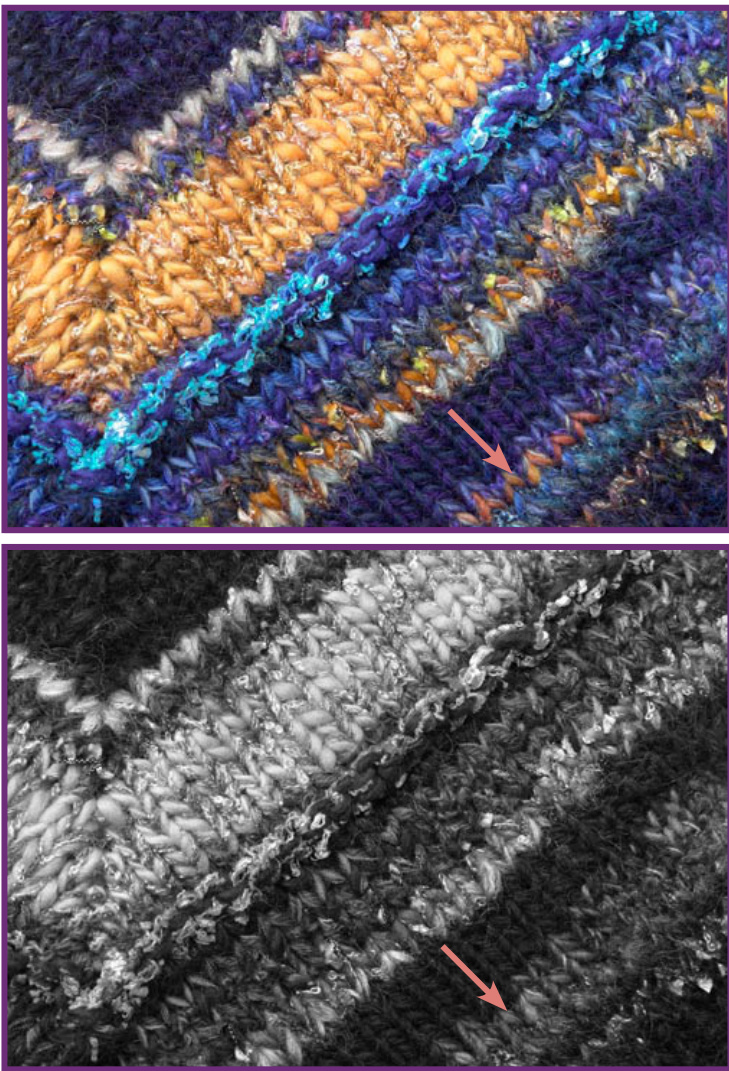
Sample.
Above: Working mostly in stockinette can be an attractive option. Below: Converted to grayscale, the contrast in value of the different yarn colors becomes very apparent. Arrow points to orange stitches that stand out in color but disappear in grayscale.
Contrast
Contrast colors our lives in ways we don't even realize. If you live in Barrow, Alaska, another cold day in March is just another cold day. But if you just arrived from Miami... Knitting has two main contrasts: color and texture. Even when the colors are similar, textures can make a dynamic fabric.
Texture e Color
Different yarn textures creates very clear stitch definition, even with similar colors. That also means two yarns with close color and texture don't have good stitch definition, yielding a more subtle look.
Value
Value is how light or dark something looks in grayscale. From across a room, colors close in value blend together. Texture comes into play here as well, since a shiny silk ribbon, a matte wool, and a boucle may be about the same color, but the difference in how they reflect light makes the shiny yarns appear lighter than the matte yarns.
Mothers e Grandmothers
Purl Bumps
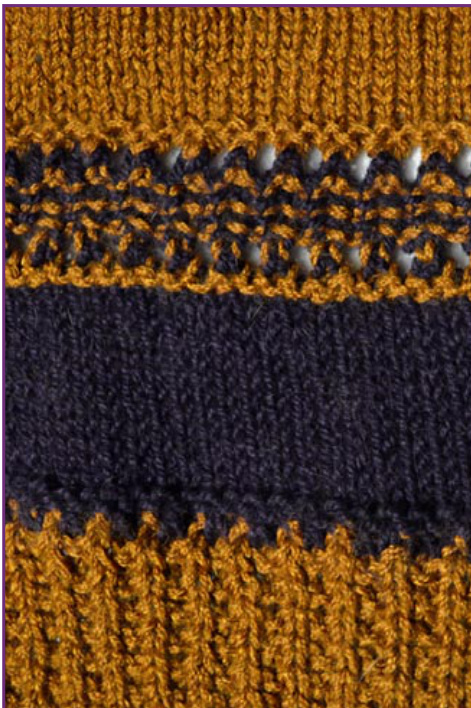
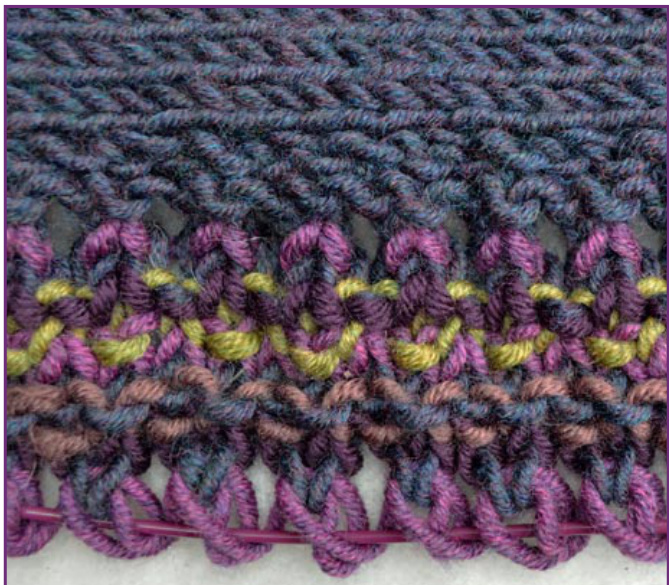
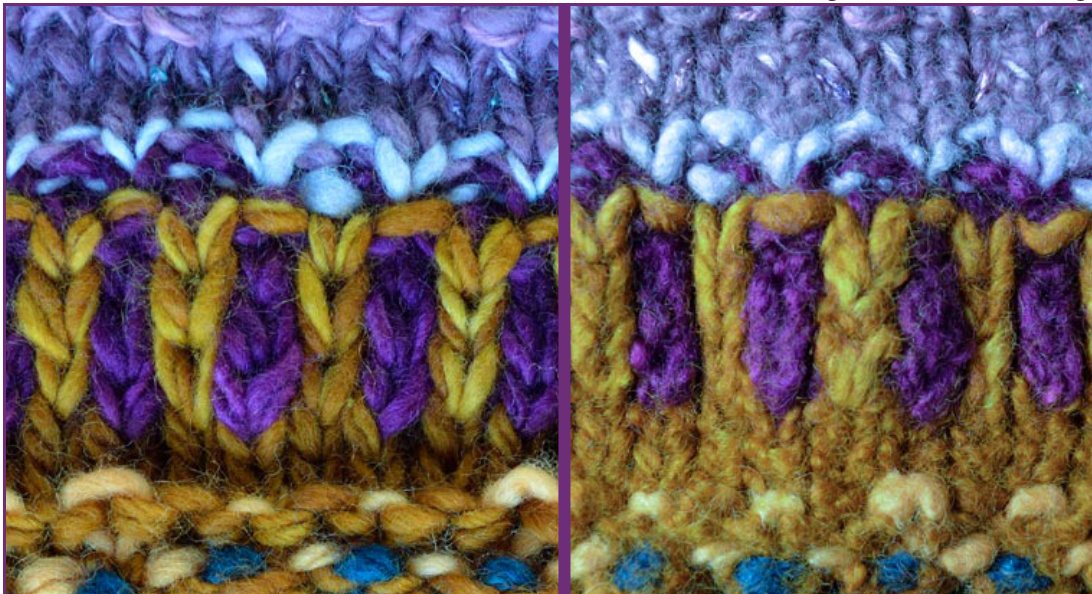
Cat Bordhi's use of the terms mother and grandmother for the previous row and the row before feels right on so many levels. Like many knitters, it was my mother and her mother who first put sticks and yarn in my hands. The incredible renaissance in knitting and the veritable explosion of knowledge that has occurred over the last half century came about because we took up our roles as symbolic mothers and grandmothers for the new generations of knitters coming after us. This book is built on information so generously shared by knitters through their books, in knitting circles, and on the internet. Loops Are Baby Stitches We tend to think of the loop on the needle as a knit or purl stitch. It's not. The loop on the needle finishes its mother stitch, turning mom into a knit or purl. To continue Cat's analogy, the loop is a baby stitch, and grows up to become a knit or purl when the next generation (row) arrives. A yarn over is an exception, born without a mother to start a new column. But it is still only a baby stitch. This explains why counting completed rows is not the same as counting rows by color. There is always one less completed row than color row. Loops on the needle have color but are not yet locked into being a knit or purl. Search “counting rows" on Ravelry to find complete disagreement on this topic. Knitting and purling are two ways to make the same stitch. Knits place the purl bump on the far side of the fabric; purls on the near side. Of course you already know this if you can knit and purl. However, in chaordic knitting this is an important key to deciding what stitch to use where on the next row. I literally think, “where do I want the purl bumps?" Then I figure out which stitches to knit and which to purl. The surrounding stitches affect how the purl bump appears in the fabric. They recede into knit stitches when stacked in ribbing, but stand out when worked in a field of stockinette, either individually or as a row. A purl bump also pulls its mother stitch up into its row while pushing itself down into her space. Childish, yes, but there you have it. Left: Vertical legs of knit stitches make rows of interlocking Vs and a smooth surface. Stitches seem to grow organically out of the previous row. Fantasia,colorswatch. Right: Purl side, showing horizontal stitch loops. Note how white ribbon yarn at the bottom looks like two rows on this side. Sample. Knits and purls mix it up.
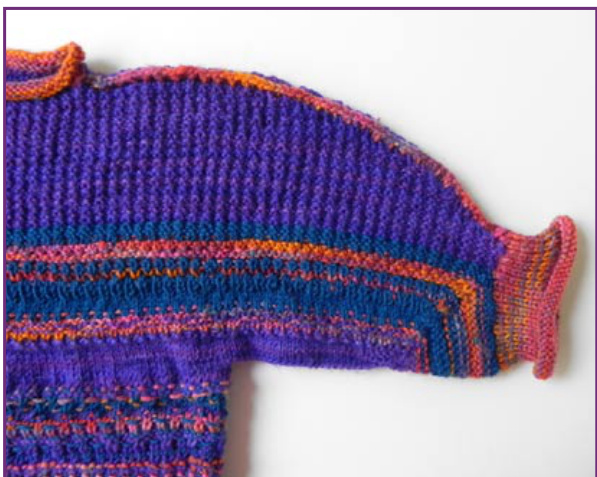
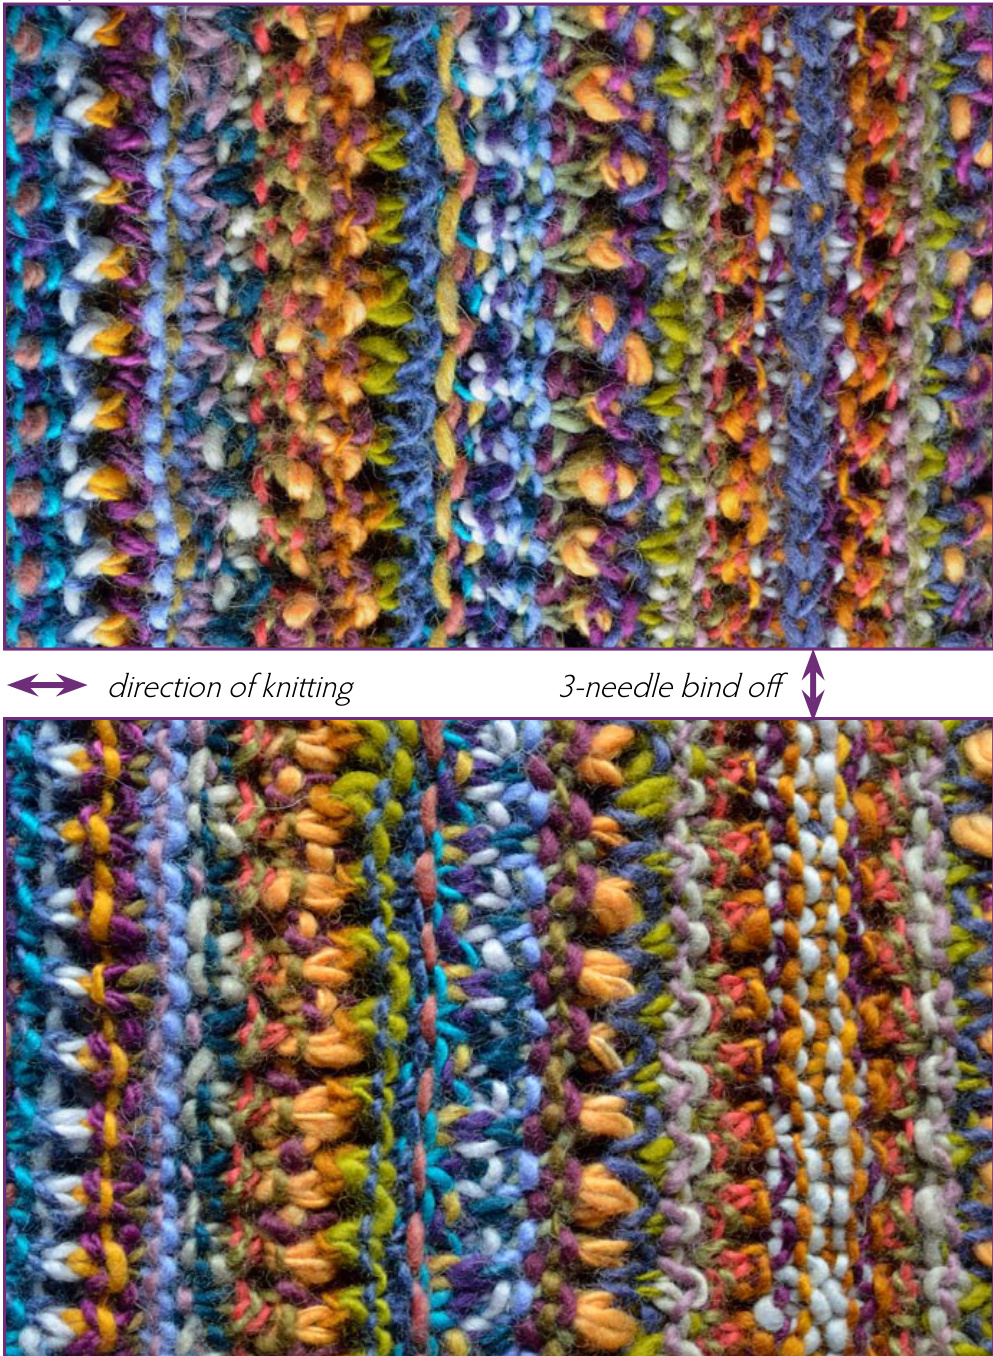
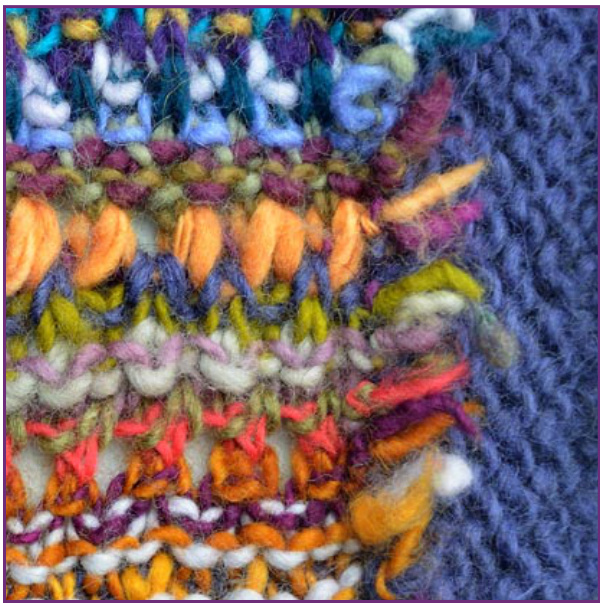
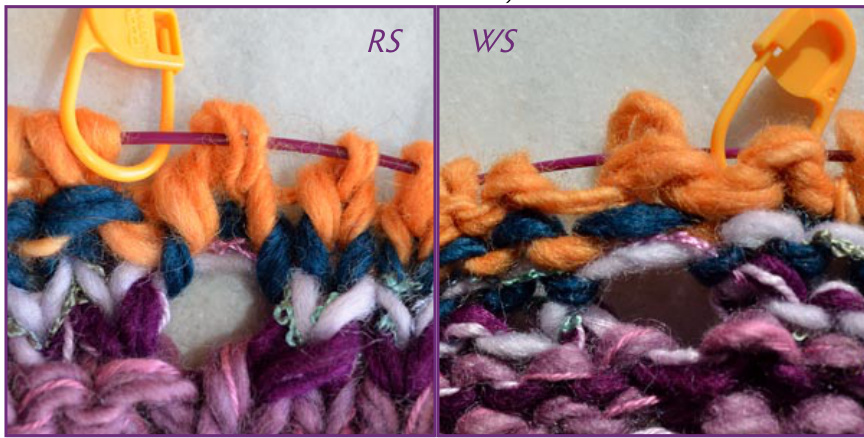
Side-to-SideVest:Every SingleSingles. Bothsides of chaordic knitting are attractive, although they are different. The arrow points to the blue 3-needle bind off that is only visible on the public side. Top: public side of the fabric. Bottom: Private side.
Do What?
Choosing a Stitch Pattern
The directions (K/Ps, P/Slips) reads "knit the purls and purl the slips." In other words, knit the next stitch if its mother is a purl and purl if mom is a slip. It is always written as the work faces you. For this book, "to the end" is understood. For random decisions about the next row, number a list of stitch patterns and toss dice. For more conscious decisions, look at the fabric already created. The current row can affect one or two rows down, even lower with dip stitches. This nomenclature is more than just a way of describing chaordic knitting stitches——it reflects the decision process used to determine the stitch pattern for the next row. Things to consider: Where will the purl bumps go? Is a strong line needed? Should this row move down into the fabric or up into the next row? Does this yarn color need to be diluted or strengthened? Have I gotten stuck in a rut? Some cases require looking back two rows, for example when the last row is entirely purl stitches. (K/Ps on yos, P/Ps on Ps) means knit the next stitch if mom is a purl and grandma is a yarn over, but purl if they are both purls. Sweater for Eden. Purl bumps pull a yarn above and below its row. The orange in the middle is a single row.

Repetition
A pattern is a repetition of something, such as a person's behavior, the weather, or a line of fence posts. Using fence posts as an example, a stone pillar, wrought iron column, cedar log, and square plastic post, set at 4, 5,6, and 7 feet, do not make much of a pattern. Why not? The spacing is a number pattern and the concept is a collection of items pattern. But the overall design looks like chaos because neither the post material nor the spacing is repeated.
Scale
To be a pattern, the scale must allow it to be seen. If you can't see the pattern, it might as well not be there. The number series 1-2-4-2-1 could be used, for example, as a stitch count. The series 16-32-64-32-16 is equivalent, but the numbers are so large the pattern would not be seen. Well, maybe on an afghan knit in sock yarn. The reason satellite images of sand dunes are such beautiful patterns is because the scale at which they are viewed allows us to see what is hidden when standing in the middle of them.
Repeat a Small Thing
You can create a pattern by repeating a tessellation, such as a short stitch pattern. Tessellation means covering a surface with a pattern of flat shapes so that there are no overlaps or gaps. The word originally comes from tessella, a Latin word meaning a piece of ceramic or glass used for a mosaic. The very act of knitting creates tessellations, with each stitch or stitch pattern being a tessella. With normal knitting the tessellation is repeated row after row. With chaordic knitting the tessellation is used for one row and then changed.
Repeat a Big Thing
The other repetition needed for a design makes the various parts look like they belong together, rather than Tom's cuff and Dick's sleeve on Harry's sweater. It becomes a defining theme for the design. For example, pick a solid color background yarn and repeat it throughout the work. As a negative example if you have not used any yarn overs in the first seventy inches of a scarf, don't put a lot of them in the last two. Instead, work a border around the scarf and use them there.
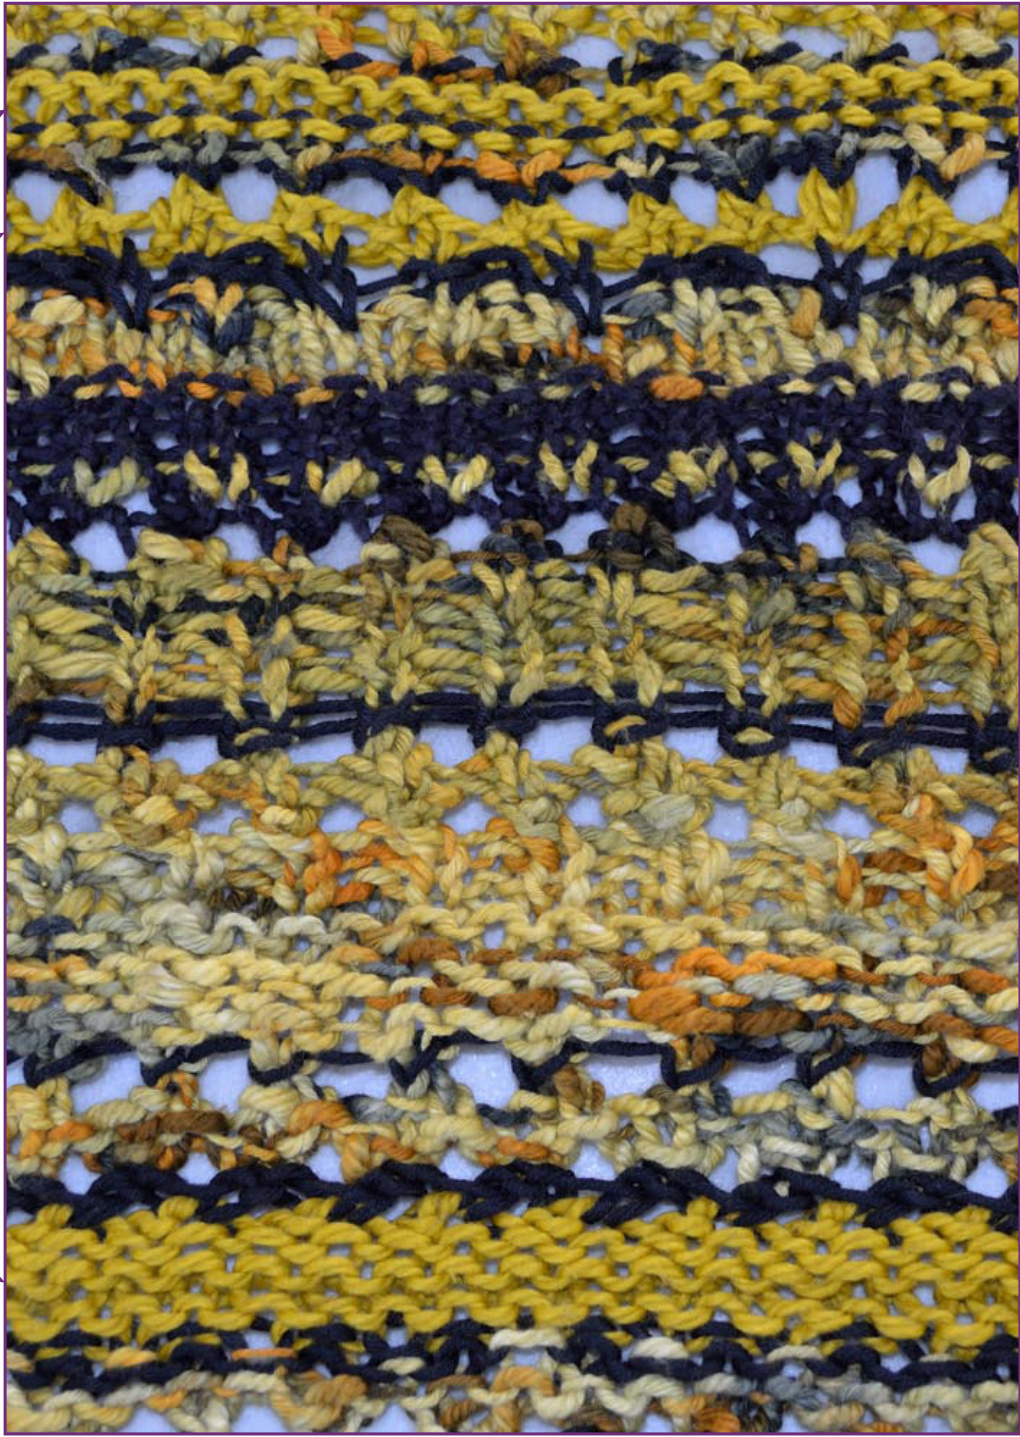
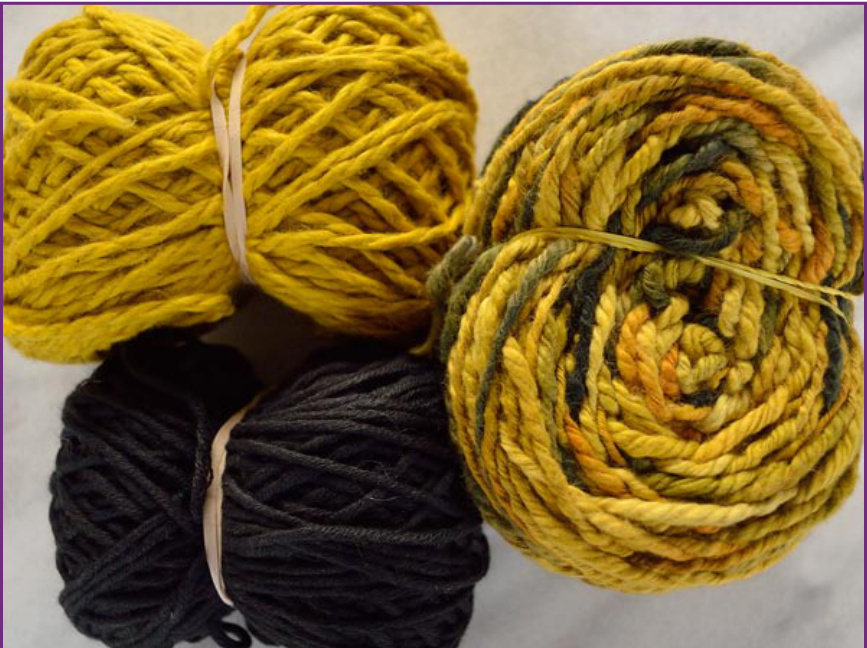
ZigZagZ: Shawl. With a limited amount of solid gold yarn, I scattered it through the shawl rather than using it in one place 212 Stash & Manage Yarn
ZigZagZ: Shawl. This was a challenge to knit since the multi color has sections that almost perfectly match both solids.
Have a Palette
Buy Local
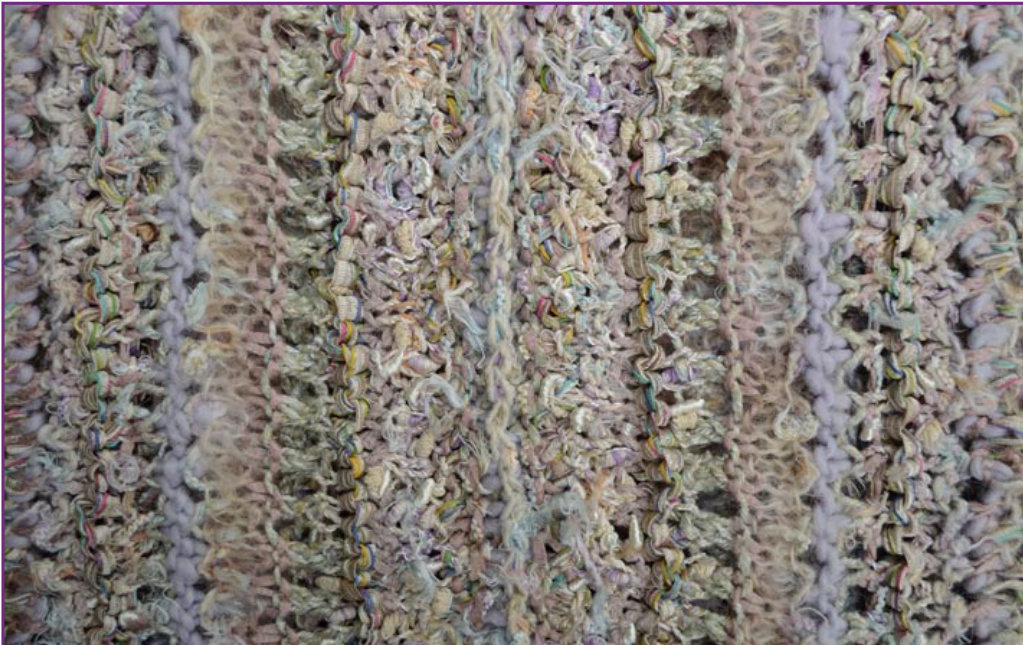
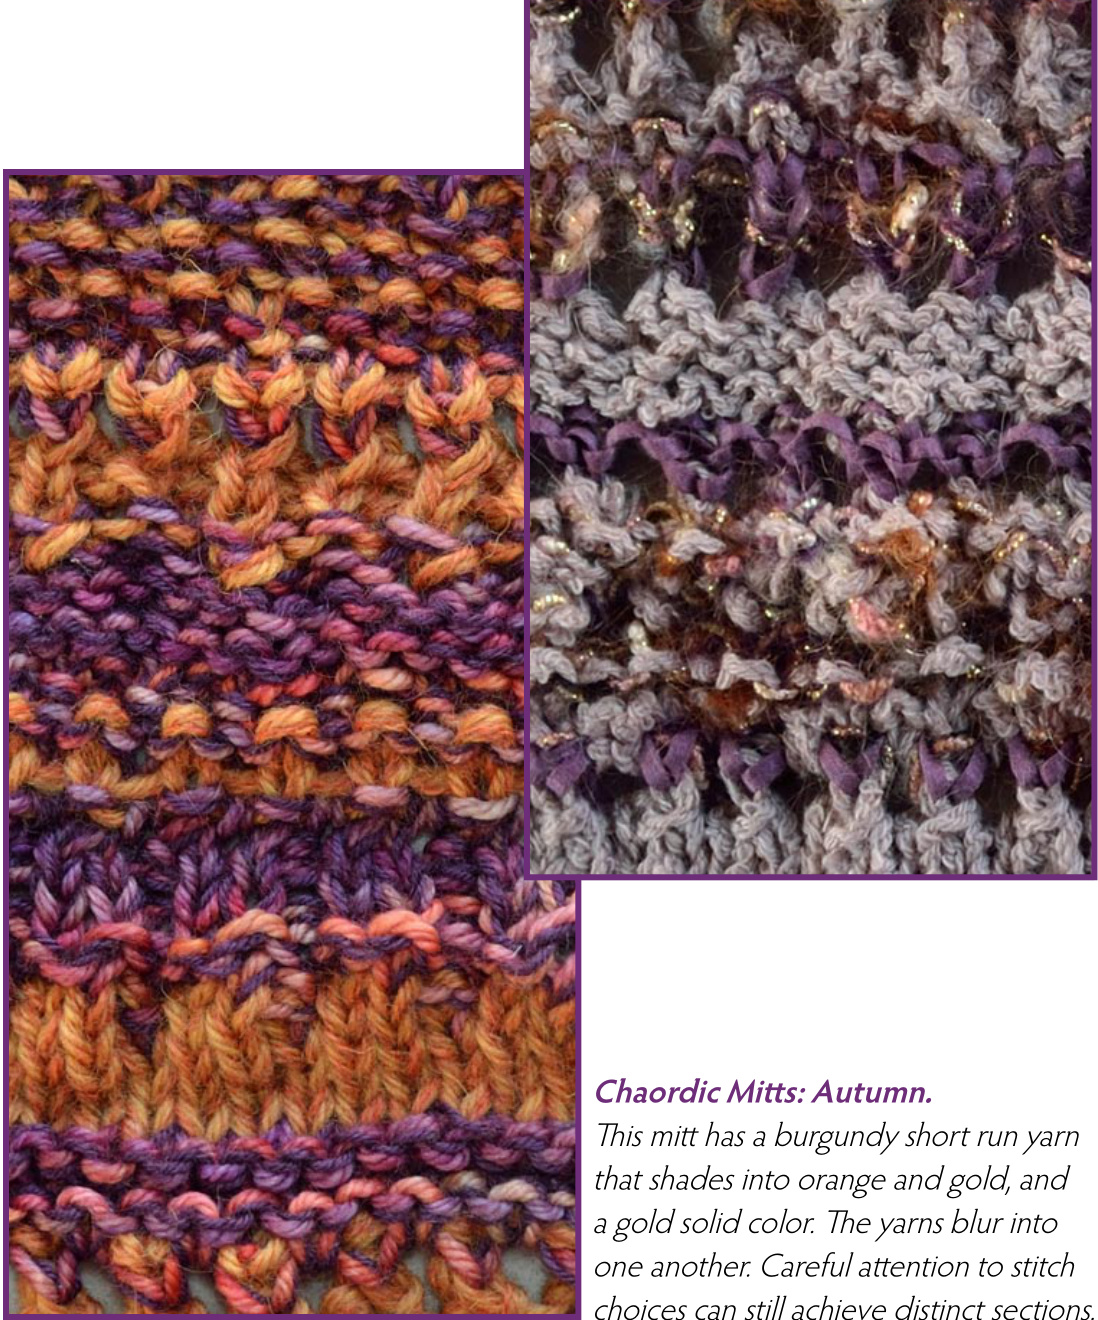
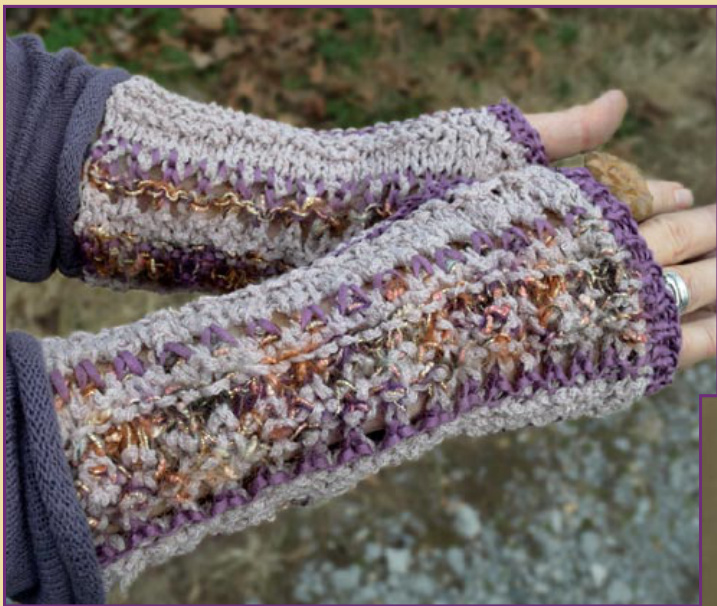
While acquiring more stuff to sit on a shelf is certainly not the goal, having a palette available to choose from helps get the creative juices flowing. When searching for new stash, I look for lace, sock, and novelty yarn in as many colors as possible. The lighter weights allow me to combine yarns while knitting. Buying local lets you fondle the fiber and know that's the real color of the yarn, options not available on the internet. Chaordic knitting makes it easy to incorporate the really good stuff: home grown handspun, while supporting local artists and the local economy. It just feels special to knit with yarn spun by someone you have met, even if that someone is you! Chaordic Mitts: Fringe. It is hard to go wrong sticking with an analogous color scheme, in this case, purple to teal.
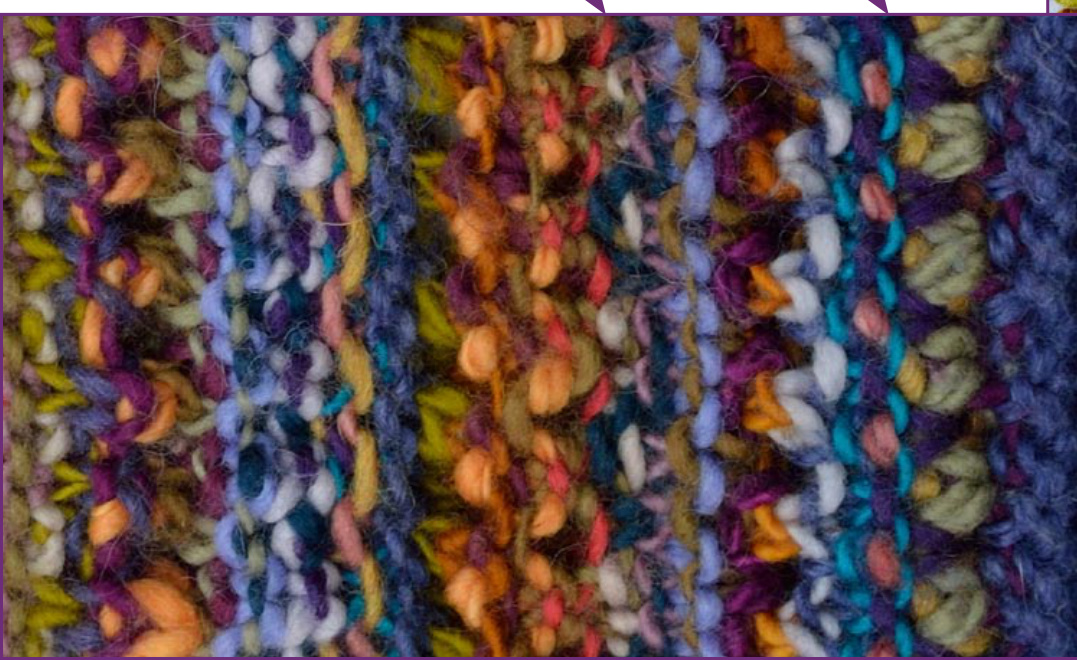
Side-to-Side Vest: Every SingleSingles. This one obeys no known color rules, but does manage to break a few. The key to a colorway like this is excess. Take any quarter of the yarns away and it would not work as well.
One of the great thing about chaordic knitting is that pieces as short as two yards (meters) are useful. Leftovers are wonderful, they are like having ready-to-eat meals in the fridge. Then there are trips to the LYS. Over the years I have bought many projects, but the yarn was seldom used for that project. So now I go to my LYS to add to my main stash. Of course, I went yesterday to the after Christmas sale and already have half of the first Ditty Bag on the needles, with yarn I bought for that purpose (who can say no to half price Noro??). But it will be stash yarn that is used for the trim.
Managing Stash
Choosing yarn to begin a project can be very enjoyable and creative—-if your stashing methods don't get in the way. A bunch of snarled up, half unwound skeins will strip the joy right out of the process. Ask your friends to save clear zippered plastic bags, the kind that sheet sets and comforters are sold in, which keeps them out of the dump (I know they callit a landfill these days, but as old Will said four hundred years ago, that's just renaming a rose, the smell's the same.) It is handy to have an assortment of sizes. I organize by yarn type, so singles wool, sock yarn, and cottons all have their own bags. If a bag overflows, sort into additional bags by color, texture, or some other attribute. Even though it's a protein, I put silk with vegetable fibers, since it is cool enough for a summer garment. Keep all of one line and color together, so you can easily see how much you have. Keep the labels attached. Once the label is gone and your LYS doesn't carry it any more, it can be very hard to find out what yarn it is. And you never know when you'll start writing patterns. Wind yarn that is falling apart in the original skein or ball into center pull balls, or yarn cakes. If the original skeins or balls are in good shape, I usually store them as is. When finished with a project, take the left overs, rewind if needed, and put them back where they belong. You will feel virtuous. Above: The turquoise yarn was actually purchased for this project. After pulling a project stash that included all the accent yarns, I decided that turquoise was the color needed to tie it all together. Right: Project stash. Acid green, orange, turquoise, yellow, baby blue, seriously?
Spit Joins
Reasons to Use Yarn Cakes
Winding Yarn Cakes
Knots in Skeins
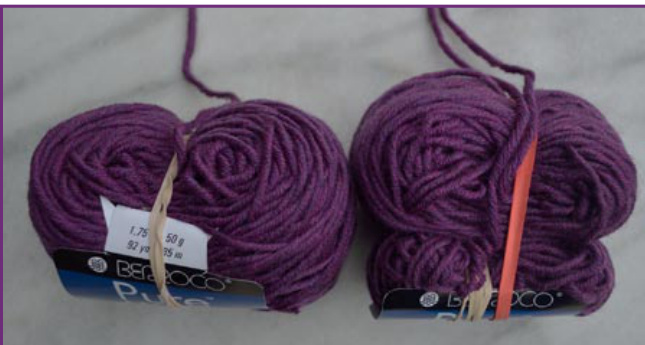
I use this technique more when winding yarn cakes than while knitting, so it is included here. Fibers that full, like wool and alpaca, can be spit joined. In a pinch, you can even use water instead of spit. Wet the ends, overlap them about 5" (13cm), and rub them together vigorously between your hands, fulling the two ends together. Treat the result as one length of yarn. To be more particular about the join, remove a ply from each end before fulling to reduce the bulk. Yarn Cakes. Note the rubber band around the cake vertically so it won't sink in. The skein on the right had a knot, so / wound the two pieces separately but have them rubber banded together so I know it is a whole skein. This yarn is a very soft Merino, which would make a strong spit join. However, it would probably harden the yarn to full it, so weave in tails instead.
Yarn cakes stay where you put them instead of rolling around. For cakes made of most knitting yarns up to 100g or 3.5oz, wrapping the rubber band around once will allow the yarn to be pulled from the center fairly easily while still keeping the yarn under control. Wrapped twice, or more if needed, the rubber bands will stop the yarn from pulling out. This allows easy transport of the project without making a snarled mess of the yarn. It is also handy when straightening out multiple yarns attached to a project. I prefer to separate yarn management from knitting, so I wind my own yarn cakes and take care of yarn issues while winding. Your LYS will do this. But winding gives you a chance to become familiar with the yarn and deal with knots, difficult to unwind skeins, and color issues. Then you can knit in peace. After winding the yarn into a cake, hold the label on the side and put a rubber band vertically on the cake, trapping the label. If you put a rubber band around the waistline, it will sink into the yarn and cause problems. When knitting, I don't pull out more yarn than I will use in the next few minutes. Extra yards just make extra yarn management issues. But when tink happens, just wind the excess on the outside of the ball following the path of the rubber band. If needed, use another rubber band to hold the new winding. If there are knots in a skein, I take corrective measures while winding. At a minimum, double over the yarn at the knot and tie a slip knot that can be pulled out from the end. When knitting, you won't have to tink for a yarn tail for the join. Or be really asleep and miss the knot entirely, knitting it into place. At best, a knot will make a hard place in the fabric; at worst, it will come loose. And usually the only practical ways to correct it are to tink back to it or get really creative with duplicate stitch. For long run yarns with lots of knots that are tied without any regard to the colors being joined, I always wind separate balls from each piece. I may end up with ten cakes from three skeins, but at least I can see what is available. Often, I spit join the pieces while winding a second time, making better color choices at the joins and possibly lengthening the color runs. At other times, I arrange the cakes in sequence and number them, so I know which one to use next.
Getting Started
How Many Yarns?
Label Project Yarns
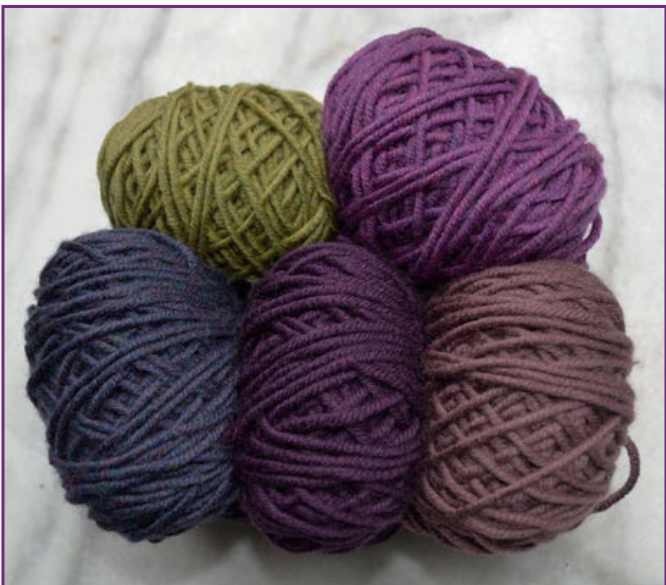
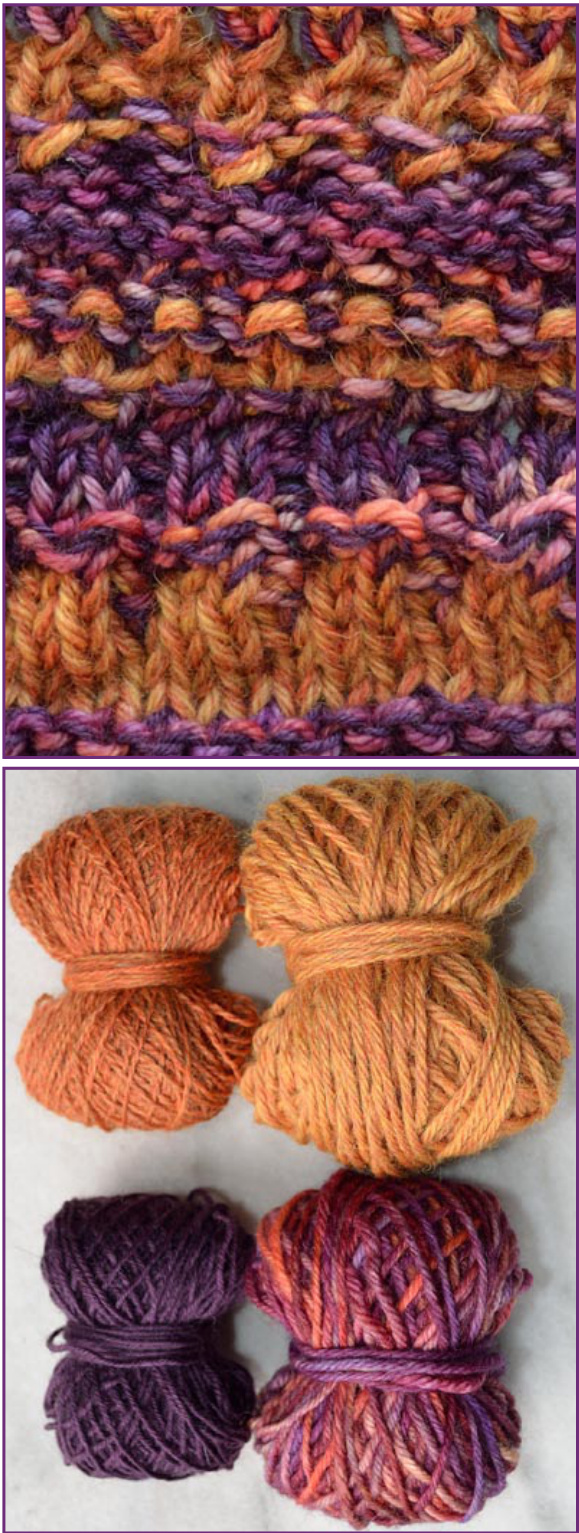
Once I know what garment I'm making, I decide whether it will include protein fibers such as wool or alpaca, vegetable fibers like cotton and linen, or a mix. Then I decide on a color scheme and begin pulling a project stash. First, I take the appropriate bags out of their many hiding places, spread the (clear) bags out so I can see the contents, and start choosing individual yarns. Copy paper box lids make excellent trays for project yarn. They are a nice depth to hold a single layer of cakes. I usually pull more yarns than I end up using. I note if there are more skeins available, but except for the main yarn, pull just one skein of each yarn for the project tray. The most yarns I have used in one project is about 35. If I'm keeping records of the yarns used in a project, I write the abbreviation for each yarn on its label. My abbreviations tend to have some meaning, like TurqL for turquoise lace yarn, instead of just A, B, C. On a big project, there may be dozens of yarns. Trying to find the right one is a lot easier when you have an idea what color and weight it is. Option1:Limit thePalette A few solids from one line can be quite attractive. Colors change appearance when they are intermingled. Contrasting ones like red and green will dull down. This yarn shown in the pictures is a beautiful, springy merino wool. 1 bought all left in stock, enough for a sweater of some kind. I took the colors available (fortunately, there was the right amount of green: not much!) I would have chosen a different color mix if given the opportunity, but sometimes it's good to stretch.
Sample.
Right: These five colors are from one yarn line. The green is just the right accent for this otherwise limited palette, and will be used sparingly throughout the garment. Left: Only one row of stitches in the photo is worked in the green yarn, demonstrating the power of purls to pull color up and down.
Option 2: Use It All!
On the other hand, sometimes more is just more. Combining yarns yields wonderful results. Adding two different lace yarns to a project stash can triple the effective number of yarns available, since they can be carried with other yarns. A row in a different weight from the rest is not a problem. Thicker or thinner, just work on the same needles you've been using.
Make Up Some Rules
Sometimes a self-imposed rule or two makes it easier to come to some design decisions. Every Single Singles and Whiter Shade of Pale both used rules for yarn selection.
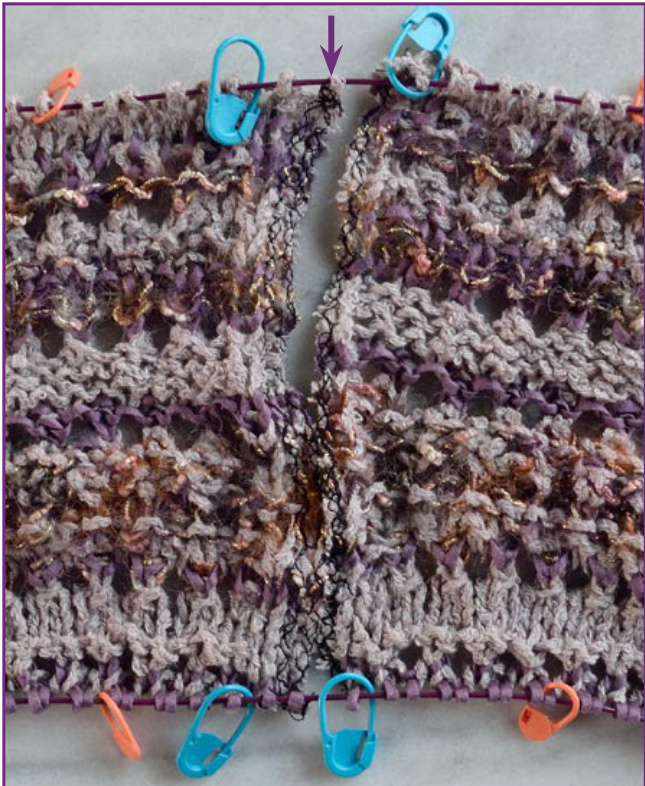
Side-to-Side Vest: Whiter Shade of Pale.
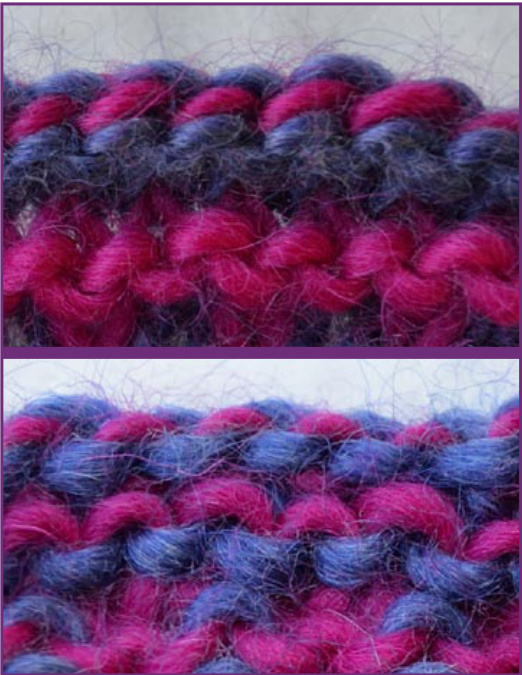
This vest used every yarn in my stash that was remotely off-white to beige (nine in total including one used in Every Single Singles). Both sides were knit at one time, so they mirror image without keeping records. The single arrow marks the 3-needle bind off.
Side-to-Side Vest: Every Single Singles.
The rule for this vest was to use all 18 solid color singles heavier than lace in my stash. Each yarn was used by itself. No yarn was used a second time until all had been used once. All the singles went in one copy paper box top to start. After each ball was used it moved to a different box top. The hardest part was including the really vivid red and turquoise, marked by arrows in the photo. Those two colors just stood out like sore thumbs in the project tray. They were used in a (K1, P1) pattern so they did not make solid lines of color.
Combining Yarns
Mix two or more yarns, such as a lace yarn and sock yarn with a thin eyelash or ladder, in a row. Or continue a particular lace or fancy yarn over several rows while changing the other yarns. When combining yarns, make sure your needle size is large enough, unless you want a dense, stiff fabric. Use the following to combine yarns and keep the yarn weight fairly uniform: 2-3 lace weights = sock weight 2 sock weights = worsted weight 2 worsted weights = very bulky
Solids Stripes
I include anything that reads as solid from about three feet away as a solid color. A short run striping yarn works with solid colors around it, as long as the short run yarn doesn't include one of the solid colors. Several short runs used near each other turn into a jumble. Long run striping yarns offer several colors in one ball.
Monochromes
A monochromatic color scheme with yarns of different textures, such as ribbon, chenille, and bouclé, also looks good. In fact, a single yarn can be used by itself to create texture, similar to a gansey or twisted stitch knitting. Choosing The Next Yarn During knitting, the next yarn choice is mostly a color decision. Weight may play a role, such as using a heavy yarn for a strong garter ridge. Repetition is important for a cohesive fabric. Except for that ridgeline, use most of the project yarns several times throughout the garment. Chaordic Mitts: Do A Little Dance. In this mitt the yarns have enough variety that each one can be clearly distinguished.
3019 Techniques
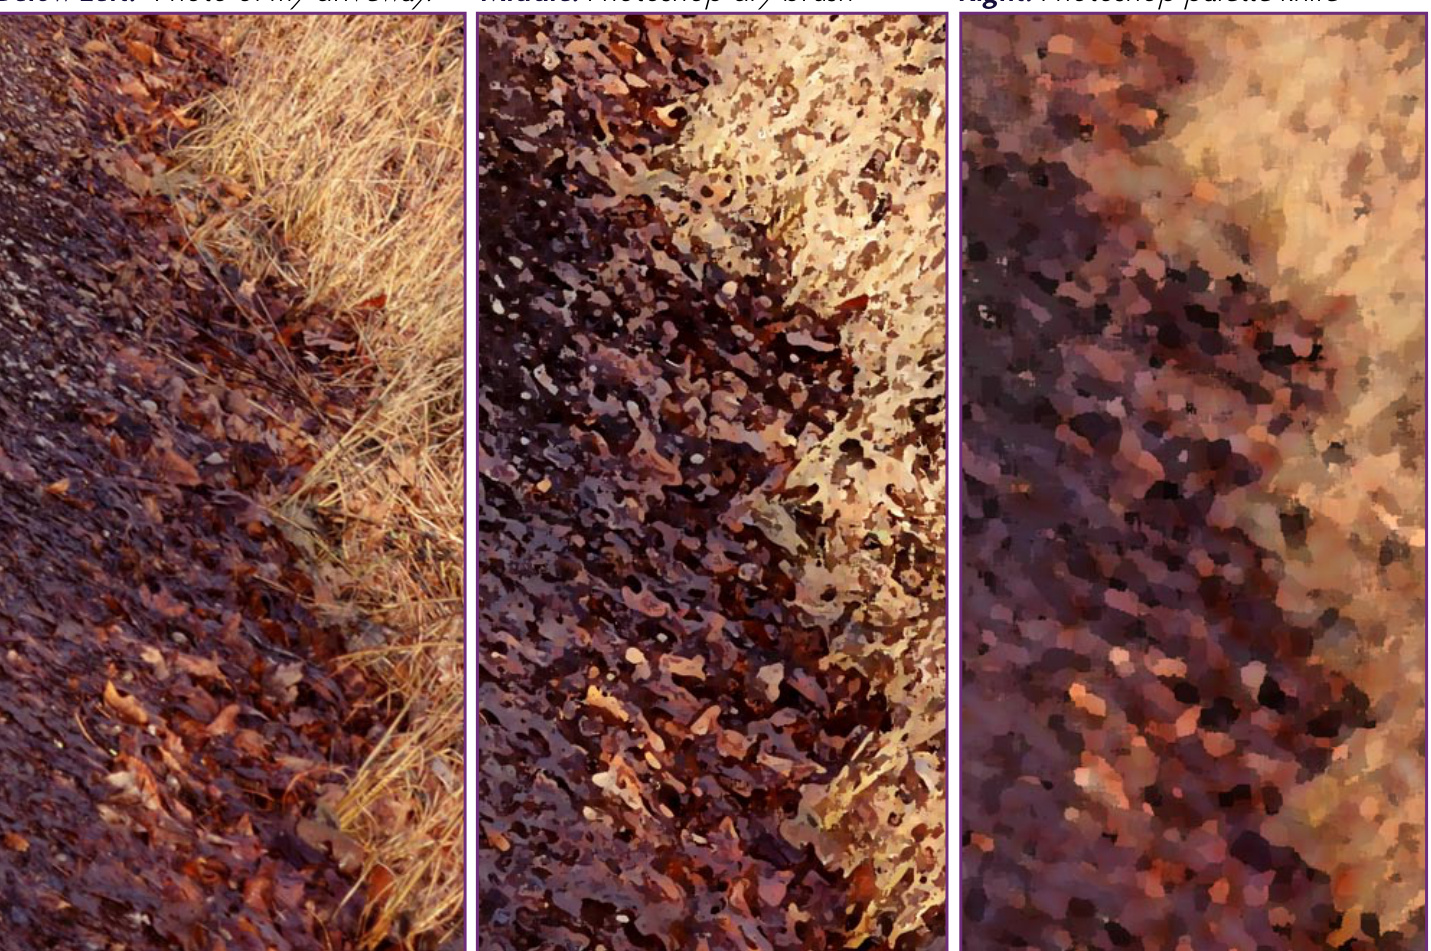
Nowadays, we all walk around with these little communication devices that would make Mr. Spock so envious. We don't even have to slap our shoulders to make them work! And they have built-in cameras. You don't need a good photo for color inspiration, as long as you capture the combination that caught your eye. When conditions are right, the brown leaves and pale broomsedge along my drive morph into one of my favorite color schemes. In the afternoon in mid-winter, when it's sunny after a rain and I'm facing east, the wet broomsedge becomes a potent apricot brandy and the leaves ripen to a rich, succulent burgundy. Back at the computer, I crop to the part of the image that best captures the color and play with Photoshop@ a little. Chaordic Mitts: Do a LittleDance. Fabric and project stash. Below Left: Photo of my driveway. Middle: Photoshop dry brush
Right: Photoshop palette knife
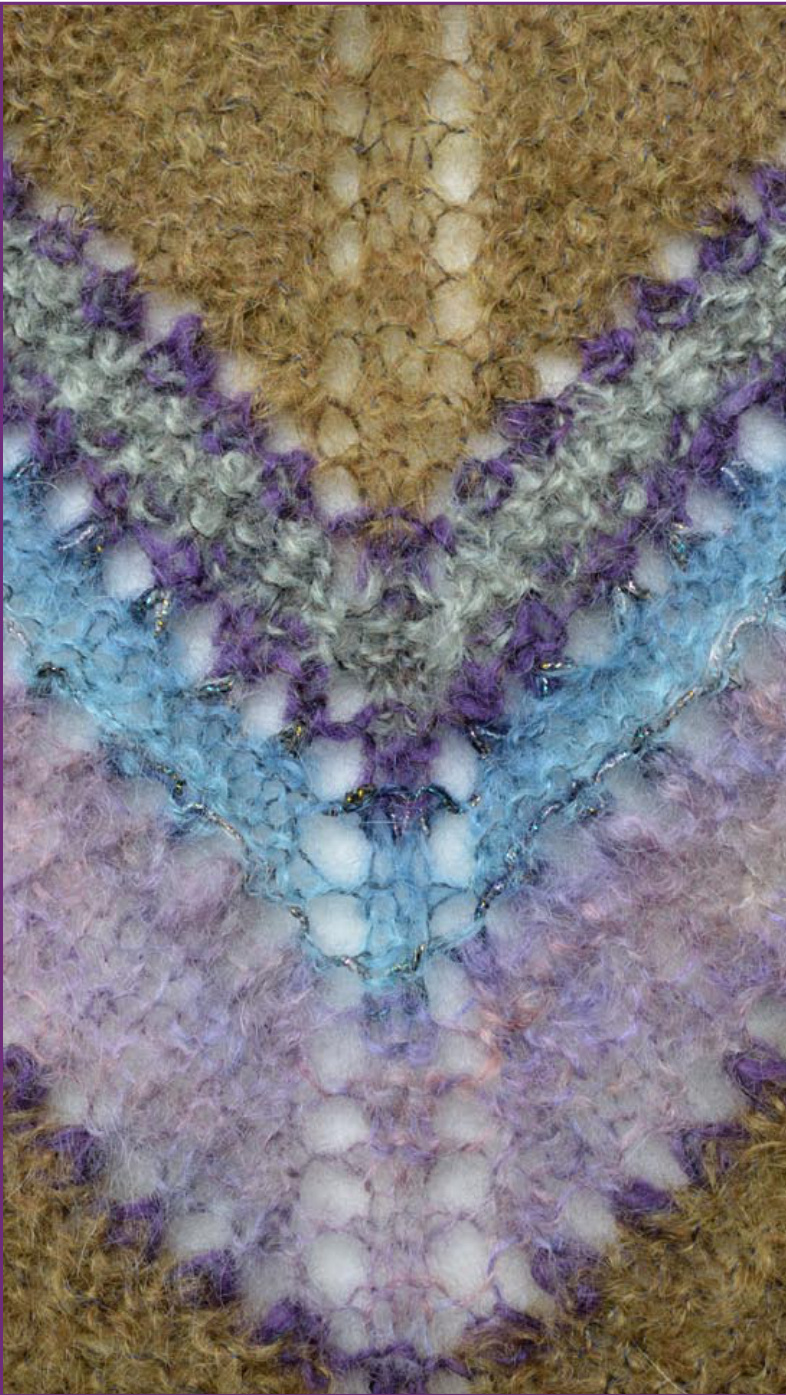
Tie Shawl: Warm Fuzzy, center back detail. Stitches on either side of center back shaping are mirror imaged in this tie shawl made of mohair.
Edges
Begin and end rows with a plain knit or purl rather than a yarn over, decrease, slip stitch, dip stitch, or any other complex stitch. Then work the row as far as possible completing the repeat in the chosen pattern and maintaining stitch count. At the end, if needed, knit or purl the last stitch or two. Treat stitches on either side of steeks the same as beginning and ending stitches. This makes sewing seams easier and gives stronger, more uniform edges. To carry yarns up the edge, either twist yarns at beginning and end of rows or work Edge Stitch or Edge Wrap. See Chapter 5, Unusual Stitches. And in case you missed it earlier, please: Begin and end all rows with a knit or purl as appropriate. Work pattern repeat for entire row, ending with a completed repeat, and knitting or purling any remaining stitches. Maintain stitch count, matching each decrease with an increase.
Shaping
At edges, work shaping stitches inside the plain outermost stitch. You may want to keep an additional stitch plain following the shaping. Inside the garment, mirror image stitches before and after shaping. For example, center shaping for Warm Fuzzyis (yo, K2, yo). If the chaordic pattern for the shaping row is (K2tog, y0), the last pattern repeat might complete two stitches before shaping. To avoid two yarn overs in a row, knit the last two stitches. After working the shaping, mirror the other side by knitting two stitches, yarn over, and resume the chaordic pattern. The final K2tog is worked the same number of stitches from the ending edge as the first one was at the beginning. Shaping is often worked on the right side. If work slides instead of turning at end of row, shaping must be worked from the other side. If so, reverse the shaping stitches (Ks become Ps, Ps become Ks). For increasing with pairs of yarn overs, I like to use two stitches (K or P) between the yarn overs. The stitches trap the marker so it can't slip under a yarn over and get out of place. It also keeps the marker in the right spot without having to relocate it every shaping row.
Pick UpKnit
Use a Circular Needle
I was always intimidated by picking up stitches, until I learned some procedures that make it fairly easy. In this book, pick up means a loop of the working yarn is pulled through the fabric and ends up on the needle, also called pick up and knit.
Use a Matching Yarn
To pick up, use one needle with a yarn matching the fabric color for the least visibility. It is hard to turn a pick up into an attractive accent, so don't draw attention to it with color. Use a yarn from the fabric for the pick up row, then change to a new yarn. Make similar motions as for knitting, but using your left hand to manipulate the fabric. Insert right needle knitwise in a single loop of the fabric and knit. Pick up with a circular, even if you knit with double points. Markers stay in place instead of falling off. Transfer to double points on first round.
Pick Up Ratios
To pick up garter along its side, work at a ratio of 1 new stitch per 2 rows (1 garter ridge). Slipping the first stitch of every row in garter makes it easy: just pick up every stitch. Stockinette, seed, and ribbing's ratio is 3 new stitches per 4 rows. Again, slip the first stitch of each row, then work (pick up 2, yo) on every available stitch, for the proper ratio. The yarn over has less body than a regular stitch, which helps the fabric lay flat.
Fantasia.
Black neckline tie with body of shawl picked up and worked in turquoise. Arrows bracket one set of (K2, yo) pick up stitches. Top, outside: Knit stitches make a smooth transition between neckline tie and main fabric. Bottom, inside: The stockinette neckline tie curls to the inside without being sewn closed.

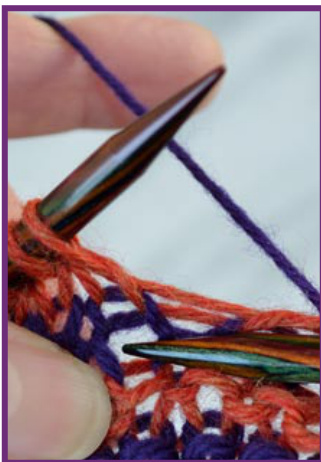
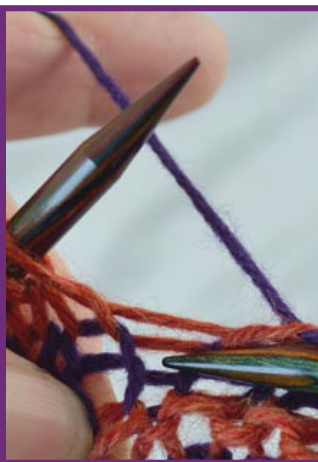
Pick Up Single Loops
Pick up a single loop so the join feels like knitted fabric; an entire stitch makes a hard ridge. Don't pick up floats from carrying yarns, since they are not as stable. Step by step photos on next page. Generally, work from the public side, with yarn tails to back. You can pick up from the private side, but do a few inches and work a return row to sample. If the garment is reversible, pick up (K1, P1). Tink if you don't like it—-at least there's no stitches to come loose.
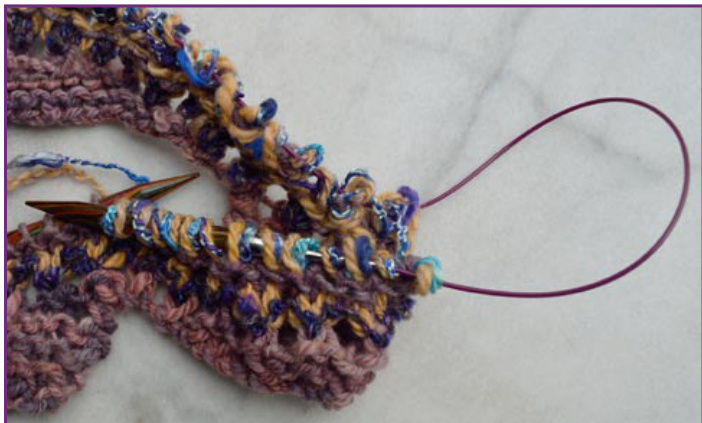
Sarah Hauschka's Magic Loop. When it becomes diffcult to work because too many stitches hold the needle in place, pull the cable out between stitches a few back from the working end. With lots of stitches, you can just pull out one loop to the right. For fewer stitches, pull out another loop to the left.
Pick up edge of garter stitch.
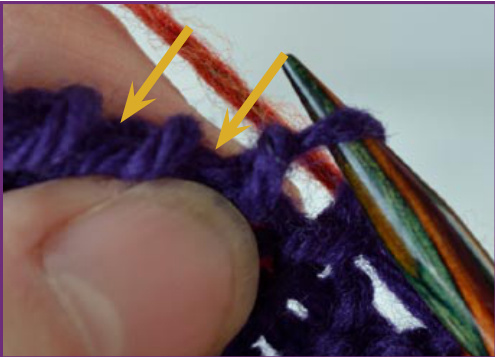
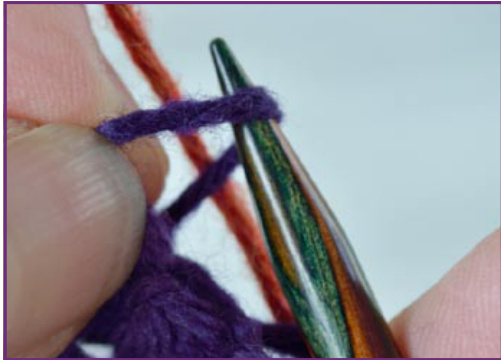
A1. Using RN only, insert needle through a single loop. Last stitch on each row was slipped; edge would look different if last stitch were knit. Arrows mark next two pick up points. If for some reason an additional stitch is needed, use the bump between the arrows to make a loop. I use the bump frequently when picking up chaordic knitting.
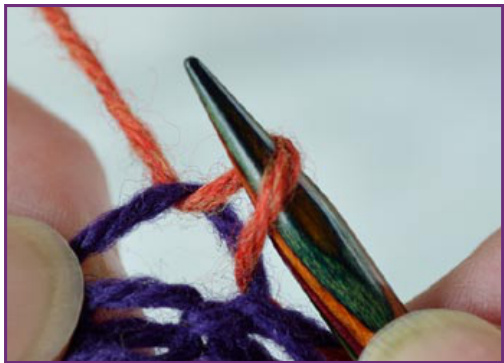
A2. Wrap working yarn and pullup a loop, side facing is a knit stitch. There is more information on the next page and a detailed example of how to pick up around a neckline. I don't work a pick up in a knitting circle or with an eye (or even an ear) on a TV. It's the foundation for what comes next. Get it right and the border, sleeve, or collar grows organically out of the original fabric without puckers or holes.
Pick up at an inside corner with loose yarn.
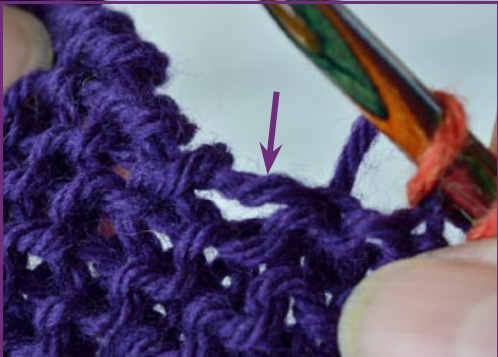
B1. Loose yarn at an inside corner of an L shaped piece of knitting. In this case, it is where edge of garter stitch meets backwards loop cast on.
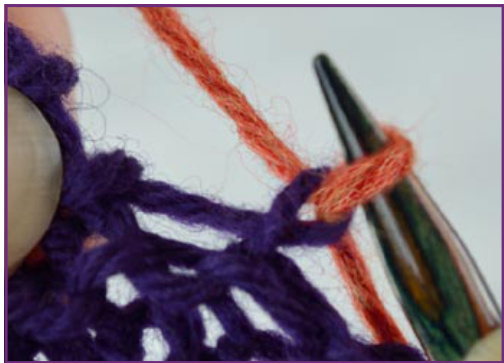
B3。 Working yarn pulled through the twisted loop. B2. Lift loop and twist, holding it open with your fingers.
Pick Up Example 3o24
Example: Pullover Neck
Please read entire section on pick ups before starting. Chaordic knitting doesn't have ratios like regular stitches. I don't usually slip stitches at the edges. You must estimate how many stitches to pick up. Don't stress over this, just pick up a few inches, slide stitches onto the cable, and see what it looks like. You don't want gaps or stitches jammed together. A little tight is better than gappy. Minor corrections can be made on the next row. Sometimes the fabric is loose, such as at a corner. Instead of just picking up a loop, pick it up as a make 1, twisting the loop in the fabric (not the working yarn) to tighten it up. Inside corners usually benefit from picking up extra stitches that are decreased on the next row. At outside corners, pick up an extra stitch on each side of the corner stitch and one at the tip, so the fabric will lay flat. Use one set of removable markers for main garment sections, such as center front and back, and a different set or color for smaller divisions. Transfer markers from fabric to needle during the pick up. Leave them in place until the next row is worked. Stop often to evaluate your work.
Divide Neckline in Sections
Place main markers in fabric at shoulder lines, center front, and center back. Place three quarter-markers evenly spaced in the fabric between each pair of main markers. Put one precisely in the middle and then halve each of those spaces.
Pick Up First Back Section
Work back neckline first, since it is often less complicated than the front. Begin at shoulder with right side facing and pick up area to your left. Each quarter receives the same number of stitches, allowing for odd numbers. Work pick up for this section, moving markers to needle as you work. Slide the stitches onto the cable, and evaluate. Write down the stitch count in each quarter of the section. If a do-over is required, also note the new stitch counts you think will work, tink, and rework.
Pick Up Second Back Section
Move center back marker to needle. Work pick up, matching stitch counts from first section and transferring markers to needle.
Pick Up Front
Repeat the same process for the front, which probably has more stitches than the back neckline.
Finish
Stitch count for left and right sides should match. On next round, as needed, increase or decrease up to 2-3 stitches per neckline quarter. This is in addition to any required corner increases or decreases, such as for the top or bottom of a button band or a square neckline. If changes are required, consider working the second row/round with the same yarn to make the stitches less noticeable.
Knitting the Band at Corners
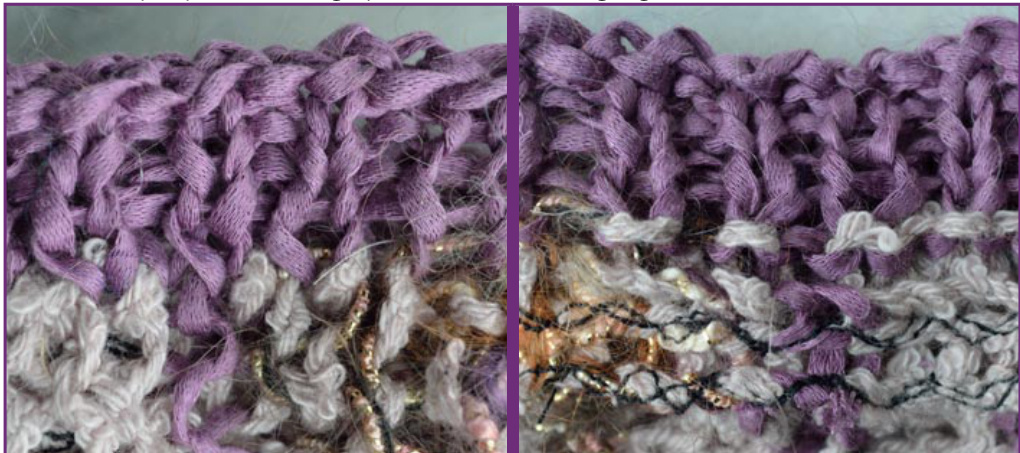
Left, outside: There is a fairly neat line of knit stitches where the purple and beige yarns meet. For a flat fabric, on every other row work two increases at outside corners and two decreases at inside corners, For square corners stack the increase and decrease stitches so they form lines in the fabric. For a rounded neckline, stagger the stitches. Chaordic Mitts: Do a Little Dance. Purple fingertip cuff picked up and worked in the round on a fingerless mitt. The mitts were knit with a steek. Right, inside: Messier beige purl bumps on the inside. Note black zigzag machine stitches at the steek.
Why Steek?
I worked the Chaordic Mitts several ways. They are fingerless mitts knit flat with rows running from wrist to fingertip. Since the chaordic knitting was freestyle, I knit both mitts at one time, with lots of starts and stops and yarn management. Do a Little Dance was the third version, and I decided to steek it. Instantly halved the yarn management and doubled the length of a row, so I could knit on the express train instead of the local. Which is the reason steeks were invented in the first place.
How To Knit a Steek
The steek must be wide enough to sew each about-to-be edge and cut between the sewing lines. If necessary, increase the stitch count at the beginning of the steek. The stockinette should face the side that makes it easier to distinguish the steek from the rest of the piece. To knit a steek, add at least 1" (2.5cm) (minimum 3 sts, preferably 4) in stockinette where opening-to-be begins.
Fiber Determines Method
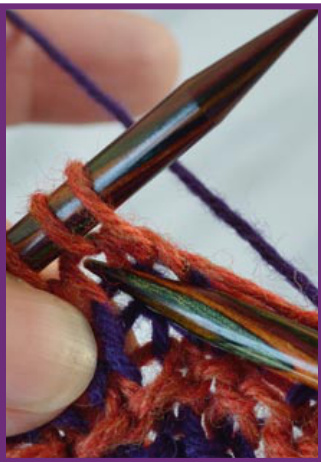
Wool (not superwash) tends to full instead of raveling. It can be secured with a line of crochet stitches, or just allowed to full, if you are brave enough. For slippery yarn, machine sew with a small zigzag stitch, hand sew with sewing thread and needle, or cut, unravel the steek stitches, and tie overhand knots. Sample. The white arrows bracket the steek stitches. Sew both legs of stockinette stitches between the white and green lines. Cut on the turquoise line in the middle. The outside leg of the first and last stockinette stitch (between white line and arrow) is picked up to finish the edge.
Please read to end before sewing. Sew e Cut
Sew with a short stitch length and slight zigzag, so the steek line can stretch. I prefer to sew with the knitting on the cables (not a needle!), making it easier to pull the fabric around to stitch exactly where I want. Or you can bind off before sewing. Each of the four sewing lines (two on each side of the cut line) follows a single leg of a column of stockinette. The outermost leg on each side of the steek is used to pick up loops; do not sew it. Sew the next two legs closer to the cut line on both sides of the steek, leaving space in the middle to cut. Make sure the sewing secures the loops on the cable. You may have to cut the last steek stitch to get it off the needle. Take your time getting the sewing right. It is (pause to search for less graphic term) very tedious to take it out. If tedium isn't your thing, work steeks in stockinette and sew from the knit side. Stockinette's knit stitches make nice strong lines to guide the sewing. Once sewn, cut the steek down the middle, staying between the sewn lines.
Chaordic Mitts: Do a Little Dance.
I used 3 stitches for the steek on these mitts; 4 would be easier. The steek stitches are between the blue markers. The steek has been machine sewn with black thread and cut open. The arrow points to a steek stitch that must be cut to get it off the cable. For inquiring minds, the orange markers are for the thumb openings.
A Fact of Life
Show Them Off
Weaving in ends is covered in basic knitting books, and I am not going to repeat it here. I am going to talk about what to do instead.
Hide Them
Tie the ends using an overhand knot. Square knots are not secure except for wool that will full. Trim the ends to about 3%" (2cm). Hold them to the back when picking up an edge for a border or collar. Another way to hide the ends is to knit an integral border, often in stockinette. This can be sewn down, tucking the yarn tails to the inside.
Weavers fringe their ends all the time. Add some beads while you're at it.
Don't Make Them
You can use up to four yarns, maybe more, without cutting by carrying them up the side of the work. Long floats on edges are easy to pull too tight, distorting the fabric. Either twist all attached yarns at the end of every row around the last yarn used or use Edge Stitch or Edge Wrap, see Chapter 5, Uncommon Stitches. Another choice is to fold the tail over and work it as part of the yarn. You need to evaluate whether this works for your fabric. It doesn't work very well for slippery yarns. Side-to-SideVest: Every Single Singles. Yarn tails hide inside the bottom border.
What Wind e Rain?
Movement Is Required
Fiber Choices
Ladder Yarn. Felted or fulled wool is incredibly wind and waterproof. My ex-hat (more on that on the next page) carried me through one of the early days of building my house when it rained all day. Every time I bent forward, water poured off the hat, but my hair never got wet and my head didn't get cold. More than I can say for the high dollar synthetic raincoat I had on.
The Fulling Process
Many people call this felting, but the proper term is fulling. Felting is done with loose fiber that is not organized. Once the fiber is spun, it is called fulling, but the changes are caused by the same process. Felting and fulling occur because water, heat, soap, and movement make the scales on the fiber open up while the fiber is moving around. The scales of one piece of fiber latch on to another piece and lock them together. Soap helps the process by making things slippery, and therefore easier to move. Too much soap will actually prevent felting because it makes everything so slippery one piece of fiber can't hold on to another. Eventually, the fiber can't shrink any more. Each strand is so locked in place no movement can occur. If you begin with a tightly knitted fabric, you have already reduced the amount any individual strand of fber can move. Paradoxically, it may well shrink less than if it had been knit more loosely. Knit with a Loose Gauge A loosely knit fabric (too open for regular knitting) shrinks a lot and loses stitch definition. It may not even look knitted. It is dense and windproof, making a great pot holder or a waterproof hat. Knit with a Normal Gauge A fabric knit to a standard gauge for the yarn doesn't shrink as much or lose stitch definition. The stitches in Ditty Bag can be seen even after fulling. Except for silk, natural protein fibers all felt. Soy is a man-made protein fber that, from my limited experience, doesn't felt but is a champion at fraying. Superwash wools have been chemically modified to prevent felting. Many bright white wools are bleached to make them brighter, which also interferes with felting. A mixture, such as a wool and silk yarn, will not full as much as 100% wool. Carry along yarns, such as a thin ladder, will be trapped by the wool fibers and held in place, with some quite interesting effects. For a quick test, knit up a 3" square, draw its outline on a piece of paper, and toss the sample in a load of laundry.
Changing Yarn
Weave yarn tails in only 2 or 3 stitches. Just before fulling, snug the tails to proper tension and trim to about 1" (2.5cm). A thick spot in the fabric becomes quite noticeable after fulling, so keep weaving in to a minimum. Trim ends flush after the first trip through the washer. I still have this hat. It gets washed like it was made of tissue paper. Note there is no stitch definition left in the wool or the ladder yarn.

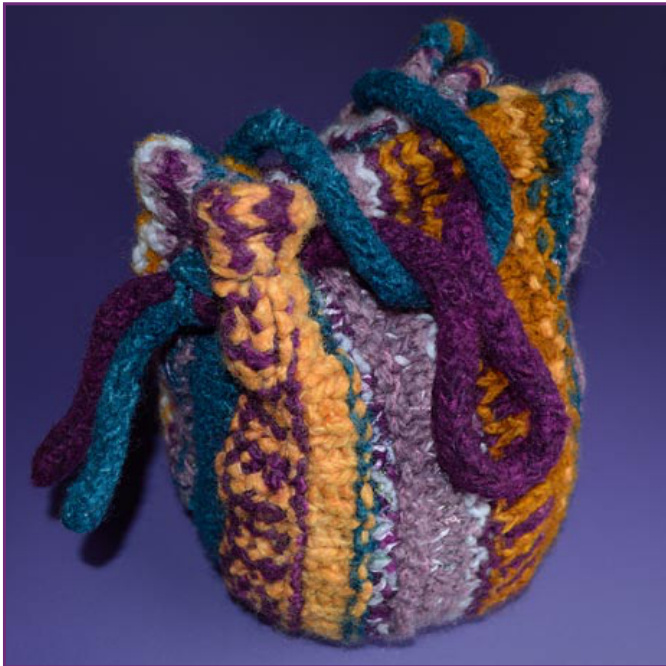
Ditty Bag. This is the short version without grommets. The wool fulled enough from being washed and did not require being run through the dryer.
Full in a Front Loader
I full knitted items the same way in a front load or top load washer, and use a dryer to finish. It is simple and also gets some laundry done. Unlike using hot water, a cold water wash will not put permanent creases in the fabric during spin out, or suddenly change the fabric from slightly fulled to a brickbat. It is also easier to see what the item looks like when it is not dripping water everywhere.
Just Right or Too Much?
Decide how much you want the item fulled. Stop anywhere in the drying process and fnish by air drying.
Shape By Stretching
When you take the item out of the washer, decide if you want to work on the shape. Unlike hand felting, you cannot make an area shrink more, but you can make it shrink less by stretching it. You are effectively pulling the fibers back apart. Both bags were shaped by stretching the lower portion of the sides, making them more pear shaped.
Ditty Bag.
This is a close up of the bag on the previous page. After a gentle fulling, there is still a lot of stitch defnition. Left: Before fulling. Right: After fulling
Aftercare
If you didn't completely full the item when you made it and you want it to stay the size it is, clean it with a cold water soak without agitation, rinse very gently in a cold water bath (not running water), and let it air dry. Or be prepared to give that hat to a friend with a smaller head. Sigh. At least she's a good friend. And patient photographer's model! On the other hand, my knitted pot holders just go in with a load of laundry for cleaning. Ditty Bag. Bottom of the short bag showing the texture from working decreases on every round for the bottom of the bag.
General Directions
1 : If possible, turn item wrong side out. Put it in a laundry bag, to trap fiber that gets loose and could stop up the drain or harm the washer. 2: Wash in cold water with a moderate sized load of dirty towels or other laundry, running complete cycle including rinse, drain, and spin. 3: Shape the item by stretching it where you want it to stay bigger. 4: Dry the load on medium heat, checking things about every 15 minutes (set a timer). Continue to shape the item. If it becomes fulled enough on this pass, shape it one final time, and allow it to finish air drying. 5: If you want more fulling, repeat the process from the beginning.
Circular Needles
Twisted Purls
Circular needles offer some flexibility straight needles lack. You can work with either side facing by sliding the fabric back to beginning of row rather than turning. Sliding allows single rows of different colors while keeping the yarns attached. I think of this as the yarns chasing each other. Sliding also allows a row to be knit instead of purled, or vice versa. It easier to evaluate the fabric shape when it is on a cable, since there is less distortion than on a straight needle. The brioche stitch patterns used here can only be worked on circulars or double points. And I don't end up crawling under the table at the coffee shop in knit circle trying to find the needle that's gone astray. You find more stuff down there than you really want to.
Mixing Handspun Skeins
Working alternate rows from different skeins of handspun or hand dyed yarns mixes the yarn for a more uniform fabric. Work first row with one skein. Attach second skein and work back. Attach third, work last stitch in Edge Stitch, drop #3 and work next row with #1. Continue Edge Stitch and changing yarn on every row.
Distinct Markers
My productive and easy-on-the-hands continental knitting style sets purls with the front leg (the one closest to the needle tip) to the back (far side) of the needle. For basic knits and purls, I work through the front leg, wherever it may be found, untwisting as I go. For decreases I don't change the set of twisted stitches, nor do I recommend that other knitters start twisting theirs. On close inspection, the fabric will look slightly different worked one way or the other. Stitches set front leg to the front are easier to purl. Stitches set the other way are easier to knit.
Yarn Required for a Row
There is nothing quite like getting almost to the end of a row and running out of yarn. Check the row yardage by measuring off a few yards and tie a slip knot to mark the end. Work the row, adding yardage if needed. At the end of the row determine how much was used. I measure by my arm length instead of a tape measure. It is much faster and surprisingly consistent. The yardage for a row varies depending on stitch pattern. Check more than one row to get a range.
Reverse Engineering? Ha!
To reproduce freestyle stitches, write it down while you're knitting. Chaordic knitting helps you learn to read knitting while on the needles, but reading finished fabric, with slips, decreases, and yarn overs, can be extremely difficult. An alternative is to work two pieces at a time. For matching pieces, such as left and right fronts of a cardigan, knit them at the same time to freestyle without writing a stitch pattern and keeping track of yarn choices. That is the real fun of chaordic work. To distinguish one marker from another if they all look the same, tie on a short piece of yarn.
Counting Rows.
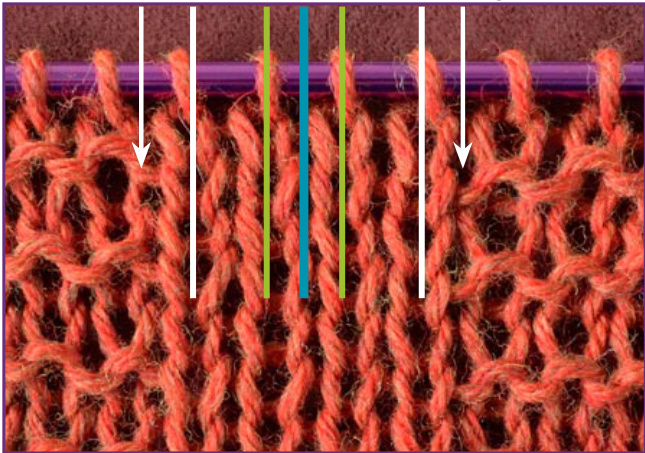
To work a yo every 4th row, for example, count the bars above the last yo to know when it is time. The loop on the cable doesn't count as a bar. There are 3 bars (white, teal and orange), so 3 rows have been completed since the last yo. Work a yo on the row about to start.
Stitch Set.
The sinister left stitch has its front leg set to back of needle. The right stitch, conventionally for many Americans, has its front leg to front of needle. The set is the same from either face of the knitting.
40 30
Casting On Binding Off
About Austrian Cast On
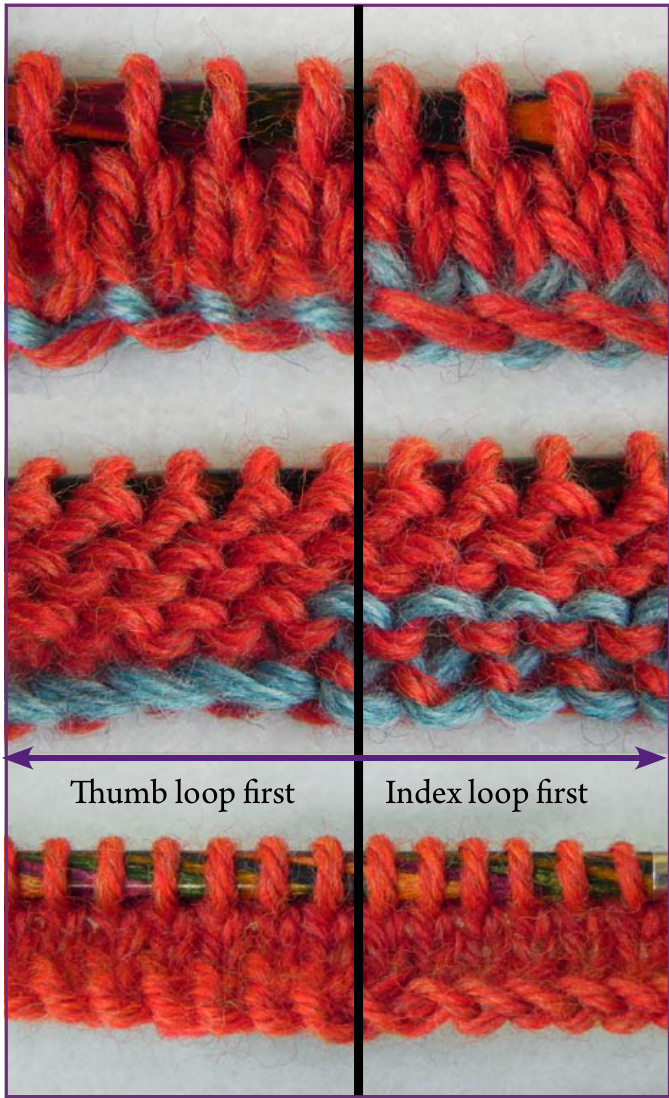
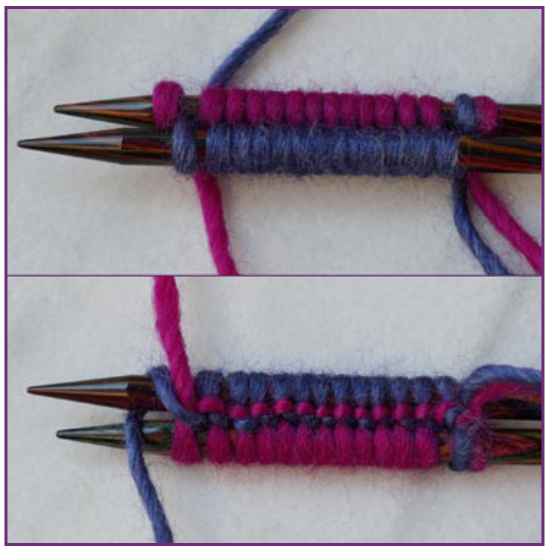
Directions to work the Austrian cast on are on the next page. Austrian is a variation of traditional long tail cast on with the same number of steps. One loop is picked up differently. It will stretch to double in width and return to its original size, but is not sloppy or loose. Long tail cast on is better for areas such as a shawl neckline, where stretch is not a good thing. Like long tail cast on, Austrian has knitted and purled versions. For both, the knitted version begins with the thumb loop and the purled with the index finger loop. These can alternate to cast on for ribbing. Austrian Cast On Samples. The two-color samples are worked with turquoise over the thumb and red over the index finger. Top: stockinette. Middle:reverse stockinette. Bottom:stockinette
More Twisted Purls
The Austrian purl (index) cast on sets the stitches twisted, so either work the first row through the back loop to correct or knit through the front loop to add more twist. Unlike many cast ons, wrapping the loop the other direction to fix the set doesn't work.
I actually figured this cast on out myself, but then found out that while it is rather obscure, I wasn't the first. This is my cast on of choice unless I need stitches going both ways and use Judy's Magic cast on or I don't want any stretch and use the standard long tail cast on.
Why Does It Work? The reason this cast on has more stretch and spring back is that the yarn is looped so many times, not just twisted. Curved Sample. This knitting is 22"(56cm) wide. The grey is garter stitch, and lays flat even with this strong curve.
To Work Austrian Cast On
How Long a Tail?
Since the knit and purl methods look so different, it is a good idea to make a sample before casting on very many stitches. A tail for long tail cast on is often estimated at 1" (2.5cm) per stitch. Austrian uses more, about 1-14" (3cm) per stitch. To estimate how much to allow, cast on 10 stitches and measure the amount of yarn used. Divide the required stitch count by 10 and multiply by yarn used.
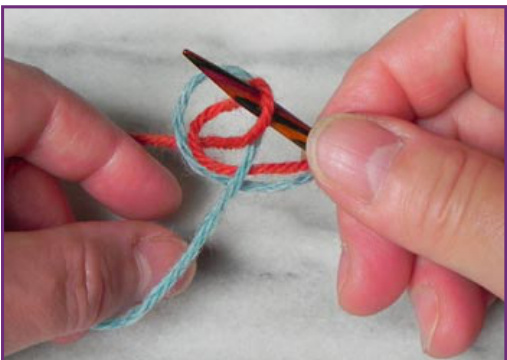
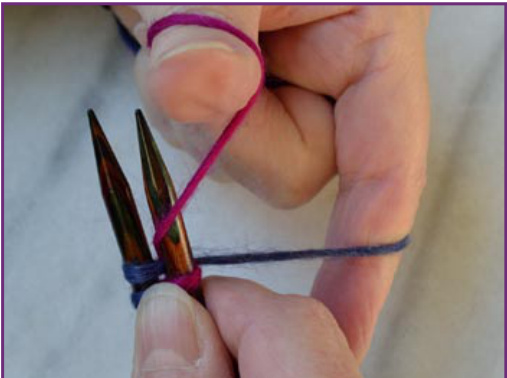
Thumb Loop First: Knit Stitch
1. To match the samples on the previous page, turquoise goes over thumb.
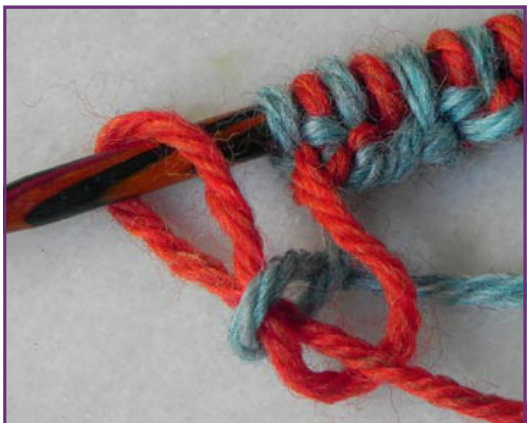
2. Skip the slip knot. Wrap the yarn tails twice around the needle and hold in placewith thumb. Instead of measuring a tail, use two balls or both ends of one ball. Weaving in two extra tails is small price to pay to avoid running out of yarn. It is easier to practice with two colors of yarn. The fingers separating the yarns must be pulled out to tighten each stitch. The yarns want to twist, so they change places quite readily. This makes an obvious mistake in the cast on. With two colors, it is easy to remember which color goes where. It is also easier to see if you are pulling one yarn tighter than the other.
3. Pick up thumb loop as for long tail cast on.

4. Austrian is different on this step. Pick up index finger loop on far side of finger, not near side. Right thumb holds turquoise loop picked up in 3. When using one yarn cake for the cast on, decide which end goes to which finger, so you can keep it straight. Purl(lndexLoopFirst) Reverse 3-4: pick up far side of index loop first, then thumb loop. Austrian requires more effort than traditional long tail to snug the new stitch into place. Take care to tension both yarns equally, but only as tight as required to make the loops neat.
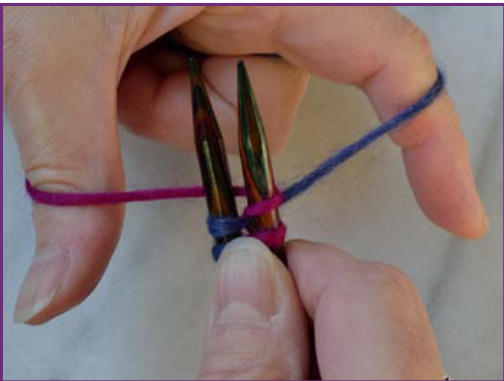
5. Needle pulls index loop through thumb loop.
6. Drop thumb and index loops. Snug both yarns equally.
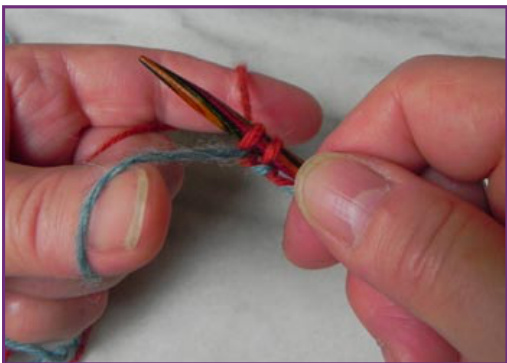
7. Last stitch and previous stitch on needle.

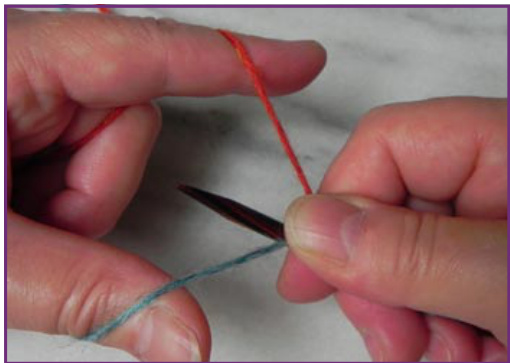
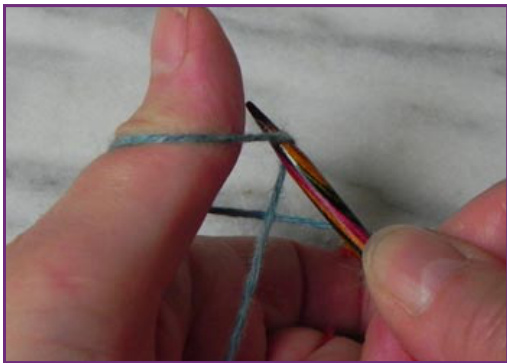
1. Put a slip knot on RN and hold yarn in the long tail cast on position
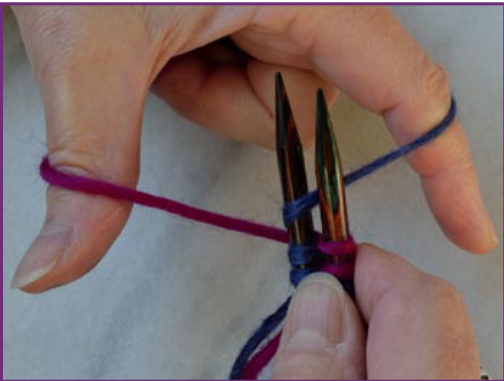
3. Dip needles to wrap blue yarn around LN and down between needles.
2. Point needles past index fnger over top of blue yarn. 4. Point needles past thumb, catching red yarn between needles and over RN.
5. Wrap red yarn around RN. One st cast on to each needle.
General Notes
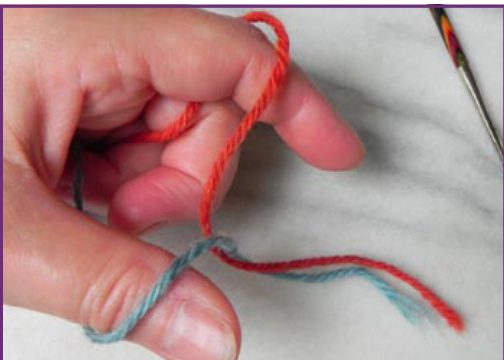
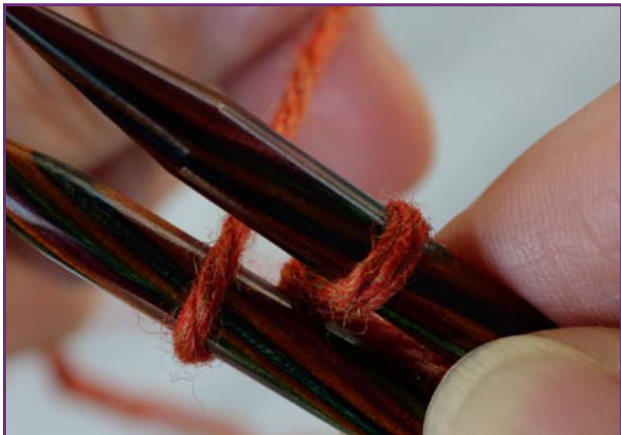
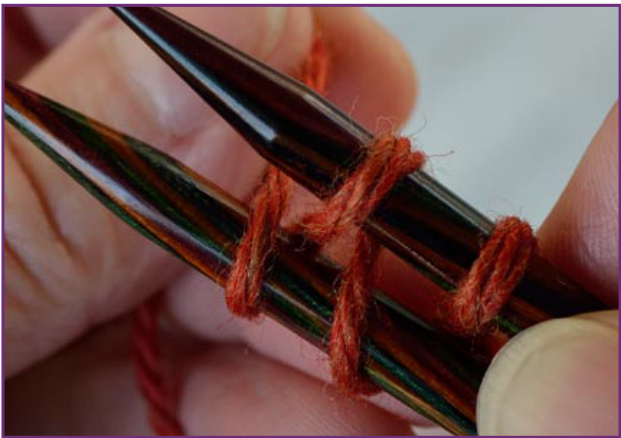
Judy Becker's Magic Cast On is wonderful for placing stitches on two needles for work in the round. It can be used to avoid picking up stitches later, since they are already on a cable. A fabric can also be started in the center and have miror image sides by working out from the cast on. Judy's original instructions and more details can be found on her website, PersistentIllusion.com. If using two yarns, start this cast on with a slip knot. Without it, the yarn tails will probably unwrap and the beginning stitches come undone. Discard the slip knot once the stitches are secure. Judy's Magic Cast On. Top: Front (knit) side of completed cast on. This side faces as cast on is being worked. Note original slip knot on right end of top needle. Bottom: Back (purl) side.
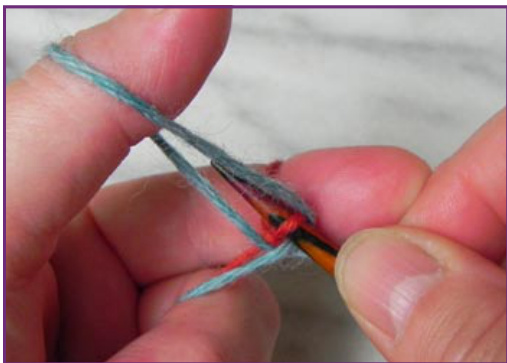
Untwisted Purls
Step 4 shown here is different from the original. The red yarn is carried between the needles to wrap over the right needle, so the red stitches are set with the same mounting as the blue ones. The original method sets the red stitches reversed.
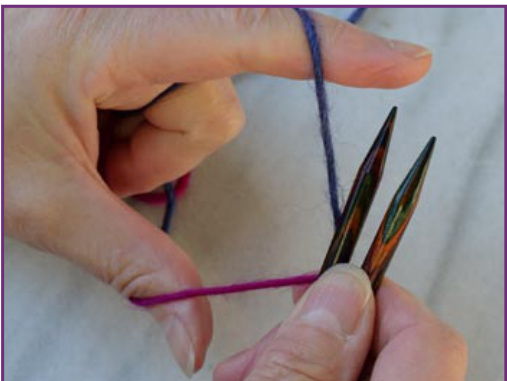
1. Slip knot in place, ready to begin
2. Wrap yarn around lower needle, then between needles.

3. Wrap yarn around upper needle, then between needles.
4. Repeat 2 and 3 to desired stitch count. A figure 8 cast on puts stitches on 2 needles, like Judy's Magic cast on does, but it only uses one yarn to make it happen. It can be used any time instead of Judy's Magic, but it easily becomes sloppy the same way a backwards loop cast on does. There is just not enough structure to secure the loops. Sweater for Eden uses this cast on for the sleeve.
On Ist st only, Slip 1 purlwise. 1. Insert LN in back leg of st on RN.
2. Insert RN knitwise into 2nd st on LN, pull 2nd st through 1st st.
3. K 2nd st, pulling loop between 1st and 2nd sts.

4. Drop 1st and 2nd sts from LN. If needed, work a chain st next to help an outside curve lay flat.
Tie Shawl: Geometry, left. Tie Shawl: Warm Fuzzy, right. Bottom edge is curved over to show bind off.
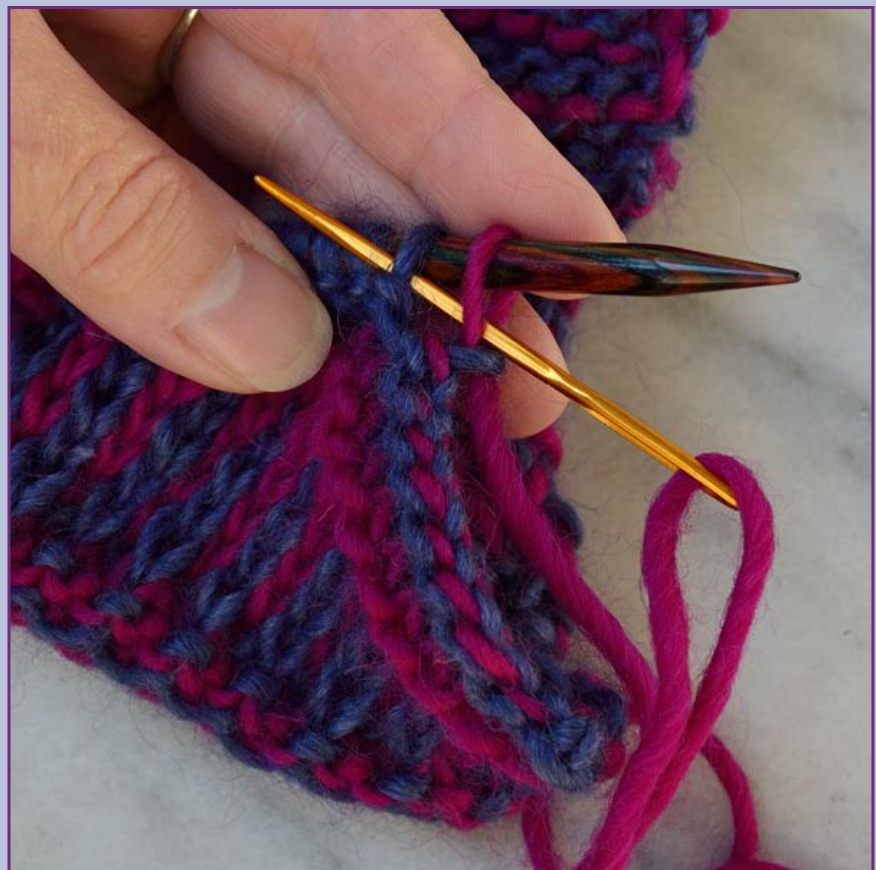
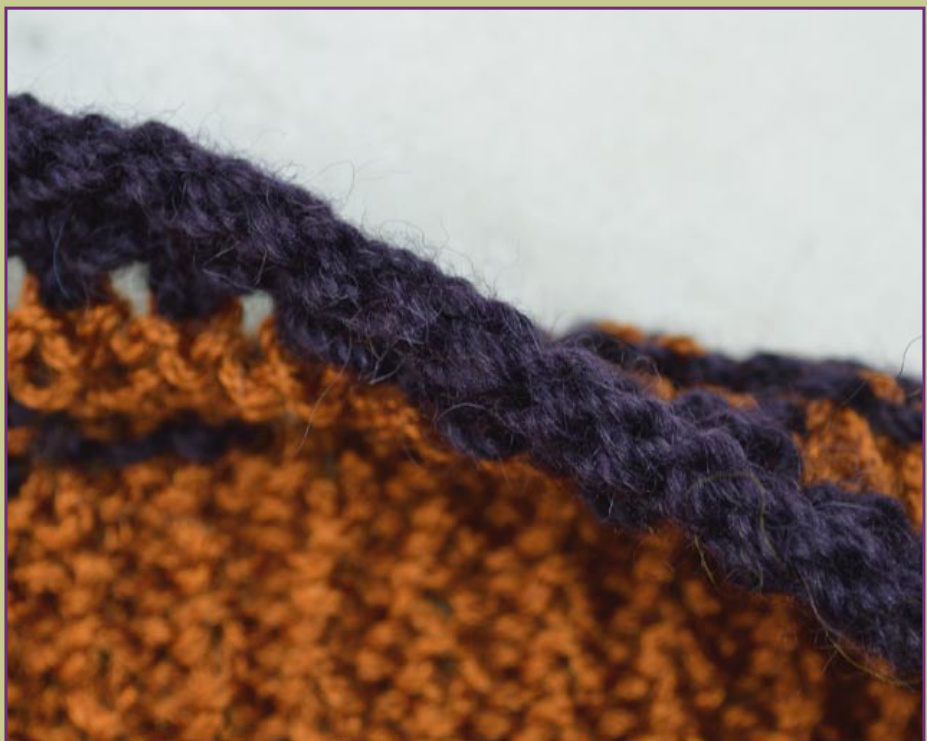
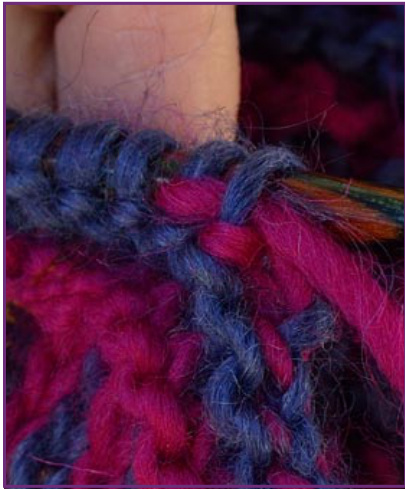
I developed this bind off to have a neat but stretchy edge. My research found an unnamed bind off with the same finished appearance but worked in a different manner. That bind off was published in 1988 in Icelandic in Triangular and Long Shawls by Sigridur Halldorsd6ttir, now available in English. The edge looks cabled and is slightly thicker than the fabric, like Austrian cast on. It is fast to work, looks similar from both sides, and does not roll. Two stitches are dropped each time, but one was put on the left needle to begin the repeat. On stockinette, this bind offlooks like EZ's sewn bind off, but it looks very different on ribbing. I don't use this bind off for toe-up socks (use EZ's sewn bind off instead) or when the edge shouldn't stretch. JCbo. Top: Side facing during bind off. Bottom:Reverse side. JCbovs.EZ'sSewnBind Off. Top: Cabled on 1x1 rib. Bottom: Sewn on 2x2 rib.
The Original
Sewn Bind Off & Join
Elizabeth Zimmerman's exquisite bind off is simple, elegant, and stretchy, although it must be unthreaded to take it out. It is the most beautiful finish I've seen for ribbing (see previous page). Use a tapestry needle in place of the right needle. I doubt I'm the first to come up with this variation. It uses EZ's sewn bind off to sew down a band at the same time as working the bind off. It takes a little more yarn. Worked neatly, the inside and outside are very difficult to distinguish.
2. Insert needle knitwise into I st st. To prepare, cut the yarn leaving a tail at least 4 times as long as the length to be bound off. Thread the tail on a tapestry needle.
1. Insert needle purlwise into 2 sts, pull yarn through and snug. Work as for sewn bind off, but before Step 1 on each repeat, pick up one loop of main fabric at join location before inserting needle into first 2 stitches on LN.
Sewing With Long Tails
Fold the tail not quite in half, leaving the last 6" (15cm) or so at the fabric single. Insert the fold in the needle instead of the end of the yarn. There are 4 strands at the needle instead of2.
Sew as usual. When you run out of single yarn, move the fold first, pulling the end of the yarn tail away from the fabric, then relocate the needle.
4. Slip 1 st off needle. EZ'sSewnBindOff. Left: Side facing during bind off. Right: Reverse side.
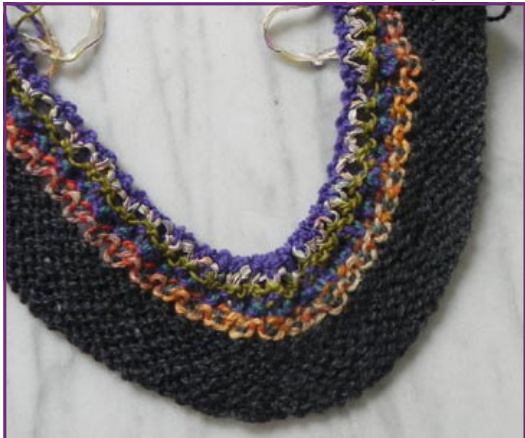
Tie Shawl: Warm Fuzzy.
Gold neckline band picked up and knit on pink yarn. Inside of band is sewn down on purple and grey. Yarn tails are concealed by the band. Glitzy blue and multi color yarn is turning row worked in the gold border.
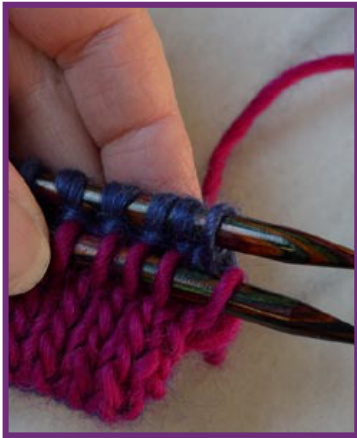
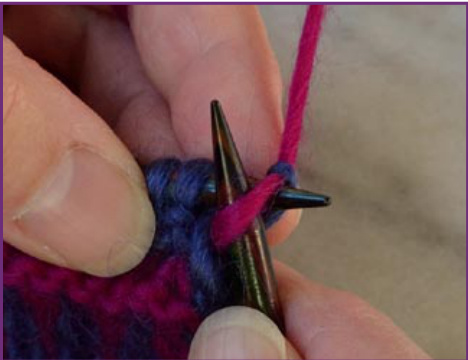
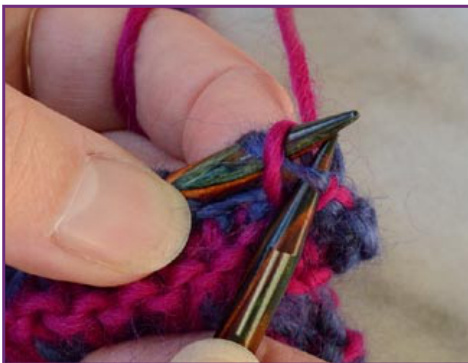
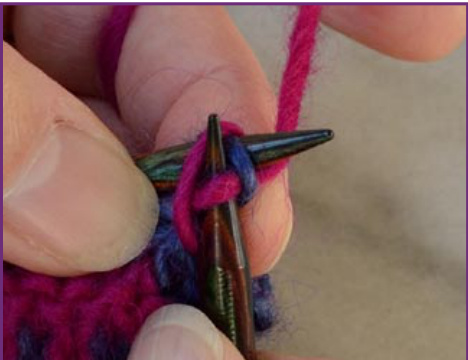
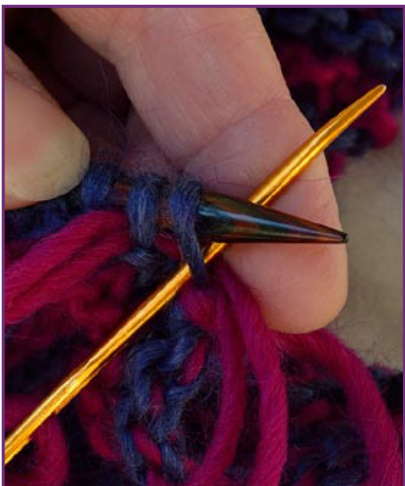
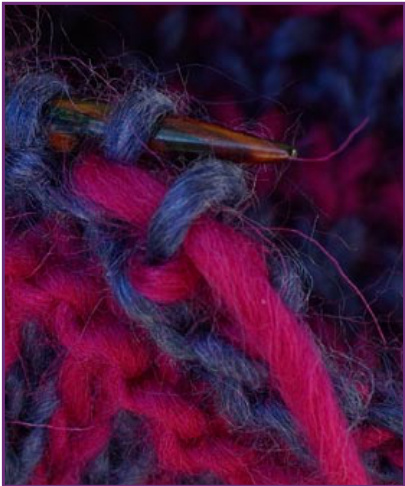
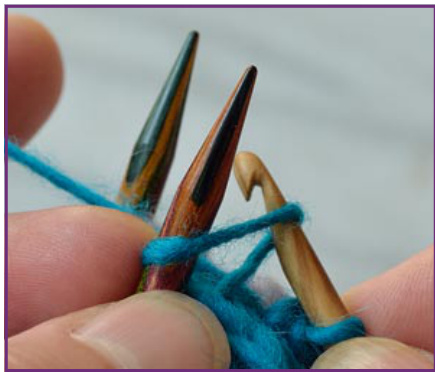
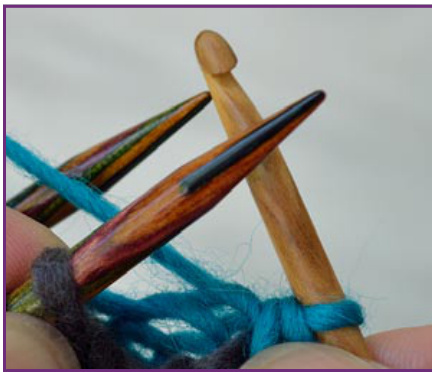
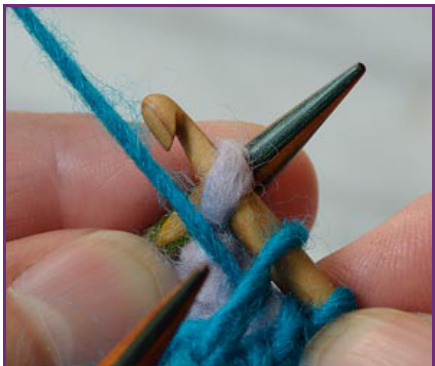
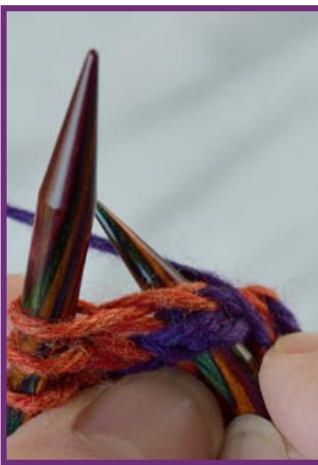
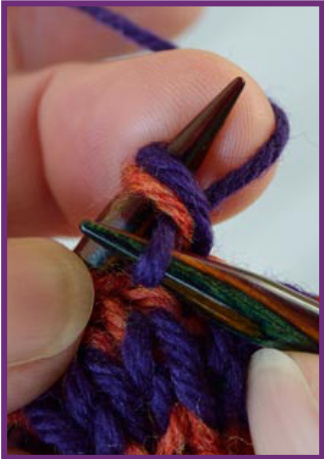
A 3-needle bind off joins two pieces of knitting while binding off the live stitches on both. Photos show the knit version, which rolls to one side. A crochet hook works much easier than a knitting needle for the third needle.
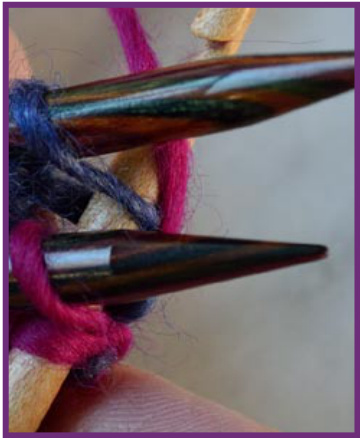
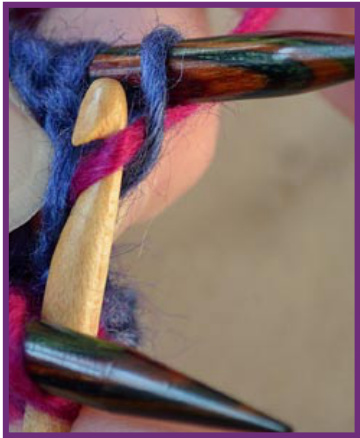
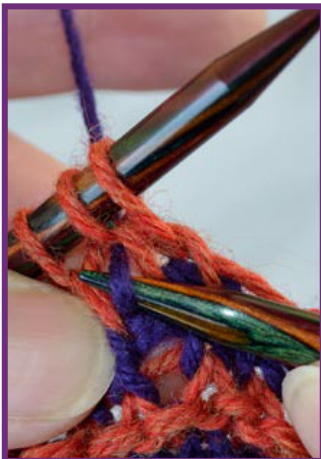
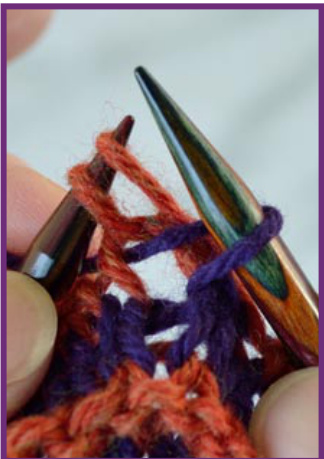
This bind off can be purled. In Step 2, insert hook from the back purlwise into both stitches, holding yarn to front. This also rolls. 1. Bind off ready to work. 2. Insert hook knitwise in 1st st on each needle. Previous pink bind off st can be seen on hook. 3. Pull yarn through 1st st. Another alternative is to alternate knitting both stitches and purling both stitches. This stops the roll, though it does zigzag slightly.

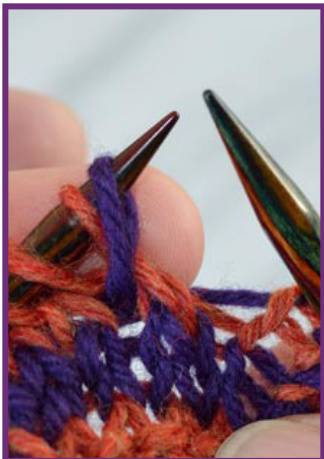
4. Slip 1st st off needle
6. Pull yarn through original pink st on hook. 5. Pull yarn through 2nd st and slip it off needle.

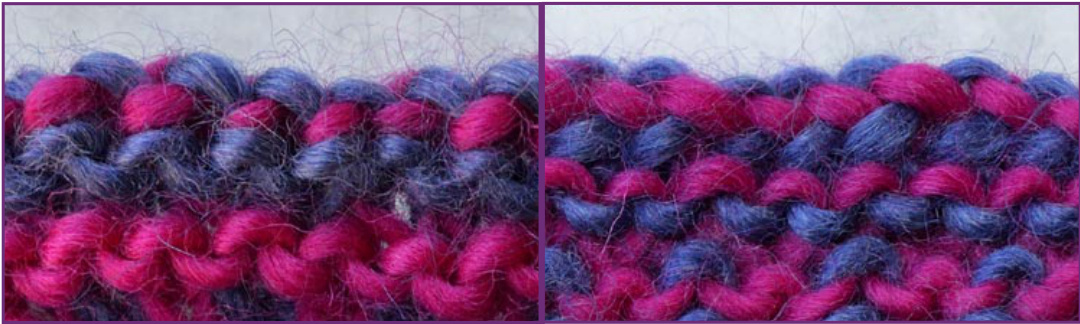
Sample. Worked knitwise from pink side. Bind off rolls to the pink. Sample would look the same worked purlwise from blue side. Side-to-Side Vest: Every Single Singles. Blue bind off worked K1, P1. The stitches zigzag, but don't roll to either side. Top: Side facing during bind off. Bottom: Reverse side.
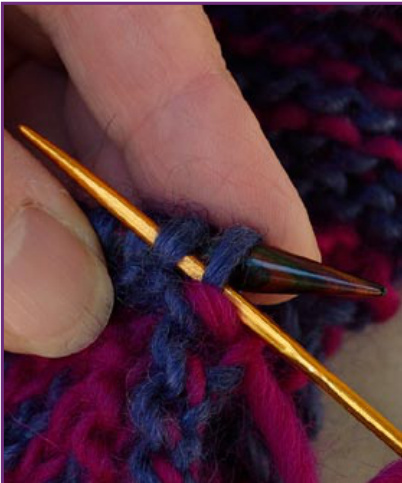
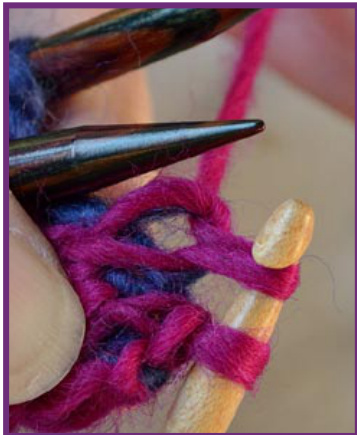
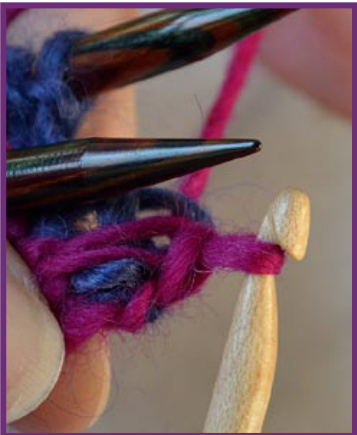
Joan's Chain St3NBO4o38
Joan Schrouder (SchrouderKnits on Ravelry) came up with the Chain Stitch 3-Needle Bind Off that doesn't zigzag and has virtually no roll. Who says you can't have it all?
1. Place yarn between the two left needles. Loop already on hook is previous bind off st. With a crochet hook and yarn between needles, slip near stitch knitwise, purl far stitch, pull last loop through other two loops on hook. 2. Insert hook knitwise into st on near needle and slip it .
An Alternative
You can also knit the near needle stitch instead of slipping it. This makes the ridge more prominent, both visually and to the touch. There is no roll front to back, but it's harder to work. Useful for a strong accent line.
3. Insert hook purlwise into st on far needle and purl it.
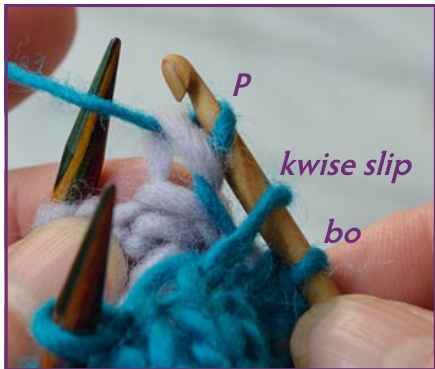
4. All sts on hook.


5. Pullpurlop through all loops on hook. Sample. Bind off worked with turquoise facing and slipping near needle stitch. Ditty Bag. Chain St 3NBO used to join side seam. Bind off worked by knitting near needle stitch.
5 o39 Stitches & Abbreviations
3NBO 3-Needle Bind Off Aco Austrian cast on BLco Backwards Loop cast on, can be used as an increase cc, c(#) contrast color or yarn co cast on Ch Insert LN from left to right into front leg of st on RN, K1 thru back loop, slide loop off LN {1 chain st made, no change in st count on either needle} Dec Any 2 st into 1 decrease (-1) Dec2 Any 3 st into 1 Dec, such as K3tog; P3tog; DecL2 (-2) DecL Insert RN into 1 st purlwise, then into 2nd st knitwise, pull 2nd st thru 1st st, K it, drop both sts from LN (-1) DecL2 [another way to work (Slip1, K2tog, pass slip st over)} Insert RN into 1st st purlwise, then into 3rd & 2nd sts together knitwise, pull 3rd & 2nd sts thru, K2tog, drop 3 sts from LN (-2) DecR Insert RN in 2"d st purlwise,lift it over Ist st and end of LN, K 1st st (-1) Dip See Chapter 5, Dip Stitches Edge St see next page Edge Wrap senext page grandmother st two rows previous that current row st springs from I-cord see next page Inc Any 1 st into 2 increase (+1) JCbo Jennifer's Cabled bind off JMco Judy's Magic cast on K Knit K1Below Kinto next mother st, see next page K2tog K2 sts together(-1) K3tog K3 sts together(-2) Kfb K front and back (+1) K-kb-K (K1, K1Below, K1) in next st (+2) K-P-K (K1, P1, K1) in next st (+2) K-yo-K (K1,yo, K1)in next st(+2) LLinc Lifted Leftincrease, Kin left leg of previous st's grandmother (+1) LN Left Needle LRinc Lifed Right increase, Kin rght leg of next st's mother (+1) LTco Long Tail cast on m(s) marker(s) m(#) # sts before marker, ex. K to m(2) = K to 2 sts before m mA(B, C) marker A (B, C) make 1 lift bar before nex st, twist loop, place on LN and K (+1) mc main color or yarn mother st in previous row that curren row st springs from P Purl P1Below Pinto next mother st P2tog P2 sts together (-1) P3tog P3 sts together (-2) pick up pick up and K pm place marker RN Right Needle rs right side Slide at end of row slide work back to beginning without turning; work next row with same ide facing Slip Slip st, purlwise unlessnoted, See Chapter 5, Slip Stitches Slip twisted Slip and twist st while slipping it (insert needle from left to right through back loop and slip it) Slip-yo completed Slip yon St(s) Stith(es) tbl thru back loop turn turn without wrapping w&t short row turn with wrap work work as st pattern requires {Work = O} Work as row instruction require ws wrong side yb with yarn in back (knitwise) yf with yarn in front (purlwise) yon with yarn over needle (brioche) yo yarn over yo #x work # of yos in succession yo-K-yo (yo, K1, yo) in next st (+2) (#) st count () Repeat whatis in( )to end or asspecified \*\* Repeat whatisbetween\*\*as specified {} Notes for current row (K/Decs, P/Slips) or any combination of Dec, K, P, Slip, yo, or other st in previous row: Work st before slash only on mother listed after slash. Example reads K the Decs, P the Slips. (K/Ps on Slips) or other combination in previous two rows: Work st before slash only on mother and grandmother combination listed after slash Row instructions usually list all combinations in previous row. Ex.: if mother row contains Ks, yos, and Decs, pattern row might be (K/Ks, P/yos, P/Decs)
A Few of My FavoritePatterns
(K2tog, yo) (K2togtbl, yo) (Dec, BLco) (Dec, Dip) {use Dip as Inc} (Dec, Inc); Next: (Ktbl/Decs, P/lncs) (Dec, Inc); Next: (K/Decs, Slip/lncs) 2+ rows in 1 yarn, change yarn, (K1, Slip1)
EdgeStitch,1-cord,K1Below 5o41
Edge Stitch
Edge Wrap
I-cord
I-cord, Applied
Edge Stitch is worked on first and/or last stitch of a row. It binds carry yarns without leaving long floats. It firms the edges without tightening them the way slipping the last stitch does, so it's a good choice for shawls and scarves. Sample to see how this will look with your yarn. I invented this knitting a rectangle shawl with handspun dog yarn. I was alternating three skeins to even the handspun. When there are only two skeins left, switch to Edge Stitch for one yarn. In one color of yarn, the two versions look almost identical. Edge St for one yarn: work to last st, LRinc1,slip st just made on LN, K2tog Edge St for multiple yarns: with all available yarns, K last st of row, drop yarns not needed
1. K1Below: insert RN into mother of next st. This is a less bulky way of incorporating the carry yarn. Edge Wrap is worked between the last two stitches in a row, trapping carry yarns between stitches. Again, a sample is in order.
2. Pull yarn through. Edge Wrap Before working last st in row, with all available yarns except working yarn, carry yarns between the needles. If yarns are to back, bring to front. If to front, take to back. As an alternative, you can carry the yarn around the edge below the LN before taking it between the needles.
3. Slide both loops off LN. Requires double points or short circular. Makes a knitted tube. Yarn is pulled across back of fabric. I like to stretch the I-cord every inch or so to even out the stitches. Cast on required sts, K to end Next: \*Slide, K to end\* Makes a knitted tube attached to a fabric. Can bind off live stitches or be applied to an edge with a pick up. I prefer to work pick up first, but stitches can be picked up while working I-cord. Cast on required sts, K to end, K1 from fabric { live st or pick up 1} Next: \*Slide, K cast on st count, K2tog {2nd st is live st or pick up 1, 1 fabric st bound off}\*
K1Below
I think of this as afterthought brioche, since it is worked into the mother row below and finished on this pass. It is worked on the mother stitch as though that stitch were still on the LN. Work P1Below same as K1Below, except work purlwise. Note that a K1Below is the most basic dip stitch. NOTE: This will look like it is unraveling. When complete, loops of both the mother and grandmother stitches will be around the stitch on RN. K1Below Insert RN knitwise into mother of next st on LN, K1, slide both loops off LN.
Slip yib
Slip the next stitch with the working yarn held in back of work. This pattern significantly draws in the fabric side to side. The stitch carries the color of the mother row into the current row.
Slip yif
Slip the next stitch with the working yarn held in front of work. This pattern significantly draws in the fabric side to side. The stitch puts a bar of the current yarn across the slipped stitch.
Slip yon (Brioche)
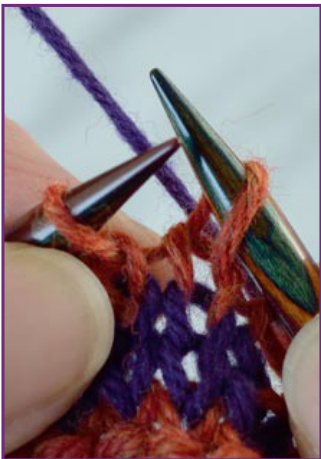
Another way to work brioche is slip a stitch with yarn over needle instead of to front or back of work. This creates a stitch with a yarn over on top of it. On the next row, work the Slip-yo as a single stitch. This fabric is identical in appearance to K1Below, but is worked in a different manner. The methods are not interchangeable within a row.
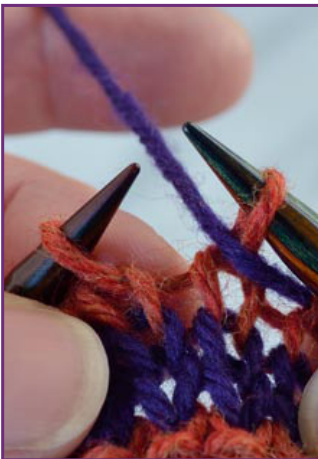
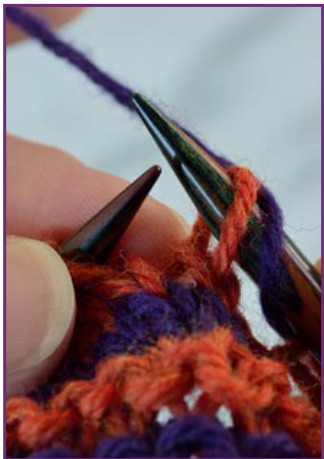
This pattern significantly widens the fabric side to side. After the Slip-yo has been worked on the next row, the current yarn hides behind the slipped stitch. Slip Stitches: rs & ws. Top: Right side of knitting. Bottom: Wrong side (viewed upside down). Note that Slip yon has 2 loops on the needle, 1 orange and 1 blue. They are side by side on right side of knitting, but the blue is on top of the orange yarn on the wrong side.
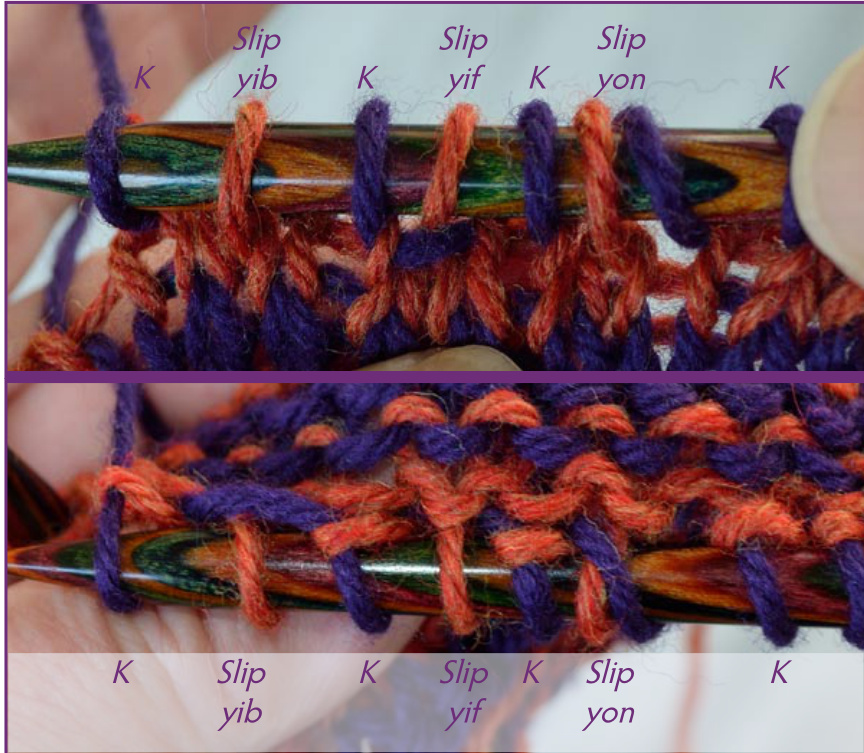
Slip yib Slip purlwise with yarn held in back. The orange slipped st is already on RN. Slip yif Slip purlwise with yarn held in front. Slip yon Slip purlwise with yarn over needle.
Dips-Knit or Purl
A Dip is a K1Below on steroids. Row instructions will give insertion point for RN and what to do with the loop. Pulled up snug, dips smock the fabric. To knit a Dip, insert RN from front knitwise. Insertion point is one, two, or more rows below the current row. It can be directly below the next stitch, or to the left or right. It can move right or left in half stitch increments, either placed in the middle of a stitch or between two stitches. Once the new loop is on RN, it can stay as an increase or be placed on LN and worked together with next stitch.
Purls
To purl a Dip, insert RN from back with yarn held purlwise.
Use as an Increase
Dips make an interesting increase. The Dip carries the working yarn down over the top of the finished fabric. It does not leave a hole like a yarn over, which is why I used it for Ditty Bag.

Top Photos:
1. Insertion down 2, to the left V stitch. Two possible insertion points for RN, finishing with the Dip used as an increase by leaving it on RN. Be careful to make the new loop long enough to lay flat, if you don't want to smock the fabric.
Bottom Photos:
2. Insertion down 3, to the left 1 stitch. 3. Wrap the yarn around 4. New loop on RN. RN to K the stitch. Another possible insertion point, returning new loop to LN, working a K2tog, and maintaining stitch count.
1. Insertion down 1, to the left 2 stitches.
2. Pull yarn through.
3. New loop on RN.
4. Move loop to LN.
6. Slide both loops off LN. 5. K2tog with new loop and 1 st orange st.
| Slip yb | Front | Back | Slip yf | ||||
| ribbing | ribbing | ||||||
| garter | garter | ||||||
| stockinette | reverse stockinette | ||||||
| seed | seed | ||||||
| 1. (K2tog, yo) 2.K | 1. (K2tog, yo) 2. K | ||||||
| brioche rib | brioche rib | ||||||
| brioche stockinette | brioche stockinette | ||||||
Width e Stretch of Fabric
The sampler (previous page) shows stitch patterns changing the width of the fabric. Except for slips, up to four rows can usually be worked in a pattern without making the fabric widen or narrow excessively. Slip stitches have very little stretch, drawing in the fabric noticeably if repeated for more than two rows. To work over more rows, increase the needle size to compensate. Curiously, Slip yon is the widest of all the patterns and very stretchy, while Slip yf or yb is the narrowest and least stretchy. Alternating Slip yon and either of the other slips makes a width comparable to stockinette.
Use Short Repeats
Stitch patterns can be one stitch long, such as (K) or (P). Two-stitch patterns like (K1, P1) and (K2tog, yo) work well. Longer patterns can be used, but I seldom go over four. A small tessellation is easier to see as a pattern, and easier to remember. Since the pattern keeps changing, muscle memory won't help. Even my 4-stitch patterns are usually two pairs: (K2tog, yo, P2tog, yo) or (K1, Slip1 yf, K1, Slip1 yb).
Basic Stitch Patterns
The four basic stitch patterns have some interesting characteristics. Even though they are completely different in character, garter and stockinette both begin with an entire row of knit or purl. Ribbing and seed also share a setup: (K1, P1). Garter and seed share a pattern, (K/Ps, P/Ks), as do ribbing and stockinette, (K/Ks, P/Ps). Garter is thick and has strong horizontal lines. Ribbing is thick, stretchy sideways, and has strong vertical lines. Seed is bumpy. For these three patterns, both sides look the same and all lay flat. Only ribbing draws in sideways. Stockinette is very smooth on the knit side and bumpy on the other, called reverse stockinette. It curls sideways toward the purl bumps and lengthways toward the smooth side.
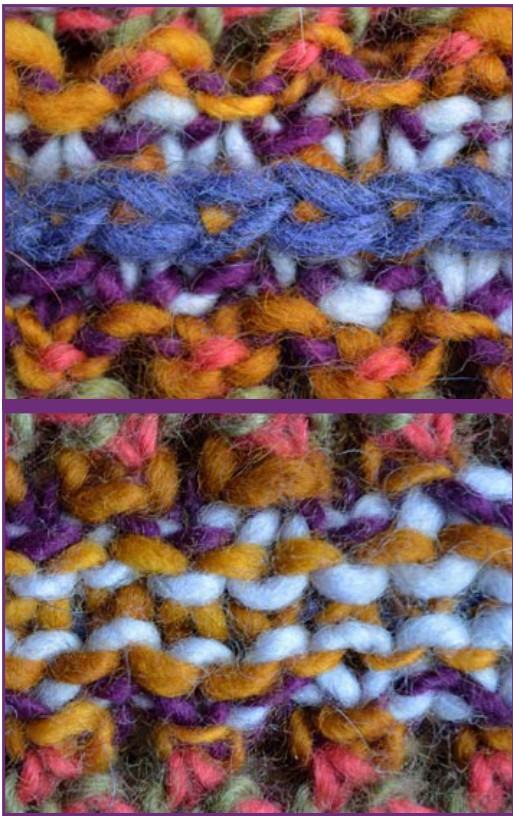
Garter Ridges
Garter ridges are two consecutive rows of knit stitches or purl stitches. The purl bumps on the second pass form the ridge. A garter ridge can be placed on the right side of stockinette beginning at either edge. Work the first row with purl bumps to the side not chosen. The second row forms the ridge. In other words, if you are on the back side of stockinette you have to purl 2 rows to make a garter ridge.
Garter Stitch
Garter stitch can be thought of as multiple garter ridges. The ridges appear on both sides of the fabric. When worked two yarns two rows each, the fabric is quite different from one side to the other. Two yarns one row each is yet another look and is reversible.
Ribbing Alternative
Garter ridges can be used for a cuff, taking the place of ribbing. Work side to side in garter slipping the first or last stitch of each row.
Pinstripes
Garter ridges make strong accent lines when worked in a different color. They are wonderful short rows, though attention must be paid to not leaving holes.
Ditty Bag. Garter ridge short rows on a feld of stockinette stand up from the fabric. Photo taken before fulling. Side-to-SideVest: Every Single Singles. Periwinkle and olive garter ridge. The periwinkle row was either knit from the far side or purled from the facing side.
Garter Samples.
Left: Garter stitch, two yarns worked two rows each. Right: Opposite side.

The mechanics of working a Slip yon was covered earlier in this chapter. These brioche two-color patterns fit nicely with chaordic knitting. They must be worked on double point or circular needles. It is attractive to work a row in MC or cc before or after a brioche section. Directions on this page use the Slip yon method rather than K1below. These two patterns lay flat without curling. Do not cut yarn in a brioche section. Begin and end all rows with a knit or purl stitch. Brioche is so much wider than the other stitch patterns that it is often advisable to discontinue shaping increases in a brioche band less than 2" (5cm) long. Brioche stockinette has an attractive reverse side that looks very different from the other face. Brioche rib has mc ribs on one side and cc ribs on the other.
Brioche Stockinette
Begin on side ribs are to face. After Setup, work rows 1-4 to desired length.
Brioche Rib
Begin on side mc ribs are to face. After Setup, work rows 1-4 to desired length. Setup1: {rs, mc} (K1, Slip1 yon) 1: {ws, cc} (P/Sl-yos, Slip/Ps yon), Slide 2: {ws, mc} (P/Sl-yos, Slip/Ps yon) 3: [rs, cc} (K/Sl-yos, Slip/Ks yon), Slide 4: {rs, mc} (K/Slip-yos, Slip/Ks yon) Understanding the pattern: P with both yarns on one face, K with both on the other face. Setup: [rs, mc} (K1, Slip1 yon), Slide 1 : [rs, c} (P/Slip-yos, Slip/Ks yon) 2: {ws, mc} (P/Slip-yos, Slip/Ks yon), Slide 3: {ws, c} (K/Slip-yos, Slip/Ps yon) 4: {rs, mc} (K/Slip-yos, Slip/Ps yon), Slide Understanding the pattern: K with one yarn and P with the other on each face
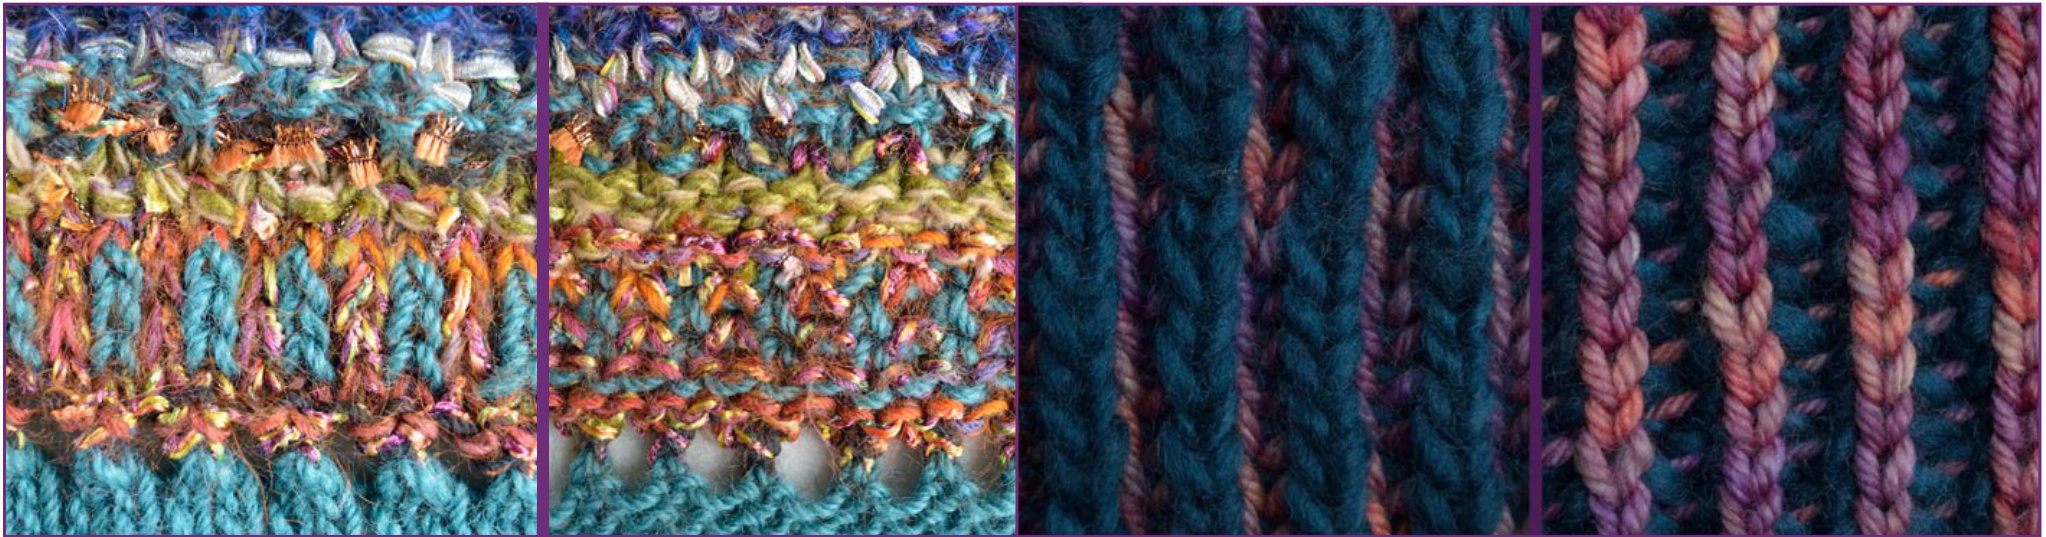
Fantasia. Brioche stockinette, front and back. Brioche is worked in turquoise and orange yarns Sample. Brioche rib, front and back. Teal yarn is almost twice as thick as multi color.
Gallery
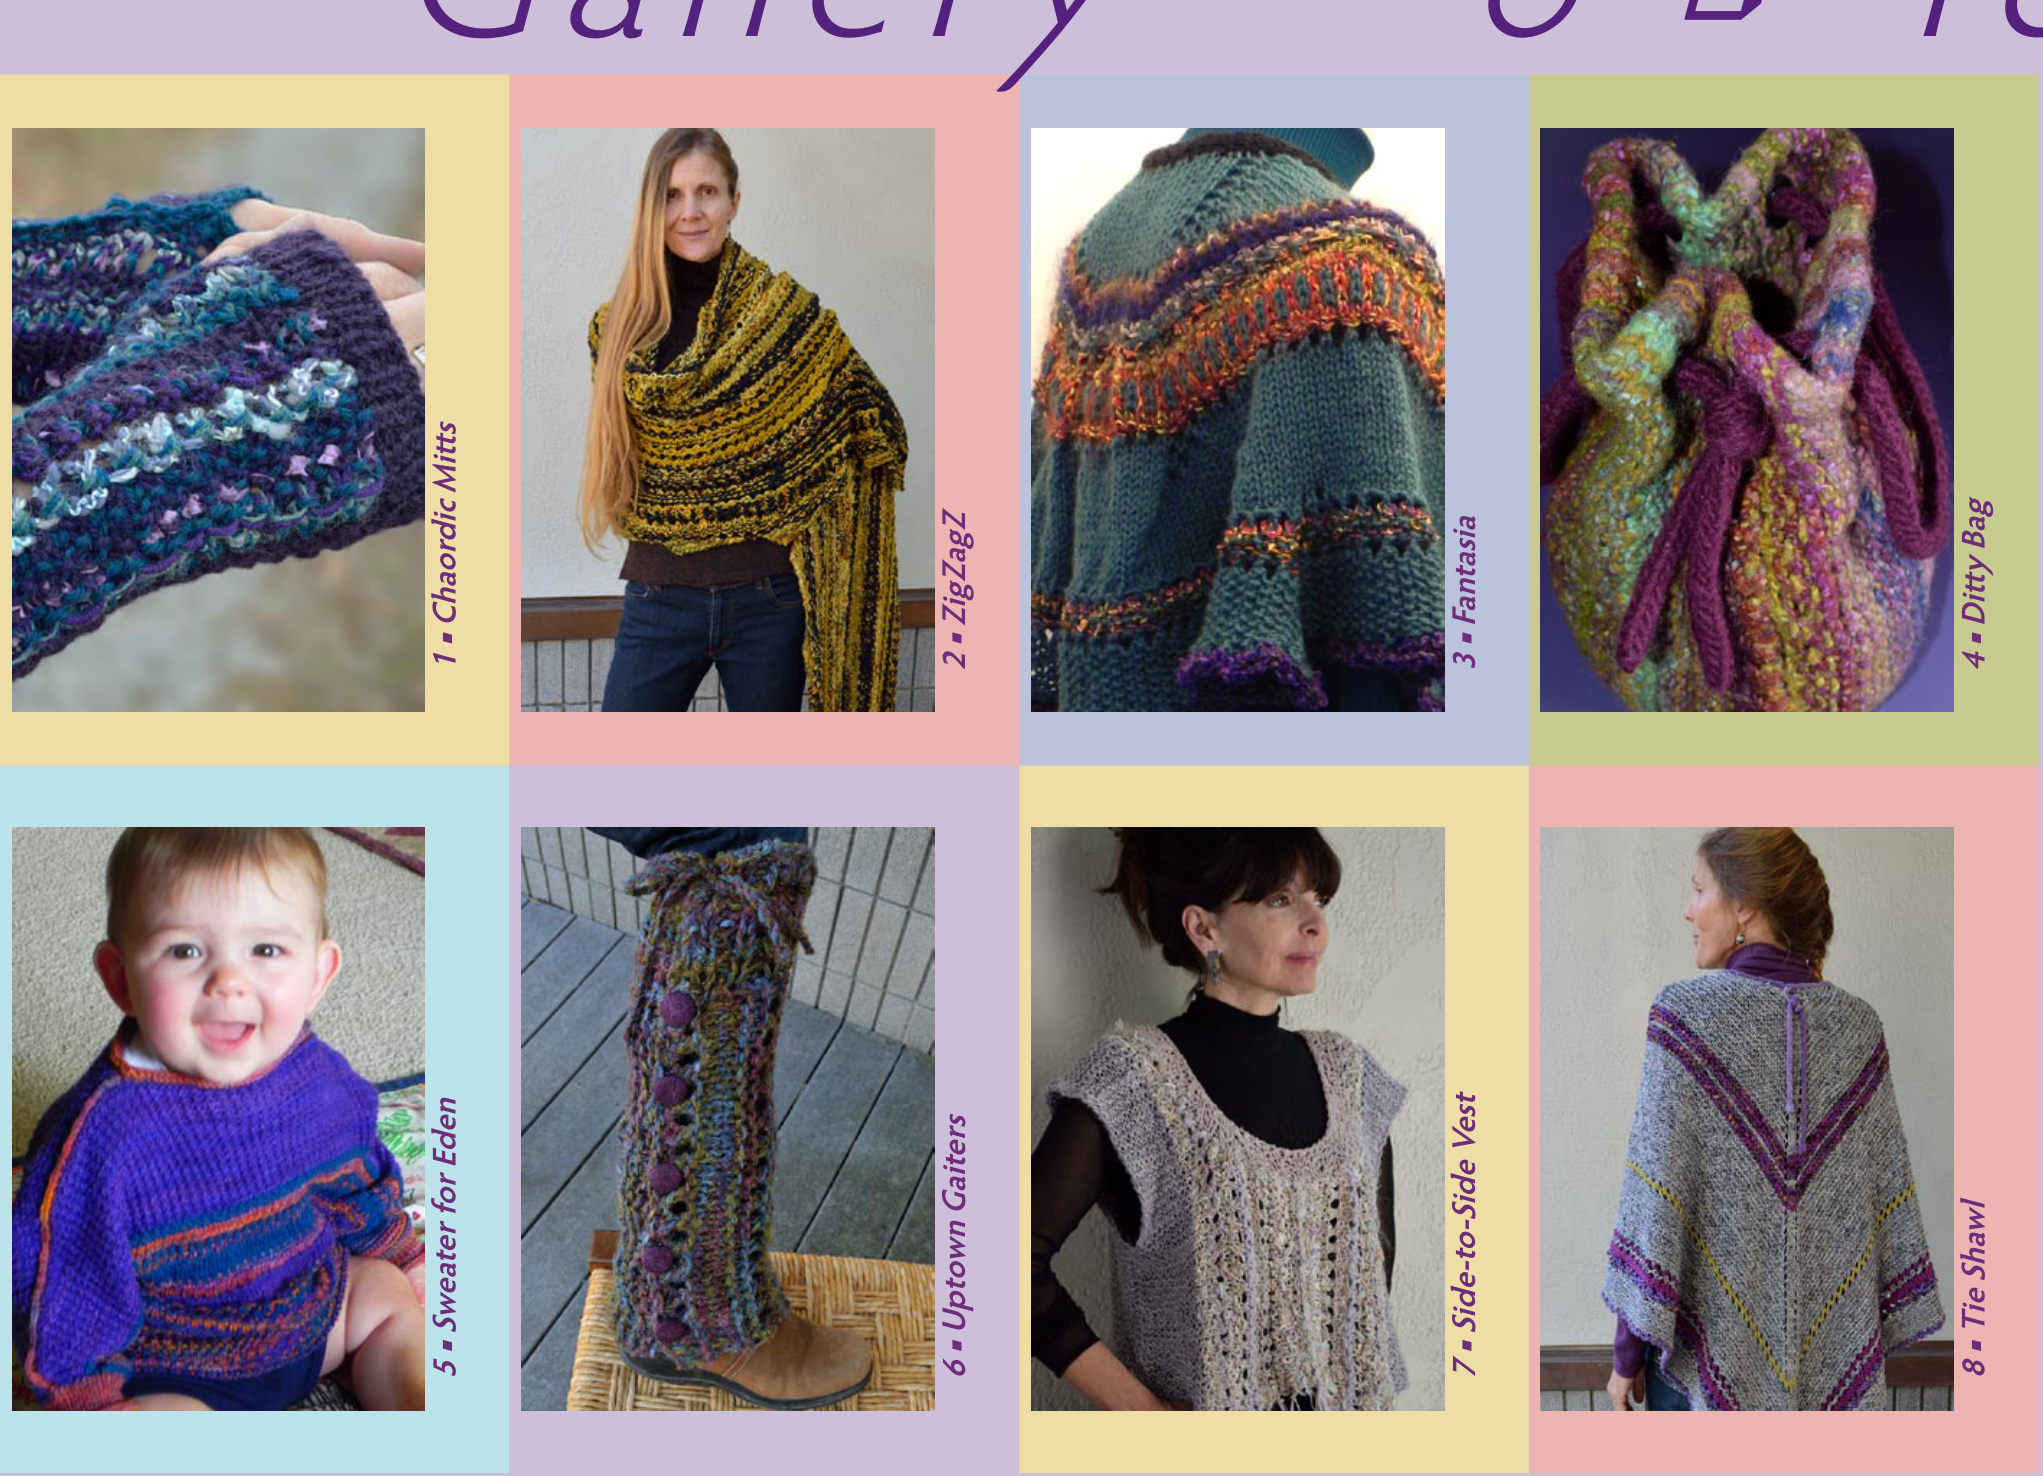
What Next?
The remainder of the book is a collection of patterns. I use the term pattern rather loosely. Some of the pieces are detailed row by row, but some only give the structure, shaping, and the location of the chaordic knitting, leaving the really fun decisions up to you. I have worked mostly with 2-stitch patterns and a few 3- and 4-stitch patterns. Twisted stitches and cables are another area deserving exploration. Since we have now reached the edge of my map, I will mark the spot with the traditional encouragement:

I hope you enjoy the journey.
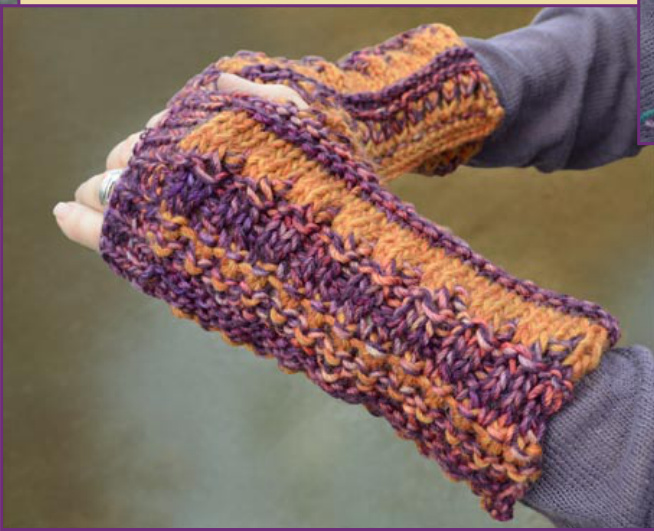
Chaordic Mitts
Autumn. worked with LTco, yarn carried up side, and picked up for 3-needle bind off. Do a Little Dance. worked with JMco, yarn carried up side, steeks, and gussets.
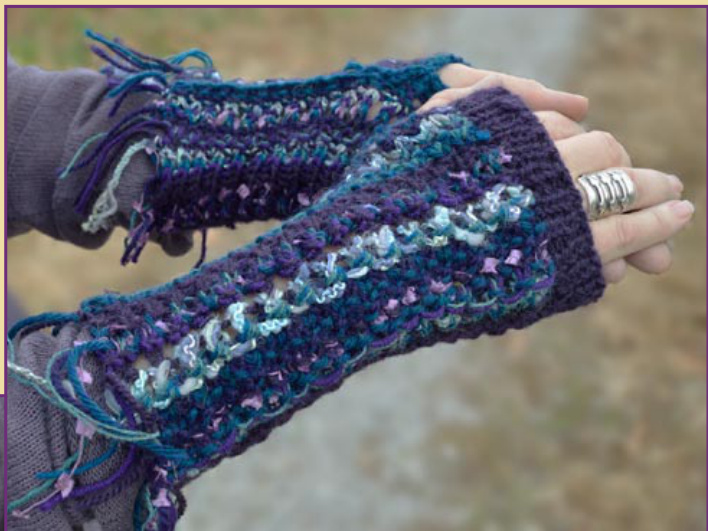
Fringe. Worked with JMco and yarn cut and knotted.
Overview
These mitts are great stash busters. Once started, especially if they are steeked and don't use many yarns, the project travels easily. Knit flat with rows running from wrist to fingertip, both mitts are knit at one time with fingertips toward each other. When fabric length matches circumference of palm, public face of fabric is chosen. A 3-needle bind off forms two tubes with thumb openings. Thumb cuffs finish the remaining live stitches. Fingertip cuffs are worked in the round. Mitts may be steeked by joining at the fingertips.
Pattern Notes
Except for gussets, select all Options before knitting. Use DIY & Master Pattern to begin all mitts, then follow Model Pattern for chaordic work, if desired. The models were knit both mitts at the same time. If the mitts are knit one at a time, you probably have to cut and join the yarn used for the 3-needle bind off and thumb cuff for the second mitt be a mirror image of the first. Remember, the mitts match up with the fingertips be pointing at each other and the same side (palm or back of hand) facing up. Size Size is based on palm circumference, measured at base of fingers without including thumb.
Identical Twins or Not
You may not want the mitts to be mirror images. Working from one project stash with the same yarn for the cuffs, the mitts still look like a pair. The mitts can be knit one at a time on the same stitch count and to the same length, without keeping records of yarn and stitch patterns.
JMco or Other Cast On
With JMco and no steek, the cast on stitches are held by the cable. The yarn get less tangled, because the cable won't let the strands get between the mitts (there is no between with a steek). This only works with a short cable and interchangeable needles with end stops. A long cable or dangling needles tangles even worse. Any cast on can be used. Work to beginning of 3-needle bind off, pick up stitches on the cast on edge, and finish as directed.
Carry or Cut Yarn
Decide whether to carry yarns or cut and knot.
To Steek or Knot to Steek?
The knitting is faster and easier if steeked between the fingertip edges. Otherwise, treat fingertips like wrist edge and use separate yarn balls for each mitt. To steek, work mitts as one fabric to start of 3-needle bind off, keeping center 4 steek stitches in stockinette. Open the steek and finish as for mitts knit in two pieces.
Gussets
If mitts are longer than mid-forearm, a gusset may be needed to fit comfortably. The gusset is a short row triangle added before the 3-needle bind off.
Tools
Main Needles see Mitt Stats for needle size, 1 pr interchangeable circulars, 32" (80cm) long, or size to fit yarn Second Cable 16"(40cm) long with end caps, for JMco only Bind Off Needle 1 needle any type or length or crochet hook, size to match main needle Thumb St Holder 1 needle any type or length, size no larger than main needle Crochet Hook to match Markers 10 (mA, mB, mS, mG, mT)removable, 1 must be distinct
Yarn
Yarn is either worsted weight or sock to lace held 2-3 strands together. Average combined yarn for a row is worsted. See Model Yarns for specific yarns used. Gauge See Mitt Stats.
| MittStats | |||
| Fringe | Autumn | Do a Little Dance | |
| St Count 1 mitt | 31 | 27 | 31 |
| St Count with Steek | 66 | 58 | 66 |
| St Count Fingertip Cuff | 36 | 32 | 38 |
| Gauge /4" (10cm) | 24 | 16 | 14 |
| Finished Length | 8" 20cm | 18cm | 10.5" 27cm |
| Weight 2 Mitts | 2.3oz 65g | 2.5oz 71g | 2.3oz 65g |
| Needle | 4.5mm US7 | 5mm US8 | 5mm US8 |
\*Finished Length is fngertip to wrist opening, not including fringe
Markers
Since I used a lot of markers on this one, I thought a couple of photos would help. In the top photo, every marker used in the mitts is in place. When working the mitts, the mS markers can be removed and used for the mG markers. mA Mitt #1 edge marker mB Mitt #2 edge marker mG gusset markers mS steek markers mT thumb opening markers
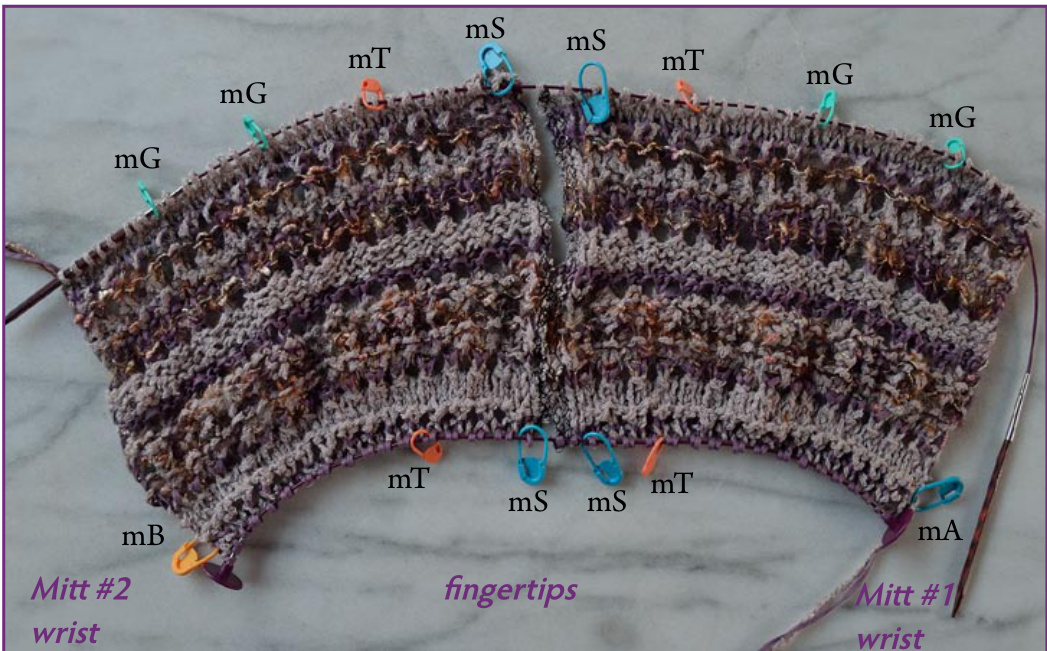
Do a Little Dance Above: All markers in place, steek sewn and cut, ready to begin gusset. Short cable at bottom by mA and mB hold stitches from JMco. Below: Gusset worked in upper portion of photo, needles and end caps rearranged to begin 3-needle bind off on Mitt #1.
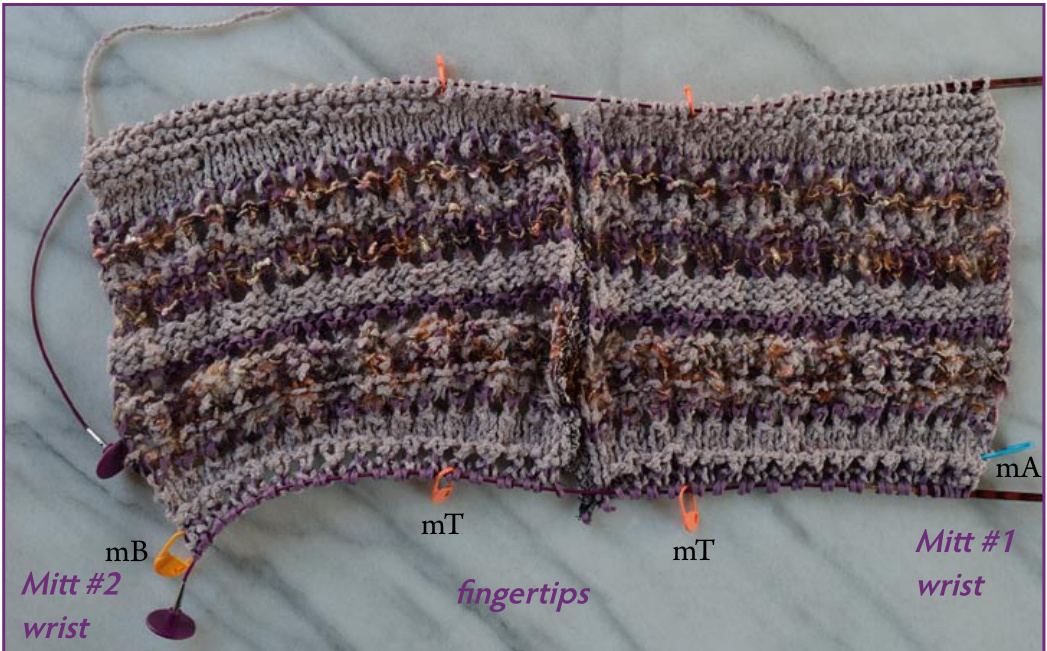

Fringe
1 Knitting Funky Fringe Yarn (100% polyester, 1oz/29.4g 90yds/82m) no color given, lavendar short eyelash c2 Karabella Yarns Aurora 8 Irrestringibile (100% merino, 1.75oz/50g 98yds/90m) color 03 c3 (Fingertip Cuff)Berroco Ultra Alpaca (50% alpaca, 50% wool, 3.5oz/100g 215yds/198m) color 6244 c4 Plymouth Yarn Gabrielle (75% wool, 15% rayon, 10% nylon, 1.75oz/50g 71yds/65m) no color given c5 KnitPicks Alpaca Cloud (100% baby alpaca, 1.75oz/50g 440yds/400m)Tide Pool c6 KnitPicks Risata (42% cotton, 39% merino superwash, 13% polyamide, 6% elite elastic, 1.75oz/50g 196yds/178m)Woodland Sage c7 Cascade Yarns Heritage Sock (75% merino superwash, 25% nylon, 3.5oz/100g 437yds/398m) color 5637 c8 (Cast on, Bind off, Thumb cuff) unknown worsted (100% wool) teal

Autumn
mc (Cast on, Fingertip cuff) Burgandy: 1 strand Rios and Violeta Africana held together Malabrigo (1) Rios (100% superwash wool, 3.5oz/100g 210yds/191m) 850 Archangel Malabrigo (2) Violeta Africana (100% superwash wool; 3.5oz/100g, 440yds/400m) color 020701 cC (Cast on, Bind off Thumb cuff)Gold: 1 strand Galway and Shadow held together Plymouth Yarn (3) Galway Highland Heather (100% wo0 3.5oz/100g 210yds/191m) color 856 KnitPicks (4) Shadow (100% merino wool, 1.75oz/50g 440yds/400m) Persimmon Heather
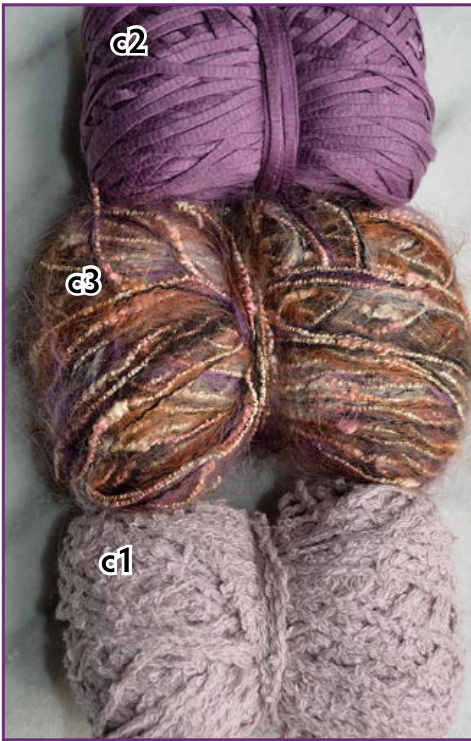
Do A Little Dance
c1 (Cast on) Classic Elite Sand (100% cotton; 1.75oz/50g, 77yd/70m) color 6409 c2 (Cast on, Bind off, both cuffs) National Yarn Crafts ribbon (100% cotton; 1.75oz/50g, length not given) 379 Wysteria c3 Trendsetter Yarns Dune (41% mo hair, 12% viscose, 6% metal, 3% acrylic, 11% nylon, 1.75oz/50g 90yds/82m)color64
| My Yarn Chart | |||
| c1 | c5 | ||
| c2 | 6 | ||
| c3 | c7 | ||
| c4 | c8 | ||
Notes
Mitt Body
Arm Gusset, Mitt #1
ThumbCuffMitt#2
See Yarn for cast on, bind off, and cuff yarns. To use JMco, put an end cap and needle on 16" (40cm) cable. Put other needle on 32"(80cm) cable.
Cast On
Steek: Cast on required stitches, including steek stitches
OR
Mitt #1: Cast on required sts Mitt #2: With second strand of same yarn, work as for Mitt #1 If using 2 cables, put both end caps on 16" (40cm) cable and needles on 32" (80cm) cable.
Mitt Body Setup
Place mA (distinct from other markers) in fabric on right edge of right mitt (Mitt #1) or on right edge of steek fabric. Place mB on left edge of left mitt (Mitt #2) or left edge of steek fabric. Rows begin on mA or mB edge, since rs/ws is not clear. For steek, place 2 mS on each cable (4 mS total) setting off center 4 steek stitches. Work steek stitches in stockinette throughout. Work mitt body in chaordic knitting, following a Model Pattern if desired. Carry or cut yarn as desired or as directed in Model Pattern. Continue until length is 14" (0.5cm) short of palm circumference, 7-1/4" (18.5cm) on model. Bind off adds 14" (0.5cm).
Open the Steek
Cut all yarns except yarn for gusset and 3-needle bind off. Leave markers in place. Sew and cut steeks. Steek edge is fingertip opening.
Mark Thumb Openings
Measure gauge on fabric. Calculate stitches in 1-1/2" (4cm), rounding to next bigger number for any fraction. Models were 6-9 stitches. Use stitch count to place 2 markers mT at 1-1/2" (4cm) from unmarked fingertip edges on 32" (80cm) cable or from mS. Remove mS if present. Photo on next page shows all markers. Do not cut yarn until directed. On 32" (80cm) cable, place 2 mG at at 1/3 points between mT and edge (2 mG total, at 8 and 16 stitches on Do a Little Dance). 1-2: (K to mG, remove mG, turn without wrapping, K to end) 3: (K to mT, turn, K to end) 4: (K to end), cut yarn unless using for bind off
Arm Gusset, Mitt #2
Repeat for Mitt #2, replacing K with P to maintain symmetry.
BindOffMitt#1
For balance of mitt, do not cut yarn until directed. Rearrange interchangeables so both cables have a needle on the same mitt and end caps on other mitt. Fold mitt so chosen side is out. It can be folded either way. 1: 3-needle bind off to mT, remove mT Place remaining live stitches on thumb stitch holder needle. Cut yarn, leaving a 3yd (2.7m) tail for thumb cuff.
BindOffMitt#2
Repeat for Mitt #2, being careful to match the way the mitt is folded, except do not transfer thumb stitches. Work thumb cuff in the round to desired length (3 rounds for models). 1: {Join at start of round} (K1, P1), ending Kfb if needed for even st count Next:(K/Ks, P/Ps} Bind off, cut yarn, pull tail through.
ThumbCuffMitt#1
Work as for Mitt #1, working first round off thumb stitch holder needle. Remove any remaining markers.
Fingertip Cuff
Weave or secure yarn tails. Trim tails at fingertips to 34" (2cm). With Mitt #1, public side facing, yarn tails to back, pick up stitches around fingertip opening. Check the fit before working the ribbing. The cuff should not be tight. Work ribbing as for thumb cuff for 1" (2.5cm). Bind off, cut yarn, pull tail through. Repeat for Mitt #2.
Arm Finish or Cuff
Trim yarn tails evenly to make fringe, or finish same as fingertip cuff. >
Notes
Cut and knot for yarn changes without a steek. For multiple rows in one yarn, begin first row at specified marker. To steek with fringe, cut and tie steek or tie on fringe to finish.
Mitts
Work according to DIY Pattern until directed to begin chaordic work. Work mitts row by row. 1: {c4, mA} (K1, P1) 2: {c2, mB} (K1, Slip1 yf, K1, Slip1 yb) 3: {c1, c5, c7, mA} (K2tog, yo) 4: {c3, mB} (K1, P1) 5: {c2, c5, mA} (K/Ps, P/Ks) 6: {c2, mB} (K/Ks, P/Ps) 7: {c3, mA} (K/Ps, P/Ks) 8: {c4, mB} (K/Ks, P/Ps) 9: {c6, c7 (2 strands), mA} (P1, Slip1 yf) 10: {c3, mB} (K1, P1) Work 11-13 for Mitt #1 then #2. 11-13: {c2, mA} (K/Ks, P/Ps) Work 14-16 for Mitt #1 then #2. 14: {c1, c2, mB} (K) 15: {c1, c2, mA} (K2tog, yo) 16: [c8, mB} K/Ps, Slip/yos yon) Work mitts row by row. 17: {c3, c5, mA} (K/Ps, P/Sl-yos) Work 18-20 for Mitt #1 then #2. 18: {c2, mB} (K/Ks, Slip/Ps yf) 19-20: {c2, mA} (K) Work mitts row by row. 21: {c5, c6, c7, mB} (K1,Slip1 yf) 22: {c4, mA} P/Ps, K/Slips) 23: {c8, mB} (K2togTBL, yo, K2tog, yo) 24: {c3, c5, mA} (K/Dec, Slip/yos yf) 25: {c1, c2, mB} (K/Ps, P/Slips) 26: {c2, mA} (K/Ps, P/Ks) 27: [c8, mB} (K/Ps, P/Ks) 28: {c2, mA} (K/Ps, P/Ks) 29: {c8, mB} (K/Ps, P/Slips) 30: {c2, mA} (K/Ks, P1Below/Ps) 31: [c5, c6, c7, mB}(K) 32: {c4, mA} (DipK {insert RN down 1 st & left 2 sts, leave loop on RN3, K2togTBL) 33: {c2, mB} (P/Dips, K/Dec) 34: {c3, mA} (Decl, yo) 35: {c1, c2, c5, mB} (K/Dec, Slip/yos yon) 36: [c5, c8, mA} (K/Slip-yos, Slip/Ps yf) Work mitts row by row. 43: {c2, mB} (K/Ps, Slip/Ks yf) 44: {c4, mA} (P2tog, yo) 45: {c2, mB} (P/Decs, Slip/yos yon) 46: {c8, mA} (K/Ks, Slip/yos yf) Work 47-48 for Mitt #1 then #2. 47-48: {c2, mB} (K/Ps, P/Slips) 49: (c2, mB} (K)
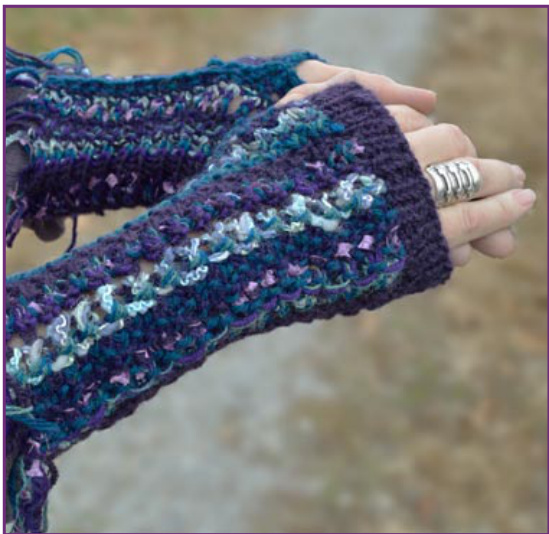
Model was bound off at this point. For more length (a bigger diameter mitt), return to an earlier row and work until mitt is desired size. Return to DIY Pattern
| My Yarn Chart | |||
| c1 | c5 | ||
| 6 | |||
| c7 | |||
| c4 | c8 | ||
Notes
Carry yarn at the edge for yarn changes, no steek. Work each row once on both mitts before starting next row. When necessary to access specified yarn, slide work instead of turning.
Mitts
Work according to DIY Pattern until directed to begin chaordic work. 1: [mB; cc}(K1, P1) 2: {mA; c} (K/Ps, P/Ks) 3: {mB; mc} (K2tog, yo) 4: {cc} (K/Dec, Slip/yos yon) 5-8: [mc} (K) 9: {Ccc} (K) 10: [cc}(P) 11: {cc}(K) 12: {Ccc} (P) 13: [cc} (K) 14: {mc, work DipK down 2 bars between sts on LN and RN} (K2, DipK, place Dip loop to LN loosely [not smocked}, yarn front, P Dip loop and next st tog) 15: (mc}(K) 16: [mc} (K2, P1) 17-19: {mc} (K/Ks, P/Ps) 20: {mc} (P2tog, yo twice) 21: {cc} (K/Decs, Slip/yos yf dropping 1 yo loop to make an elongated st) 22: {cc3(K/Ps Slip/Slips yf) 23: (mc}(P) 23: [mc} (K/Ks on Slips, P/Ks on Ks) 24: [mc} (K/Ps, P/Ks) 25: (mc} (K) 26: [mc} (P) 27: (mc)(K) 28: [cc, work DipK down 2 rows and 2 sts to the right of next st}(K3, DipK, place Dip loop to LN loosely, DecL) 29: [cc}(K1, P1) 30-31: {cc} (K/Ks, P/Ps) 32: [mc} (K2tog, yo) 33: [cc}(K/Decs,Slip/yos yon) 34: [mc} (P/Ps, K/Slips) 35: [mc} (K/Ks, P/Ps) 36: [cc} (K/Ps, P/Ks) 37: [mc} (K/Ps, P/Ks) 38: {Ccc} (K/Ps, P/Ks) 39: {mc} (K/Ps, P/Ks) 40: Cc (K/Ps, P/Ks) 41: (mc) (K/Ps, P/Ks) 42: {mc} (P2, K1) 43: [mc} (K/Ks, P/Ps) 44: [cc}(K2tog, yo) 45: [cc3 (P/Decs, K/yos) 46: [mc} (K) 47: {mc} (P) 48: (mc} (K) Model was bound off at this point. For more length (a bigger diameter mitt), return to an earlier row and work until mitt is desired size.
Return toDlYPattern
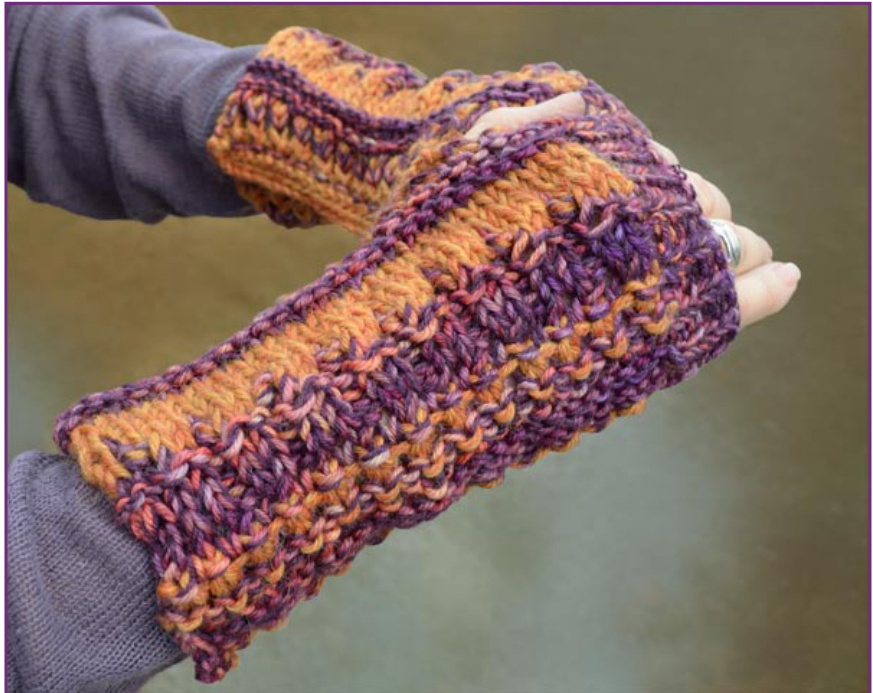
Notes
Carry yarn at the edge for yarn changes. Model is steeked. Work each row once on both mitts before starting next row. When necessary to access specified yarn, slide work instead of turning.
Mitts
Work according to DIY Pattern until directed to begin chaordic work. 1: {c2, mB} (K1, P1) 2: {c1, mA} (K2tog, yo) 3: {c1, mB}(K) 4: {c1, mA}(K) 5: {c1, mB} (P) 6: {c1, mA} (K) 7: {c2, mA} (DecL, yo) 8: {c3, mB} (K/Dec, Slip/yos yon) 9: {c1, mB} (K/Ks, P/Sl-yos) 10: {c1, mA} (K/Ps, P/Ks) 11: {(c3, mA} (K) 12: {c3, mB} (P) Brioche section. 13: {c1, mB} (K1, Slip1 yon) 14: {c3, mA} (K/Sl-yos, Slip/Ps yon) 15: [c1, mA} (P/Sl-yos, Slip/Ks yon) 16: {c3, mB} (P/Sl-yos, Slip/Ps yon) 17: {c1, mB} (K/Sl-yos, P/Ks) End of brioche. 18: {c2, mB} (K2togtbl, yo) 19: [c2, mA} (K) 20: {c1, mA}(K1, P1) 21: [c1, mB}(K) 22:{c1, mA} (P) 23: [c1,mB}(K) 24:{c2, mB} (K2togtbl, yo, K2tog, yo) 25: {c3, mA} (P/Dec, Slip/yos yon) 26: [c3, mB}(K/Ks, P/Sl-yos) 27: {c2, mA}(K/Ks, P/Ps) 28: {c3, mA}(K/Ks, P/Ps) 29: {c1, mA}(K/Ps, P/Ks) 30: {c1, mB} (K/Ps, P/Ks) 31: {c1, mA}(K/Ps, P/Ks) 32: {c3, mB} (K2tog, yo) 33: [c3, mA}(K) 34: (c2, mB} (K) 35: [c1, mB} (K2togtbl, yo) 36: {c2, mA} (K/Decs, Plyos) 37: {c1, mA}(K) 38:[c1, mB}(P) 39: [c1, mA}(K)
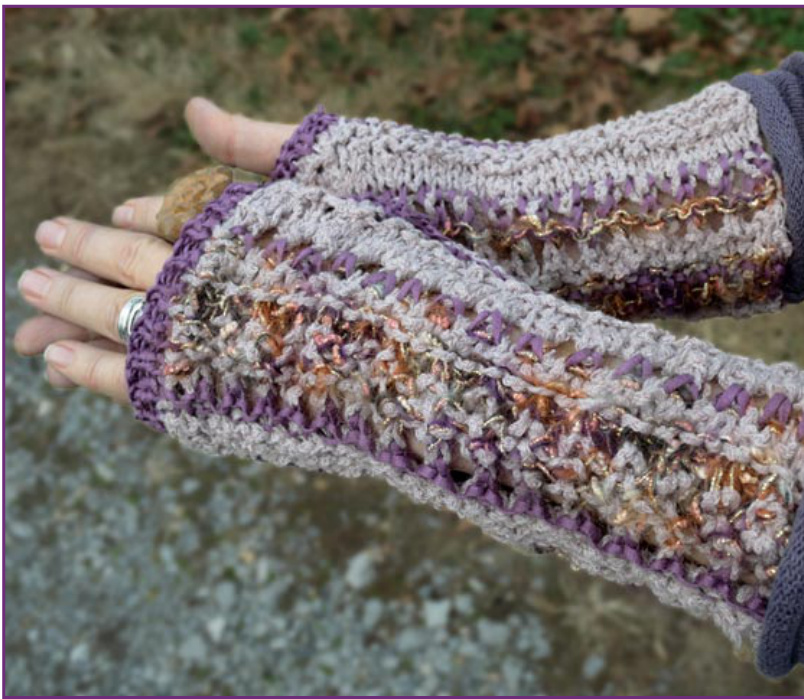
Model was bound off at this point. For more length (a bigger diameter mitt), return to an earlier row and work until mitt is desired size.
Return to DIY Pattern
| My Yarn Chart (model used 3 yarns) | |||
| cl | c5 | ||
| c2 | 6 | ||
| c3 | c7 | ||
| c4 | c8 | ||
258 ZigZagZ A Rectangle
Overview
ZigZagZ is a do-it-yourself rectangle that can be any size, such as a scarf, shawl, or afghan. The cast on can be the long or short side. It begins with a toothed border worked with short rows, using any yarn and needles. Cast on and bound off edges zigzag in unison or run opposed, each edge mirror imaging the other. The pattern gives row by row directions for casting on and binding off the teeth. Size Size modelis 2"(56cm) wide by 9" (2.7m) long
Notes
Items knit in cotton yarn stretch; wool doesn't. If you are knitting in cotton, stretch the teeth to measure your cast on length. A tight cast on or bind off misshapes the rectangle. Turn short rows without a wrap and work first stitch on return row, don't just slip it. Look up your stitch count in the table on the next page. Each tooth is A stitches wide and 5 rows tall. Use the yarn label to see how big a tooth will be. A sock yarn with A equal to 10 has teeth about 1.5" (3.8cm) wide. A very bulky yarn with A equal to 25 has teeth about 10" (25cm) wide. Pick a cast on stitch count by weight of yarn or width of teeth. The choice does not affect fabric gauge or dimensions of finished rectangle.
Tools
Needles 1 pr circulars to match yarn Crochet Hook to match Markers 1 (mA) removable
Yarn
100% cotton approx. 105yd/100m 3.5oz/100g per skein, 3 colors: black, mustard, multi (black, mustard, olive), total weight 2.5 Ibs (1. 1kg) Gauge Gauge work to desired dimensions
Fringe
If you want to fringe the straight edges, make the yarn tails long enough and tie the joins with slip knots that can be pulled out from the yarn tail end. When finishing, you may need to add more fringe so it looks full enough. When adding fringe, open the slip knots, add fringe as needed, and retie with overhand knots. Since the fringe would include all yarns used in the project, I would also make any added fringe from a mix of all yarns. As an alternative to long fringe, simply tie overhand knots and trim the ends to about an inch or so long, as done on Whiter Shade of Pale.
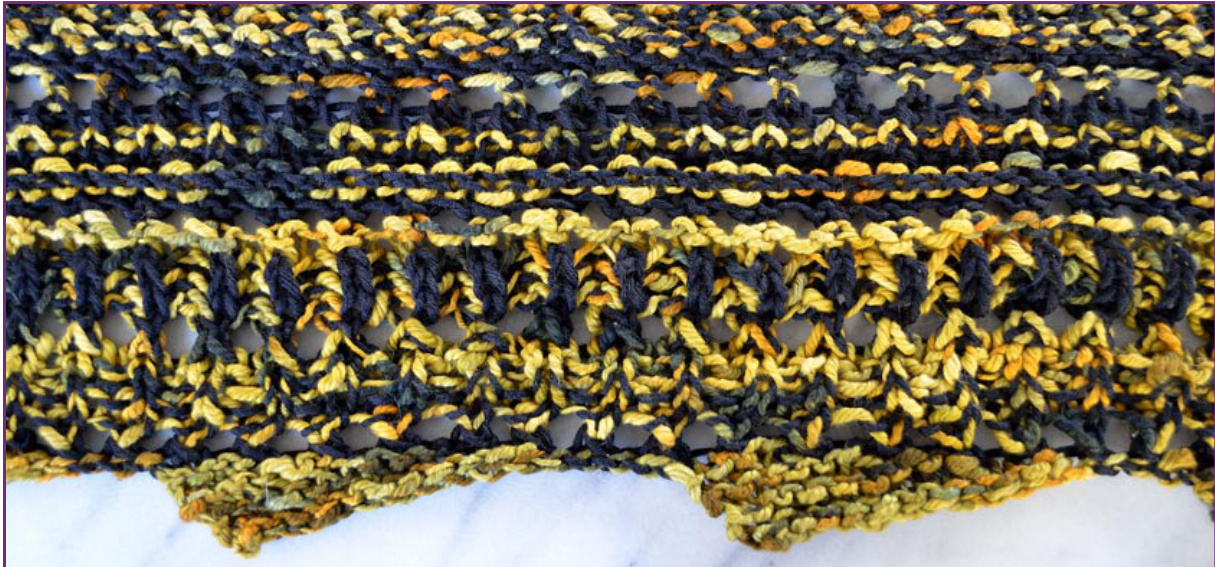
Notes
You may prefer to work over an odd or even stitch count (I prefer odd). If A and tooth count are both odd, total stitch count is odd. Otherwise, total stitch count is even. To change to your preference, increase or decrease one stitch in first row, then maintain stitch count.
| Cast On Stitch Count | ||||
| no | Sock | Worsted | Bulky | Bulky Very |
| A | 25 | 20 | 15 | 10 |
| B | 20 | 16 | 12 | 8 |
| c | 15 | 12 | 9 | 6 |
| D | 10 | 8 | 6 | 4 |
| E | 5 | 4 | 3 | 2 |
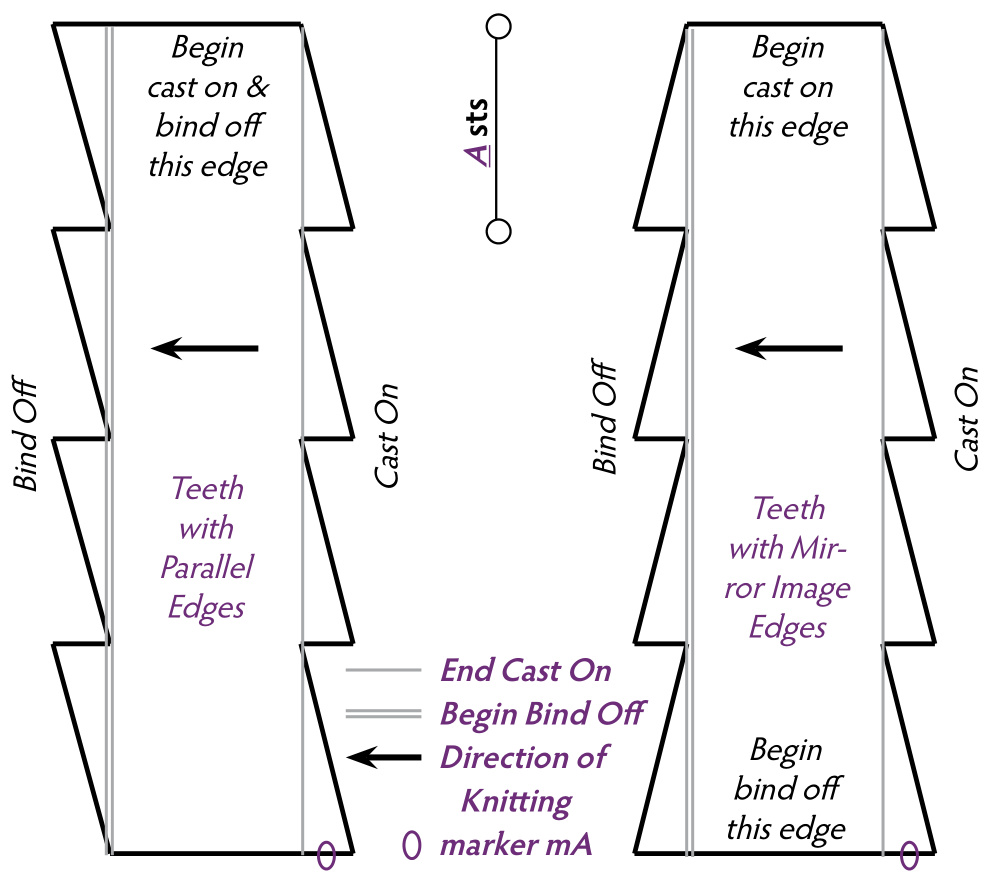
Cast On with Short Rows
Each repeat of rows 1-5 creates one tooth. Using 2 skeins, changing working yarn at end of each row, using Edge Wrap, work rows 1-5 to desired width. 1: Aco A sts, turn 2: KB, turn, K to end 3: KC, turn, K to end 4: KD, turn, K to end 5: KE, turn, K to end Place mA in fabric of last tooth.
Bind OffwithShort Rows
Before starting each tooth, you can place a removable marker on LN A stitches from beginning of tooth, as an aid to counting stitches. For row 5, bind off until next stitch would be worked on both sides of marker and move marker to the left A stitches. Do not count last bind off stitch on RN as an A stitch.
Body of Rectangle
Work in chaordic knitting to desired length. End at edge with mT for teeth that mirror image each other. End at edge without mT for teeth that run parallel with cast on teeth. Once starting edge of bind off is determined, remove marker. Each repeat of rows 1-5 completes one tooth. Work next rows until all stitches are loosely bound of. Beginning with 2nd tooth, count last bind off stitch on RN as 1st stitch in E stitches. 1: KE, turn, K to end 2: KD, turn, K to end 3: KC, turn, K to end 4: KB, turn, K to end 5:JCboA Cut yarn, pull tail through last stitch, weave in tails. If desired, work a crochet edging on toothed edges and fringe on straight edges. > Abbreviations Aco Austrian cast on JCbo Jennifer's Cabled bind off
3 -61 Fantasia
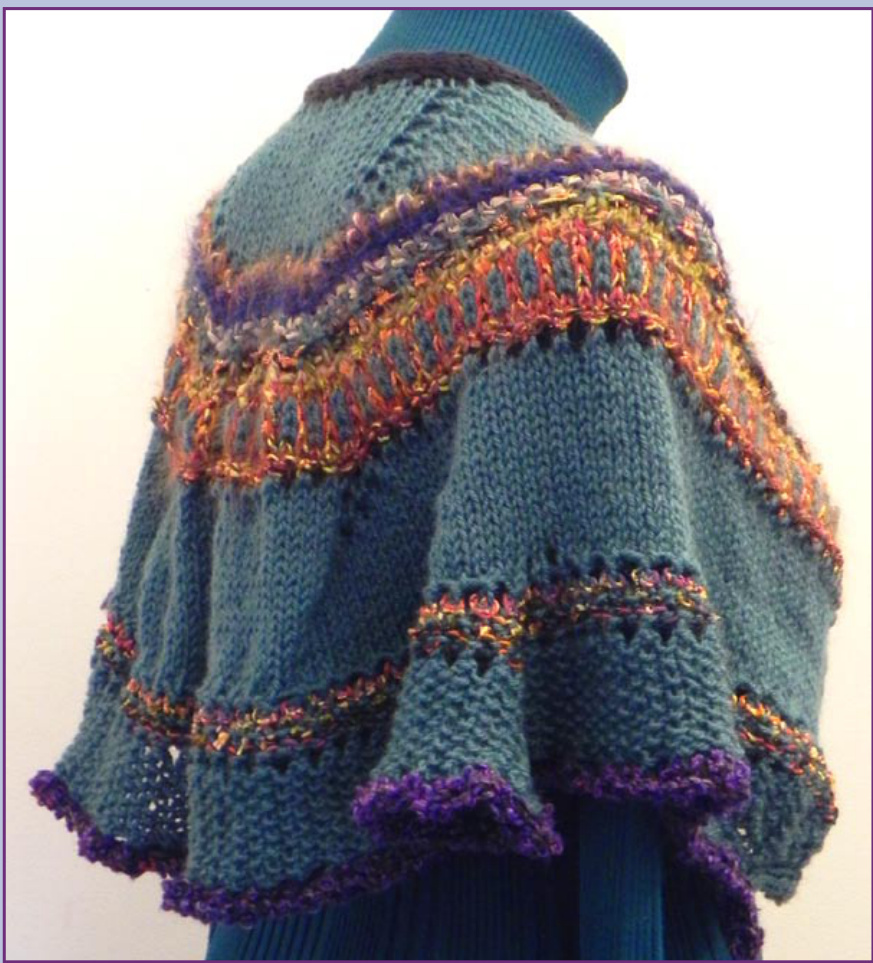
Overview
Pattern uses worsted to bulky yarn. Work neckline tie to desired length, pick up stitches along tie edge, and knit shawl top down. Cut and knot for yarn changes. Integral stockinette border conceals yarn tails. To wear shawl, thread ties through openings before tying.
Sizing
Use shoulder diameter to find neckline tie length and yarn required. Measurement is much larger than bust diameter and taken over typical clothing. Finished shawl length is 16-1/2" (42cm).
Tools
Needles 1 pr circulars 5mm/Us8 or size to fit yarn, 32" (80cm) and 60"(150cm) long
Crochet Hook to match
Markers 3 (mA, mB) removable, they can match
Yarn
Yarn B is used for the neckline tie. To stand up to wearing, choose a strong, smooth yarn that withstands abrasion. Sock yarn is a good choice. mc Wool Pak New Zealand Wool 10 ply (100% wool, 430yd/393m 8.9oz/250g) (2 skeins for larger size) Teal B Smooshy Sock Yarn Dream in Color (100% superwash wool, 450yd/411m 4oz/112g) Black Parade VS360, held 3 strands together cC assorted yarns, lace to worsted
Gauge
13 sts per 4" (10cm) with mc in stockinette on5mm/US8needles
Measuring
Measure shawl length at center back, including neckline tie.
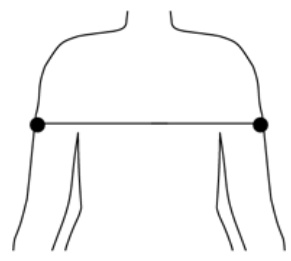
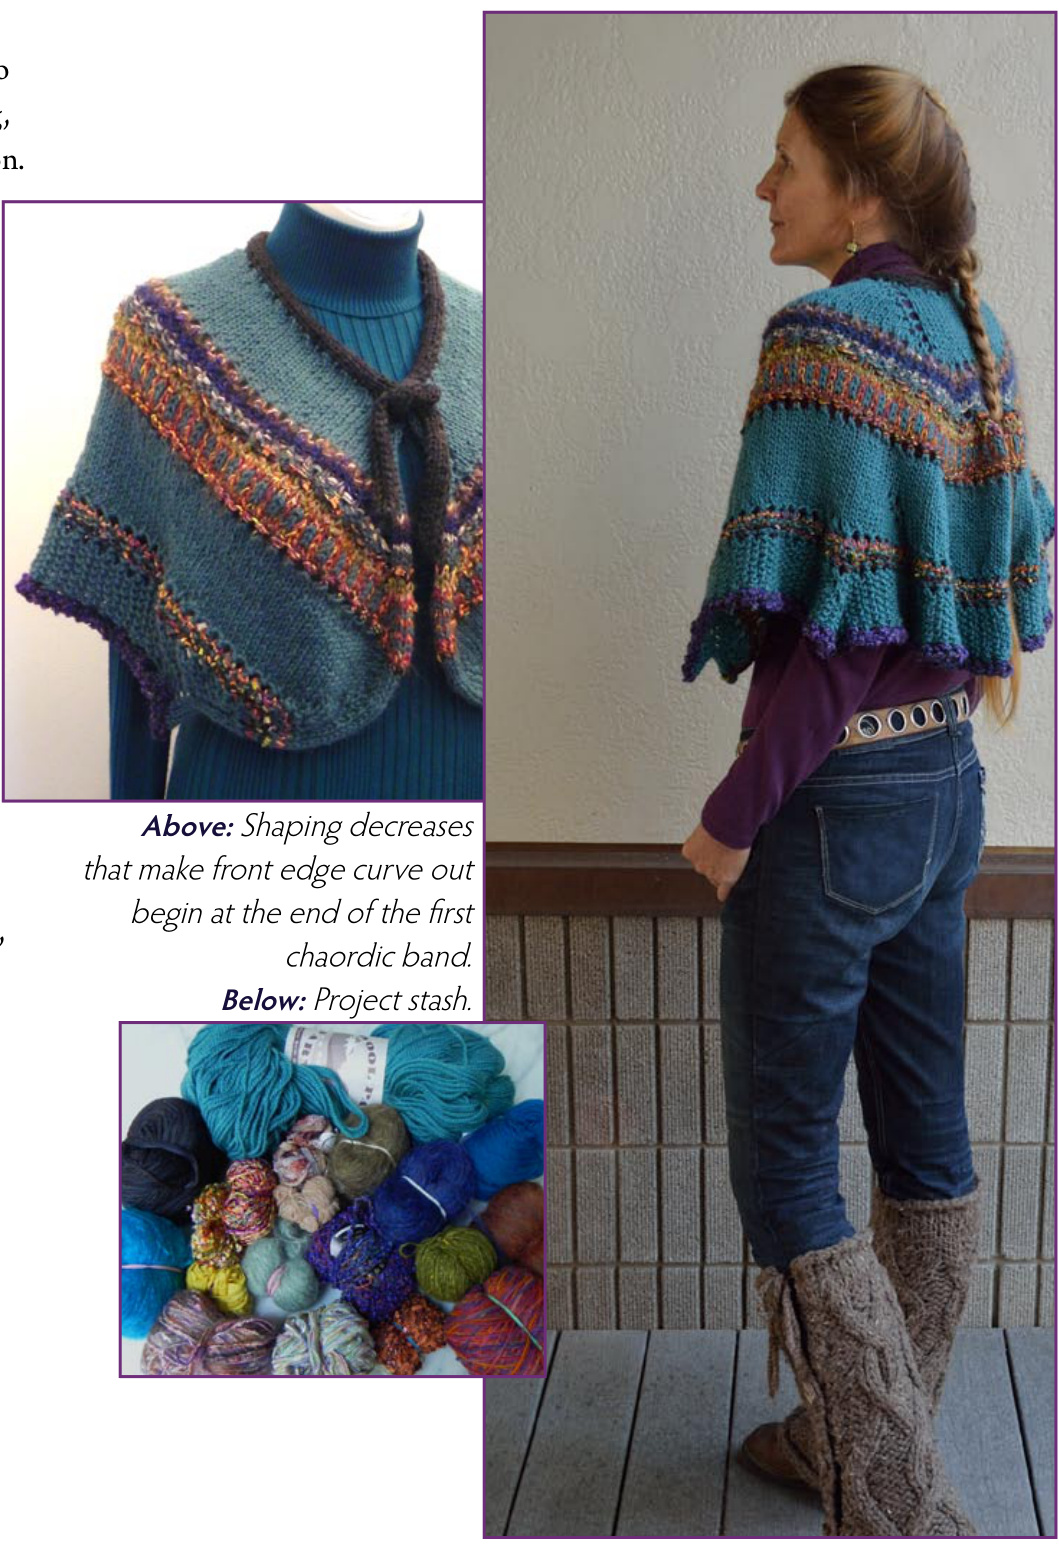
| Tie Length eYarn | |||
| Shoulder Diameter | Size | TotalTie Length | Total Yarn Required |
| 50" 127cm | X-small to 1x | 41" 104cm | 500yd 455m |
| 70" 178cm | 2x to 3x | 49" 124cm | 800yd 728m |
Stitch Patterns
Neckline Tie
1st Chaordic Band
Border [rs, start of row} K5, yo {rs, end of row} yo, K5 {ws row} P6 With 3 strands B held together, cast on 5 stitches. Work next rows to desired length, ending after either row. Interior shaping only on rows 3, 7, 11. Change cc every row. Work next rows once. Shape 1 {rs) (yo, K1) 2x Shape 2 {rs)(K1, yo) 2x
Pattern Row Notes
Border and shaping stitches are not repeated in pattern rows. They occur every other row on rs, unless noted. Rows with shaping at border are marked {Border}. Maintain 5 border stitches in stockinette plus a yo on shaping rows at both edges. If desired, place marker 4 stitches before end of rs row for start of border. Rows with interior shaping are marked {Shape}.
Example Pattern Rows
The next example rows list all stitches. Only red instructions are given in pattern rows. 1: {rs, c, Border, Shape} Border {K5, yo},Work to 2 sts before mA, Shape 1 {yo, K1, yo, K1}, slip mA, Work to mB, slip mB, Shape 2 {K1, yo, K1, yo},Work to last 5 sts Border {yo, K5} (+6) 2: {ws, cc} P6, Work to last 6 sts, P6 1: Pto last st, Slip1 yf 2: K to last st, Slip1 yb Bind off, cut yarn.
Pick Up Sts for Body
Place marker 8-1/2" (21.5cm) from each end of neckline tie. With mc, rs facing, and most of neckline tie to your left, work next rows once. 1: {rs} Begin at first marker, pick up 2 sts, BLco2, skip 2 loops {tie opening made}, (pick up 2sts, yo) to last 4 loops, BLco2, skip 2 loops, {tie opening made}, pick up 2 sts, remove markers Move mA and mB closer to each edge 4.5" (11cm). Resume interior shaping. Work next rows once. 19: {ws, cc, Border, Shape} (P) 20: [rs, c} (K), cut c, Slide 21: {rs, cc, Border, Shape} (K), Slide 2: {ws} (P) With rs facing, locate center back. Place mA 3" (7.5cm) to right of center back and mB same number of stitches to left of center back.
1st mc Stockinette Band
With mc, work next rows until mc band is 3" (7.5cm) long. 1: {rs, Border, Shape} (K) 2: {ws} (P) 1: {rs, cc, Border} (DecL, yo) 2: {ws, c} (K/yos, P/Ps) 3: {rs, cc, Border, Shape} (K) 4: {ws, same cc} (K) 5: {rs, c, Border} (K1, P1) 6: {ws, c} (K/Ks, Slip/Ps yf, K/yos) 7: {rs, cc, Border, Shape} (K/Ps, P/Slips) 8: {ws, cc} (P) 9: [rs, c, Border} (P1, Slip1 yb, P1, Slip1 yf)} 10: {ws, cc} (P/Slips, K/Ks, K/yos) 11: {rs, cc, Border, Shape} (K) 12: {ws, cc} (K1, P1) Brioche, do not cut yarn. No interior shaping. Work next rows once. 13: {rs, cc, Border} (K), Slide 14: {rs, mc} (K1, Slip1 yon) 15: {ws, c, Border} (P/Slip-yos, Slip/Ps yon), Slide 16: {ws, mc} (P/Slip-yos, Slip/Ps yon) 17: {rs, cc, Border} (K/Slip-yos, Slip/Ks yon), Slide 18: {rs, mc} (K/Slip-yos, Slip/Ks yon), cut mc cont. on next page
2nd MC Stockinette Band
Begin 4 decreases on shaping rows, inside of Border. This changes stitch count for shaping row from (+6) to (+2). With mc, work next rows once. 1: {rs, Border, Shape} DecL 2x, (Decl, yo) to last 9 sts, DecR 2x(+2) 2: {ws} (P) 3: {rs, Border, Shape} DecL 2x, K to last 9 sts, DecR 2x(+2) 4: [ws} (P) Begin 6 decreases on shaping rows, inside of Border. Stitch count remains constant for rest of shawl. Work next rows twice. 5: {rs, Border, Shape} DecL 3x, K to last 11 sts, DecR 3x 6: [ws} (P) Move mA and mB closer to each edge 4.5" (11cm). Work next rows 3 times. 7: {rs, Border, Shape} DecL 3x, K to last 11 sts, DecR 3x 8: [ws} (P) Work next rows once. 9: {rs, Border, Shape} DecL 3x, K to last 11 sts, DecR 3x 10: {ws} (K1, P1) do not cut mc
2nd Chaordic Band
Change cc every row. Do not cut mc. Move mA and mB closer to each edge 4.5" (11cm). Work next rows once. 1: {rs, cc, Border, Shape} DecL 3x, (DecL, yo) to last 11 sts, DecR 3x, Slide 2: {rs, mc} (Plyos, K/Ks) 3: {rs, c, Border, Shape} DecL 3x, (K/Ps, P/Ks) to last 11 sts, DecR 3x 4: {ws, mc} (K/Ps, P/Ks, K/yos) 5: {rs, cc, Border, Shape} DecL 3x, K to last 11 sts, DecR 3x
Final MC Seed Stitch Band
Maintaining seed stitch pattern across shaping, work next rows once. Work next rows until shawl is desired length. 4: {rs, mc, Border, Shape} DecL 3x, (K/Ps, P/Ks) to last 11 sts, DecR 3x 5: {ws, mc} (P/Decs, K/Ps, P/Ks)
BindOff&Finish
Change to cc that is heavier than mc with at least 20yd (18m) available. Remove markers. Work next row once. 1: {rs, cc, Border} Decl 3x, (DecL, yo) to last 11 sts, DecR 3x Bind off with same yarn, using JCbo. Weave in tails not covered by border. Trim knotted yarn tails to 34" (2cm). With mc, sew border closed, hiding yarn tails. Reinforce tie openings with single crochet. Block if desired. >
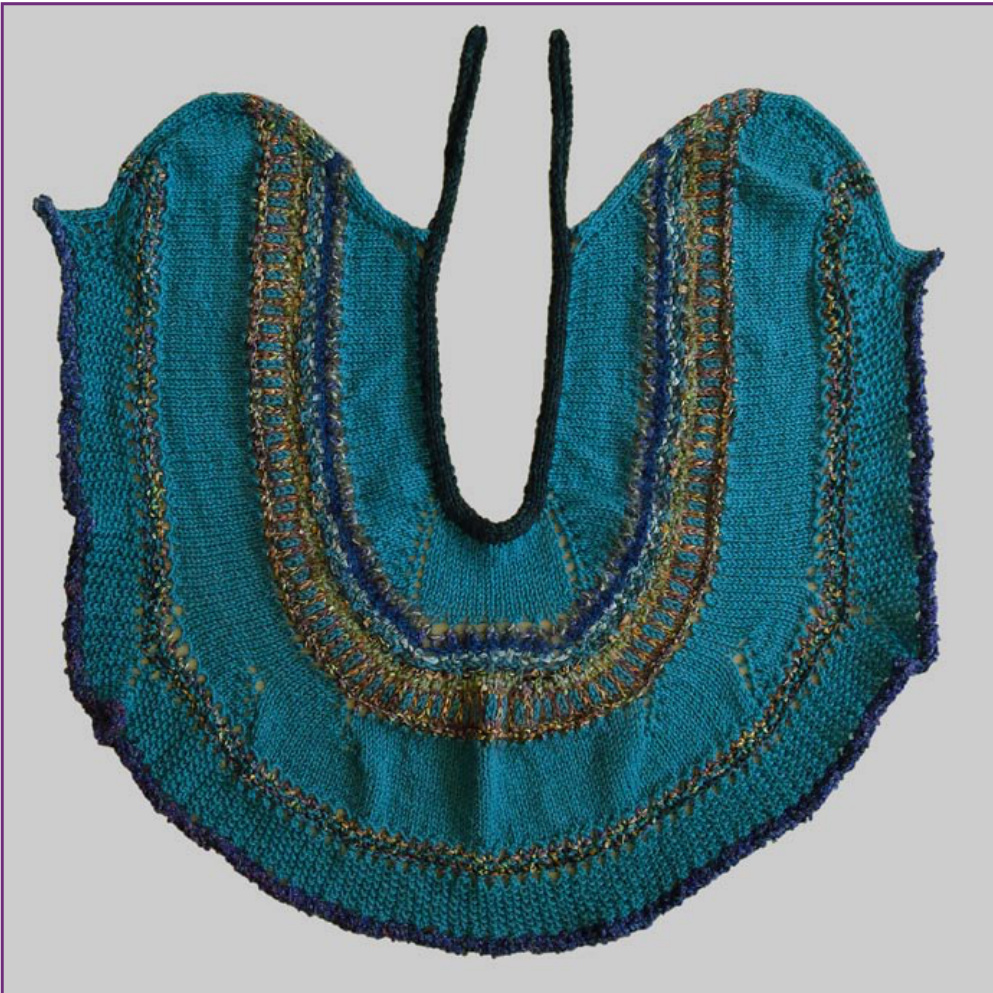
465 Ditty Bag

Overview
General Notes
Notes on Fulling
Notes on Bottoms of Bags
To prevent holes in the fabric, use Dips or BLco in stitch patterns for increases rather than yarn overs. Tall Bag is worked in freestyle chaordic knitting, using the generic pattern to maintain the rolled border at the top edge of the bag. Short Bag has row by row pattern instructions. Fulled bag worked flat from side to side and turned into a a tube with a 3-needle bind of. Bottom is picked up and worked in the round. A rolled stockinette border at the top edge has holes made with yarn overs for threading the handles directly or installing grommets. Border also conceals yarn tails on that edge.
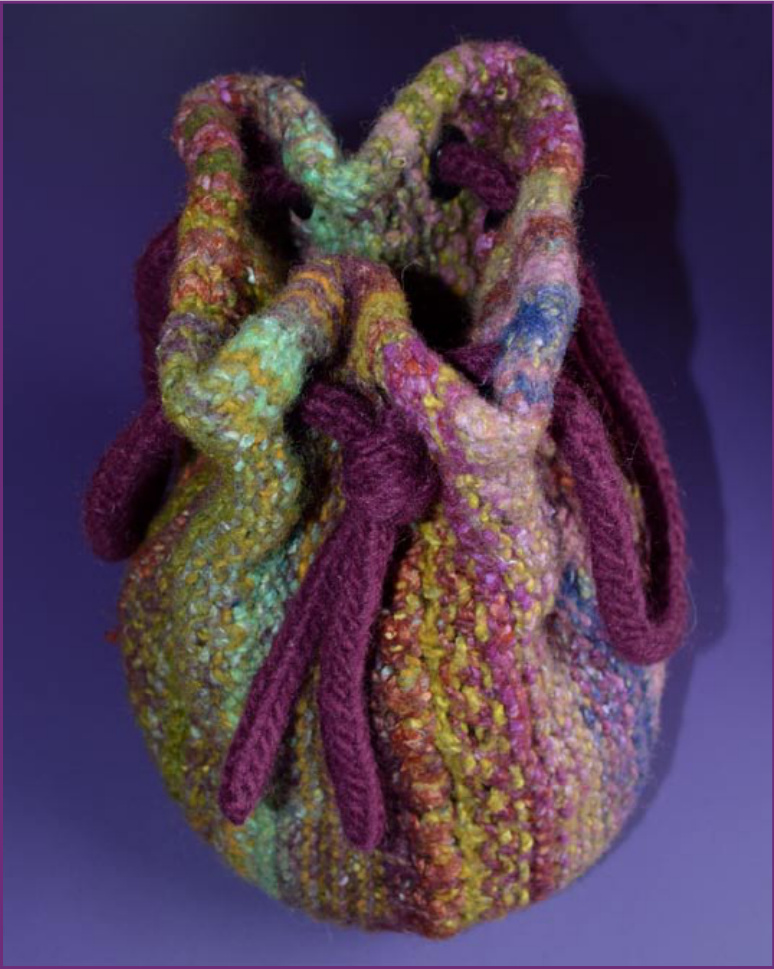
Tall Bag was washed twice and machine dried completely once and partially a second time. Short Bag was washed once and air dried only. Tall Bag stretches more than Short Bag, since the Noro yarn does not full as completely. Whenever they were handled during fulling, both bags were stretched sideways in the lower part of the bag, without stretching the top opening, so finished bags are pear shaped. Tall Bag: 12-V"(32cm) high, knit with a long run striping Noro yarn and a solid color Brown Sheep yarn with freestyle chaordic knitting and grommets. Tall Bag can be worked according to Short Bag pattern by using the larger cast on stitch count and the required Tll Bag length, changing yarns as desired. Because of the yarns chosen, the bottoms of the two bags are worked differently. Match your yarn to the following descriptions to choose the better bottom. Either bottom fits either bag. Brown Sheep yarn used for the bottom of the Tall Bag shrinks more than Noro used for the sides. As a result, the bottom shrinks more and pulls the sides in, so bottom is not visible when the bag is upright. For this situation, use the More Rounds Bottom with decreases worked every other round until close to the center. For the Short Bag, the same yarn was used for the sides and the bottom. To achieve the same look, the Fewer Rounds Bottom (photo next page) uses fewer rounds with decreases worked on most rounds. Even before fulling, this bottom pulls the sides under. Fewer Rounds Bottom
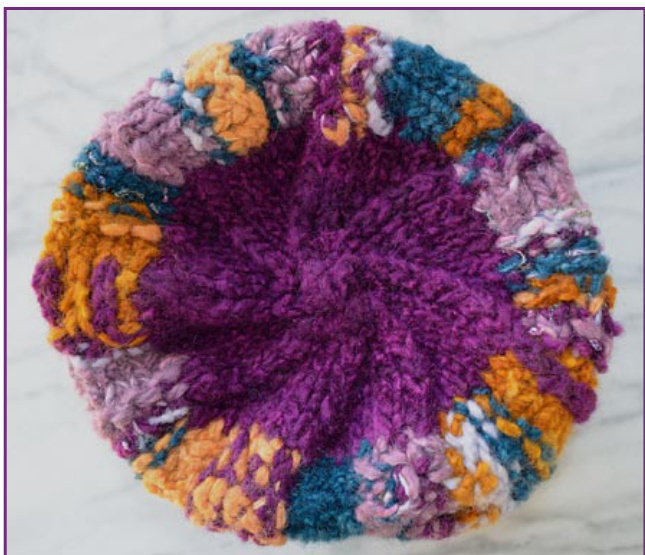
Pick Up for Bottoms of Bags
Insert Grommets eHandles
All knitters actually have a lot of experience seeing how knitting fits on a needle. After all, we all look at our knitting! You just may not be used to doing a pick up using that experience. To place 8 markers for bottom pick up, fold bag flat and put a marker at each side fold. Refold with side markers lined up in the middle and again place a marker at each side fold. Then subdivide the quarters. After markers are in place, pick up the first section (probably 7-8 sts). Spread the stitches along the needle, allowing fabric to come to rest as much as possible, not stretched or jammed tight. Count the stitches. If the stitches are crowded subtract one stitch, pull out the pick up, and work it again with the new stitch count. If it looks stretched, do the same only adding one stitch. Evaluate again. When you are happy with the first section, pick up the second using the same stitch count. Evaluate, and if that looks good, work the rest of the pick up using that stitch count between markers. With 8 markers, stitch count will automatically be divisible by 8. Before inserting grommets, follow the procedure for inserting the handles without grommets. Once you are happy with the handles, mark the eyelets, remove the handles, insert the grommets, and replace the handles. I prefer to place some markers for guidance before inserting handles. Mark both edges and the centers, similar to preparing for the bottom pick up. Before inserting handles, tie them together at one end with a loose overhand knot that will be easy to adjust later, leaving about 4" (10cm) tails. Insert the loose end of each handle through adjacent eyelets at one side, leaving the knotted ends outside the bag. Then take each end outside before the center marker, back in past the center marker, and back out on either side of the other side marker. Reposition as necessary to balance the spacing. Widen eyelets by stretching them, if needed. If not using grommets, tie snug overhand knots in both ends of handles. If using grommets, mark eyelets, remove handles, insert grommets, and replace handles. Looking down on open bag.
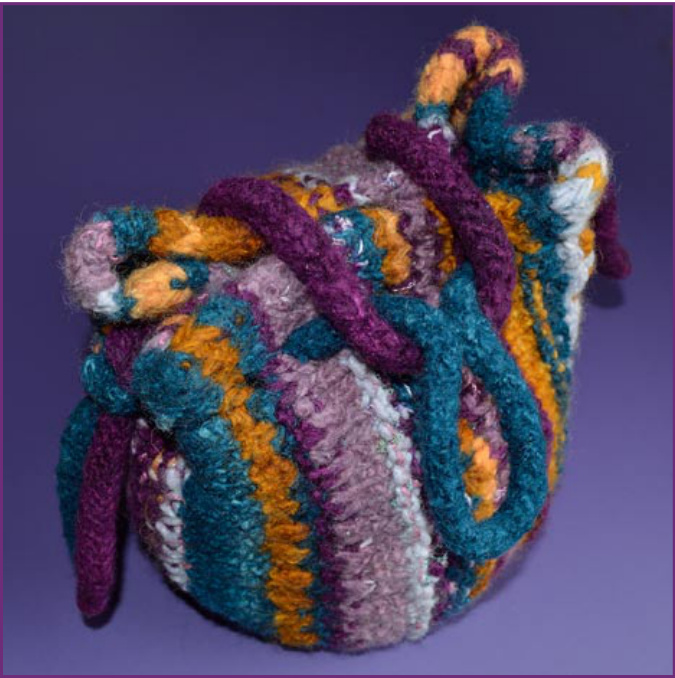
Short Bag: 9-%" (24cm) high, worked with several yarns following row by row pattern instructions and no grommets.

Sizing
NOTE: Your size will vary after fulling Tall Bag Before fulling: 14" (36cm) high x 14" (36cm) wide. Fulled: 12-V2" (32cm) high x 11-v2" (29cm) wide. Short Bag Before fulling: 11" (28cm) high x 12" (30cm) wide. Fulled: 9-%2" (24cm) high x 11" (28cm) wide.
Tools
Tall Bag Needles 1 pr circulars 8mm/US11, 32" (80cm) long, short cable with end caps if using JMco Short Bag Needles 1 pr circulars 9mm/US13, 32" (80cm) long, short cable with end caps if using JMco Other Needles 1 pr double points or short circulars for l-cord
Crochet Hook to match
Markers 8 (mA, mB)(1 must be distinguishable),all removable
Gauge
Tall Bag 11 sts/4"(10cm) before fulling Short Bag 10.5 sts/4" (10cm) before fulling
Tall Bag Yarn Supplies
The Noro yarn, with 25% silk, does not full as hard as the Brown Sheep, and retains a lot of stitch definition. Both yarns are bulky singles with consistent diameter. mc Noro Iro (75% wool, 25% silk, 131yd/120m 3.5oz/100g) 2 skeins 90 cC Brown Sheep Lamb's Pride Bulky (85% wool, 15% mohair, 125yd/114m 4oz/113g) Chianti MB8 Grommets 8 with a %" (1.3cm) hole, optional
Short Bag Yarn & Supplies
Yarns without labels are the same weight as the Manos yarns and thinner than the Noro or Brown Sheep used for Tall Bag. They are all thick and thin singles, so the stitches vary in size for a more rustic look to the finished fabric. All wool yarns are held double. The Ironstone yarn does not full, but is trapped by the wool yarns. It is a 3 ply yarn. Separate the plies and use one at a time; carry with a wool yarn. A good alternative would be a thin ladder yarn. Ironstone (1) Sky, (70% cotton, 30% rayon, 70yd/64m 2.1oz/60g) unknown color, separated into 3 plies: c1 (ply 1) rayon boucle multi c2 (ply 2) pale pink cotton c3 (ply 3) dark pink cotton c4 wool singles, pale red violet c5 wool singles, medium red violet c6 wool singles, dark red violet c7 Manos del Uruguay (100% wool, 138yd/126m 3.5oz/100g)W c8 Manos del Uruguay (100% wool, 138yd/126m 3.5oz/100g) 40 c9 wool singles, teal Grommets 8 with a V" (1.3cm) hole, optional
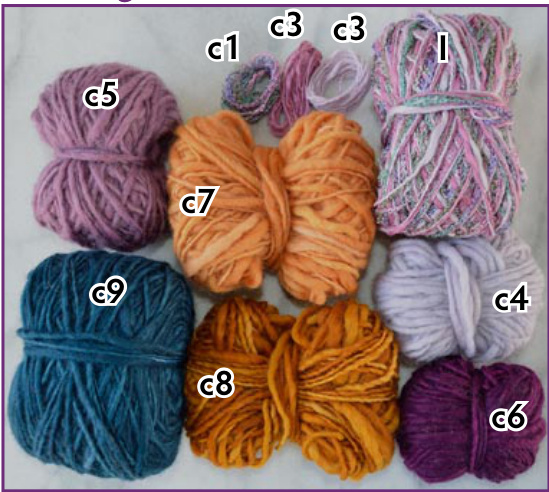
Short Bag Yarn
| My Yarn Chart | |
| c1 | |
| c2 | |
| c3 | |
| c4 | |
| c5 | |
| c6 | |
| c7 | |
| c8 | |
| c9 | |
StitchPattern
Maintain 5 stitches in stockinette at marker mA edge (top opening of bag) with a yo every 4th row for threading handles. If work Slides instead of turns, replace Ks with Ps and vice versa for Border only.
Border
1: K5 2: P5 3: K3, K2tog, yo 4:P5
Cast On
Some test knitters had trouble with the Austrian cast on being too tight (and if Aco is too tight, a regular long tail will be way too tight). If this might be a problem for you, use JMco or a provisional cast on. If using JMco, use a short cable to hold the second set of stitches. You cannot slide the knitting if all the stitches are on one cable. CO: With mc, Aco 39 sts or JMco 78 sts for tall bag
Sides
Place marker mA in fabric at start of first row. Attach second ball of Noro when desired and alternate (more or less) between balls. Carry yarn up the side without cutting. Work rows 1-4 in chaordic knitting until fabric is 28" (71cm) long, ending with one yarn at each edge, not both on same edge. 1: {mA} K5, (Work) 2: Work to last 5 sts, P5 3: {mA} K3, K2tog, yo, (Work) 4: Work to last 5 sts, P5
3-NeedleBind Off
Either side can be public side. Select yarn to use for pick up. Slide live stitches to one end of needle to begin. Skip pick up if using JMco. Pick Up: beginning at edge with yarn for pick up, pick up 39 sts along original cast on Next: folding desired side out, 3-needle bind off all live sts, cut both yarns, pull tail through last st of bind off, remove mA
More Rounds Bottom
Follow these instructions if yarn for bottom shrinks more than yarn for sides. Otherwise, use Fewer Rounds Bottom on Short Bag pattern. At edge without border, beginning with a distinct marker at 3-needle bind off, place 8 markers evenly around bottom edge. Next: With c, pick up the same number of sts in each section (9 for model, 72 total), moving marker from fabric to needle at end of each section. Work next rounds until 24 stitches remain. 1: (K to m, K2tog) 8x (-8) 2: (K) Work next rounds once. Next: {remove markers) (K2tog) (12) Next:(K2tog)(6) Next: (K2tog) (3) Next: cut yarn leaving a 6"(15cm) tail, weave tail through remaining sts
I-cord Handles
With cc cast on 3 stitches and work Icord until cord is 36" (92cm). Bind off and weave in tails. Repeat for second handle.
Finish Bag
Secure all yarn tails and trim to 1" (2.5cm) long. Leaving yarn overs exposed below sewing, concealing yarn tails, and turning border down as little as possible to leave room for grommets, sew border. Full bag according to Notes on Fulling on first page of pattern and following the directions in Chapter 3. After first wash, trim yarn tails flush. AttachGrommets&Handles Fold bag to match model, choosing face you want for front and back. Use a large knitting needle or your fingers to widen appropriate yarn overs. If using grommets, install them in the openings. Insert handles through the holes. Tie ends in overhand knots at sides of bag. >
Stitch Pattern
Maintain 5 stitches in stockinette at maker mA edge (top opening of bag) with a yo every 4th row for threading handles. If work Slides instead of turns, replace Ks with Ps and vice versa for Border only.
Border
1: K5 2:P5 3: K3, K2tog, yo 4: P5
Cast On
CO: With c6 held over thumb and c5 over index finger, Aco 29 sts or JMco 58 sts (see note on previous page)
Sides
Carry yarn up the side or cut and knot, as practical. Place marker mA (distinct from mB) in fabric at start of first row. Place mB on other edge. Rows begin on mA or mB edge, since rs/ws is not clear. Maintain Border at top (mA edge) of bag. Rows with yo are marked {Border?. Work next rows once.
| 4: {c1, c9, mA} (P1, K1Below) | 31: {c5, mA, Border} (K/Ks, P/Ps) |
| 5: {c2, c9, mB} (K) | 32: {c9, mA} (P/Ks, K1Below/Ps) |
| 6: {c1, c6, mB} (K1, P1) | 33: {c9, mB} (P) |
| 7: {c3, c4, mA, Border} (K/Ps, P/Ks) | 34: {c7, mA} (K) |
| 8: {c1, c4, mB} (K) | 35: {c7, mB, Border} (K) |
| 9: {c5, mA} (K) | 36: {c7, mA} (K) |
| 10: {c5, mB} (P) | 37:{c7, mB} (P) |
| 11: {c2, c5, mA, Border} (K) | 38: {c9, mA, insertion point for |
| 12: {c5, mB} (P) | DipK is 2nd st of last K2tog just |
| 13: {c6, mA} (K1, P1below) | worked in current row & down |
| 14: {c9, mA} (K/Ks, P/Ps) | 2 rows (1 row above garter |
| 15: {c9, mB, Border} (P) | ridge)} (K2togtbl, DipK) |
| 16: {c8, mA} | 39: {c4, mA, Border} |
| (P/Ks on Ks, K1Below/Ks on Ps) | (K/Dec, Slip twisted yf/Dip) |
| 17: {c8, mB} (K/Ks, P/Ps) | 40: {c5, mB} (P/Slips, K/Ps) |
| 18: {c9, mA} (K) | 41: {c5, mA} (K) |
| 19: {c9, mB, Border} (P) | 42: {c5, mB} (P) |
| 20: {c9, mA} (K) | 43: {c3, c5, mA, Border} (K) |
| 21: {c9, mB} (P) | 44: {c3, c5, mB} (K) |
| 22: {c9, mA} (K) | 45: {c9, mA} (K) |
| 23: {c9, mB, Border} (P) | 46: {c1, c9, mB} (K) |
| 24: {c3, c4, mA} (K2tog, Blco) | 47: {c9, mA, Border} (K1, P1) |
| 25: {c6, mB} (P/Blco, K/Ps) | 48: {c8, mA} (P2tog, Blco) |
| 26: {c2, c7, mA} (K/Ks, P/Ps) | 49: {c7, mA} (K/Ps, Slip yf/Blco) |
| 27: {c6, mA, Border} (K) | 50: {c8, mB} (K) |
| 28: {c3, c6, mB} (K) | 51: {c8, mA, Border} (K) 52: {c8, mB} (P) |
| 29: {c2, c5, mA} (K1, P1) |
| My Yarn Chart |
| c1 |
| c2 |
| c3 |
| c4 |
| c5 |
| 6 |
| c7 |
| c8 |
| c9 |
Begin Brioche Stockinette section. 53: {c6, mA} (K1, Slip1 yon) 54: {c8, mA} (K/Sl-yos, Slip/Ks yon) 55: {c6, mB, Border} (P/SI-yos, Slip/Ps yon) 56: {c8, mB} (P/Sl-yos, Slip/Ps yon) 57: {c6, mA} (K/Sl-yos, Slip/Ks yon) 58: {c8, mA} (K/Sl-yos, Slip/Ks yon) 59: {c6, mB, Border} (K/Sl-yos, P/Ps) 60: {c4, mA} (K/Ps, P/Ks) 61: {c5, mB} (K/Ks, P/Ps) 62: {c1, c5, mA} (K) 63: {c2. c5, mB, Border} (P) 64: {c3, c5, mA} (K) 65: {c3, c5, mB} (K) 66: {c6, c2, mA}(K) 67: [c1, c4, mB, Border} (P1, Slip1 yf, P1, Slip1 yb) 68: {c9, mA} (K) 69: {c7, mB} (K) 70: {c7, mA} (K1, P1) 71: {c7, mB, Border (K/Ks, P/Ps) 72: {c7, mA} (K/Ks, P/Ps) 73: {c6, mA} (P) Begin reverse side of Brioche Stockinette section. 74: {c7, mB} (K1, Slip1 yon) 75: {c6, mB, Border} (K/Sl-yos, Slip/Ks yon) 76: {c7, mA} (P/Sl-yos, Slip/Ps yon) 77: {c6, mA} (P/Sl-yos, Slip/Ps yon) 78: [c7, mB} (K/Sl-yos, Slip/Ks yon) 79: {c6, mB, Border} (K) End of brioche section. 80: [c9, mA} (K) 81: {c9, mB} (P) 82: {(c9, mA}(K) 83: {c9, mB, Border} (P) 84: [c9, mA}(K) 85: [c9, mB} (P) 86: [c1, c5, mA}(K2tog, Blco) 87: [c3, c9, mA, Border? (K/Blco, P/Dec) 88: {c5, mB} (K/Ks, P/Ps) 89: [c6, mA} (K/Ks, P/Ps) 90: [c5, mA} (K/Ps, P/Ks) 91: {c4, mB, Border} (K/Ks, P/Ps) 92: {c8, mA}(K1Below/Ps, Slip yf/Ks) 93: {c4, mA}(P) 94: {c4, mB} (K) 95: {c9, mA, Border} (P2tog, Blco) 96: [c9, mB} (P) 97: {c8, mB} (K) 98: {c8, mA}(K) 99: [c8, mB, Border} (P) 100: {c8, mA} (K) At this point, model was 24" (61cm) long and ready to be bound off. Cut all yarns except c8.
3-NeedleBind Off
Skip pick up if using JMco. Pick Up: beginning at mA edge, with c8, pick up 29 sts along original cast on, cut c8 Bind Off: folding fabric so that stockinette side of Border is to outside, with c6, 3-needle bind off all live sts, do not cut yarn, end with 1 st remaining on needle, remove markers
Fewer Rounds Bottom
Follow these instructions if yarn for bottom shrinks the same or less than yarn for sides. Otherwise, use More Rounds Bottom on Tall Bag pattern. At edge without border, beginning with a distinct marker at 3-needle bind off, place 8 markers evenly around bottom edge. Next: With c6, pick up the same number of sts in each section (8 for model, 64 total), moving marker from fabric to needle at end of each section. Work next round until 32 stitches remain. Work next rounds once. Next: (K) Next: (K to m, K2tog) 8x (24) Next: (K to m, K2tog) 8x (16), remove all markers except end of round Next: (K) Next: (K2tog) (8) Next: (K2tog) (4) Next: break yarn leaving a 6" (15cm) tail, with a tapestry needle weave tail through remaining sts
I-cord Handles
Using c6, cast on 3 stitches and work I-cord until cord is 36" (92cm). Bind off and weave in tails. Using c9, repeat for second handle.
Finish Bag
Leaving yarn overs exposed below sewing, concealing yarn tails, and turning border down as little as possible to leave room for grommets, sew border. Full bag according to Notes on Fulling on first page of pattern and following the directions in Chapter 3. After first wash, trim yarn tails flush. Attach Grommets & Handles Fold bag to match model, choosing face you want for front and back. Use a large knitting needle or your fingers to widen appropriate yarn overs. If using grommets, install them in the openings. Insert handles through the holes. Tie ends in overhand knots at sides of bag. >
5 ·72
SWeater for Eden
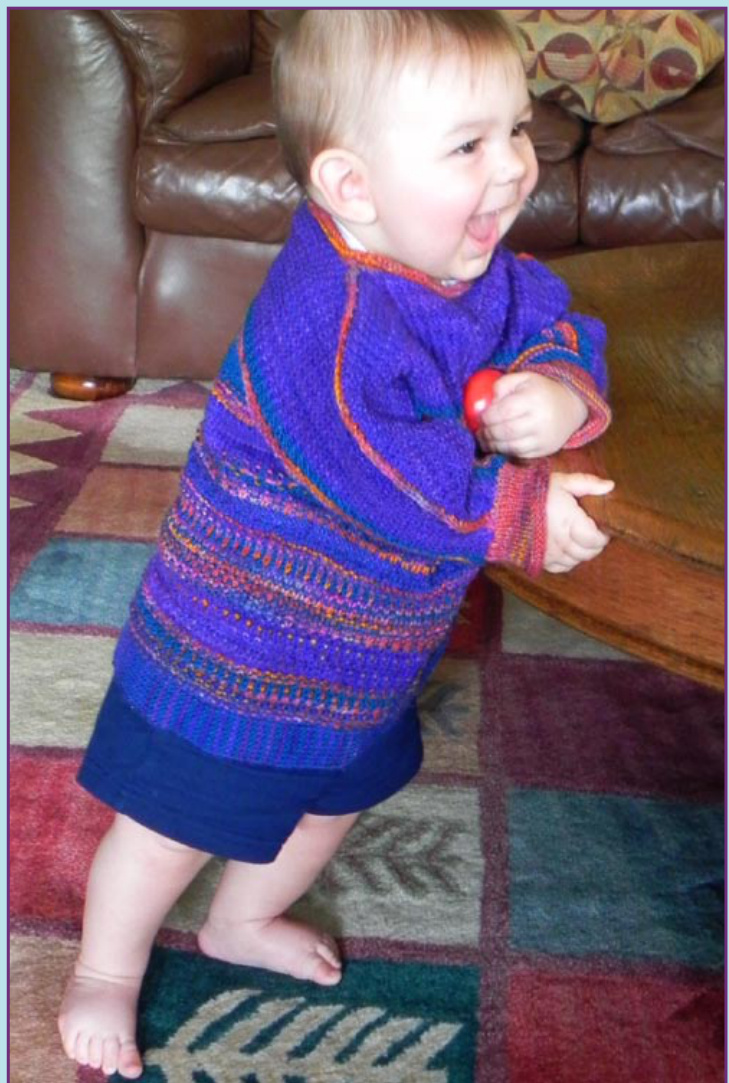
Overview
The unusual construction of this boat neck pullover finishes with a sleeve seam worked at the shoulder line rather than under the arm. The sweater begins at a garter stitch bottom band knit side to side to desired diameter of sweater. Finished band is joined to form a circle. Body is picked up from band and worked up in the round. At bottom of arm opening the sleeve underarm is cast on. Four pairs of increases form miters to shape the ends of the sleeves. Work continues in the round until the sleeves are long enough. Front and back shoulders are finished separately, working back and forth. Sleeves and shoulders are shaped with short rows, then joined with a 3-needle bind off. Neck and sleeve cuffs are finished in the round in stockinette.
Notes
Work to given dimensions rather than stitch or row counts.
Sizes
Sweater was knit to dimensions given in the schematic (next page) and modeled by an eight month old boy. To change sizes, take the measurements shown on the schematic from an existing sweater.
Tools
Main Needles 1 pr circulars 3.25mm/US3 or size to fit yarn, 48" (120cm) long (a second pair is helpful)
Crochet Hook to match
Markers 6 (mA, mB, mS) removable, all can match
Yarn
Model is made with sock yarn, but pattern works for any weight yarn. mc (purple) Knit Picks Stroll (75% superwash merino wool, 25% nylon, 3.5oz/100g 462yd/421m) Royalty Tonal c1 (teal) Cascade Yarn Heritage Sock Yarn (75% merino superwash, 25% nylon, 3.5oz/100g 437yd/400m) 5637 c2 (orange) Hand Painted Knitting Yarns Sock Yarn (65% superwash wool, 25% nylon, 10% donegal, 3.5oz/100g 463yd/421m) purple, orange, yellow, teal, pink, red, with teal slubs
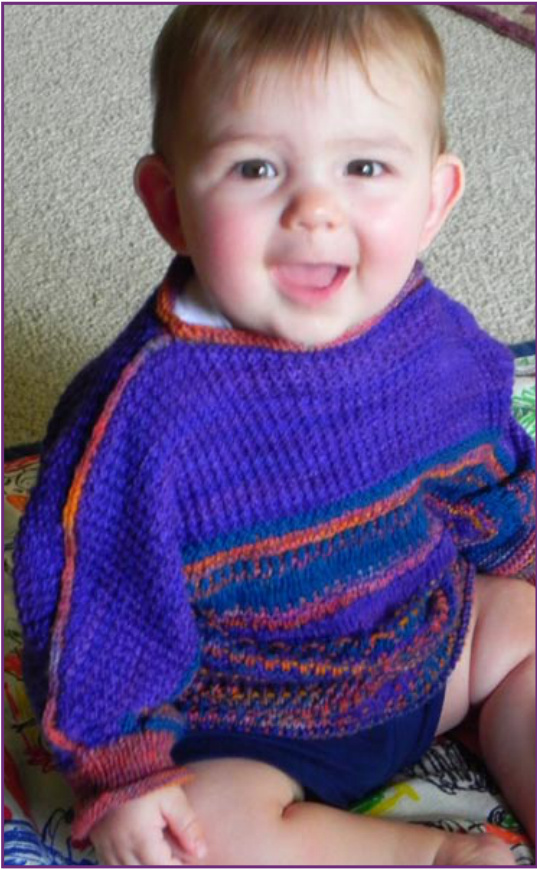
Model is 8 months old.
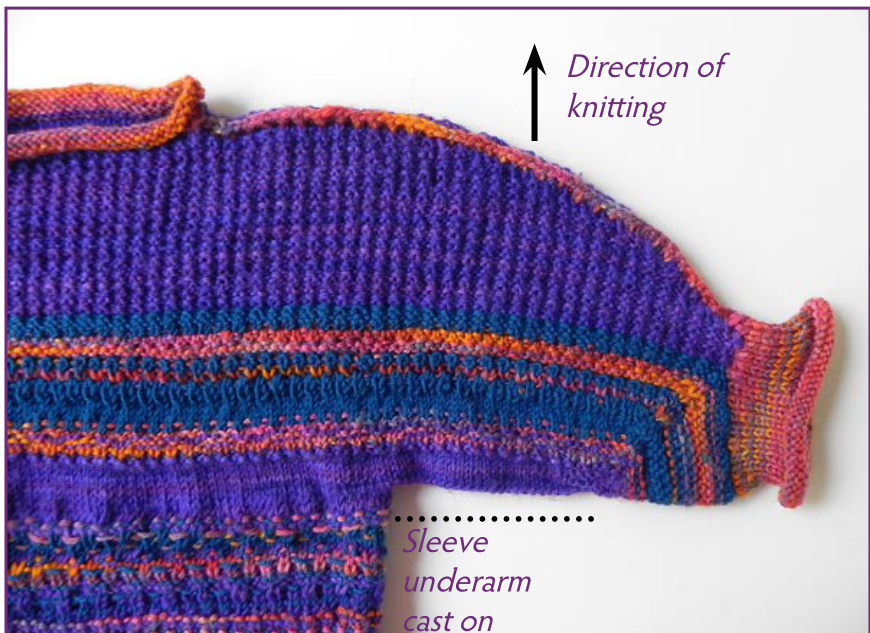
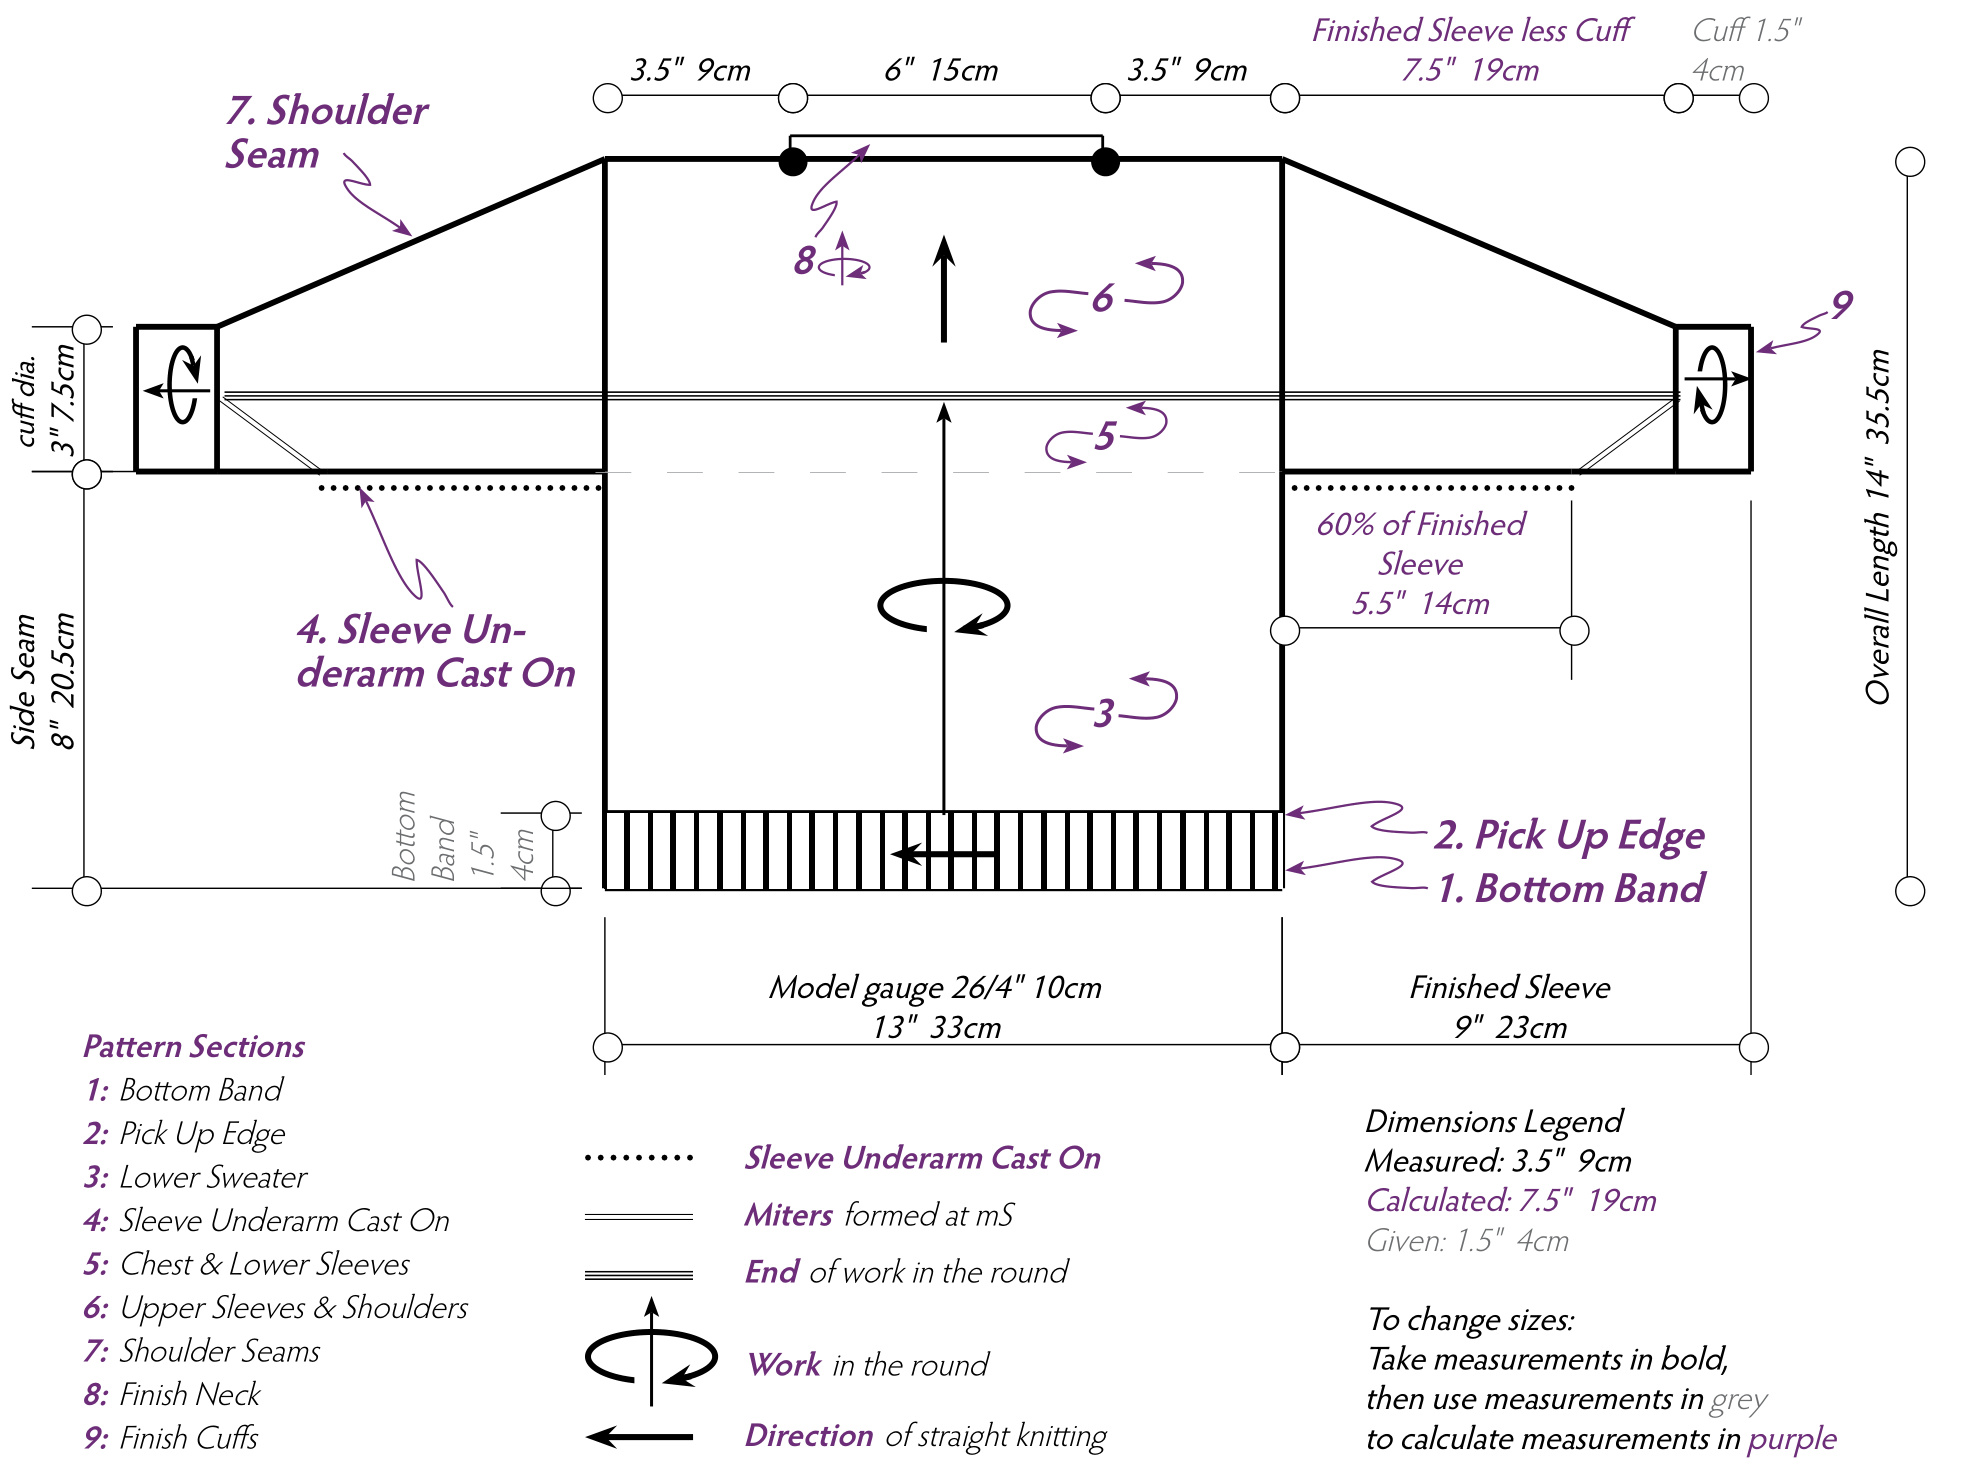
1: Bottom Band
1: With c1, cast on 10 sts or 1-12" (3.8cm), turn, K to last st, Slip1 yb Work row 2 with 2 rows mc then 2 rows cl until garter band is diameter of sweater, 26" (66cm) for model. Carry unused yarn at edge. End with a completed pair of c1 rows. 2: K to last st, Slip1 yb Choose rs (the sides don't match). With other end of mc yarn and rs facing, pick up stitches along cast on edge. With mc, join ends with Chain St 3-Needle Bind Off.
2: Pick Up Edge
Pick Up: With rs facing, pick up an even number of sts along edge of bottom band (174).
3: Lower Sweater
Place mA at beginning of round. Carry unused yarns at mA, twisting them around each other to prevent holes. Work in chaordic knitting until sweater is 14" (0.5cm) (at least 2 rows) short of required side seam length. Cut all yarns except yarn for underarm sleeve cast on (purple on model). Next: Using chosen yarn, work to required side seam length in stockinette, ending at mA.
4: Sleeve Underarm Cast On
Measure stitch gauge from fabric over a 4" (10cm) length. Divide st count by 4 (10) to get gauge per inch (cm)
Multiply
finished sleeve length x 0.6 x gauge Round result down to a whole number Multiply by 2 for st count for sleeve underarm cast on (72 for model) Note: Front and back sides of sleeve are cast on at the same time. The cast on places half the total stitches on front needle and half on back needle. Marker mA is already located at one side seam. Place mB opposite mA, at half of total stitches, to mark second side seam. Next round has 6 sections (this is an overview, detailed instructions next column): S1) figure 8 cast on a sleeve, S2) place 2 mS near end of cast on {beginning of miter line}, S3) turn work, pull out a needle for Magic Loop, K second half of cast on and one side of body, S4) figure 8 cast on second sleeve, S5) place 2 mS near end of cast on, S6) turn work, pull out a needle for Magic Loop, K second half of cast on and other side of body. At the end of S1-S6 (following), stitch count total is sum of original body stitch count plus twice the sleeve underarm cast on. Work S1-S6 once, using Magic Loop as needed. S1: beginning at mA with body of sweater to your right, rs facing, both needles pointed left, with mA on near needle, figure 8 cast on sts for frst sleeve, half on each needle, S2: place 2 markers mS for first sleeve miter, 1 on each needle at 1 st before end of cast on, S3: turn work, K to mB, remove mB,do not turn, S4: figure 8 cast on sts for second sleeve, half on each needle, S5: place 2 markers mS for second sleeve miter, 1 on each needle at 1 st before end of cast on, S6: turn work, K to mA
5: Chest & Lower Sleeves
Markers mS are for location of sleeve miters as shown on schematic. Beginning at mA, work rounds 1-2 at least twice in yarn used for sleeve cast on and in stockinette before resuming chaordic work. End with a completed round 1 when sleeves are at least 1 round short of desired length less cuf. 1: (Work to 1 st before mS, Kfb, slip marker, Kfb) 4x (+8) 2:(Work) Work next round once, removing markers as they are passed. Bound off stitches are at ends of sleeves. 3: (Work to mS, bind off to mS) 2x
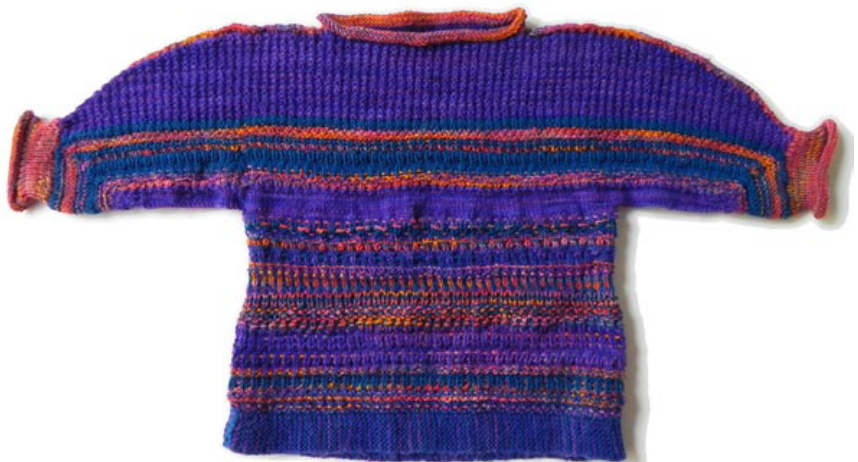
6: Upper Sleeves & Shoulders Front
Verify that front and back have an even number, matching stitch count. Pick 1 color for band that finishes the shoulders (purple on model), cut other yarns. Use the circular cable as a stitch holder for back, or work first row of front onto a second pair of needles. On front, working back and forth, rs facing, work rows 5-6 until cuff is desired width (cuff dia. on schematic, 3" for model). 5: {rs} (K) 6: {ws} (K1, P1) Calculate short row stitch count (SR). Multiply st gauge x 0.75" (2cm), round result to a whole even number not less than 2 With rs facing, place mA at SR stitches from right edge and mB at SR stitches from left edge. Work row 7 until sweater is desired overall length. 7: {rs} (K) to mB, w&t,{ws} (K1, P1) to mA, w&t, move markers toward center by SR sts Remove all markers.
Back
Repeat for back.
7: Shoulder Seams
Place markers for neck opening, making sure front/back and left/right sleeve stitch counts are identical. If there are one or two stitches difference between the whole front and back, leave the extras in the neck so the shoulder seams will match. Arrange stitches so both needles are at one cuff. Note: If you use a 3-needle bind off that is not symmetrical, you may need to purl the bind off for the other side (see Chapter 4, 3-Needle Bind Off). It is not necessary to pick up wraps at w&t stitches. Next: With c2, work Joan's Chain St 3-needle bind off from cuff to neck marker. Cut yarn. Repeat for other sleeve. Remove markers.
8: Finish Neck
With c2 and rs facing, work remaining neckline stitches in the round in stockinette for 1" (2.5cm). Bind off loosely.
9: Finish Cuffs
With c2 and rs facing, pick up cuff edge of sleeve and work in the round in stockinette for about 1-1/2" (3.8cm). Bind off loosely. Repeat for other sleeve.
Finishing
Weave in tails. Block if desired. Open a bottle of champagne to celebrate! >?

6.77
Uptown Gaiters
Next Release pattern testing now
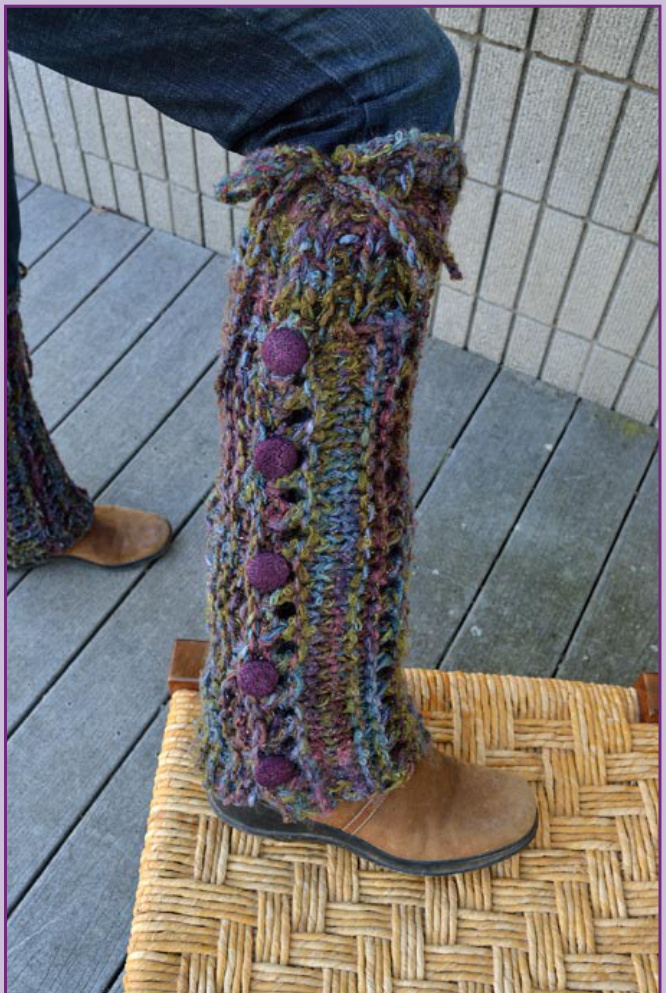
7 78
Side-to-Side Vest
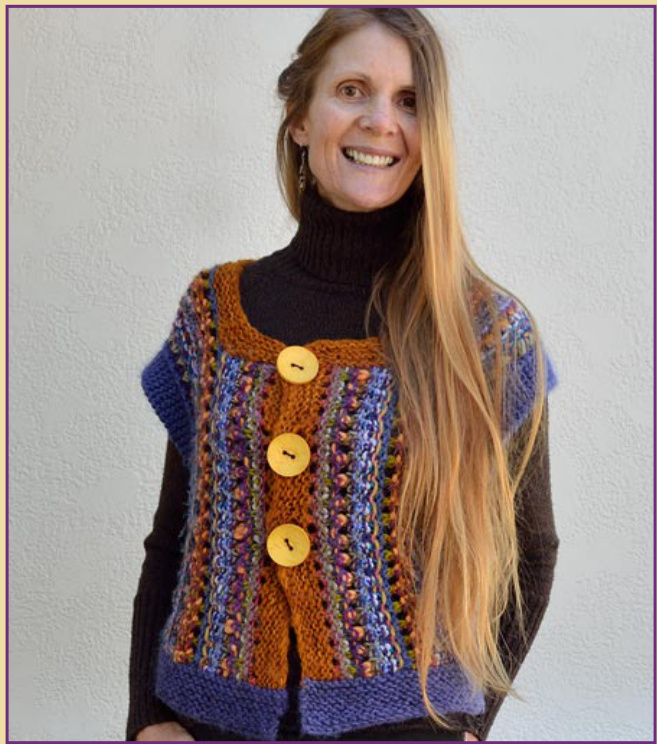
Every Single Singles Coming Soon!
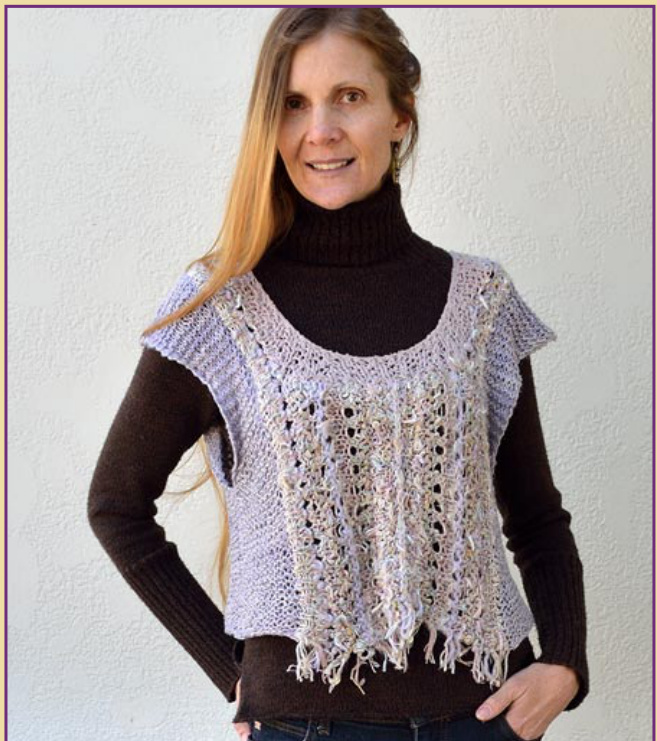
Whiter Shade of Pale
879
Tie Shawl
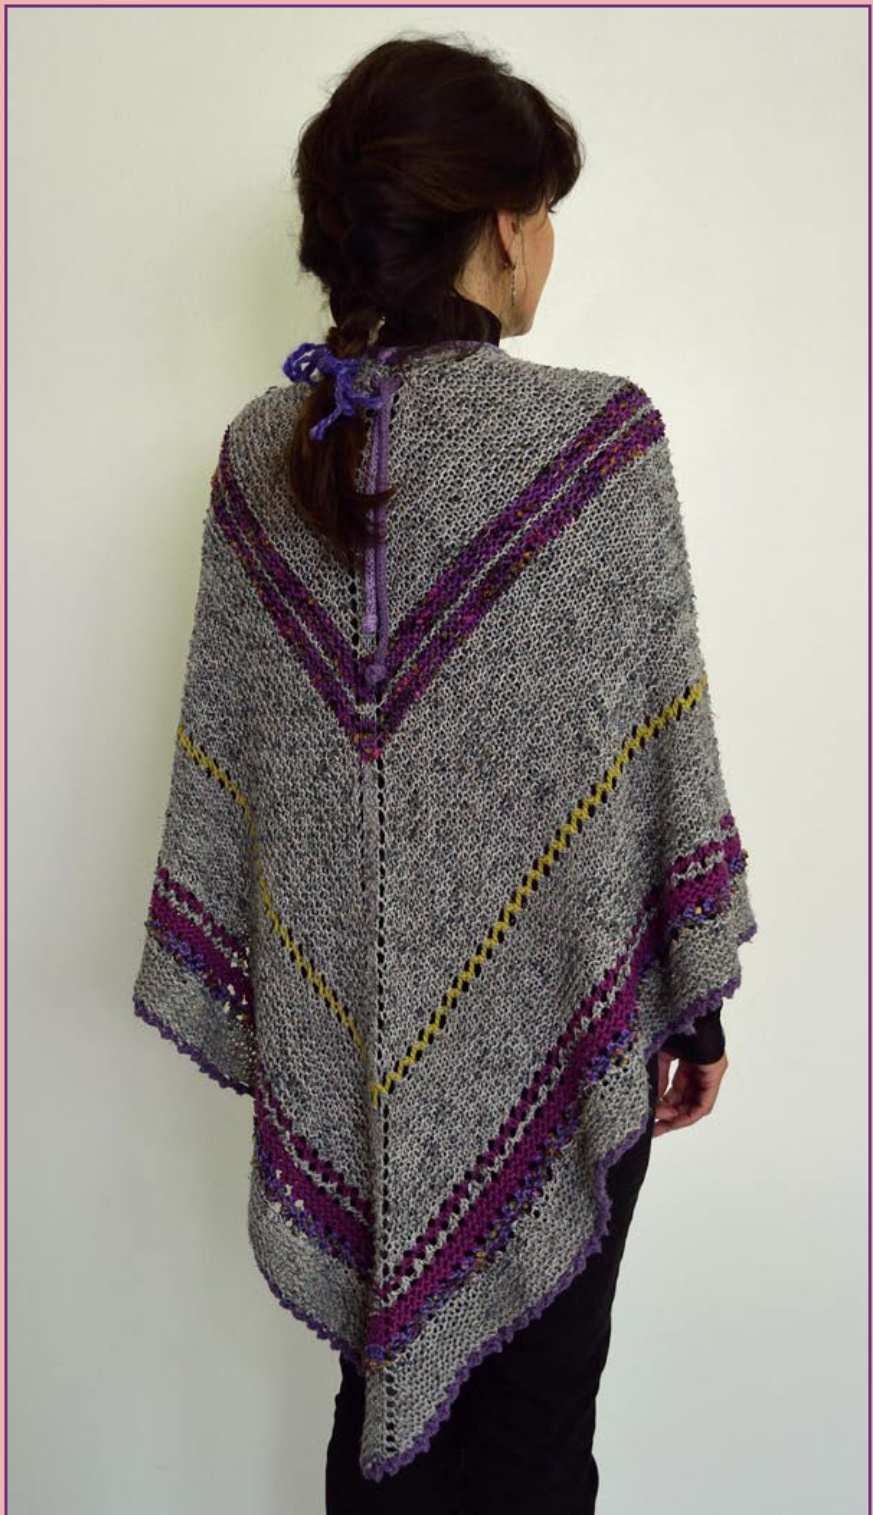
Last to be released
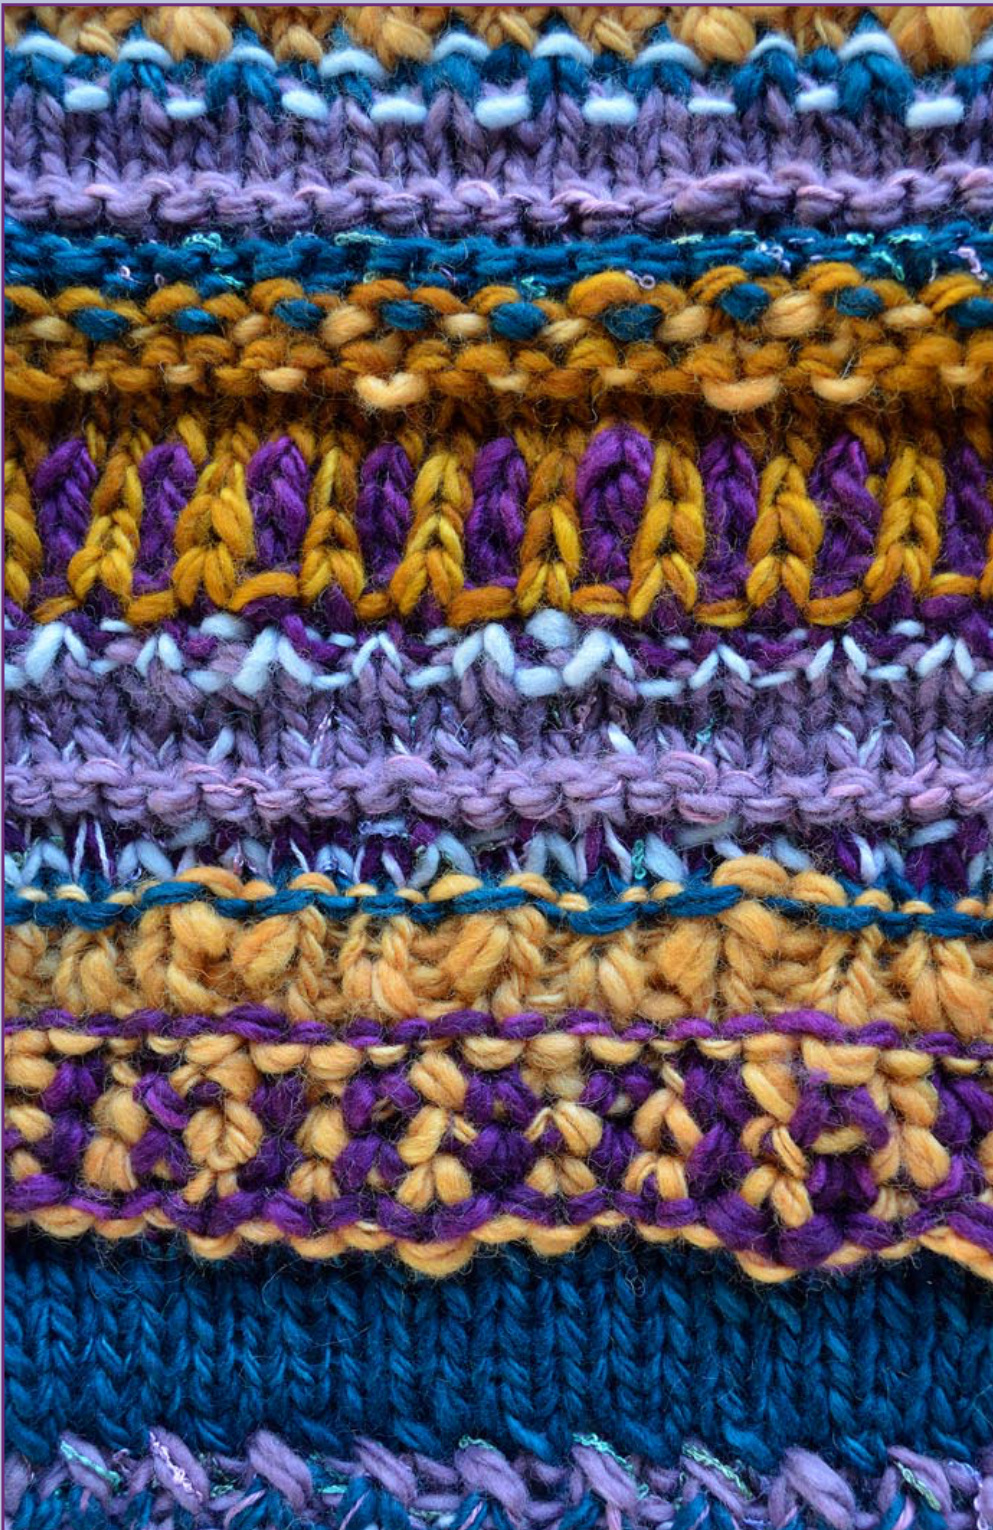
General Notes
These notes apply to all patterns unless specifically noted otherwise. One skein is required for all yarns unless a larger number is given. Slip markers as you come to them. When necessary, use Magic Loop to work in the round. Use Edge Wrap when carrying yarn. Change to longer needles when required to accommodate stitch count.
English eMetric
All garments worked using English measurements and converted to metric. As a result, there are some rounding discrepancies.
Chaordic Work
Model patterns specify where chaordic work is placed. However, all of the patterns can be used for the basic structure of the item (number of cast on stitches, where to place shaping, etc.) with plain and chaordic work mixed as the knitter chooses.
Wrong Side Borders e Shaping
Groups of Rows
Most borders and shaping are worked on rs. If border and shaping are worked on ws (for example, when work slides instead of turns), replace Ks with Ps and vice versa. Many pattern rows are grouped together with instructions to work the next rows a certain number of times or to a certain length. Work each row in the group and repeat the group as instructed, ending with a full repeat unless specifically told to do otherwise.
Row After Shaping Row
The pattern row following a shaping row may not specify how to work yarn overs used as increase stitches. For example, the pattern may only list (K/Ps, P/Ks). Decide whether to treat the increase stitches as a K or P and remain consistent throughout row.


