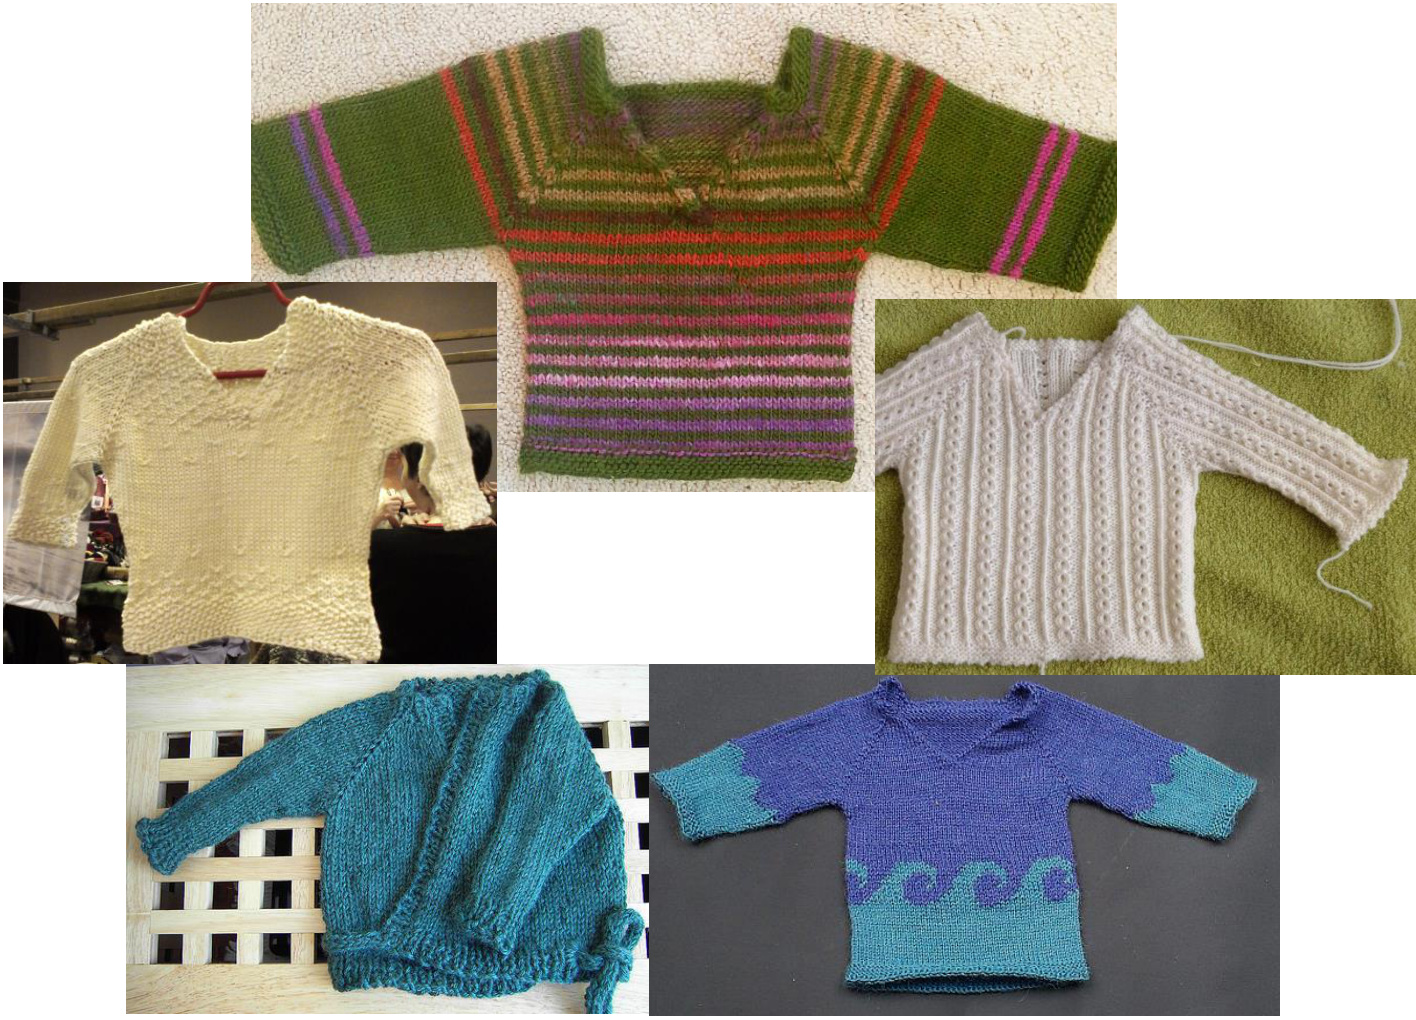
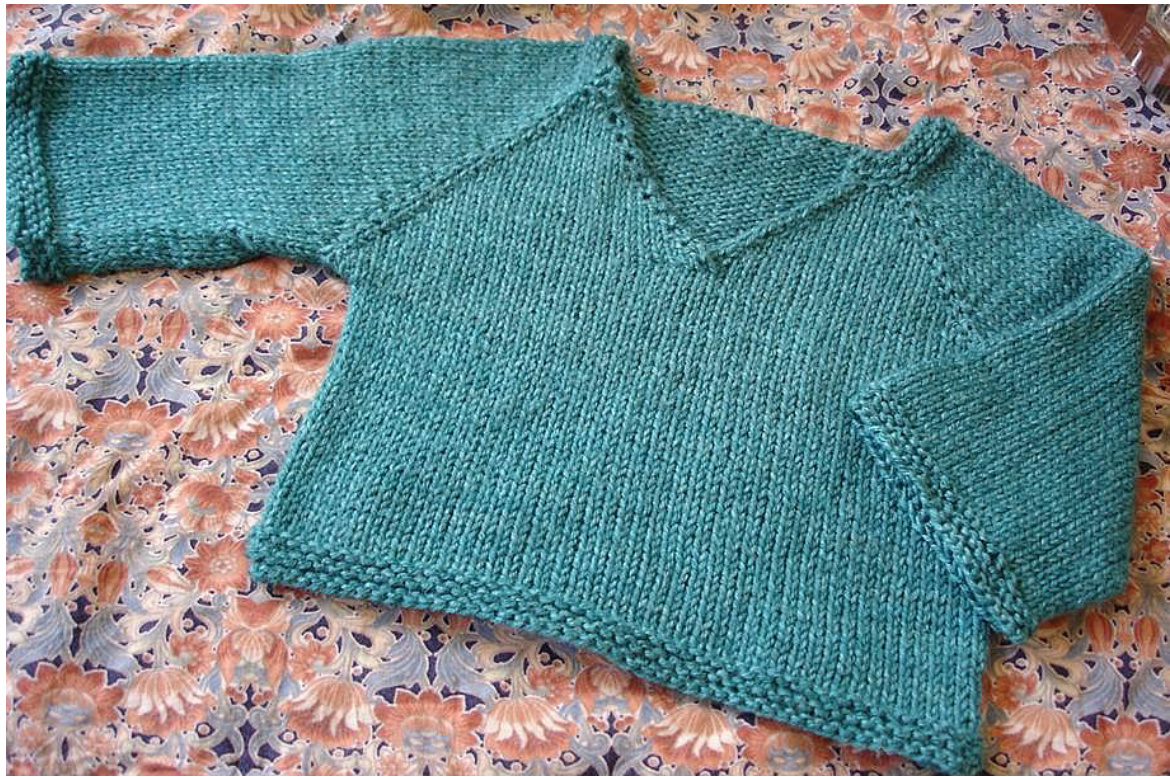
The 5(-ish) Hour Baby Sweater
by Anna Larsson
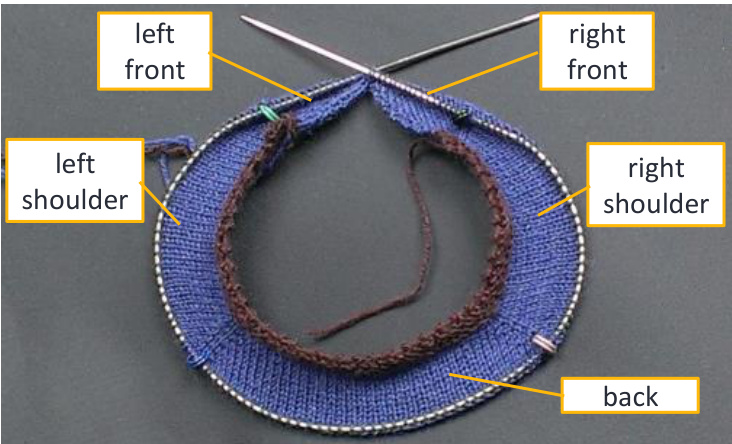
This is a basic baby raglan, worked from the top down with regular increases at four shoulder seams. Knit in bulky for a newborn, it can indeed be done in about five hours, but the principles, if not the time estimate, can be applied to other sizes and yarn weights. I've expanded the pattern to four weights and six sizes, but please note that larger sizes and/or finer yarn will need more time, as will embellishments likecables.
Sizes and finished measurements
| abbreviation | nb1 | nb2 | 3m | 6m | 9m | 12m |
| size | Newborn1 6-8lbs/ 2.5-3.5kg | Newborn2 9-11lbs/ 4-5kg | 3months | 6months | 9 months | 12 months |
| chest | 11%"/29cm | 14%"/36cm | 16"/40cm | 17"/43cm | 18"/46cm | 19"/48cm |
| length | 8"/20cm | 9"/23cm | 10"/25cm | 11"/28cm | 12"/30cm | 13"/33cm |
Materials
O One long circular needle in the size appropriate for your chosenyarn O 4stitchmarkers O A cable needle or double-pointed needle O 2 lengths of fine ribbon or smooth yarn, as stitch holders Atapestryneedle O Enough yarn. The yardage will depend not only on size and yarn weight, but also on stitch pattern and fiber content, sc it's nearly impossible to estimate yardage for all available options. If in doubt, ask at your LYS, or check Ravelry to see what yardage other people have on similar projects.
Abbreviations
knit p purl st/sts stitch/stitches ktbl knit through the back loop kfb increase by knitting into the front and the back of the same stitch pm place (stitch-)marker 、wt weight
Gauge
| /inch | /cm | needles | |
| fingering weight: | 8sts,11%rows | 3.2 sts,4.6rows | US 2/2.5mm |
| dk weight: | 6%sts,9%rows | 2.6 sts,3.8 rows | US4/3.5mm |
| worstedweight: | 4 3% sts, 6 rows | 1.9 sts,2.4 rows | US7/4.5mm |
| bulky: | 4%sts,5rows | 1.7 sts,2 rows | US 10/6.0mm |
Pattern Notes
0 The sweater is knit back and forth, then joined at the front and continued in the round. When you reach a certain length, you'll separate the sweater into a body and two sleeves, and knit in the round tothecast-off. O Where a range is indicated, such as 3-6 rows or 1-2"/2-4cm, that means choose the number (within that range) that will yield the look you want. O The pattern as written is for a plain sweater, but there's a lot of room for improvisation. Feel free to use a different cast on, or work ribbing instead of garter stitch at the collar and cuffs, or throw in a stripe, a stitch pattern, or some cables. See notes on pattern variations on page 5. O If you want to make a different size or work at a different gauge, you can calculate the numbers for it using theFormula on page6.
Cast On...
Using the Channel Island Cast On (or any stretchy cast-on you like), cast on according to your chosen size and yarn weight. Here's a YouTube tutorial for the Channel Island Cast On:http://youtu.be/fPbJGGz8k8Q. I like this cast on for its stretchiness and pretty picot edge, but I don't like tucking in ends, so I work thisonewith a singletailinsteadof the doubled tail shown in the video. Garter stitch: Knit every row.
| for size | nb1 | nb2 | 3m | 6m | 9m | 12m |
| fingering | 56 | 66 | 72 | 76 | 82 | 82 |
| dk | 48 | 58 | 59 | 62 | 66 | 69 |
| worsted | 46 | 50 | 54 | 60 | 61 | 64 |
| bulky | 43 | 50 | 53 | 54 | 60 | 60 |
Work about %"/1cm of garter stitch for the collar, twisting the selvedge sts by knitting them tbl. This should be about 3-6 rows, depending on your chosen yarn weight. In the last row of garter stitch, place your stitch markers as shown in the table below. For example, for a size nb1 in fingering weight yarn: k3, pm, k14, pm, k22, pm, k14, pm, k3
| for size | nb1 | nb2 | 3m | 6m | 9m | 12m |
| fingering | 3-14-22-14-3 | 3-17-26-17-3 | 3-19-28-19-3 | 3-20-30-20-3 | 3-22-32-22-3 | 3-22-32-22-3 |
| dk | 3-12-18-12-3 | 3-15-22-15-3 | 3-15-23-15-3 | 3-16-24-16-3 | 3-17-26-17-3 | 3-18-27-18-3 |
| worsted | 3-12-16-12-3 | 3-13-18-13-3 | 3-14-20-14-3 | 3-16-22-16-3 | 3-16-23-16-3 | 3-17-24-17-3 |
| bulky | 3-11-15-11-3 | 3-13-18-13-3 | 3-14-19-14-3 | 3-14-20-14-3 | 3-16-22-16-3 | 3-16-22-16-3 |
Switch to stockinette and begin increases: k1tbl, kfb, kfb, slip marker. \*kfb, knit across to one st before the next marker, kfb, slip marker.\* Repeat \*\* until the last marker has been slipped, then kfb, kfb, ktbl. On all wrong-side rows until the join: ktbl, p across to the last st, ktbl. On all right-side rows until the join: ktbl, kfb, \*knit to one st before the next marker, kfb, slip marker, kfb.\* Repeat \*\* until the last 3 sts, which kfb, k1, ktbl.
Join the two front halves and continue in the round
Stop increasing at the selvedge edges when the two front halves add up to four or five\* more than the number of sts at theback.
| for size | nb1 | nb2 | 3m | 6m | 9m | 12m |
| fingering | row 19 back 42 front 23 | row23 back 50 front 27 | row25 back 54 front 29 | row27 back 58 front31 | row 29 back 62 front33 | row 29 back 62 front33 |
| dk | row 15 back 34 front 19 | row 19 back 42 front 23 | row 21 back 45 front 25 | row21 back 46 front 25 | row23 back50 front 27 | row 25 back53 front 29 |
| worsted | row 13 back 30 front 17 | row 15 back34 front 19 | row17 back38 front 21 | row19 back 42 front 23 | row 21 back 45 | row21 back 46 |
| bulky | row 13 back 29 front 17 | row 15 back 34 front 19 | row17 back37 front 21 | row17 back38 front 21 | front 25 row 19 back 42 front 23 | front 25 row 19 back 42 front 23 |
\* Four if your back-neck caston was an even number,five if it was odd. With bulky yarn, joining the front neck and separating into a body and sleeves will happen in quick succession, frequently in the same row, so I'd advise reading ahead to the split section. IF, at this point, the neck opening is not big enough to accommodate that big baby head, then work a few more rows back and forth, increasing at the shoulder markers but not at the selvedge edges
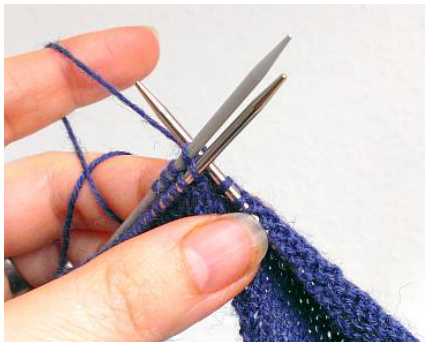
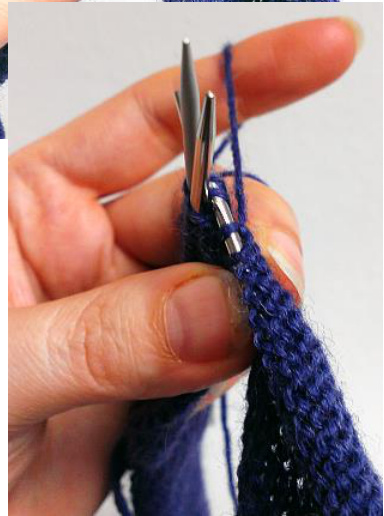
Once this row is finished (and if the neck opening is big enough, see sidebubble), work 1 more purl row and then, on the following knit row, join the two fronts to continue in the round as follows: ktbl, k across, increasing on each side of every marker but not at the selvedge edge, until the last 4 (or 5) sts. Slip these last 4 (or 5) sts onto a cable needle and \*k the first st on the cable needle together with the first st on the left needle.\* Repeat \*\* 3 (or 4) moretimes. Continue working in the round, increasing on each side of every marker on every other round, until it's time to separate the sleeves from the body. This will be after the last increase round for your chosen size and yarn weight, noted in the table below. The number of stitches at the back and sleeve are noted for reference.
| for size | nb1 | nb2 | 3m row41 | 6m | 9m | 12m |
| fingering | row 31 back 54 sleeve 46 | row37 back 64 sleeve55 | back70 sleeve 61 | row43 back 74 sleeve64 | row 45 back78 sleeve68 | row49 back 82 sleeve 72 |
| dk | row25 back 44 sleeve 38 | row 29 back 52 | row33 back57 sleeve 49 | row 35 back 60 sleeve 52 | row37 back 64 | row39 back 67 |
| worsted | row 15 back 32 sleeve 28 | sleeve 45 row19 back 38 sleeve33 | row 21 back 42 sleeve36 | row 21 back 44 sleeve38 | sleeve 55 row23 back47 sleeve 40 | sleeve 58 row 25 back 50 |
| bulky | row 13 back 29 sleeve 25 | row 15 back 34 sleeve 29 | row17 back 37 sleeve 32 | row 17 back 40 sleeve 34 | row 19 back 42 sleeve 36 | sleeve 43 row 19 back 44 sleeve 38 |
Separate the Sleeves from the Body
Knit one more round without increasing. Continue across the front to the first marker. Transfer the marker and all the sleeve stitches to a length of ribbon or smooth contrasting yarn. Slip the next marker onto the needle and knit across the back to the next marker. Transfer this marker and the sleeve stitches to another holder. Knit the body in the round, working a 1"/2cm gusset at each' sideseam.
Gusset:
Knit 1 round even (i.e., without decreasing). On the next round, knit to 2 sts before the seam marker, ssk, slip marker, k2tog, repeat on the other side.Repeat these two rounds three more times for fingering weight, twice more for dk weight, and once more for worsted weight and bulky yarn. When the side-seam gusset decreases are finished, work even to the desired length. Once I'm done decreasing I generally stop counting rounds and just knit to my chosen length, but if you prefer to count, here are some numbers.
| for size | nb1 4"/10cm | nb2 4%"/11cm | 3m 5"/12cm | 6m 5%"/14cm | 9m 6"/15cm | 12m 6%"/16cm |
| fingering | 46 | 50 | 55 | 64 | 69 | 74 |
| dk | 38 | 42 | 46 | 53 | 57 | 61 |
| worsted | 24 | 26 | 29 | 34 | 36 | 38 |
| bulky | 20 | 22 | 24 | 28 | 30 | 32 |
Work 4-8 rounds garter stitch (a bit more than %"/1cm), then bind off loosely.
Knit the Sleeves
Transfer the sts of one sleeve from the holder to the needle. Pick ur 4 sts at the underarm, twisting them to avoid holes, and leaving a longish tail to tighten up any holes that should appear. Work a sleeve gusset to mirror the side-seam gusset (see green bubble at the top of this page). Once thegussetis finished,workpaired decreasesin accordance with the chart below. For example, for size nb1 in fingering weight, work paired decreases every 7th round, 5 times. 'Paired decreases: Garter stitch in the round: Purl one round. Knit one round. Repeat as needed.
| for size | nb1 | nb2 | 3m | 6m | 9m | 12m |
| fingering | e7r 5x | e8r 5x | e7r 6x | e8r 6x | e7r 8x | e9r 8x |
| dk | e7r 4x | e8r 4x | e7r 5x | e8r 5x | e7r 7x | e8r 7x |
| worsted | e6r 3x | e7r 3x | e6r 4x | e6r 4x | e6r 5x | e7r 5x |
| bulky | e7r 2x | e8r 2x | e6r 3x | e7r 3x | e6r 4x | e7r 4x |
K to 2 sts before the marker, ssk, slip marker, k2tog. After the last pair of decreases, work 3-6 rounds garter stitch (about %"/1cm), and then bind off loosely. Work the second sleeve in the same way as the first. Using the tapestry needle, weave in all ends. Wash. Block. Hug.
Notes on Pattern Variations
O Stripes: If you're going to use an all-over horizontal stripe pattern, then once you've joined to work in the round the color change will be front and center: not a good look. There are several ways to approachthis. 1. For narrow stripes: after the join, slip stitches across the front and left sleeve and start the new color at the back left shoulder. Continue to increase before and after each marker on every other round. 2. For broad stripes, knit around to the back left shoulder and start the color changes there. I'd keep the row-counter at the front center, though. 3. Work a cable down the front center. 4. Work a jogless stripe.Here's aYouTube tutorial:http://youtu.be/PjAolRoMOU,and TechKnitter lists several variations here: http://techknitting.blogspot.de/2007/01/ioglessstripes.html O Or you could stripe with textures; alternate stockinette with moss stitch, or purl a row/round ever! sooften. O Cables and ribbing will make the sweater narrower, so you may need more stitches to start with. They'll also use more yarn. O Many lace patterns will make the sweater wider, so you may need to start with fewer stitches OThe garter stitch collar can curl a bit at the back, though blocking helps that a bit. Ribbing is a bit morestable. O You can also choose not to join at the front, but to continue the front neck increases all the way to the bottom, attach some i-cord, and make a wraparound sweater (this'll definitely use more yarn).
@ Anna Larsson 2014
The Formula
Here's the basic math to figure out how many stitches to cast on, if you want to make a different size Or work with a different gauge. 1. Start with a chest circumference (circ) and a gauge swatch. 2. Calculate armhole circ at 45% of chest circ. 3. Armhole depth is % armhole circ. 4. Multiply the row gauge by the armhole depth for the key number (number of rows from cast-on to split). 5. (Chest circ + ease) x stitch gauge = number of sts at chest. 6. Chest sts/2 = width of back (and front) at the split. 7. Width of back at split - key number = cast on at back neck. 8. (Armhole circ + ease) x st gauge = number of sts at upper arm. 9. Upper arm sts - key number = cast on at shoulder. 10. Back neck cast on + 2x shoulder cast on + 6 = total cast on.
Thank you!
HUGE huggy thanks to test-knitters Arja, Corrie, MJ, Yvonne, and Hilde, and totest-babies Jake, Thomas, Salomon and Yara


