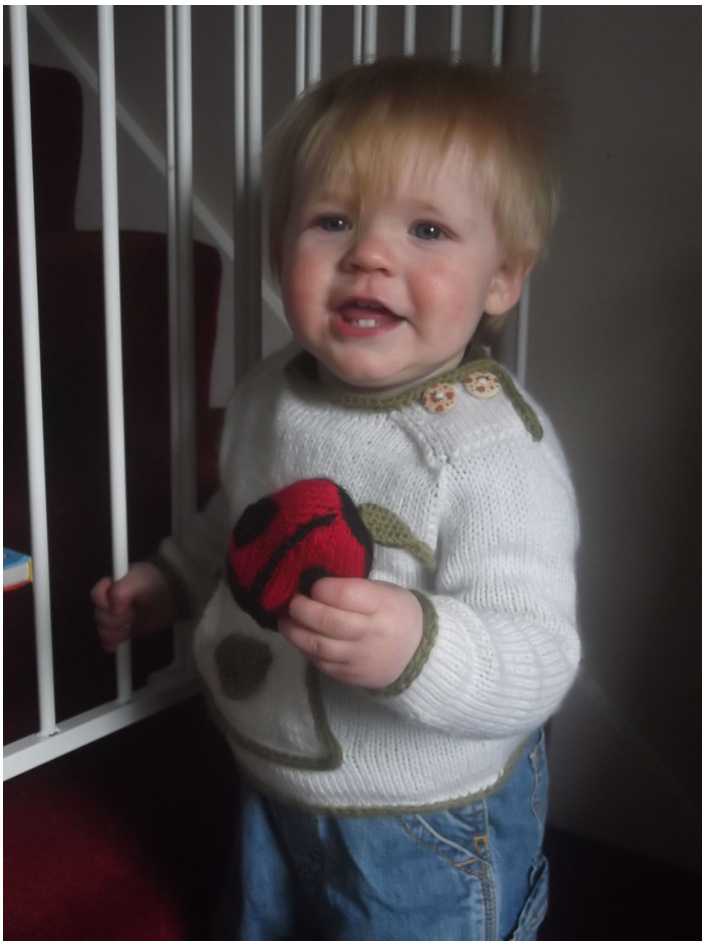
This pattern contains instructions for a children's jumper with I cord trim and kangaroo pouch pocket with a surprise, a ladybird which can be attached to the pocket by a button. There is a choice of a leaf or ladybird appliqué for the pocket. The saddled shoulder jumper is made in the round from the bottom up with a buttoned shoulder tab on one side.
Materials
King Cole Merino Blend DK: Main Colour, White and Contrast Colour, Green or Red Oddments of Black and Red DK Two Ladybird Buttons One plain button
Gauge
22 stitches and 28 rows to 4in/10cm
Notions
(60cm) circular needle US size 6 (4mm) double pointed needles darning needle 4 stitch markers (or scraps of yarn), one in a different colour to the rest
| To fit age | 0-6 months | 6-12 months | 1-2 years | 2-3 years |
| To fit chest | 16in (41cm) | 18in (46cm) | 20in (51cm) | 22in (56cm) |
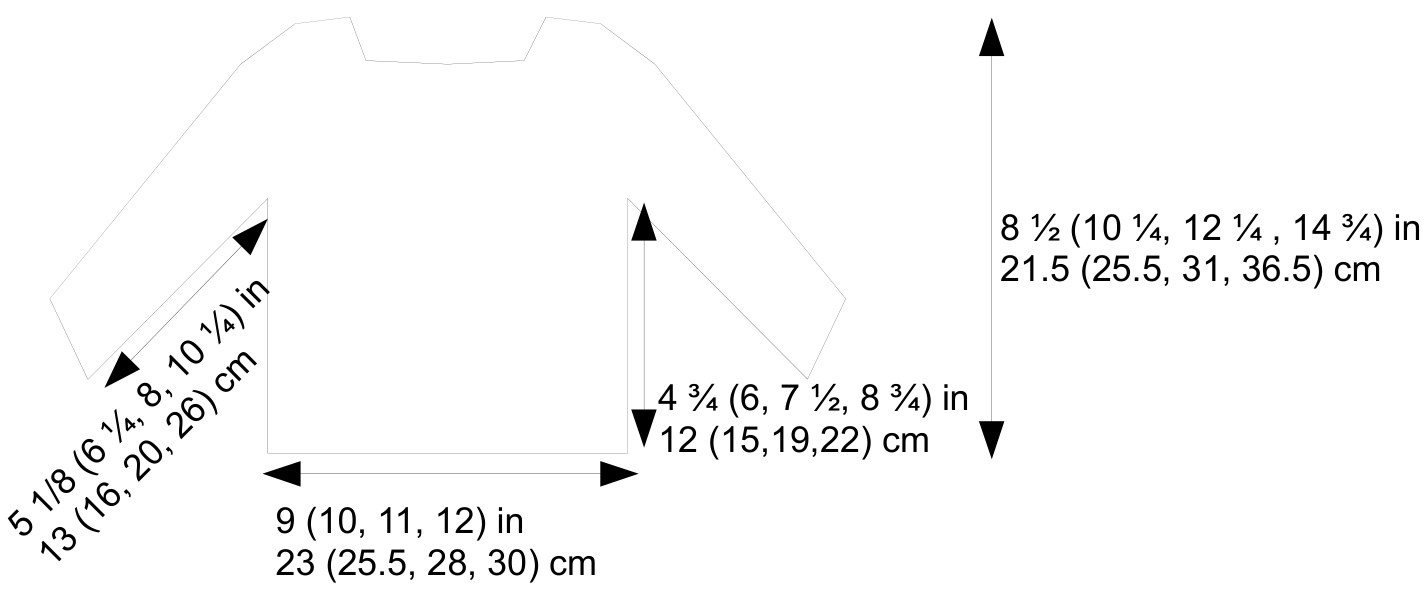
| Actual Size | 18in (46cm) | 20in (51cm) | 22in (56cm) | 24in (60cm) |
| Main colour | 186 yards/2 balls | 250 yards/3 balls | 360 yards/3 balls | 480 yards/4 balls |
| Contrast colour | 40 yards/1 ball | 45 yards/1 ball | 50 yards/1 ball | 55 yards/1 ball |
Abbreviations
| YO | yarnover |
| k | knit |
| p | purl |
| k2tog | knit2stitchestogether |
| ssk | slip two stitches knitwise to righthand needle, knit the two stitches together through the back loop |
| p2tog | purl 2 stitches together |
| PR | purl 1 stitch, return to lefthand needle, pass next stitch over, and replace purled stitch to righthand needle |
| See http://www.youtube.com/watch?v=RaTGRyKUABU for a tutorial. | |
| pm | Place emarker |
| inc1 | increase 1 stitch using backwards loop method |
| See http://www.youtube.com/watch?v=sFYppcVal1w for a tutorial |
The i-cord cast off I have used is the Joyce Williams Applied I-cord method mentioned in Elizabeth Zimmerman's book Knit One, Knit All. This is so that main colour does not show through the border.
Body
Using main colour and circular needle cast on 100(112, 120, 132) stitches. Place marker and join in the round being careful not to twist your stitches. Knit stocking stitch for 4 %(6, 7 12, 8 %) inches or 12(15,19,22)cm and leave stitches on spare cable needle or waste yarn and knit the sleeves.
Sleeves (make 2)
Using main colour and double pointed needles cast on 32(36, 40, 44) stitches. Place marker and join in the round being careful not to twist your stitches. Knit in stocking stitch increasing every 8(9, 9, 12) rounds until you have 40(46, 48, 54) stitches as follows: Knit 1, inc1, knit to one stitch before the marker, inc1, knit 1, pm. Continue in stocking stitch until your sleeve measures 5 1/8(6 %, 8, 10 %4) inches or 13(16, 20, 26) cm. Leave a long tail to either graft or do a three needle bind off of the underarm stitches later. Place first 4(5, 5, 5) stitches and last 4(5, 5, 5) stitches of sleeve on waste yarn. Put remaining stitches on another strand of waste yarn.
Unite body and sleeves
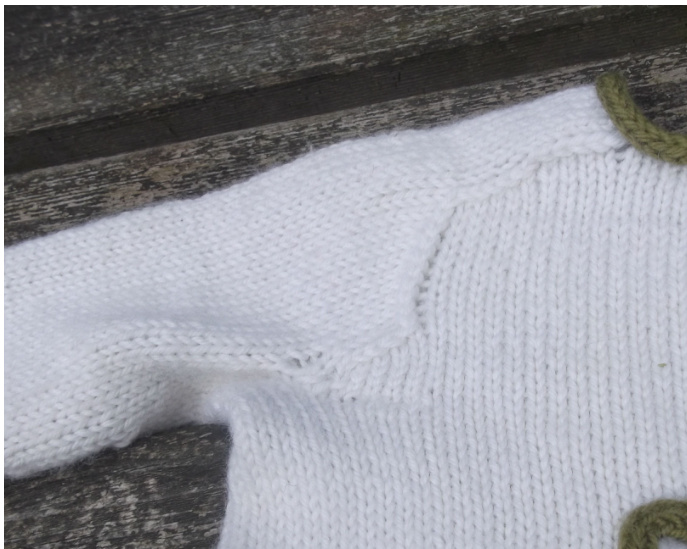
pm at beginning of the round. Knit across 42(46, 50, 56) body stitches, place next 8(10, 10, 10) body stitches on waste yarn, knit across 32(36, 38, 44) sleeve stitches, knit across next 42(46, 50, 56) body stitches, place last 8(10, 10, 10) body stitches on waste yarn, knit across 32(36, 38, 44) sleeve stitches. Knit 2(3, 4,5) rounds. The shaping now begins and is on every row, with the marked stitches being the ones left over when you have done your decreases eg, the first stitch when you do SSK and the second stitch when you k2tog. Initially you decrease the body stitches to get them down to the shoulder width. Next you will decrease from the sleeve stitches for quite a while, all the way down to the number you have in the tab at the shoulder. Finally you decrease from the body stitches again, this creates the shoulder and is done in two stages. Firstly you decrease in rows (not rounds) and next you work on each tab individually. It is best to mark the actual decrease stitches so your decreases will all be in line. The picture below shows what the shoulder decreases look like.
So lets start by decreasing from the body stitches:
SSK, pm in stitch just completed (on the first round this marker replaces the beginning of round marker, use a different colour for this one and call it marker 1), knit 38(42, 46, 52) stitches, k2tog, place marker 2 in stitch just completed, knit 32(36, 38, 44) sleeve stitches, ssk, place marker 3 in stitch just completed, knit 38(42, 46, 52) stitches, k2tog, place marker 4 in stitch just completed, knit 32(36, 38, 44) sleeve stitches.
sizes 1-2 years and 2-3 years ONLY
SSK, pm in stitch just completed, knit to 1 stitch before next marked stitch (marker 2), k2tog, pm in stitch just completed, knit to marker 3, SSK, pm, knit to 1 stitch before next marked stitch (marker 4), K2 tog, pm and repeat 0(1) more time. All sizes begin sleeve decreases section.
Now reverse the shaping to decrease from the sleeve stitches as follows:
Knit to 1 stitches before marker 1, k2tog, pm, knit to marker 2, ssk, pm, knit to 1 stitch before marker 3, k2tog, pm, knit to marker 4, ssk,pm and repeat this every round until you have 8(10, 10, 10) sleeve stitches on either side. This will take 12(13, 14, 17) rounds. On the last sleeve decreases round you need to create your extra stitches for the overlapping buttonholetab:
READ AHEAD
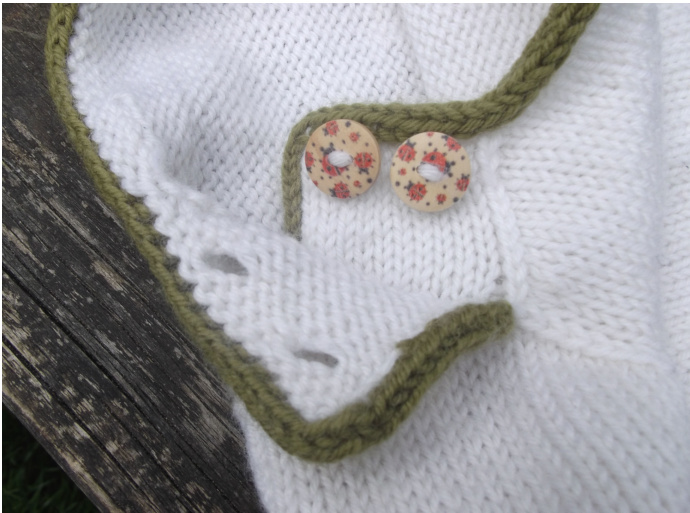
After your decrease at marker 4, increase inbetween each stitch on the sleeve so that you have 9(11, 11, 11) extra stitches (one for of the sleeve stitches and one for the body stitch at one side). Turn before the before marker 1. As you purl back put the extra stitches on a dpn on the right side of the work, then at the end of the purl row purl them. You should now have, from the right side, 9(11, 11, 11) new stitches for the buttonhole tab, then the first marked stitch, front body stitches, 8(10, 10, 10) sleeve stitches, back body stitches and 8(10, 10, 10) sleeve stitches for the button tab. The picture below shows what you are aiming for.
AT THE SAME TIME work next set of decreases from the body stitches again in the same way as the first decrease section until you have 32(32, 34, 38) body stitches in between both sets of markers. This will take 4(6, 6, 6) rows. On the purl rows do p2tog when you would have done k2tog on the right side, and when you would have done ssk do PR (see abbreviations for explanation). At either end of the row just work the stitch normally. Your next row should be a purl row. Purl to marker 4, p2tog, pm and turn, slip first stitch and knit to end, turn and repeat until you have 27(28,30,33) stitches on the back. Purl to marker 4, p2tog, \* purl to marker 2, p2tog, pm and turn, slip first stitch, knit to marker 3, ssk, pm and turn, slip first stitch and repeat from \* until you have 20(22, 24, 26)stitches on the back and 26(27,29,32) stitches on the front. Purl to end. Knit to marker 1, ssk, pm and turn, slip first stitch, purl to end and repeat until you have 22(22,24,26) stitches on the front. Buttonhole row: Knit 2(3, 3, 3) stitches, YO, k2tog, knit last 3(4, 4, 4) stitches, YO, k2tog, knit O(1, 1, 1) stitch, ssk, pm and turn, slip first stitch and purl to end. Knit to marker 1, ssk, pm and turn, slip first stitch and purl to end. Time to cast off: First pick up (but don't knit!) one stitch for each row down each side of the shoulder tabs at either end of your circular needle. Cast on 3 stitches in contrast colour and transfer to left hand needle. Knit 2, slip 1, YO, knit 1, pass slip stitch and YO over. Transfer the three stitches back to left hand needle and repeat until all of the sweater stitches are cast off. When you get to a corner on one of the shoulder tabs work an unattached i-cord row by knitting 3 stitches and slipping them back onto the left hand needle. For sleeve and body borders pick up one stitch for each cast on stitch and do the contrasting colour i-cord cast off. If you wish, provisionally cast on the 3 i-cord stitches so that you can graft them to your working stitches when you have finished the cast off.
Cast on 25(25, 30, 30) stitches in main yarn, work back and forth in stocking stitch. Decrease one stitch each end every 5 rows (ssk, k2tog) or purl equivalent on purl rows 3(3, 4, 4) times. Work 4 more rows. Do the contrasting colour i-cord cast off along the top edge of the pocket, work one unattached i-cord row at the corner. Pick up stitches (but don't knit yet) at a rate of one stitch per row or cast on stitch around the other edges of pocket and work i-cord cast off, doing an unattached i-cord row at each corner. Sew or graft your i-cord ends together.
Leaf Applique
Cast on 7 stitches, place marker either side of central stitch. Row 1: Knit to first marker, YO, pm, k1, pm, YO, knit to end. Row 2 and all even rows: Purl rows. Row 3, 5 as row 1. Row 7 Knit 1, ssk, knit to last 3 stitches, k2tog, k1. Repeat row 7 and row 2 until 5 stitches remain. Next row: K1, sl, k2tog, psso, k1. Cut end, draw through remaining stitches and fasten off.
Ladybird Appliqué
Cast on 5 stitches in red, place marker either side of central stitch. Row 1: Knit to first marker, inc1, pm, k1, pm, inc1, knit to end. Row 2 and all even rows: Purl rows. Row 3, 5 as row 1. Row 7, 9, 11: Knit row. Row 13, 15, 17: Change to black yarn, Knit to two stitches before marker, k2tog, pm, k1, pm, ssk, knit to end. Row 18 Cast off in purl. Using black yarn and duplicate stitch (swiss darning) embroider the divide using the center stitch as a guide. Again using black yarn, embroider dots on the ladybird front. Using white yarn make two small stitches for the eyes if wanted. Sew button onto the wrong side of the pocket, then sew applique onto the right side to cover any ends from the button. Sew finished pocket onto the sweater front. Sew ladybird buttons in place on the bottom shoulder tab. Weave in all ends. Block out the sweater to the required measurements.
Ladybird toy
In red cast on 11 stitches. Row 1: K5, inc1, pm, k1, pm, inc1, k5 Row 2 and all even rows: purl Row 3, 5, 7: Knit to first marker, inc1, pm, k1, pm, inc1, knit to end Row 8-16: Stocking stitch Change to black Row 17,19, 21, 23, 25: knit to 2 stitches from marker, k2tog, pm, k1, pm, ssk, knit to end cast off in purl. Using black yarn and duplicate stitch (swiss darning) embroider the divide using the center stitch as a guide. Again using black yarn, embroider dots on the ladybird front. Using white yarn make two small stitches for the eyes if wanted. Backofladybird Work as for ladybird front but all in black. Sew back and front together using mattress stitch and stuff with fiberfill
Strap
Cast on 5 stitches, knit all rows for 14 rows. K2, YO, K2tog, K1. Knit 4 more ridges and cast off. Sew to base of ladybird.