Simpty Made
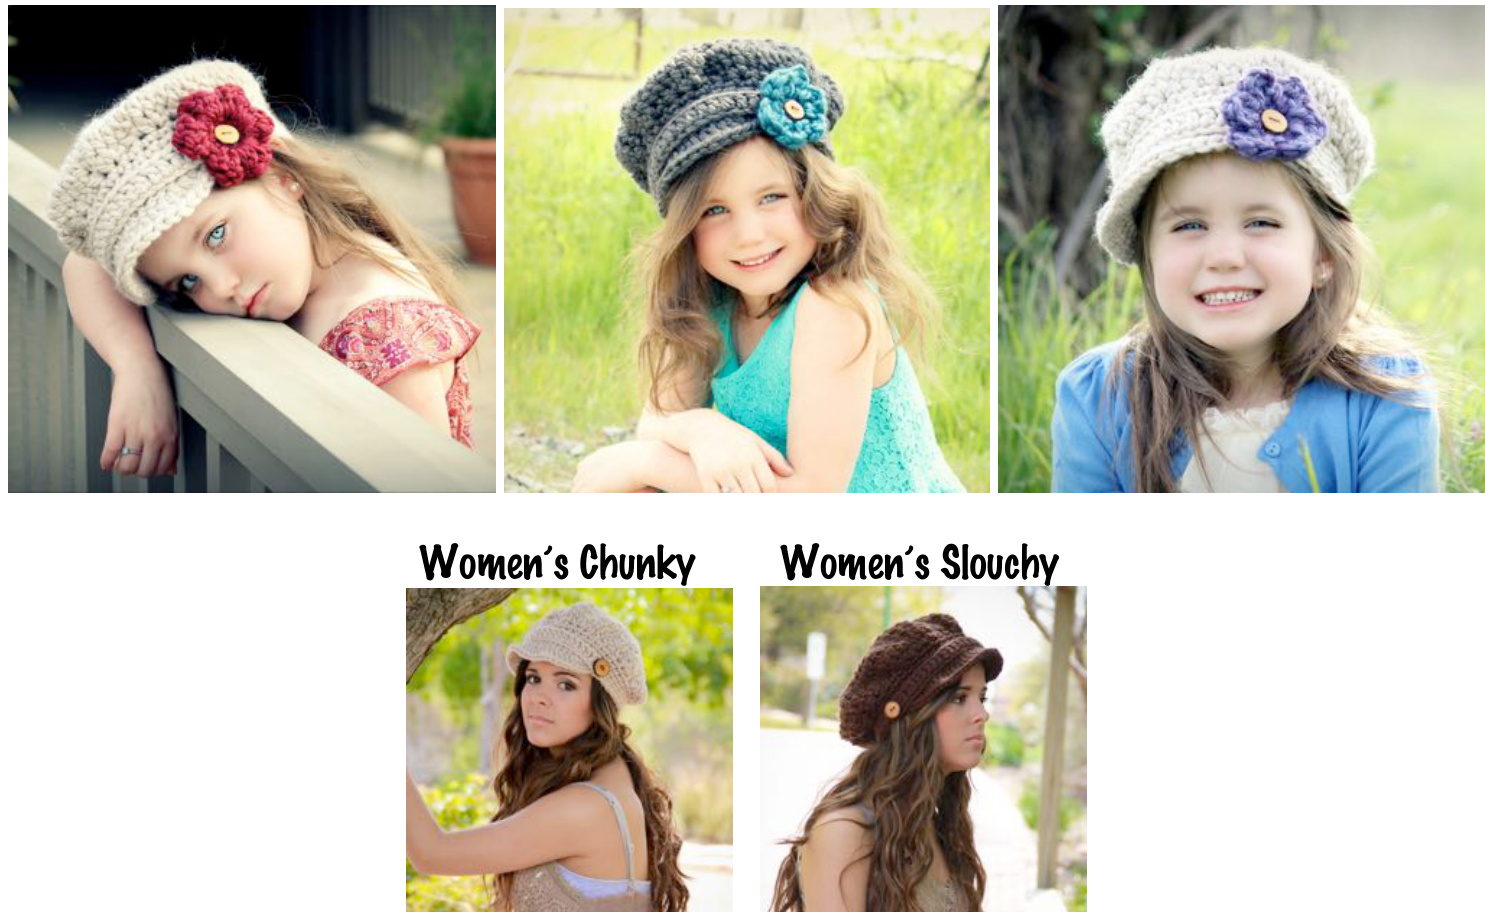
Pattern 011 Chunky or Slouchy Newsboy Hat Optional Strap & Daisy 3 Years - Women's Large
Pattern and images are copyright protected and the sole property of Simply Made By Erin. The written pattern is for personal use only. Please do not redistribute, transfer, or sellthe pattern or images. Feel free to do what you like with the finished product, but please credit me as the designer. Skill Level: Advanced Beginner/Easy Abbreviations: (Standard American Crochet Terms) ch(s) - chain/chains sl st - slip stitch SC - single crochet hdc - half double crochet dc - double crochet sc2tog- single crochet two together st(s) - stitch/stitches rnd(s) - round/rounds
Materials:
Approximately 80-130 yards size 6, super bulky yarn (6oz./170g (108 yd/98 m) I prefer Michael's Brand Loops & Threads Cozy Wool, you can also use Lion Brand Wool Ease Thick & Quick but, be sure to check gauge first because it is slightly thicker and you may need to go down a hook size (results will vary depending on yarn used) N15/10mm Crochet Hook (or size to meet gauge) M13/9mm Crochet Hook (or size to meet gauge) Note: this hook size will be used on the slouchy version only J10/6mm Crochet Hook (or size to meet gauge) Tapestry Needle Stitch Marker Flexible Measuring Tape Optional Buttons, Needle & Thread
Gauge Working in Rounds:
Chunky Version = First 3 Rounds in Pattern = 4 % Inches with N Hook Slouchy Version = First 3 Rounds in Pattern = 5 %2 Inches with N Hook Please be sure to check your gauge before starting, as tension can vary greatly from person to person and depending on the yarnused.
Adjusting to Meet Gauge:
If your gauge doesn't match, chances are your project will turn out smaller or larger than the size intended. Do not get discouraged. Many people crochet with different tensions, even when using the same yarn or hook size suggested. There are many adjustments that can be made to resolve this. If you continue to have problems after trying the tips below, please contact me. I am more than happy to make adjustments and offer other suggestions to make the pattern work for you. My email address is simplymadebyerin@gmail.com 1. If the item is too small try going up a hook size or two,i i's too big go down a hook size or two. 2. When available, try working the pattern instructions for the next size up or down. 3. Add or subtract increase or decrease rows/rounds. This can be tricky on certain patterns therefore, I only suggest doing this if you are comfortable in making these adjustments on your own. Doing this may interfere with the remainder of the pattern, and change the stitch count throughout.
Hat Sizes:
3-10 Years, Fits Head Circumference 19-20.5 Inches Women's Smal/Medium - Fits Head Circumference 21-22 Inches Women's Medium/Large - Fits Head Circumference 22-23 Inches Sizes are approximate based on the average for each age. When available, please use head measurements, rather than age, as children and adult heads tend to vary quite a bit. If your child is between sizes I recommend going with the larger size to allow the most room for growth.
Special Stitch: Single Crochet Two Together (sc2tog)
Insert hook into stitch and draw up a loop. Insert hook into next stitch and draw up a loop. Yarn over, draw through all 3 loops on hook. Chunky Version, 3-10 Years Fits Head Circumference 19-20.5 Inches Rnd 1. Using N Hook, Ch 3 (counts as 1st hdc), 9 hdc in 3rd chain from hook, join with sl st to top of ch 3. (10hdc) Alternatively, you may use the magic circle method as follows: Create a magic circle, ch 2 (counts as 1st hdc) 9 hdc in circle, join with sl st to top of ch 2. (10 hdc) Rnd 2. Ch 1 (does not count as 1st st now & throughout unless otherwise noted), 2 hdc in same st as ch 1, 2 hdc in remaining sts around, join with sl st in beginning hdc. (20 hdc) Rnd 3. Ch 1, hdc in same st as ch 1, 2 hdc in next st, \*hdc in the next st, 2 hdc in next st\*, repeat from \* to \* around, join with sl st in beginning hdc. (30 hdc) (diameter should measure approximately 4 % inches across) Rnd 4. Ch 1, hdc in same st as ch 1, hdc in next st, 2hdc in the next st \*hdc in next 2 sts, 2hdc in next st\*, repeat from \*to \* around, join with sl st in beginning hdc. (40 hdc) Rnd 5. Ch 1, hdc in same st as ch 1, hdc in next 2 sts, 2hdc in the next st \*hdc in next 3 sts, 2hdc in next st\*,repeat from \* to \* around, join with sl st in beginning hdc. (50 hdc) Rnd 6. Ch 1, hdc in same st as ch 1, hdc in next 3 sts, 2hdc in the next st \*hdc in next 4 sts, 2hdc in next st\*, repeat from \* to \* around, join with sl st in beginning hdc. (60 hdc) Rnd 7. Ch 1, hdc in same st as ch 1, hdc in next 4 sts, 2hdc in the next st \*hdc in next 5 sts, 2hdc in next st\*, repeat from \* to \* around,join with sl st in beginning hdc. (70 hdc) (diameter should measure approximately 10 % -10 % inches across) Rnd 8. Ch 1, sc in same st as ch 1, sc in next st, sc2tog in remaining sts around, join with sl st in beginning sc. (36 sts) Rnd 9-11. Ch1, sc in same st as ch 1 and remaining sts around, join with sl st in beginning sc. (36 sts) Do Not Fasten Off, Move to Step 1 below to complete Brim & Sides of Hat. Slouchy Version, 3-10 Years Fits Head Circumference 19-20.5 Inches Rnd 1. Using N Hook, Ch 4 (counts as 1st dc), 9 dc in 4th chain from hook, join with sl st to top of ch 4. (10dc) Alternatively, you may use the magic circle method as follows: Create a magic circle, ch 3 (counts as 1st dc) 9 dc in circle, join with sl st to top of ch 3. (10 dc) Rnd 2. Ch 2 (does not count as 1st st now & throughout unless otherwise noted), 2 dc in same st as ch 2, 2 dc in remaining sts around, join with sl st in beginning dc. (20 dc) Rnd 3. Ch 2, dc in same st as ch 2, 2 dc in next st,\*dc in the next st, 2 dc in next st\*, repeat from \* to \* around, join with sl st in beginning dc. (30 dc) (diameter should measure approximately 5 % inches across) Rnd 4. Ch 2, dc in same st as ch 2, dc in next st, 2dc in the next st \*dc in next 2 sts, 2dc in next st\*, repeat from \* to \* around, join with sl st in beginning dc. (40 dc) Rnd 5. Ch 2, dc in same st as ch 2, dc in next 2 sts, 2dc in the next st \*dc in next 3 sts, 2dc in next st\*, repeat from \* to \* around, join with sl st in beginning dc. (50 dc) Rnd 6. Ch 2, dc in same st as ch 2, dc in next 3 sts, 2dc in the next st \*dc in next 4 sts, 2dc in next st\*, repeat from \* to \* around, join with sl st in beginning dc. (60 dc) Rnd 7. Ch 2, dc in same st as ch 2, dc in next 4 sts, 2dc in the next st \*dc in next 5 sts, 2dc in next st\*, repeat from \* to \* around, join with sl st in beginning dc. (70 dc)(diameter should measure approximately 11 % 12 inches across) Rnd 8. (switch to M Hook) Ch 1, sc in same st as ch 1, sC in next st, sc2tog in remaining sts around, join with sl st in beginning sc. (36 sts) Rnd 9-11. Ch1, sc in same st as ch 1 and remaining sts around, join with sl st in beginning sc. (36 sts) Do Not Fasten Off, Move to Step 1 below to complete Brim & Sides of Hat. Note: If the band is turning out too large or too small you can easily adjust the size by going up or down a hook size or adding more or less decreases. Changing the number of decreases will change the stitch count throughout the rest of the pattern, and you will need to make an adjustment to the number of stitches when working the sides of the hat on Step 1 and Step 4.
Brim & Sides of Hat
The brim and sides are worked with one continuous strand of yarn. You will first work side 1, then form the brim, then work side 2, ending at the back seam of the hat. The final step is to work a border around the hat. The sides of the hat are worked with an N hook for the Chunky Version, M Hook for the Slouchy Version, and J Hook for the brim. Step 1. (working side 1) Ch 1, sc in same stitch as ch 1, sc in next 10 sts, (working brim, switch to J hook), sc in next 14 sts, (mark next st with st marker), sc in marked st, TURN. (26 sts) Step 2. (continuing brim) Ch 1 (counts as 1st sc), sc in next st, hdc in next st, \*dc in next st, 2 dc in next st,\* repeat from \* to \* 3 for a total of 4 times dc in next st hdc in next st sc in next 2 sts, TURN (19 sts) de imhext st, Tepeat 1 more times for a total of 4 times, dc in next st, hdc in next st, sc in next 2 sts, TURN. (19 sts) s Tor a tolal of4 times, dc imhext st, idc imhext st, sc inhext 2 sts, TorN. (19 sts) Step 3. (continuing brim) Ch 1 (counts as 1st sc), sc in next st, hdc in next st,\*dc in next 2 sts, 2 dc in next st,\* repeat from \* to \* 3 more times for a total of 4 times, dc in next st, hdc in next st, sc in next 2 sts, sl st in marked st to join brim to body of hat, (DO NOTTURN).(23sts) Step 4. (working side 2, switch back to M/N hook), sc in next 10 sts, join with sl st in beginning sc from Step 1, (DO NOT TURN). (10 sts) Finishing Border: Using M/N Hook, Ch 1, sc in same st as ch 1, sc in each st along perimeter of hat & brim, sl st to beginning sc. ten offαweave inlooseends. Optional Strap: Using J Hook, ch 26 (or ch until desired length of strap), dc in 3rd ch from hook, & remaining chs across, ending with a sl st in the last st. Fasten off& weave in lose ends. Sew buttons and strap onto each side of hat using needle and thread. The hat is complete, see below instructions if you would like to add the optional Flower Embelishment. Chunky Version Women's Small/Medium Fits Head Circumference 21-22 Inches Rnd 1. Using N Hook, Ch 3 (counts as 1st hdc), 9 hdc in 3rd chain from hook, join with sl st to top of ch 3. (10hdc) Alternatively, you may use the magic circle method as follows: Create a magic circle, ch 2 (counts as 1st hdc) 9 hdc in circle, join with sl st to top of ch 2. (10 hdc) Rnd 2. Ch 1 (does not count as 1st st now & throughout unless otherwise noted), 2 hdc in same st as ch 1, 2 hdc in remaining sts around, join with sl st in beginning hdc. (20 hdc) Rnd 3. Ch 1, hdc in same st as ch 1, 2 hdc in next st, \*hdc in the next st, 2 hdc in next st\*, repeat from \* to \* around, join with sl st in beginning hdc. (30 hdc) (diameter should measure approximately 4 % inches across) Rnd 4. Ch 1, hdc in same st as ch 1, hdc in next st, 2hdc in the next st \*hdc in next 2 sts, 2hdc in next st\*, repeat from \* to \* around, join with sl st in beginning hdc. (40 hdc) Rnd 5. Ch 1, hdc in same st as ch 1, hdc in next 2 sts, 2hdc in the next st \*hdc in next 3 sts, 2hdc in next st\*, repeat from \* to \* around, join with sl st in beginning hdc. (50 hdc) Rnd 6. Ch 1, hdc in same st as ch 1, hdc in next 3 sts, 2hdc in the next st \*hdc in next 4 sts, 2hdc in next st\*, repeat from \* to \* around, join with sl st in beginning hdc. (60 hdc) Rnd 7. Ch 1, hdc in same st as ch 1, hdc in next 4 sts, 2hdc in the next st \*hdc in next 5 sts, 2hdc in next st\*, repeat from \* to \* around, join with sl st in beginning hdc. (70 hdc) Rnd 8. Ch 1, hdc in same st as ch 1, hdc in next 5 sts, 2hdc in the next st \*hdc in next 6 sts, 2hdc in next st\*, repeat from \* to \* around, join with sl st in beginning hdc.(80 hdc) (diameter should measure approximately 11 %2 - 12 inches across) Rnd 9. Ch 1, starting with same st as ch 1, sc2tog, sc2tog in remaining sts around, join with sl st in beginning sc. (40 sts) Rnd 10-12. Ch1, sc in same st as ch 1 and remaining sts around, join with sl st in beginning sc. (40 sts) Do Not Fasten Off, Move to Step 1 below to complete Brim & Sides of Hat. Slouchy Version Women's Smal/Medium Fits Head Circumference 21-22 Inches Rnd 1. Using N Hook, Ch 4 (counts as 1st dc), 9 dc in 4th chain from hook, join with sl st to top of ch 4. (10dc) Alternatively, you may use the magic circle method as follows: Create a magic circle, ch 3 (counts as 1st dc) 9 dc in circle, join with sl st to top of ch 3. (10 dc) Rnd 2. Ch 2 (does not count as 1st st now & throughout Rnd 2. Ch 2, (3 dc, sl st) in same st as ch 2. In next st,\*sl st, ch 2, 3 dc, sl st\*,repeat from \* to \* in next 4 stitches (you should have a next st, 2 dc in next st\*, repeat from \* to \* around, join with sl st in beginning dc. (30 dc) (diameter should measure approximately 5 % inches across) Rnd 4. Ch 2, dc in same st as ch 2, dc in next st, 2dc in the enough to affix to the hat. around, join with sl st in beginning dc. (40 dc) Rnd 5. Ch 2, dc in same st as ch 2, dc in next 2 sts, 2dc in the next st \*dc in next 3 sts, 2dc in next st\*, repeat from \* to \* around, join with sl st in beginning dc. (50 dc) Rnd 6. Ch 2, dc in same st as ch 2, dc in next 3 sts, 2dc in the next st \*dc in next 4 sts, 2dc in next st\*, repeat from \* to \* around, join with sl st in beginning dc. (60 dc) Rnd 7. Ch 2, dc in same st as ch 2, dc in next 4 sts, 2dc in the next st \*dc in next 5 sts, 2dc in next st\*, repeat from \* to \* around, join with sl st in beginning dc. (70 dc) the next st \*dc in next 6 sts, 2dc in next st\*, repeat from \* to \* around, join with sl st in beginning dc. (80 dc) (diameter should measure approximately 13 % - 14 inches across) Rnd 9. (switch to M Hook) Ch 1, starting with same st as ch total of 6 petals), join with sl st in ch1 space (from beg ch 2), fasten off & weave in the loose ends, leaving the remaining tail ends long beginning sc. (40 sts) Rnd 10-12. Ch1, sc in same st as ch 1 and remaining sts around, join with sl st in beginning sc. (40 sts) Do Not Fasten Off, Move to Step 1 below to complete Brim & Sides of Hat. Note: If the band is turning out too large or too small you can easily adjust the size by going up or down a hook size or adding more or less decreases. Changing the number of decreases will change the stitch count throughout the rest of the pattern, and you will need to make an adjustment to the number of stitches when working the sides of the hat on Step 1 and Step 4.
Brim & Sides of Hat
The brim and sides are worked with one continuous strand of yarn. You willfirst work side 1, then form the brim, then work side 2, ending at the back seam of the hat. The final step is to work a border around the hat. The sides of the hat are worked with an N hook for the Chunky Version, M Hook for the Slouchy Version, and J Hook for the brim. Step 1. (working side 1) Ch 1, sc in same stitch as ch 1, sc in next 11 sts, (working brim, switch to J hook), sc in next 16 sts, (mark next st with st marker), sc in marked st, TURN. (29 sts) Step 2. (continuing brim) Ch 1 (counts as 1st sc), sc in next st, hdc in next st, \*dc in next st, 2 dc in next st,\* repeat from \* to \* 4 more times for a total of 5 times, dc in next st, hdc in next st, sc in next 2 sts, TURN. (22 sts) Step 3. (continuing brim) Ch 1 (counts as 1st sc), sc in next st, hdc in next st, \*dc in next 2 sts, 2 dc in next st,\* repeat from \* to \* 4 more times for a total of 5 times, dc in next st, hdc in next st, sc in next 2 sts, sl st in marked st to join brim to body of hat, (DO NOTTURN).(27sts) Step 4. (working side 2, switch back to M/N hook), sc in next 11 sts, join with sl st in beginning sc from Step 1, (DO NOT TURN). (11 sts) Finishing Border: Using M/N Hook, Ch 1, sc in same st as ch 1, sc in each st along perimeter of hat & brim, sl st to beginning sc. Fasten off& weave in loose ends. Optional Strap: Using J Hook, ch 28 (or ch until desired length of strap), dc in 3rd ch from hook, & remaining chs across, ending with a sl st in the last st. Fasten off & weave in loose ends. Sew buttons and strap onto each side of hat using needle and thread. The hat is complete, see below instructions if you would like to add the optional Flower Embellishment. Chunky Version, Women's Medium/Large Fits Head Circumference 22-23 Inches Rnd 1. Using N Hook, Ch 3 (counts as 1st hdc), 9 hdc in 3rd chain from hook, join with sl st to top of ch 3. (10hdc) Alternatively, you may use the magic circle method as follows: Create a magic circle, ch 2 (counts as 1st hdc) 9 hdc in circle, join with sl st to top of ch 2. (10 hdc) Rnd 2. Ch 1 (does not count as 1st st now & throughout unless otherwise noted), 2 hdc in same st as ch 1, 2 hdc in remaining sts around, join with sl st in beginning hdc. (20 hdc) Rnd 3. Ch 1, hdc in same st as ch 1, 2 hdc in next st, \*hdc in the next st, 2 hdc in next st\*, repeat from \* to \* around, join with sl st in beginning hdc. (30 hdc) (diameter should measure approximately 4 % inches across) Rnd 4. Ch 1, hdc in same st as ch 1, hdc in next st, 2hdc in the next st \*hdc in next 2 sts, 2hdc in next st\*, repeat from \* to \* around, join with sl st in beginning hdc. (40 hdc) Rnd 5. Ch 1, hdc in same st as ch 1, hdc in next 2 sts, 2hdc in the next st \*hdc in next 3 sts, 2hdc in next st\*, repeat from \* to \* around, join with sl st in beginning hdc. (50 hdc) Rnd 6. Ch 1, hdc in same st as ch 1, hdc in next 3 sts, 2hdc in the next st \*hdc in next 4 sts, 2hdc in next st\*, repeat from \* to \* around, join with sl st in beginning hdc. (60 hdc) Rnd 7. Ch 1, hdc in same st as ch 1, hdc in next 4 sts, 2hdc in the next st \*hdc in next 5 sts, 2hdc in next st\*, repeat from \* to \* around, join with sl st in beginning hdc. (70 hdc) Rnd 8. Ch 1, hdc in same st as ch 1, hdc in next 5 sts, 2hdc in the next st \*hdc in next 6 sts, 2hdc in next st\*, repeat from \* to \* around, join with sl st in beginning hdc. (80 hdc) (diameter should measure approximately 11 1%2 - 12 inches across) Rnd 9. Ch 1, sc in same st as ch 1, and next 3 sts, sc2tog in remaining sts around, join with sl st in beginning sc. (42 sts) Rnd 10-12. Ch 1, sc in same st as ch 1 and remaining sts around, join with sl st in beginning sc. (42 sts) Do Not Fasten Off, Move to Step 1 below to complete Brim & Sides of Hat. Slouchy Version, Women's Medium/Large Fits Head Circumference 22-23 Inches Rnd 1. Using N Hook, Ch 4 (counts as 1st dc), 9 dc in 4th chain from hook, join with sl st to top of ch 4. (10dc) Alternatively, you may use the magic circle method as follows: Create a magic circle, ch 3 (counts as 1st dc) 9 dc in circle, join with sl st to top of ch 3. (10 dc) Rnd 2. Ch 2 (does not count as 1st st now & throughout unless otherwise noted), 2 dc in same st as ch 2, 2 dc in remaining sts around, join with sl st in beginning dc. (20 dc) Rnd 3. Ch 2, dc in same st as ch 2, 2 dc in next st, \*dc in the next st, 2 dc in next st\*, repeat from \* to \* around, join with sl st in beginning dc. (30 dc) (diameter should measure approximately 5 % inches across) Rnd 4. Ch 2, dc in same st as ch 2, dc in next st, 2dc in the next st \*dc in next 2 sts, 2dc in next st\*, repeat from \* to \* around, join with sl st in beginning dc. (40 dc) Rnd 5. Ch 2, dc in same st as ch 2, dc in next 2 sts, 2dc in the next st \*dc in next 3 sts, 2dc in next st\*, repeat from \* to \* around, join with sl st in beginning dc. (50 dc) Rnd 6. Ch 2, dc in same st as ch 2, dc in next 3 sts, 2dc in the next st \*dc in next 4 sts, 2dc in next st\*, repeat from \* to \* around, join with sl st in beginning dc. (60 dc) Rnd 7. Ch 2, dc in same st as ch 2, dc in next 4 sts, 2dc in the next st \*dc in next 5 sts, 2dc in next st\*, repeat from \* to \* around, join with sl st in beginning dc. (70 dc) Rnd 8. Ch 2, dc in same st as ch 2, dc in next 5 sts, 2dc in the next st \*dc in next 6 sts, 2dc in next st\*, repeat from \* to \* around, join with sl st in beginning dc. (80 dc) (diameter should measure approximately 13 % - 14 inches across) Rnd 9. (switch to M Hook) Ch 1, sc in same st as ch 1, and next 3 sts, sc2tog in remaining sts around, join with sl st in beginning sc. (42 sts) Rnd 10-12. Ch 1, sc in same st as ch 1 and remaining sts around, join with sl st in beginning sc. (42 sts) Do Not Fasten Off, Move to Step 1 below to complete Brim & Sides of Hat. Note: If the band is turning out too large or too small you can easily adjust the size by going up or down a hook size or adding more or less decreases. Changing the number of decreases will change the stitch count throughout the rest of the pattern, and you will need to make an adjustment to the number of stitches when working the sides of the hat on Step 1 and Step 4.
Brim & Sides of Hat
The brim and sides are worked with one continuous strand of yarn. You will first work side 1, then form the brim, then work side 2, ending at the back seam of the hat. The final step is to work a border around the hat. The sides of the hat are worked with an N hook for the Chunky Version, M Hook for the Slouchy Version, and J Hook for the brim. Step 1. (working side 1) Ch 1, sc in same stitch as ch 1, sc in next 12 sts, (working brim, switch to J hook), sc in next 16 sts, (mark next st with st marker), sc in marked st, TURN. (30 sts) Step 2. (continuing brim) Ch 1 (counts as 1st sc), sc in next st, hdc in next st, \*dc in next st, 2 dc in next st,\* repeat from \* to \* 4 more times for a total of 5 times, dc in next st, hdc in next st, sc in next 2 sts, TURN. (22 sts) Step 3. (continuing brim) Ch 1 (counts as 1st sc), sc in next st, hdc in next st, \*dc in next 2 sts, 2 dc in next st,\* repeat from \* to \* 4 more times for a total of 5 times, dc in next st, hdc in next st, sc in next 2 sts, sl st in marked st to join brim to body of hat, (DO NOTTURN).(27sts) Step 4. (working side 2, switch back to M/N hook), sc in next 12 sts, join with sl st in beginning sc from Step 1, (DO NOT TURN). (12 sts) Finishing Border: Using M/N Hook, Ch 1, sc in same st as ch 1, sc in each st along perimeter of hat & brim, sl st to beginning sc. Fasten off & weave in loose ends. Optional Strap: Using J Hook, ch 28 (or ch until desired length of strap), dc in 3rd ch from hook, & remaining chs across, ending with a sl st in the last st. Fasten off & weave in loose ends. Sew buttons and strap onto each side of hat using needle and thread. The hat is complete, see below instructions if you would like to add the optional Flower Embellishment.
Daisy Embellishment
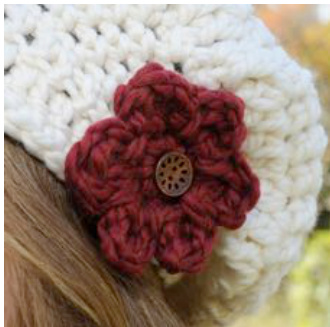
This Flower Embellishment can be adjusted to any size by using a different size yarn and hook. I prefer using the same yarn and hook size as the hat. The button size used in the picture above is 20mm.
Using N Hook
Step 1. Make a magic circle (several tutorials are available online if you are unfamiliar with the magic circle), ch 1, 5 sc in ring, pull string to close circle slightly (make sure the circle is left open enough to slip over your button) join with sl st in top of ch 1. Step 2. Ch2, (2dc, sl st) in same st as ch 2. In next st, \*sl st, ch 2, 2dc, sl st\*, repeat from \* to \* in next 4 stitches (you should have a total of 6 petals), join with sl st in ch1 space from beginning ch2. Weave in Loose ends. Step 3. Sew button onto side of hat, place flower over button.


