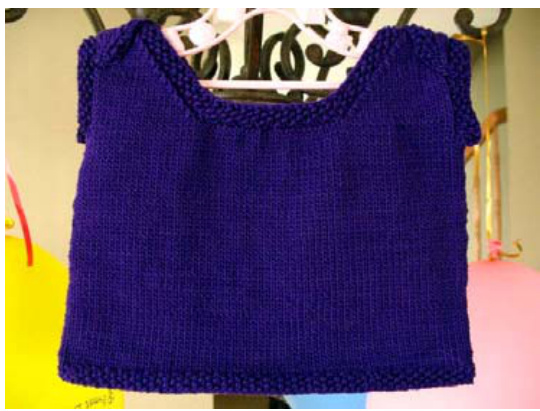
Teeny Baby Top by Johanne Grenier MoonDust Boutique
Skill Level Intermediate Size 3-6 mo
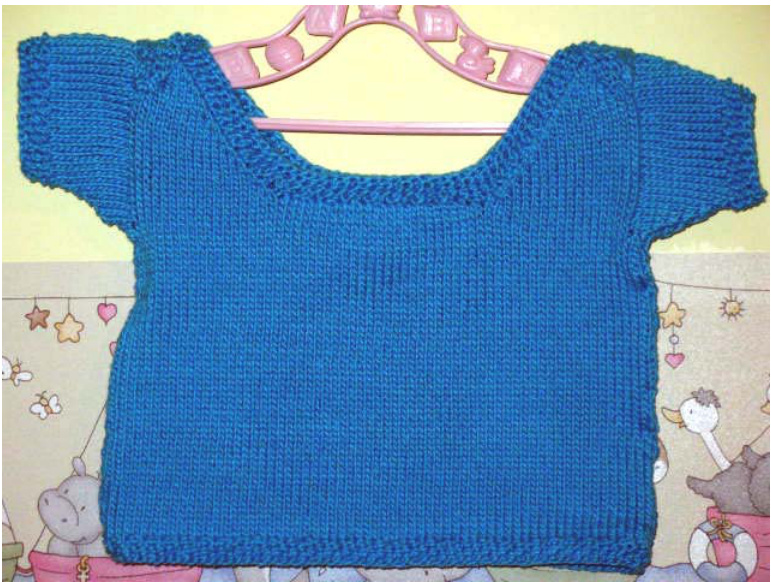
Finished Measurements Finished Chest: 19" Finished Length: 9" Materials Tahki-Stacy Charles, Inc. Cotton Classic $100\%$ Mercerised Cotton (50g/108 yds per skein) Approx. 96g/207 yds (2 skeins) US $2\%$ $(3\;\mathsf{m m})$ knitting needles, or size to obtain gauge. Stitch holders Yarn needle Safety pins
Skills & Notions Required
Knitting, purling, and combining both in the same row Stockinette St Simple decreases (k2tog, ssk) Picking up stitches Tapestry needle Gauge 26 sts and 38 rows on 4" in St st Notes Patterns usually refer to right side and left side in relation to the actual side when the garment is worn. However, because the front and the back of this top are identical, and to avoid unnecessary repetitions in the instruction, I will be referring to right side and left side as when looking at the garment, RS facing (i.e. the right side is what is on your right, and vice-versa). When picking up stitches, the general rule of thumb is to pick up 2 stitches and skip one stitch, although you may occasionally adapt this to make it look nice or to achieve the correct number of picked up stitches for example, you could pick up 3 stitches instead of 2 at one point before skipping one). For good tutorials on picking up stitches, visit www.theshizknit.com. When finished, the neck opening tends to fit losely on the shoulders. Some wil find that satisfactory. but if you prefer a tighter fit, consider kniting a few more even rows when you get to the last 2 sts of the shoulder before k2tog, and then overlapping the tips further, which will close up the opening more. For general help with any skills, visit www.knittinghelp.com - they have extensive explanations, as well as videos for both Continental and English style. It's truly an online knitting bible! Instructions BACK Cast-on 65 sts. Work in Seed st for the first 4 rows as follow: Row 1-4: \* K1, p1; rep from \* until 1 st remains, k1. Starting with a knit row, continue in St st until garment measures 6" from cast-on edge, finishing with a Ws (purl) row. Shape for armholes Next row: Bind off 2 sts at the beginning of the row, knit to the end. [63 sts] Next row: Bind off 2 sts at the beginning of the row, purl to the end. [61 sts] Continue in St st until garment measures 6.5" from cast-on edge - approx. 2 more rows - ending with a Ws (purl) row. Shape Neckline & Shoulder Straps Row 1: K19, bind off 23, k18 - you will have 2 sections of 19 sts. Row 2: Purl the first set of 19 sts on needle (left strap), and put the following set of 19 sts (right strap) on a stitch holder. We will work the left strap first, then rejoin yarn for the right strap. LEFT STRAP (when looking at the garment with RS facing) Row 1: K1, k2tog, knit to end of row. Row 2:Purl. Repeat these 2 rows until 2 sts remain. K2tog. Break yarn and thread yarn through remaining st to bind off. RIGHT STRAP (when looking at the garment with RS facing) Row 1: Rejoin yarn on the purl side, p19. Row 2: Knit until 3sts remain, ssk, k1. Row3:Purl. Repeat rows 2 & 3 until 2 sts remain. Ssk. Break yarn and thread yarn through remaining st to bind off. Neckline Seed StBorder With RS facing and starting at the tip of the right strap (strap on the right when looking at the garment), pick up and knit 24 sts going down the strap, 17 sts at the neckline line, and 24 sts going up the left strap, with the final picked up sts at the tip of the strap. 65 sts total. Work 4 rows of Seed st [\* K1, p1; rep from \* until 1 st remains, k1]; bind off in pattern. FRONT Work same as Back.
SLEEVES Lightly bock front and back so that they will lay flat on a table.
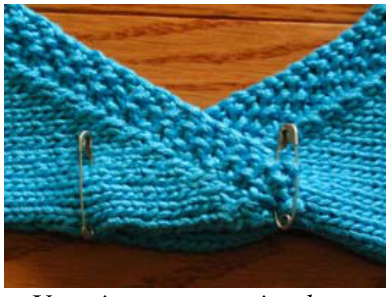
With RS facing up, start by aligning the right and left shoulder tips of both sides. Taking the back, bring the tips over the front tips approx. $1.5^{\circ}$ . Use pins to secure the tips and the sides together, fold in half, and verify that the back and front bottom edges align nicely and evenly.
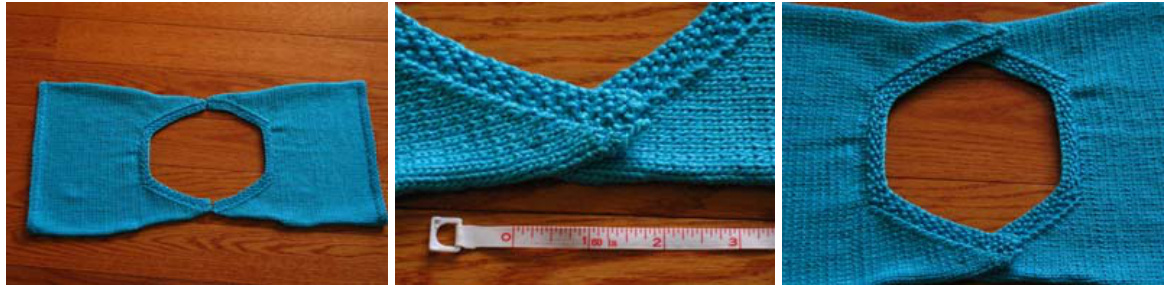
With RS facing and starting at the armhole cast-off of either side, pick up and knit 51 sts, ending at the armhole cast-off of the other side. Tip: to keep back and front sides straight, the front is now the side where the tips fall on TOP.
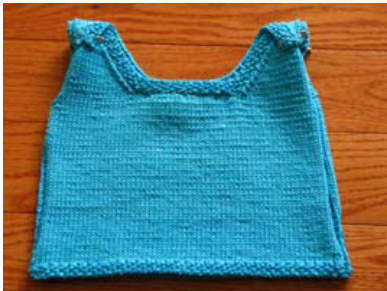
NOTE: when you get to the overlapping tips, you will be picking up stitches over TWO layers of garment, hence sewing them together as you go. This will create the overlapping that provides stretch to fit the garment over a fragile newborn's head (kind of like the ones on store bought onesies). You should be approx. picking up 20 sts along the back side before getting to the first tip, 11 double sts along the overlapping tips, and 20 more sts along the front side after the back tip. It's okay if you get a slight variation in these numbers, as long as you have a similar amount of sts on both sides of the overlapping tips, and 51 sts total. If you are close but not quite at 51 sts (e.g. 49 sts), it may be because your tips are overlapping more than 1.5". You can either re-measure, or it's also ok to skip the first decrease row (you would simply be knitting all sts in this case), which would bring you to the right amount of sts for the following knit row. Also, if you find picking up sts from both layers to be too tight (it does get a little tight, depending on your knitting), you may either pick only one loop (rather than from under both loop) from the bottom flat, or, 1 loop of each layer. Basically, as long as it looks good, that you have the right amount of sts, and that you are satisfied with it, it's all good! $\circledcirc$ For a sleeveless version (shown right), immediately work the 4 rows of Seed st, as explained below after the \* in the short sleeves version; bind off in pattern. For the short sleeves version:
Row 1: Purl. Row 2: K1, k2tog, knit to last 3 sts, ssk, k1. Row 3: Purl. Repeat rows 2 & 3 until 39 sts remain, ending with a WS (purl) row. \*Work 4 rows of Seed st [\* K1, p1; rep from \* until1 st remains, k1]; bind off in pattern. Repeat for $2^{\mathsf{n d}}$ sleeve. FINISHING Sew the tips (but not the sides!) of flaps to the body on back and front. (Tip: if you find that the overlapping front tip is too large/anaesthetic, pinch it in a point when sewing it). Sew together sleeve edges & side edges on both left and right side (sleeveless version: you may leave the Seed st edge on sleeve un-sewn for a loose arm fit). Weave in all ends. Wash and block according to yarn manufacturer's instructions. Enjoy! Abbreviations: k2tog Knit two stitches together RS Right side WS Wrong side
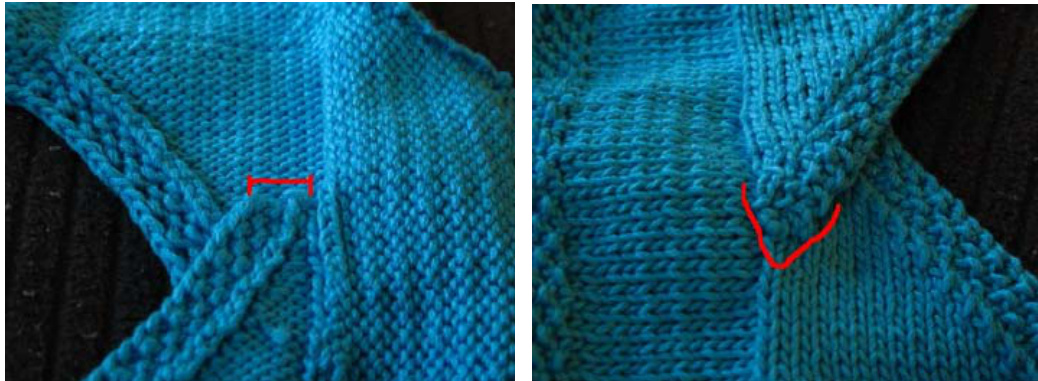
Sew only the END of the tips, not the sides - this willeave room to open for the baby's head. Pinch the front tip in a point for a more pleasing finish. Slip slip knit (slip 2 stitches on right needle purlwise, insert left needle from underneath and knit together) st / sts Stitch(es) St st Stockinette stitch


