BUNDLE OF JOY Design by Amy E. Anderson @
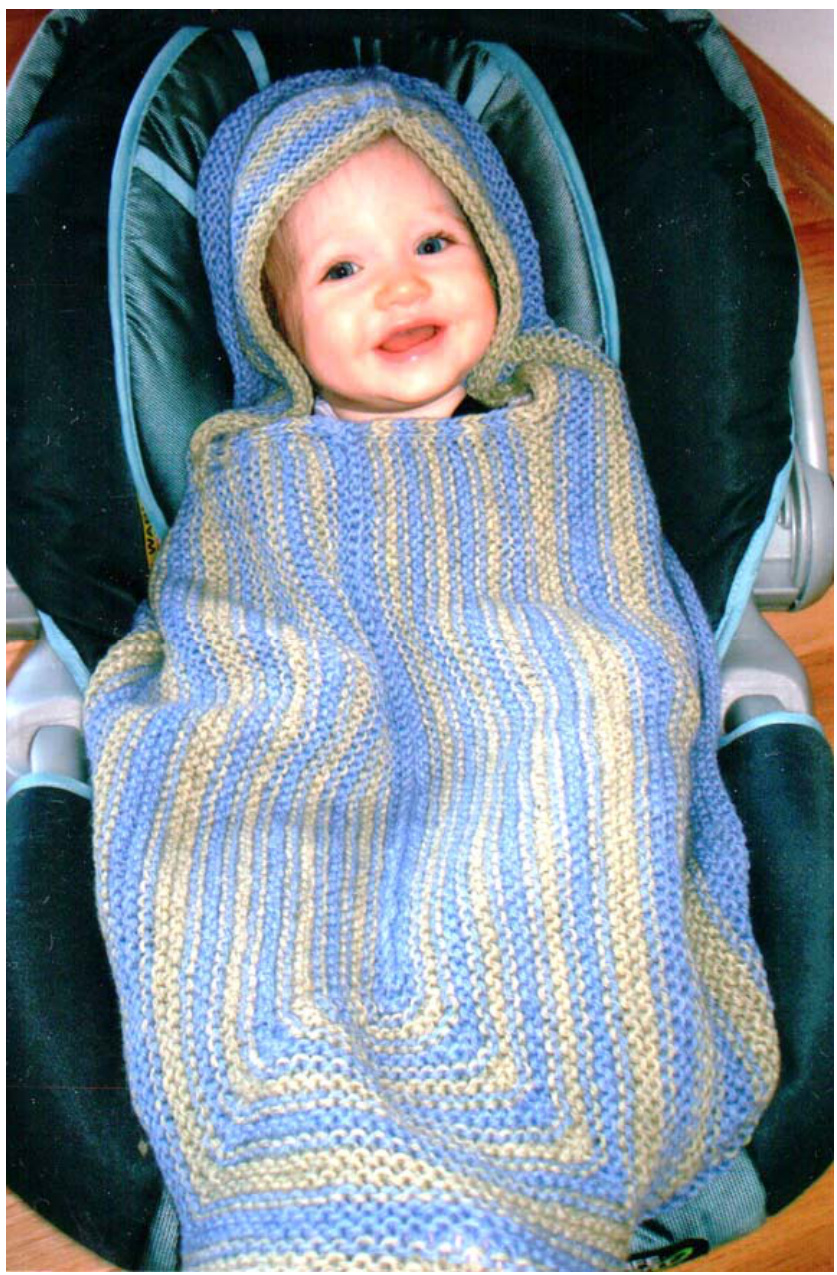
Baby Blanket to Fit Car Seats, Strollers, or Baby Carriers Advanced Beginner Skill Level OneSize Your choice of Fingering, Sport, DK, or Worsted Weight Yarn design by Amy E. Anderson These days, a baby spends most of the $\jmath^{s t}$ year of its life in one of 3 places: A baby carrier, a stroller, or a car seat. So, I decided to make a baby blanket specifically designed for these conveyances. The finished blanket looks kind of like a large bib and will surround the baby's head for added warmth. I have written the directions so that you can use several weights of yarn. The blanket only requires about 250 grams of any weight yarn, so this design may be good for using up letovers - or as an excuse to buy something really soft and luxurious. For practical reasons, I would recommend washable wool, cotton, or synthetic yarns. Directions are givenfor Fingering Weght, with Sport, DK, and Worsted Weight in parentheses. If only one number is given, it applies to all yarn weights.

A Few Comments Before You Get Started:
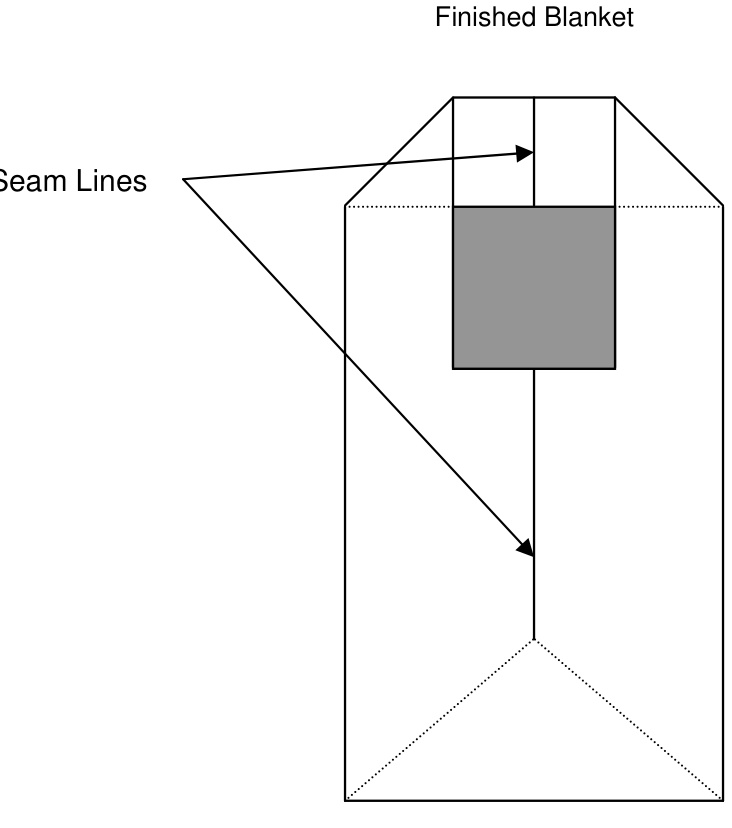
This design employs Built-in I-Cord and I-Cord Bind-off. If you are not familiar with these techniques, this is a great opportunity to learn. I-cord is nothing more than a tiny tube of knitting. In this case, the I-cord runs along the edges of your knitting, creating a very finished edge that looks like piping. The methods for creating it are really very simle.Follow the instructions fora fewrepeats and you'll begin to see what's happening. For builtin I-cord, you simply bring the yarn forward and slip the last 3 stitches of every row. These 3 stitches curlinto a smalltube as you go. adore this technique, however, it can only be employed on garter stitch or other stitches that are very dense vertically. I-Cord Bind-Off can be used whenever you like. Each repeat of the instructions creates one more row of l-cord and attaches it to the body of the fabric as you go. It's a wonderful way to finish off collars, pockets, or the tops of purses to be felted. The decreases at the 2 markers create mitered corners. This is why the stripes seem to bend around the corners. Imagine a picture frame: Each row goes down one side, across the bottom, and up the other side. This is why you start out with so many stitches, but don't be discouraged, every row gets a couple of stitches shorter and once your knitting is $4\%"$ tall, you get to bind off a whole bunch of stitches on the next 2 rows.
Directions:
Step 1-Cast on 450 (412, 374, 338) sts. (Line A-B-C-D). Step 2 - Work 1st row: Knit 180(165, 150, 135) sts, Place Marker, Knit 90 (82, 74, 68) sts, Place Marker, Knit to last 3 sts, yf, slip 3. Note: Both sides of garter stitch look the same;if you are working stripes, mark one side as the “Right Side" and always start your new colors at the beginning of a right side row. Change color stripes whenever you feel like it. Sten3- Work Every Row as follows: Work [ Knit to 2 sts before marker, K2together] twice, then Knit to last 3 sts of the row, yarn forward, slip 3. Continue until piece measures $4\;^{1}\!/\!_{2}^{\;"}$ tall. Step 4 - Work the next 2 rows as follows: Bind of 60 (55, 50, 45) sts in I-cord bind-offat the beginning of the next 2 rows (directions below),then work the remainder of the row as established in Step 3 (K2tog before each marker and slip the last 3 sts with yarn in front.)
Directions For I-Cord Bind-Off:
Work as follows: \*Knit 2, Knit 2together through the back of the loops, slip the 3 sts from the Right needle onto the Left needle\*, repeat \* - \* to end of row. Step 5 - Same as Step 3. Continue until 154 (142, 130, 116) sts remain. You should have 2 sts remaining between the 2 markers.
Bundle of Joy - Page Two
Step 6: Knit together seam line G - H on WS:
Slip one half of the remaining sts onto one needle. Slip the other half onto a $2^{\mathsf{n d}}$ needle. Hold these two needles so that the RS are together and you're looking at the Ws. Using a $3^{\mathsf{r d}}$ needle, work 3-needle bind-off as follows: Insert needle through 1 st on the front needle and 1 st on the back needle, and knit these 2 sts together. Repeat for the next st on the front and back needle, then lift the first st on the right needle over the $2^{\mathsf{n d}}$ st to bind off, as you would in ordinary knitting. Continue working in this manner to end of row. Note: It is also okay to bind off and sew this seamline, if you prefer. Step 7: Finishing - Weave in loose ends. Fold straps and sew Line A-F to line D-E as in diagram
Abbreviations:
$\mathsf{K}=\mathsf{K}\mathsf{n i t}$ $\mathsf{y f}=$ yarn forward K2tog $=$ knit 2 together $\mathsf{r e p=}$ repeat