
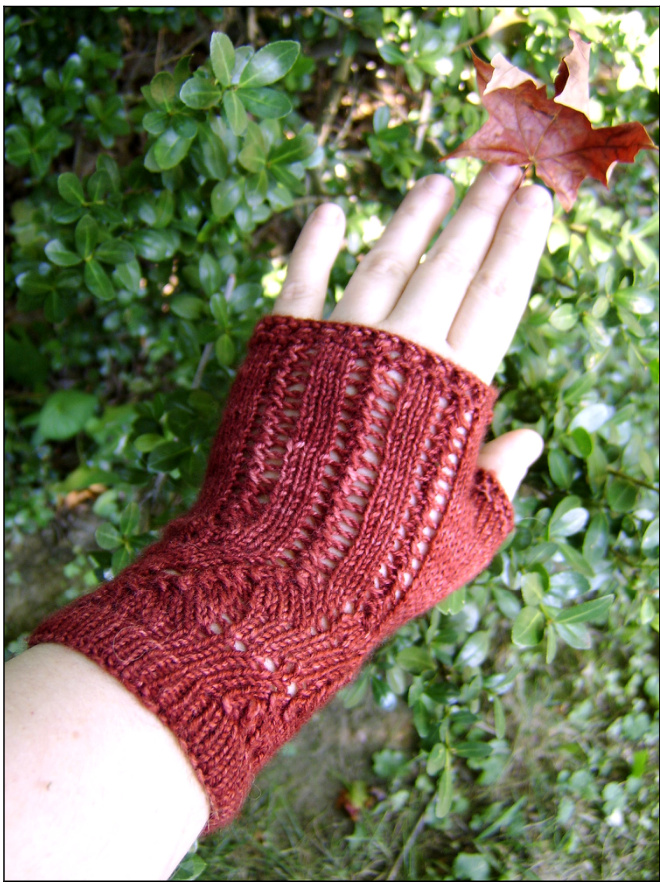
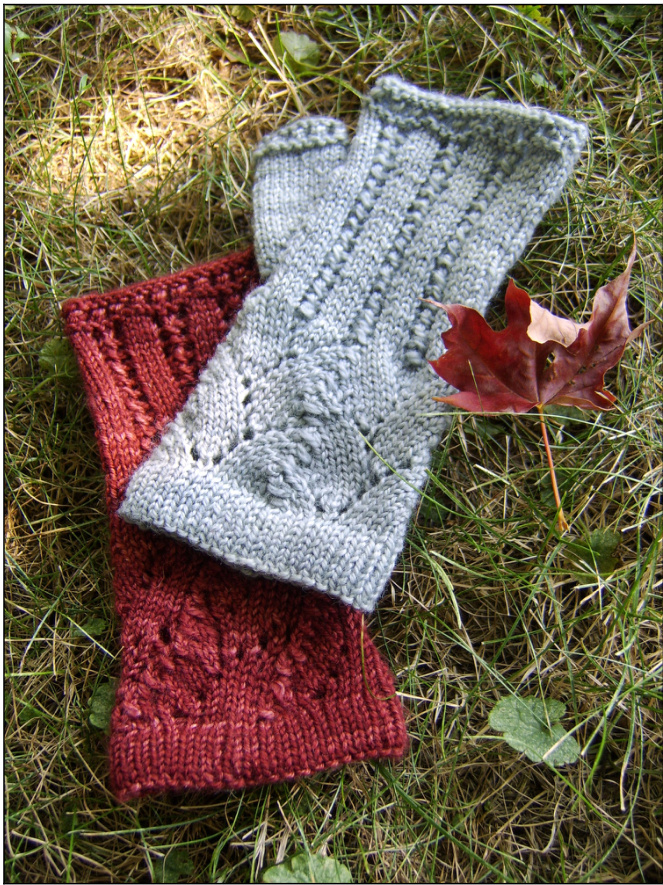
These fingerless mitts were inspired when a friend's search for a matching pattern to go with her newly knit Ishbel Beret was unsuccessful. After helping to turn over the last stone on the Internet, I decided there was nothing left to do but write up a pattern for her. The mitts come in two forms - Ishbel and Elena - the Scottish and Slovakian forms of my two new cousins' names and a nod
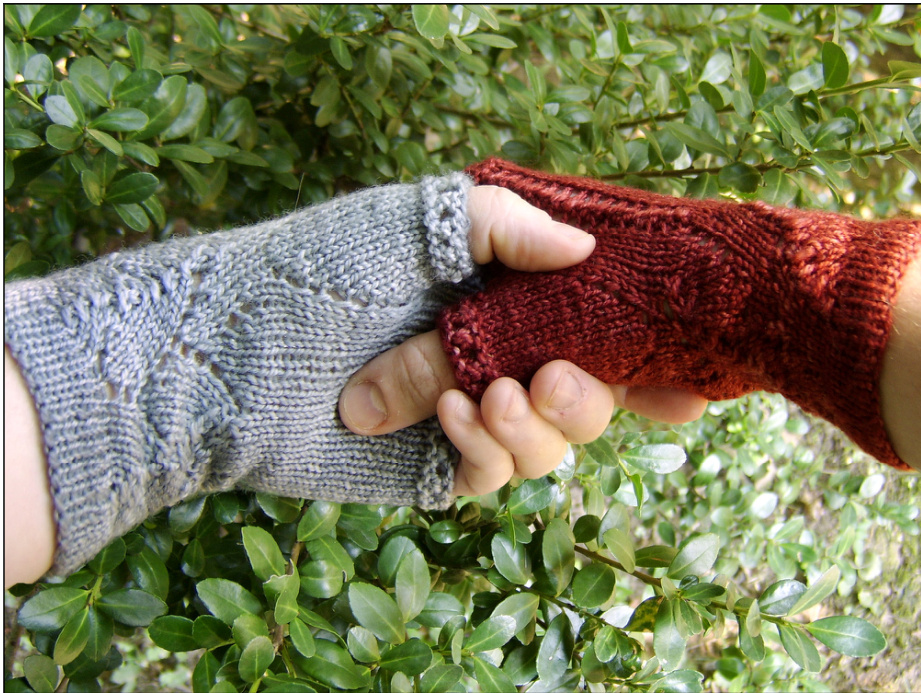
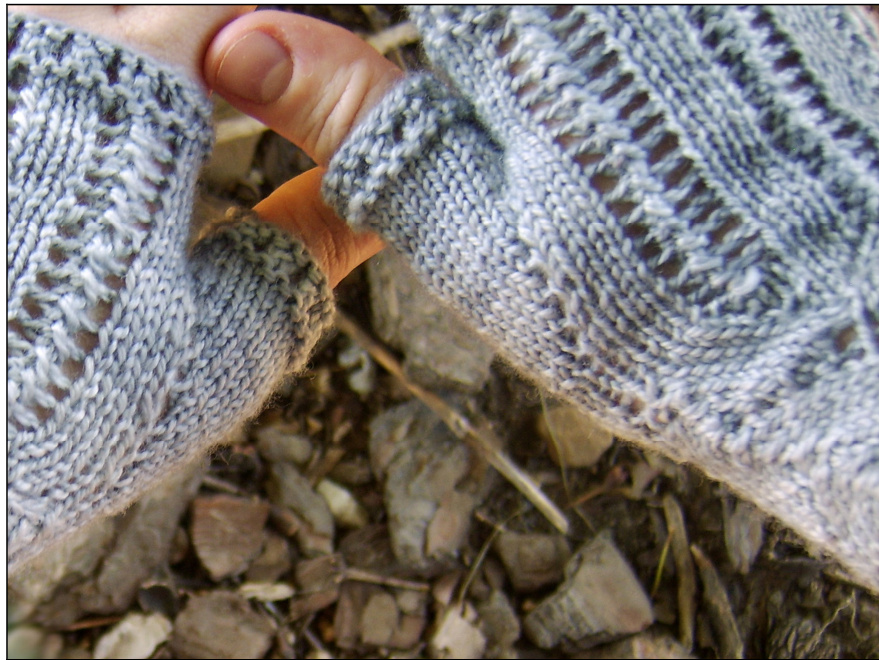
to our shared heritage. Just like the sisters they are named after, both designs feature the same traditional vine lace pattern, but with a slight visual difference - one stands up straight while the other meanders along the wrist. Each flows into the parallel lines of a razorshell lace panel over the back of the hand. A decorative lace border across the knuckles creates a delicate cast-off edge. Three sizes are available for these mitts: petite/small(6/6.5 inches), medium/large (7/7.5 inches) and extra-large (8/8.5 inches). Measure around the widest point of your hand at your knuckle to find your size. This mitt has negative ease, which means it should have a fitted appearance, stretching around your hand with the cuff snug against your wrist. If your mitt looks all loosey-goosey, go down a needle size to achieve a closer fit. Two different methods for casting on the cuff are provided. I find a crochet provisional cast-on is simple and painless, even if you've never crocheted before in. your. life. Trust me. Too lazy to do a provisional cast-on? Yeah, me too. Just follow the lazyman's instructions below.
MATERIALS
125 - 250 yards / 115 - 230 meters of fingering weight / 4 ply yarn size 2 US / 2.75 mm double-pointed needles, or size to obtain correct gauge a few wee little stitch markers a tapestry needle
GAUGE
8 stitches = 1 inch in St st
DIRECTIONS
THE CUFF
CO 40 [50, 60] stitches, using either provisional or long-tail (lazyman) method.
PROVISIONAL CUFF:
Knit across one row and join to begin working in the round. Place stitch marker to mark beginning of rnd. Rnds 1-6: Knit for 6 rnds. Rnd 7: Purl one rnd. Rnds 8-14: Knit for 7 rnds. Undo provisional cast-on and slip cast-on sts onto extra needle. Fold the cast-on edge sts inward toward the live sts, making sure the St st side (right side) is facing out, and purl side sts are facing inward toward each other. Holding the cast-on sts behind the live sts, knit one cast-on st and one live st together. Rep k2tog one st from each needle for the entire rnd. Rnd 15 (inc rnd): \*k10, m1\* rep to end. 44 [55, 66] sts. LAZYMAN'S CUFF: After CO, join to begin working in the round. Place stitch marker to mark beginning of rnd. Rnds 1-6: Knit for 6 rnds. Rnd 7: Purl one rnd. Rnds 8-14: Knit for 7 rnds. Fold the cast-on edge inward toward the live sts, making sure the St st side (ride side) is facing out, and purl side sts are facing inward toward each other. Pick up one st from cast-on edge with right needle, and then slip it to the left needle. With right needle, knit picked up st and nearest live st together. Rep this method of picking up and k2tog for entire rnd. Rnd 15 (inc rnd): \*k10, m1\* rep to end. 44 [55, 66] sts. Ishbel & Elena Mits. Copyright @ 2010 Sarah Core, Exchanging Fire. This pattern is for personal, non-commercial use only and may not be sold or reproduced. For more information or technical assistance contact ladydanio@gmail.com.
THE BODY
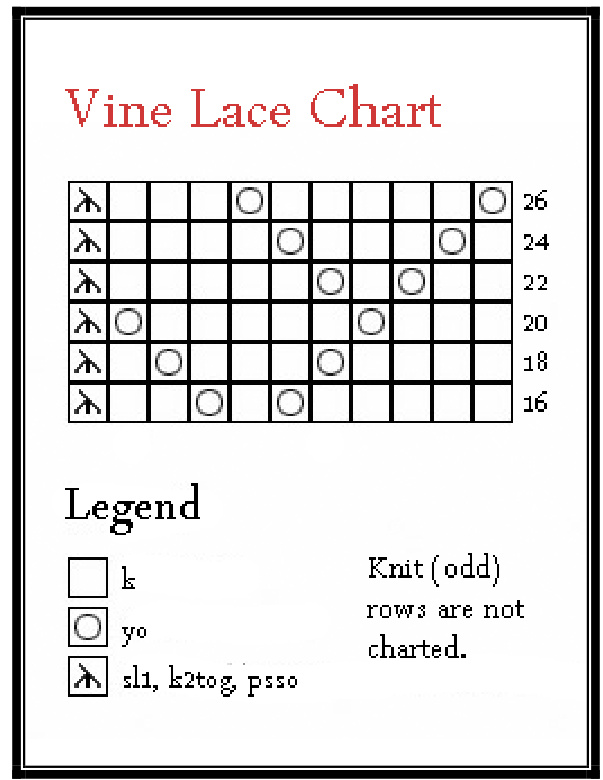
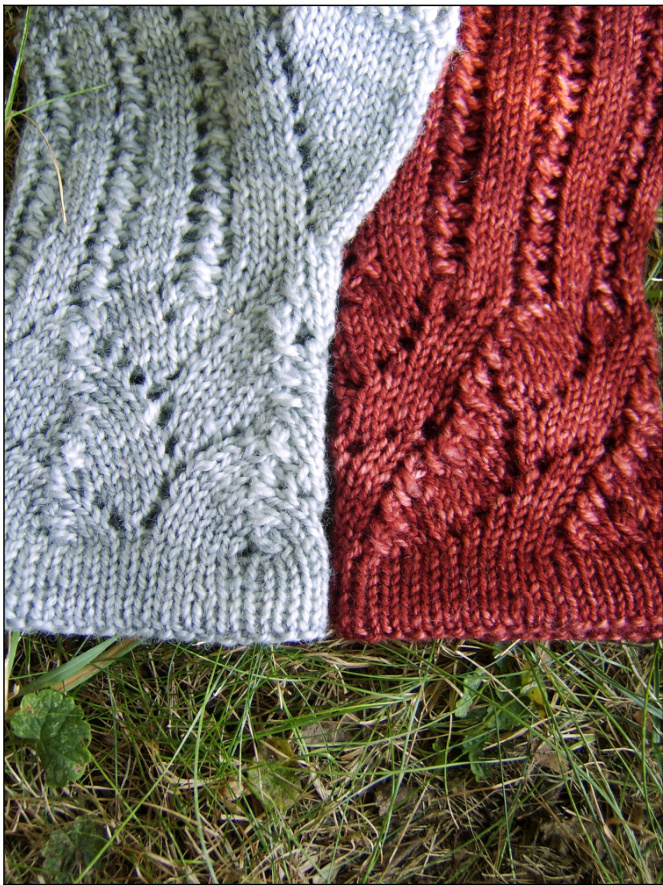
While both Ishbel and Elena require knitting the same pattern, their execution is what makes all the difference. Ishbel is a traditional older sibling, working hard to reach for the sky, while Elena is the easy-going younger and wanders merrily around your wrist. At the end of every lace rnd (even rnd), remove your marker, knit one stitch, and then replace your marker to adjust for the new beginning of the rnd. Continue knitting pattern as written. Your st count should remain the same. The effect is that the design shifts over once in every rnd, thereby making your sl1, k2tog, psso stitch “bumps" line up vertically. TO KNIT ELENA:
You don't actually think Elena requires hard work, do you? Just knit the pattern!
VINE LACE PATTERN: Rnd 16: \*k5, yo, k1, yo, k2, sl1, k2tog, psso\* rep 4 [5, 6] more times to end of rnd. Rnd 17 (and all odd rnds): Knit even. Rnd 18: \*k4, yo, k3, yo, k1, sl1, k2tog, psso\* to end. Rnd 20: \*k3, yo, k5, yo, sl1, k2tog, psso\* to end. Rnd 22: \*k2, yo, k1, yo, k5, sl1, k2tog, psso\* to end. Rnd 24: \*k1, yo, k3, yo, k4, sl1, k2tog, psso\* to end. Rnd 26: \*yo, k5, yo, k3, sl1, k2tog, psso\* to end. Rnds 28-38: Repeat rnds 16 to 26. Ishbel & Elena Mits. Copyright @ 2010 Sarah Core, Exchanging Fire. This patern is for personal, non-commercial use only and may not be sold or reproduced. For more information or technical assistance contact ladydanio@gmail.com.
THUMB GUSSET
Now you will divide your sts to knit thumb gusset for the right or left hands, as instructed below. You will begin knitting the razorshell lace panel as you build your thumb. If using circular needles, simply use stitch markers to mark beginning and end of lace panel, as well as sts of thumb gusset.
RIGHT HAND:
Split sts using needle one for the 21 [25, 29] sts of the lace panel, needle two for the 8 [10, 12] of the thumb gusset and knitting last 15 [20, 25] St sts on needle three. Rnd 39: Knit even. Rnd 40: Work sized razorshell lace panel [see sidebar] on needle one, knit to end of rnd. Rnd 41-45: Rep rnds 39 and 40, ending with
RAZORSHELL LACE PANEL
This lace panel is a simple one-row repeat designed specially for each size. PETITE/SMALL: k3, (yo, sl1, k2tog, psso, yo, k3) 3 times. [21 sts] MEDIUM/L ARGE: k5, (yo, sl1, k2tog, psso, yo, k3) 2 times, yo, sl1, k2tog, psso, yo, k5. [25 sts] EXTRA-LARGE: k4, (yo, sl1, k2tog, psso, yo, k3) 3 times, yo, sl1, k2tog, psso, yo, k4. [29 sts]
a rep of rnd 39. Rnd 46: Knit lace panel on first needle. On second needle, knit as follows: k2 [k3, k4], pm, m1, k2, m1, pm, k4 [k5, k6]. Knit across needle three. There should be 4 thumb sts between markers. Rnd 47: Knit even. Rnd 48 (inc rnd): Work lace panel on needle one. On needle two, knit to first marker, slm, m1, knit to the next marker, m1, slm, knit to end of needle. Knit even across needle three. 6 thumb sts. Repeat rnds 47 and 48, increasing in this manner until 16 [18, 20] thumb sts sit between markers. Knit one round even. For next rnd, work lace panel on needle one. On needle two knit to one st before first marker, kfb, slip thumb sts onto waste yarn, pull yarn tightly across the gap left by the thumb stitches, kfb, then knit across needle three. 44 [55, 66] sts. Continue razor lace panel until roughly half an inch [1 cm] from desired end of mitt, finishing with an odd rnd. Note: If knitting middle size, dec once in the final odd rnd with a k2tog at end of third needle. 44 [54, 66] sts.
LEFT HAND:
Split sts using needle one for the 21 [25, 29] sts of the lace panel, knitting 15 [20, 25] St sts on needle two, and needle three for the 8 [10, 12] of the thumb gusset. Rnd 39: Knit even. Rnd 40: Work sized razorshell lace panel [see sidebar] on needle one, knit to end of rnd. Rnd 41-45: Rep rnds 39 and 40, ending with a rep of rnd 39. Rnd 46: Knit lace panel on first needle. Knit across needle two. On third needle, knit as follows: k4 [k5, k6], pm, m1, k2, m1, pm, k2 [k3, k4]. There should be 4 thumb sts between markers. Rnd 47: Knit even. Rnd 48 (inc rnd): Work lace panel on needle one. Knit even across needle two. On needle three, knit to first marker, slm, m1, knit to the next marker, m1, slm, knit to end of needle. Repeat rnds 47 and 48, increasing in this manner until 16 [18, 20] thumb sts sit between markers. Knit one round even. For next rnd, work lace panel on needle one. Knit across needle two, and on needle three, knit to first marker, kfb, slip the thumb sts onto waste yarn, kfb, knit to end of needle. 44 [55, 66] sts.
Continue razor lace panel until roughly half an inch [1 cm] from desired end of mitt, finishing with an odd rnd. Remember when knitting middle size to k2tog once in final odd rnd. 44 [54, 66] sts.
DECORATIVE EDGE:
To finish off the mitts, for the final five rnds we are creating a decorative edge. You can always substitute this for one of your own, like a simple turned-over hem to match the cuff around the wrist. Rnd 1: Purl. Rnd 2: Knit. Rnd 3: \*yo, k2tog\* to end of rnd. Ishbel & Elena Mits. Copyright @ 2010 Sarah Core, Exchanging Fire. This pattern is for personal, non-commercial use only and may not be sold or reproduced. For more information or technical assistance contact ladydanio@gmail.com. BO loosely. Return to finish thumb, as shown below. THE THUMB: Pick up thumb sts from waste yarn, dividing onto two needles. With third needle, pick up 4 sts from the edge of the mitt's upper thumb opening. 20 [22, 24] sts. Knit in St st for about 6 rnds, until roughly half an inch [1 cm] from desired end of thumb. Rep five rnds of decorative edge. BO loosely. Weave in all ends.
FINISHING
To block, soak in cool water. Fold mitts into a towel and pat gently to remove excess water.
Stretch each mitt flat, pinning the wrist and palm to ensure lace is arranged properly. Allow to dry, keeping mitts away from blown hot or cool air (Trust me, I've made more than one yarn stiff and gnarly trying to dry it over a vent). Unpin your mitts, put them onto your hands and go play outside! Ishbel & Elena Mits. Copyright @ 2010 Sarah Core, Exchanging Fire This pattern is for personal, non-commercial use only and may not be sold or reproduced. For more information or technical assistance contact ladydanio@gmail.com.
ABBREVIATIONS
CO - cast on psso - pass the slipped stitch over BO - bind off rnd(s) - round(s) dpn(s) - double-pointed needle(s) rep - repeat k - knit sl - slip kfb - knit through the front and then the back slm - slip marker of the same stitch (increase) st - stitch k2tog - knit two stitches together (decrease) sts — stitches m1 - make one (increase) St st - Stockinette stitch P - purlRS - right side pm - place marker WS - wrong side
THANKS
Thanks to KnitingFool.com for the fre knitting stitch Shll Lace and Ysolda Teague for creating the lovely Ishbel and Ishbel Beret, which inspired this design. Matching outfits for everyone! I am indebted to my technical editor, Emily Miller for her assistance in cleaning up my wordy words and to my test knitters Bre Donnelly and Hester Thorpe for their wilngness to be guinea pigs and their flexibility with constantly changing instructions. Thank you ladies for all of your help.
KNITTING RESOURCES
For online assistance with any of the techniques used in this pattern, please check out a few of my favorite knitting resource websites, listed below: Craftyarncouncil.com/weight.html - Standard weight chart to guide you in choosing the right yarn. Knittinghelp.com/videos/learn-to-knit - Informative videos and succinct descriptions cover almost everything, from the basic stitches right up to advanced techniques. Ravelry.com - Online knitting community where you can find full pattern support. Visit my blog, exchangingfire.wordpre.com, to learn more about me and my upcoming designs!


