Two Easy One Piece Cushion Covers
With step-by-step instructions on how to fake intarsia, plus button designs and templates!

? 2014 Alison Hamilton 2014. Title: Two Easy One Piece Cushion Covers with step-by-step instructions on how to fake intarsia, plus button designs and templates!
Page 2 Envelope Cushion Cover
Materials
Two 4 mm [US size 6] knitting needles, or the needle size required to obtain the correct gauge. One 40cm x 40 cm [16 in x 16 in] cushion inner. Four stitch markers. Tape measure. Scissors. Darning/tapestry needle with a blunt tip. Row counter (optional). Five snaps to secure the top flap of the cushion cover (optional). Embellishments (optional). Sewing needle and thread (optional - only required if you're sewing embellishments or snaps on to the cushion cover).
Introduction
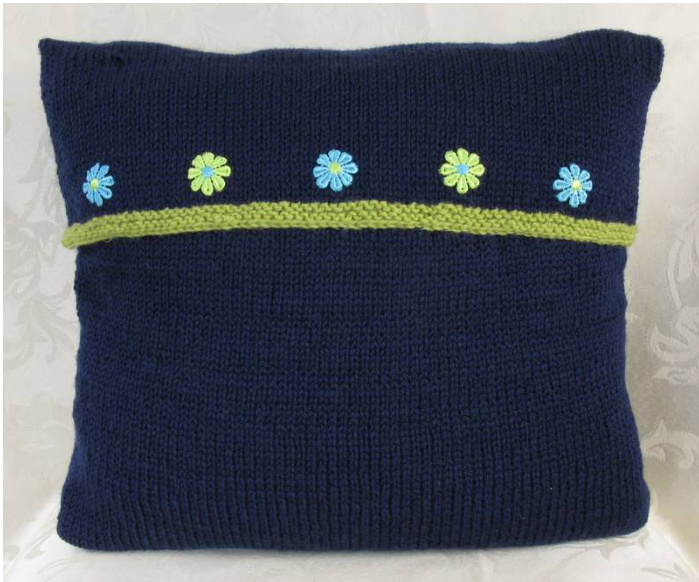
In this pattern, I'll show you how to make an easy-toknit one piece cushion cover with a top flap that folds over like an envelope flap. The flap features a contrast garter stitch edge. Either side can be chosen as the front or back of the cushion cover.
Cushion Inner Sizes and Measurements
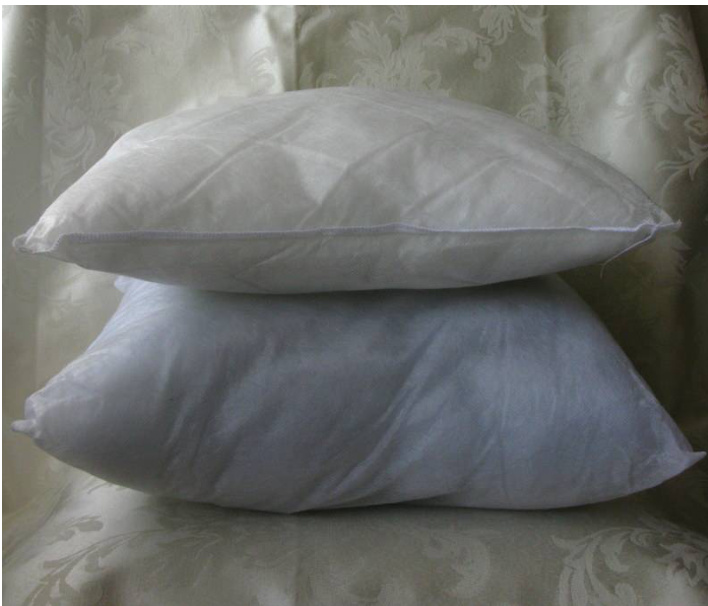
This pattern is designed for a 40 cm (width) x 40 cm (height) [16 in x 16 in] cushion inner. Three sizes are provided in this pattern because the actual thickness of the cushion inner may be quite different depending on the amount of stuffing - see photo below.
Features
The cushion cover is knitted in one piece to minimise the number of seams. The pattern is very easy. If you can knit, purl, cast on and cast off, you should be able to knit this cushion cover. You can add your own finishing touches to create your own unique, personalised cushion cover. I've provided some design ideas to get you started :-)
Yarn for One Cushion Cover
Main colour: 6 (7, 8) balls Cleckheaton Country 8 ply, 100% wool, approx. 95m per 50g ball, colour 0048Navy. Contrast colour: 1 ball John Q Creative 8 ply, 100 % wool, approx. 101m per 50g ball, colour 1927 Avocado. Or substitute approx. 540 (620, 690) metres [590, 680, 755 yds] of 8 ply / DK yarn for the main colour; and 15 metres [17 yds] of 8 ply / DK yarn for the contrast colour. Wool yarn is recommended.

Measure across the fullest part of your cushion inner both horizontally and vertically. Choose the cushion cover size from the list below that is closest to the measurements you've taken. The cushion cover needs to be a similar size to the cushion inner to prevent the top flap from arching across the cushion. 40 x 40 cm [16 x 16 in] across fullest part 43 x 43 cm [17 x 17 in] across fullest part 46 x 46 cm [18 x 18 in] across fullest part
Gauge
21.5 stitches x 30 rows = 10 cms [4 ins] in stocking stitch. If the gauge swatch is too small, knit another swatch using larger needles and measure again. If the gauge swatch is too large, knit another swatch using smaller needles and measure again.
Abbreviations
approx. - approximately CC - contrast colour cm/cms - centimetre / centimetres CO - cast on 8 ply/DK - double knit g st - garter stitch in, ins - inch, inches m - metres / metres MC - main colour RS - right side st/sts - stitch / stitches st st - stocking/stockinette stitch WS - wrong side yds - yards
Panel 1 (Side underneath and below the flap)
CO 88 (96, 102) sts using MC. Work 4 rows in g st. Work in st st until the cushion cover measures 40 (43, 46) cms [16, 17, 18 ins] from the beginning of the knitting. Place a marker at each end of the row. This is the first set of markers.
Panel 2 (Other side of cushion cover)
Work in st st until the cushion cover measures 80 (86, 92) cms [31.5, 34, 36 ins] from the beginning of the knitting Place a marker at each end of the row. This is the second set of markers.
Top Flap
Work in st st until the cushion cover measures 92.5 (100, 107) cms [36.5, 39.5, 42 ins] from the beginning of the knitting, ending with a WS row. Change to CC and work 4 rows in g st. Cast off.
Finishing
Weave in loose yarn ends. Block Panel 1 so that it measures 41 (44.5, 47) cms [16, 17.5, 18.5 ins] wide x 40 (43, 46) cms [16, 17, 18 ins] long. Block Panel 2 using the same dimensions as Panel 1. Block the top flap of the cushion cover to 41 (44.5, 47) cms [16, 17.5, 18.5 ins] wide x 14 (15.5, 17) cms [5.5, 6, 7 ins] long. Fold Panel 1 at the first set of markers over Panel 2 with wrong sides together. Fold the top flap over Panel 1 at the second set of markers. Sew the sides of the cushion cover through all thicknesses using mattress stitch. If you haven't used mattress stitch before, there are lots of sites on the internet that will walk you through the technique.
Page 4 Personalising your Cushion Cover
1. Embellish either side of the cushion cover with hand-made or store-bought items such as motifs, buttons, bows, trimmings and other decorative items. Just ensure that your embellishments are soft, flattish and washable for practical reasons.
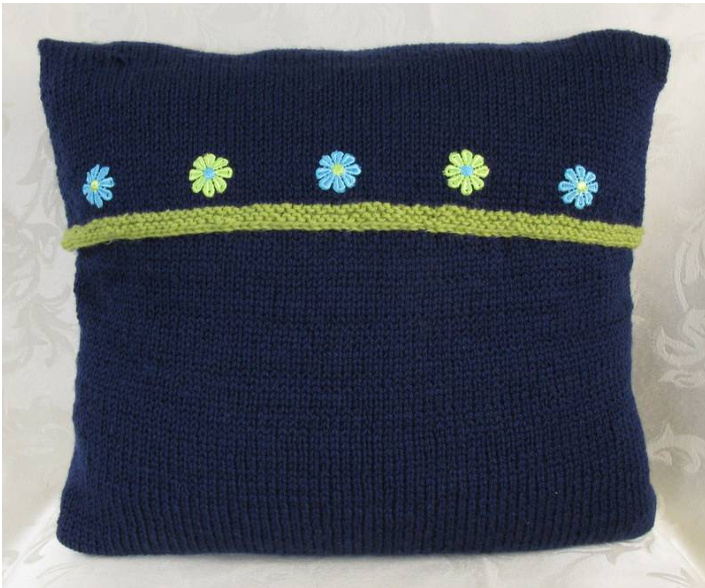
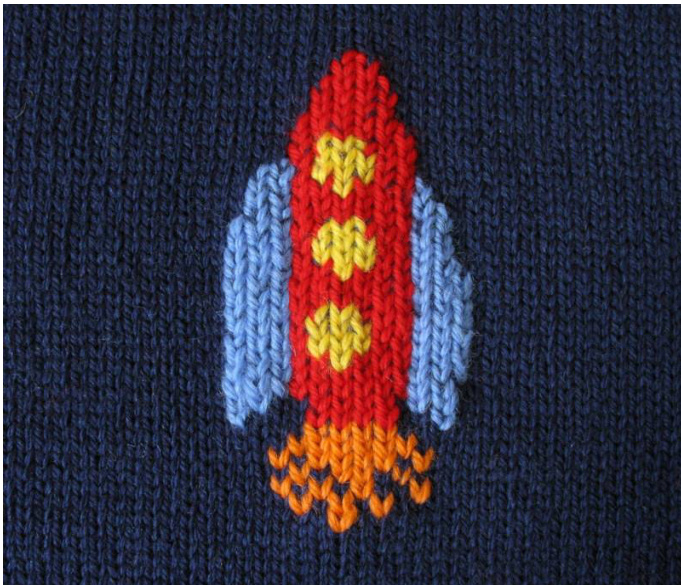
The flowers on this example cushion cover were cut from a chainof multi-coloured daises and hand sewn ontothecushioncover. 2. Knit or crochet flowers, animals or other items separately, then sew these items on to either side of your cushion cover. 3. How about embroidering a picture on to your cushion cover? My step-by-step instructions on duplicate stitch shows you how to imitate intarsia and produce great results. You'll find the instructions at the end of this document.
4. Consider knitting horizontal stripes on Panel 2 of the cushion cover. Experiment with colour, stripe height, stripe spacing and repetition to create an unlimited range of stripe designs.
Cushion Cover with Button Fastening
Introduction
In this pattern, I'll show you how to make an easy-toknit one piece cushion cover with button fastening. The ribbed bands and the buttons provide a nice decorative finish.
Features
The cushion cover is knitted in one piece to minimise the number of seams. The pattern is very easy. If you can knit, purl, cast on and cast off, you should be able to knit this cushion cover. You decide where you want to place the cushion cover opening - one third, half, or three quarters down the cushion - or wherever you want the cushion cover opening to appear. This pattern provides a choice of button and buttonhole layouts: oFour buttons in the centre of the band; Four buttons evenly spaced across the band; Five buttons in the centre of the band; or Five buttons evenly spaced across the band. You can personalise your cushion cover by creating designs on your buttons. I've included a few button designs to get you started :-)
Yarn for One Cushion Cover
6 (6, 7) balls Cleckheaton Country 8 ply, 100% wool, approx. 95m per 50g ball, colour 0048 Navy. Or substitute approx. 500 (560, 620) metres [550) 615, 680 yds] of 8 ply / DK yarn. Wool yarn is recommended.
Materials
Two 4 mm [US size 6] knitting needles, or the needle size required to obtain the correct gauge. One 40cm x 40 cm [16 in x 16 in] cushion inner. Tape measure. Scissors. Darning/tapestry needle with a blunt tip. Four or five 20-23mm [12/16 - 15/16 ins] buttons. Sewing needle and thread for sewing the buttons onto the cushion cover.
Cushion Inner Sizes and Measurements
This pattern is designed for a 40 cm (width) x 40 cm (height) [16 in x 16 in] cushion inner. Three sizes are provided in this pattern because the actual thickness of the cushion inner may be quite different depending on the amount of stuffing - see photo below.
Measure across the fullest part of your cushion inner both horizontally and vertically. Choose the cushion cover size from the list below that is closest to the measurements you've taken:
Page 6
40 x 40 cm [16 x 16 in] across fullest part 43 x 43 cm [17 x 17 in] across fullest part 46 x 46 cm [18 x 18 in] across fullest part
Gauge
21.5 stitches x 30 rows = 10 cms [4 ins] in stocking stitch. If the gauge swatch is too small, knit another swatch using larger needles and measure again. If the gauge swatch is too large, knit another swatch using smaller needles and measure again.
Abbreviations
approx. - approximately cm/cms - centimetre / centimetres CO - cast on 8 ply/DK - double knit in, ins - inch, inches inc - increase K = knit K2tog - Knit two stitches together m - metres / metres mm - millimetres P- purl rep - repeat RS - right side st/sts - stitch / stitches st st - stocking/stockinette stitch WS - wrong side yds - yards
Buttonhole Instructions
To create the buttonhole: rib 2 sts, cast off 1 stitch, rib one st, cast off 1 st. To close up the buttonhole: cast on two sts using the single cast on method. If you haven't used the single cast on method before, there are lots of sites on the internet that will walk you through the technique.
Ribbed Band
CO 86 (94, 102) sts. Row 1: K2, \* P2, K2; rep from \* to end. Row 2: P2, \* K2, P2 rep from \* to end. Rep rows 1 and 2 another 4 times (10 rows in total).
Cushion Cover Body
Row 11: Size 46 x 46 cm [18 x 18 in] only: K2 tog, knit to last two stitches, K2tog (100 sts). Row 11: For all other sizes: knit to end of row. Row 12: All sizes: Purl to end of row. Continue in st st until work measures 80 (86, 92) cms from the beginning [31.5, 34, 36.5 ins] ending with a WS row. For size 46 x 46 cm [18 x 18 in] only: increase one st at each end of the last row (102 sts).
Buttonhole Band
Rep rows 1 and 2 two times (4 rows in total). Continue to work in rib when creating and closing up the buttonholes. Follow the buttonhole instructions in the previous column.
Option 1: Four Buttonholes in Centre
Buttonhole row 1: Rib [32, 34, 34] sts, create buttonhole, rib [3, 5, 7] sts, create buttonhole, rib [3, 5, 7] sts, create buttonhole, rib [3, 5, 7] sts, create buttonhole, rib to end. Buttonhole row 2: \*Rib to cast off sts, close up buttonhole; rep from \* 3 times; rib to end. Option 2: Four Evenly Spaced Buttonholes Buttonhole row 1: Rib [16, 18, 20] sts, create buttonhole, rib [15, 15, 17] sts, create buttonhole, rib [15, 15, 17] sts, create buttonhole, rib [13, 15, 17] sts, create buttonhole, rib to end. Buttonhole row 2: \*Rib to cast off sts, close up buttonhole; rep from \* 3 times; rib to end.
Option 3: Five Buttonholes in Centre
Buttonhole row 1: Rib [30, 30, 30] sts, create buttonhole, rib [3, 5, 7] sts, create buttonhole, rib [3, 5, 7] sts, create buttonhole, rib [3, 5, 7] sts, create buttonhole, rib [3, 5, 7] sts, create buttonhole, rib to end. Buttonhole row 2: \*Rib to cast off sts, close up buttonhole; rep from \* 4 times; rib to end.
Option 4: Five Evenly Spaced Buttonholes
Buttonhole row 1: Rib [14, 14, 14] sts, create buttonhole, rib [11, 13, 15] sts, create buttonhole, rib [11, 13, 15] sts, create buttonhole, rib [11, 13, 15] sts, create buttonhole, rib [11, 13, 15] sts, create buttonhole, rib to end. Buttonhole row 2: \*Rib to cast off sts, close up buttonhole; rep from \* 4 times; rib to end. Rep rows 1 and 2 two times again (4 rows in total). Cast off in rib.
Finishing
Weave in loose yarn ends. Block the st st part of the cushion cover so that it measures 41 (44.5, 47) cms [16, 17.5, 18.5 ins] wide x 77 (83, 89) cms [30.5, 32.75, 35 ins] 1ong. Do not block the ribbing as it will lose its elasticity. Lie the cushion cover on a flat surface with the WS facing upwards, Ensure the band with the buttonholes is at the top. Fold the bottom of the cushion cover, so that the ribbing is positioned where you want the opening. The RS of the cushion cover bottom should be facing you. Fold the top of the cushion cover so that the ribbing with the buttonholes sits on top of the ribbing from the bottom of the cushion cover. The RS of both the top and bottom of the cushion cover should be facing you. Sew the sides of the cushion cover through all thicknesses using mattress stitch. If you haven't used mattress stitch before, there are lots of sites on the internet that will walk you through the technique. Mark the position of the button holes onto the ribbed band without buttonholes. Sew your buttons onto the marked positions.
Button Designs
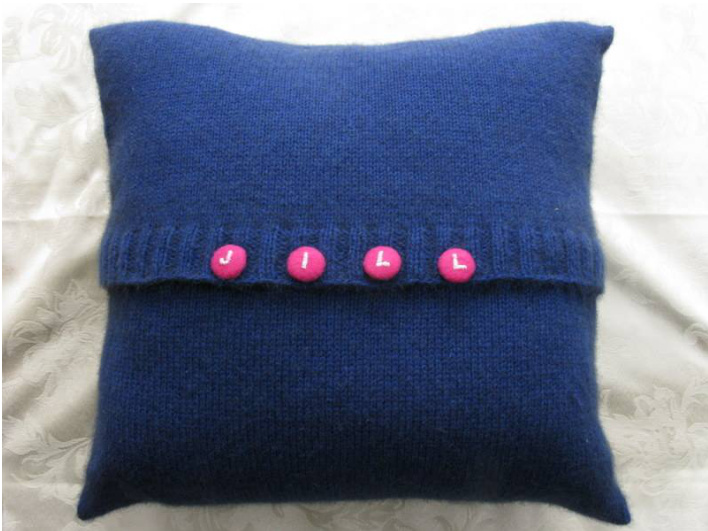
Ever wanted a unique, personalised set of buttons? In this section, I'll show you how to create four different button designs: The “Running Stitch' button; ? The “Letter’ button; The "Dog Paw" button; and The "Sun" button.
Materials
20mm-23mm [12/16 - 15/16 ins] self-cover button kit. I used 23mm self-cover buttons to create the buttons shown in the photographs. Fabric for the button cover. All of my buttons were covered with felt fabric. Don't use thick felt as it can be difficult to insert the back of the button into the button shell. Marker. Scissors. Tweezers. Embroidery design. Templates, such as the sun's rays template, for cutting fabric to the right size and shape. Pins. Sewing or embroidery needle with a large eye. Embroidery thread. Use 2-3 strands of embroidery thread when embroidering the design.
Prepare the Button Cover
Cut the fabric for the button cover, following the instructions provided in the button kit. If there are no instructions, a 48mm diameter circle of fabric should be sufficient for a 23mm [15/16 ins] round button. You'll find a 48mm circle template at the end of this pattern.
Decorate the Button Cover
Running Stitch Button
Centre the button cover over the button shell (the top of the button). Mark the boundaries of the circle on the wrong side of the button cover. I found marking the top, bottom, left and right boundary was sufficient to allow me to sew the stitched circle freehand.
Page 8
Thread the needle using 2-3 strands of embroidery thread. Start at one marker and sew using small running stitches to the next marker to create one quarter of the circle's circumference. (Running stitch is the most basic sewing stitch - it consists of passing the needle in and out of the fabric). Continue sewing around to the next marker, then the next marker, and back to the first marker to create a circle all the way round the fabric.
Letter Button
Choose a font and font size using your word processor. Simple fonts work best because they're easier to embroider and easier to read. For my "JILL" buttons, I chose 36 point Arial Black font. Print out the letter and see how it looks on the button shell. Change the font or adjust the font size if necessary. When you're happy, cut out the letter leaving enough paper around the letter so you can pin the paper onto the button cover.

Usually, the design (or font in this case) would be transferred onto the button cover before you embroider the design. But it's difficult to transfer a design onto felt. Instead I pinned the each letter onto the middle of a button cover, and embroidered each letter right over the top of the paper using satin Stitch.
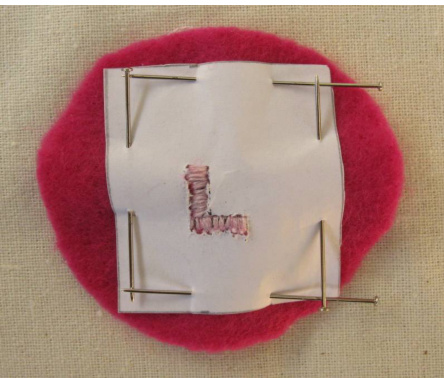
After the letter has been embroidered, remove the paper. You may need to use tweezers to get rid of all the pieces of paper.
Dog Paw Button
The Dog Paw design can be found at the end of this pattern. Proceed as for the Letter button. That is, print out the Dog Paw design, cut around the design, pin the design onto the middle the button cover, embroider the dog paw over the paper using satin stitch, and remove the paper.
Assemble the Button
Assemble the button, following the instructions provided in the button kit. Ensure the decorated part of the button cover is placed in the centre of the button.
Add the Finishing Touches
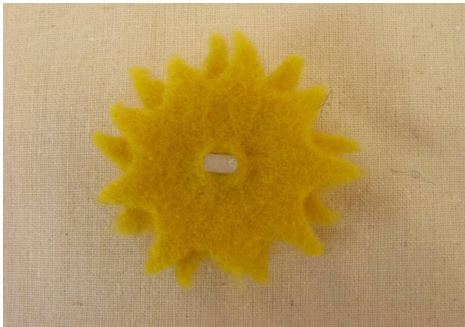
Sun Button
NOTE: Before making the Sun button, check there is sufficient space between the button holes to accommodate this button. The Sun button is a little different from the other buttons because it doesn't require sewing or embroidery skills. Prepare the button cover and assemble the button as above. The covered button is the centre of the sun. Print out the sun's rays template (the template can be found at the end of this pattern). Cut out the template. Pin the template onto your chosen fabric, and cut the fabric following the edges of the template. You'll need to cut two copies of the sun's rays. Make a small hole in the centre of each of the sun's rays. Place one of the sun's rays over the button shank. Place the second of the sun's rays over the button shank but offset the rays as shown in the photo below.
Button Designs and Templates
Button Cover Template, 48mm diameter
Dog Paw Design

Sun's Rays Template
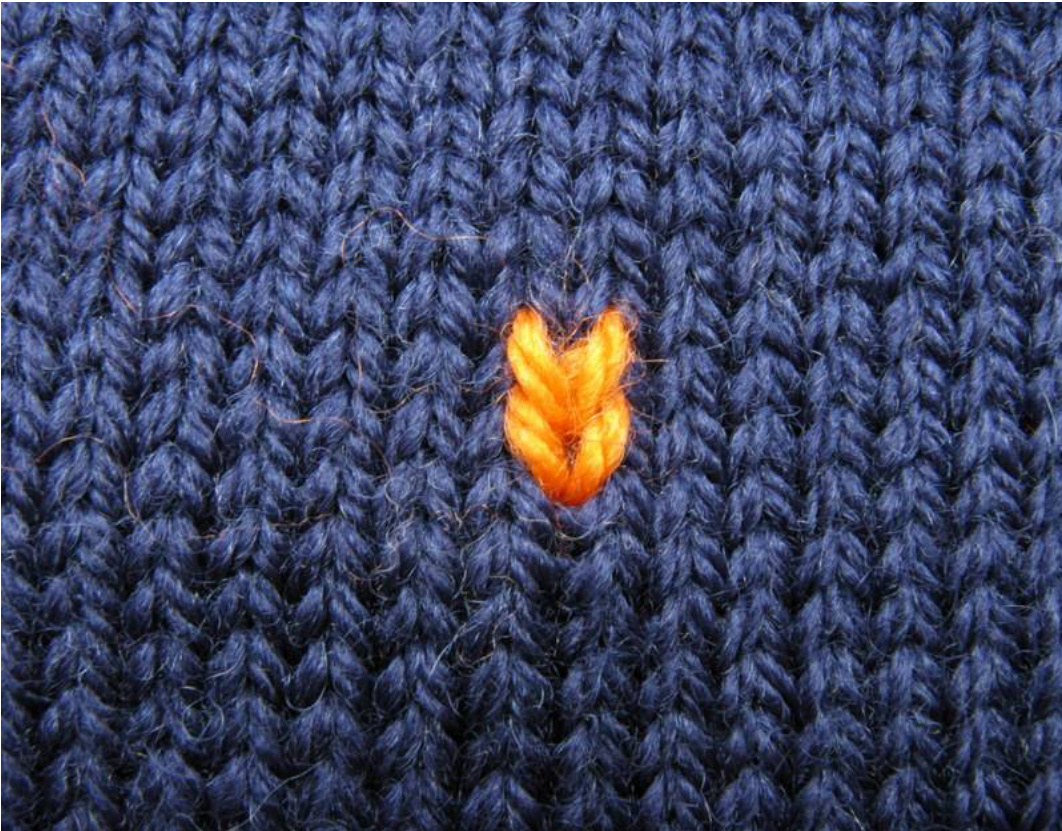
How to Fake Intarsia Using Swiss Darning or Duplicate Stitch
Duplicate stitch allows you to create motifs on your knitting similar to intarsia. The effect is achieved by embroidering over the “v? shaped stitches in your knitting.
What are the Advantages of Duplicate Stitch?
1.You can add duplicate stitch designs to your knitted projects any time after you've knitted them. 2. It's easy to remove or to change your design without unravelling rows of knitting. iplicate stitch can also be used to camouflage mistakes in your fair-isle or intarsia knitting
Preparation
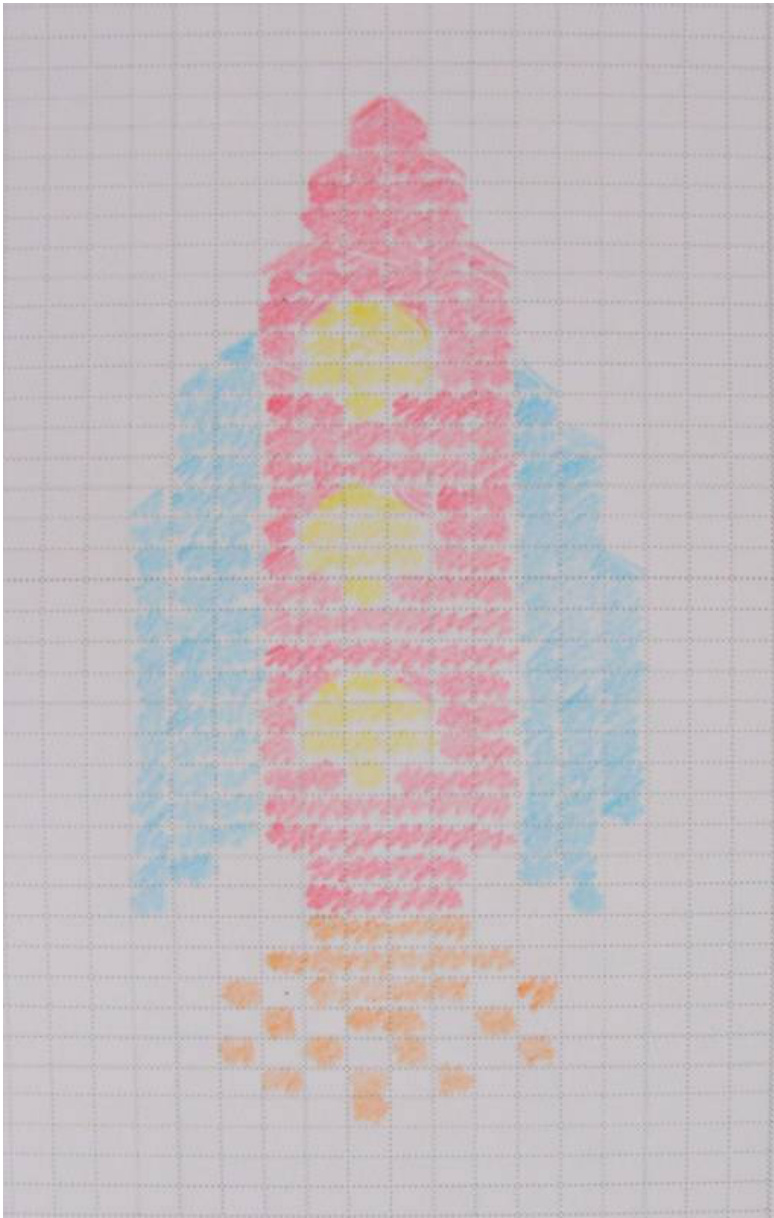
1. First, you need to decide on your design. Duplicate stitch is great for adding a small to medium sized motif onto your knitted project. I wouldn't recommend using duplicate stitch to cover your entire knitted project though! 2. Chart your design. There are websites on the internet that enable you to print kniting graph paper to match your gauge ie. the number of stitches and rows in a 10 cm x 10 cm square. The rocket design below is based on a gauge of 21.5 stitches x 30 rows.
3. Choose the yarns you're going to use. The yarns should be about the same weight as the yarn you used in your knitting project. If the yarn is too thick, the stitches in your knitted project will stretch. If the yarn is too thin, the yarn won't cover the knitted stitches. You should also check that the laundering instructions of your chosen yarns are compatible with your knitted project to avoid any laundering issues.
Step-by-Step Instructions
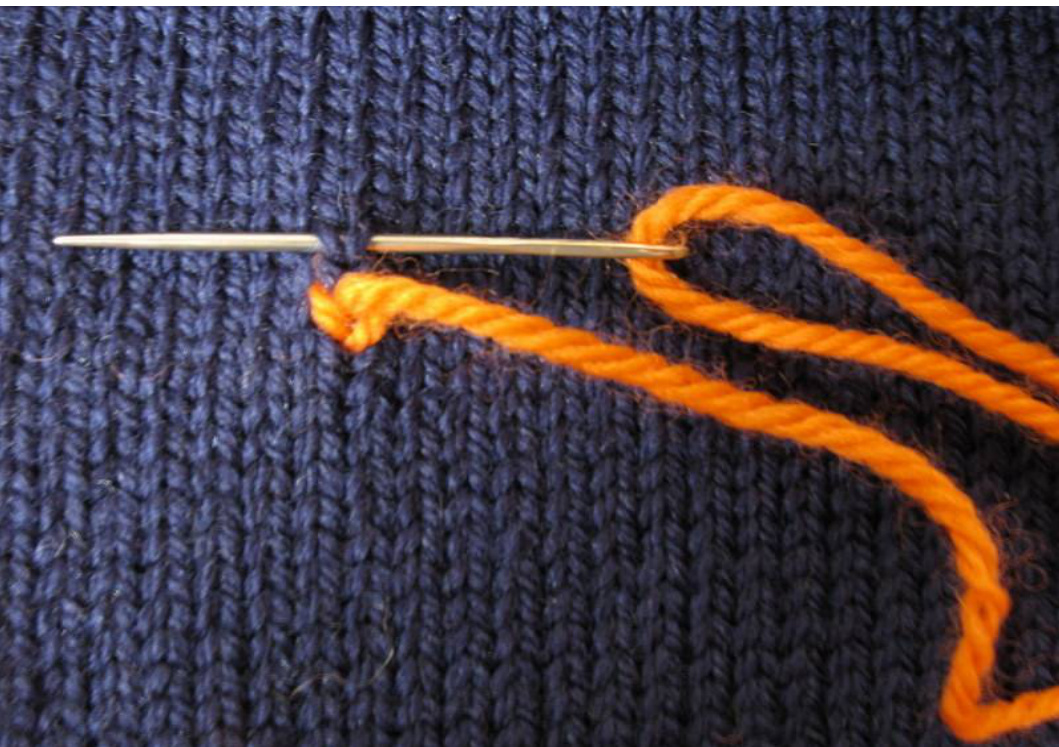
1. Choose a blunt needle to embroider your design and thread the needle. There's no need to tie a knot in the yarn - your can weave the yarn end into your knitting later. 2. Bring the needle up through the bottom of the “v” of the stitch.
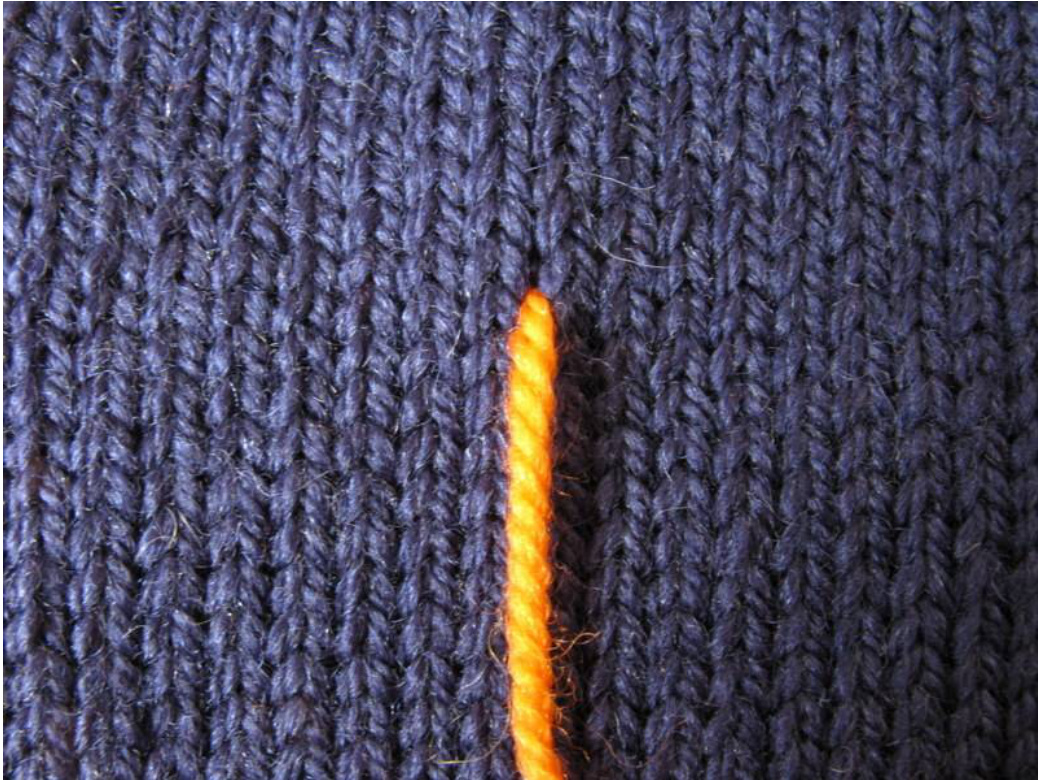
he needle under the two “legs"” of the stitch above the stitch you're currently embroidering
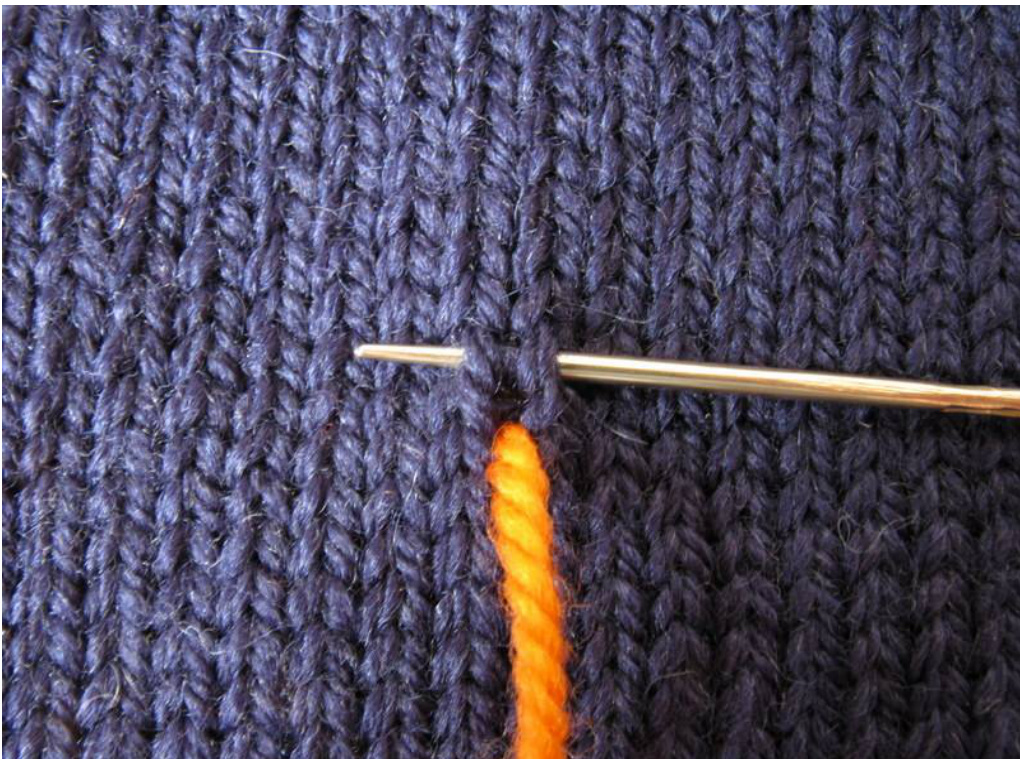
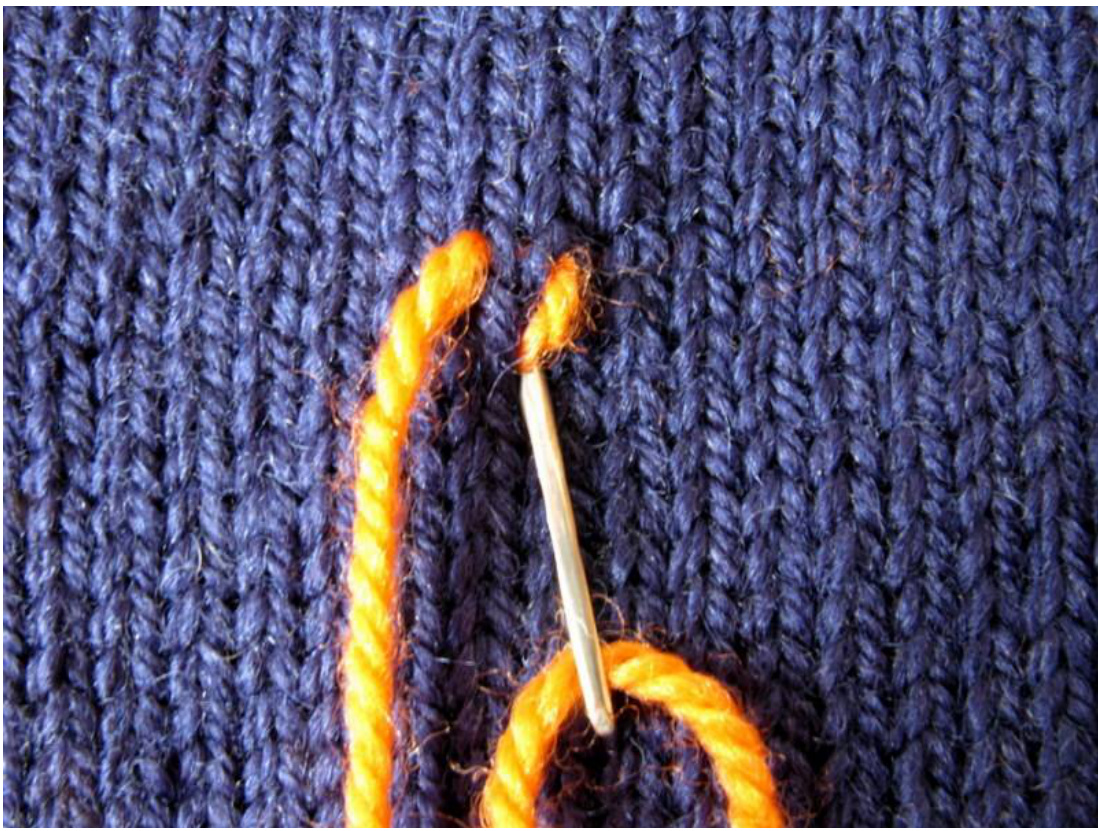
Page 12 Pull the yarn through. Ensure that the yarn has the same tension as the knitted stitch. If the tension is too tight, your knitting will pucker. If it's too loose, the embroidered stitch will look untidy. 4. Insert the needle back into the "v” of the stitch where you first started. Congratulations! You've completed one duplicate stitch.
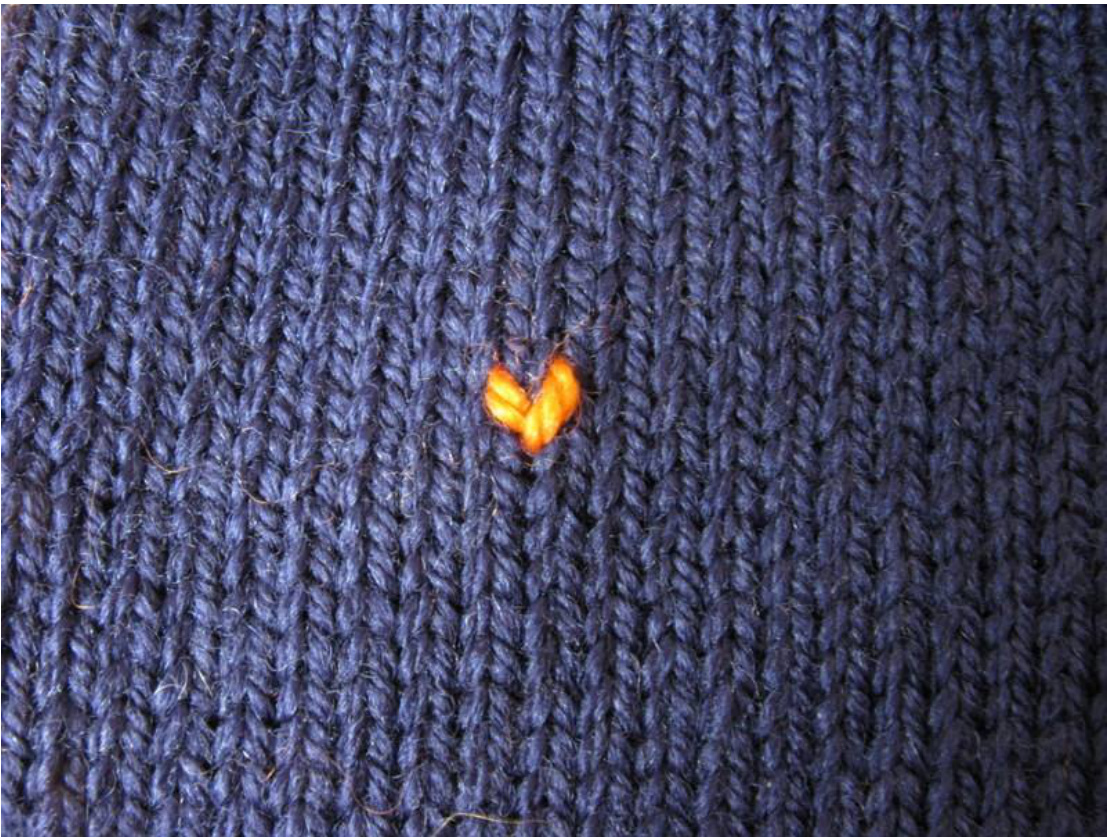
5.You can embroider further duplicate stitches to the left, right or above the stitch you've just finished. I tend to embroider horizontally in one direction, then in the opposite direction on the next row above.
Page 14
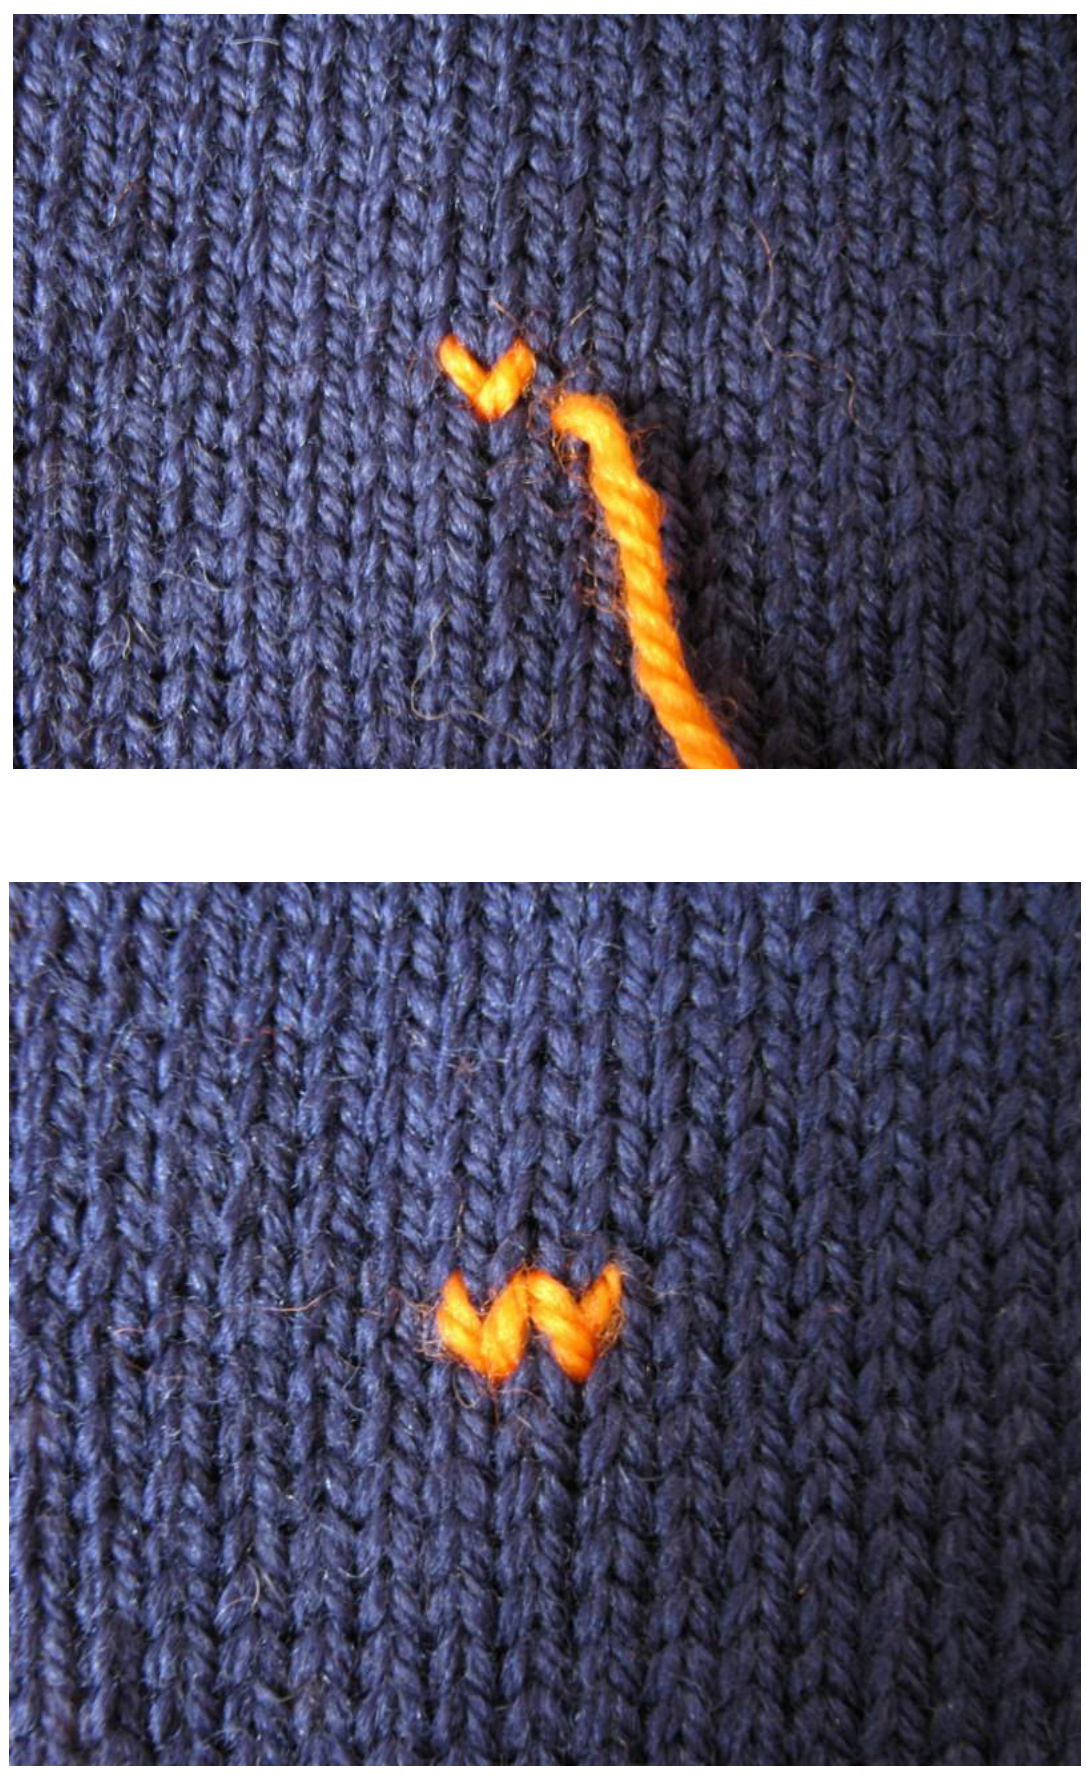
6. Another advantage of duplicate stitch is that you can embroider just half a stitch. I use this technique to soften that “stepped" look you sometimes see in intarsia knitting. The stitch half does have to be slanting the right way though for this technique to work properly.
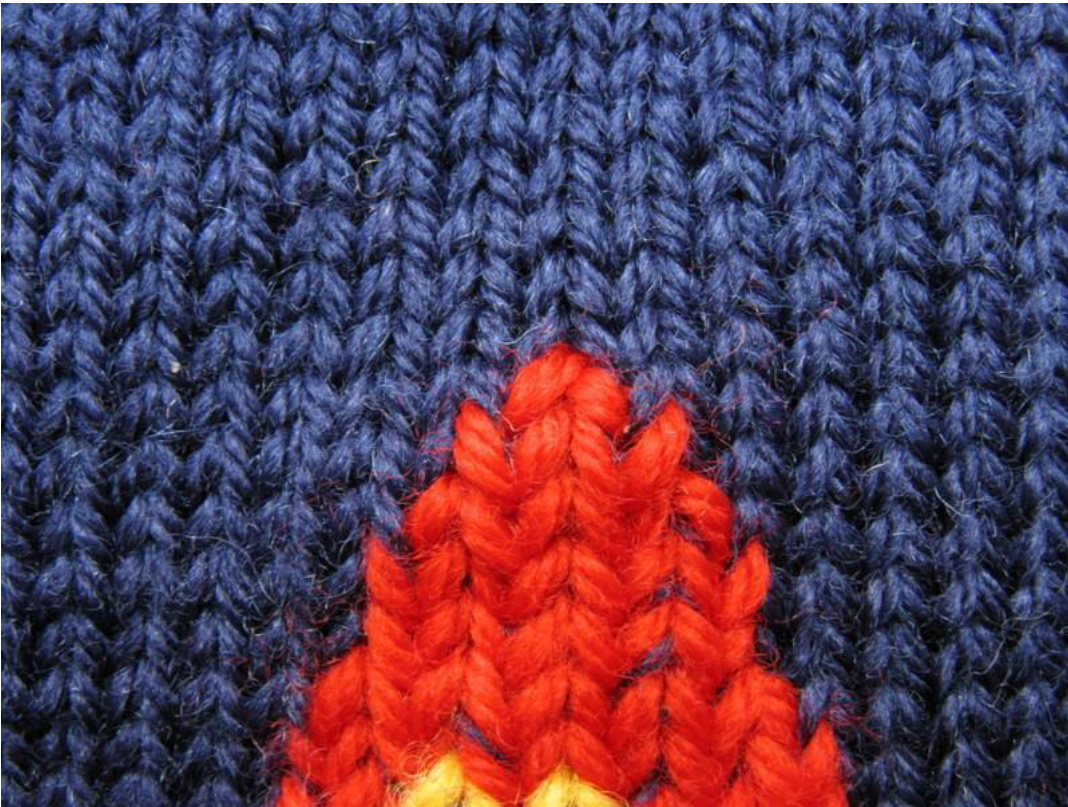
If you look closely, you'll see that I've embroidered only half of some stitches to create the pointed nose on therocket.


