Fulled Curly-Q Scarf By Adriana Schoenberg
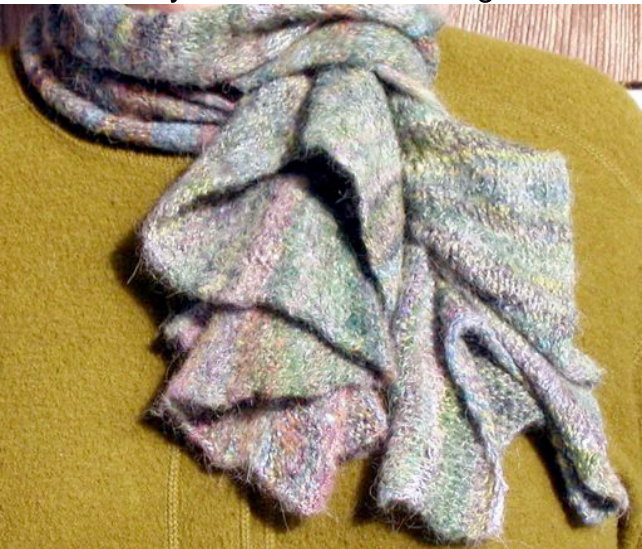
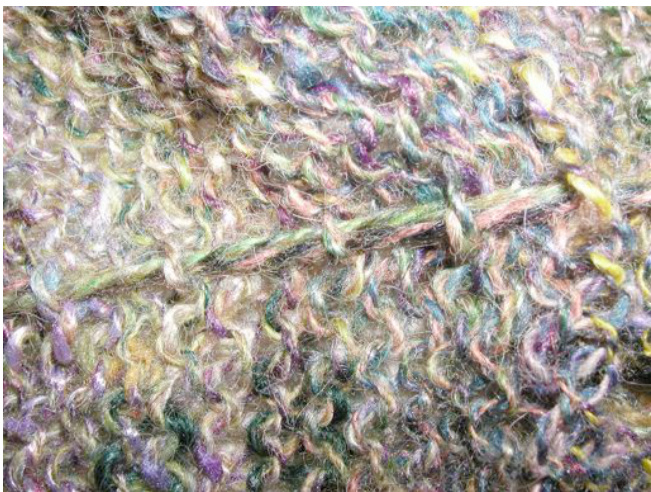
I was looking for a fairly mind-less, easy, but fun project that could be picked up and put down easily. A big plus, would be to have hand-made gifts for friends and family. I became intrigued with the “It's a Bloomin' Holiday: Felted Wave Scarf" demonstrated by Maggie Pace that I saw on Knitty Gritty. The results have been so popular with my friends and co-workers that I wanted to share it. I made a few samples from commercially prepared yarn from my stash, before using my own hand-spun yarn. My partner and fiber muse, Nancy Roberts www.machineknittingtodyefor.com, (see cover articles Spin-Off Fall 2006) also got involved by quickly machine knitting the ten feet of stockinette fabric for these scarves after I knit the first one by hand. Though Nancy tends to like less frilly and more challenging projects, this venture caught her attention too. We have collaborated on these scarves and had a lot of fun in the process! The Fiber: I used Crosspatch Creations Signature Blend Special Color for SOAR 2005- Forest Shadow, a blend produced specifically for Carolina Homespun (and a wool/alpaca blend dyed by Deb Menz that I bought from her at SOAR 2006. The Forest Shadow blend came in a batt and Deb's blend came as a roving. Gauge: It knits up at about 5 stitches per inch using #6 US needles. Knitting and gathering: Nancy knit this scarf on an LK 150 knitting machine, but it can easily be knit by hand. Cast on between 25-50 stitches depending on your width preference (remembering that it will shrink with fulling). Knit approximately 10 feet in stockinette stitch and then cast off. Do not worry about the curling edges and ends, typical of stockinette stitch, as they will form a nice selvedge edging with fulling. This scarf was 10'X125" before fulling. To create the curly ends, I gathered the ends before fulling. First, I placed a marker 45" from each end of the scarf, at the center. Using a double strand of the same yarn used for knitting the scarf and a tapestry needle, I used a basting stitch to gather the knitted ends. Make sure to tie a double knot at each end of the basting yarn to the scarf so that the stitches do not come loose during fulling. Starting 1" from the center of the cast-on edge, down the center of the scarf to the marker, I basted in and out every 2 stitches. I repeated the same basting on thecast-offside.
The basting stitch and gathering line Then I pulled the basting yarn on both sides to gather the material until it was very curly before tying the 2nd knot at the point where the marker was placed to secure the basting line (the stitches will not show after fulling). I gently spread the folds so that they were even and removed the markers. My scarf was ready for fulling!
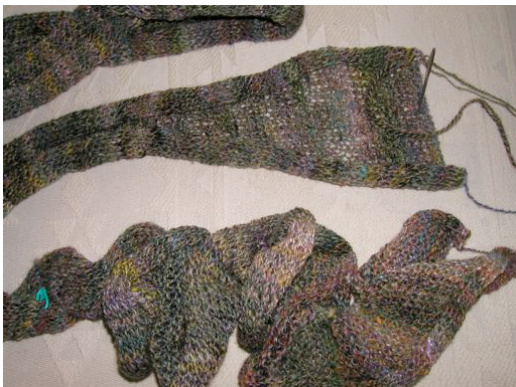
One side of the scarf is gathered.
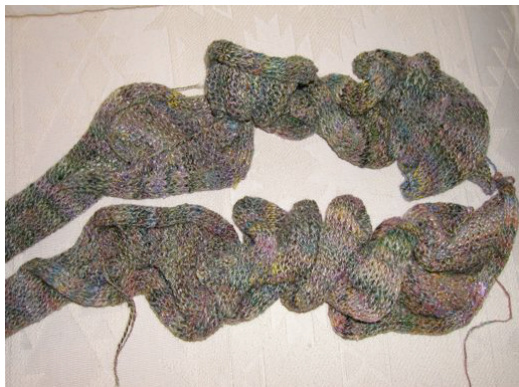
Both sides are gathered. Fulling: I used my top-loading washer, the water level at the lowest setting, the water temperature at the hottest setting, and about a quarter cup of laundry detergent. I let the machine go through it's washing (agitating) cycle and checked it every 2-3 minutes until it had reached the level of fulling that I desired. 1 adjusted the folds that seemed uneven, wrapped it in a towel to squeeze out most of the water, and then hung it up to dry. The result of this process was a warm, firm but pliable, and fashionable looking scarf. A great project for the beginner spinner, knitter, and felter, like me.


