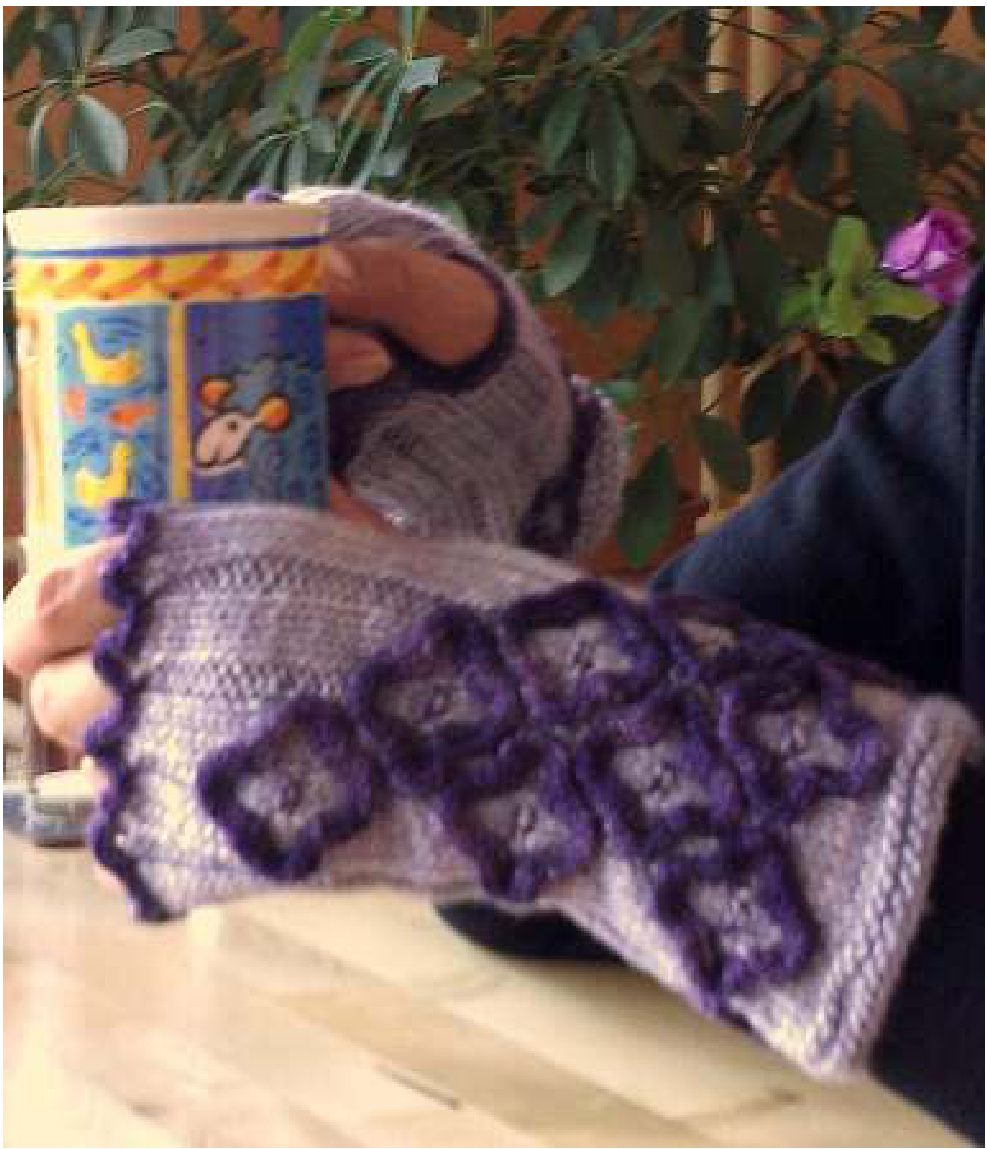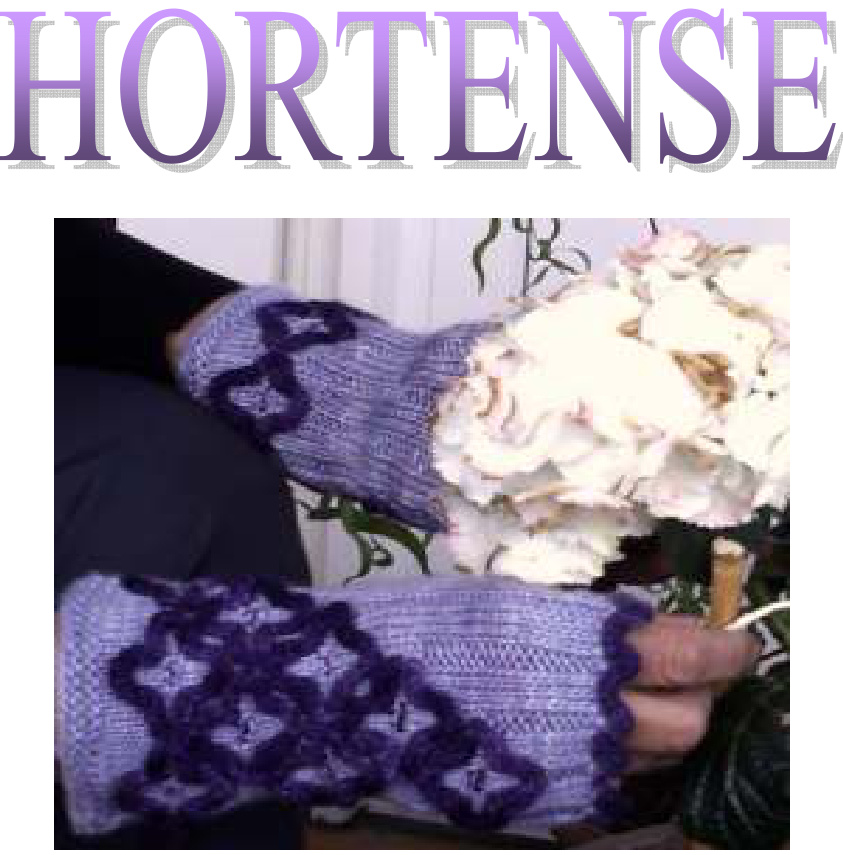
The Hortense mittens are named after the German word for hydrangea, because the clusters of blossoms remind me of that flower. They are an expression of my growing obsession with using i-cord for everything except bag handles. The clusters of little blossoms are created with a technique called “scrawling", outlining a design in purl stitches, then picking up and knitting into the purl bumps to trace the design with applied i-cord. The mittens are topped off by a wavy I-cord Picot Bind Off, and the Afterthought Thumb is finished with - well, take a guess. It does help if you are already comfortable with working i-cord, but don't worry if you are not. When these are done, you will be a pro. Promise. The mittens are designed with a flared cuff, for elegance rather than sub-zero temperatures. The ribbing on the palm side makes them fit snugly on the wrist and stretches to accommodate the hand. While the i-cord design stretches with the underlying fabric, the mittens should be worn with no more than about an inch of negative ease, otherwise the blossoms will stretch sideways and look a bit squashed. Since the design and technique accommodate many yarns and gauges, you can simply go up a needle size (for all sets of dpns),if you need a little more room. If you want smaller mittens, you can also go down in needle size, but the i-cord should be worked with needles no smaller than #0/2mm.
Contents:
Materials Measurements and Gauge Pattern Notes Abbreviations Instructions Finishing Scrawling tutorial
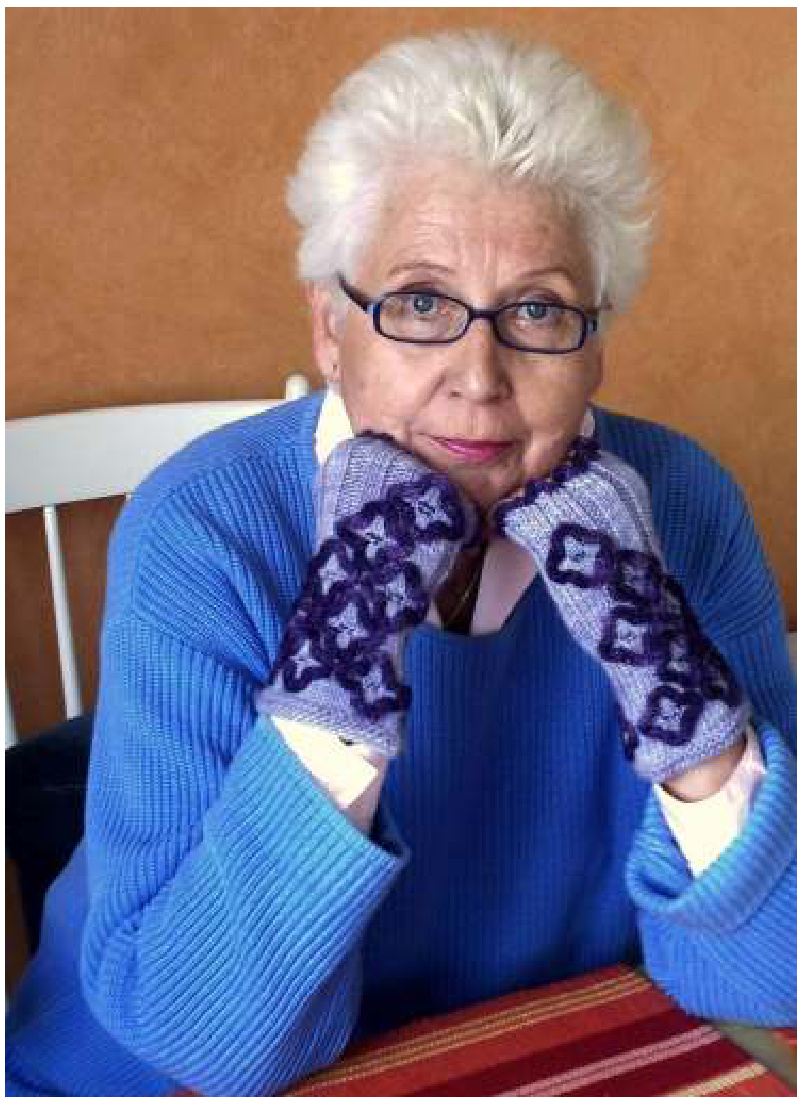
Model: Bambi Brunkow
Materials
[MC] Malabrigo Silky Merino $[50\%$ Merino Wool, $50\%$ Silk; 150yd/137m per 50g skein]; color: Evening Violet; 1 skein [CC] Malabrigo Sock Yarn $[100\%$ Superwash Merino; 440yd/402m per 100g skein]; color: Violeta Africana; 1 skein You need about 83yd/76m of Malabrigo Sock Yarn to complete the mittens, so if you have a full skein, you can still make socks. Needles: 1 set US #4/3.5mm double-point needles 1 set US #2.5/3mm double-point needles 1 set US #1.5/2.5mm double-point needles Approx. 14 inches/35cm smooth waste yarn (weight similar to MC) in a contrasting color Tapestry needle
Measurements and Gauge
Finished measurements:
Cuff circumference: 8 inches Wrist circumference: 6.5 inches (unstretched) Length: 7.5 inches
Gauge:
24 sts/30 rows $=$ 4" in stockinette stitch with MC using largest needles 19 st x 25 rows $=10~\mathrm{cm}/4$ in in stockinette with $4.5\ \mathrm{mm}/7.0$ needles in contrast color
Pattern Notes
Skill level: Beginner to intermediate The pattern is written for a set of 4 double-point needles, but you can use 2 circular needles or magic loop, if you prefer. If you do not use double-points, divide stitches evenly between needles. 3x2 Rib (worked in the round over a multiple of 5 sts): Round 1: [K3, p2] to end. Repeat this round for 3x2 rib. As you follow the charts,the 3x2 rib is gradually established.
I-cord Picot Bind Off:
If you are not familiar with the regular i-cord bind off please refer to instructions found on the Internet, e.g. at www.knitty.com. I-cord Picot Bind Off creates a nicer finish on the WS, so you will turn your work inside out to bind off.
Abbreviations
$\mathrm{K=knit}$ ${\mathrm{P}}={\mathrm{purl}}$ $\mathrm{K}2\mathrm{tog}=\mathrm{knit}$ two stitches together $\mathsf{S s k=}$ slip two stitches purlwise, knit them together $\mathtt{M1}=\mathtt{M a k e}$ 1 stitch. Pick up the bar between two stitches, knit through the back loop $R S=$ right side $\mathrm{WS}=$ wrong side St $=$ stitch/es $\mathsf{K t b l=}$ knit through back loop
Instructions
Right Hand
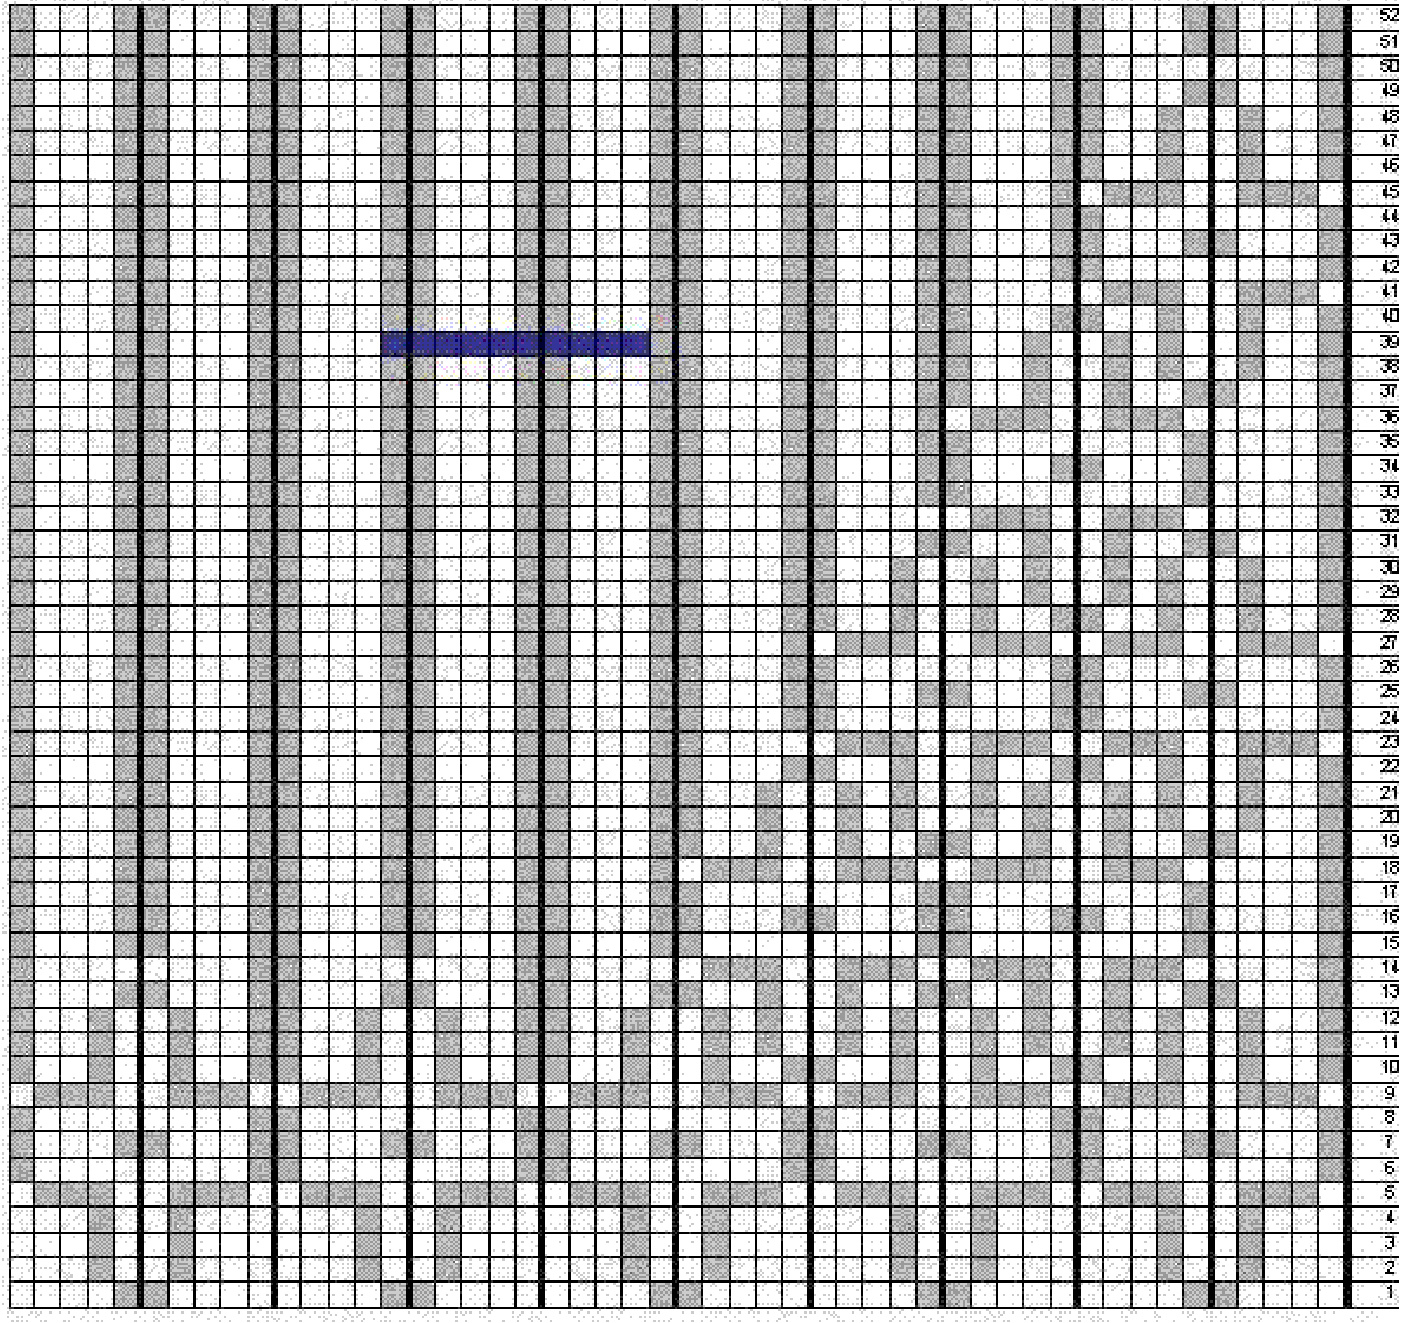
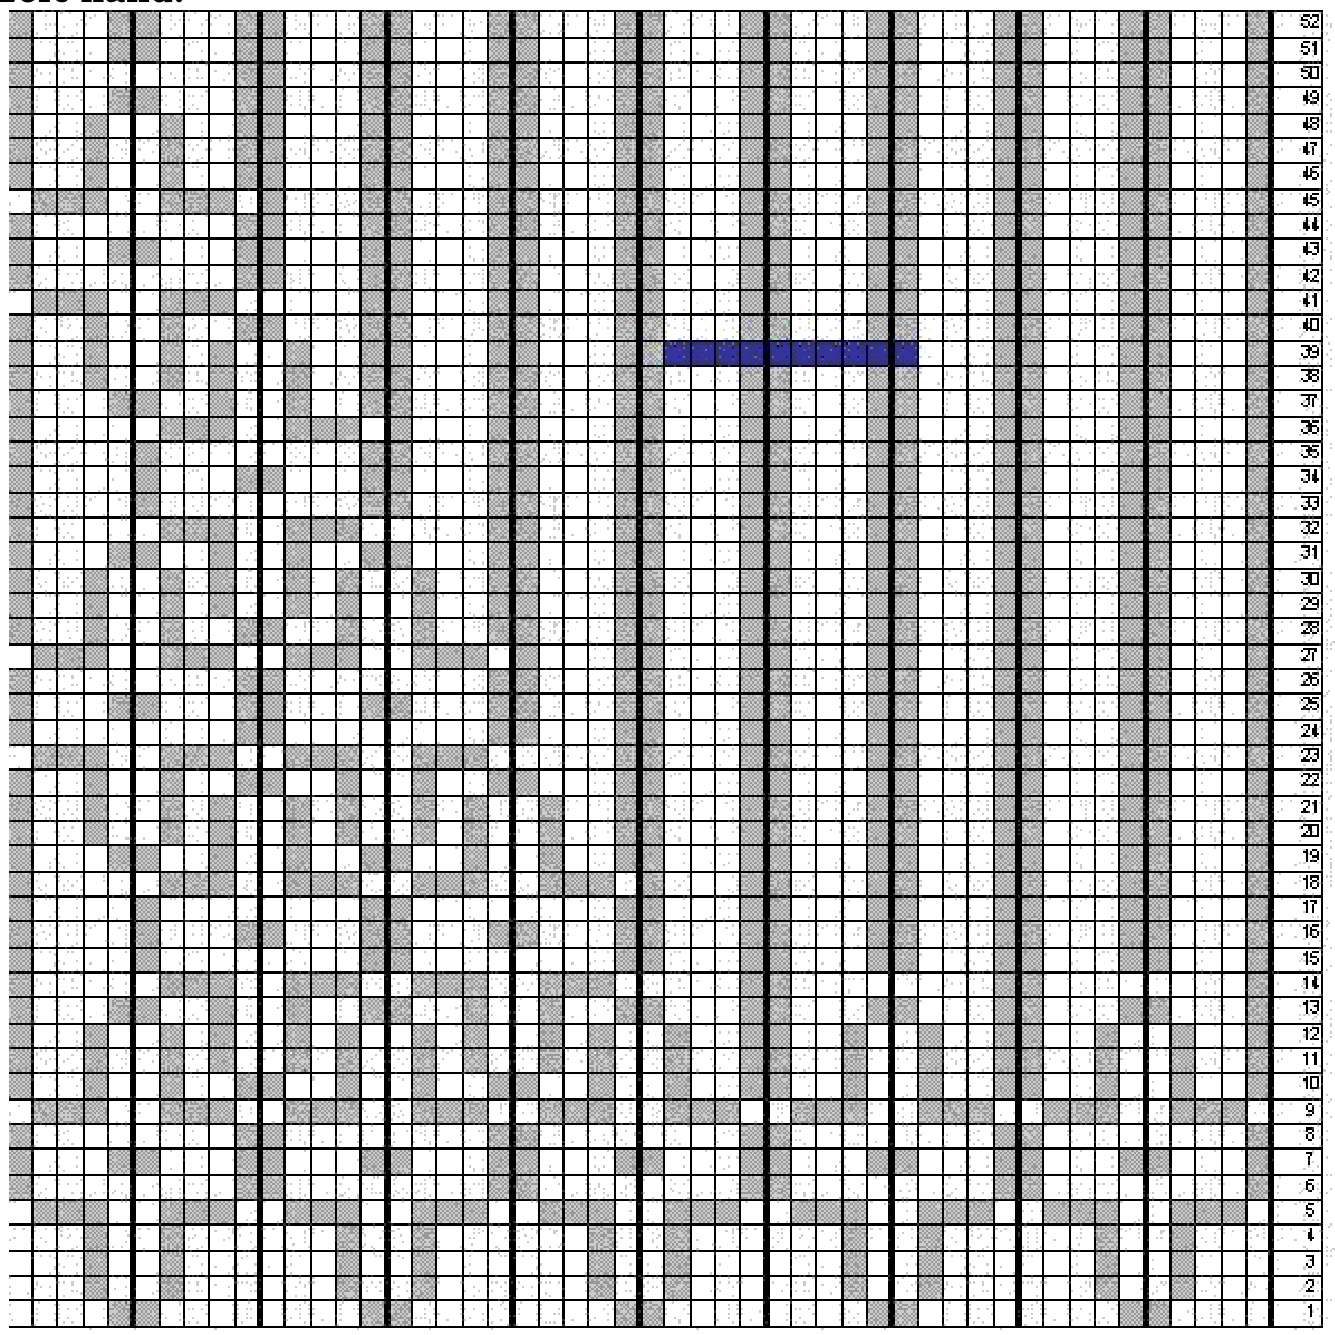
CO 50 sts using MC. Divide between needles, placing 17 sts on the first, 16 sts on the second, and 17 sts on the third needle. Join to work in the round, taking care not to twist. The cast-on tail indicates beginning of round. K 1 round. P1 round. Repeat these two rounds once more. Work Right Hand Chart to Round 38. Round 39: Work 26 sts according to chart; using waste yarn, work next 10 sts in 3x2 rib as established; slip these sts back to left needle and work them again with working yarn in 3x2 rib as established; finish round according to chart. Continue working Right Hand Chart to end. Work 3 rounds of 3x2 rib as established.
I-cord Picot Bind Off
Work next round with #2.5/3 mm needles. Break yarn, leaving a tail of at least 4 inches. Slip last st of round to first needle. Turn mitten inside out, so that the wrong side is visibie. The round now begins with 3 purl sts and ends with the st that has the yarn tail attached. Using #1.5/2.5 mm needles, CO 3 sts with CC. Slip these sts to the left needle Bind off 3 purl sts using I-cord Bind Off. Before slipping i-cord sts back to the left needle, cross the next 2 knit sts: Insert tip of right needle purlwise from the back into second st on left needle; slip both sts off the left needle, the second st remains on right needle; pick up loose st and place on left needle. Slip other st from right to left needle; The second st is now the first, crossing at the back. (Crossing the 2 sts prevents the i-cord picot from stretching out too much and leaving a visible hole.) Bind off first knit st. Work 3 rounds of i-cord without binding off any sts. Bind off next knit st. Repeat these steps until all sts are bound off. Bind offi-cord: K3tog; break yarn; thread tail through last st; pull tight.
Afterthought Thumb
Carefully pull out the waste yarn and place the live sts on 2 dpns #1.5/2.5mm; there will be 9 sts above the opening and 10 sts below. Using a #1.5/2.5mm dpn, CO 3 sts with CC. Beginning with the upper row of sts, work I-cord Bind Off to end. Pick up 2 sts on the side, between upper and lower row of sts; do not knit these sts, just place them on the left needle and bind off. Continue the I-cord Bind Off on lower row of sts. Pick up 2 sts on the side, between lower and upper row of sts; do not knit these sts, just place them on the left needle and bind off. Bind off i-cord: K3tog; break yarn; thread tail through last st; pull tight.
Left Hand
Work as for Right Hand, using Left Hand Chart, EXCEPT: Round 39: Work 14 sts according to chart; using waste yarn, work next 10 sts in 3x2 rib as established; slip these sts back to left needle and work them again with working yarn in 3x2 rib as established; finish round according to chart.
Charts
Right hand:
K on RS, p on WS P on Rs, k on WS Work thumb.
Finishing
Join ends of i-cord on the thumb and bound off edge with a few neat stitches. Weave in yarn tails. Lightly block mittens, gently shaping the i-cord blossoms.
Tutorial: Scrawling
I-cord Blossoms
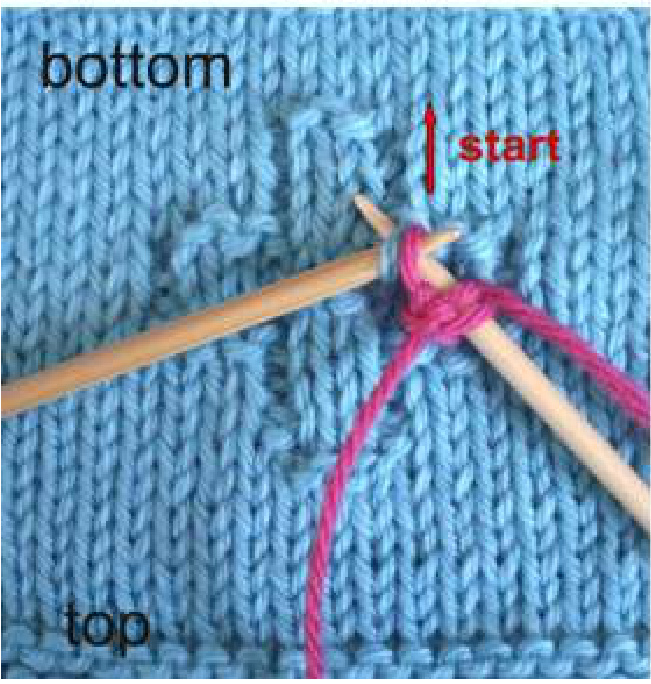
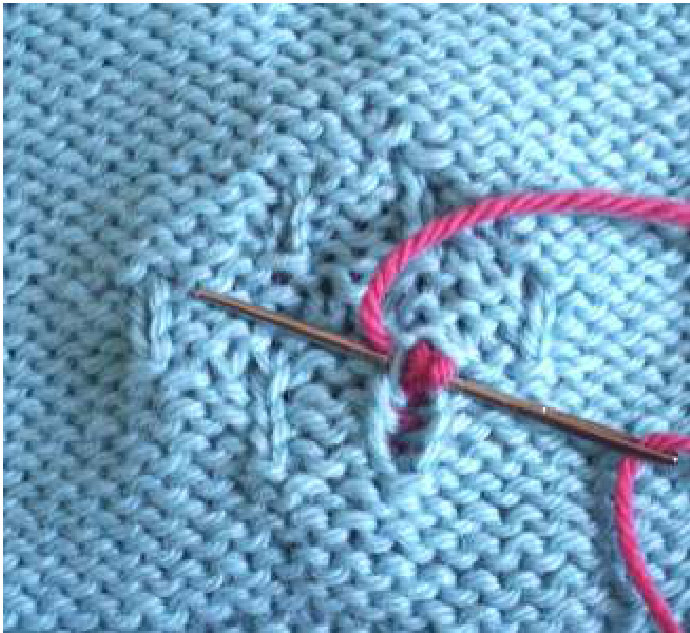
Scrawling: CO3 sts on $\mathbf{41.5/2.5mm}$ dpns using CC. Without turning, slide these sts to other end of needle; switch needle to your left hand. K 2 sts; slip last st to right needle.
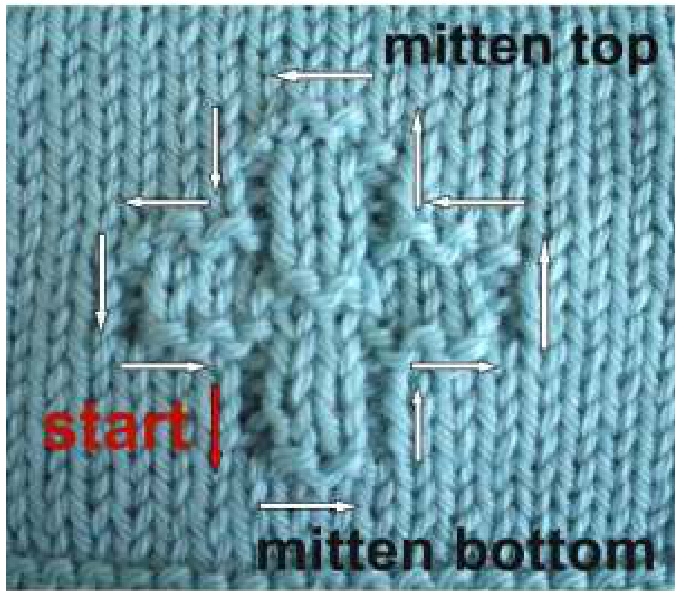
Beginning at the left-hand corner of the bottom petal, pick up the first purl bump with the left needle. Slip unworked st back to left needie, k2tog tbl.
Storyteller Knits
www.storytellerknits.com
Repeat for each purl bump outlining the blossom. Keep turning the work so that the next bump to pick up is always above the last one. On horizontal rows of purl sts, pick up the lower bumps.
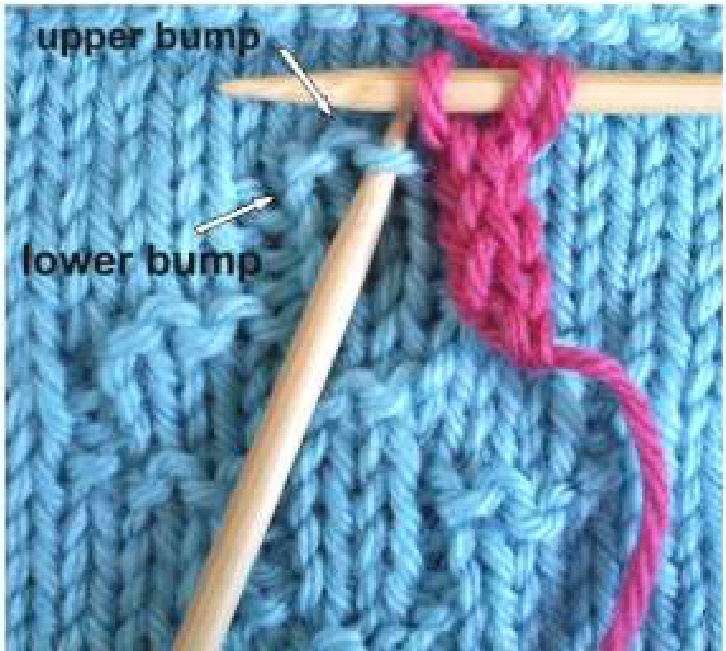
After working the last purl bump, bind offi-cord: K3tog; break yarn leaving a tail of at least 5 inches; thread tail through last st, pull tight. Work all blossoms following these steps. Note: If you find it difficult to keep the outlines apart, begin with the bottom row of blossoms. Once the row is finished, the blossoms directly above it will be easier to see. Thread tapestry needle with tail of one i-cord end, pulltail through fabric to WS; give tail a gentle tug until the i-cord end peeks through on Ws. Secure i-cord end.
Storyteller Knits
www.storytellerknits.com
Bring tail back to RS and trace the 2 purl sts at the center with duplicate stitch; weave in tail. Thread tapestry needle with the tail of the other end; join the two ends with a few neat stitches; weave in tail.

Tips:
Scrawling is not an exact science. You do not necessarily have to catch each and every purl bump. Give the i-cord an occasional tug to straighten it, then lay it flat on the fabric without stretching it and see which purl bump is closest to the i-cord stitches. Unused purl bumps will be covered by the icord. In many designs, there are more purl bumps than you will need, in order to give you a bit of flexibility. If you are a perfectionist about finishing, you can graft the i-cord ends together. Cast on the i-cord stitches with a provisional cast on. When you are done, pick those stitches up and graft them together with the live stitches on the other end. Weave in the yarn tail. I do this sometimes, but to be quite honest, it is not worth the trouble most of the time, as the ends will look fine if you connect them with a few stitches. Scrawling gives you lots of yarn choices. As a general rule, the yarn you use for the i-cord should not be thicker than the yarn you used for the item. You may choose a thinner yarn, but the difference should not be too great - sock yarn on a chunky fabric will not work too well. When selecting the needle size for the i-cord, think tight fabric. When in doubt, go down a size or two, especially if you work the i-cord from the same yarn weight as the item.
Copyright Information
This pattern is for personal use only. Reproduction and/or distribution of this pattern is prohibited unless specific written authorization has been obtained from the author. This includes, but is not limited to reproduction in print or other media and distribution via the Internet. The pattern is published exclusively as a PDF document. Printed copies of this document are for personal use only and may not be sold or otherwise distributed. Pattern support and questions: blum.katja@googlemail.com or send a message to Storyteller on Ravelry