Fence Rail Lizard
by Jennifer Adair
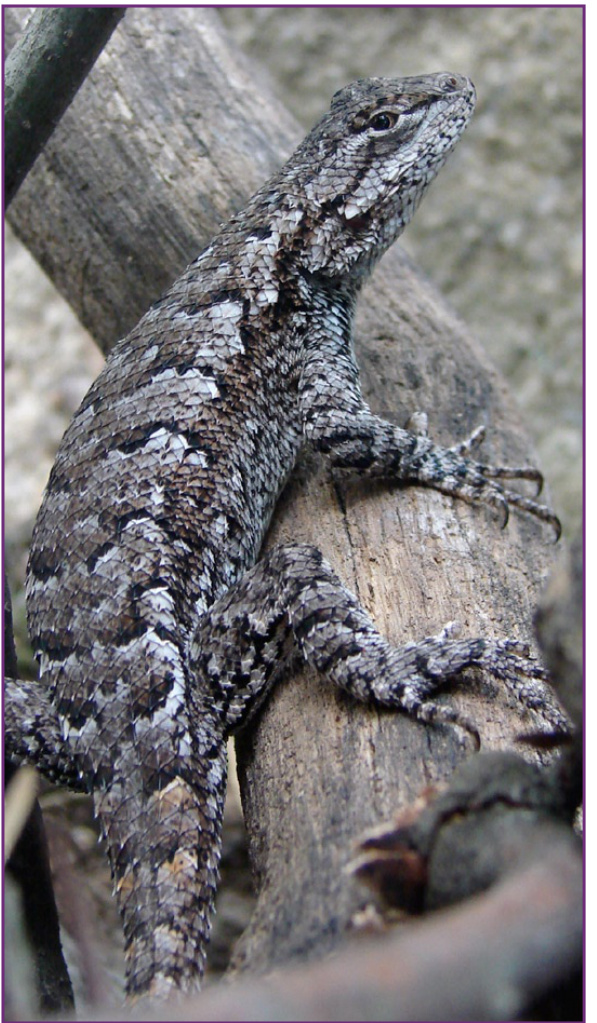
Diffculty: Intermediate, because of moebius cast on and set up. After that, it's easy. Inspiration: I was sitting outside on the deck knitting a moebius and getting really bored with that much garter. Not that I don't love garter stitch, but this time I just wanted ... more. As usual, fence rail lizards were sunning on the house foundation and the trunks of nearby white oak trees. I stopped to admire their zigzag scale patterns, which are impressive camouflage against tree bark, turned back to my knitting, and Fence Rail Lizard was born.
www.JenniferAdair.com Jennifer Adair 2014 Lace Stitch Pattern: The structure of the lace is very simple: take a ten stitch repeat, work it over a 10-stitch multiple minus one, and on each round the continuous edge automatically ratchets one stitch to the left, forming zigs, if you will. After a while, increase a couple of stitches and start ratcheting to the right to work some zags. Size & Yarn: The lace is very stretchy, so the wrap is forgiving on size. The pattern works for any weight yarn and can be custom fit. In a DK or sock yarn, it weighs about 100g, making it perfect for that wallflower skein languishing in your stash. There's even help to use all the skein and get through the bind off without running out of yarn. Cast On: Complete directions for ribbed long tail cast on are included, or use a different moebius cast on. NOTE: a tight cast on makes a tight line in the center of the wrap. Bind Off: The stretchy Icelandic is recommended, also with complete directions. Markers: Slip markers as you come to them.
Measurements
Notions
Color Test Swatch
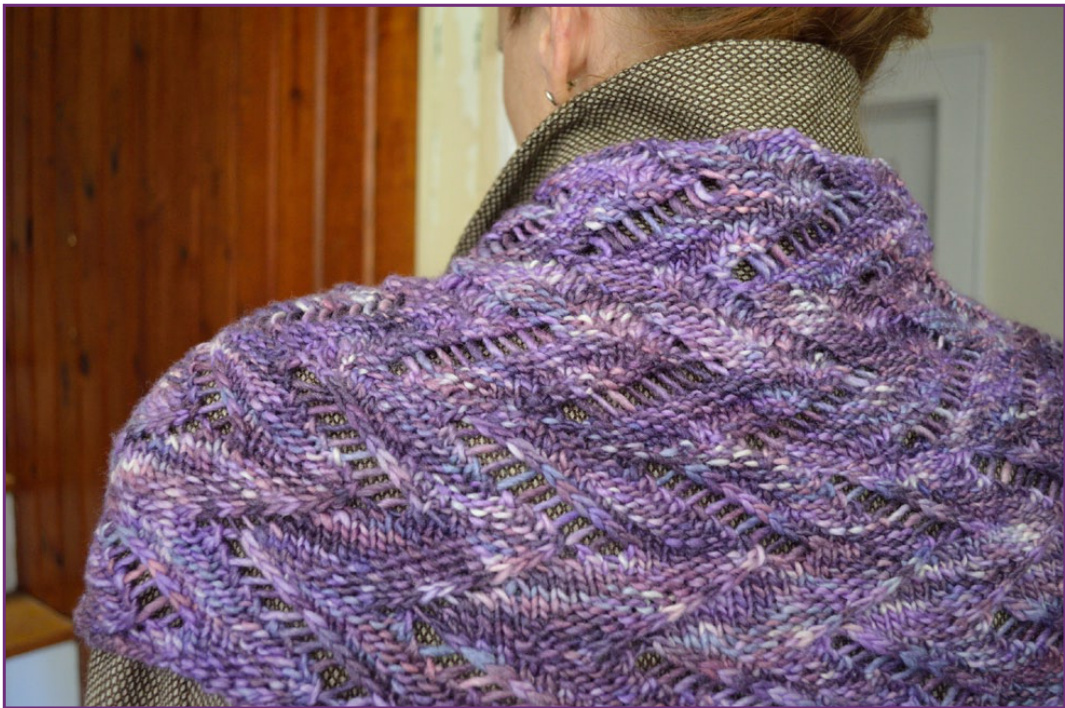
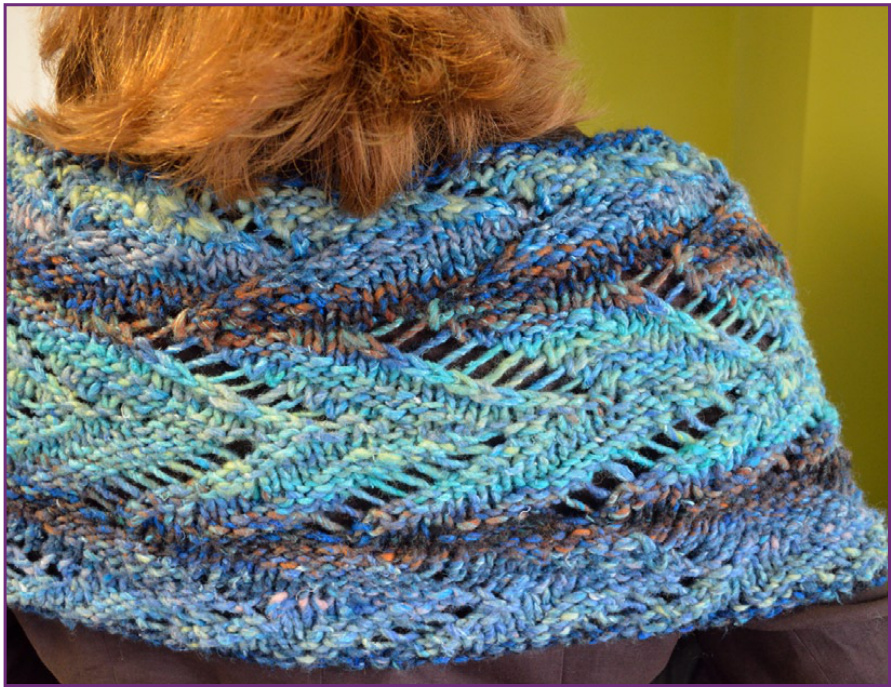
Circumference is distance around bust and shoulders. For garment, measure width of lightly blocked garment laid flat and double the number. Turquoise: circumference 40" (102cm), length 12"(30.5cm) Purple: circumference 39" (99cm), length 10" (25cm)
Yarn
Exact quantities depend on desired size. Quantities given below are for the two models as worked. The lace pattern shows up very nicely with solid color or long run striping yarns. It becomes a little less distinct in a short run striping yarn like Purple. I recommend a color test swatch for any short run or printed yarn. Turquoise: Noro Iro [75% wool, 25% silk; 131yd/120m per 100g skein]; color 84; 2 skeins; label gauge 12 sts = 4" on US10-11/6-8mm [yarn is discontinued, Noro Hitsuji, Karuta, Obi, or Odori suggested as a substitute] Purple: Manos del Uruguay Silk Blend [30% sillk, 70% merino 150yd/135m per 50g skein]; color 3117 Violets; 2 skeins; label gauge 22-24 sts = 4" on US4-6/3.5- 4.25mm 1 distinguishable end of round marker (mA) 9-18 other markers (mB), quantity to match Finished Setup Rib Count [Turquoise 10, Purple 15]
Needles
Use needles that give a pleasing fabric. Turquoise: 48" (120cm) US10.5/6.5mm circular Purple: 48" (120cm) US6/4mm circular
Abbreviations & Definitions
blco backwards loop cast on (+1) Final Full Repeat final completed repeat in round k knit k2tog k2 together (-1) kfb k front and back (+1) Last Repeat final repeat started but not finished in round mA(B) marker A(B) p purl p2tog p2 together (-1) st(s) stitch(es) tbl thru back loop yo yarn over (#) st count NOTE: This is not a gauge swatch. Use it to see how the yarn will look in pattern and determine what size needle gives a pleasing fabric. Then work an actual gauge swatch. Begin: cast on 15 sts on double points or a circular. Slide work back to beginning and loosely drape working yarn around the back Next: Step Left [k3, p3, k tbl, k1, yo, k2tog tbl], k to end, slide and drape working yarn Next: k1, Step Left,k to end, slide and drape working yarn Next: continue as established adding one more k st at beginning of each row until Step Left ends at left edge of work Bind offif desired. Evaluate swatch for needle size and yarn.
Gauge Swatch
A stockinette gauge swatch is used to determine your Cast On St Count. Row gauge does not matter for this pattern. Turquoise: 12 sts = 4" (10cm) in stockinette, 13 sts = 4" (10cm) in pattern Purple: 17.5 sts = 4" (10cm) in stockinette, 19 sts = 4" (10cm) in pattern Work a stockinette gauge swatch large enough to get an accurate stitch count over 4" (10cm). your swatch gauge: sts per 4" (10cm) Stitch pattern requires 8% more sts than stockinette. Multiply your swatch gauge by 1.08:
Custom Fit
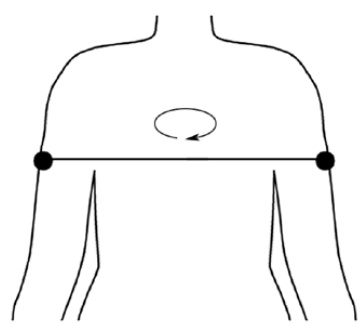
Measure around bust and shoulders as shown on Measurement Diagram: Circumference: (cm) Multiply Circumference by 1.1 for 10% ease: Finished Garment: "(cm)
Cast On St Count
Multiply Finished Garment by Pattern Gauge: sts Round number of sts to a multiple of 5: Your Cast On St Count: sts [Turquoise 130 sts, Purple 185 sts] Use your Cast On St Count to look up additional information in the Setup Chart. Pattern Gauge: sts per 1" (cm)
| Setup Chart, use your Cast On St Count to look up your other numbers. | ||||||||||
| v2 Setup Count Count Count Up | ||||||||||
| uno | Count Pick | Row 1 Setup Count b | Row | Total Setup b 2b | Count :Count Left Pick Up | Row 1 Setup tCount | 2 Setup Count Count Row Rib | Total Setup Count b b | ||
| 110 | 109 219 | 4 | 5 | 6 3 | 200 | 199 | 399 8 | 8 | 16 | 15 |
| 115 | 114 229 | 4 | 5 | 9 13 | 205 | 204 | 409 8 | 9 | 17 | 1 |
| 120 | 119 239 | 5 | 4 | 9 23 | 210 | 209 | 419 8 | 9 | 17 | 11 |
| 125 | 124 249 | 5 | 5 | 10 9 | 215 | 214 | 429 8 | 9 | 17 | 21 |
| 130 | 129 259 | 5 | 5 | 10 19 | 220 | 219 | 439 9 | 9 | 18 | 7 |
| 135 | 134 269 | 5 | 6 | 11 5 | 225 | 224 | 449 6 | 9 | 18 | 17 |
| 140 | 139 279 | 5 | 6 | 11 15 | 230 | 229 | 459 6 | 10 | 19 | 3 |
| 145 | 144 289 | 6 | 6 | 12 1 | 235 | 234 | 469 9 | 10 | 19 | 13 |
| 150 | 149 299 | 6 | 6 | 12 11 | 240 | 239 | 479 10 | 9 | 19 | 23 |
| 155 | 154 309 | 6 | 6 | 12 21 | 245 | 244 | 489 10 | 10 | 20 | 9 |
| 160 | 159 319 | 6 | 7 | 13 7 | 250 | 249 | 499 10 | 10 | 20 | 19 |
| 165 | 164 329 | 6 | 7 | 13 17 | 255 | 254 | 509 10 | 11 | 21 | 5 |
| 170 | 169 339 | 7 | 7 | 14 3 | 260 | 259 | 519 10 | 11 | 21 | 15 |
| 175 | 174 349 | 7 | 7 | 14 13 | 265 | 264 | 529 11 | 11 | 22 | 1 |
| 180 | 179 359 | 7 | 7 | 14 23 | 270 | 269 | 539 11 | 11 | 22 | 11 |
| 185 | 184 369 | 7 | 8 | 15 9 | 275 | 274 | 549 11 | 11 | 22 | 21 |
| 190 | 189 379 | 7 | 8 | 15 19 | 280 | 279 | 559 11 | 12 | 23 | 7 |
| 195 | 194 389 | 8 | 8 | 16 5 | 285 | 284 | 569 11 | 12 | 23 | 17 |
Measurement Diagram
Edging & Bind Off Yarn Set Aside
Follow these directions to set aside yarn for either the final round (same color) or final round and bind off (change color). Butterfly yarn on one end of a skein and rubber band or otherwise secure it until needed. At some point while working rounds 1-10, starting at mA, measure 8 yards (m) of yarn from the working skein and tie a loose slip knot at the end to mark the location. Work the round, adding or subtracting yarn as required to finish that round. Multiply total used by 1.1, round up to next whole number, and write result here: Yarn for l round: yd (m) [Turquoise 11yd/10m, Purple 9yd/8m] Multiply yarn for 1 round by 1.3 and round up to next whole number: Yarn for Bind Off: yd(m) [Turquoise 14yd/13m, Purple 12yd/11m] If working with one color, set aside only the Bind Off amount. If changing color for the edge, add the two yarn amounts together. Total yarn to set aside: yd (m) [Turquoise 25yd/23m, Purple 12yd/11m]
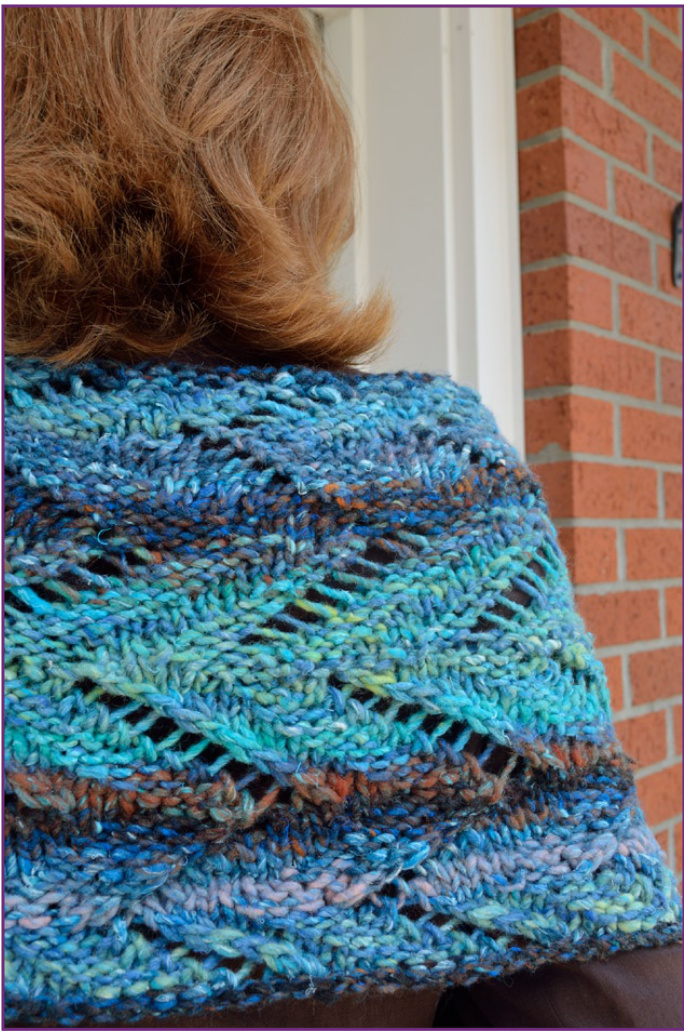
Turquoise: A section of dark brown yarn was used for the final round and bind off.
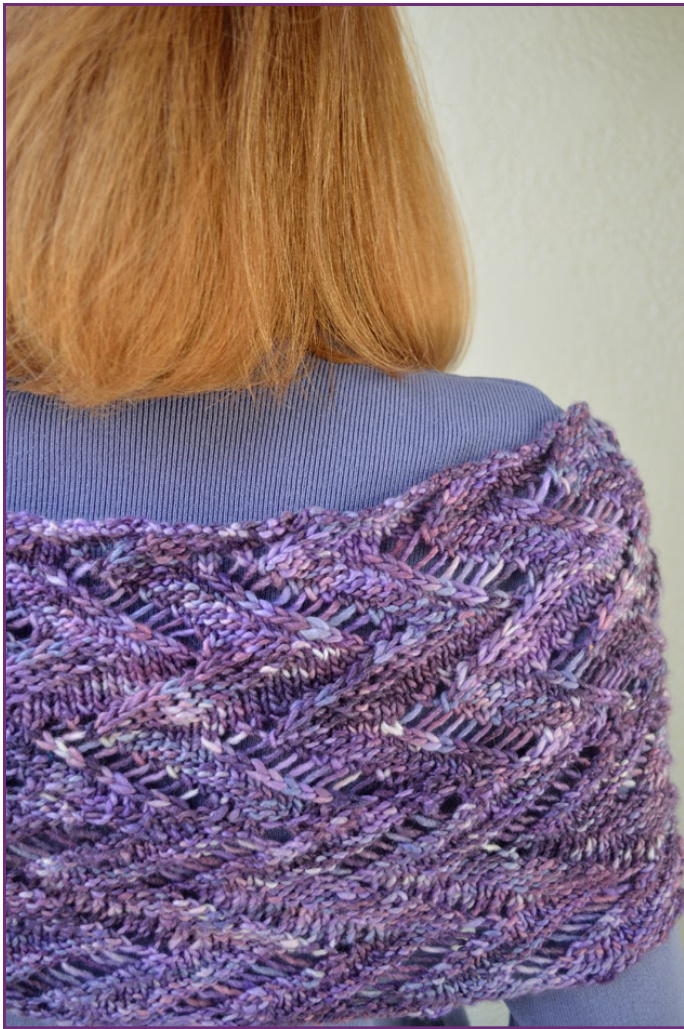
Purple: Bind off was worked without changing color, so only enough yarn for the bind off was set aside.
PATTERN — Cast On & Setup
Other Moebius Cast On
If using a different cast on than Ribbed Long Tail, cast on the required Step Left St Count. Place mA on right needle. Go to Begin Setup, treating Setup Rows 1 and 2 as next round, except work stitches already on cable instead of picking up stitches.
Ribbed LongTail Cast On
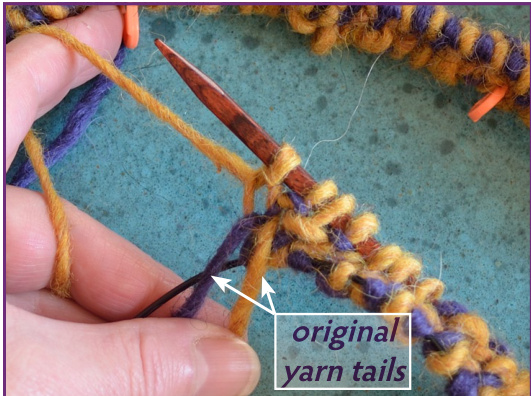
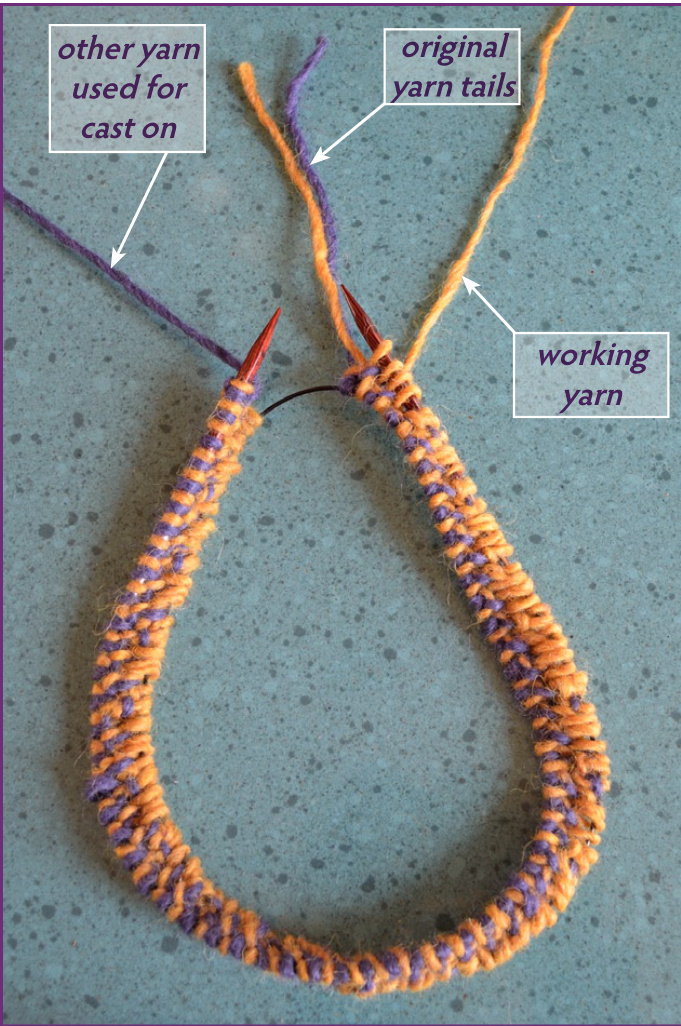
See page 8 for photos and details. Begin: cast on required Cast On St Count. Cut 1 yarn. Remove slip knot.
Begin Setup
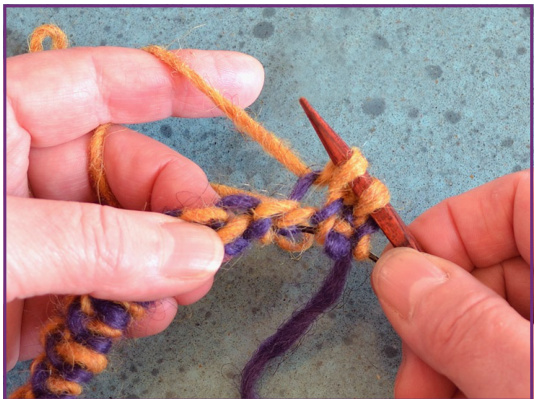
See page 9for photos and details. Pick up is worked on edge of cast on. Setup Row 1: Placing an mB after every repeat, pick up and work Setup Rib to end of row, ending with a partial repeat to be completed on Setup Row 2. (Pick Up St Count added, Step Left St Count on needle)
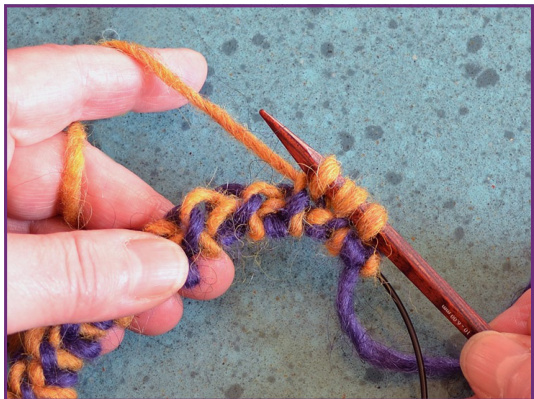
Finish Setup
See page 10 for photos and details Setup Row 2: Finish repeat started on Setup Row 1. Ending with a full repeat, work Setup Rib as close as possible to mA. See Setup Chart for Remaining Sts To mA. If actual st count does not match chart count by more than -3 to +3 (example: count should be 15 but actual count is less than 12 or more than 18), go directly to Tink City, do not pass Go. If count is -3 to -1 (should be 15, is 12 to 14) increase to correct count by replacing final k of k3 with kfb, 2nd st of increase counts as 1st st of following p3. If needed, take out some sts to make corrections. If count is +1 to +3 (should be 15, is 16 to 18) decrease by replacing 2 knit sts with a k2tog or 2 purls with a p2tog. Once st count matches or can be made to match during remaining partial Setup Rib, work 1 partial Setup Rib, ending at mA. Remove all mB markers. First st of Body round 1 completes join for "other" edge.
Detailed DirectionsandPhotos Ribbed Long Tail Cast On page 8 Begin Setup page 9 Finish Setup page 10

If your stitch count is not correct, please read Finish Setup before you tink! Setup Rib [\*k3, p3\* 4 times, place mB]
PATTERN —- Body
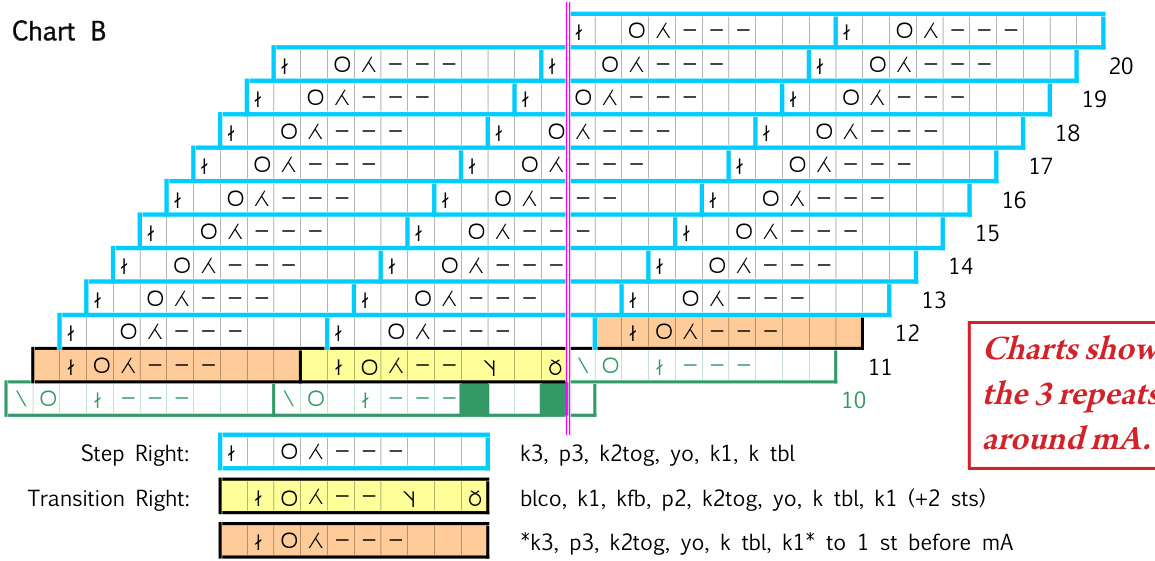
Step Left: Chart A Remember to work Edging & Bind Off Yarn Set Aside, page 4. End of round 1, work final k2tog tbl (remove mA, k2tog tbl, replace mA before decrease). End of next round, slip mA, yo. Rounds 1-10: Repeat Step Left for 10 rounds, ending when a Final Full Repeat ends at mA. Transition & Step Right: Chart B Round 11: blco, k1, kfb, p2, k2tog, yo, k tbl, k1, \*k3, p3, k2tog, yo, k tbl, k1\* to 1 st before mA. (+2) End of round 17, work final k2tog tbl(remove mA, k2tog tbl, replace mA after decrease). End of next round, yo, slip mA. Rounds 12-20: Repeat Step Right for 9 rounds, ending when a Final Full Repeat ends at mA.
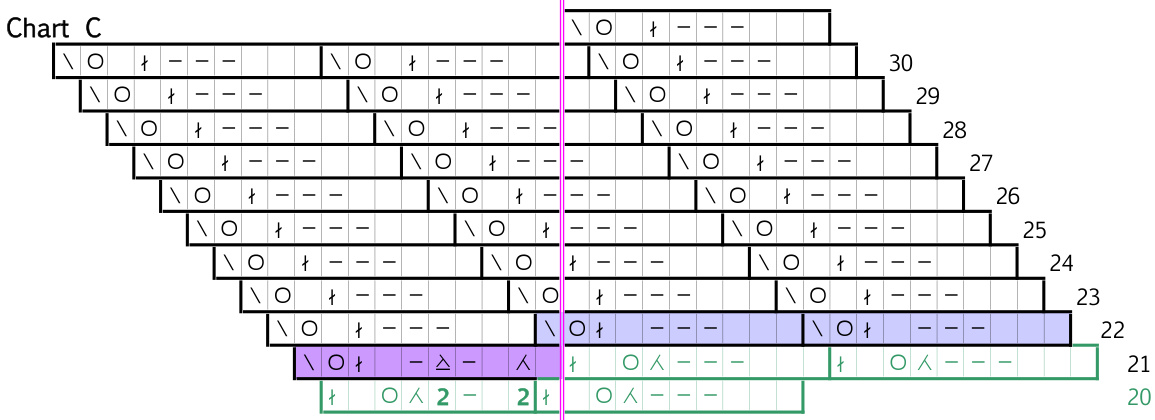
Transition & Step Left: Chart C
Round 21: k1, k2tog, k1, p1, p2tog, p1, k1, k tbl, yo, k2tog tbl, \*k3, p3, k1, k tbl, yo, k2tog tbl\* to 1 st after mA, replacing mA before final k2tog tbl. (-2) End of round 22, slip mA, yo. Rounds 22-30: Repeat Step Left until either a Final Full Repeat ends at mA and go to Additional Rounds orto desired length, ending at next completed k3, and go to Finishing.
Additional Rounds
For additional length, repeat rounds 11-30 (Charts B and C) to desired length, ending with a completed k3. Go to Finishing.


PATTERN — Finishing
The edge of the Icelandic Bind Off looks cabled and is slightly thicker than the fabric. It works fast, looks the same on both sides, is stretchy and neat, and does not roll. Two stitches are dropped on Step 4, but one was put on the left needle to begin the repeat Icelandic Bind Off: \*insert left needle in back leg of first st on right needle (looks like start of a purl), insert right needle knitwise into next st on left needle, pull that st through first st, knit pulled-through st, drop both sts from left needle, repeat from \* to end. Cut yarn, pull tail through last loop. Weave in tails. Block lightly.
1. To begin first repeat only, slip 1 purlwise (not shown). Insert left needle in back leg of stitch on right needle.
3. Knit the second stitch, pulling new loop between first and second stitches.
2. Insert right needle knitwise into second stitch on left needle and pull second stitch through first stitch.
4. Drop first and second stitches from left needle. One stitch bound off.
About The Designer
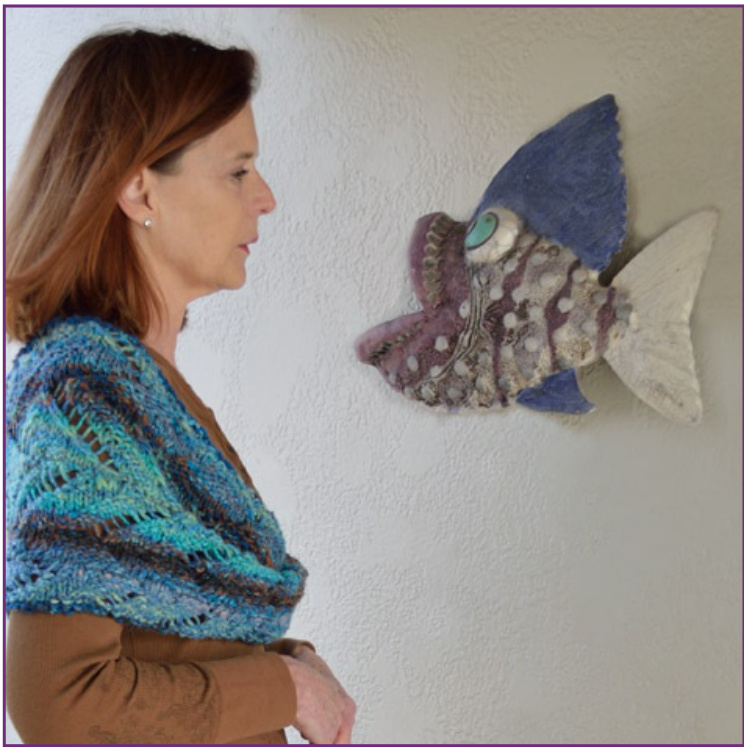
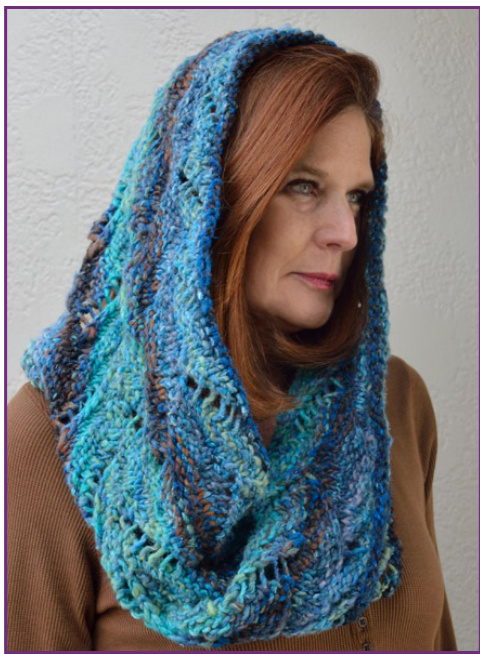
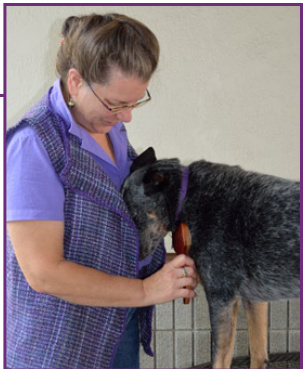
Jennifer Adair has been playing with fiber for over fifty years. She has spun over a pound of Blue Heeler undercoat from Zeke (aka Mr. Softy Sides), whose favorite words are "Ready to get carded?" Combining a love of the environment and allthings fibery, she recently developed BioFiberSoak, a method of cleaning raw fleece without hot water or detergent (published Winter 2013 Spin-Off). Her ebook Chaordic Knitting is available on Ravelry. Website: www.JenniferAdair.com Ravelry link: http://www.ravelry.com/designers/jennifer-adair Model: Deborah Kitchen, photos: Jennifer Adair Model: Sceloporus undulatus, photo: Brachyrhynchos5
1. Tie slip knot or hold ends wrapped around needle. Not a cast on stitch.
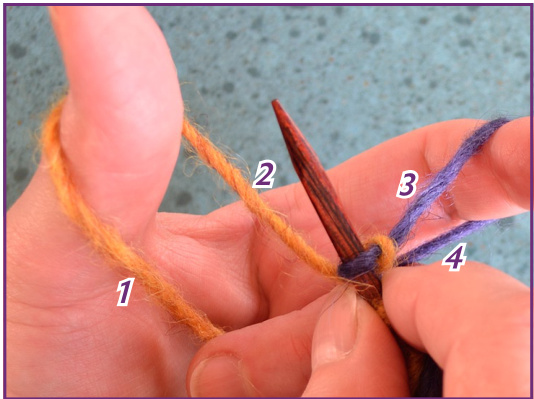
2. Starting position for each new stitch, beginning of #3 and #6.
3. Knit: Needle over and around 1, pick up loop.
4. Needle over and around 3, pick up loop.
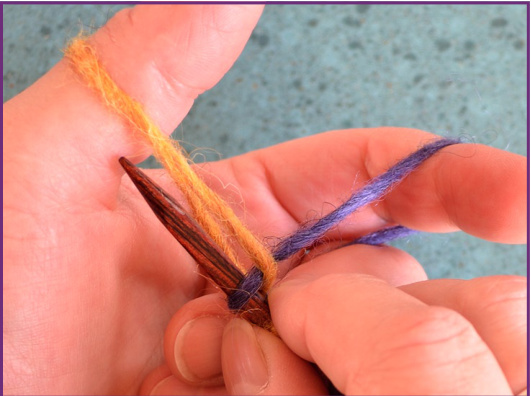
5. Pull 3 through 1. Pull left index finger, snug new stitch loosely to keep a gap between sts (see #9).
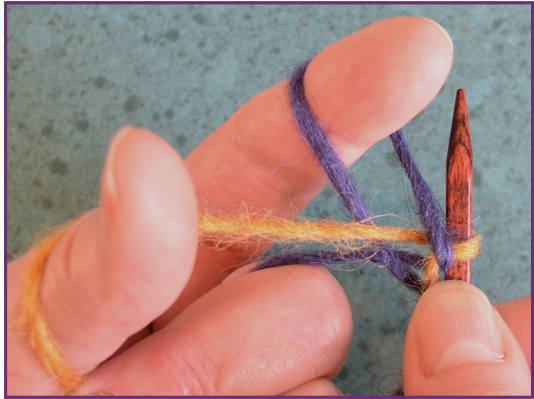
6. Purl: Return to starting position. Needle over and around 4, pick up loop. 7. Needle under and around 2, pick up loop, sets front leg to front. 8. Pull 2 through 4. Pull left thumb out, snug stitch loosely using right thumb to keep a gap between sts (see #9). Return to starting position.

9. Using thumb to keep a gap between sts while snugging new stitch.
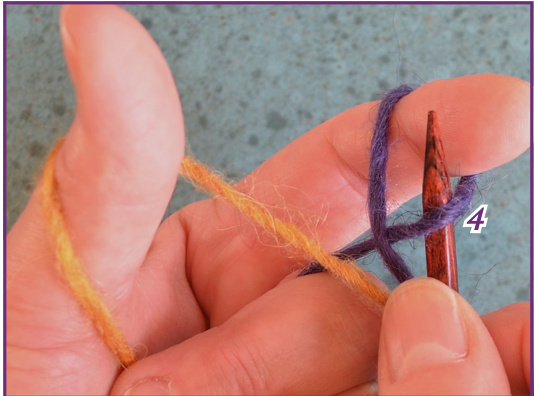
10. Completed long tail ribbed cast on.
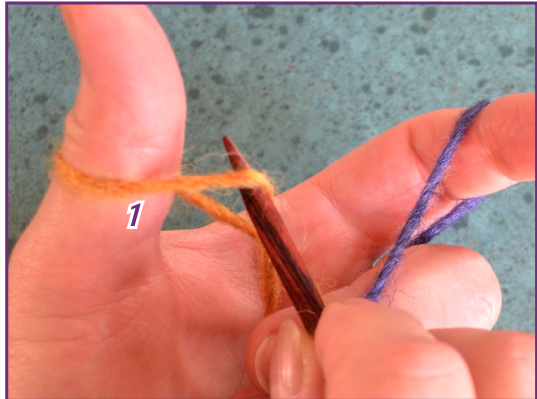
Ribbed Long Tail Cast On
Begin with both ends of a skein or 2 skeins rather than estimating the amount of yarn for the tail. It makes two extra tails to weave in, but that's a lot easier than finding out your long tail isn't quite long enough! Sample was worked with 2 colors of yarn for clarity. When beginning cast on, determine which skein supplies thumb yarn and which goes to index finger. Maintain that arrangement throughout. If you set the front leg to the back in #7 by going over and around instead of under and around, just work into the back of the stitch on the first round to correct it.
1. Work is turned and slid onto cable, off the needle used for cast on. Working needle is in first pick up loop.
2. Stretch cast on side to side to better see where to pick up.
4. Knit the loop, following Setup Rib stitch pattern. 3. Needle in first pick up loop, in 1 strand only.
5. Needle in second pick up loop.
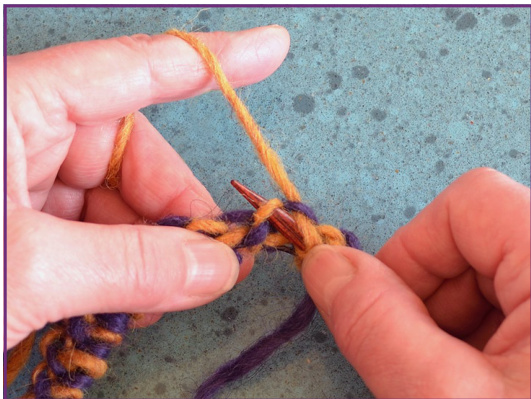
6. Knit the loop. 7. Needle in third loop.
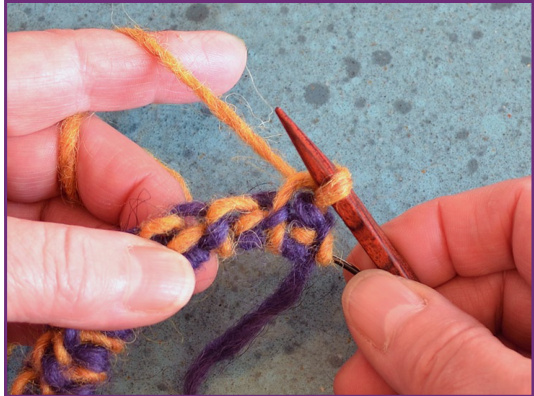
8. Three completed pick up stitches worked. Continue in Setup Rib stitch pattern to end of row.
9. Completed pick up on long tail ribbed cast on. Orange m Bs are for counting setup ribs.
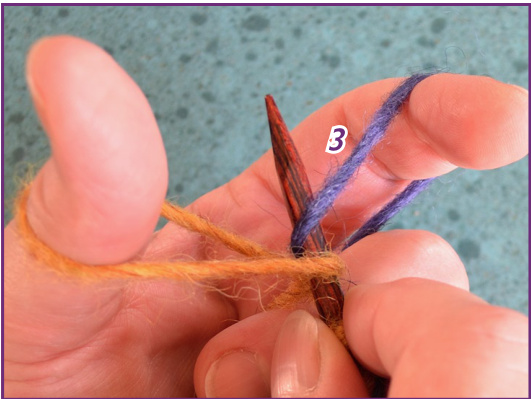
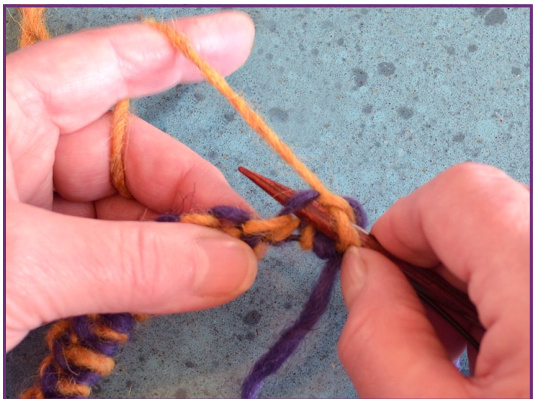
Begin Setup
Picking up a single strand rather than two loops makes the fabric feel like it was continuously knitted rather than picked up along an edge. If two strands are picked up, it feels like a hard ridge. Only the right needle is used for this row.
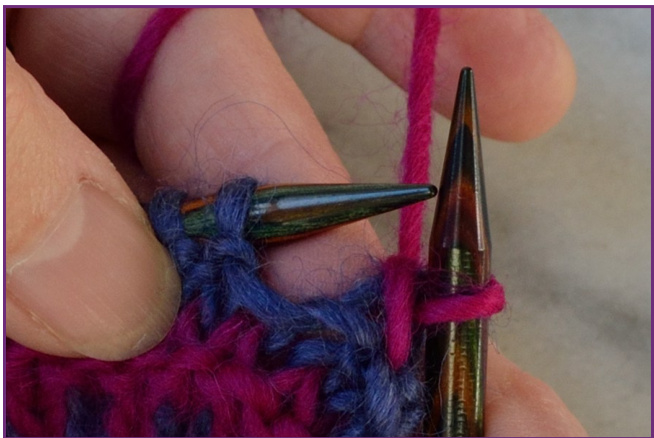
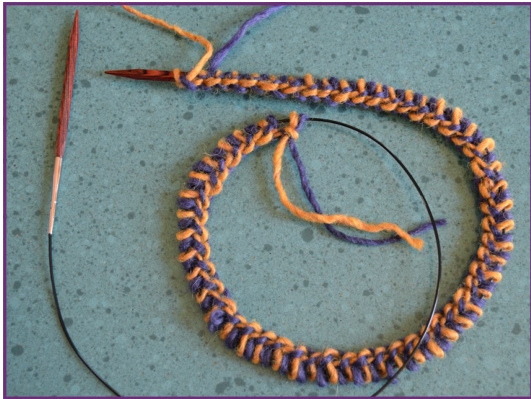
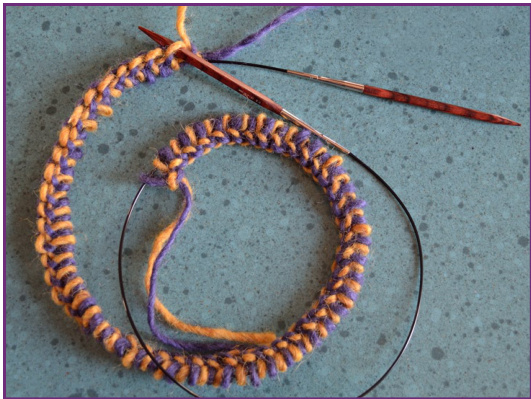
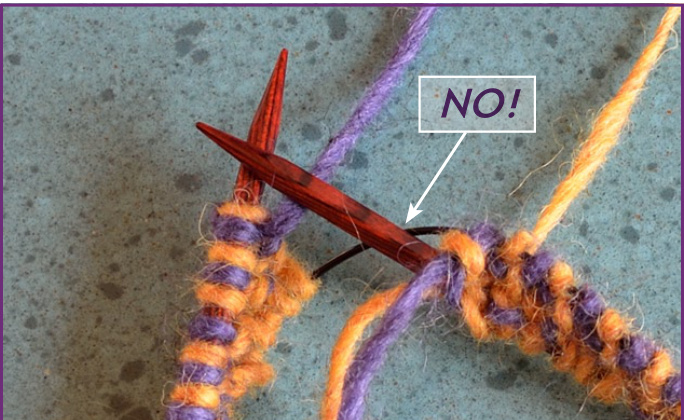
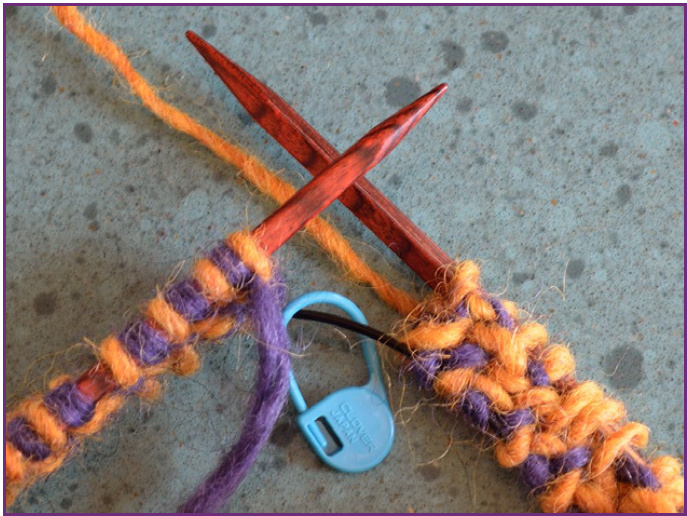
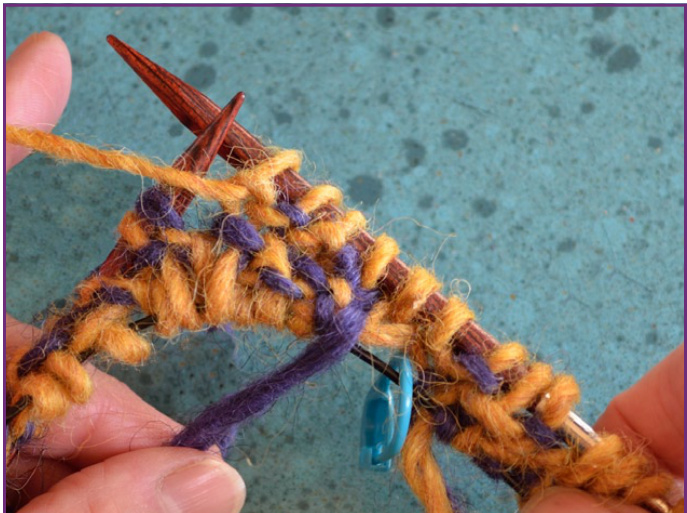
1. Cast on and pick up complete. Cable should be coiled like a spring as shown above, not tied in a knot like below.
www.JenniferAdair.com Jennifer Adair 2014
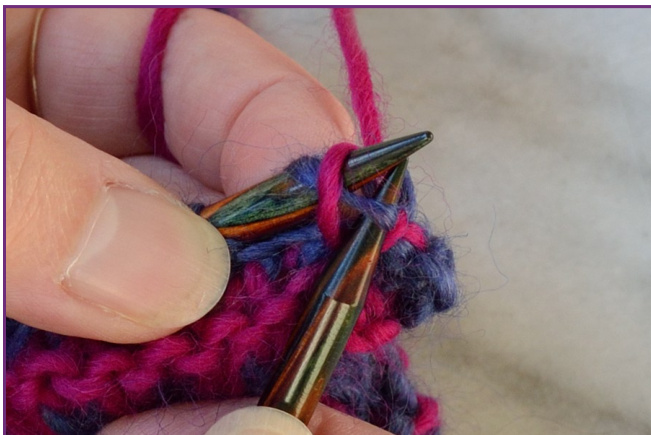
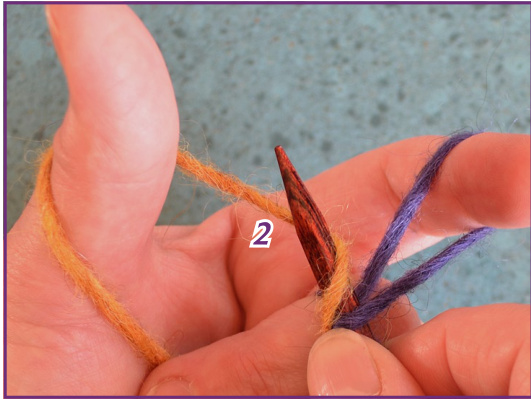
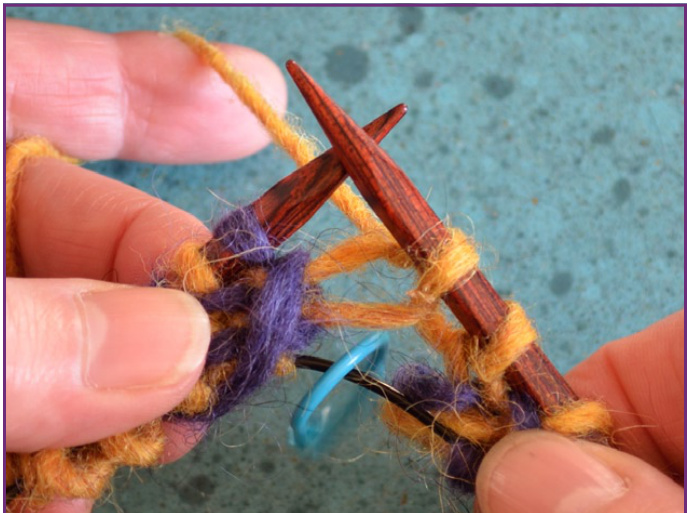
2. Beginning position with right needle on the bottom, cable in the middle, and left needle on the top. Place blue marker mA for end of round. Cast on yarn tails are out of sight behind work on right needle.
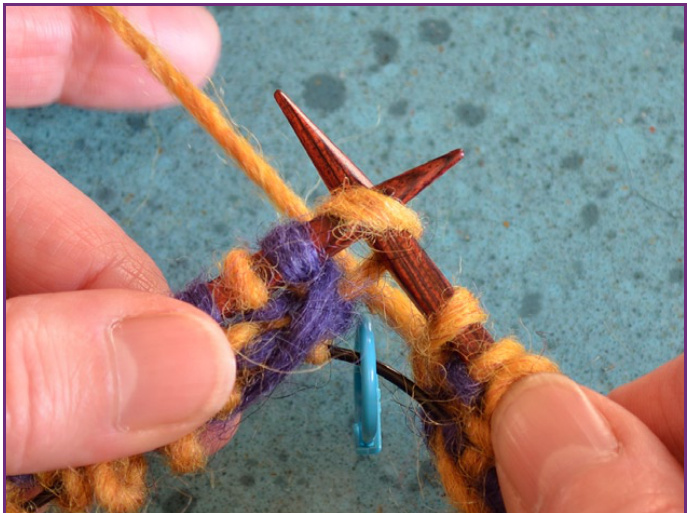
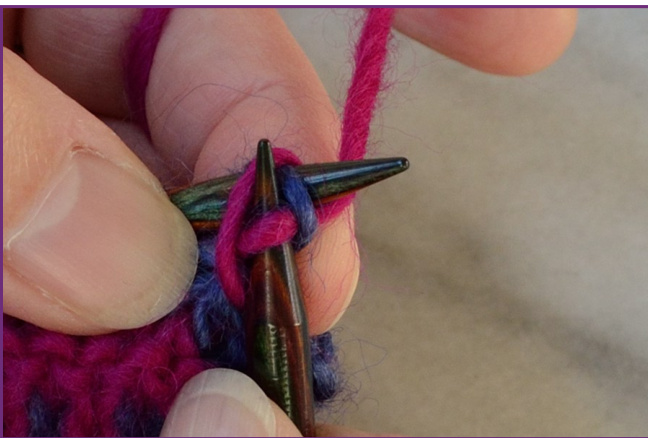
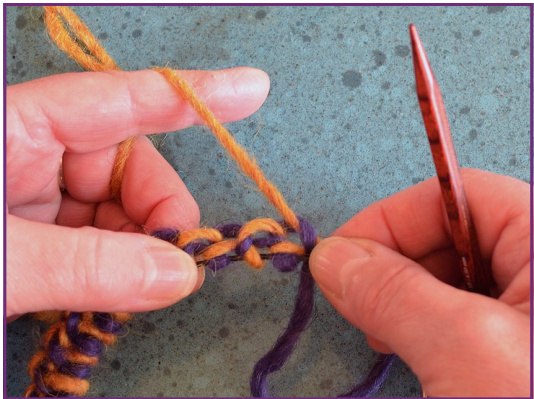
3. Needle knitwise in first stitch to join first "edge" of moebius.
4. Joining stitch knitted.
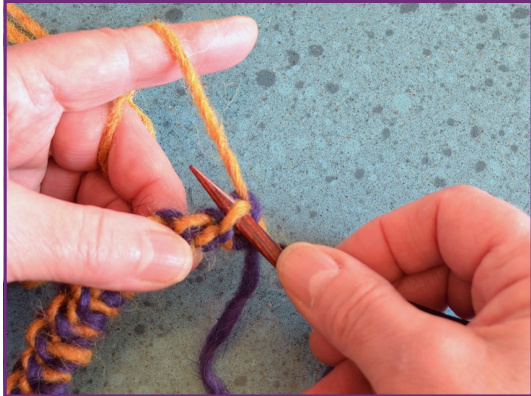
5. First 6 stitches worked. Second “edge" of moebius will be joined at blue marker mA.


