Roosimine
'rose' socks by Caoua Coffee
size woman's medium US 7-8 (large US 9-10) leg: 7.5(8.5) inches circumference, 7.5 inches from CO edge to beginning of heel
materials:
310yards/285m (370yards/340m) semi-solid sock yarn 60yards/55m (70yards/65m) contrast color sock yarn (Sample: 100% merino, Dream in Color Smooshy) needles US1/2.25mm or size to obtain gauge 4 stitch markers tapestry needle
gauge:
34 sts / 44 rows = 4 inches in stockinette
abbreviations:
CC = contrast color k= knit stitch k2tog = knit 2 together M1 = make 1 by picking up the strand in between the stitch just worked and the next stitch and knitting into the back of this thread MC = main color P= purl stitch p2tog = purl 2 together PM = place stitch marker RS = right side / public side sl yb = slip stitch as if to purl with yarn in back sl yf = slip stitch as if to purl with yarn in front ssk = slip 1 knit wise, slip 1 purl wise, knit both stitches together through the back loc st(s) = stitch(es) WS = wrong side / private side
Roosimine socks - by Caoua Coffee
Roosimine - technique explications:
The technique called ‘roosimine' is worked from a chart that shows dark squares where contrast colored yarn that's woven in covers the knit stitches that hide behind it. A double strand of CC is used throughout for the weaving pattern whereas all the stitches that are actually knitted are in a single strand of MC. The double thickness of the CC helps the yarn stay in place nicely, as it hasn't too much room to move around between the stitches where it's woven in and therefore the pattern will be visible very distinctly. (Don't be discouraged by the lengthy explanation, just try it out. It's less scary then it sounds.) odd numbered rounds: (the weaving yarn is at the right end of the patterned area) With MC knit up to the first dark sqare, bring CC to the front between the 2 needle tips and let it hang there. With MC knit as many sts as there are dark squares, bring CC to the back between the 2 needle tips and let it hang. \*[With MC knit up to the next dark square, bring CC to the front, knit as many sts with MC as there are dark squares, bring CC to the back.] Repeat from \* until you have covered all the black squares of the round. You end with the CC being at the WS of the work and at the left end of the patterned area. Knit some more sts in MC, then pull gently at the CC yarn end to even out the tension of the woven in strands. (You might consider stretching the fabric a bit while doing this to prevent puckering, if you pull the CC too tight.). Finish the round by knitting the rest of the sts with MC. even numbered rounds: (the weaving yarn is at the left end of the patterned area) With MC knit up to the first dark sqare, bring CC (that hangs somewhere far left) to the front over that left needle (not between the needle tips!). Now you form a U with that double strand of CC and bring the right “leg' of that U to the back between the 2 needle tips. This results in a Ushaped strip of CC yarn hanging on the RS of your knitting. That U should be about 6-8 inches in length. All the weaving in this round will be done with this U-strip. (For now, you can forget about the end of the CC yarn that is attached to the ball.) With MC knit as many sts as there are dark squares, bring the rightmost part of the U-shaped CC to the back between the 2 needle tips. (Now there's a smaller U-shaped strip of CC hanging on the RS with both ends of the U laying over the left needle. \*[With MC knit up to the next dark square, bring CC to the front (make sure it's the end of the U-strip you just used and not the CC-end that's attached to the ball!), knit as many sts with MC as there are dark squares, bring rightmost part of the U-shaped CC to the back.] Repeat from \* until you have covered all the black squares of the round. Knit some more sts in MC, then pull gently at the CC end that is attached to the ball and - voila - the magic is done, the U-shaped strip of yarn has disappeared and the working CC yarn is back at the right end of the patterned area.
Roosimine socks - by Caoua Coffee
pattern:
before starting: wind the CC yarn so as to be able to access both ends of the ball at the same time, since in some parts of the sock the CC is worked as a single strand, whereas in the roosimine part, it's used doubled. cuff: With MC, loosely cast on 64(72) sts and join to begin working in the round. Work 10 rounds of [k2, p2] ribbing. Join a single strand of CC and work 2 rounds of [k2, p2] ribbing, drop CC (don't break yarn!) With MC work 1 round of [k2,p2] ribbing, drop MC (don't break yarn!) With CC work 2 rounds of [k2, p2] ribbing, drop CC (don't break yarn!) With MC work 2 rounds of [k2,p2] ribbing, and then work 1 round of plain knit. Preparation for roositud pattern: Join a second strand of CC so as to have a double strand of CC for the weaving pattern. Attention: there's only one roositud pattern stripe on each leg (on the outside of each leg, which would be the left side of the left leg and the right side of the right leg). To end up with mirrored patterns on the 2 socks, make sure to follow one of the charts for the first sock and the other chart for the second sock!
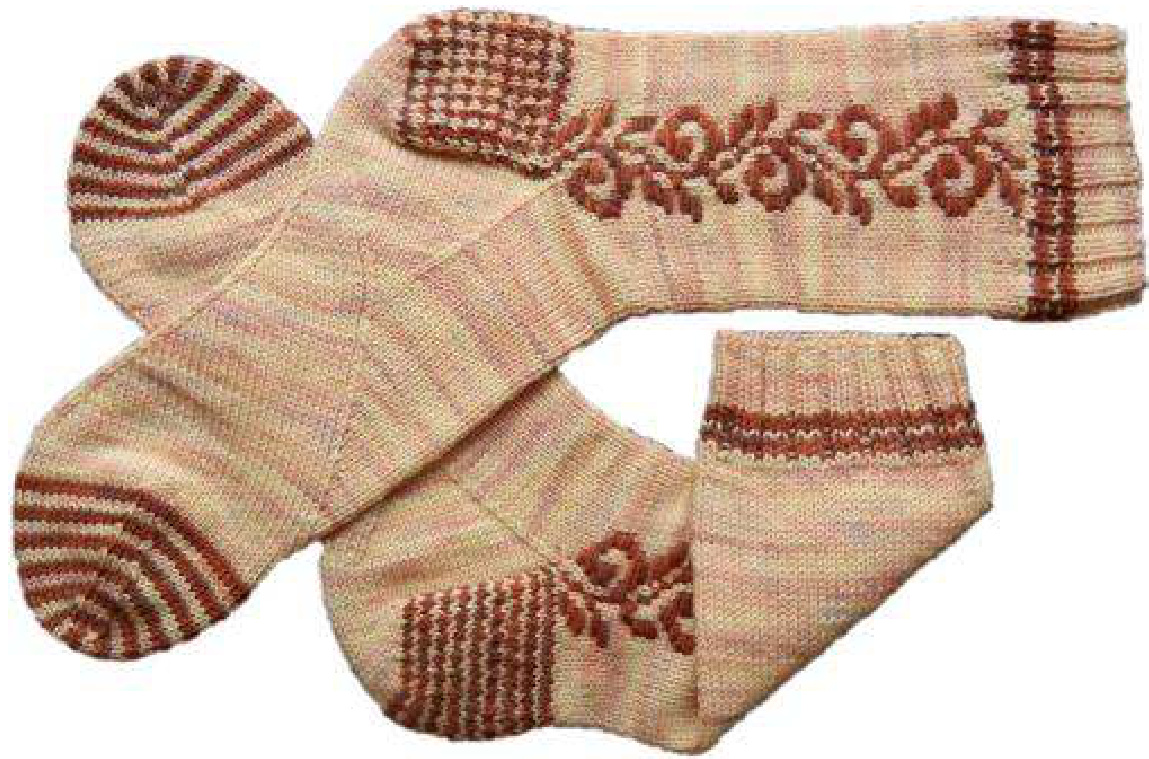
leg: Start working the pattern chart. (Make sure to read the roosimine technique explications first!) Always work the 15 sts of the roositud pattern of the corresponding round first, than k49 (57). Finish after having completed all 68 rounds. Do not forget to k49 (57) in MC after the 15 roositud sts on the last round!! Break 1 strand of the CC (leaving a tail to weave in), but keep the other strand attached to your sock, you will use it for the stripes of the heel flap
Roosimine socks - by Caoua Coffee
@Caoua Coffee 2012 - pattern is for non-commercial, personal use only. all rights reserved! Roosimine v.2.0 - page 4/8
Roosimine socks - by Caoua Coffee
attention: heel instructions for right and left sock are different!
left sock only (i.e. if you used the chart for left side of left leg'): with MC k38(42), place next 32 (36)sts on hold for instep, turn Now you should have 32(36) sts left on your needles. The heel is worked back and forth over these sts. With the WS facing you continue as follows: heel flap: with MC Ws: \*[p1, sl1 yf] repeat from \* to end of row, turn with CC RS: knit all sts to end of row, turn WS: \*[sl yf, pl] repeat form \* to end of row, turn with MC RS: sl yb, knit to end of row, turn Repeat theses 4 rows 9 times altogether, i.e. 36 heel flap rows total. Break CC, leaving a tail long enough to weave in and continue in MC for the whole foot until the toe. right sock only (i.e. if you used the chart for 'right side of right leg'): set-up for heel flap: with MC k9(9), place next 32 (36)sts on hold for instep, turn Now you should have 32(36) sts left on your needles. The heel is worked back and forth over these sts. With the Ws facing you continue as follows: heel flap: with CC WS: purl to end of row, turn RS: \*[sl yb, k1] repeat from \* to end of row, turn with MC WS: sl yf, purl to 1 stitch before end of row, sl yf, turn RS: \*[k1l, sl yb] repeat from \* to end of row, turn Repeat theses 4 rows 9 times altogether, i.e. 36 heel flap rows total. Break CC, leaving a tail long enough to weave in and continue in MC for the whole foot until the toe.
continue for both socks:
turn heel: WS: purl 19(21), p2tog, p1, turn RS: sl yb, knit 7(7), k2tog, k1, turn WS: sl yf, purl to 1 st before gap, p2tog, pl, turn RS: sl yb, knit to 1 st before gap, k2tog, k1, turn Repeat the last 2 rows until all sts have been worked. Don't turn after the last RS row. Now 20(22) heel sts remain.
gusset setup:
Pick up and knit 18 sts along side of heel flap, pick up one more between flap and instep . Continue by knitting the 32(36) held instep sts. Then pick up 1 st between instep and heel flap. Pick up and knit 18 sts along second side of heel flap and knit across the 39(41) other sole sts. Now you have 32(36) sts for the instep and 58(60) sts for the sole.
Roosimine socks - by Caoua Coffee
gusset decreases:
Attention: The arch shaping starts during gusset decreases at round 7. Don't miss it! round 1: instep:k32(36) sole: ssk, knit to 2 sts before instep, k2tog round 2: k across all sts Work these 2 rounds 3(3) times, i.e. 6(6) rounds total, decreasing by 2 sts every othe: Now you have 32(36) sts for the instep and 52(54) sts for the sole. Now the arch shaj round 7: instep:k32(36) sole: ssk, k18(19), k2tog, k3, M1, k2, M1, k3, ssk, k18(19), k2tog round 8: k across all sts round 9: instep: k32(36) sole: ssk, k16(17), k2tog, k4, M1, k2, M1, k4, ssk, k16(17), k2tog round 10: k across all sts round 11: instep:k32(36) sole: ssk, k14(15), k2tog, k5, M1, k2, M1, k5, ssk, k14(15), k2tog round 12: k across all sts round 13: instep: k32(36) sole: ssk, k12(13), k2tog, k6, M1, k2, M1, k6, ssk, k12(13), k2tog round 14: k across all sts round 15: instep: k32(36) sole: ssk, k10(11), k2tog, k7, M1, k2, M1, k7, ssk, k10(11), k2tog round 16: k across all sts round 17: instep: k32(36) sole: ssk, k8(9), k2tog, k8, M1, k2, M1, k8, ssk, k8(9), k2tog round 18: k across all sts round 19: instep: k32(36) sole: ssk, k6(7), k2tog, k9, M1, k2, M1, k9, ssk, k6(7), k2tog round 20: k across all sts round 21: instep:k32(36) sole: ssk, k4(5), k2tog, k10, M1, k2, M1, k10, ssk, k4(5), k2tog round 22: k across all sts round 23: instep: k32(36) sole: ssk, k2(3), k2tog, k11, M1, k2, M1, k11, ssk, k2(3), k2tog smaller size only: round 24: k across all sts round 25: instep:k32 sole: ssk, k2tog, k12, M1, k2, M1, k12, ssk, k2tog
continue for both sizes:
Now there are 32(36) sole sts left and you always have 32(36) sts on the instep side. Decreasing for gusset is finished, from now on there is only the arch shaping. The arch decreases 'climb' up on the instep side of the sock, so at some points, you have to move some sts around on your needles to be able to do the k2tog and ssk. Even the beginning of the round starts shifting.
Roosimine socks - by Caoua Coffee
foot:
round 1: k34(41), PM, k13(12), PM, k2, PM, k13(12), PM, k2(5) from now on you work continually round and round like this, decreasing/increasing every second round (if you have slender arches or quite small feet, see # Note below): \*[knit to 2 sts before marker, k2tog, slip marker, k to next marker, M1, slip marker, k2, slip marker, M1, k to next marker, slip marker, ssk] [k to next marker, slip marker, k to next marker, slip marker, k2, slip marker, k to next marker, slip marker] always repeat from \*
Note: For very slender arches or quite small feet, you could consider decreasing/increasing every round instead of every other round. In this case you work round and round like this: \*[knit to 2 sts before marker, k2tog, slip marker, k to next marker, M1, slip marker, k2, slip marker, M1, k to next marker, slip marker, sk] always repeat from \*
Work until foot is approx. 2 inches shorter than desired length. Arch shaping ends, when the k2tog and ssk bump' into each other at the middle of the instep. If arch shaping has ended before you reach the desired length, just continue by plain knitting every round. If arch shaping hasn't ended before your reach the desired length, you may either continue the arch shaping during toe decreases or just stop shaping and do the toe. toe: Rearrange the sts on your needles to be able to identify the 32(36) sts of the instep and the 32(36) sts of the sole. With MC knit to the beginning of the instep, then join a single strand CC with CC: round 1 (plain round): k all sts round 2 (decrease round): k1, ssk, k to 3 sts before end of instep, k2tog, k1, k1, ssk, k to 3 sts before end of sole, k2tog, k1 with MC: round 1 (plain round): k all sts round 2 (decrease round): k1, ssk, k to 3 sts before end of instep, k2tog, k1, k1, ssk, k to 3 sts before end of sole, k2tog, k1 Repeat theses 4 rounds until there are 32 sts left (16 on each side), then always work round 2 twice per color until there are 16 sts left (8 on each side).
finishing:
Leaving a tail of at least 8 inches, break yarns and close the toe using Kitchener stitch with the yarn end that suits you best color-wise. Weave in the ends and knit a second sock. Enjoy!
suggestions for modifications:
this pattern lends itself to using up small pieces of leftover yarns in multiple colors for the roositud motif. Go wild and use a different color for each of the little curlicues in the pattern if you like - but keep in mind, that there will be lots of ends to be woven in afterwards!
Roosimine socks - by Caoua Coffee
about this pattern:
The color pattern of these socks is neither achieved by an intarsia nor an embroidery method. It's done by simply weaving in the contrast colored yarn between the stitches while knitting a plain stockinette sock with the main color. In Estonian knitting, this technique is called ‘roosimine’ (which means ‘rose’) and the corresponding patterns are called ‘roositud’ patterns. Traditionally, it's used on mittens and socks and most roositud patterns are quite geometrical and done in a set of bright primary colors. You can find some real Estonian examples here: http://www.tlu.ee/opmat/ku/MLT6008/roosimine.html http://www.tlu.ee/opmat/ku/MLT6008/roositud motiivid.html To make it more easy to get used to this very versatile technique (and to have less ends to weave in), there's only one color for the weaving strand used on these socks. Oh - by the way: to prevent being bored to death by a plain stockinette foot after all that fun with the roosimine, there is some arch shaping and a bit of striping going on, too.


