(not so ugly) Duckling
fingerless mitts by Caoua Coffee
materials:
110-130 yards/100-120 m in main color 3yards/3m each of 2 contrast colors needles in a size to obtain gauge (according to your yarn choice)
size
child's (in fingering gauge) woman's S/M (in sport gauge) man's (in DK or light worsted gauge)
gauge:
fingering:32 sts = 4 inches in stockinette sport: 28 sts = 4 inches in stockinette dk or light worsted: 22-24 sts = 4 inches in stockinette
abbreviations:
CC = contrast color k = knit stitch k2tog = knit 2 together M1 = make 1 by picking up the strand in between the stitch just worked and the next stitch and knitting into the back of this thread MC = main color P = purl stitch p2tog = purl 2 together RS = right side / public side st(s) = stitch(es) WS = wrong side / private side
(not so ugly) Duckling mitts - by Caoua Coffee
Roosimine - technique explications:
The Estonian technique called ‘roosimine' is worked from a chart that shows darker squares where contrast colored yarn that's woven in covers the knit stitches that hide behind it. A double strand of CC is used throughout for the weaving pattern whereas all the stitches that are actually knitted are in a single strand of MC. The double thickness of the CC helps the yarn stay in place nicely, as it hasn't too much room to move around between the stitches where it's woven in and therefore the pattern will be visible very distinctly. You can find some real Estonian examples here: http://www.tlu.ee/opmat/ku/MLT6008/roosimine.html http://www.tlu.ee/opmat/ku/MLT6008/roositud_motivid.html This is how roosimine works: t be discouraged by the lengthy explanation, just try it out. It's less scary then it sounds.) rounds A: (the weaving yarn of the CC you want to use next is at the right end of the patterned area) With MC knit up to the first dark square, bring CC to the front between the 2 needle tips and let it hang there. With MC knit as many sts as there are marked squares, bring CC to the back between the 2 needle tips and let it hang. \*[With MC knit up to the next marked square, bring CC to the front, knit as many sts with MC as there are dark squares, bring CC to the back.] Repeat from \* until you have covered all the black squares of the round. You end with the CC being at the WS of the work and at the left end of the patterned area. Knit some more sts in MC, then pull gently at the CC yarn end to even out the tension of the woven in strands. (You might consider stretching the fabric a bit while doing this to prevent puckering, if you pull the CC too tight.). Finish the round by knitting the rest of the sts with MC. rounds B: (the weaving yarn of the CC you want to use next is at the left end of the patterned area) With MC knit up to the first dark square, bring CC (that hangs somewhere far left) to the front over that left needle (not between the needle tips!). Now you form a U with that double strand of CC and bring the right “leg' of that U to the back between the 2 needle tips. This results in a U-shaped strip of CC yarn hanging on the RS of your knitting. That U should be about 6-8 inches in length. All the weaving in this round will be done with this U-strip. (For now, you can forget about the end of the CC yarn that is attached to the ball.) With MC knit as many sts as there are dark squares, bring the rightmost part of the U-shaped CC to the back between the 2 needle tips. (Now there's a smaller Ushaped strip of CC hanging on the RS with both ends of the U laying over the left needle. \*[With MC knit up to the next dark square, bring CC to the front (make sure it's the end of the U-strip you just used and not the CC-end that's attached to the ball!), knit as many sts with MC as there are dark squares, bring rightmost part of the U-shaped CC to the back.] Repeat from \* until you have covered all the black squares of the round. Knit some more sts in MC, then pull gently at the CC end that is attached to the ball and - voila - the magic is done, the U-shaped strip of yarn has disappeared and the working CC yarn is back at the right end of the patterned area. Confused? Interweave/Knitting Daily has some explanations and a short video here: http://www.knittingdaily.com/blogs/daily/archive/2012/02/15/learn-something-new-roositud-inlay.aspx http://www.youtube.com/watch?v = wAA56UWu4Ps
(not so ugly) Duckling mitts - by Caoua Coffee
before you start:
notes about the size of the mitts: this pattern is written to be a sort of ^one size fits all' : depending on your gauge, you will end up with either children's mitts (if worked in a gauge of 32sts/inch, which means fingering weight yarn for most knitters), women's mitts (28sts/inch, sport weight yarn) or men's sized mitts (22-24sts/inch, DK or light worsted). the mitts are quite stretchy due to their ribbed structure, so they'll cover a range of hand circumferences even within a given yarn thickness. notes about the contrast colored yarns: for the CCs, use yarn of the same weight as your MC yarn and hold it doubled for the roosimine weaving. this is done with the object of having the 2 strands lie neatly next to each other and cover the whole space underneath. (do not use only 1 strand of twice the thickness, it won't cover the space as nicely.) try to find some yarn scraps that are not tightly spun (think more along the lines of ‘plush'), it really makes a world of a difference. embroidery vs. roosimine: my embroidery skills are virtually nonexistent. this is why roosimine comes in handy for me, but your mileage may vary. perhaps you are an experienced embroiderer and would prefer to simply' stitch the duck pattern onto the mitts? no problem - in this case, work the mitts as described but omit the roosimine and always simply knit all 12 stitches in stockinette where the duck pattern would be. once you finished the mitts, use that stockinette area as canvas for your embroidery.
pattern:
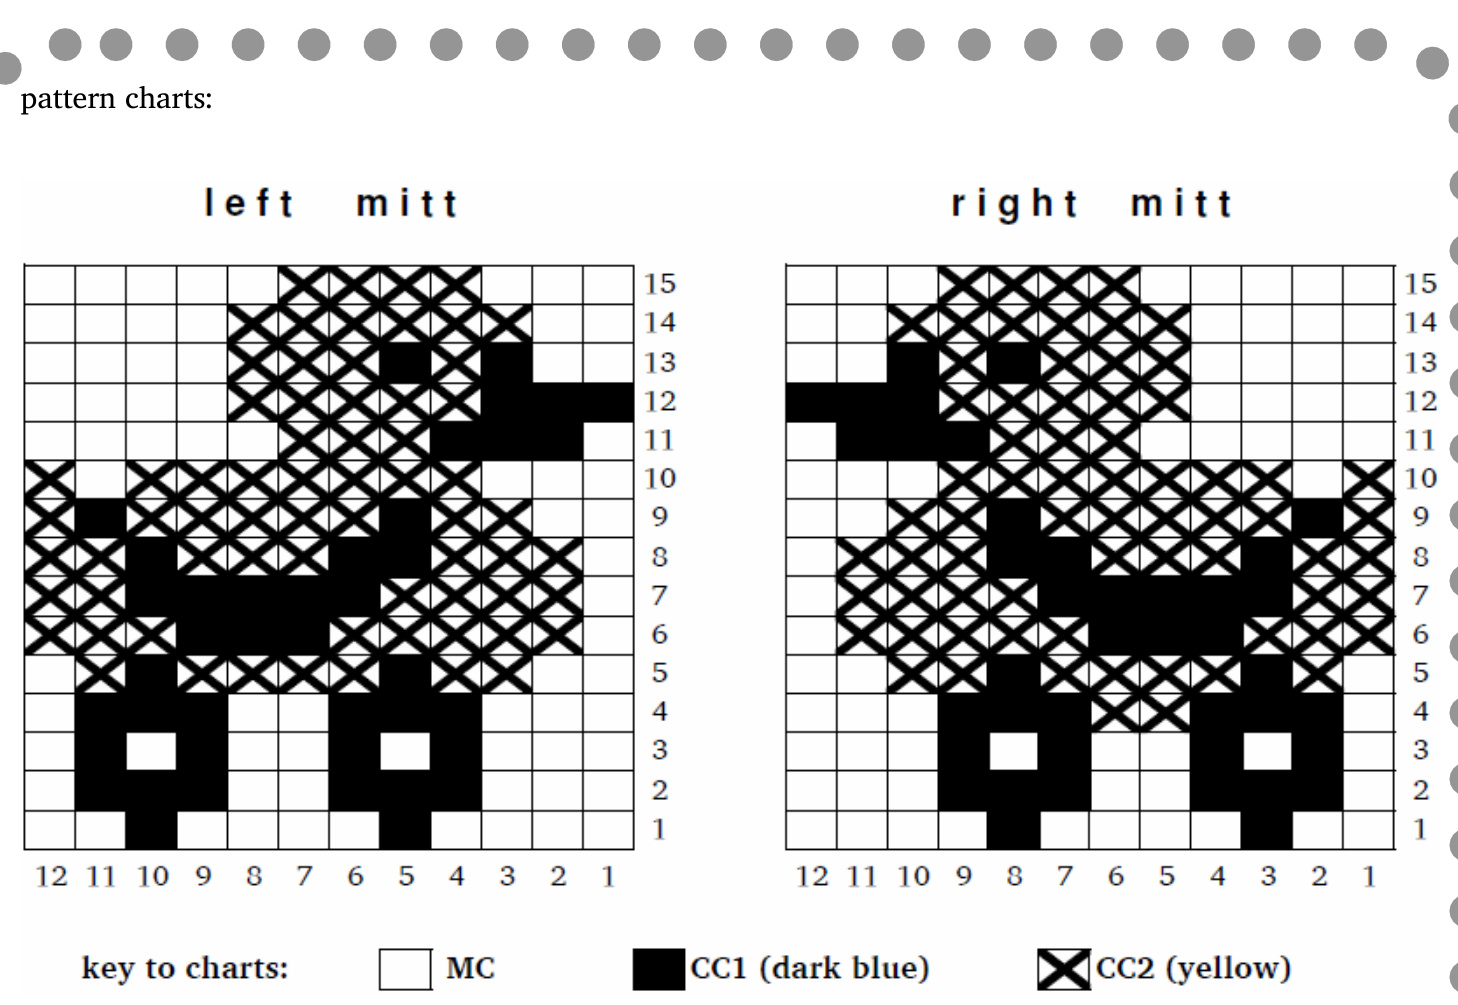
cuff: with MC, loosely cast on 42 sts and join to begin working in the round. purl 1 round. work 12 rounds of [kl, pl] ribbing. setup for hand: increase round: [k1, M1, k2] 14times, M1 = > now you have 57sts on the needles. purl 1 round. hand: work 8 rounds like this: k3, pl, k12, pl, [k3,p1] 10times. now comes the fun part, but make sure to read the roosimine technique explications first! attention: To end up with mirrored patterns on the 2 mitts, make sure to follow one of the pattern charts (see below) for the first mitt and the other chart for the second mitt! work 15 rounds like this: k3, p1, work 12 sts of roositud pattern of the corresponding row, then [k3, p1] 10times then work 2 rounds like this: k3, p1, k12, pl, [k3,pl] 10times.
(not so ugly) Duckling mitts - by Caoua Coffee
thumb placement and rest of hand - attention: instructions for right and left mitt are different! for rightmitt only: round 1: k3, p1, k12, pl, k3, pl, place next 16sts on a piece of waste yarn, using backwards loop method cast on 2 sts over the gap, [k3, p1] 5times round 2: k3, pl, k12, pl, k3, p2tog, k2tog, k2, pl, [k3, p1] 4times = > now you have 4lsts on the needles.
for left mitt only:
round 1: k3, pl, k12, pl, [k3, pl] 6times, place next 16sts on a piece of waste yarn, using backwards loop method cast on 2 sts over the gap. round2: k3, p1, k12, p1, [k3, p1] 5times, k3, p2tog, k2tog last st of the round together with the first stitch of the next round. put that last st back onto the left needle. = > now you have 4lsts on the needles.
continue for both mitts:
work 4 rounds like this: k3, pl, k12, pl, [k3, pl] 6times setup for ribbing round: [kl, p1] 5times, k2tog, pl, [k1, p1] 14times = > 40sts. work 8 rounds of [kl, pl] ribbing. loosely cast off purlwise.
thumb:
place the 16 held thumb sts back onto needles. [k3, pl] 4times, pick up 4 sts (= 1 st from the gap, 2 from the cast on sts, 1 st in the gap) and work them as k3, p1. work 5 rounds of [k3, pl] ribbing. work 4 rounds of [kl, p1] ribbing. loosely cast off purlwise.
finishing:
weave in the ends and knit a second mitt. hint: when weaving in the ends of the roosimine part, you can use them to tuck down any long strand that might have occurred on the inside of the mitts. print out a gift tag from http://thelittleyellowduckproject.org and attach it to your mitts. then enjoy loosing/gifting them!
(not so ugly) Duckling mitts - by Caoua Coffee
about this pattern:
The Little Yellow Duck Project (http://thelittleyellowduckproject.org) creates and distributes handcrafted gifts to raise global awareness of blood, bone marrow, organ and tissue donation. The little yellow duck gifts are left in public places as random acts of kindness for others to find. A special tag invites the finder to take their gift home to brighten their day and to visit the project's website in the hope that the stories and information found there will encourage the finders to pledge their own random act of kindness by registering to donate blood, bone marrow, organs or tissues. Head on over to http://thelittleyellowduckproject.org to find out more about how you can be involved in this worthy cause. (By the way, if you want to make some mitts as a reward for yourself or want to give some to your friends and talk to them personally about the Little Yellow Duck Project, that's perfectly fine with me.) The color pattern of these mitts is neither achieved by an intarsia nor an embroidery method. It's done by simply weaving in the contrast colored yarn between the stitches while knitting plain stockinette underneath with the main color. In Estonian knitting, this technique is called ‘roosimine’ (which means ‘rose’) and the corresponding patterns are called ‘roositud' patterns.


