A Tale of Two Cultures
An Ethnically Inspired Cardigan by Renée Burton December 2014

A Tale of Two Cultures is a cardigan incorporating Estonian techniques and Turkish-inspired design. The colourwork is not your every day stranded or intarsia. It is accomplished with an Estonian in-lay technique called roosimine, which creates embroidered motifs and a unique accent to knitted fabric. Beyond the colorful borders, geometric cables reminiscent of Turkish carpet motifs line the bottom of the cardigan and encircle the wrists. A large colour motif sits between the shoulder blades on the back of the sweater. All of the colourwork and cables were designed for this cardigan. The use of a dk, or light worsted, weight yarn creates a mid-weight sweater with a bit of warmth that can still be worn in the office. A complete roosimine tutorial is included with the pattern.
Finished Measurements.
This pattern includes instructions for three finished sizes, approximately (36", 41", 46")/(91cm, 104cm, 117cm) in circumference. See Diagram 2 for detailed body measurements. These sizes use 6, 7, and 8 copies of the cable in the bottom border, respectively. I recommend you review all the finished measurements to ensure they are a good fit for you before beginning the sweater. If you need a different size, you can change yarn weight or add additional knit stitches between the cables. For the latter, you will also need to recalculate portions of the sweater. To help with resizing the sweater, the table below includes basic grading information for several additional sizes based on the pattern's stated gauge.
| Finished Circumference | # of cables | #knitstitches between cables | CO st | Border stitch count | Post-border stitch count |
| 34.6" (88cm) | 6 | 2 | 182 | 222 | 176 |
| 37.7" (96cm) | 9 | 4 | 196 | 236 | 190 |
| 39.2"(100cm) | 6 | 5 | 203 | 243 | 197 |
| 43"(109cm) | 7 | 4 | 228 | 268 | 214 |
| 44.8" (114cm) | 7 | 5 | 236 | 276 | 222 |
Yarn, Needles, and Gauge.
900-1200 yds of dk or worsted weight yarn, with small amounts (10-30yds) of a similar yarn in 2-5 complimentary colors for the colorwork. A wool or wool-blend yarn is recommended. The prototype was made with a yak/merino blend. Cable gauge (Chart A) 32 st x 26 row pattern = 5-1/4" x 4" (13cm x 10cm) Stockinette gauge 18st x 24 rows = 4" x 4" (10cm x 10cm) Please check your gauge before beginning and as you go along. Because the cable design encircles both the bottom border and the sleeve cuffs, there isn't a lot of room for error. Needle size US7 (4.5mm) and US6 (4mm), optionally, for the cuff and neck hems, or needles used for gauge.
Roosimine.
Roosimine is an Estonian in-lay technique, typically used in gloves and socks. It creates a beautiful embroidered look to the fabric, but is accomplished while knitting and without an embroidery needle. See the separate document included with this pattern for detailed instructions on the Roosimine technique.
Instructions.
Refer to Diagram 1 for an overview of the construction. Diagram 2 is a detailed schematic of the body shaping, including major stitch counts. Cast 0n (192, 244, 276) stitches using the larger needle, and knit 1.5" (4cm) of stst, ending with a right side row. Using a backwards loop cast on, or cast on of your choice, cast on 20 more stitches at the end of the last row. Turn the work and knit back across the row, casting on 20 more stitches at the end of that row. (232, 264, 296) stitches.
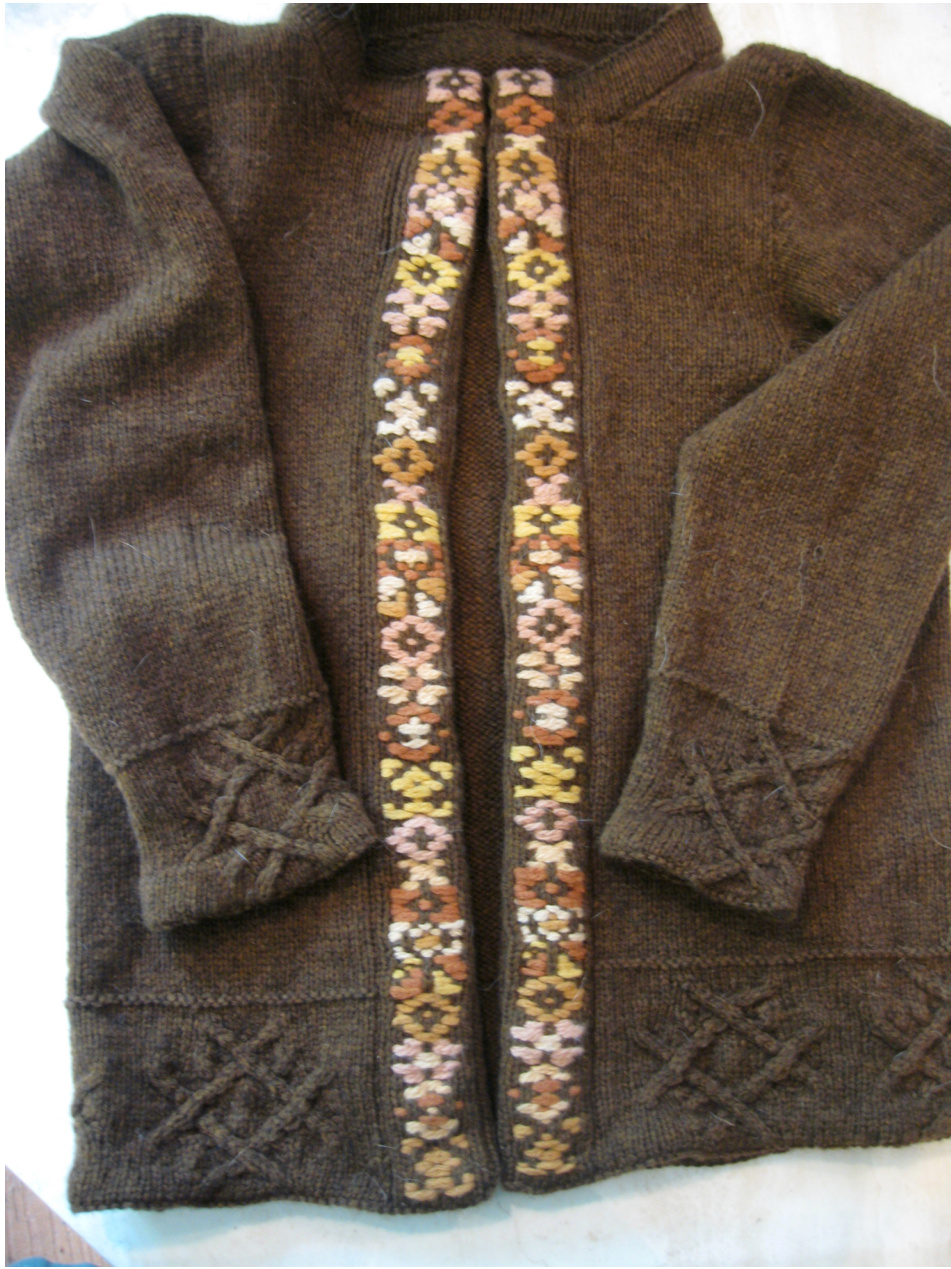
Turn your work, so the RS is facing you. You now have a row of purl bumps on the right side which creates a fold line for the bottom hem, and you ready to start the body of the sweater. Set Up. RS row: K9, p1, k9, p1, PM, \*k32, PM, rep from \* (5, 6, 7) more times, p1, k9, p1, k9. WS: knit the knits, purl the purls. Working the Band. From this point until the bind off at the neckline, the first and last 10 stitches of the sweater are worked identically to create a folded hem with 9 knit stitches and 1 purl stitch. The Roosimine colourwork, shown in Chart B, is done over 9 stitches, and a further purl stitch separates the body from the band. The band therefore has 20 stitches. The phrase “work the band" means to knit the hem and work the appropriate row of Chart B, the band chart, over those 20 stitches. There is a band on either side of the cardigan, for a total of 40 stitches. Reading the Roosimine Band Chart (Chart B). To prevent Chart B from being a very long and skinny chart, it is presented as three 9-stitch sections side-by-side on a single chart. Grey blocks are used to outline each of the sections, and each section is numbered with stitches 1-9. After completing one section, begin the next section of the chart at the bottom again. After completing all rows, start again with the bottom of the first section. You might want to mix up the colours as you progress up the sweater rather than following a set pattern. There are two options for the border cable, Chart A or Chart A-alt. Work the bottom border of the sweater asfollows: On all right side rows, work the band, work Chart A or Chart A-alt (6, 7, 8) times, work the band. On all wrong side rows, work the band, purl until last 20 stitches, work the band. e border chart, knit three rows of stockinette, finishing with a wrong side row The stockinette gauge is significantly looser than the cable border, so to maintain an even circumference for the body, you need to adjust the stitch count after the cable border by decreasing evenly outside of the band. To do this, on the next right side row, work the band, \*(p2, p2tog) rep from \* to the band, work the band. (184, 208, 232) stitches. Continue the body of the sweater in stockinette, working the band on either side until it measures (14.5", 16.5", 18") (37cm, 42cm, 45.5cm) from the hem turn row, or desired length to the underarms. Repeat Chart B, as necessary, as you work. Armholes. You are now ready to create and shape the armholes. For each armhole, you will bind off (8, 10, 10) stitches. This will separate your sweater into two front panels and a back panel, and you will those panels separately. RS Row. Work the band, (k27, k32, k38), B0 (8, 10, 10) stitches, (k36, k41, k47), m1, (k37, k42, k48), BO (8, 10, 10), (k26, k31, k37), work the band. (169, 189, 213) stitches. You now have three sections of stitches on your needles: two front panels with (47, 52, 58) stitches and a back panel with (75, 85, 97) stitches. You will work each section (left front, right front, and back) independently and decrease the remaining underarm stitches. It may help to place the sections you are not working onto a spare circular needle or waste yarn. Front Panels. (47, 52, 58) stitches in each panel. Decrease an additional (8, 9, 11) stitches at the underarm edge over several rows, as follows: Decrease 2 stitches every other row (3,3,4) times. (41, 46, 50) stitches. Decrease 1 stitch every fourth row (2, 3, 3) times. (39, 43, 47) stitches. Once the decreases are completed, knit straight, continuing the band until you are ready to decrease for the neckline. (39, 43, 47) stitches remain. When the panel measures (7-1/4", 8-1/4", 9") (18.5cm, 21cm, 23cm) from the underarm bind off, or approximately 2" (5cm) below the desired total length, stop working the Roosimine border and begin the neckline shaping. The length to the bottom hem turn should be approximately (21.75", 22.75", 27")(55cm, 58cm, 68.5cm). The shaping is done by binding off stitches at the beginning of rows that start at the neckline. Bind off (22, 24, 25) stitches at the neck edge to create the neck opening. Note that this will also bind off the folded hem. At this point, you will stop working the band and work the piece in stockinette stitch. (17, 19, 22) stitches remain. Next row starting at neck edge: BO (2, 3, 3) stitches, work to end of row. Next row starting at neck edge: BO (2, 2, 2) stitches, work to end of row. (13, 14, 17) stitches remain, and you are ready to begin the shoulder shaping at the armhole edge. The piece should measure (22.75", 23.75", 28") (58cm, 60cm, 71cm) to the bottom hem turn row when beginning the shoulder shaping, or about 1" (2.54cm) less than the total desired length. Next row starting at the armhole: BO (5, 5, 6) stitches, work to end of row. Next row starting at the armhole: BO (4, 5, 6) stitches, work to end of row. Next row starting at the armhole: BO (4, 4, 5) stitches. The piece measures approximately (23.75", 24.75", 29") (60cm, 63cm, 74cm) to the hem fold line, or desired length.
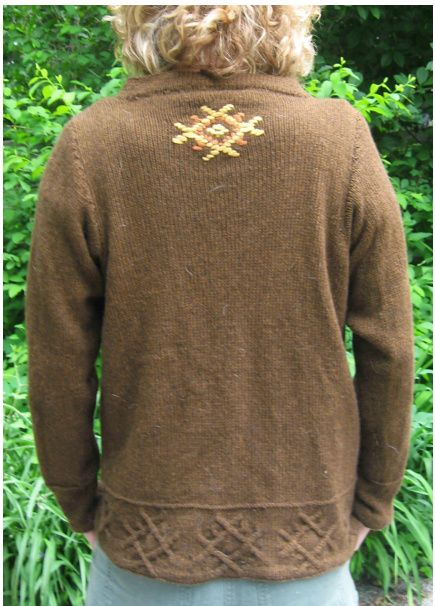
Back Panel. (75, 85, 97) stitches. You will begin working the large Roosimine motif, Chart C, along the back panel after approximately (5", 6", 61/2") (13cm,15cm, 16.5cm) so keep that in mind as you continue the underarm decreases. It may be helpful to place a marker at the center stitch of the back panel, as you'll need to center your motif at this point. Join yarn and decrease an additional (8, 9,11) stitches at each underarm, as follows: Decrease 2 stitches every other row (3,3,4) times. (63, 73, 81) stitches. Decrease 1 stitch every fourth row (2, 3, 3) times. (59, 67,75) stitches. Continue in stockinette, incorporating the Chart C motif, until the back measures (22.75", 23.75", 28") (58cm, 60cm, 71cm) to the hem turn row, or about 1" (2.54cm) less than the desired length. Begin shoulder shaping on the next RS row. For the next two rows, BO (5, 5, 6) stitches, work to end of row. For the next two rows, BO (4, 5, 6) stitches, work to end of row. For the next two rows, BO (4, 4, 5) rows, work to end of row. (13, 14, 17) stitches bound off for each shoulder. Place remaining (33, 39, 43) onto waste yarn. The piece measures approximately (23.75", 24.75", 29") (60cm, 63cm, 74cm) to the hem fold line, or desired length. Join the back and front. Match each front panel with corresponding stitches on the back panel and use mattress stitch to join the shoulder seam. Sleeves. Starting at the shoulder seam, pick up (82, 94, 106) stitches evenly around the armhole, placing markers as follows: pick up (9, 9, 11) st, pm, pick up (16, 19, 21) st, pm, pick up (16, 19, 21) st, pm, pick up (16, 29, 21) st, pm, pick up (16, 19, 21) st, pm, pick up (9, 9, 11) st. leeve cap with short rows, as follows, slipping each marker as you come to it Set Up rows: k(12, 12, 14), wrap the next stitch and turn (or used short-row method of your choice). p(24, 24, 28), wrap the next stitch and turn, Knit to the wrapped stitch, pick up the wrap and knit them together, k3, wrap the next stitch and turn, Purl to the wrapped stitch, pick up the wrap and knit them together, p3, wrap the next stitch and turn, Repeat these two shaping rows until (50, 56, 66) stitches are included in the short row, counting wrapped stitches. Next row (RS), knit all(82, 94, 106), picking up and knitting the last wrapped stitches along the way. Knit to underarm marker. This is now the start of the round. Knit one round, removing all markers except that at the center of the underarm (start of round). Next round: k1, dec1, knit to last three stitches, dec1, l Knit two rounds. Next round: k1, dec1, knit to last three stitches, dec1, k1 (2 stitches decreased) Continue decreasing every third round until (38, 40, 42) stitches remain. Continue to knit straight until the sleeve measures (14", 16.5", 18.5") (36cm, 42cm, 47cm), or 4" (10cm) less than the desired length. Then begin the cuff cable border. Because the cable gauge is significantly tighter than stockinette gauge, we use a series of increases and decreases during the cable along the wrists, as shown in chart D. This will keep the overall width at the wrist relatively constant. Alternatively, you can increase 12 stitches at the start of the wrist cable, work chart A, and then decrease those 12 stitches again at the end of the chart. Set Up Cuff Cable. (p3, p4, p5), pm, p32, pm, (p3, p4, p5) Over next 28 rows, (p3, p4, p5), sm, work chart D, sm, (p3, p4, p5) Purl one row, removing all markers. Switch to smaller needles and knit 1" (2.54cm) in stockinette stitch to create a folded hem. Bind off all stitches using the larger needle. Folded Hems. Fold the lower border hem along the purl row and stitch into place. Then fold the cardigan border hems covering the wrong side of the Roosimine band, and stitch into place. Fold each sleeve hem in and stitch into place. Neckline. After you have sewn down the folded border hems, pick up (66, 75, 85) stitches along the neckline, including those remaining on waste yarn from the back. Knit 1" (2.54cm) in stockinette stitch. Optionally, resume the Roosimine band along the edge. Purl one row. Switch to smaller needles, and knit another 1" (2.54cm) in stockinette stitch. Bind off all stitches. Fold neck hem into the cardigan and stitch into place. Blocking. I strongly recommend that you gently wet block your finished sweater. No need to stretch it! Just soak for 15-30 minutes until it is fully saturated with water. Of course, you can also use a wool wash or gentle detergent. Squeeze out excess water without wringing. Then, lay flat on a large towel and roll into a cylinder. Walk on the rolled towel to push out excess water. Unroll and gently shape the sweater; lay flat to dry.
Acknowledgements.
This pattern would not be possible without the help of my Ravelry testers: Bryshamom , LidaP, and Miti-Mom. An incredible amount of work went into bringing this pattern from scribbled notes to something understandable by other knitters. I am grateful for them for their patience, attention to detail, and helpful feedback. Please look at their beautiful versions of this sweater on Ravelry and take a minute to thank them by leaving a comment.
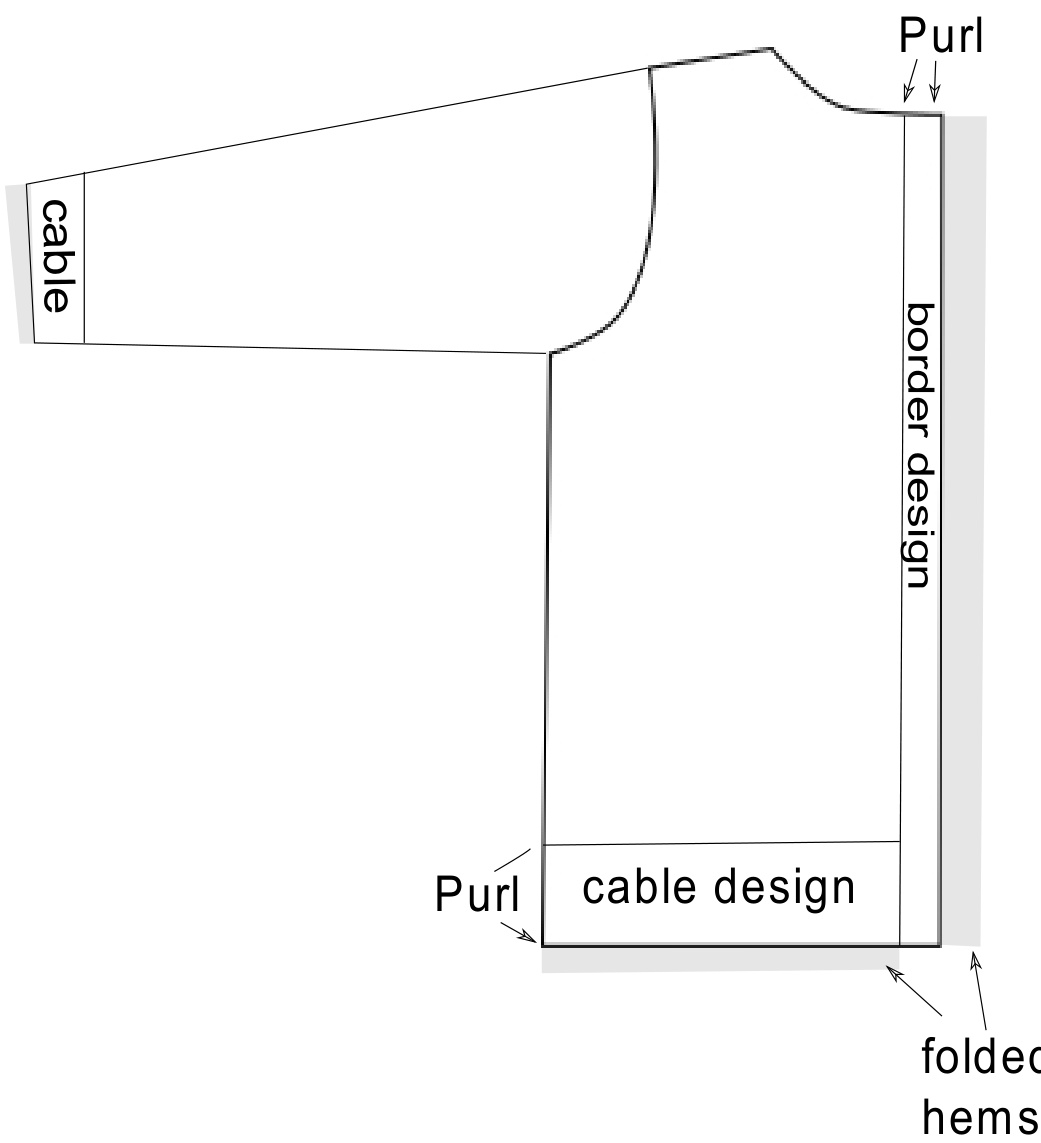
Diagram 1. Sweater Overview.
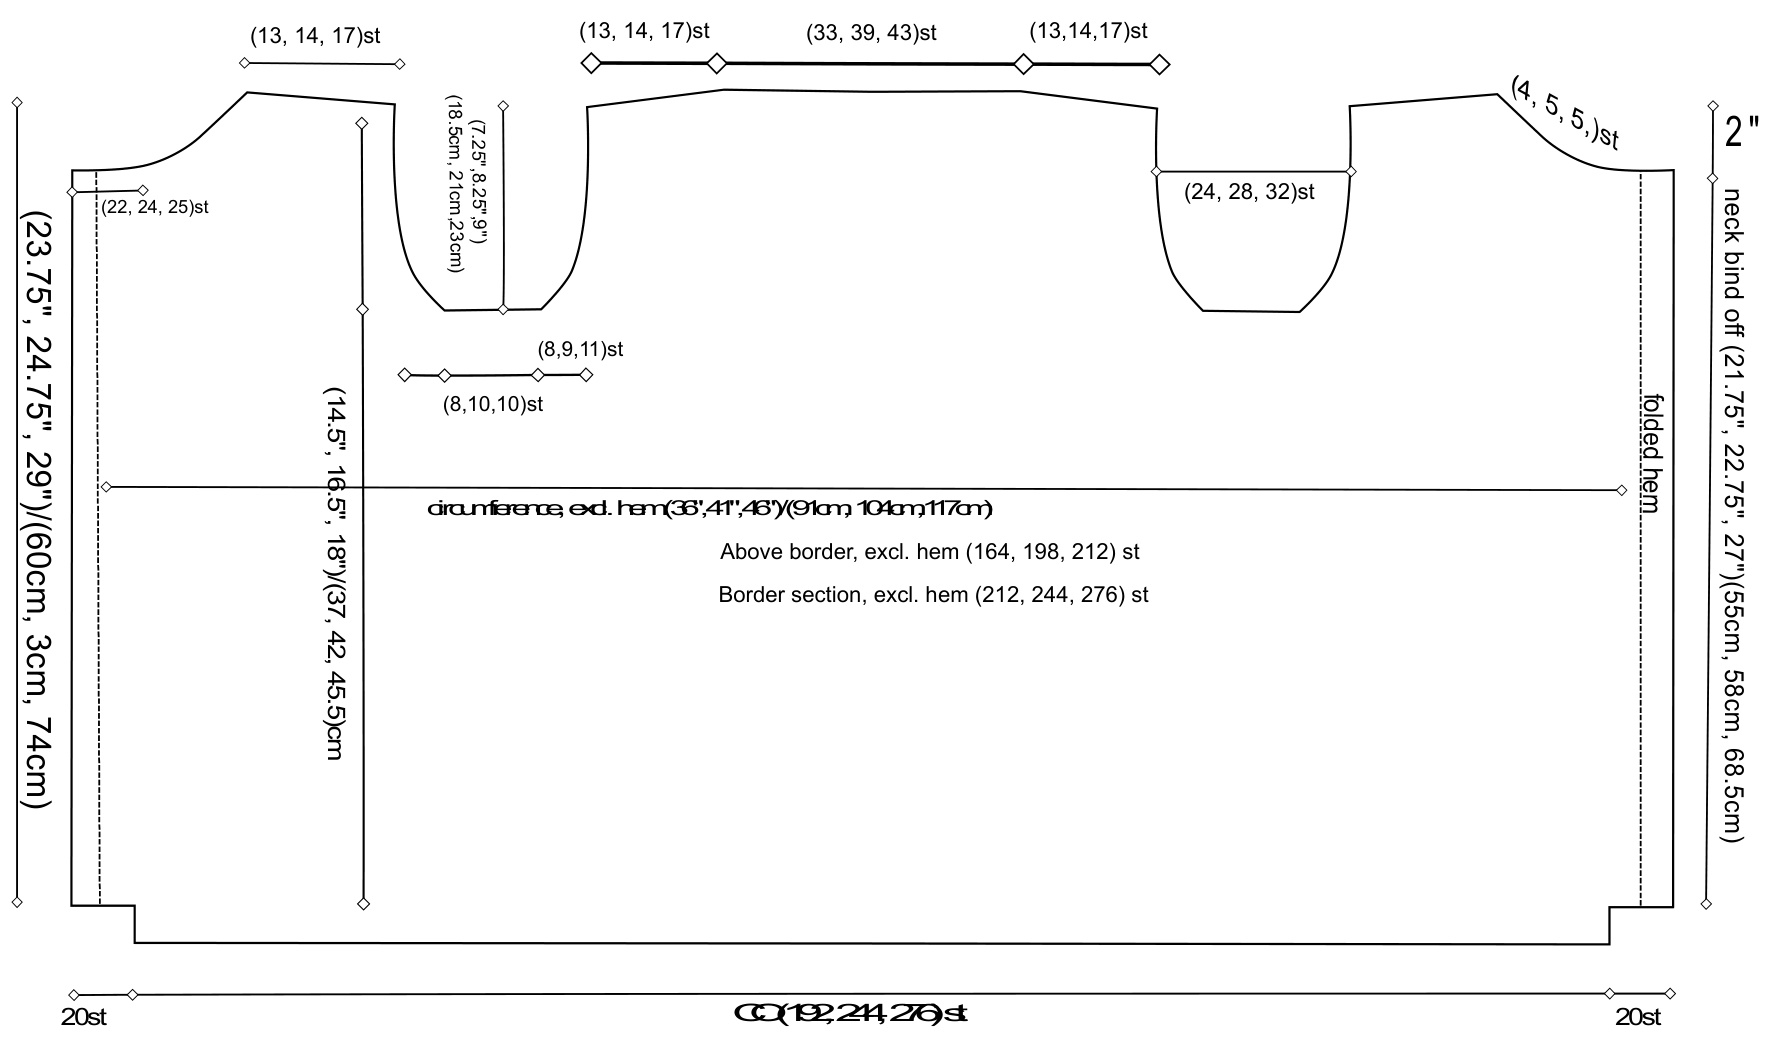
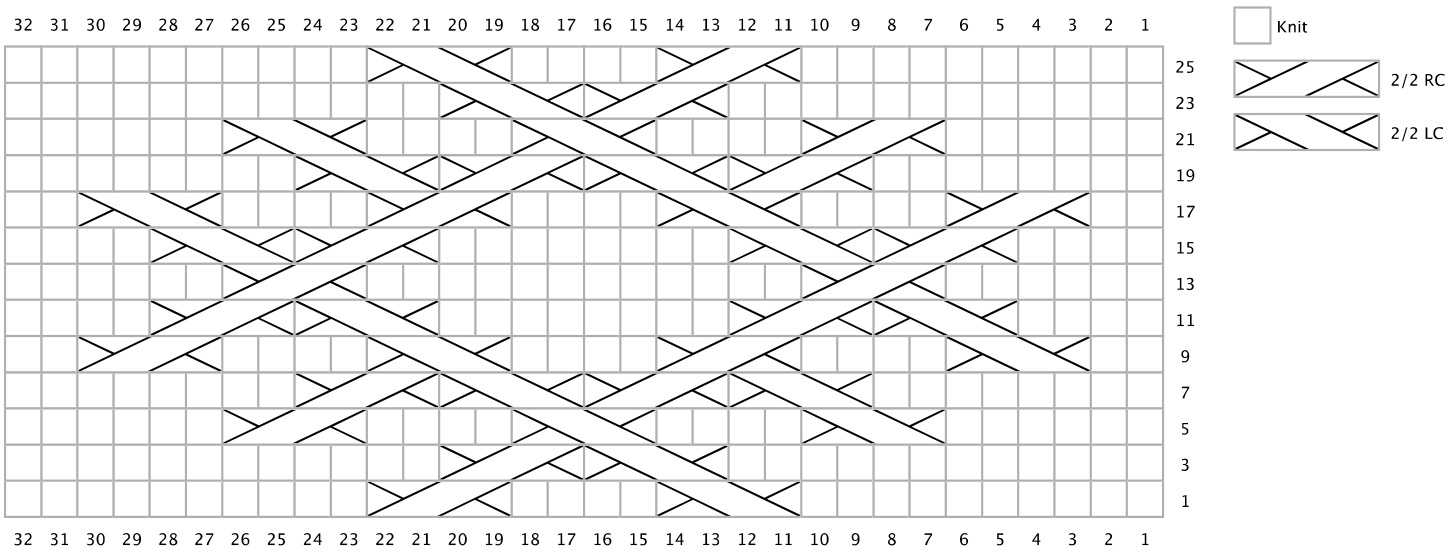
Chart Chart A. Border Cable.
Note: Purl all even rows. Row 1 (RS): K10, 2/2 LC, k4, 2/2 RC, k10. (32 sts) Row 3: K12, 2/2 LC, 2/2 RC, k12. Row 5: K6, (2/2 LC, k4) x 2, 2/2 RC, k6. Row 7: K8, (2/2 LC, 2/2 RC) x 2, k8. Row 9: K2, 2/2 LC, k4, 2/2 RC, k4, 2/2 LC, k4, 2/2 RC, k2. Row 11: K4, 2/2 LC, 2/2 RC, k8, 2/2 LC, 2/2 RC, k4. Row 13: K6, 2/2 RC, k12, 2/2 RC, k6. Row 15: K4, 2/2 RC, 2/2 LC, k8, 2/2 RC, 2/2 LC, k4. Row 17: K2, 2/2 RC, k4, 2/2 LC, k4, 2/2 RC, k4, 2/2 LC, k2. Row 19: K8, (2/2 RC, 2/2 LC) x 2, k8. Row 21: K6, 2/2 RC, (k4, 2/2 LC) x 2, k6. Row 23: K12, 2/2 RC, 2/2 LC, k12. Row 25: K10, 2/2 RC, k4, 2/2 LC, k10.
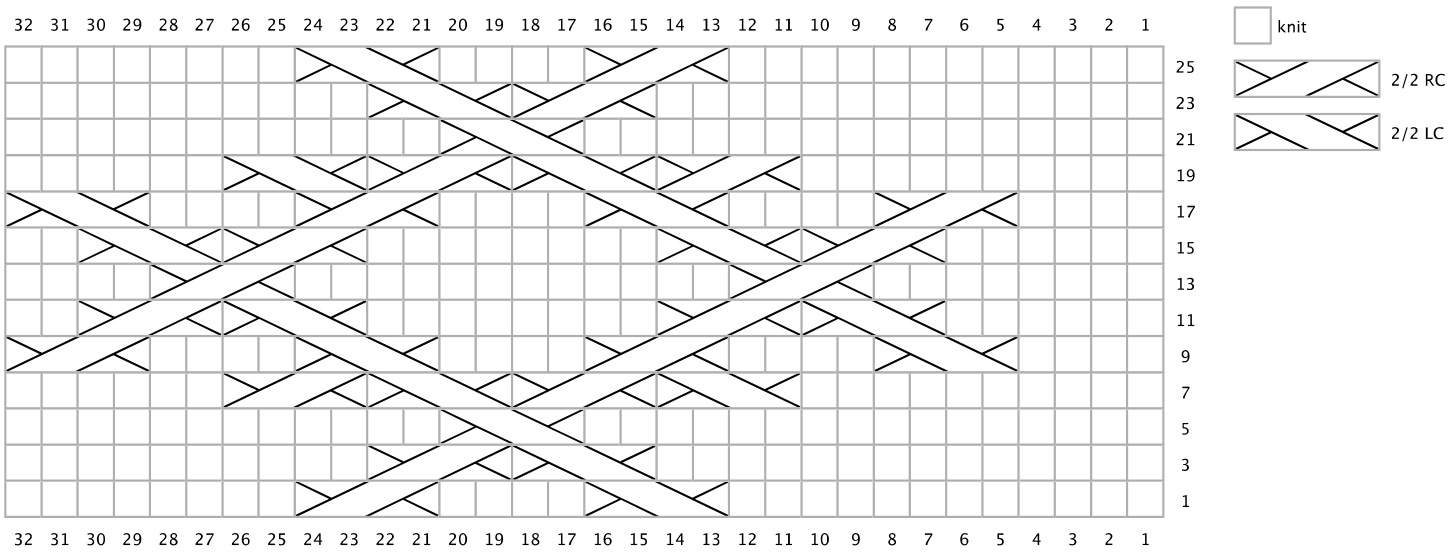
Chart Chart A-alt. Border Cable (Short Leg Version)
Row 1 (RS): K12, 2/2 LC, k4, 2/2 RC, k8. (32 sts) Row 3: K14, 2/2 LC, 2/2 RC, k10. Row 5: K16, 2/2 LC, k12. Row 7: K10, (2/2 LC, 2/2 RC) x 2, k6. Row 9: (K4, 2/2 LC, k4, 2/2 RC) x 2. Row 11: K6, 2/2 LC, 2/2 RC, k8, 2/2 LC, 2/2 RC, k2. Row 13: K8, 2/2 RC, k12, 2/2 RC, k4. Row 15: K6, 2/2 RC, 2/2 LC, k8, 2/2 RC, 2/2 LC, k2. Row 17: (K4, 2/2 RC, k4, 2/2 LC) x 2. Row 19: K10, (2/2 RC, 2/2 LC) x 2, k6. Row 21: K16, 2/2 LC, k12. Row 23: K14, 2/2 RC, 2/2 LC, k10. Row 25: K12, 2/2 RC, k4, 2/2 LC, k8.
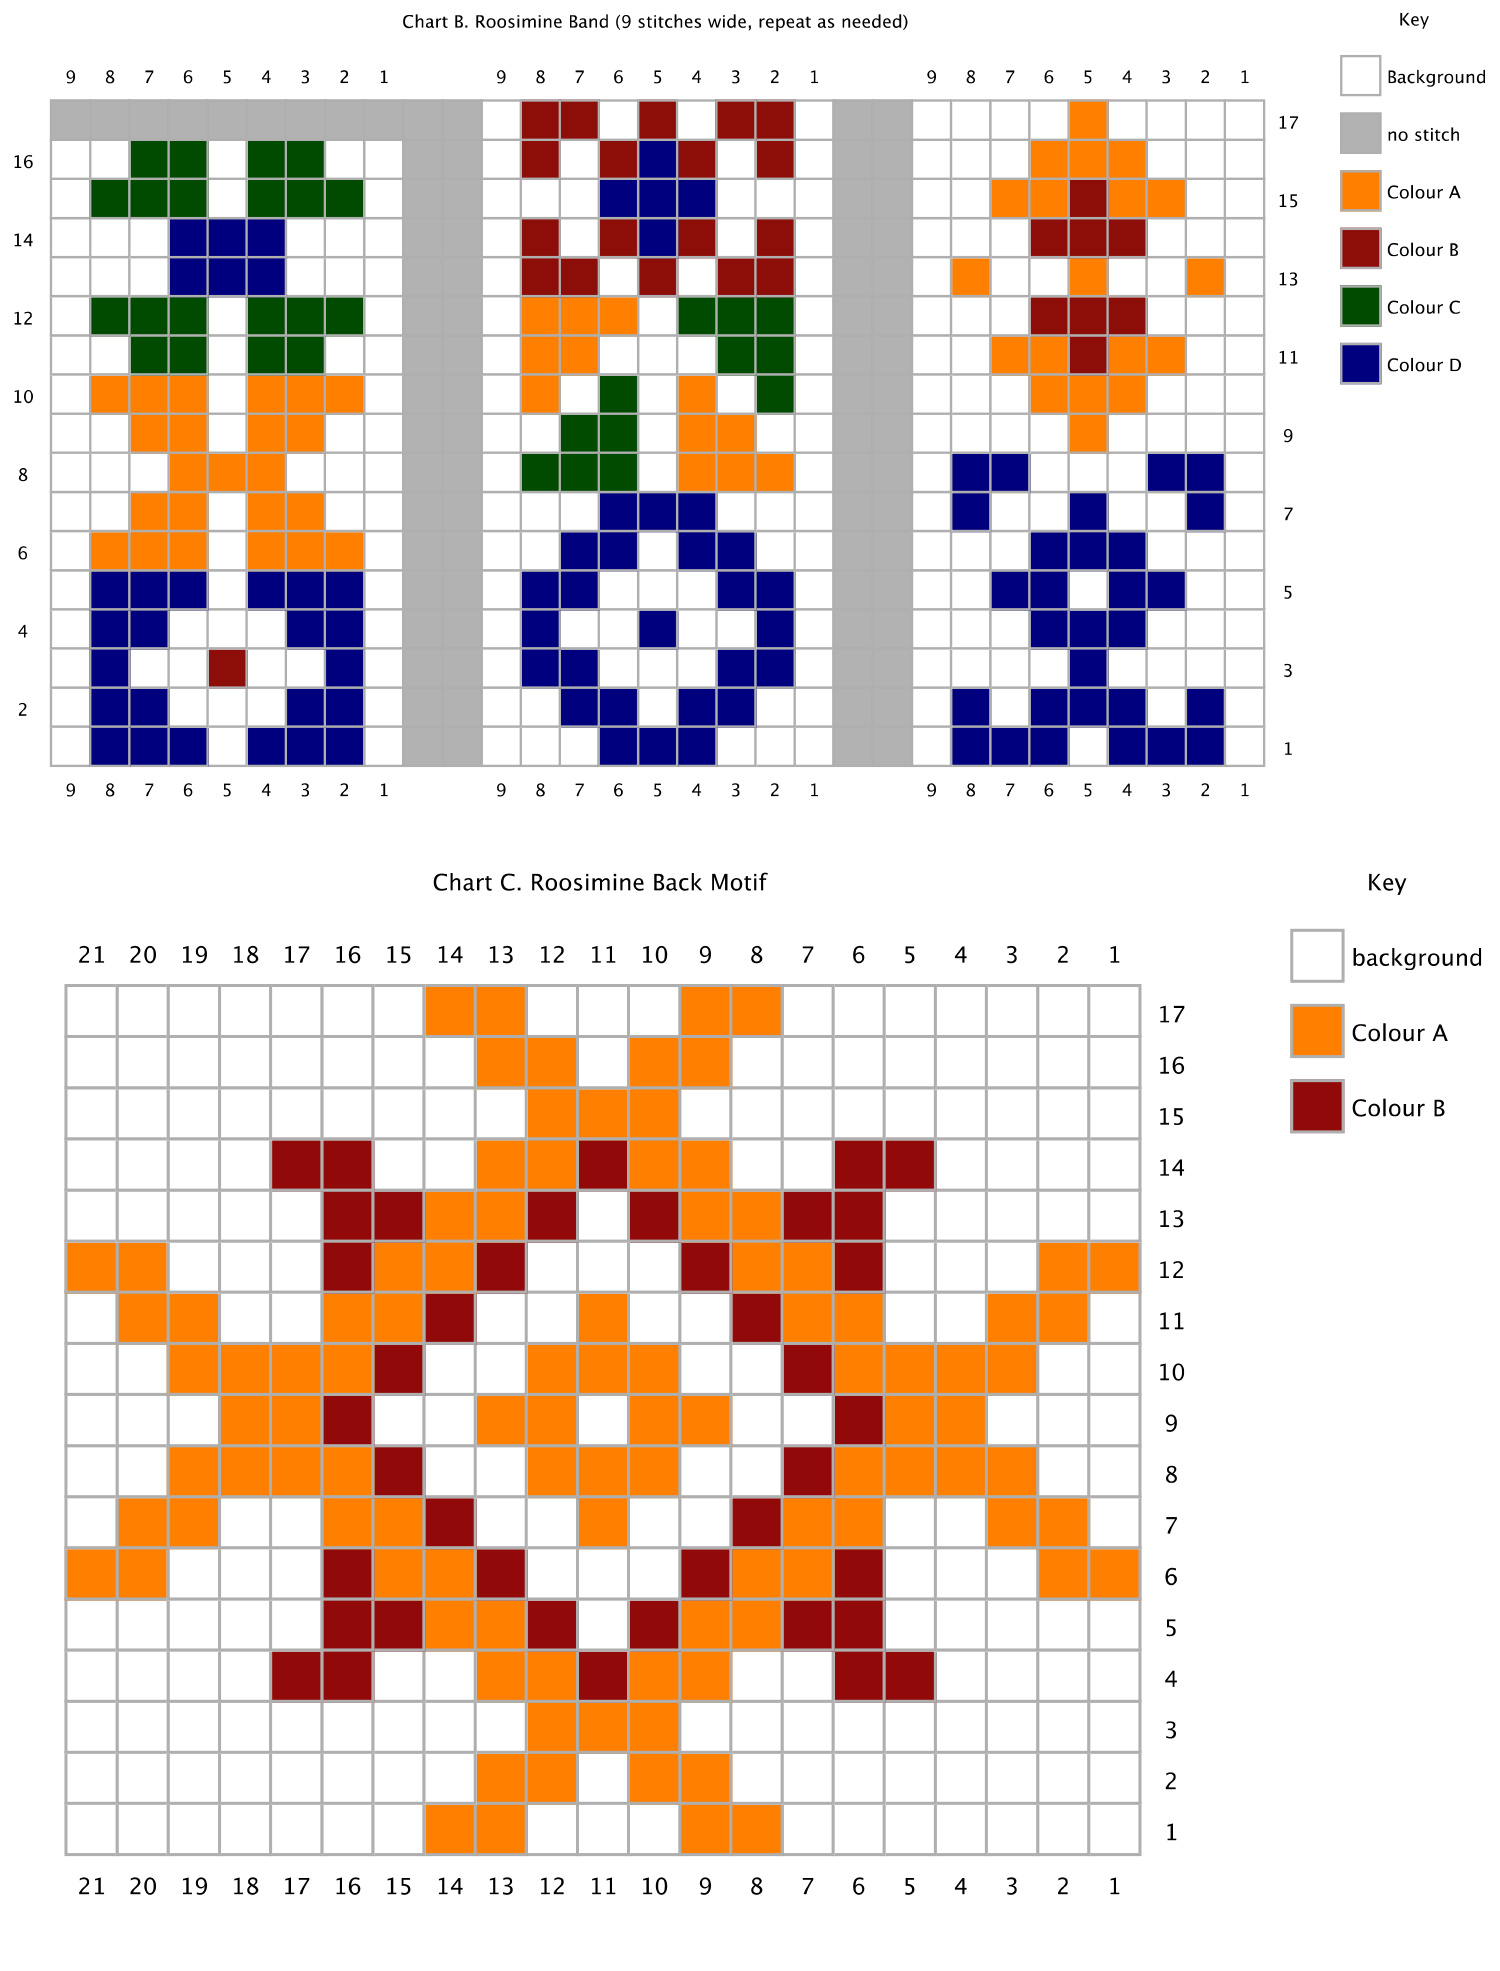
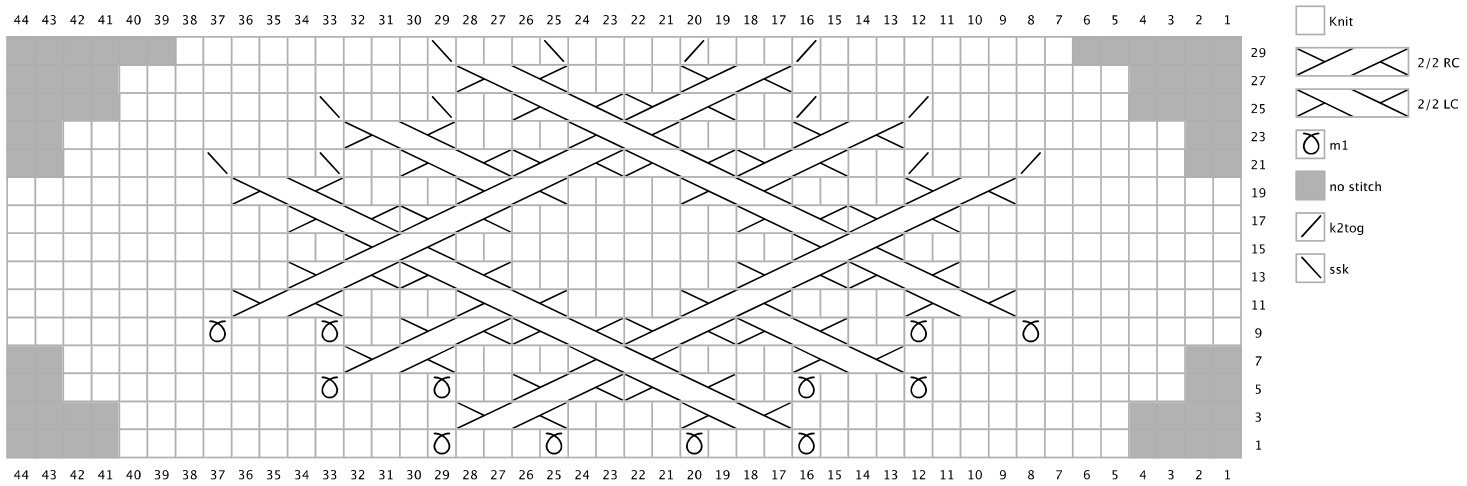
Chart Chart D. Cuff Cable Chart. Knit all even rounds.
Row 1 (RS): K11, m1, k3, m1, k4, m1, k3, m1, k11. (36 sts) Row 3: K12, 2/2 LC, k4, 2/2 RC, k12. Row 5: K9, m1, k3, m1, k2, 2/2 LC, 2/2 RC, k2, m1, k3, m1, k9. (40 sts) Row 7: K10, (2/2 LC, k4) x 2, 2/2 RC, k10. Row 9: K7, m1, k3, m1, k2, (2/2 LC, 2/2 RC) x 2, k2, m1, k3, m1, k7. (44 sts) Row 11: K8, 2/2 LC, k4, 2/2 RC, k4, 2/2 LC, k4, 2/2 RC, k8. Row 13: K10, 2/2 LC, 2/2 RC, k8, 2/2 LC, 2/2 RC, k10. Row 15: (K12, 2/2 RC) x 2, k12. Row 17: K10, 2/2 RC, 2/2 LC, k8, 2/2 RC, 2/2 LC, k10. Row 19: K8, 2/2 RC, k4, 2/2 LC, k4, 2/2 RC, k4, 2/2 LC, k8. Row 21: K5, k2tog, k3, k2tog, k2, (2/2 RC, 2/2 LC) x 2, k2, ssk, k3, ssk, k5. (40 sts) Row 23: K10, 2/2 RC, (k4, 2/2 LC) x 2, k10. Row 25: K7, k2tog, k3, k2tog, k2, 2/2 RC, 2/2 LC, k2, ssk, k3, ssk, k7. (36 sts) Row 27: K12, 2/2 RC, k4, 2/2 LC, k12. Row 29: K9, k2tog, k3, k2tog, k4, ssk, k3, ssk, k9. (32 sts)


