Roosimine Tutorial
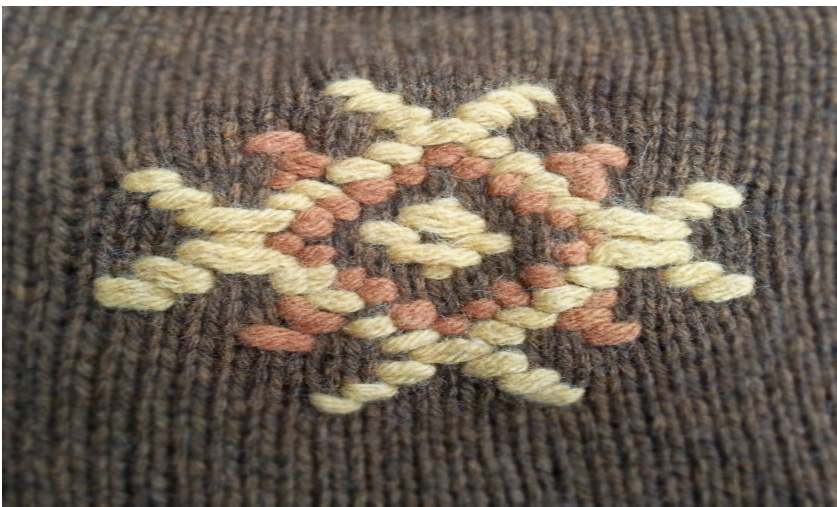
Renée Burton, December 2014 Roosimine, derived from the Estonian word for rose, is an in-lay technique for knitting used traditionally in mittens and socks. It creates an embroidered effect, but is done entirely during the knitting process. As such, it is particularly effective, as it stands out from the background stockinette stitch. For less experienced knitters, it provides a great way to add colour to their knitting without having to master elements necessary for stranded or intarsia colorwork, the two most well known types of knitting colorwork.
Introduction.
Estonia has a rich and diverse knitting history, like its neighbor, Latvia. Knitted items, such as socks, gloves, bags, and sweaters, played an important role in the lives of Estonians historically, and still do in many parts of the country. Like Latvia, Estonia has very regionalized knitting traditions, which includes local styles and colour choices. Estonians have committed to preserving this history, and the National Museum is an excellent source of knitted items. There is an online gallery with photographs of some wonderful historic pieces. The Estonians have a number of unique or uncommon techniques, including interesting cast ons, cast offs, decrease methods for items like mittens, and an array of braids. Their methods differ significantly from those of Latvia. The word roosimine refers to the technique described here, but a finished object using the technique would be called roositud. You might find gloves, for example, referred to as roositud gloves.
Key elements of roosimine:
· Contrasting yarn is “laid into" the knitted background, creating an embroidered effect, Traditionally a single strand of same-weight yarn was used, but holding the yarn double, or using a thicker weight yarn, produces a bolder inlay Designs are made up of horizontal stretches of the contrasting yarn, · Designs are charted, just as they would be for stranded knitting or intarsia, · Because the yarns are not interlocked in the same way as stranded knitting, you can often use colours that have less difference in value - less contrast - than might be necessary for a stranded design, · Can be worked flat or in the round, · Can be done in as many colours as you like, · Best done using small “"butterflies" of contrasting yarn, similar to how intarsia yarns are usually managed Often found on Estonian gloves or socks, but could be placed in a small section of any item where you'd like an unusual design. Hat patterns are available on Ravelry. Photographs of Estonian museum items can be used for inspiration
How to knit roosmine.
Roosimine creates an inlay by weaving a contrasting yarn over a knitted fabric in a background color. The trick is that the inlay is done as you knit along following a chart for the design. All of the knitting is done in the background color. The chart should be read as sections of knit stitches where the contrasting color lies in front of the knitted fabric. For example, if a chart shows three stitches in a contrasting color, the contrasting color will lie in front of the fabric for those three stitches. The chart always shows what the design should look like from the front side of the fabric. For those who prefer videos, there is one from Knitty about knitting Roosimine in the round. This is the link to the knitty video for the roosimine technique. Here's how to do roosimine: · Knit in the background colour until the stitch at which you want to begin the roosimine design. This would be indicated by your first contrasting color square on the chart. Using either one or two strands, lay the contrasting yarn between the stitch just completed and the next stitch to be worked so that a short tail of yarn lies to the back. This puts the working contrasting yarn in front of the fabric. · Knit the next stitch in the background color, making sure that the background yarn comes over the contrasting yarn so that it is locked into the fabric. Then, knit as many more stitches as required by the chart for that section of contrasting color. If the chart shows three stitches of contrasting color, you should have knit a total of three stitches after placing the contrasting color. · Bring the contrasting color to the back of the work. The contrasting yarn now looks like a horizontal line across your knit fabric. Knit the next stitch in the background color to lock it into place. ·Continue working across the first row of the chart, moving the contrasting yarn to the front and back of the work as required. One or more other yarns might also be incorporated. · Once the chart is complete, finish knitting to the end of the row or round. · If you are knitting flat, on the next row, you simply purl your stitches, moving the contrasting yarn back and forth again to match the chart. Make sure you read the chart in the opposite direction for purl rows. · If you are knitting in the round, there is a clever way to position the yarn for the next row of the chart. · Knit to the start of the next position for the contrasting yarn. Bring your contrasting yarn up over the top of the needle and in front Then bring it between the stitch just worked and the next on the working needle, so that the contrasting yarn hangs in front of the fabric in a large loop, with the working end of the yarn behind the fabric. Knit the next stitch in the background color, making sure to lock in the contrasting yarn. ·At this point, you have a big loop of contrasting yarn in front of the fabric which is locked into place. Knit as many more stitches as necessary for this section of the chart, then move the loop to the back of the work, so the contrasting yarn runs between the stitches. Again, knit in the background color to lock in the yarn. Continue along the chart row, moving the loop backwards and forwards as required, making sure to lock in the yarn with the background color at each color change. If at any point you need more yarn, gently pull to make your working loop larger. ·At the end of the chart row, your contrasting yarn will be in the back. Gently pull it to remove any extra slack and even out the stitches. Notice that the contrasting yarn is now in place to work the next row, and all odd rows, as you did row 1, moving the yarn back and forth. All even side rows are worked by first bringing a large loop to the front, and moving the loop back and forth. Tips. ·Always knit the background colour over the contrasting colour to lock in the yarn. If you fail to do this, you'll have to tink back. Unfortunately, this isn't an error that you can fix. You chart may have several colors. If you have a color change between two contrasting colors without an intermediary background stitch, notice that one color will lie above the over as horizontal lines. It's best to be consistent about which lies on top. · Checking your contrasting yarn tension that the end of each row. · Colors may be carried vertically up the wrong side of the fabric, depending on the pattern. · If your pattern calls for multiple contrasting colors, you might be manipulating two loops that cross each other in the back. This is normal. If you can, you might align the yarns before working the row in a way to minimize twisting on the backside. · The easiest way to work the contrasting colors it to create small butterfly bobbins, or use some other type of bobbins. Here is a video on how to create butterfly bobbins. You do not need very large amounts of yarn. · Try different contrasting yarn weights. In Estonia, they often work with a single strand of contrasting yarn, but you can hold the contrasting yarn double, or use a thicker yarn.


