MAUDIE
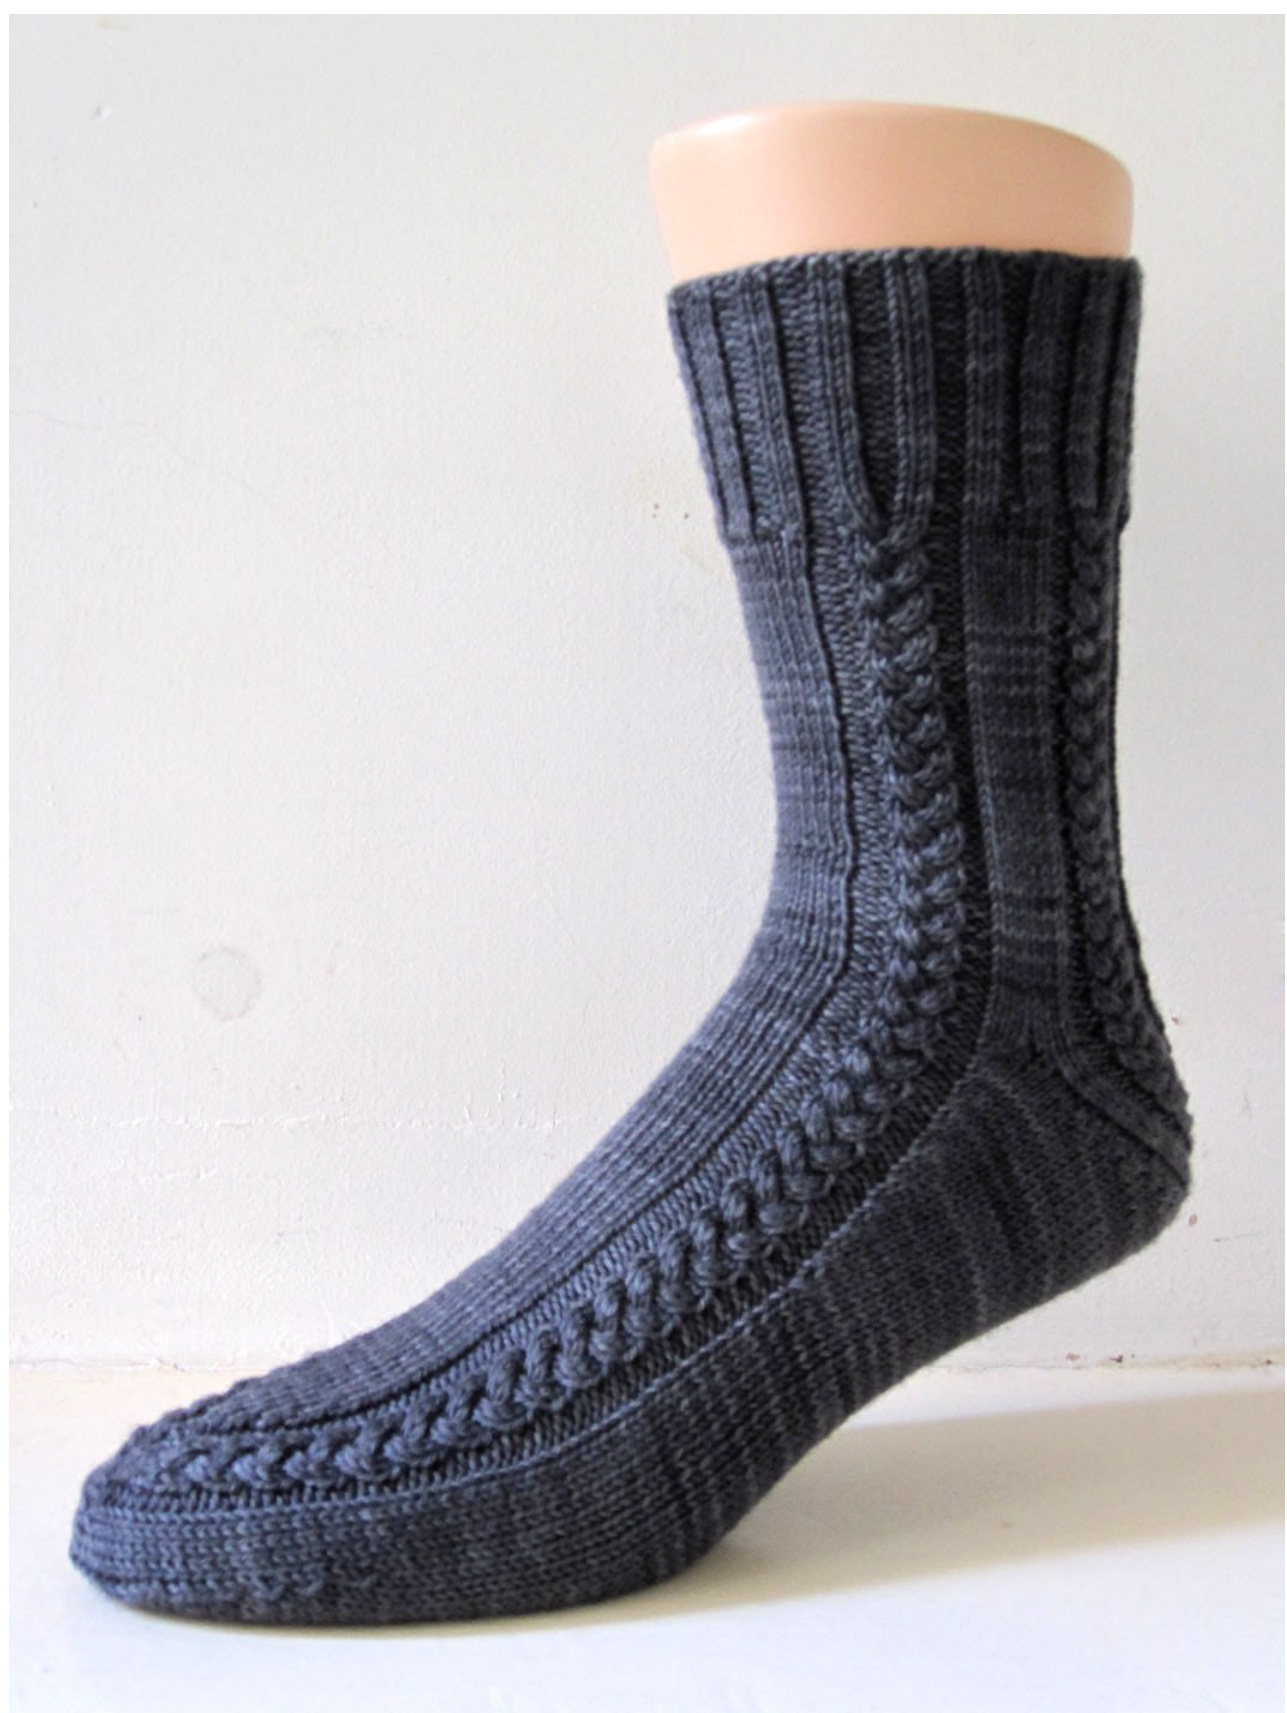
COPYRIGHT ? GENERAL HOGBUFFER 2012 "Miss Silver, having finished her tea, picked up a brightly flowered knitting-bag and extracted from it four needles from which depended about an inch of what was intended to be a child's jumper in a pleasing shade of blue. Her niece Ethel Burkett's little Josephine would be seven in a month's time, and the garment was part of the twin set which had been planned as a birthday gift. She could always knit and listen at the same time, her hands held low in her lap, the needles moving rhythmically and at great speed." Patricia Wentworth, Poison in the Pen, London 1957 This design is named after Miss Maud Silver, Patricia Wentworth's equally prolific detective and knitter, and it was my April 2012 entry in the SKA 2012 Sockdown, themed "literary Inspiration"
Size:
Due to the complexity of the chart, only one size is charted. It would be possible to add or subtract some of the plain knitted sts to achieve a different size, but this would have to be factored into the decreases for the heel and the toe, and it would also alter the balance of the design, so I would not recommend it. If you need to adapt the fit, try going a needle size up or down. As a general rule, this sock is designed to fit people who would wear a plain sock with 64 sts circumference.
Material:
100 g Sock wool in 4 ply / fingering weight should be enough for most pairs of socks. I used just a shade over that, but mine were made in a size 42 (UK 9). If you are making them for a man, maybe err on the side of caution and get 150 g.
Needle size:
2.5 mm or size needed to get the right dimensions. You will need 2 circulars, which I will call needle 1 and needle 2. If you prefer to work on DPNs, divide the sts for needle 1 equally onto your needle 1 and 2, and the sts for needle 2 onto your needle 3 and 4.
Further requirements:
A cable needle if you are not comfortable cabling without a needle, although I would urge you to give it a try. The simplicity of the pattern would be perfect for learning a new technique, and it speeds things up considerably.
Cuff:
Using your favourite cast-on method cast on80 sts and close to a round, taking care not to twist thecast-on. Work K2, P2 rib for as many rounds as you would like your cuff to be, I did 24 rounds for my sample. In the next row, decrease and shift sts as follows: Needle1: K12, [K2tog, k2] 3 times, K2tog, K13, take the last remaining st onto Needle2 Needle2: K13, [K2tog, k2] 3 times, K2tog, K13, take the last remaining st onto Needle 1 (72 sts, 36 per needle)
Leg:
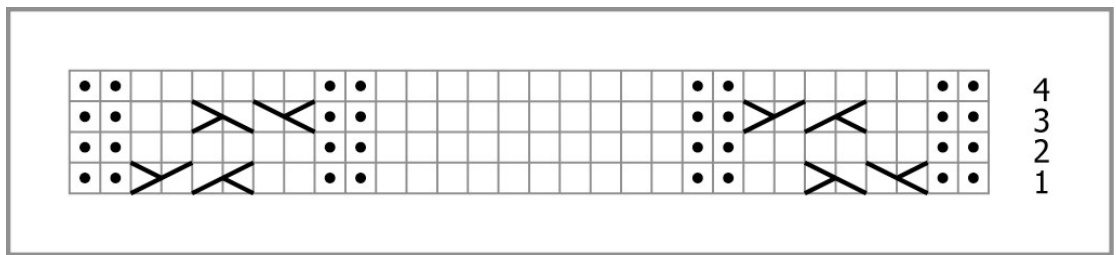
Needle1: K3, work chart, K3. repeat on Needle2 Continue working this way, repeating the 4 rows of the cable chart, until you have reached your desired leg length, ending with a row 4 of the chart.
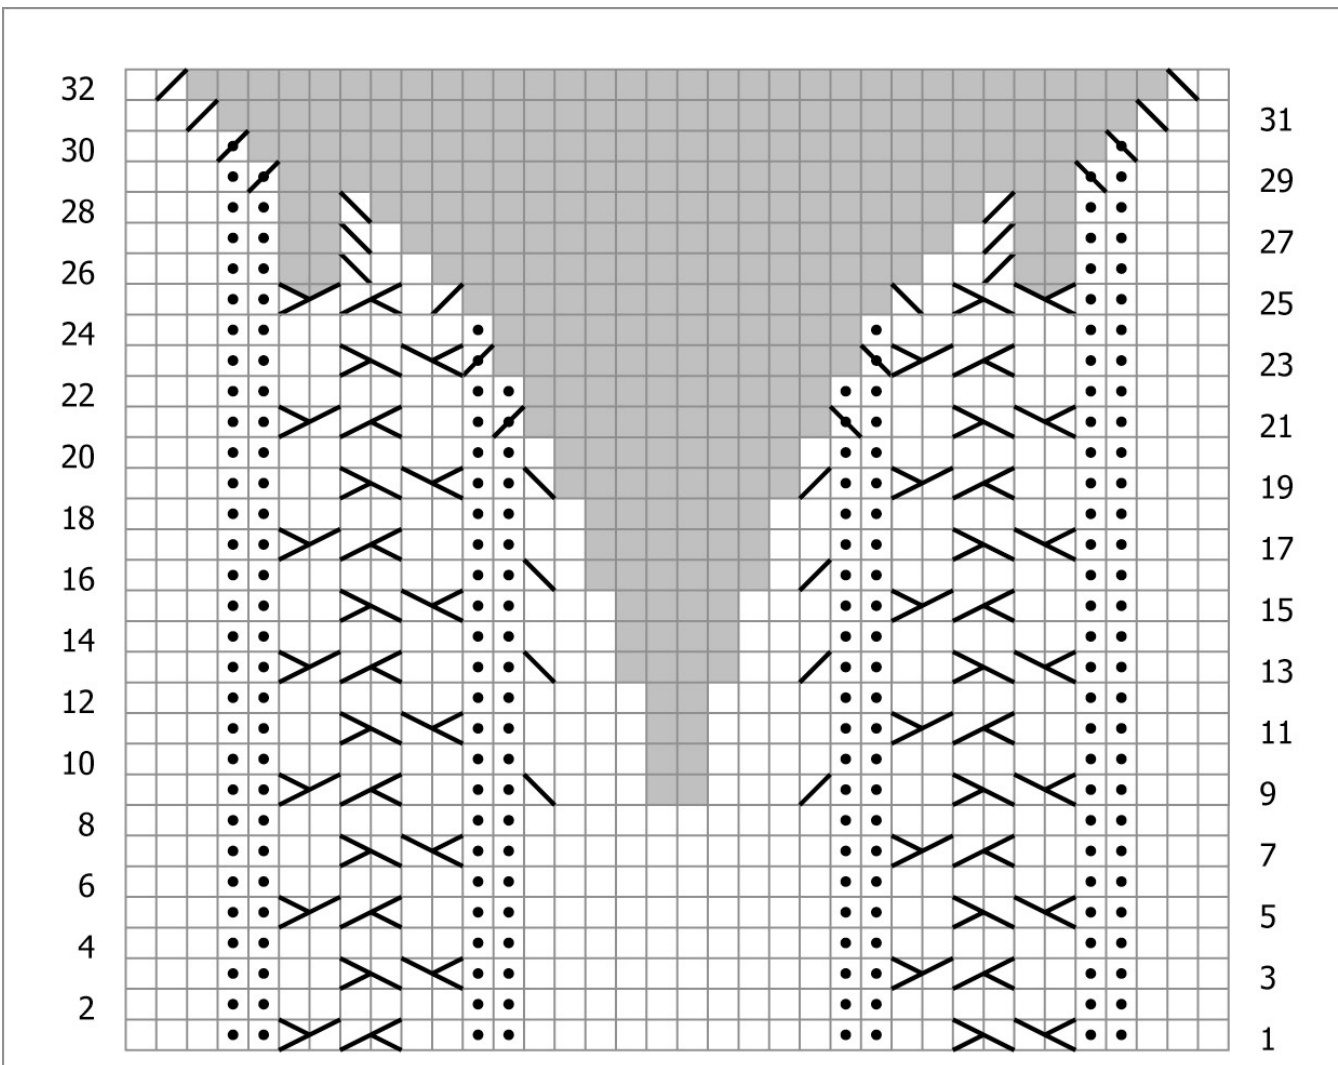
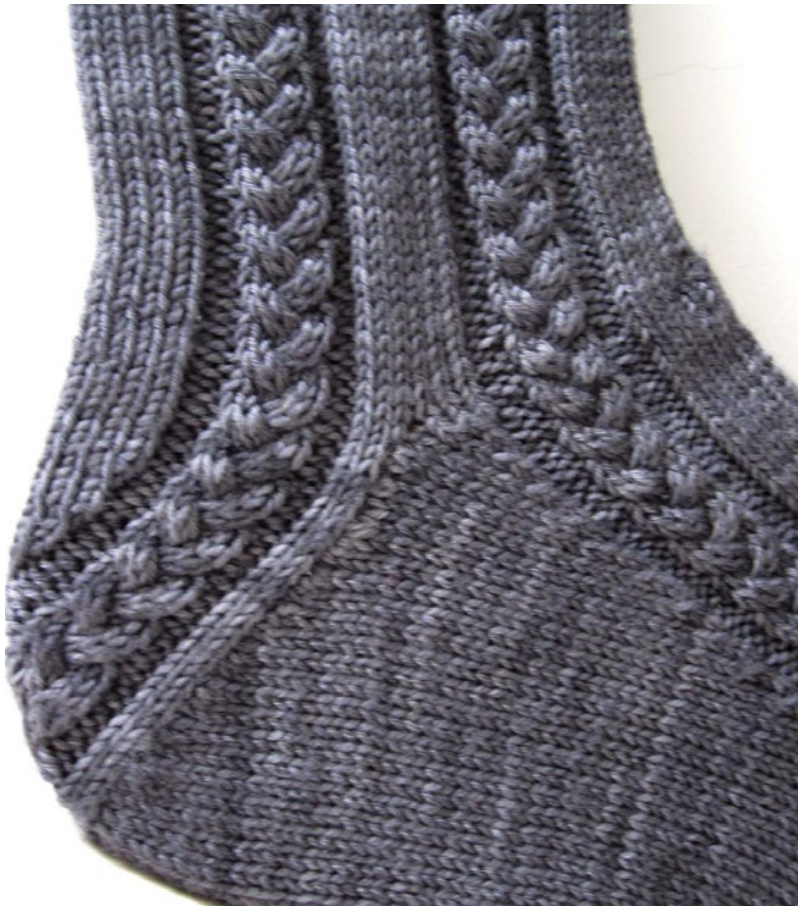
Heel:
There are two main differences to the heel construction, compared what you may be used to from a normal flap + gusset heel: the flap itself is shaped, and you will be picking up the gusset sts before you turn the heel, not after. Work the 32 rows of the heel chart over needle 1 only, resting the sts on needle 2. resist the temptation to slip the first st on each row as normal - you will be picking up a st for each round later, and slipped sts o the edge will make this near impossible. After finishing row 32 on the wrong side, you will be left with 4 sts. Turn and slip the first two sts on a spare DPN or stitch holder. With needle 1, K the two sts on your needle, and then pick up and K one stitch into each of the edge sts, omitting the very top and the very bottom st. (2 sts + 30 sts picked up = 32 sts) M1 in the gap between the heel and the instep sts. Still with needle1, work over half of the sts parked on needle 2, following row 1 of the cable chart and stopping after 5 K sts in the centre of the chart. With needle2, work the remainder of the sts on the needle according to the chart, M1 in the gap before the heel sts. Pick up and K one stitch into each of the edge sts, again omitting the very top and the very bottom st, for a total of 30 picked up sts. K the 2 sts parked on the holder. (102 sts in total, 51 per needle) I have found I got the cleanest result by picking up just one side of the sts, but feel free to experiment and see what you prefer. Turn the heel as follows: Row1:K9, turn Row2: sl1, P17, turn (you will be working across the divide between the needles during the whole of the heel turn.) Row3: sl1, K to 1 st before gap, SSK, K2, turn Row4: sl1, P to 1 st before gap, P2tog, P2, turn Repeat rows 3 and 4 for a further 5 times. The last row you worked should be: SI1, P41, turn Next row, sl1, K20. this should bring you back to the divide between Needle 1 and 2, and the start of your rounds. Next round, K to 1 st before gap, SSK, continue working across the instep until you reach 1 st before the gap o the other side, K2 tog, k to end of round. (88 sts, 44 on each needle)
Gusset:
Round 1: K until 2 sts before the first P st of the chart, K2 tog. Work pattern according to chart, SSK, K to end. Round 2+3: K to beginning of chart, work chart as set, K to end. Work these 3 rounds for a total of 10 times, until you have a total of 68 sts on your needles, 34 on each needle.
Foot:
Keep working the foot straight, i.e. K to beginning of chart, work chart as set, K to end, until you have about 2 inches / 5 cm less than your total required foot length. Make sure you end with row 4 of the cable chart.
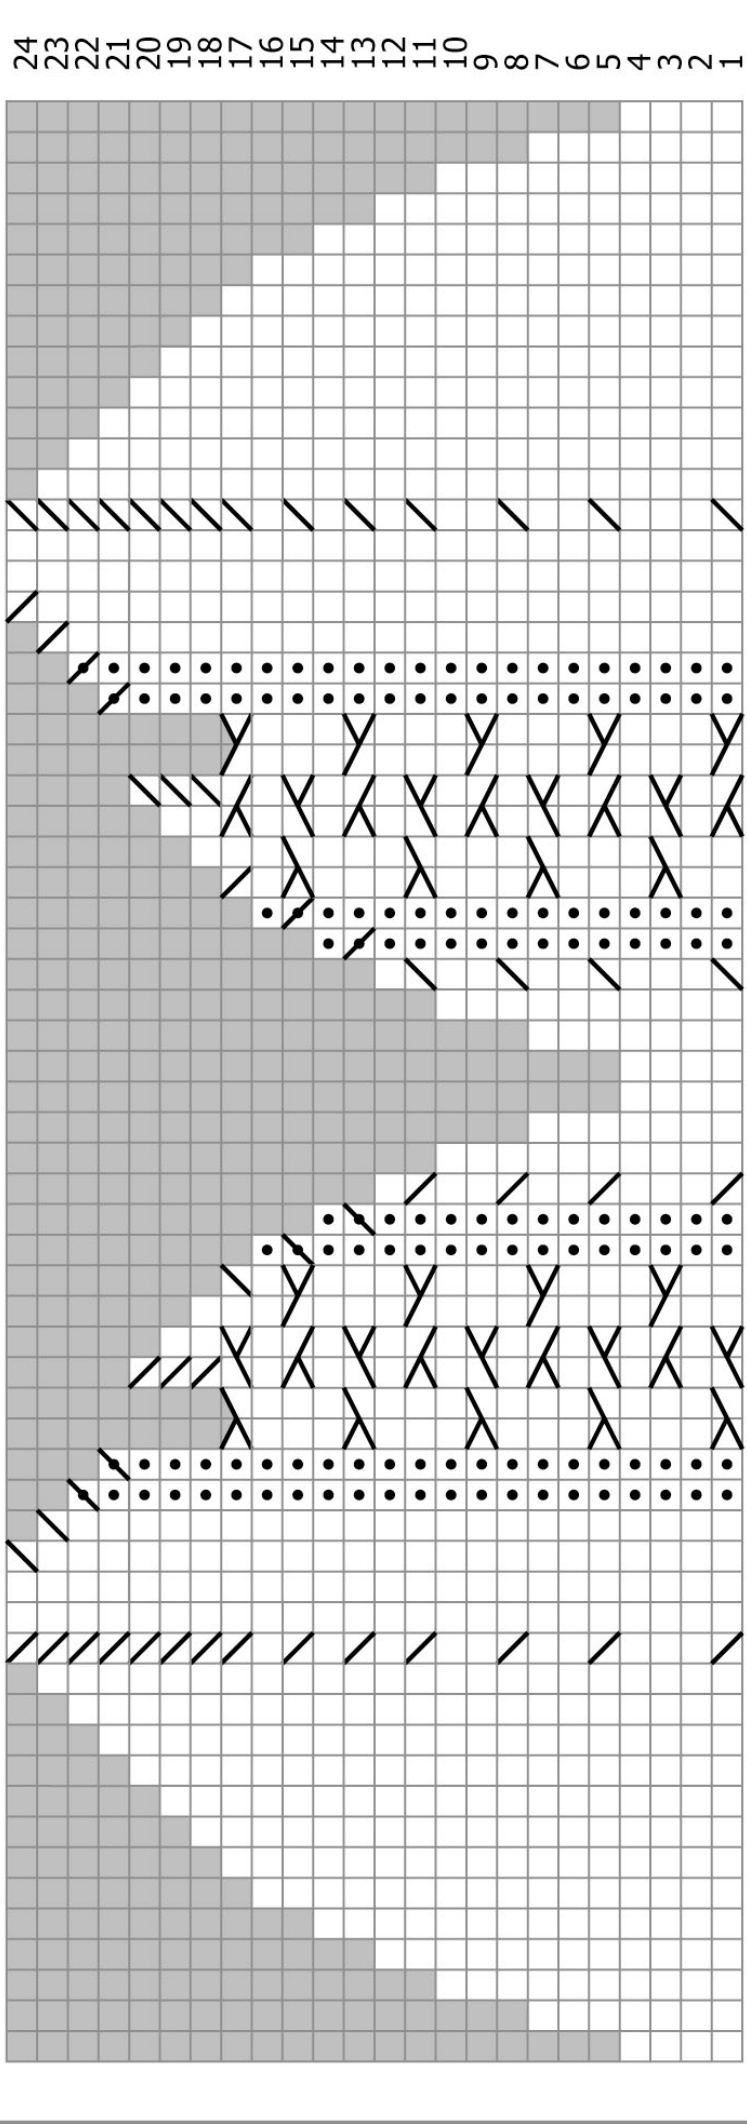
Toe:
Follow the toe chart to decrease the toe, ending with 4 sts. You will in effect be working a classic banded toe on the sole portion of the sts, and the same shape you already worked for the heel on the top of the foot. Cut yarn, leaving about 10 inches / 25 cms and graft the toe closed. Turn sock inside out and darn in all loosethreads. Work a second sock if you must..
Further options:
Since the heel and toe charts are essential to the design, for once, you should not substitute your favourite heel and toe variants, sorry. If you have slim calves or need the extra tightness, only cast on 72 sts and omit the decrease round after the cuff.
Glossary:
DPN double-pointed needles St, sts stitch, stitches Kknit Ppurl SI slip (purlwise unless otherwise stated) K2tog knit 2 stitches together SSK slip, slip, knit. Slip 2 stitches separately as if to knit, insert left needle into these two stitches from the right and knit onto right needle. P2tog purl 2 stitches together
Pattern for personal use only, Copyright @ General Hogbuffer 2012
Glossary of symbols used:
knit on right side, purl on wrong side

purl on right side, knit on wrong side no stitch

knit 2 tog on right side, purl 2 tog on wrong side

slip, slip, knit on right side, purl, purl, purl 2 tog tbl on wrong side

purl, purl, purl 2 tog tbl on right side, slip, slip, knit on wrong side

purl 2 tog on right side, knit 2 tog on wrong side
C2B: put next 2 sts onto a cable needle and hold at the back of work. K2, K2 from cable needle, or cable without a cable needle.
C2F: put next 2 sts onto a cable needle and hold at the front of work. K2, K2 from cable needle, or cable without a cable needle.
Cable decrease right: put next 2 sts on cable needle, hold to back of work, [K 1 st from main needle tog with 1 st from cable needle] twice
Cable decrease left: put next 2 sts on cable needle, hold to front of work, [K 1 st from cable needle tog with 1 st from main needle] twice
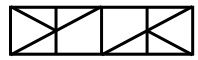
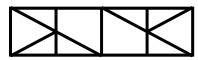
MAIN CABLE CHART
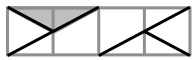
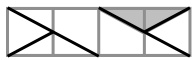
HEEL CHART