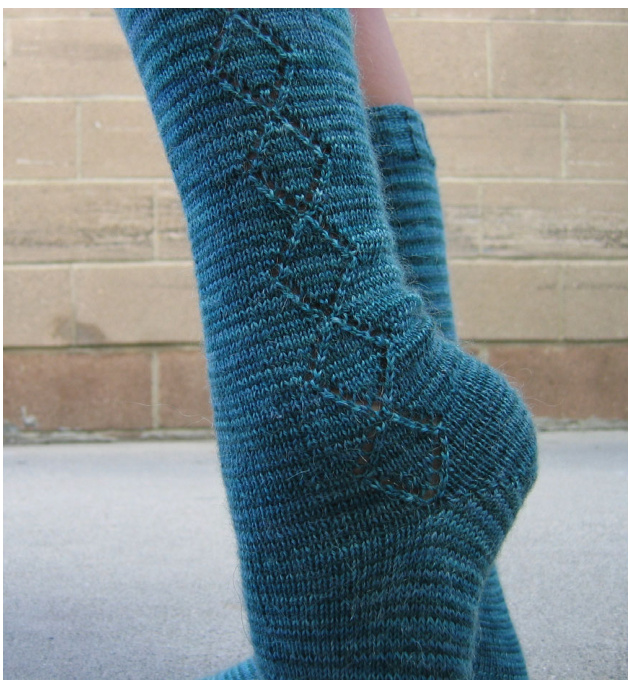
Anne Diamond Knee Socks by Star Athena
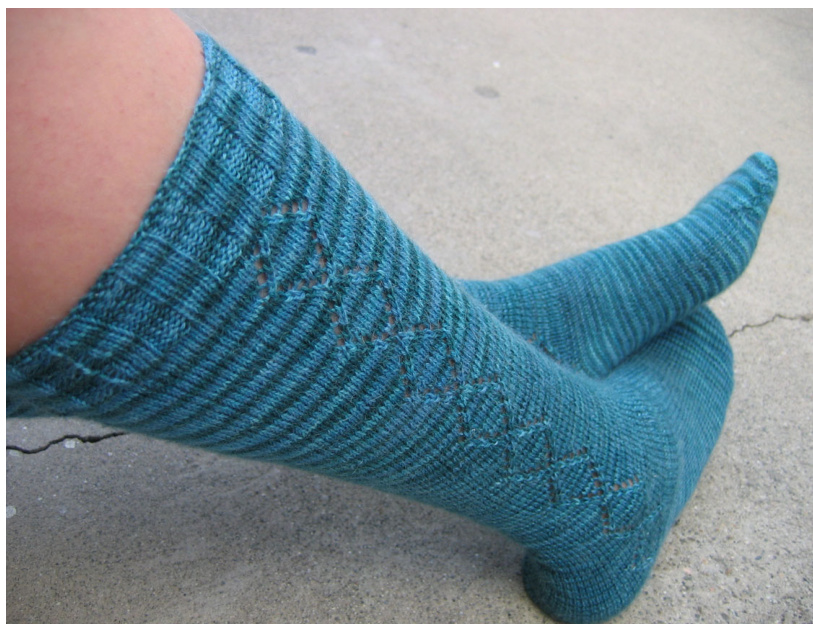
Size S [M, L] (Shown in size M) Foot circumference: 7.5 [8.0, 8.5] inches (19 [20, 21.5] cm) Calf circumference: 10 [12, 14] inches (25.5 [30.5, 35.5] cm) Take the time to measure your foot and calf! Yarn: Schaefer Yarn Anne $60\%$ Merino wool Superwash, $25\%$ Mohair, $15\%$ Nylon; 560 yards [512 m] / 40z [113 g]), 1 (1, 2) skeins. (Or any light fingering yarn) Needles: 1 set of size US 1 $(2.25\,\mathsf{m m})$ double pointed needles, or size to get gauge. Gauge: 36 sts / 50 rows $=4^{\circ}$ in St st. NOTEs: This pattern is worked from the toe up, using a provisional cast on, short row heel, diamond-shaped lace up both sides of the leg, and a sewn bind Off This pattern uses standard abbreviations, including w&t: W&T: Wrap and turn. On a knit row, bring yarn to the front of work as if to purl, slip next stitch from left needle to right needle, bring yarn to the back to work as. if to knit, slip stitch back to left needle. Turn. On a purl row, bring yarn to back of work as if to knit, slip next stitch from left needle to right needle, bring yarn to the front of work as if to purl, slip stitch back to left needle. Turn. Diamond Lace Pattern: (20 rows) Row 2: (and all even rows) K. Row 3: K6 [7, 7] k2tog, yo, k1, yo, ssk, k6 [6, 7]. Row 5: K5 [6, 6] k2tog, yo, k3, yo, ssk, k5 [5, 6]. Row 7: K4 [5, 5] k2tog, yo, k5, yo, ssk, k4 [4, 5]. Row 9: K3 [4, 4] k2tog, yo, k7, yo, ssk, k3 [3, 4]. Row 11: K3 [4, 4] yo, ssk, k7, k2tog, yo, k3 [3, 4]. Row 13: K4 [5, 5] yo, ssk, k5, k2tog, yo, k4 [4, 5]. Row 15: K5 [6, 6] yo, ssk, k3, k2tog, yo, k5 [5, 6]. Row 17: K6 [7, 7] yo, ssk, k1, k2tog, yo, k6 [6, 7]. Row 19: K7 [8, 8] yo, ssk, k8 [8, 9]. Row 20: K.
Start toe:
CO 34 [36, 38] sts using provisional cast on. Purl back across stitches. Row 1: K33 [35, 37] w&t. Row 2: P32 [34, 36] w&t. Row 3: K31 [33, 35] w&t. Row 4: P30 [32, 34] w&t.
Continue as established, ending after P14 [16, 18] row. The toe is half finished. Turn toe: Row 1: K14 [16, 18]. Pick up the wrap around the next stitch and knit it together through the back loop with the stitch it is wrapped around, w&t. Row 2: P15 [17, 19]. Pick up the wrap around the next stitch and purl it together with the stitch it is wrapped around, w&t. Row 3: K16 [18, 20]. Pick up both wraps around the next stitch and knit them together through the back loop with the stitch they are wrapped around, w&t. Row 4: P17 [19, 21]. Pick up both wraps around the next stitch and purl them together with the stitch they are wrapped around, w&t. Continue as established, until you have worked all 34 [36, 38] stitches. Pick up the 34 [36, 38] stitches remaining from your provisional cast on and place a marker to indicate the end of a row. Divide the 68 [72, 76] stitches evenly onto 4 needles: two needles for the top of the foot, two for the bottom.
Work foot:
Knit every round until you reach 2" (5cm) from the back of the heel, slipping the marker each time you come to it, or place a coil-less safety pin to your sock to indicate where the end of the row is, to avoid having to slip a marker every round.
Start heel:
Heel is worked back and forth over two needles. Leave the top of foot sts on your needles as they are for now or you can transfer the sts to waste yarn if you prefer to keep these needles out of your way. Row 1: (RS) K33 [35, 37] w&t. Row 2: (WS) P32 [34, 36] w&t. Continue as established, ending after P14 [16, 18] row. The heel is half finished.
Turn heel:
Row 1: K14 [16, 18]. Pick up the wrap around the next stitch and knit it together through the back loop with the stitch it is wrapped around, w&t. Row 2: P15 [17, 19]. Pick up the wrap around the next stitch and purl it together with the stitch it is wrapped around, w&t. Row 3: K16 [18, 20]. Pick up both wraps around the next stitch and knit them together through the back loop with the stitch they are wrapped around, w&t. Row 4: P17 [19, 21]. Pick up both wraps around the next stitch and purl them together with the stitch they are wrapped around, w&t. Continue as established, until you have worked all 34 [36, 38] stitches. You are now ready to start knitting in the round again. If you have put the top of foot stitches onto waste yarn, put them back onto the needles. In order to more easily knit the diamond lace up the sides of the socks, you will need to re-divide the needles in the next section. Knit across top of foot (needles 3&4) back to the start of the next round, the start of the heel. Knit one round. You are now ready to set up the new needle locations as follows: Round 1: K8 [9, 10] sl next 9sts onto needle 2. K17 [18, 19] sl next 9sts onto n3. K17 [18, 19], sl next 9 sts onto n4. K17 [18, 19] sl next 9 sts onto n1. K9, pm, k8 [9, 10]. The marker is to indicate the end of the row. You may find it easier to place a coil-less safety pin into the stitch on the row below this point to avoid having to slip the marker on every round. Round 2: Knit across the 17 [18, 19] stitches on the new needle 1. Work First row of diamond pattern on n2, k17 [18, 19] sts on n3, work first row of diamond pattern on n4.
Work leg:
Continue up the leg, knitting all the sts on n1 & n3, working the diamond lace pattern on n2 & n4.
Start calf shaping:
Approx 6 inches from the floor up the leg is a good place to start calf shaping. 1 like to start on row 4 of the fourth diamond for the small size, row 20 of the third diamond for the medium size, and row 4 of the third diamond for the large size. You will want to think about the shape of your leg and make adjustments as necessary, starting your increases earlier or later if you have shorter or longer legs, or narrower or wider calves. Try the sock on often to insure a good fit. The directions included are for a semi-snug fit on the calf, so the socks stay in place. The increases are worked as follows: Inc Round: Knit to the center of n1. (back of leg) Insert right needle into stitch just below the stitch you just knitted into and knit into that stitch also, M1. (2 increases made) You now have 70 [74, 78] stitches total, with the 2 increased sts in the center of n1. Continue in diamond pattern, working an increase row every 4 rows. If you started on Row 4 or 20, your increases will happen on rows 4, 8, 12, 16 and 20. Continue as established until you have worked 10 [16, 22] increase rows, for a total of 88 [104, 120] sts. Then work the pattern even until desired length. Socks shown have 8 diamonds, you may want a taller or shorter sock. NOTE: You may find managing all of the increases on n1 to be difficult after a while. You can slide some of these stitches onto n2 and n4 for ease, but you'll probably want to place a marker first, so you can be sure to continue following the diamond lace pattern without getting confused by the extra sts. http://keeponknittinginthefreeworld.blogspot.com/
Ribbing:
Next Round: [K4, p4] to end. Repeat this round 18 times more. BO using an elastic, stretchy bind off method of your choice. I prefer the sewn bind off as follows: Break yarn, leaving a tail that is four times longer than your bind off edge. Thread yarn tail onto a tapestry needle. \*Sew needle through the first two sts on kniting needle purl-wise, then sew through the first st on knitting needle knit-wise. Drop the first st off the knitting needle. Repeat from \* until all sts are bound off. Finishing: Weave in ends. Block if desired. This design is for personal, non commercial use only. If you wish to share the pattern please don't distribute, instead, direct people to my site, or to the Schaefer Yarn site, so they can buy their own copy. Thank you! Email: starina@hotmail.com


