Sarah's Fall Hat
Materials
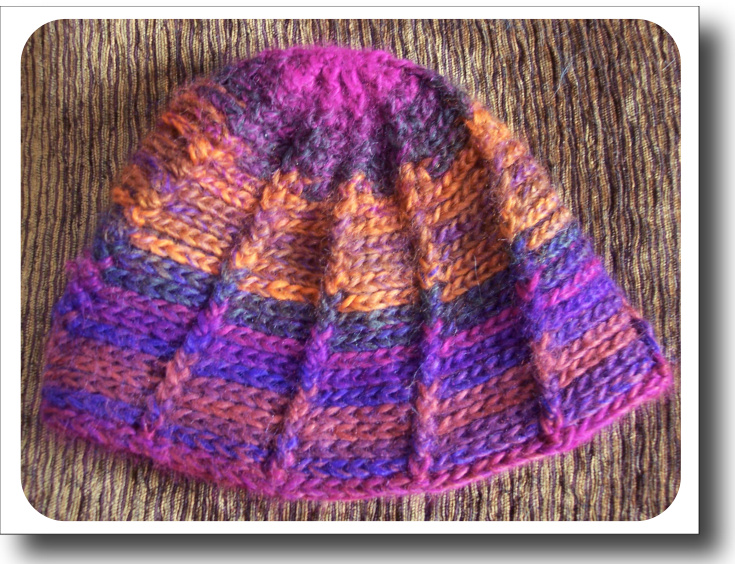
. Worsted weight yarn > 2 balls of Classic Shades in Tropics or 2 balls Plymouth Yarn's Encore Worsted or Encore Colorspun Worsted or 1 ball Loops & Threads Impeccable Solids or 2 balls Impeccable Ombre · US H/5.00 mm hook
Terminology
This pattern is written in US crochet terms. If you want UK terminology, please comment! I am more than happy to convert the pattern for you.
magic adjustable loop:
Wrap the yarn around two fingers twice, creating a loop. To crochet in the loop, you want to insert the hook from the side where the tail end of the loop hangs to the other side where your working yarn hangs. Pull through one loop and proceed with pattern's instructions. ch....chain. dc...... double crochet sl st.... slip stitch. fpds...front post double crochet bpdc...back post double crochet bphdc.... back post half double crochet
Notes
I only used 1 ball of Classic Shades and avoided breaking into the second ball by making a very very very short brim. That being said, I highly suggest 2 balls of Classic Shades in case you need to make your hat longer or wider.
Instructions
Start: Create magic adjustable loop. Ch 2. 10 dc in loop. S1 St in first dc made. Ch 2 never counts as a stitch. R1: Ch 2. Fpdc around dc you sl st into AND ch 2 in "Start" round below. Dc in same dc. fpdc and dc in each dc around. Sl st in top of first fpdc made. 10 fpdc & 10 dc made. 20 sts total. R2: Ch 2. Fpdc around first fpdc AND ch 2 made in previous round. Dc in same fpdc you just fpdc around. Bpdc next dc. \*fpdc and dc in next fpdc; bpdc next dc\* repeat from \* to \* around. Join with sl st in top of first fpdc made. 10 fpdc, 10 dc, & 10 bpdc made. 30 sts total. R3: Ch 2. Fpdc around first fpdc AND ch 2 made in previous round. Dc in same fpdc you just fpdc around. Bpdc next 2 sts. \*fpdc and dc next fpdc; bpdc next 2 sts\* repeat from \* to \* around. Join with sl st in top of first fpdc made. 10 fpdc, 10 dc, & 20 bpdc made. 40 sts total. R4: Ch 2. Fpdc around first fpdc AND ch 2 made in previous round. Dc in same fpdc you just fpdc around. Bpdc next 3 sts. \*fpdc and dc in next fpdc; bpdc next 3 sts\* repeat from \* to \* around. Join with sl st in top of first fpdc made. 10 fpdc, 10 dc, & 30 bpdc made. 50 sts total. R5: Ch 2. Fpdc around first fpdc AND ch 2 made in previous round. Dc in same fpdc you just fpdc around. Bpdc next 4 sts. \*fpdc and dc in next fpdc; bpdc next 4 sts\* repeat from \* to \* around. Join with sl st in top of first fpdc made. 10 fpdc, 10 dc, & 40 bpdc made. 60 sts total. R6: Ch 2. Fpdc around first fpdc AND ch 2 made in previous round. Dc in same fpdc you just fpdc around. Bpdc next 5 sts. \*fpdc and dc in next fpdc; bpdc next 5 sts\* repeat from \* to \* around. Join with sl st in top of first fpdc made. 10 fpdc, 10 dc, & 50 bpdc made. 70 sts total. R7: Ch 2. Fpdc around first fpdc AND ch 2 made in previous round. Bpdc next 6 sts. \*fpdc in fpdc; bpdc next 6 sts\* repeat from \* to \* around. Join with sl st in top of first fpdc made. 10 fpdc & 60 bpdc made. 70 sts total. R8: Ch 2. Fpdc around first fpdc AND ch 2 made in previous round. Bpdc around next 6 bpdc. \*Fpdc next fpdc. Bpdc next 6 bpdc\* repeat from \* to \* around. Join with sl st in top of first fpdc made. 70 sts total each round. Repeat R8 until desired length -- I suggest periodically trying the hat on to decide if it's long enough and to placate your worries about the hat being too small. Keep in mind that back post double crochet curls inward (as in, towards the inside of your hat.) This results in the hat looking smaller than it actually is. But Don't Panic! The fabric is quite stretchy and will expand to contain your enormous cranium made huge by your awesome intellect. To Finish: Ch 1. Bphdc around fpdc AND ch 2 in round below. Bphdc around each st. Sl st into first bphdc. 70 bphdc made. 70 sts total.
Congratulations! You're Done!
The inspiration for making this pattern came from a picture of Totally Tam from the Crochet! Magazine. I saw the picture online but didn't want to track down a copy of Crochet! to buy to make the hat. Mine's not nearly as awesome --- it lacks flop. Please check out the Totally Tam pattern in Crochet! Magazines' current issue. If you liked this beanie you may also like the Tam which has a floppy design and a nifty little brim. It's really a fabulous hat.


