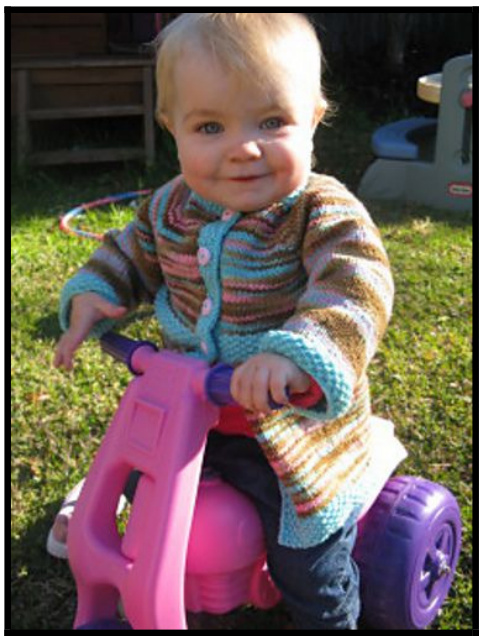
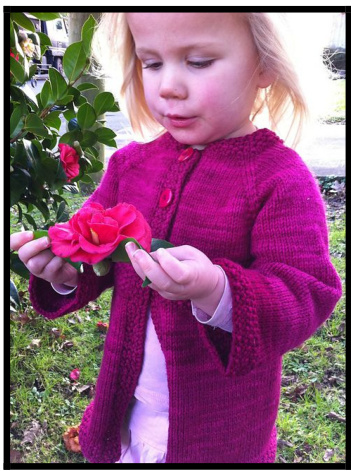
Brooklynn Jacket by Rachel Evans
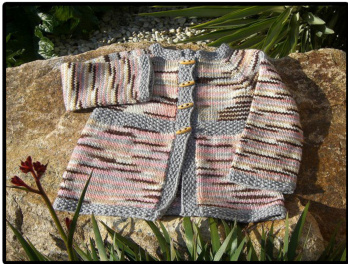

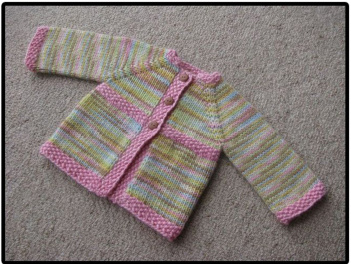
The Brooklynn Jacket is a very simple, yet stylish coat designed to highlight those gorgeous variegated yarns that we all have in our stash waiting for that perfect pattern. It is a totally seamless, top-down pattern and a very quick and easy knit. An essential addition to a small girl's winter wardrobe.

Worsted Version
Size nb(3m, 6m, 9m, 12m,18m, 24m)[3y, 4y, 5y, 6y]
To fit chest size of: 15(16,17,18,19,20,21) [22,23,24, 25] inches 38(40.5, 43, 46, 48.5,51,53.5) [56, 58.5, 61,63.5] cm Positive ease has been written into the pattern. Make sure you choose the size that is equivalent to the chest size of the child rather than age. You can add extra length if required.
Yarn Requirements
10ply/worsted weight yarn - main colour and contrast colour. Some suggested yarns O100purewool 3ply OFamily Roots willow merino Aran BFL OLollytree Kona Worsted pproximate yardage required: Main colour - 200/185(250/230, 275/255,300/275,350/320,400/365, 450/415) [500/460, 550/505, 600/550, 680/625] yards/meters. Contrast colour - 100/95(100/95, 100/95,120/110, 130/120,140/130, 150/140) [170/155,170/155, 190/175, 200/185] yards/meters.
Gauge/Tension
20st/10cm (5st/1") Gauge is very important so please make sure you have correct gauge before starting. Adjust your needle size if necessary.
You will need
4.5mm circular needle (or size to achieve correct gauge) 80 cm and 30cm. 4 stitch markers. waste yarn. buttons. (a minimum of 3 for sizes 3- 9m and min of 4 for sizes 12m - 6y )
Abbreviations
MC- Main colour yarn CC - Contrast colour yarn k- knit p- purl pm - place marker kfb - Knit front and back. Knit into the front of the stitch, then into the back of the same stitch. pbf - Purl into the back of the stitch then into the front of the same stitch. sm - slip marker. RS - right side. WS - wrong side. yo- yarn over. k2tog - Knit two stitches together. p2tog - purl two stitches together. ssk - slip 1 stitch knitwise, slip the next stitch knitwise, put left needle through the front of both stitches (from the left) and knit them together. Backwards loop cast on -- http://www.knittinghelp.com/video/play/backwa rd-loop-cast-on

Start Knitting!
Using CC, Cast 0n 36(40, 44,48, 50, 52,58) [62,64,64, 70] stitches. Row A (ws) - \*k1, p1; repeat from \* to end of row. Row B - \*p1, k1; repeat from \* to end of row. For sizes nb, 3m & 6m - repeat rows A & B once more. (4 moss stitch rows) For sizes 9m, 12m, 18m, 24m, 3y, 4y - repeat rows A & B twice more. (6 moss stitch rows) For sizes 5y, 6y - repeat rows A & B three times more .(8 moss stitch rows) For sizes nb, 3m & 6m only - Knit row C in moss stitch (k1, p1) pattern in the CC placing markers when indicated on the chart below. All other sizes - Change to main yarn. Row C- Purl across placing markers as indicated on the chartbelow:
| Size | |||||
| nb | 5 | 6 | 14 | 6 | 5 |
| 3m | pm | pm 6 | pm 16 | pm 6 | 6 |
| 6 pm | pm | pm | |||
| 6m | 7 | 6 | 18 | pm 6 | 7 |
| 9m | pm | pm | pm | pm | |
| 7 | 8 | 18 | 8 | 7 | |
| 12m | pm 8 | pm 8 | pm 18 | pm 8 | 8 |
| 18m | pm | pm | pm | ||
| pm 8 | 8 | 20 | 8 | 8 | |
| pm | pm | pm | pm | ||
| 24m | 9 | 9 | 22 | 9 | 9 |
| pm | pm | pm | pm | ||
| 3y | 10 | 9 | 24 | 9 | 10 |
| pm | |||||
| 4y | pm | pm | pm | ||
| 11 | 9 | 24 | 9 | 11 | |
| 5y | pm | pm | pm | pm | |
| 11 | 9 | 24 | 9 | 11 | |
| pm | pm | pm | pm | ||
| 12 | 10 | 26 | 10 | 12 | |
| 6y | |||||
| pm | pm | pm | pm |
(sizes nb, 3m & 6m - you will change to main colournow) Row D (lncrease row) - \*Knit to 2 stitches before marker, kfb, k1, sm, kfb; repeat from \* to the end of the row. (8 stitches increased) Row E- purl. Repeat rows D & E 12(13, 13,14,15,16, 16) [16, 17, 18, 18] more times for a total of 13(14,14,15,16,17,17)[17,18,19,19] times. Final stitch count will be:
| Size | Total | |||||
| Nb | 18 m | 32 m | 40 m | 32 m | 18 | 140 |
| 3m | 20 m | 34 m | 44 m | 34 m | 20 | 152 |
| 6m | 21 m | 34 m | 46 | 34 m | 21 | 156 |
| 9m | 22 m | 38 m | m 48 | 38 | 22 | 168 |
| 12m | 24 m | 40 m | m 50 | m 40 m | 24 | 178 |
| 18m | 25 m | 42 m | m 54 | 42 | 25 | 188 |
| 24m | 26 m | 43 m | m 56 | m 43 | 26 | 194 |
| 3y | 27 m | 43 m | m 58 m | m 43 m | 27 | 198 |
| 4y | 29 m | 45 m | 60 m | 45 m | 29 | 208 |
| 5y | 30 m | 47 m | 62 m | 47 m | 30 | 216 |
| 6y | 31 m | 48 m | 64 m | 48 m | 31 | 222 |
Dividing for sleeves
Row F (for sizes nb, 3m, 6m & 9m) -Knit to 2 stitches before first marker, kfb, k1, remove marker and place all the stitches between here and the 2nd marker onto waste yarn, remove marker, kfb, pulling yarn tight. Knit across the back to 2 stitches before the 3rd marker, kfb, k1, remove marker and place all the stitches between here and the 4th marker onto waste yarn, kfb, pulling yarn tight. Knit to end of row. Row F (for sizes 12m, 18m, 24m, 3y, 4y, 5y, 6y) - Knit to 2 stitches before first marker, kfb, k1, remove marker and place all stitches between here and the 2nd marker onto waste yarn, remove marker. Using backwards loop, cast on 2 stitches, kfb, pulling yarn tight. Knit across the back to 2 stitches before the 3rd marker, kfb, k1, remove marker and place all stitches between here and the 4th marker onto waste yarn, remove marker. Using backwards loop, cast on 2 stitches, kfb, pulling yarn tight. Knit to end of row. You will now have 80(88, 92, 96, 106, 112, 116) [120, 126, 130, 134] stitches Row G - Purl, pulling yarn tight at the underarm joins. Row H- Knit Row I- Purl Sizes nb, 3m & 6m - Continue onto Contrast band Sizes 9m, 12m, 18m, 24m - Repeat row H & 1 1 more time Sizes 3y, 4y, 5y - Repeat row H & I2 more times Sizes 6y - Repeat row H & I 3 more times
Contrast Band
Row 1 (RS) Change to CC and knit across. Row 2 - \*k1, pl; repeat from \* to end of row. Row 3 - \*p1, k1; repeat from \* to end of row. Sizes nb, 3m, 6m, 9m - Repeat rows 2 & 3, 2 more times, then row 2 once. (7 rows of moss stitch) Sizes 12m, 18m, 24m, 3y, 4y, 5y, 6y -Repeat rows 2 & 3, 3 more times, then row 2 once. (9 rows of moss stitch) Contrast band is finished.
Change to main colour and knit across
Row J - \*Purl 6, pbf; repeat from \* to the last 6 stitches. (this may not work out evenly, that's ok) Purl 6 stitches. Row K - knit across. Row L - purl across. Continue in stocking stitch (repeating row K & L) until length measures (from the shoulder): 10(11,12,13,13.5,14,15) [16, 17,18,19] inches 25.5(28, 30.5,33,34.5,35.5,38) [40.5,43, 45.5, 48.5] cm Finish with a purl row.
Hem
(RS) Change to CC and knit a row. Row M- \*k1, p1; repeat from \* till end of row. Repeat row M 6(6, 6, 6, 6, 6, 6) [6, 6, 6, 8] more times. (Note - if you have an even number of stitches, your second row will start with p1 rather than k1 ) Cast off in pattern. When you have one stitch remaining on your right needle, turn your work and start picking up stitches up the right edge of the jacket. Pick up and knit 2 stitches out of every 3 rows between the jacket bottom edge and the bottom of the neckline. As you do this, place a stitch marker at the bottom of where you want the last button to go. Worsted version You can decide how many buttons you want to use. I recommend at least 4 buttons between the neckline and contrast band for the sizes 12m -6y and 3 buttons for the smaller sizes. If you only want buttons in the top half of the jacket, then put the stitch marker at the bottom of the contrast band.
Edging
Row 1 (Ws) - \*k1, p1; repeat from \* to end of row. Row 2 - p1, k1; repeat from \* to end of row (nb - it will depend how many stitches you have as to whether row 2 starts with a k1 or a p1. If you have an even number of stitches, the row will start with a p1 and if you have and odd number it will startwithak1) Row 3 (WS) - buttonhole row. - (Refer to the worksheet at the end of the pattern to work out where the button holes will go). k1, p2tog, yo, \*moss stitch (c)stitches, p2tog^, yo, repeat from \* until there are (b) stitches before the stitch marker. Continue in the moss stitch pattern to the end of the row, removing the marker as you come to it. (^ you will have to 'read' the moss stitch when doing the purl or knit 2 together before the yo. If the stitch before the yo is a k2tog, then you will yo, k1. If the stitch before is a p2tog, you will yo, p1.) Row 4 - repeat row 2. Row 5 - repeat row 1. Row 6 - repeat row 2. Cast off in pattern. (WS)
Edging for opposite side
With right side facing and starting near the top of the jacket where the contrast collar joins the main colour, pick up and knit 2 stitches out of every 3 rows, ending at the bottom of the jacket. Row 1 (Ws) - \*k1, p1; repeat from \* to end of row. Row 2 - P1, k1; repeat from \* to end of row (nb - it will depend how many stitches you have as to whether row 2 starts with a k1 or a p1. If you have an even number of stitches, the row will start with a p1 and if you have and odd number it will start with ak1) Repeat rows 1 & 2 2 more times. (6 rows of moss stitch in total) Cast off in pattern.
Sleeves
Using 30cm 4.5mm needle, place one set of stitches from waste yarn onto needle. Join yarn and pick up and knit 1(1,1, 1, 2, 2, 2) [2, 2, 2, 2] stitches under the arm, place marker, pick up another 2(2,2, 2, 3, 3,3) [3, 3, 3, 3] stitches. Knit a round. Sizes 12m, 18m, 24m, 3y, 4y, 5y, 6y only - Knit 2, k2tog, knit around until 3 stitches remain, ssk, knit to marker. Total sleeve stitches 35(37, 37, 41, 43, 45, 46) [46, 48, 50, 51]. All sizes - Knit in the round until the sleeve measures: 5.5(6, 6.25,6.5,7,7.5,8) [9,10, 10.5, 11] inches 14(15, 16, 16.5, 18,19, 20.5) [23, 25.5, 26.5, 28] cm from the underarm.
Change to CC.
Round 1
For sizes 24m, 3y, 4y, 5y - Knit until 2 stitches before the stitch marker, k2tog All other sizes - Knit a round. Round2 - \*k1, p1; repeat from \* to end of round. Round 3- \*p1, k1; repeat from \* to end of round cast offinpattern. Repeat rounds 2 & 3 2 more times then row 2 once. (7 moss stitch rows in total) Cast off in pattern.
Repeat for second sleeve.
Weave in ends, block and sew buttons on.
I want to say a very VERY special thank you to my wonderful testers. Thank you so much Kathryn, Kath, Margaret, Natalya, Ali, Anna, Fiona, Sarah, Lisa, Elena, Shelley, Margaret, Jo, Cathy, Casey, Jacquie, Julia, Christine and Fiona. Also a big thank you to Georgie, my tech editor and Paula who designed the front page.
Worksheet to work out buttonhole placement.
1. Count the stitches between the neckline and the marker - 2. Subtract 3 from that number of stitches - 3. Divide the remaining stitches by one less than the number of buttonholes you want (a) remainder (b). 4. Subtract 2 from (a) - (c). 5. k1, p2tog, yo, \*moss stitch __(c) stitches, p2tog^, yo, repeat from \* until there are (b) stitches before the stitch marker. Continue in the moss stitch pattern to the end of the row, removing the marker as you come to it. (^ You will have to 'read' the moss stitch when doing the purl or knit 2 together before the yo. If the stitch before the yo is a k2tog, then you willyo, k1. If the stitch before is a p2tog, you will yo,p1.)
Example
I have 29 stitches between the top of the edging and the bottom of the contrast band. I want 4 buttons. 1. = 29 2. 29 -3 = 26 3. 26 / 3 = 8 remainder 2, therefore (a) = 8, (b) = 2 4. 8 minus 2 = 6, therefore (c) = 6 So I will k1, p2tog, yo, \*moss stitch _6 (c) stitches, p2tog, yo, repeat from \* until there are 2 (b) stitches before the stitch marker. Continue in the moss stitch pattern to the end of the row, removing the marker as I come to it.


