Simply Harika
Stranded Hat and Mittens by Renee Burton 8/28/13 Table of Contents. This table of contents will allow navigation within the Google doc version of the pattern. Within the pdf version, it will only provide information about the structure of the document. Introduction. Yarn and Gauge. Needles. Sizing. Iable 1. Final Dimensions, excluding ribbing. using Sport Weight Chart. Table 2. Final Dimensions, excluding ribbing. using fingering weight chart. Skills. Optional Cast On and Ribbings. How to make a Latvian braid. Reading the chart. Hat Construction Overview. Concise Instructions. Instructions. References and Credits. Chart 1. Sport Weight Hat. All-On-One-Page instructions. Chart 2. Fingering Weight Hat. All-On-One-Page Instructions. Chart 3. Fingering Weight Hat, Option 2. All-on-One-Page instructions. Making Mlttens. Chart 4. Fingering Weight Mittens, ribbed cuff, two options. All-On-One-Page Instructions. Chart 5. Fingering Wt Mittens, stranded cuff. All-On-One Page instructions. Chart 6. Fingering Wt. Mitten, stranded cuff, option 2. All-on-One-Page.
Introduction.
This is one of three hats, and matching mittens, designed for the local knitting guild using a common theme. This hat uses stranded knitting techniques and a standard hat construction to produce a hat with three motifs that cover the hat. Optionally, you can incorporate different types of ribbing and two-colour Latvian braids to add something special. This pattern assumes knowledge of stranded knitting, though there are no floats longer than six stitches to worry about, so the design is accessible for those with limited colorwork experience. The hat construction is described later in this document. Taking into consideration the variations presented here, there are six fingering weight and three sport weight hat patterns enclosed. The design and instructions are for a sport weight yarn at 26-27st/4" (10cm), or for fingering weight yarn at a gauge of 30-32st/4in (10cm) to create an adult medium hat. A small change in gauge will produce a youth large hat, so check your gauge to ensure you are producing the hat you want! If using fingering weight yarn, you might want to knit six panels instead of five; testers for this pattern tried both five and six panels, and were all happy with their results. There are two fingering weight charts. As a third option, if you want to highlight the complete burdock pattern that is on the sides of the two charts, you can instead skip rows 11-22 and start knitting at row 23. Then, when you reach row 35, begin again at row 10. Note that you can mix and match the border, just make sure your stitch count is correct before you move from the border to the main motif. This gives you a total of six different hats in fingering weight. If you alter the panels across your hat, using three panels of one chart and two of the other, you'll have even more options. Have fun and experiment! For sport weight variation, you can swap the main motif from the fingering weight option 2. Additionally, you could alternate panels with a different main motif. This gives you at least three distinct hats to knit in sport weight. Also included are a tutorial for making mittens, including customizing mitten fit, and multiple mitten charts.
Yarn and Gauge.
You will need two or more colours of sport weight or fingering weight yarn depending on gauge and the size of hat you are making. All gauge is measured across the stranded motif. Mittens take approximately 80% of the yarn required for a hat. For the sport weight hats, approximately 100 yards of each colour was used by testers, and approximately 120-130 yards of each colour was used in the fingering weight hats. Here are the standard size options andgauges: Adult Medium, sport weight hat, stranded gauge of 25-26st/4 in (10cm), using five chart panels. Youth Large/Adult Small, fingering weight hat, stranded gauge of 32-33st/4 in (10cm) using six charts panels. Youth large, sport weight hat, stranded gauge of 27-28st/4 in (10cm), using five chart panels. Adult medium, fingering weight hat, stranded gauge of 30-31st/4 in (10cm) using six chart panels. Youth large, fingering weight, stranded gauge of 28-29st/4 in (10cm) using five chart panels. My own test in fingering weight used about 100 yards of each of two colours, however, your yardage will vary with yarn and gauge. You can create other sizes by adjusting your gauge.
Needles.
Circular needles of size 3.5mm/US4 (for sport weight), 3mm/US2.5 (for fingering), or size necessary to obtain gauge based on your hat or mitten sizes. A second needle of one size smaller is recommended for the ribbing.
Sizing.
We provide options for creating a youth large (20-21" head) or an adult medium (22.5" head), but you can create other sizes by adjusting your gauge. The sport weight design for an adult medium uses a stitch gauge of 25-26st/4 in (10cm),and a gauge of 27-28st/4in for a youth large. The fingering weight design uses a gauge of 30-12st/4in (10cm), measured over the stranded motif, for the adult medium, and 28-29st/4 in for the youth large. These fingering weight gauges assume the use of six copies of the chart panel. If you instead have a gauge of 27-28st/4 in, you can create a youth large using only five copies of the panel. The gauge for stranded knitting is generally prety square, so your row gauge is likely to be similar to your stitch gauge. As you proceed, it will be recommended to check the row gauge to determine whether your decreases should vary from the chart. Typical measurements for an adult medium hat are 20-20.5" circumference by 8.75" height. Beanie style hats are much shorter, often around 7-7.5" in height, and are fitted to the head with no extra material at the top. For custom fit, use a negative ease of 10% as a rule of thumb for hats. For a shorter hat, remove the ribbing. For a beanie, in the fingering weight hat, you may also want to remove the border. For a longer, slouchy style hat, you will want to aim for 9.5-10.5" in height. Several testers preferred the slouchy style, and to achieve that with sport weight, add a border to the bottom borrowed from the fingering weight charts. You can always start your decreases later, as well to add length. If your hat is knitting up too short or too long, you can easily adjust the height by adding or subtracting rows in the crown motif before you being your decreases. This section of the chart has a row repeat of 12 rows. To add length, note that rows 30 and 42 are the same because of the repeat, and you can simply add rows to the chart by replicating any number of rows in that repeat before starting the chart at row 30. For example, if you wanted to add five rows to your chart, knit chart rows 37-41, without any decreases, and then continue the chart at row 30. The tables below give some example stitch gauges (across the top) and paired row gauges (in the columns), with the final hat dimensions to expect. Reference to a standard hat size is made, the number of panels required, and the amount of ribbing required to make a standard height hat. Since knitting stretches, you may find that a smaller hat fits your needs fine. These size labels assume a standard 10% negative ease. These tables exclude ribbing. You can judge how much ribbing or additional stranded area you will need using the chart link above. Table 1. Final Dimensions, excluding ribbing, using Sport Weight Chart. Dimensions are given as circumference by height. Gauge and size across top. All use 5 panels.
| stranded Gauge (rows x stitches) | 24st/4' (L) | 25st/4" (M) | 26st/4" (S) | 27st/4" (YL,5 panels) |
| 25 rows/4' | 21.7"x8.3" | 20.8"x8.3" | 20"x 8.3" | 19.25"× 8.3" |
| 27 rows/4' | 21.7"×7.7” | 20.8"x 7.7' | 20"x 7.7” | 19.25"x7.7" |
| 29 rows/4' | 21.7"×7.3" | 20.8"x7.3" | 20"x7.3" | 19.25"×7.3" |
Table 2. Final Dimensions, excluding ribbing, using fingering weight chart. Dimensions are given as circumference by height. Gauge, size, and # of panels across top.
| stranded gauge (rows x stitches) | 30st/4" (YS, 5 panels) | 30st/4" (M, 6 panels) | 32st/4" (YL, 6 panels) | 28st/4" (L, 6 panels) |
| 30rows/4 | 17.3"x8.25' | 20.8"x8.25 | 19.5"x8.25' | 22.2"x8.25” |
| 32rows/4' | 17.3"x7.88' | 20.8"x7.88” | 19.5"x7.88' | 22.2"×7.88” |
| 34rows/4' | 17.3"×7.4" | 20.8"×7.4" | 19.5"x7.4" | 22.2"×7.4" |
Skills.
This pattern uses stranded knitting in the round, and it assumes the knitter has experience with colorwork and knitting from charts. Optional Cast On and Ribbings. · Two-Colour cast on. Just to add a little spice to your edge. There are several options to choose from. All of these cast ons are described in Cast On. Bind Off : 211 Ways to Begin and End your Knitting. Here are a few: O Two colour long-tail cast on (shown as alternating colours, but you can choose Three (or multi) Colour Cast On (this can be done with two colours) Braided Edge (this is shown as the edge, but it can be placed anywhere) Another Braided Edge video, and a written blog description O The Estonian Kihnu Cast On is a two-colour braided cast on that creates a lovely rounded braid on the edge. It take a bit of practice to get the tension correct, but produces a lovely result. This cast on tends to roll up a bit. I found that if you follow it with a purl row, you can counteract the roll. A second Estonian braided cast on which uses only one needle is described in this video. · Corrugated ribbing, which can be done either with traditional one-round techniques or with the two-round mosaic technique. Both are described in this linked video. It is recommended that if you are working corrugated ribbing for the first time, do so in the largerneedle. Traveling Eastern European Ribbing. This ribbing is seen in the documentary Latvian mitten book, Latviesa Cimdi. I understand it is also used in other parts of Eastern Europe. It can be done in one colour, or in stripes. The ribbing, like corrugated ribbing, is not very functional - it does not have much stretch, but it is very decorative. The original instructions I have are these: CO a multiple of six stitches, knit one foundational row. Work {P2tog, k2, yo, k2} repeatedly in the round. Worked this way, you would have traveling lace holes, but the photos do not show this, so I work the yo through the back loop when I encounter it on the next round. When you switch colours, first knit a row in the new colour before returning to the ribbing pattern. The original instructions are a bit fiddly to work for me. I have found it easier to use instead {P2tog, k2, m1, k2}, where m1 is a twisted loop over the needle. · Latvian or Estonian Braids. These are three-round braids found in Latvian and other ethnic knitting. There are a few variations of these braids, and you can also find them listed as Estonian braids. Latvian Braid A blog description of the Latvian Braid Nancy Bush's book on Estonian knitting, Folk Mittens, contains multiple variations of braids and braided cast-on methods used in Estonia. The Vikkel braid is different than the Latvian Braid, but with similar appearance. How to make a Latvian braid. · The Latvian braid is done over three rounds: a set up round, and two rounds that create the braid. Sometimes in Latvian mitten charts the set up round will be missing and the braid will be shown over two round. The set up round, however, is required. For the set up round, alternately knit one stitch in each of your two colours, A and B. It's helpful to pull several feet (or a meter) of yarn from each balls to have loose for the making of the braid. After every purl stitch, draw these strands out to push the twist you've added in the yarn far away from the needles. If you don't, the working yarns will become very short and hard to work. On the next round, purl one stitch in colour A with both yarns in front. Bring the colour B yarn under colour A and purl one stitch in colour B. Then, bring colour A under colour B and purl one stitch. Repeat across the round, always bringing the next colour under the previous, keeping the yarns in front. At the end of the round, your yarns will appear quite tangled, but have no fear and move onto the next round. · On the third round, you will alternate purl stitches, except bringing each colour over the previous colour. Again, keep your yarns in front. This will create the braid and untangle youryarns. · As a variation, you can pass the yarns over in the second round and under in the third round.Thiswillreversethedirectionofthebraid. round. This will reverse the direction of the braid.
Reading the chart.
Read the chart from bottom to top, in the direction that you knit. The black and white blocks are knit stitches in the background and contrasting colour, respectively. The grey blocks indicates areas with no stitches. At the top of the panel chart, the grey indicates shaping. The border motifs, used in the fingering weight charts, often have a different repeat than the main sections. Only the border is shown in that section of the chart, and the grey area fills out to the width of the chart for ease of reading.
Hat Construction Overview.
This hat is based on a standard construction which utilizes a set of identical panels. Each panel is given as a chart, which is knit from bottom to top in the direction you knit. An individual panel chart looks like this:

The entire hat construction looks like this:
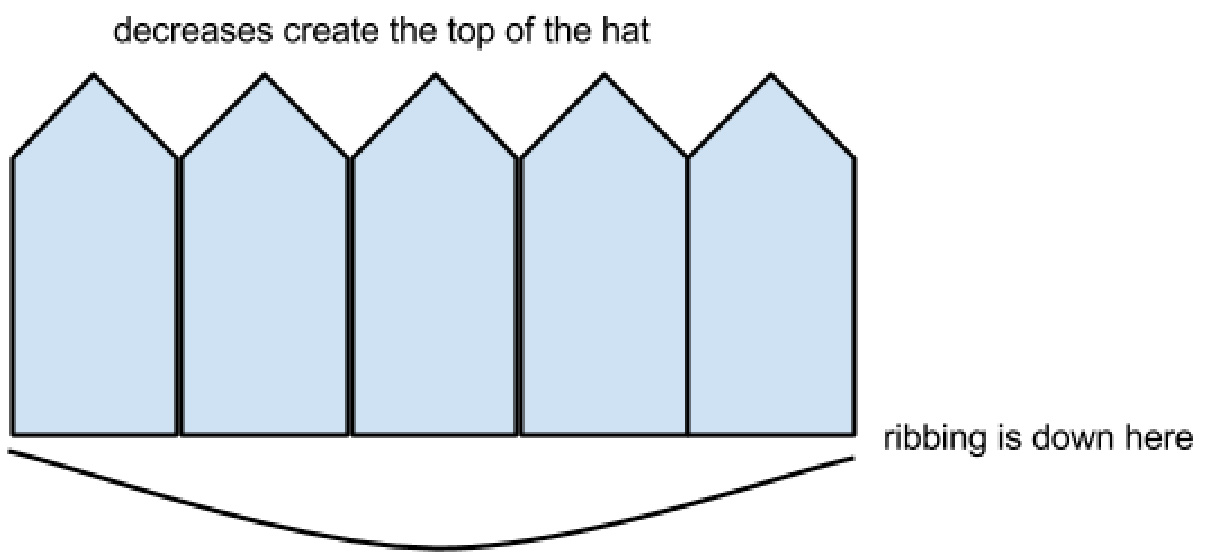
The first and last stitches are joined in the round For the overall construction, you will cast on a certain number of stitches, join in the round and knit the ribbing. Then, you will put stitch markers n stitches apart, where n is the width of your chart. This will give you several (generally patterns use five) copies of the panel in your hat. You'll knit the same chart for each panel. When you reach the decrease section, you'll decrease each section between stitch markers. Eventually this will bring you down to a handful of stitches equaling the number of panels you are using. You'll run a thread through those stitches and close up the hole. All done. :)
Concise Instructions.
· For sport weight, or five-panel fingering weight, cast on 130 stitches. For six-panel fingering weight, cast on 156 stitches. If you choose to use the second option for the fingering weight, you will cast on 128 (156) stitches for k2p2 or corrugated ribbing, or the nearest multiple for your ribbing choice. Optionally, knit 1" (2.5cm) of ribbing. For the second option, modify the stitch count to a multiple of 14 by dec 2 (2), or whatever is appropriate for your ribbing. I highly recommend using a Latvian braid to separate the ribbing from the stranded knitting. ·For the fingering weight version, knit border. For a shorter hat, you can omit the border. For the fingering weight versions, adjust your stitch count according to the chart before beginning the main motif. Check your row gauge after several inches to determine whether to follow the decreases as charted. You may want to begin your decreases earlier. Decrease according to the chart. Notice that the first decrease is asymmetric. Decrease until one stitch per panel remains. Break yarn, thread a tapestry needle, and run the yarn through these remaining stitches. Pull tight.
Instructions.
I have not provided detailed instructions for Option 2 of the fingering weight chart. You can follow these instructions, though, and replace the counts given on the Option 2 chart as you go along. Ribbing. For the sport weight version, or if you are using only five panels in the fingering weight version, cast on 130 stitches with the smaller needles, and join in the round. If you are knitting six panels of the fingering weight chart, cast on 156 stitches. Optionally, knit 1 inch (2.5 cm) of ribbing. You can use a standard k2p2 ribbing, however, corrugated ribbing is an attractive, if less functional, alternative. If you choose corrugated ribbing, you should use a two-colour cast on. I have also included instructions for a decorative traveling rib. Other options include the use of a two-colour braid cast on, which will produce a lovely braided edge, or a two-colour long tail cast on, which will produce a nice accent along the bottom edge. For a shorter hat, you can omit the ribbing and begin with a braided cast on, or similar, edge. When you finish the ribbing, I highly recommend using a Latvian Braid to separate the ribbing from the stranded work. For the fingering weight option, this braid is included as rows 1-3 of the chart. The braid is not included in the sport weight chart. Border. (Fingering weight chart only) Switch to your main needles. Knit the border motif in two colours. The border is five rows with a repeat of six stitches, though twelve stitches are shown in the chart. Setting up for the chart, if using 5 panels. Decrease two stitches evenly across the first full-width row of the chart. 130 stitches. You are knitting five copies of the chart as panels, as described in the overview. Optional Latvian Braids for Fingering Weight Chart. Rows 9-11 and 37-39 are set up for optiona/ latvian braids. If you choose not to use the braid, just knit according to the chart. The latvian braid requires three rounds - the set up round to place alternating stitches, and then two rounds for the braid itself.Instructions for the Latvian braid are found earlier in this document. Incorporating the third braid will cause the hat to have a more upright, pillbox shape, as it creates a fold in the fabric. Decreasing for the crown. After you have knit several inches of the stranded pattern, you should measure your row gauge. Then use that to calculate how tall the hat will be if you continue according to the chart. The two charts are based on relatively square knitting gauge in stranded work, and based on your own gauge, you might want to begin your increases earlier or later. If you are following the chart, decrease according to the grey outline. Left side decreases should be right leaning decreases, and right side decreases should be left leaning. It is best to put your decreases in one stitch from the edge of the panel. Finishing Off. When five stitches remain, break the yarn. thread the yarn through a tapestry needle and bring through all the stitches. Pull tight to finish off.
References and Credits.
This was ultimately a collaborative design with the Ravelry community. Knitters from around the world volunteered to test knit, tech edit, and contribute to improving the design. I am very grateful for their time and help. If you enjoy knitting this hat, credit is largely due to this group who made the pattern possible. Many thanks to my test knitters. The large double hooked motif in this design, as well as the crown motif, is found in Fancy Feet by Anna Zilboorg. This is a wonderful collection of Turkish motifs found in sock patterns. I modified the large hooked motif, which she calls Eibistan, for the side motifs of each panel. These small changes make it knit up similar to what Zilboorg calls the Turkish apple. The design she terms the apple is used to represent burdock in Turkish carpets and wheat bags. The burdock is a very sticky seed, which is believed to ward of the Evil Eye. Also, according to reference literature, “like a burdock" means “full of flowers", and the burdock symbol is often found on Turkish wheat bags. Variations of the burdock motif are also found in Latvian and Russian colorwork, though they take on different meaning in those cultural crafts. Harika (pron. HA-ree-KAH) is Turkish for beautiful, hence the name Simply Harika. These wonderful charts were made with the free colour chart making tool on www.tricksyknitter.com. Thank you for sharing this tool with the knitting community.
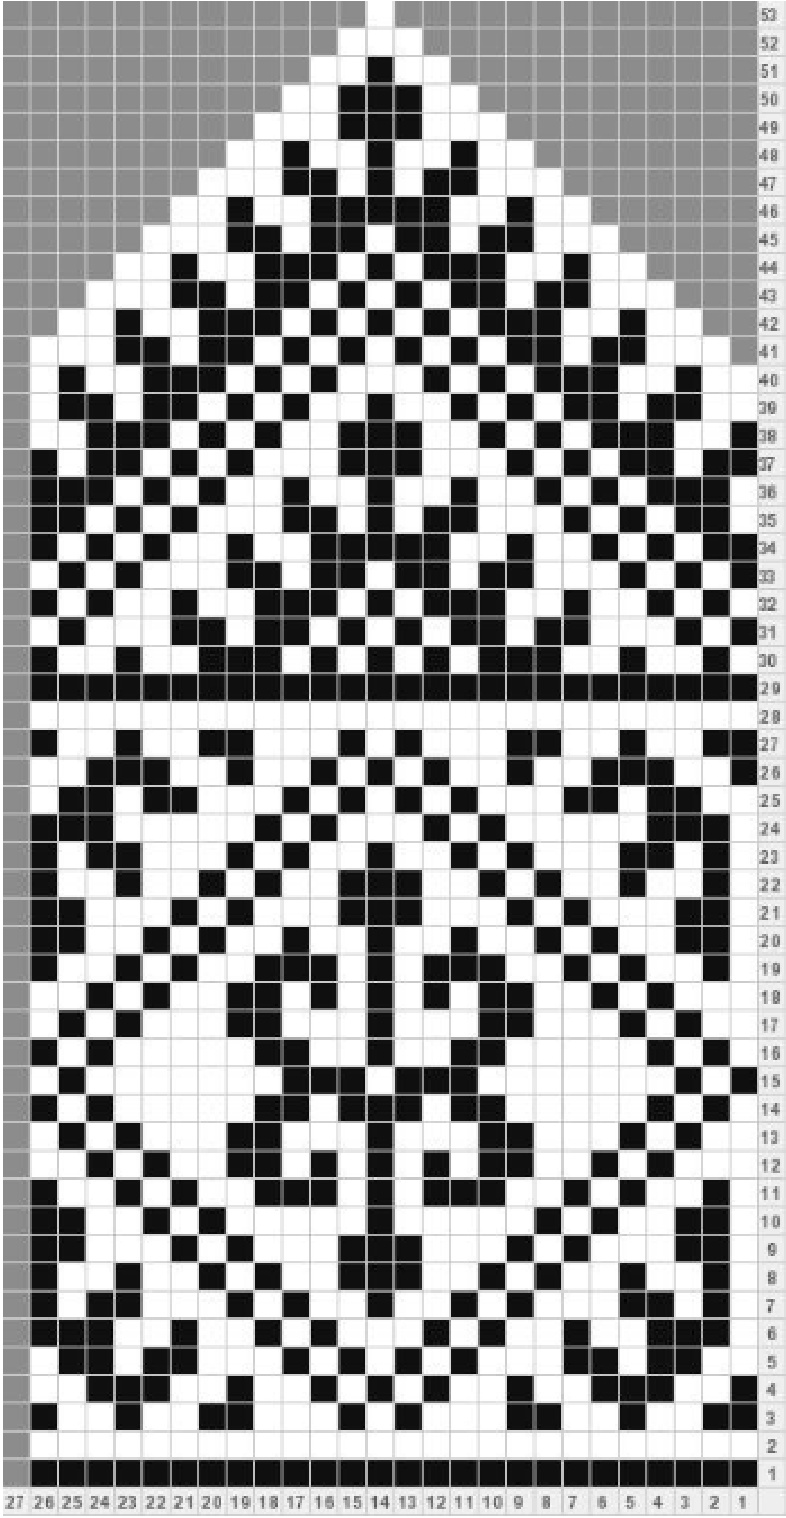
Chart 1. Sport Weight Hat. All-On-One-Page instructions.
Simply Harika
Sport Weight, 25-27st/4"(10cm) Cast on 130 stitches,join in the round. Optionally, work 1" ribbing. Recommended; work Latvian braid over next three rows. Knit chart over the round. 5 repeats.. Decrease according to the chart.Note first decrease is asymmetrical.5 stitches remain. Run yarn tail through remaining five stitches and cinch closed. Legend
Row 63: Purl this row, slipping the markers when you come to them. Cut Yarn.
SimplyHarika
Fingering Wt.,30-32st/4 Cast on 132(156) stitches in round. Optionally, work 1" ribbing. Recommended LatvianBraid. Knit border(rows 1-6). Decrease 2(0) stitches in row7 of chart.130(156) stitches. Optional Latvianbraidsrows 8- 10 and rows 36-38. Decrease according to chart, noting first decrease is asymmetric Run thread through remaining 5 (6) stitches and tie off. Legend

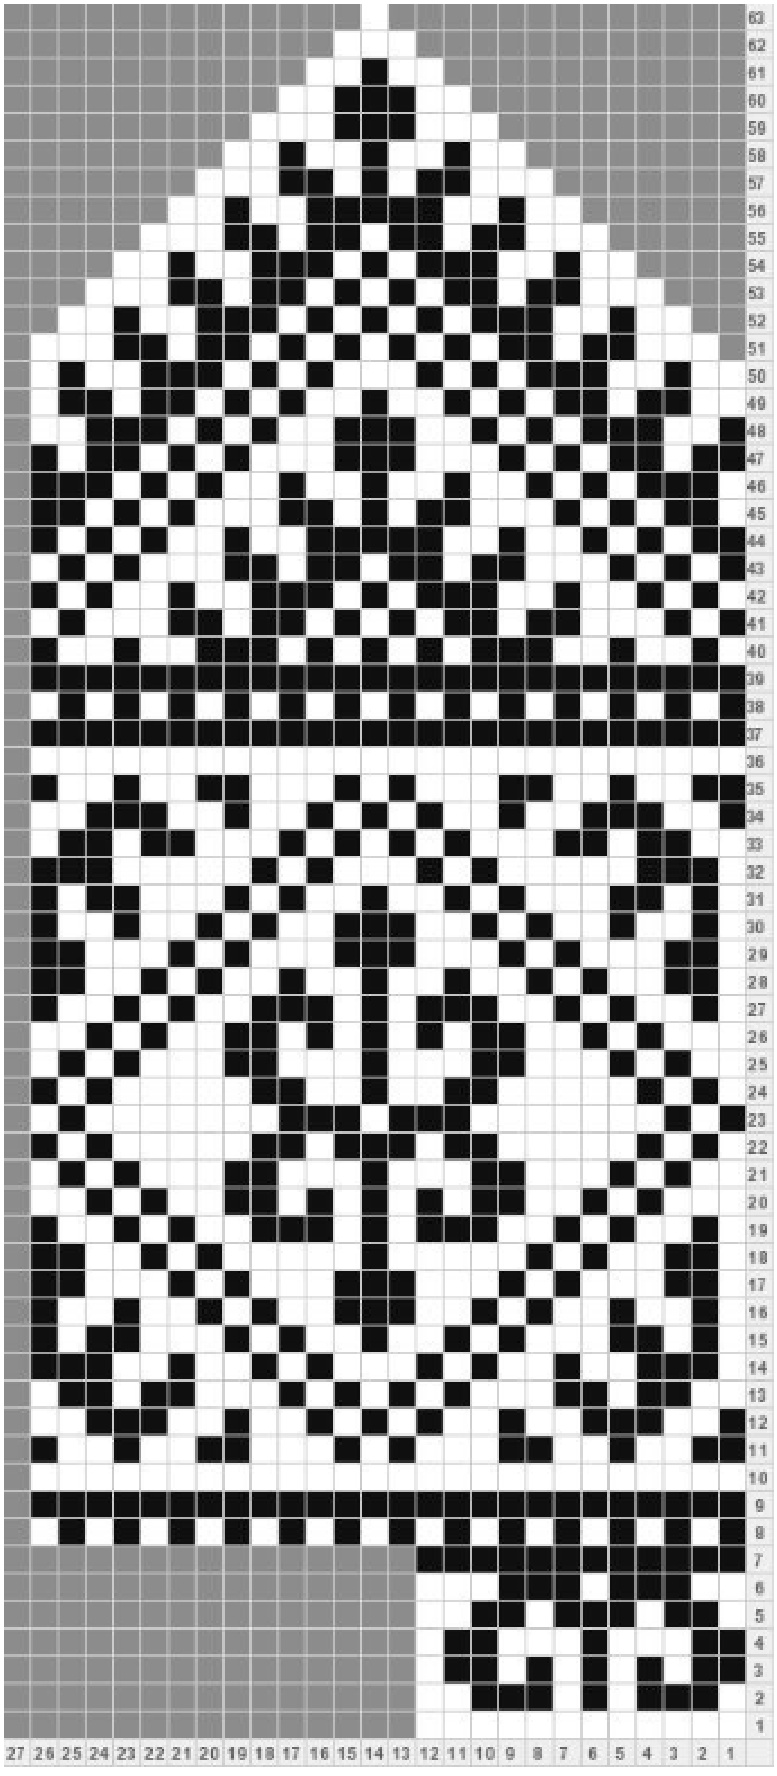
Chart 3. Fingering Weight Hat, Option 2. All-on-One-Page instructions.
SimplyHarika(Option2) FingeringWt.,30-32st/4"
If knitting optional ribbing, cast on 128(156) stitches in round, or nearest ribbing multiple. Recommended Latvian Braid. Adjust stitch count to 126 (154) stitches.Knit border (rows 1-6). Increase 4(2) stitches in row 7 of chart.130 (156) stitches. Optional Latvian braids rows 8- 10 and rows36-38. Decrease according to chart, noting first decrease is asymmetric Run thread through remaining 5 (6) stitches and tie off. Legend
Making Mlttens.
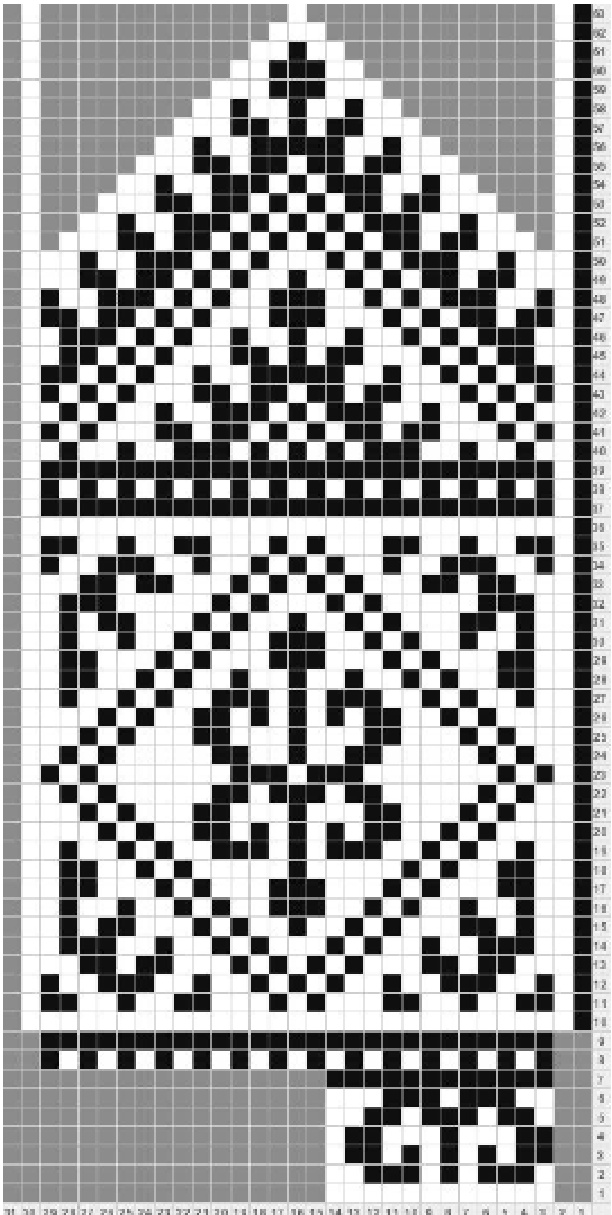
Instructions for converting the charts to mittens are provided in my mitten tutorial, which is available as a separate free Ravelry download. If you are using fingering weight, the original hat charts are a bit narrow for a women's medium mitten, however, if you add three framing stitches, as described in the tutorial, the width will be perfect. This will give you a panel of 29 stitches in width, and is shown below in charts 4-6. If you are relatively inexperienced with stranded mittens, I'd also recommend using a simple repeat pattern for the palm. One option is to use simple stripes, but I also provide a few other options in the mitten tutorial. This will make it easier to knit the palm and to make an invisible thumb. Instead of using five panels, you use only two panels for mittens, and so some adjustment of the stitch count may be necessary as you move from the border to the main motif. Also, when using the hat panel as a single framed panel, it is better to center the motif by adding one more row to the panel. This is shown below in Chart 4. Using the fingering weight yarn, here are a few options to get you started. These are demonstrated in the charts below. Using Simply Harika chart (option 1) , modified to add framing stitches and a centering stitch, the mitten panel becomes 30 stitches wide. Cast on 60 stitches and join in the round. Work 2-4" of k2p2 ribbing, or ribbing of your choice. Now work the modified chart, following the tutorial for the thumb placement. At a stitch gauge of 30-32st/4" (10cm), you mitten from wrist-to-tip will be about 8" long, and about 4" wide. This modified chart is shown below in Chart 4. Using the Simply Harika Chart (option 2), again modified to add framing stitches and a centering stitch, you have a mitten panel that is 30 st wide. The border repeat, however, is 14 stitches in this case, so some adjustment must be made. Either cast on 56 stitches, work the ribbing and border in the round, then increase 4 stitches before the motif to continue the mitten (60 stitches). Or, cast on 60 stitches, work ribbing, then increase to 62 stitches to work the border with a frame. After the border, decrease 2 stitches to 60 stitches and continue knitting the modified chart, chart 4. If you want to use a ribless cuff, as you see in Latvian mittens, for example, you'll need to add about 2" of pattern. For the fingering weight mittens, this is about 15-16 rows. One way to accomplish this it to work the border extra times, and/or to begin working the main chart earlier. Two options, for different fingering weight gauges, are given in Charts 5 and 6 below.
see the mitten tutorial.
Fingering Weight Mittens Option 1.
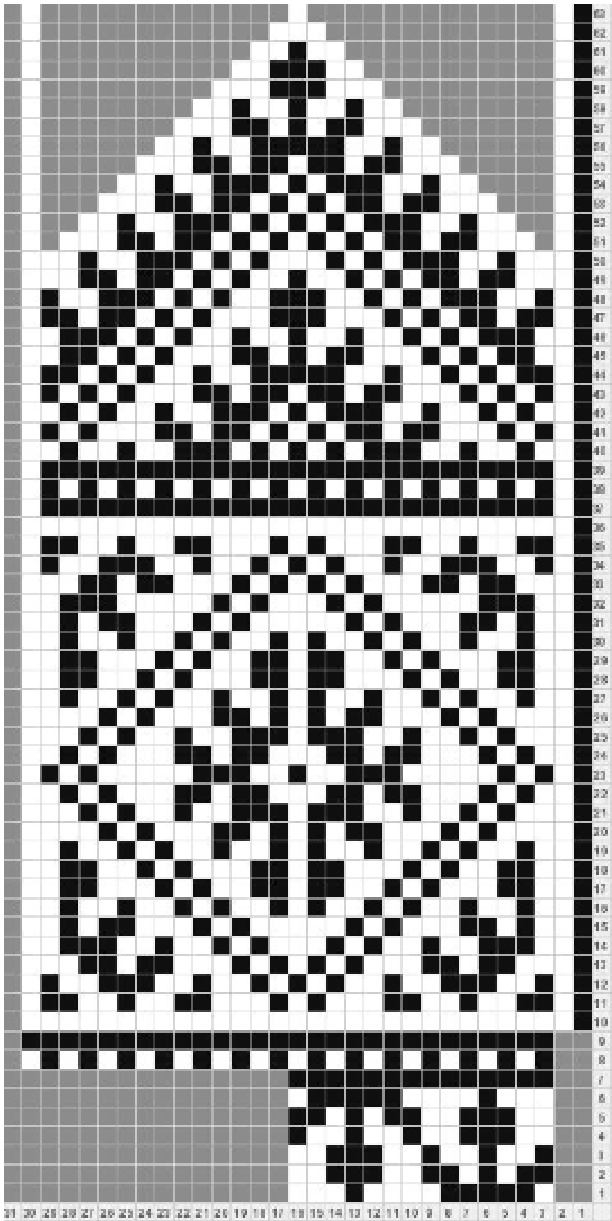
Chart 4. Fingering Weight Mittens, ribbed cuff, two options. All-On-One-Page Instructions. Cast on 60 stitches and work 2-4"of k2p2ribbing. Work complete chart across 60 stitches,as shown. If working optional Latvian braids, the framing stitches should be included in the braid for those three rows.
Fingering Weight Mittens Option 2.
Cast on 56 stitches and work 2-4"of k2p2 ribbing. Work border chart across 56 stitches. Increase to 60 stitches and work the remainder of the chart. If working optional Latvian braids, the framing stitches should be included in the braid for those three rows.
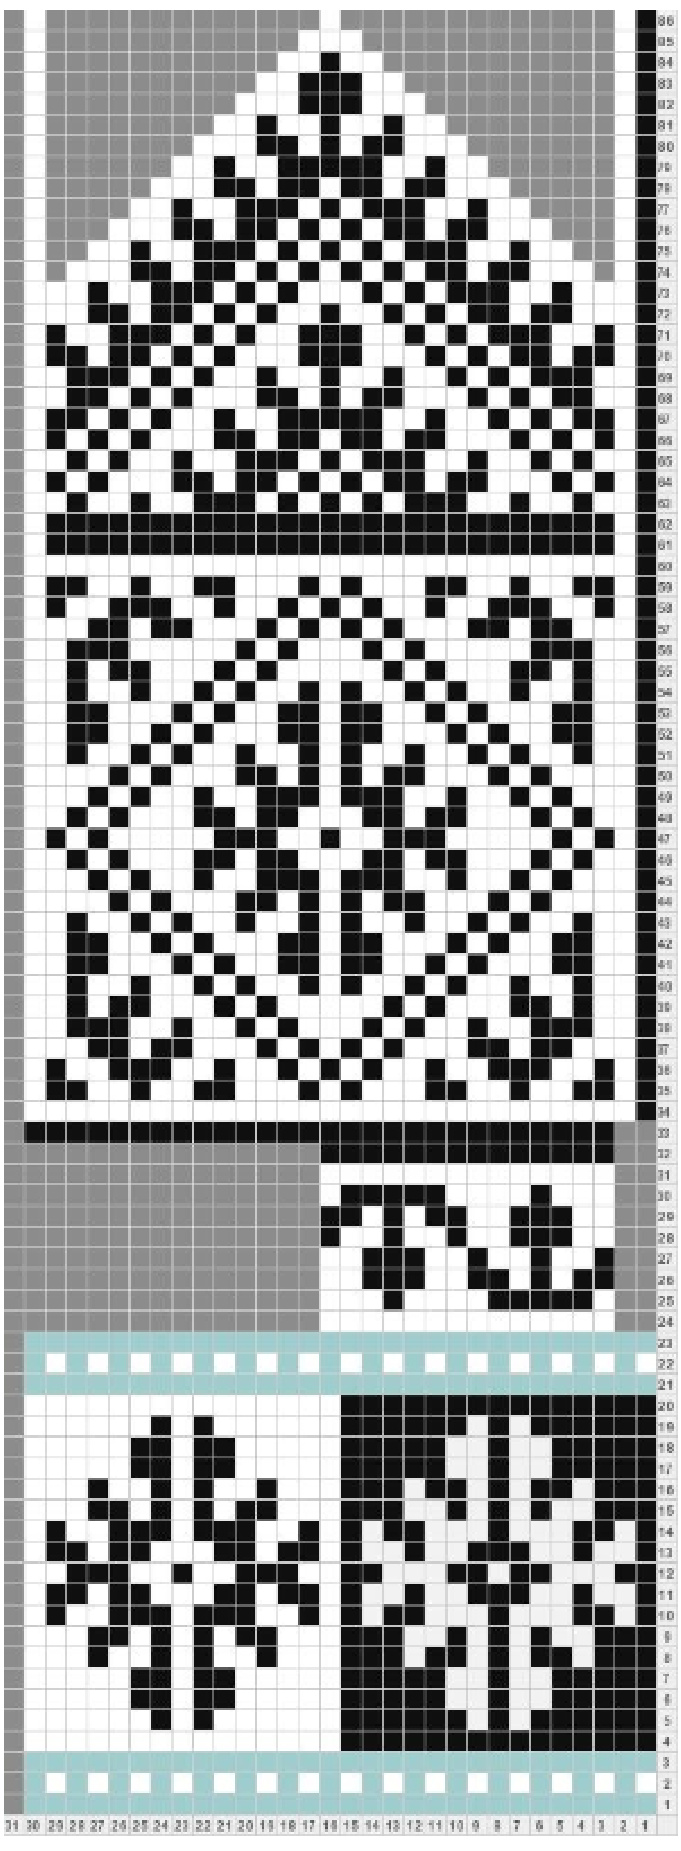
Chart 5. Fingering Wt Mittens, stranded cuff. All-On-One Page instructions.
Chart 2.Fingering Weight Mitten withStranded Cuff.Option 1.
Gauge:30st/4"and 30rows/4".If your gauge is tighter, use chart 3withmorerows. Three colours shown for demonstration - rows are optional Latvian braids Caston 60 stitches and work cuff chart Decrease 4 stitches and work wrist border Increase 4 stitches and work remaining chart
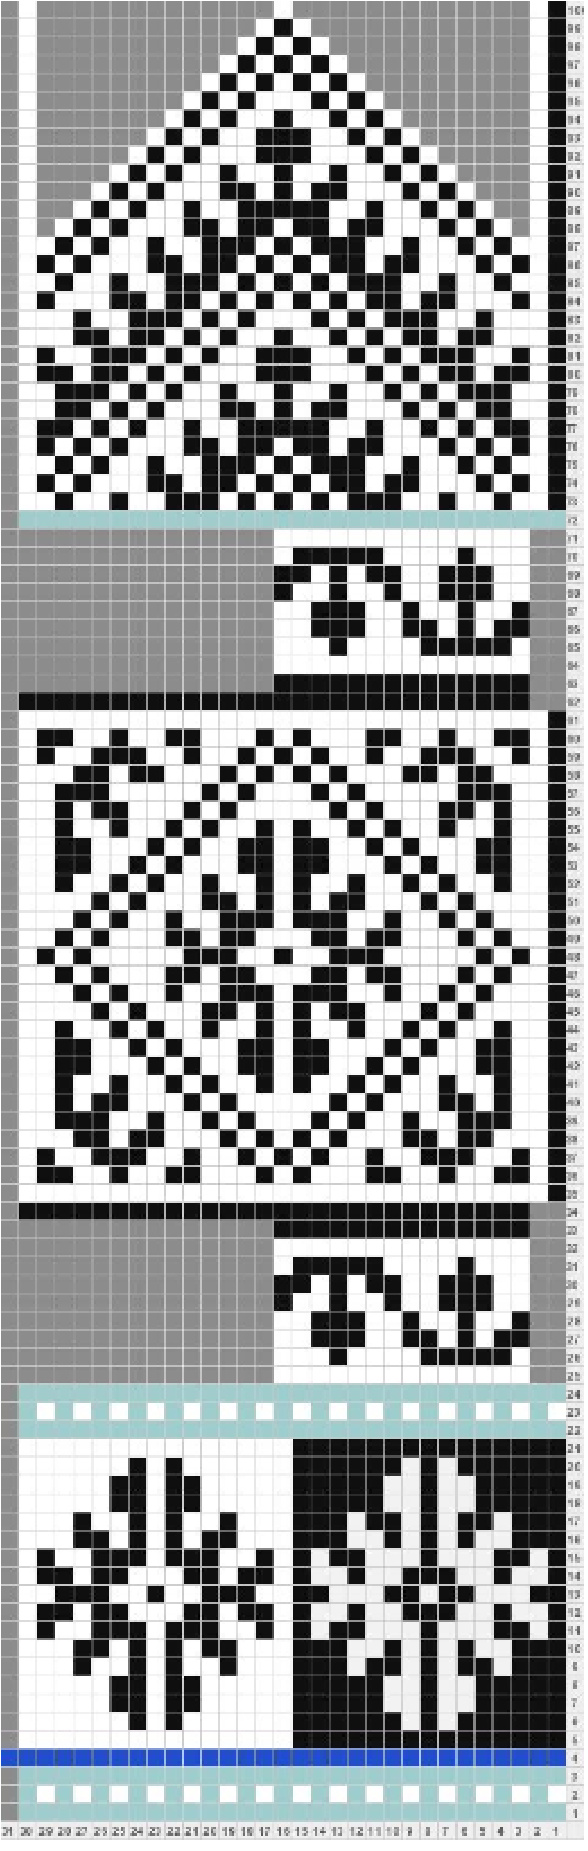
Chart 3. Simply Harika Stranded Cuff (Option 2) Gauge:32st=4",38rows=4 Chart 6. Fingering Wt. Mitten, stranded cuff, option 2. All-on-One-Page. . This chart will work for 30-32st/4". You can substitute the second main motif in directly for the burdock. The blue stitches indicate optional Latvian braids or braided cast on in two colours. Cast on 60st and work cuff Dec4 stitches evenly and work border, Inc 4 sttiches for main motif, Dec 4 stitches for another border, Inc 4 stitches for the final crown patterm. Decrease for the top,always working the framing stitches. You can decrease at the edge or one stitch in.
UsingaKinhuBraidedCastOn
(optional)Aftercasting onin two colours,knit the next row in a single colour,andpurl thenext row. This will counter the tendencyofthebraidedcaston torollup.Thepurl rowis indicatedhereinRoyalBlue


