Mitten Tutorial
A Guide to Creating Mittens Using a Panel Construction Renée Burton (ReneeKnitsABit on Ravelry) Last Update:February 5, 2014 Table of Contents This table of contents provides navigation through the Google document version of this pattern. When viewing the pdf version of the pattern, it provides only a list of contents and organization. Introduction. Panel Construction Overview. Figure 1. The generic panel. Figure 2. Two Panels Joined in the Round. How to knit a mitten: the Big Picture. How to Size a Mitten. Figure 3. Mitten Measurements Diagramed. Table 1. Mitten Measurements and Calculations. How to Knit a Mitten: in More Detail. Thumb Construction. Figure 4. The peasant thumb construction. Decreasing for the Top. Stranded Mittens. Figure 5. Framing stitches for a stranded pattern. Figure 6. Palm pattern options. Cuff Options. Liners. Figure 7. The mitten and liner. Standard Sizing. Table 2. Children's Hand Measurements, estimated. Table 3. Average Adult Hand Measurements. globally. ar Sizing. Introduction. This tutorial provides an overview and basic instructions for knitting mittens using a traditional panel construction. The goal is to teach knitters the “"big picture" for a traditional mitten construction so that they can apply it and design their own mittens, or modify existing patterns for a better fit. They can also use this guide to convert other types of designs, particularly those for hats, to mittens. The tutorial is designed specifically to go along with the three hat patterns that I designed for the Carroll County Knitting Guild (Maryland, USA) in July 2013. These patterns are available as free Ravelry downloads, and you can use this guide to create matching mittens for the hats. This tutorial is limited to a traditional panel construction with a peasant, or invisible, thumb. I will mention other thumb constructions, but do not provide instruction for them. I will also briefly cover a few cuff options and liner construction. Please note that other knitters may use other formulas in their construction, and you should experiment to find what works best for you. This tutorial is not intended to be exhaustive. I have decided, for simplicity, to offer only one standard way of making some calculations, such as the thumb width. To knit a mitten using a 5-panel hat construction, you'll need approximately 85% of the yardage used for the hat.
Panel Construction Overview.
A simple, traditional mitten (and hat) construction uses a series of panels, like that shown in Figure 1, knit together in the round. These panels are identical in shape, and by using a series of symmetric decreases at the top of the panel, you can create the top of a mitten, or crown of a hat. With an understanding of the basic construction and a few calculations, you can modify any standard panel to mittens or a hat. Understanding this construction also gives you a starting point for your own designs. After calculating your gauge, you can design your own panels with freely available charting software and create unique accessories for yourself and others. In the case of a hat, a series of panels and the top shaping are all you need. For mittens, you also have to consider the placement and size of the thumb hole, and the creation of the thumb. But, this is only slightly more complex. The thumb is two smaller panels knit in the round. A few simple calculations will allow you to properly place the thumb and mitten-top decreases to create a perfect fit. Figure 2 shows how the mitten is laid out as two large panels, and demonstrates the placement of the thumb.
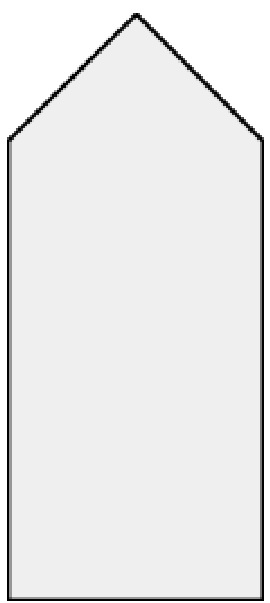
Figure 1. The generic panel.
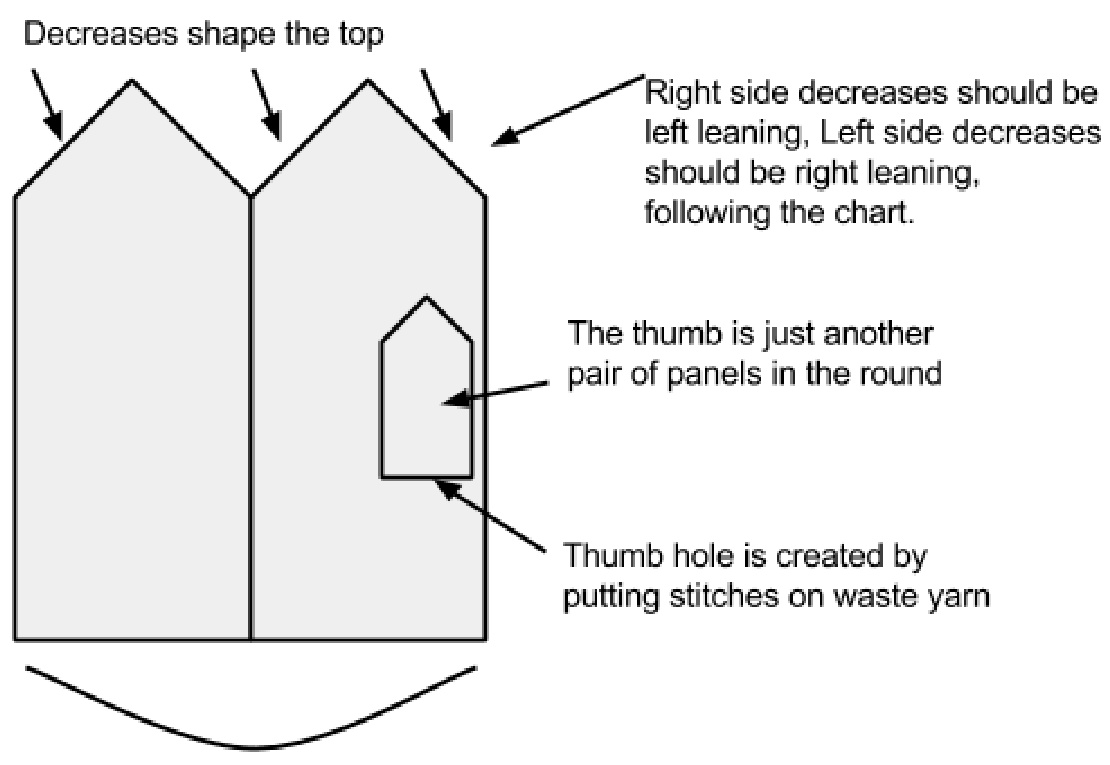
Figure 2. Two Panels Joined in the Round.
How to knit a mitten: the Big Picture.
To knit a mitten, cast on stitches for your cuff and join in the round. After knitting the cuff, begin your mitten panel. Continue knitting until you reach the base of the thumb, where the thumb hole must be placed. Here, put a number of stitches on waste yarn for the bottom side of the thumb hole, and cast on as many new stitches so that you can continue in the round. The newly cast on stitches create the top of the thumb hole. Keep knitting in the round until you need to start decreasing for the mitten top. Work the decreases symmetrically in both panels. When only two stitches remain, pull the thread through them, and cinch the top closed. Optionally, you can stop your decreases early, and graft the remaining stitches, to create a flat top mitten. To knit the thumb, pick up those stitches you put on waste yarn, an equal number along the edge where you cast on the new stitches, and a few more on the sides for a better fit. This is now the base of two tiny panels, connected in the round. You knit up those panels, and then decrease to two stitches. Again, thread the yarn through the stitches and cinch the hole closed. That's it.
How to Size a Mitten.
To properly place your thumb hole and decreases, you'll need a few measurements. Figure 3 shows the key measurements and stitch counts that are necessary for a mitten. You can take these measurements directly, or use standard mitten measurements as a guide. Table 1 shows how to calculate the necessary numbers and provides standard measurements and calculations for a women's large size mitten.
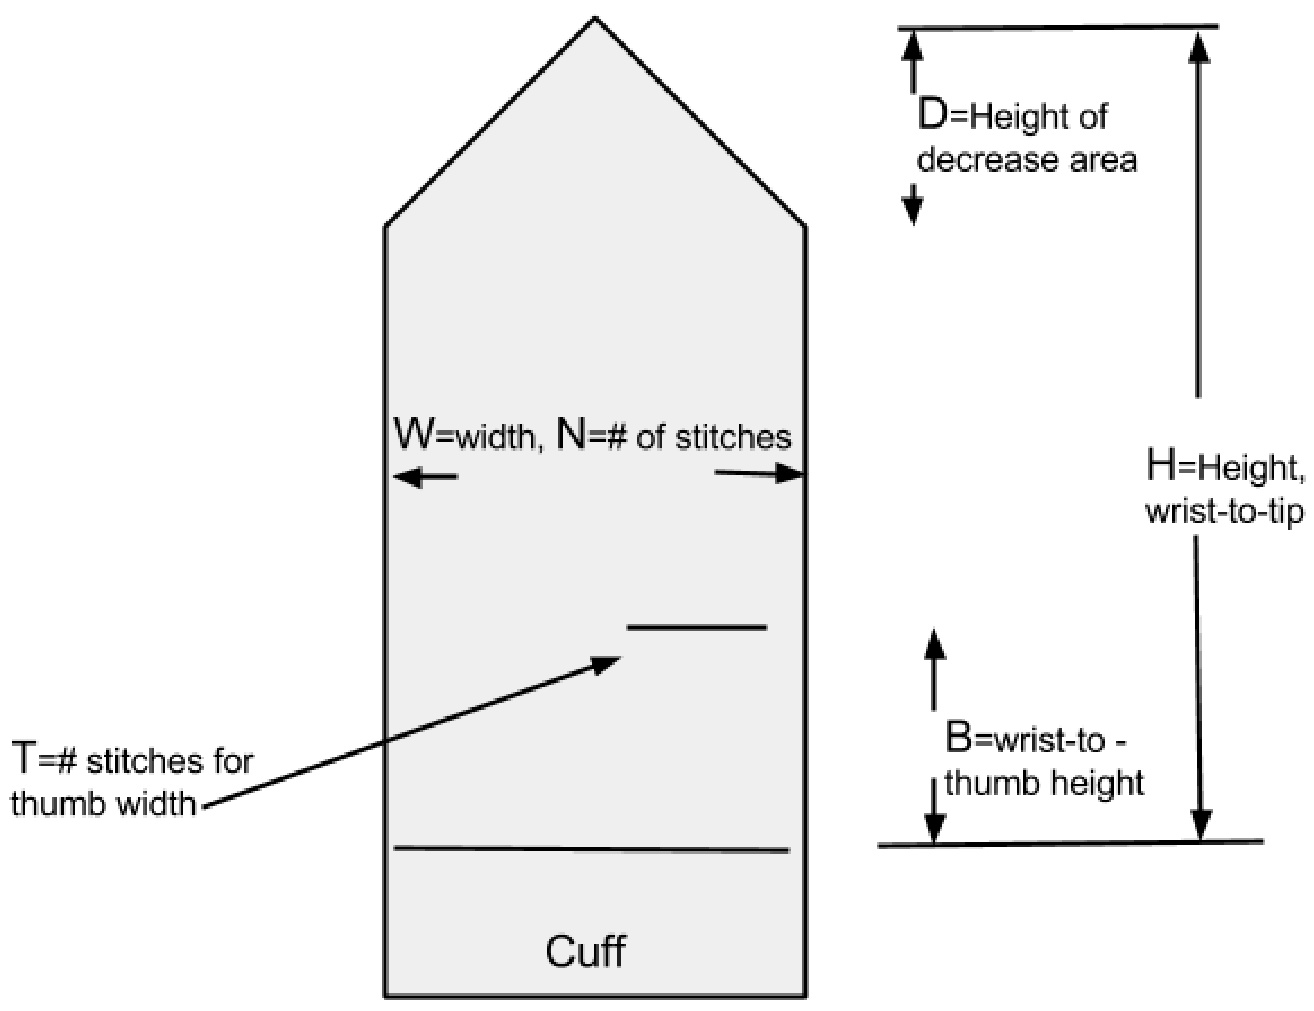
Figure 3. Mitten Measurements Diagramed. Table 1. Mitten Measurements and Calculations.
| Symbol in Figure 3 | What does it mean? | How to find or calculate it? | Stitches or measurement? | Women's Size Large Value |
| W | width of the mitten | measure the circumference of the hand and divide by two | measurement, inches or cm | 4"(10cm) |
| N | # of stitches across panel | Use gauge swatch to calculate N as number of stitches for W | stitches | varies by gauge |
| H | Height from wrist-to-tip | measure wrist-to-tip | measurement, inches or cm | 8" (20cm) |
| B | Height from wrist to base of thumb | measure right to first large knuckle of thumb | measurement, inches or cm | 2.5" (6cm) |
| T | # of stitches put aside/cast on for thumb hole | N/2-2 or nearest whole number | stitches | varies by gauge |
| D | height of mitten top decreases | approximately W/2, especially for stranded | measurement, inches or cm | 2" (5cm) |
How to Knit a Mitten: in More Detail. ate the calculations shown in Figure 3 and Table 1 to the instructions above · Cast on. Cast on the number of stitches necessary for your chosen cuff. You could use a ribbed or non-ribbed cuff. Cuffs are discussed later in this document. · When you finish the cuff, adjust your stitch count to have two panels N stitches wide on the needle. You have a total of 2N stitches on the needle. · Knit the base of mitten. Knit according to your pattern and/or chart until you have knit to a height of B inches (or cm) from the top of the cuff, which is at the wrist. This is where you need to make the thumb hole. Create the thumb hole. On the next row, you will knit 1 and then place T=N/2-2 (or the nearest whole number equivalent) stitches onto a piece of waste yarn. Then you will cast on T stitches onto your working needle. There are multiple ways to do this, and this is discussed in more detail below. The easiest way to do this is to cast on using a backward loop cast on. Now, knit to the end of the row according to your pattern. At this point, you have a fingerless mitten with a thumb hole. Don't let all these "T calculations" confuse you -- all you are really doing is putting two less than half the stitches on a holder... O Note!! This thumb construction is not symmetric, so for your second mitten, you will first knit T+3 stitches, then put T stitches onto waste yarn, then knit one. 'oon knittina ahove thumh hole Continuo knittina accordina to vo · Decrease for the mitten top. If you are knitting a chart with decreases every row, the height of the decreases will be approximately D. Begin your decreases when you have knit H-D of the mitten. Typically the decreases begin around the top knuckle of the middle finger, however, you can begin them later or earlier. I often begin just after the pinky/small finger is covered. Decreases are discussed in more detail below. Traditionally, one would decrease until two stitches remain. However, you can stop your decreases early and graft the top closed. You can also run a thread through a small number of stitches, typically six, and cinch it closed. · To knit the thumb, you'll put the T stitches from the waste yarn onto a needle, and pick up another T stitches where you cast on new stitches for the thumb hole. In addition, you'll pick up two more stitches on either side. The thumb will then be a total of approximately N stitches, made up of two panels that are T+2 stitches wide. Optionally, you may decrease some or all of the extra picked up stitches in the next few rounds. Many knitters, including myself, leave the panels the original T+2 width for more room. You will knit these two thumb panels according to the chart, as though they were an invisible part of the palm. Begin decreases after the tip of the thumb. Decrease down to two stitches, pull the yarn through, and cinch closed.
Thumb Construction.
The thumb construction described here is the traditional peasant thumb. When knitted in a stranded mitten, in the same pattern as the palm, it is referred to as the invisible thumb, as, when done well, it will disappear into the pattern of the palm. A sample of the peasant thumb is shown in the pictures for my Turkish Sampler mittens. Two other common constructions are the sore thumb and the gusseted thumb. Neither are discussed here in depth. The sore thumb sticks out from the side of the mitten. An example is found on these mittens. In the sore thumb construction, a gusset is created on the outside of the two panels, starting just above the wrist and sticking out to the side. In contrast, the gusseted thumb, often called the Nordic thumb, lies along the palm, like the peasant thumb, however, it uses a gusset to create more room at the base of the thumb hole. An example of the gusseted thumb is shown in these mittens. For the peasant thumb, you first create a hole that is just under half the width of one panel. You should adjust according to how many stitches you have in the panel and personal preference, however, the thumbhole is T stitches wide, where T is generally N/2-2 and N is the number of stitches in your mitten panel. Knit to where the thumb hole will begin, and put the next T stitches on waste yarn. After putting the stitches on waste yarn, cast on T new stitches and continue knitting in the round. You can use any cast on that can be done in the middle of the row. lf you are stranding, you can even use a long-tail cast on by using two colours of yarn. I typically use the backwards loop cast on, as it is simple and works fine for this purpose. When knitting a stranded mitten, I cast on in the pattern. There are a few other ways to create your thumb hole, however, I am not going to cover those in depth here. One common option, instead of placing the thumb stitches onto waste yarn, is to knit them onto waste yarn, then transfer the waste-yarn stitches back and knit them with the working yarn. In this case, you won't have a thumb hole yet - it is seamed closed with the waste yarn. Later, you come back and remove the waste yarn, transferring the stitches to the needles. You are encouraged to try multiple methods and pick what suits you best. After you finish the mitten top, transfer the thumb hole stitches from the waste yarn onto a needle. I prefer to pick up two additional stitches per panel, one on either side. So, I have picked up an additional four stitches total. You willfind instructions vary, and other knitters may pick up only one more stitch per panel, for example. You may choose to decrease those stitches on the next round. I do not. In any case, your thumb is created with two small panels, as shown in Figure 4. Begin your decreases at the top of the thumb and pull the yarn through the last two stitches.
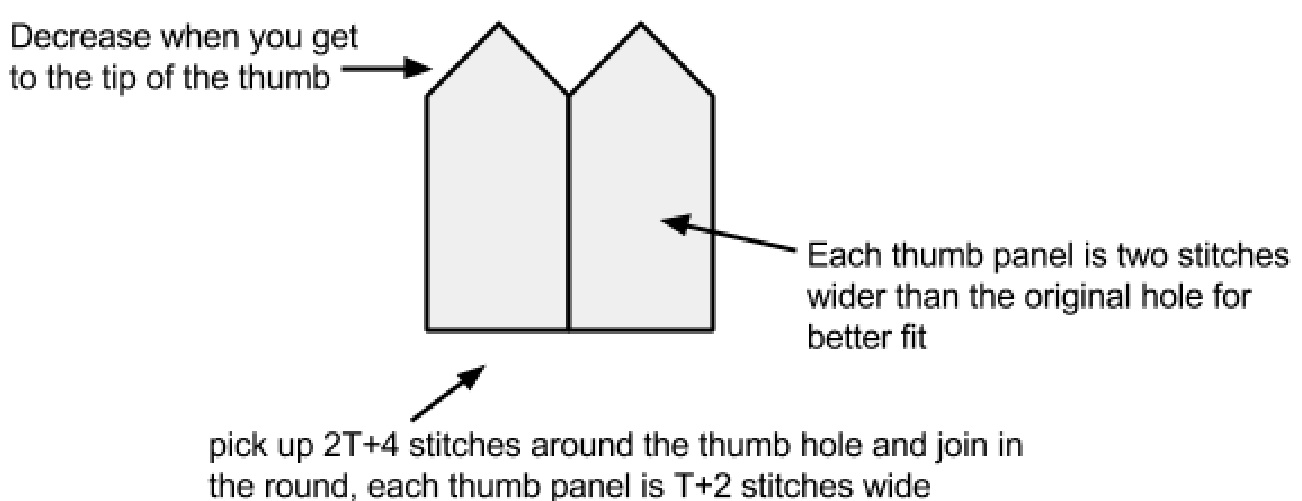
Figure 4. The peasant thumb construction.
Tips for Better Thumbs
Thumb hole too tight? Make sure to pick up an additional 4 stitches when starting the thumb and do not decrease them until the tip of the thumb. Holes, holes, holes. You will have holes at the base of the thumb, on both sides, where you pick up additional stitches. You can reduce the initial size of these holes by picking up stitches through the back loop, or twisting the loop into which you are picking up the stitch, however, the best thing is to deal with the holes at the end. Turn the mitten inside out and weave yarn across and around the hole -- almost any method will do -- then cinch it tight. Most of the time, the fix you made will be all but invisible. Thumb too tight? Make sure you picked up those four extra stitches and don't decrease down until the tip. Check your tension- it's easy to pull too tight on a small circumference. You may want to catch your floats,if doing stranded mittens,--even if they are shor -- at the sides of the thumb to prevent yarn crossing the middle. This is most often a problem with complex palm designs. Or uses framing stitches to eliminate this issue If you are knitting a stranded pattern, as you create the thumb, knit up the chart on the outward half of the thumb and down the chart on the inside half of the thumb for a fully invisible thumb. Don't forget to knit a left thumb and a right thumb! Your thumb holes need to be on opposite sides of thepalm.
Decreasing for the Top.
e many ways to do the decreases for the top of your mitten. Here are a few · For each panel, or side of the mitten, you can decrease one stitch on either side of the panel along the edge. This is easy, preserves the pattern, but also makes adjacent decreases which can lead to a gap. These decreases can either be paired as SSK and K2Tog, or pairing one of these with a (slip 1, knit 1, psso) decrease. The decrease can also be done one stitch in from the edge. For each panel, knit 1, dec 1, knit to the last three stitches of the panel, dec 1, knit 1. This has the benefit of preventing any gap along the decrease edge, but also creates a strong visual edge at the top of the mitten. Another option is to arrange your stitches at the start of the decreases so that one stitch is knit between the decreases on each side. To do this, you would knit 1, dec 1, knit to last two stitches of panel, dec 1. Repeat for the other panel. When using this option, most knitters choose a single colour for the knit stitches, which will create a line up the top of the mitten. If you are using framing stitches, you can choose to decrease inside of the framing stitches, or decrease the framing stitches down and use one of the above options. You can create a rounded top mitten, which will allow you to wear the mittens on either hand, by adding decreases at the midpoint of the panel. In this case, you'll dec 1, knit to midway, dec 1, knit to two from the end, dec 1, and repeat. This approach will disrupt any colourwork pattern, so is typically done in a solid colour. It is a very sharp decrease, and the mitten top will be shorter than other options. In addition to these choices, there are numerous others... but this will give you a start!
Stranded Mittens.
When knitting mittens it is useful, especially when you are inexperienced, to have the panel framed by the background and contrasting colour. This is shown in Figure 5, where the right side of the panel has a background stitch and a contrasting colour stitch, and the left side has a contrasting colour stitch. The mitten will have a visible frame up the side. An example of mittens I have done with a frame is shown on my Ravelry project pages here. Using each colour near or at the edge of the mitten all but prevents tension issues as you round the corners. If a mitten pattern does not use border stitches, you might consider adding them if the gauge allows, particularly if there will be floats of five or longer across an edge.
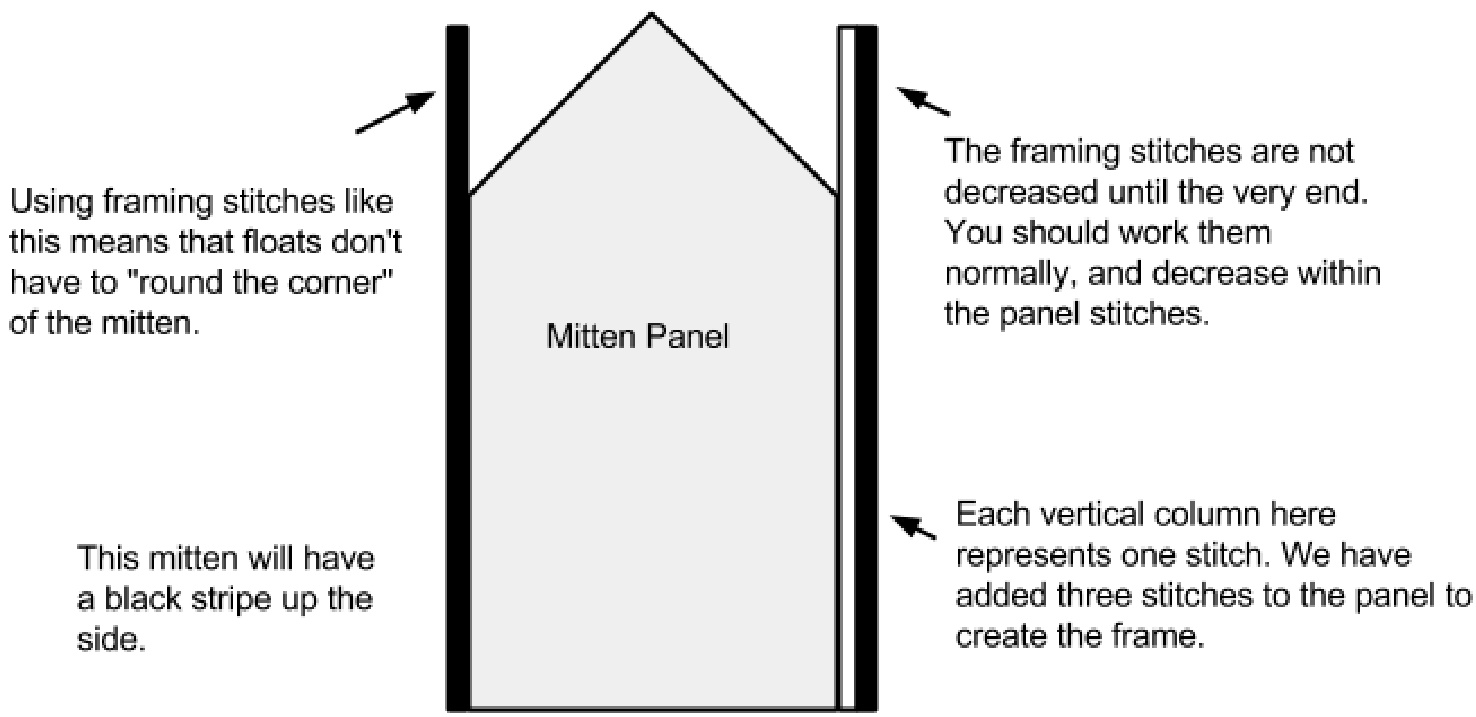
Figure 5. Framing stitches for a stranded pattern. When you see mittens charted to use framing stitches, they will look like vertical lines, as shown in Figure 5. All decreases for the mitten panel occur inside the framing stitches. They are worked normally until only four stitches remain for each panel -- the one panel stitch, and the three frame stitches. You can then choose to decrease these as you choose to a single stitch per panel. One way to close up your mittens was passed onto me by Ravelry member Deniselnlowa. She writes: When I learned to knit Norwegian mittens from Arnhild, the Norwegian distributor of Rauma yarns, she knit decreases until there were about 4 stitches of each color. The end of the contrast yarn was run through the contrast stitches and brought to the inside first. Then the main color stitches were fastened off so they would lay over the top of the contraststitches. If your pattern has very small repeats, you may not need or want to use a frame. You can always also catch the floats along the side. An example of mittens that do not use a frame are my Ziemelkurzeme mittens. The repeat of the pattern is long, but there are very short floats in this pattern. If you do not line you mittens, you might still want to put in a small hem if you are using a stranded cuff. To do this, cast on about 15% less stitches than necessary for your cuff in the background colour. Knit between five and seven rows, then increase to the full width of your cuff. Purl one row. Now begin knitting the cuff. The short hem you knit will fold up inside the mitten. When you are finishing the mitten, you tack it down on the inside to give a nice edge to the bottom of the cuff. You can also strand a tiny design inside the cuff along the hem. You can see a sample of that the pictures for my Ziemelkurzeme mittens. Additionally, for stranded mittens it is often easier to use a simple pattern for the palm. One option is to use stripes for the palm, however, you can use any short repeat that fits your panel. Using a simple pattern often makes the knitting quicker and the invisible thumb easier. Figure 6 shows a few all-over patterns that can be used for mitten palms.
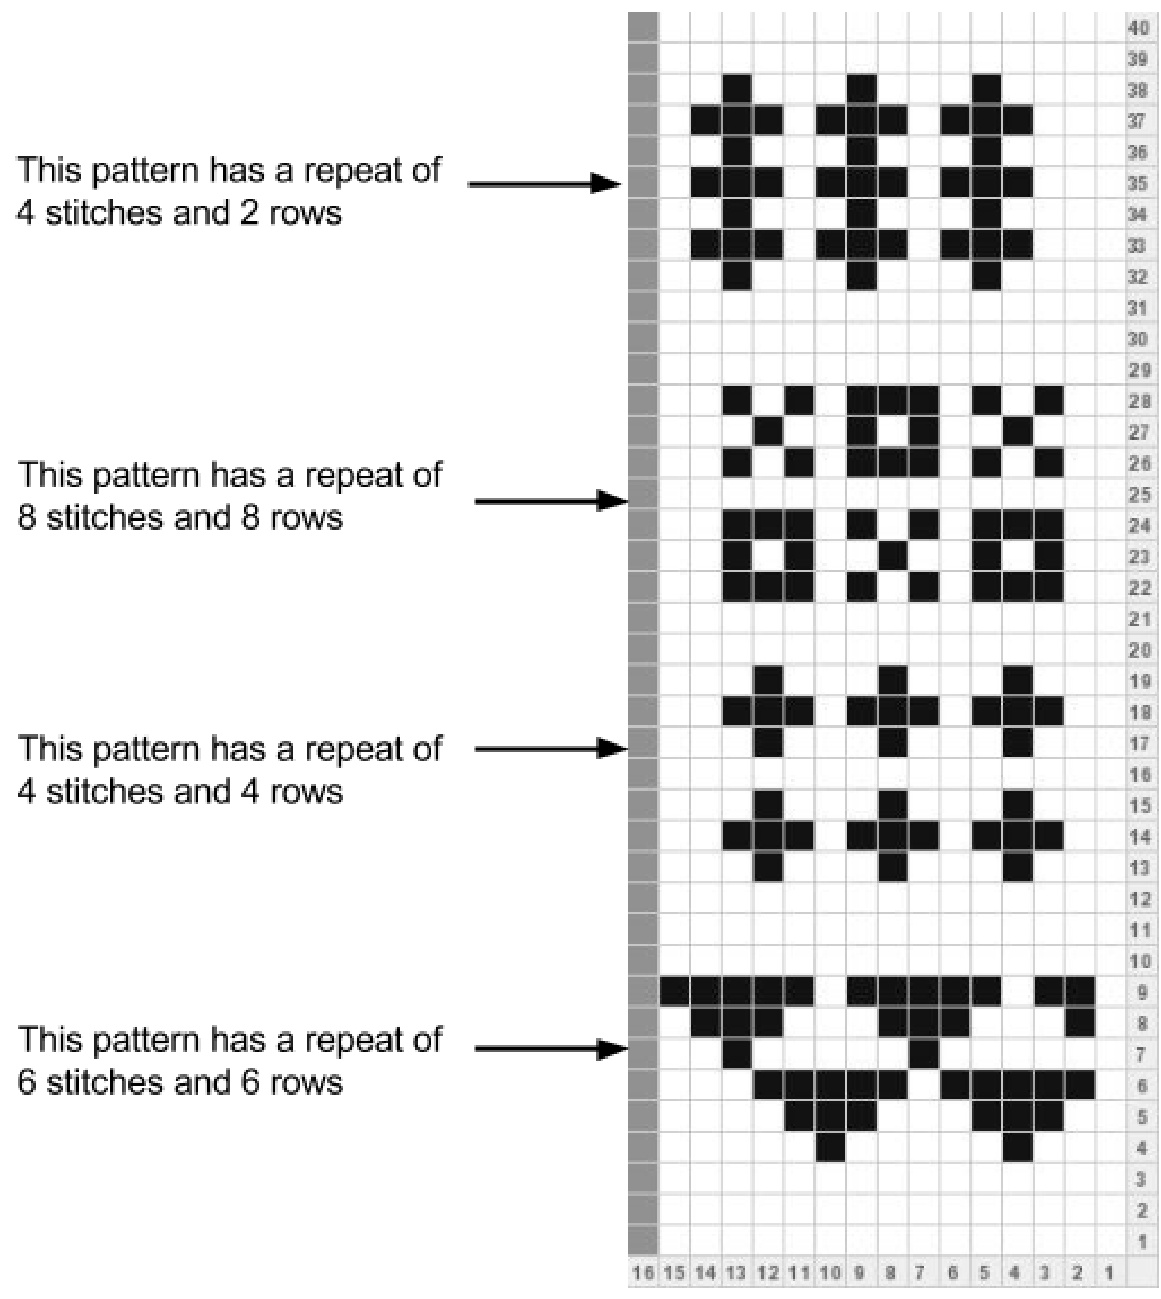
Figure 6. Palm pattern options.
Cuff Options.
The cuff is the part of your mitten that lies below the wrist. For your cuff, you can knit either a ribbed or non-ribbed cuff. Ribbed cuffs are often done in k1p1 or k2p2 ribbing, for a length of 2-4" (5-10cm). Ribbed cuffs don't need a hem. A less functional, but beautiful, variation is corrugated ribbing, which is k2p2 ribbing worked in two colours. Corrugated ribbing does not have elasticity like normal ribbing, and takes time, but makes a very striking start. While ribbing is usually done on a smaller needle size than the main mitten, you may choose to work the corrugated ribbing on the larger needle. An example of corrugated ribbing is shown in these mittens. Another ribbing option is a traveling rib. This looks like a k2p2 ribbing that is moving across the cuff. It has a small bit of elasticity, and it looks wonderful in stripes. I first saw this on Latvian mittens. To work the traveling rib, you are working in only one colour at a time. Cast on a multiple of 6 stitches. Row 1. knit. Row 2. (P2Tog, K2, m1, k2) across round Repeat row 2 until the desired length is achieved. To change colours, begin again with row 1 in the new colour. The traveling rib is shown in my Simply Harika Mittens. For non-ribbed cuffs, you can use lace or stranded patterns to create a short or long cuff below the wrist. Some options to investigate and try out are: latvian or estonian braids, welts, and picot edges. For non-ribbed cuffs, it is recommended that you start with a short hem, as described in the section on stranded mittens. This will give a nice edge to the bottom of your knitting.
Liners.
Liners are also made as panels, somewhat smaller than the original mitten. Figure 7 shows how they are constructed. The mitten and the liner are knit all in one piece, and the liner is folded inside the mitten for wearing. The key to a successful liner is making it small enough so that it folds nicely inside the outer mitten. You can see a mitten and liner in the photos for my Turkish Sampler Mittens.
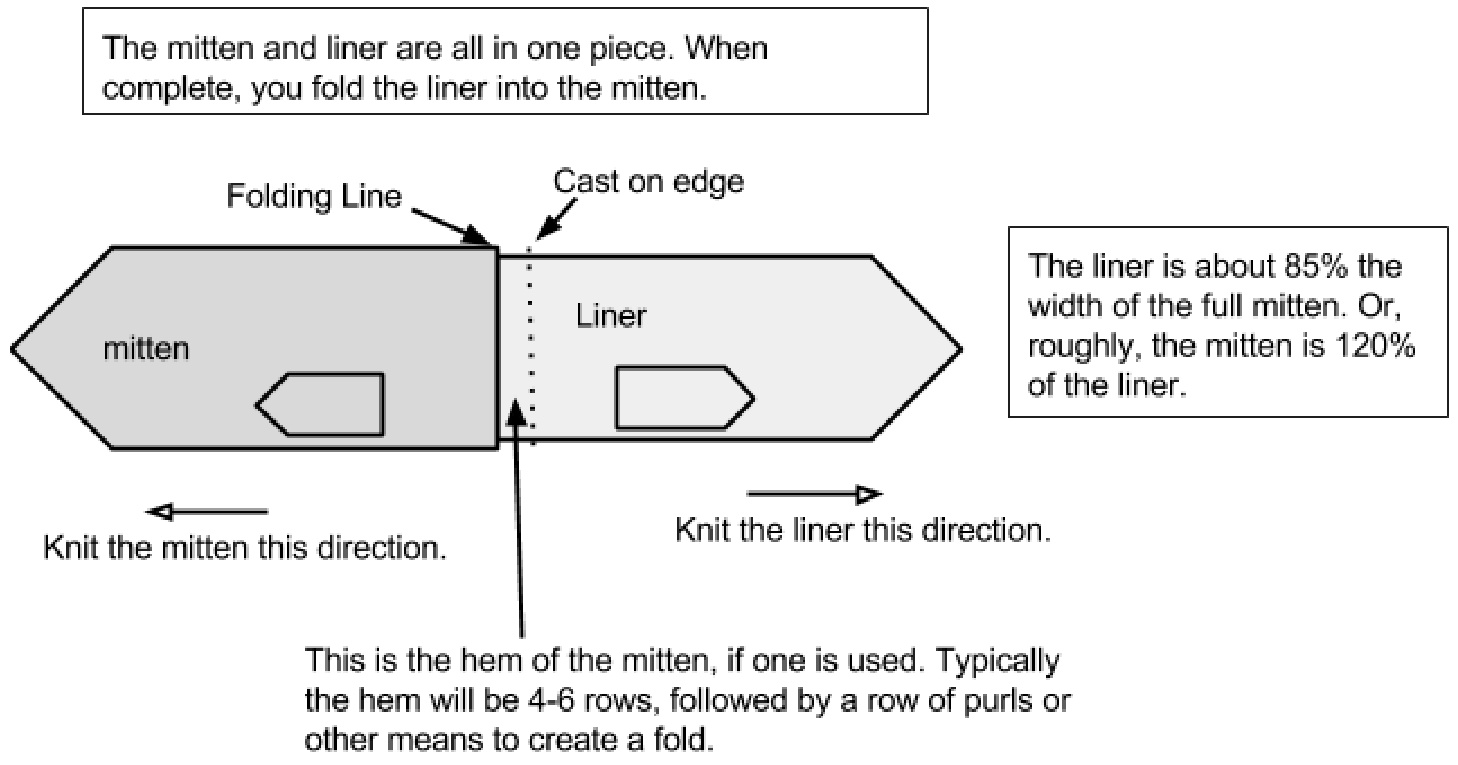
Figure 7. The mitten and liner. If the outer mitten and liner have the same stitch gauge, knit your liner using about 85% of the stitch count as original mitten. This is roughly equivalent to using 120% of the liner stitch count for the outer mitten. (Note, these figures are not equivalent, but are easier to remember! For those who want to be more exact, the outer mitten would be 117.5% of the liner.) The liner is intended to fit your hand, and this ratio will leave a bit of air space between the liner and the mitten, creating more warmth. For a woman's hand with a circumference of 7.5", notice that your final outer mitten will have a 9" circumference. A typical women's mitten pattern produces a mitten only 8" in circumference, which would, using the ratio here, have a liner that is 6.8" in circumference. Note then that you might need to adjust your gauge to get the desired result. I recommend you start by measuring your hand circumference, and using this to determine how big the outer mitten needs to measure. For all other measurements, such as the thumb hole placement, I use the same calculations as for the primary mitten. The height of the mitten should be slightly larger, but I have not had to adjust much. I generally test the fit of the liner and the mitten together as I go along. I always knit both the liner and outer mitten thumb last. To set up for a lined mitten, you can use a provisional cast on, and knit the mitten in one direction, the liner in the other. This is the most common choice for a stranded cuff. Or, you can pick up stitches from a cast on edge. Picking up stitches is the best way to handle a liner for a ribbedcuff. You can knit either the mitten or the liner first. I prefer to knit the liner first, so that I can test the fit of the mitten as I go along. Note also that you don't have to use yarns of the same gauge for the mittens and the liner. The outer mitten will have a circumference that is approximately 120% that of the liner, so you can calculate gauge for each piece separately, and add or subtract any necessary stitches at the join. Detailed Example. Let's say you want to create a lined mitten for a women with a 7.25" hand circumference. That will be the circumference of your liner. This means, your You've got the perfect stranded mitten pattern, and it has 76 stitches in the round for the hand. You can then calculate your stitch gauge as This lets you pick the perfect yarn for your mitten. Now, assume you'll use a yarn with the same gauge for the liner. The liner will have approximately 85% of the stitches as the outer mitten, so your Liner circumference = 0.85\*76 = 64.6 OR 64-65 stitches Notice that 120% of 64 stitches is nearly 77 stitches, s0 keep in mind that the 85% and 120% are rough rules-of-thumb. You should use them as guidelines and decide what will work best for you. To knit your mitten, then: Provisionally cast on 64 stitches in the round, and knit a mitten that fits the hand, except for the thumb, Put the provisionally cast on stitches onto the needle, and knit four rows straight. Typically, with a stranded cuff, this is in your background colour. This is the hem for your mitten. ·. In the next row, increase ten stitches evenly. 76 stitches on the needle. Purl the next row to create a fold line. ? You are now one row 1 of your outer mitten. Knit the outer mitten, checking that the liner continues to fit as you go. Start your decreases after the decreases of the liner, so that the outer mitten comfortably covers the liner. Knit both thumbs.
Standard Sizing.
This information is extracted from online sizing charts. The children's information seems somewhat unreliable. As a general rule of thumb, the circumference of the hand is just slightly smaller than the length of the hand. Mitten patterns will often be scaled larger, so check your gauge with the number of stitches. Table 2. Children's Hand Measurements, estimated.
| 12-18mo | 2T/3T | 4T/5T | YS | YM | YL | |
| circ. | 3” | 4” | 4.2" | 4.6" | 5” | 5.5" |
| length | 3" | 4.4" | 4.6" | 5.1" | 5.6" | 6.2" |
Globally, the average woman and man's hand is much smaller than typical mitten patterns allow for, so if at all possible, measure the recipients hand circumference. You can then estimate the length by a multiple of 1.12 times the circumference to obtain a length. Table 3. Average Adult Hand Measurements, globally, and typical Western Pattern Mitten Sizing.
| Avg. Woman | Avg. Man | Women's S | Women's M | Men'sM | |
| circumference | 5.82 | 6.6" | 7-7.5” | 7.5-8" | 8-8.5" |
| length | 6.7" | 7.4" | 7.84" | 8.4" | 9" |


