Maidenha
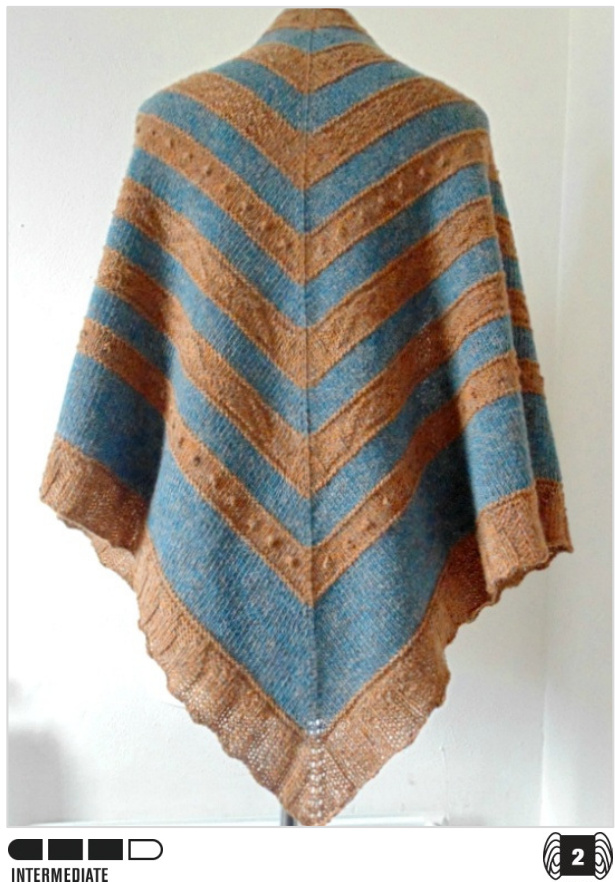
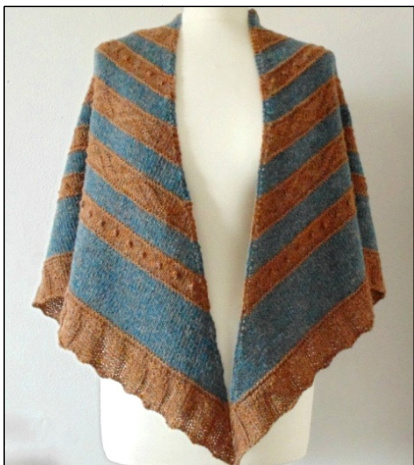
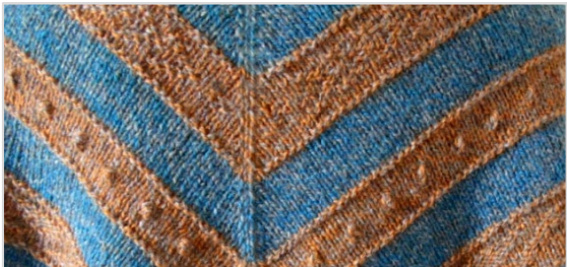
Maidenhall is a two-colour triangle shawl featuring varied textured patterns of chevrons, triangles and small bobbles in contrasting bands for knitting interest, broken up by plain sections for colour contrast, leading into a wide fluted rib border. The design was very loosely inspired by some of the female characters in the TV series "Vikings". The shawl is worked from the top down in one piece, increasing in size towards the border. All of the sections of the shawl have both written and charted directions so you can work from whichever you prefer. Illustrated instructions for the increase used are also provided, as well as additional advice for mirror/left-hand knitters.
Yarn
Fingering weight yarn, 720 metres/788 yards (360 metres/394 yards of each colour) Yarn shown is Laura's Loom Bluefaced Leicester 2-ply, which is a heavier fingering weight. Colour A: Howgill Tweed Soft Tarn (blue), Colour B: Howgill Tweed Soft Lichen (orange). Needles/Supplies Size 3.5 mm (US size 4) needles Size 4.5 mm (US size 7) needles Stitch markers (4) Tapestry needle for weaving in ends
Schematic
Blocked Gauge
22 sts & 26 rows in 10 x 10 cm (4 x 4 inches) in stockinette (stocking) stitch using 3.5 mm (US 4) needles (or size needed to obtain gauge).
Finished Size
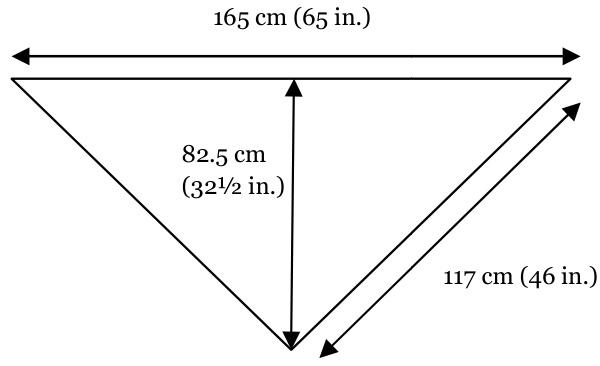
Width: 165 cm (65 in.) Height from back to bottom point of triangle: 82.5 cm (32 1/2 in.) see schematic for full measurements.
Abbreviations
k: knit p: purl m1: make one - using reverse yarn over method, see p.2 for full instructions and illustration. mb: make bobble - knit into the front and back and front again of the same st (makes 3 sts). Place these 3 sts back on the working needle then knit the 3 together through the back loops. You will end up with 1 stitch again. pm: place marker sm: slip marker st(s): stitch(es) RS: right side of work WS: wrong side of work
Special Stitch Instruction: the "reverse'" yarn over m1
The m1 (make one) increase used in this pattern is made by working a yarn over in "reverse". To work this stitch: bring the yarn up behind the working needle (1), then bring it down over the front o he working needle, placing the yarn at the back of the work (2), ready to work t m1 in standard/right-hand knitting (where new sts are formed on the right-hand needle) m1 in mirror/left-hand knitting (where new sts are formed on the left-hand needle)
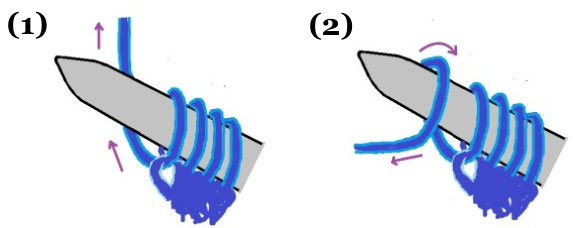
Picture shows the working (right-hand) needle
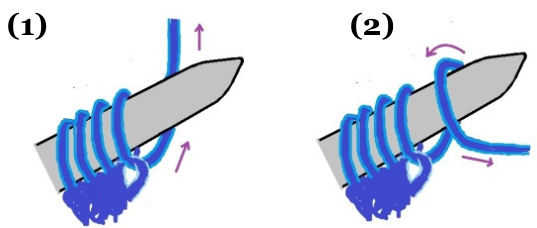
Picture shows the working (left-hand) needle On all return rows the yarn over stitch created on the previous row is purled through the front loop as normal. This particular increase results in a small decorative eyelet which is much smaller than that produced by a regular yarn over increase. ttern can be replaced by any other m1 method that does not use a stitch, if desired
\~ Maidenhall Instructions \~
Shawl Set-Up
With smaller needles and colour A, cast on 7 sts. Row 1: k2, pm, m1, k1, m1, pm, k1, pm, m1, k1, m1, pm, k2. (11 sts) Row 2: k2, sm, p to next marker, sm, p1, sm, p to marker, k2. Row 3: k2, sm, m1, k to next marker, m1, sm, k1, sm, m1, k to marker, m1, k2.(15 sts) Row 4: k2, sm, p to next marker, sm, p1, sm, p to marker, k2. Rows 5-10: Work rows 3 & 4, three times more. (27 sts) These rows establish and mark out the border sts and the centre stitch, each half of the shawl is formed on either side of the centre stitch, between the border and the centre stitch. The shawl increases by 4 sts on every RS row.
From this point on:
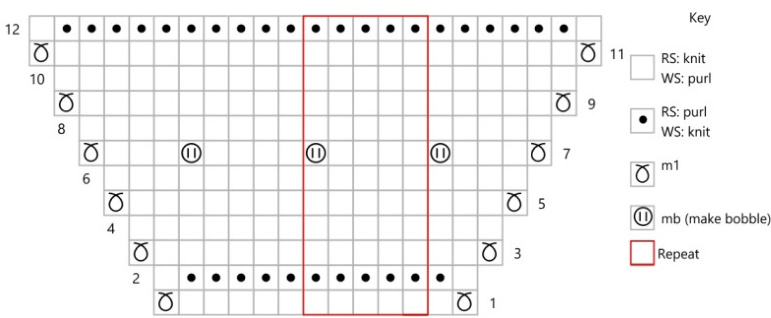
On all RS rows: k2 (border sts), sm, work pattern section instructed until next marker, sm, k1 (centre stitch), sm, work pattern section instructed until next marker, sm, k2 (border sts). On all WS rows: k2 (border sts), sm, work pattern section instructed until next marker, sm, p1 (centre stitch), sm, work pattern section instructed until next marker, sm, k2 (border sts). Section charts and written instructions do not include the 2 border sts at each side or the centre st. Always work these as directed above, while also following the pattern steps on p.3. Each pattern section contains both charted and written directions, so you can work from whichever you prefer. Step 1: Using colour B, work Bobbles Section once. (51 sts) Step 2: Using colour A, work Plain Section once. (71 sts) Step 3: Using colour B, work First Chevrons Section once.\* (99 sts) Step 4: Using colour A, work Plain Section once. (119 sts) Step 5: Using colour B, work Second Chevrons Section once.\* (147 sts) Step 6: Using colour A, work Plain Section once. (167 sts) Step 7: Using colour B, work Bobbles Section once. (191 sts) Step 8: Using colour A, work Plain Section once. (211 sts) Step 9: Using colour B, work First Triangles & Arrows Section once. (239 sts) Step 1o: Using colour A, work Plain Section once. (259 sts) Step 11: Using colour B, work Second Triangles & Arrows Section once. (287 sts) Step 12: Using colour A, work Plain Section once. (307 sts) Step 13: Using colour B, work Bobbles Section once. (331 sts) Step 14: Using colour A, work Plain Section twice, then work 6 more rows of Plain Section as established. There are 26 Plain Section rows in total in this last step. (383 sts) Step 15: Using Colour B, work Border Section once. (415 sts) Note: make sure to change to larger needles at the start of row 5 as specified in this section. Step 16: Follow the bind-off and finishing instructions on p. 6 \* Note for Mirror knitters: Work First and Second Chevrons Sections from charts only, reading L-R on RS rows and R-L on WS rows. These two patterns are not symmetrical; working from written instructions or reading charts in the standard direction will result in chevrons that run opposite to the pattern photo. All other patterns/instructions are symmetrical and hand-neutral. This advice is intended for mirror knitters. It will not apply to standard/right-hand style knitters.
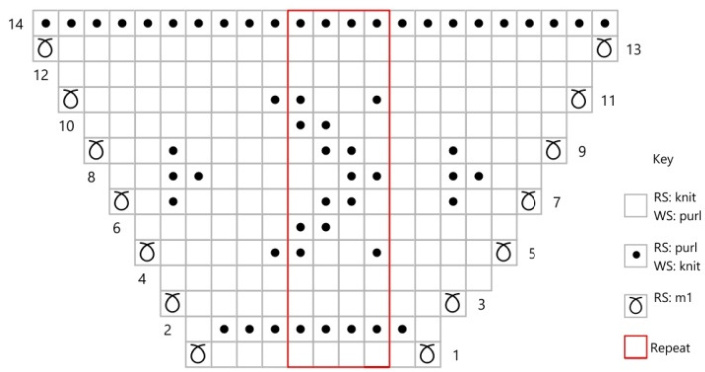
Bobbles Section (Chart)
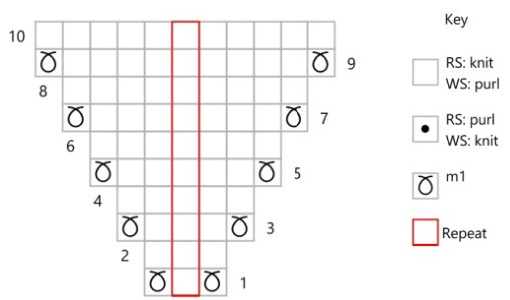
Plain Section (Chart)
Bobbles Section (Written Instructions)
Row 1 (RS): m1, k to marker, m1. Row 2 (WS): p1, k until 1 st remains before marker, p1. Row 3: m1, k to marker, m1. Row 4: purl to marker. Row 5: m1, k to marker, m1. Row 6: purl to marker. Row 7: m1, k3, mb, (k4, mb) until 8 sts remain before marker, k4, mb, k3, m1. Row 8: purl to marker. Row 9: m1, k to marker, m1. Row 10: purl to marker. Row 11: m1, k to marker, m1. Row 12: p1, k to marker, p1.
Plain Section (Written Instructions)
Row 1 (RS): m1, k to marker, m1. Row 2 and all WS rows: purl to marker. Row 3: m1, k to marker, m1. Row 5: m1, k to marker, m1. Row 7: m1, k to marker, m1. Row 9: m1, k to marker, m1. Row 10: purl to marker.
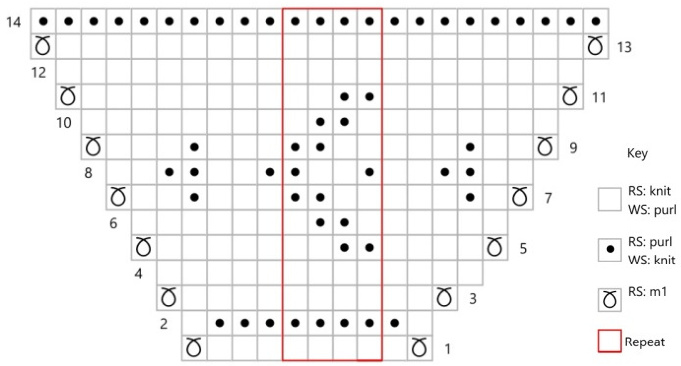
First Chevrons Section (Chart)
First Chevrons Section (Written Instructions)
Row 1 (RS): m1, k to marker, m1. Row 2 (WS): p1, k until 1 st remains before marker, p1. Row 3: m1, k to marker, m1. Row 4: purl to marker. Row 5: m1, k4, (p1, k2, p1) until 5 sts remain before marker, p1, k4, m1. Row 6: P6, (k2, p2) until 5 sts remain before marker, p5. Row 7: m1, k2, p1, k2, (k1, p2, k1) until 6 sts remain before marker, k4, p1, k1, m1. Row 8: p2, k2, p3, (p2, k2) until 6 sts remain before marker, p2, k2, p2. Row 9: m1, k3, p1, k2, (k1, p2, k1) until 7 sts remain before marker, k4, p1, k2, m1. Row 10: P8, (k2, p2) until 7 sts remain before marker, p7. Row 11: m1, k7, (p1, k2, p1) until 8 sts remain before marker, p1, k7, m1. Row 12: purl to marker. Row 13: m1, knit to marker, m1. Row 14: knit to marker.
Second Chevrons Section (Chart)
Second Chevrons Section (Written Instructions)
Row 1 (RS): m1, k to marker, m1. Row 2 (WS): p1, k until 1 st remains before marker, p1. Row 3: m1, k to marker, m1. Row 4: purl to marker. Row 5: m1, k4, (p2, k2) until 5 sts remain before marker, k5, m1. Row 6: p6, (p1, k2, p1) until 5 sts remain before marker, p5. Row 7: m1, k1, p1, k3, (k2, p2) until 6 sts remain before marker, k3, p1, k2, m1. Row 8: p2, k2, p2, k1, (k1, p2, k1) until 6 sts remain before marker, p2, k2, p2. Row 9: m1, (k2, p2) until 7 sts remain before marker, k3, p1, k3, m1. Row 10: p8, (p1, k2, p1) until 7 sts remain before marker, p7. Row 11: m1, k7, (p2, k2) until 8 sts remain before marker, k8, m1. Row 12: purl to marker. Row 13: m1, k to marker, m1. Row 14: knit to marker.
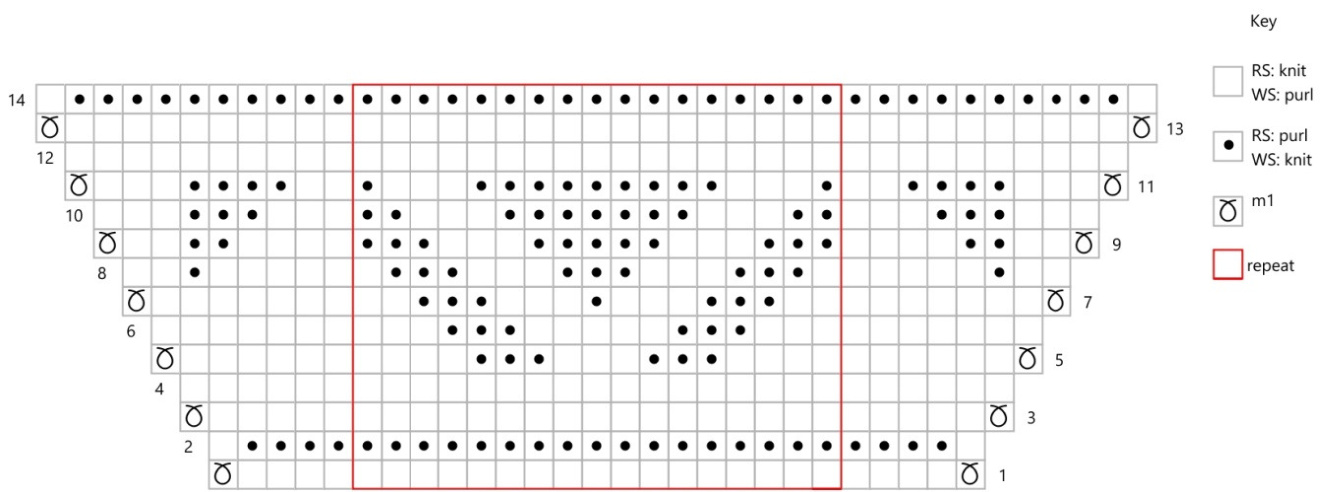
First Triangles & Arrows Section (Chart)

First Triangles & Arrows Section (Written Instructions)
Row 1 (RS): m1, k to marker, m1. Row 2 (WS): p1, k until 1 st remains before marker, p1. Row 3: m1, k to marker, m1. Row 4: purl to marker. Row 5: m1, k3, P4, k3, p1, (p1, k3, p9, k3, p1) 5 times, p1, k3, p4, k3, m1. Row 6: p4, k3, p3, k2, (k2, P3, k7, P3, k2) 5 times, k2, p3, k3, p4. Row 7: m1, k4, p2, k3, P3, (p3, k3, p5, k3, P3) 5 times, p3, k3, p2, k4, m1. Row 8: p5, k1, p3, k3, p1, (p1, k3, p3, k3, P3, k3, p1) 5 times, p1, k3, P3, k1, p5. Row 9: m1, k8, p3, k2, (k2, p3, k3, p1, k3, P3, k2) 5 times, k2, p3, k8, m1. Row 10: p8, k3, p3, (p3, k3, p5, k3, p3) 5 times, p3, k3, p8. Row 11: m1, k7, p3, k4, (k4, P3, k3, P3, k4) 5 times, k4, p3, k7, m1. Row 12: purl to marker. Row 13: m1, k to marker, m1. Row 14: p1, k to marker, p1.
Second Triangles & Arrows Section (Chart)
Second Triangles & Arrows Section (Written Instructions)
Row 1 (RS): m1, k to marker, m1. Row 2 (WS): p1, k until 1 st remains before marker, p1. Row 3: m1, k to marker, m1. Row 4: purl to marker. Row 5: m1, k6, (k4, P3, k3, p3, k4) 7 times, k6, m1. Row 6: p7, (p3, k3, p5, k3, p3) 7times, p7. Row 7: m1, k7, (k2, p3, k3, p1, k3, P3, k2) 7 times, k7, m1. Row 8: p2, k1, p5, (p1, k3, p3, k3, p3, k3, p1) 7 times, p5, k1, p2. Row 9: m1, k2, p2, k4, (p3, k3, p5, k3, p3) 7 times, k4, p2, k2, m1. Row 10: p3, k3, p3, (k2, p3, k7, p3, k2) 7 times, p3, k3, p3. Row 11: m1, k3, P4, k2, (p1, k3, p9, k3, p1) 7 times, k2, p4, k3, m1. Row 12: purl to marker. Row 13: m1, k to marker, m1. Row 14: p1, k until 1 st remains before marker, p1.
Border Section (Chart)

Border Section (Written Instructions)
Row 1 (RS): m1, k to marker, m1. Row 2 (WS): p1, k until 1 st remains before marker, p1. Row 3: m1, k to marker, m1. Row 4: purl to marker.
Change to larger needles from this point on
Row 5: m1, k1, p1, (p3, k1, p3) until 2 sts remain before marker, p1, k1, m1. Row 6: p2, k1, (k3, p1, k3) until 3 sts remain before marker, k1, p2. Row 7: m1, k2, p1, (p2, k3, p2) until 3 sts remain before marker, p1, k2, m1. Row 8: p3, k1, (k2, p3, k2) until 4 sts remain before marker, k1, p3. Row 9: m1, k3, p1, (p1, k5, p1) until 4 sts remain before marker, p1, k3, m1. Row 10: p1, k1, p2, k1, (k1, p5, k1) until 5 sts remain before marker, k1, p2, k1, p1. Row 11: m1, k1, p1, k2, p1, (p1, k5, p1) until 5 sts remain before marker, p1, k2, p1, k1, m1. Row 12: p1, k2, p2, k1, (k1, p5, k1) until 6 sts remain before marker, k1, p2, k2, p1. Row 13: m1, k1, p2, k2, p1, (p1, k5, p1) until 6 sts remain before marker, p1, k2, p2, k1, m1. Row 14: p2, k2, p2, k1, (k1, p5, k1) until 7 sts remain before marker, k1, p2, k2, p2. Row 15: m1, k2, p2, k2, p1, (p1, k5, p1) until 7 sts remain before marker, p1, k2, p2, k2, m1. Row 16: p3, k2, p2, k1, (k1, p5, k1) until 8 sts remain before marker, k1, p2, k2, p3.
Bind Off & Finishing
Bind off all sts in pattern (knit sts in knit, purl sts in purl). Shawl shown uses a regular stitch over stitch bind-off as follows: Where next st is a knit stitch, knit the st, where next st is a purl stitch, purl the st. Do the same for the next st. Slip the first st over the second st. Continue in the same manner, knitting or purling the next stitch and slipping the previous stitch over it, until all sts are bound off. Block the shawl into a neat triangle by washing according to the directions for your yarn and pinning out flat to dry using the measurements in the schematic on p.1