
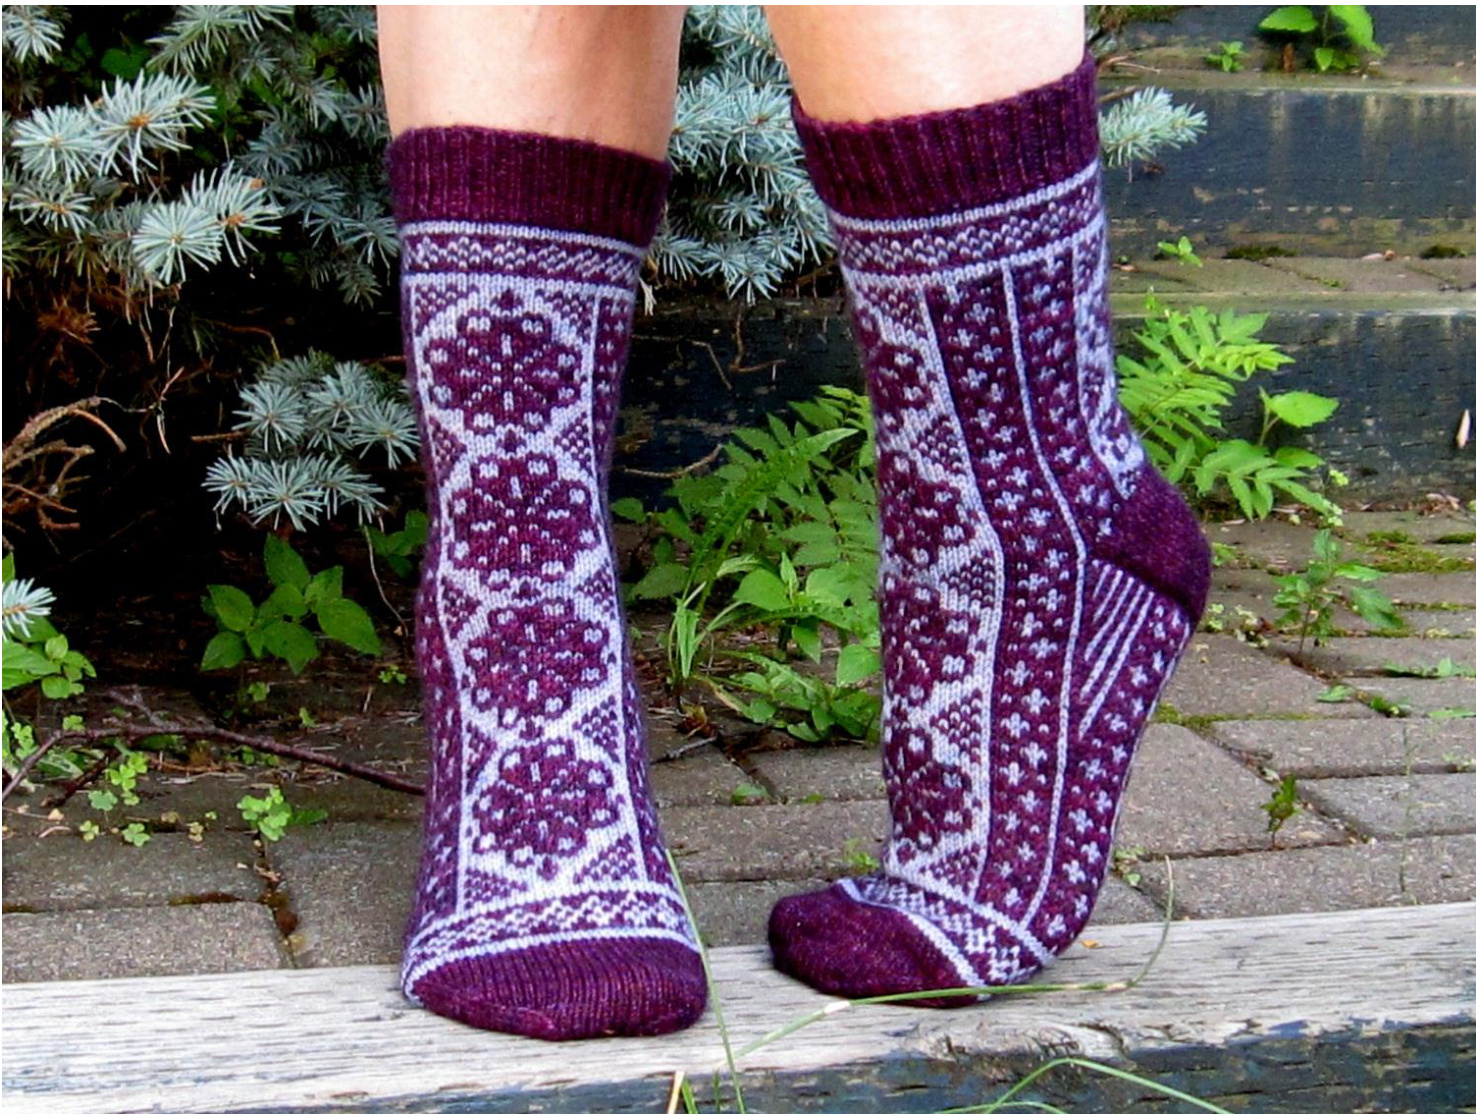
Ifound this flower motif in my Alice Starmore's Book of Fair Isle knitting.I was immediately drawn to it. It reminded me of the Fireweeds that grow wild in Northern Ontario. I just added two columns of fireweed pollen on each side and voila Fireweed socks. Pattern is written cuff down with the Magic loop or 2 circular needles method. Front needle is the front leg/instep needle and Back needle is the back leg/sole needle. If you want to use DPNS just distribute the stitches onfour needles and useneedle1 and 2 for thefront and needles3 and 4for theback.
Note: β I knit holding the forecolour in the left hand and the background in the right hand. That is because I prefer the forecolor to be the dominant color (pop out) and the background color to be less dominant. For rows 5 to 9 of the leg chart and rows 47 to 51 of the foot chart, I held the pale color in my left hand because I wanted the lozenge motif to stand out. For the rest of the stranded portion of the sock, I did the opposite: I held the darker color in my left hand because I wanted the flower motif to be more prominent. Materials: MC Hazel Knits Artisan color Queen of the night (socks shown Large size used 80 g) CC Hazel Knits Artisan color Hydrangea (socks shown Large size used 60g) US 1 (2.25 mm) circular needle 32 inch (80cm) One US 1 (2.25mm) dpn or stitch holder Tapestry needle Stitch markers Gauge: 8 STS and 11 rows per inch (2.5cm) over blocked stranded pattern with US 1(2.25 mm) needle Size: 2 sizes 64/72 STS; Medium /Large
Measurements:
Sock shown is the large size and unstretched measures 9.5 inches (24 cm) in length, foot and leg circumference are 9 inches (22 cm). Leg is 7 inches (18cm) and heel flap is 2.5 inches (6.5cm). Sizing: I suggest you swatch for row gauge since it is important for this pattern; then do the math to decide if you want to shorten the leg or foot. To shorten, simply start the leg on row 10 of the Leg chart or for the foot and stop after row 45 of the Foot chart. Chart symbols:
Knit in MC
Abbreviations:
| CO:CastOn | PU:PickUp |
| MC:MainColor(Queenofthenightinsockshown) | SL1K:Slip1stitchKnitwise |
| CC:ContrastingColor(Hydrangeainsockshown) | SL1P:Slip1stitchPurlwise |
| RS:RightSide | SM:SlipMarker |
| WS:WrongSide K:Knit | SSK:Slip2stitchesasiftoKnitoneatatimetotheright |
| K2TOG:Knit2stitchesTogether | needleandknitthose2stitchestogether |
| P:Purl | ST(S):Stitch(es) **instructionsbetweenasterixaretoberepeated |
Instructions
Cuff Note: Tilly's very stretchy cast on can be found at this link: http://www.youtube.com/watch?v=wf8cY djTRI With MC using Tilly's very stretchy cast on, CO 64(72) STS (or you can use your favorite cast on). Arrange STS to have 32(36 STS) per needle. Beginning of round is the first ST of the front needle. Knit 15 rounds in K1P1 ribbing. Leg: Work the appropriate sized Leg Chart (once per needle/twice per round) Once the leg chart has been completed, move the first ST of the back needle to the front needle. Front needle now has 33/37 STS and the back needle has 31/35 STS (front needle now starts and ends with a CC). Fireweed by Rosehiver 2of 7
Heel Flap
Heel flap is worked with MC on back needle only, work back and forth in rows (31/35 STS). Do not cut CC; you will pick it up after the heel turn. Sock is made with an Eye of Partridge heel. Some people like to slip the first ST of the heel flap and knit the last one. I prefer to do the opposite, knit the first ST and slip the last ST. I find it makes a tighter edge. Row 1: (WS): K1, purl to last ST, SL1P with yarn in front, turn Row 2: (RS): K1, \* K1, SL1K with yarn in back rep from\* to last 2 stitches, K1, SL1P with yarn in front, turn Row 3: (WS): K1, purl to last ST, SL1P with yarn in front, turn Row 4: (RS): K1, \* SL1K with yarn in back, K1 rep from\* to last 2 stitches, SL1K with yarn in back, SL1P with yarn in front, turn Repeat row 1 to 4, until flap is 2.5 in/6.5 cm, or desired length; making sure to end after a RS row ready to work a WS row.(sock shown has a heel flap 40 rows total)
Heel Turn
Continue working back and forth; use short rows to turn heel as follows: Row 1: (WS) K1, P17/19, P2tog, P1 turn Row 2: (RS) SL1P with yarn in back, K6, SSK, K1, turn Notice that there is a small gap that forms between the working STS and the unworked STS. Row 3: (WS) SL1P with yarn in front, purl to within 1 ST of gap, P2tog (1 ST on each side of gap, you are closing the gap), P1, turn Row 4: (RS) SL1P with yarn in back, knit to within 1 ST of gap, SSK, K1, turn Repeat row 3 and 4 until all STS have been worked, ending with a right side row. You will have 19/21 remaining STS. Cut MC leaving a 15 cm tail to be weaved in later. Put the heel stitches on a spare dpn or on a stitch holder.
Gusset shaping
At the top of the heel flap, at the leg and heel flap join (opposite end of where you left your CC yarn in waiting), rejoin MC pick up one ST on each side at join between heel and leg, knit those 2 STS together, then pick up and knit 1 ST for each slipped edge ST. Knit the 19/21heel STS. On the other side of the heel flap, pick up and knit 1 ST for each slipped edge ST; at the join of the heel flap and leg pick up 2 STS (one on each side of the gap) and knit those 2 STS together to close the gap at heel join. Move the first and last ST of the front needle to the back needle. Back needle now starts and ends with CC. On the back needle, put a stitch marker on each side of the 33/37 center STS. At this point I just thread a different colored yarn between the STS and replace the thread by a stitch marker when I get to it. Count the STS on each side of the markers you will need the same number of STS on each side of the marker. If not, simply do a decrease by doing K2TOG anywhere on the next round on a dark colored ST so that you have the same number of STS on each side of the marker. Note: For the gusset section, I prefer to knit with half of the instep and half of the sole STS on each needle (separating the sock sideways). Beginning of round is still the 1" ST of Needle 1. Fireweed by Rosehiver 3 of 7
Pinstripe Gusset decreases
Choose one of the 2 following set-up rounds depending on how many STS you have on each side of the marker. Set-up round if you have an even number of STS on each side of marker Needle A: Instep (top of foot), Knit in established pattern using Foot chart see page 6/7. Needle B: Sole \*Knit 1 ST in CC and one ST in MC\* called pinstripe pattern repeat from \* until marker, SM knit the next 33/37 STS according to Foot chart , SM knit in pinstripe but this time starting with \*knit 1 ST in MC and 1 ST in CC\* repeat from \* until end of round Set-up round if you have an odd number of STS on each side of marker Needle A: Instep (top of foot), Knit in established pattern using Foot chart see page 6/7 Needle B: Sole Knit 1 ST in CC and 2 STS in MC and then \*K1 in CC, K1 MC\* called pinstripe pattern repeat from\* until marker, SM, knit the next 33/37 STS according to Foot chart, SM knit in pinstripe but this time starting with \*knit 1 ST in MC and 1 ST in CC\* repeat from \* until the last 3 STS, Knit 2 STS in MC and 1 in CC Work the next 2 rounds until you are back to 64/72 STS total. Round 1 (regular round) Front Needle: Instep Knit in established pattern as per Foot chart. Back Needle: Sole Knit in established pinstripe pattern until marker, SM knit in pattern as per Foot chart, SM knit in established pinstripe pattern Front Needle: Instep Knit in established pattern using Foot chart. Back Needle: Sole Knit one St in CC, SSK in MC and then knit in established pinstripe until marker, knit as per Foot chart, slip marker, knit in established pinstripe pattern until you reach 3 STS before marker, K2TOG in MC and K1 CC Note: Your SSK and K2ToG never change colors as you decrease they are always done in MC. Remove markersforthelastdecreases.
Foot
Work in established pattern according to the Foot chart. The foot should be stopped 2 inches shy of total length needed. Toe Cut CC leaving a 15 cm tail to be woven in. Toe will be worked in MC only. Move the last ST of the back needle to the front needle. You now have the same number of STS on each needle. I like to do 4 rows of stockinette with MC but this is optional. Decrease for toes as per the following 2 rnds: Round 1: decrease round Front Needle: K1, SSK, knit to last 3 STS, K2TOG, K1 Back Needle: K1, SSK, knit to last 3 STS, K2TOG, K1 Round 2: regular round For both Front and Back Needle, Knit. Repeat rounds 1 and 2 until you have a total of 32 STS left (16 STS per needle); then work the decrease round every round until there are 16 STS left (8 STS per needle). Graft STS together with Kitchener ST, weave in all yarn ends and block. Fireweed by Rosehiver 4 of 7
| Leg72STSChart | 64STSLegChart | ||||||||||||||||||||||||||||||
| 44 3 52 5 549 48474645 443 42 4 40 39 33 73635 4 3 22 3 3029 28 7 2625 4 23 2 2 2019 187416 | 44 3 2555 4948 74654322 440 39 3373635 4 3 2330 29 28 2726 2524 232 2 20 1918 171615 | ||||||||||||||||||||||||||||||
| 15 14 | 14 | ||||||||||||||||||||||||||||||
| 54 3 52 55 4948 74654 4342 440 39 33 726 35 44 3 32 3 30 29 2 27 26 25 24 23 2 2 20 1918 1716154 1312 11109 | 12 10 | 13 12 11 10 | |||||||||||||||||||||||||||||
| 7 6 | 54 3 52 55 4948 74654 342 440 3933 736 35 4322 330 2928 77262524 232 2 20 1918 1716154 1312 11098 76 5 4 3 | ||||||||||||||||||||||||||||||
| 4 3 K5 | 36353433323130292827 | 25 | 20 | 18 | 3231302928272625242322212019181716151413121110 |
| 54 53 52 5 549 4 7 4645 4 43 42 4 40 9 3 7 625 4 3 2 3 3029 28 7726 254 23 2 22 20 19 18 7 1615 4 13 12 11 10 9 | 64STSFootChart | |||||||||||||||||||||||||||
| 54 | ||||||||||||||||||||||||||||
| 44 3352 55494847645 44342 440 39 337 265 43 23 3029 28272625 24 2322 222019 181741615413 12 11 10 9 87 6 5 4 3 2 | ||||||||||||||||||||||||||||
| 2928 27262524 | ||||||||||||||||||||||||||||
| 23224 | ||||||||||||||||||||||||||||
| 2019 18 | ||||||||||||||||||||||||||||
| 16 5 | ||||||||||||||||||||||||||||
| BackNeedle | 3 | 13 12 2 | 14 | Front Needle | 313029282726252423222120191817161514131211109 | 6 5 | 3 | |||||||||||||||||||||
| 8 7 4 3 1 | 333231302928272625242322212019181716151413121110987 |
| 72STSFootChart | ||||||||||||||||||||||||||||||
| 54 33 25504948 446454434244403933 72625 432 330 2928 772625 2423 2 222019 1874161541312 11 10 98 7 | 54 33525 5549 4847 46 45 44342 4 40 39 33 7 326 35 4 3 32 3 30 29 28 27 26 254 23 2 2 20191817 | 54 33 5255494847461544342440 39337 2635 4 3 32 3 3029 2 272254 2 2 2 20191877161541312 11109 87 6 5 4 32 1 | ||||||||||||||||||||||||||||
| 25 24 | 232221 | BackNeedle | 16 15 10 35 34 | 32 | 27 26 | 23 | FrontNeedle | 16 | 14 | |||||||||||||||||||||
| 65432 1 | 32 31 28 |


