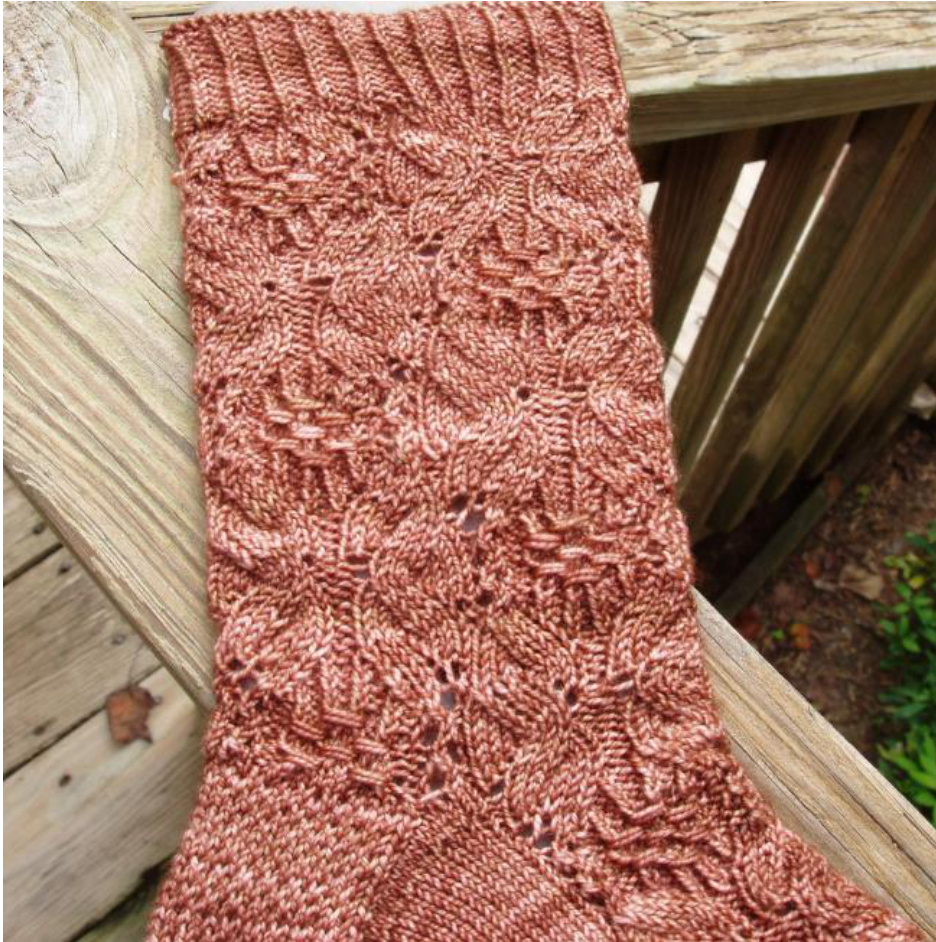
Plenocaris Socks
Materials - 1 skein of fingering weight yarn (\~ 400 yds). I used Saffron Dyeworks enya in “Rose Gold" Needles - 2.0 mm (US size 0), or size needed to obtain gauge Stitch markers and tapestry needle. Size: Women's medium Gauge: 8 - 9 stitches; 11 - 12 rows per inch in the charted pattern (I'm a REALLY tight kniter, you may prefer a loosergauge.) The charted pattern is used on the top of the foot and leg. Because of the stitch pattern this sock is in just one size. Any changes in size will have to be made by adjusting the gauge. On pages 8 & 9 there are some suggestions for improving the fit of your sock and links for techniques used in this pattern. On pages 10-12 there are charts for doing the sock as a centered lace panel.
Abbreviations: K: Knit P: Purl SI: Slip K2T: Knit 2 Together P2T:Purl 2 together SSK: Slip both stitches knit wise to the right needle, then knit them together through the back loops YO: Yarn Over M1: Make 1 KB: Knit through the back loop CL4: Cluster 4 stitches - Slip 4 stitches onto cable needle, wrap yarn around the stitches counter clockwise ? times, slip stitches onto working needle without knitting them
Toe Up Directions
Toe: Using Judy's Magic Cast On cast on 26 stitches (13 stitches on each needle). Knit all of the stitches on each needle once. (Note: I prefer to make my increases by doing a yarn over on one round, and knitting it through the back on the next. It makes it very easy to tell whether or not I'm on an increase round.) Round 1: Instep needle: K2, M1, knit until 2 stitches before the last stitch, M1, K2. Sole needle: K2, M1, knit until 2 stitches before the last stitch, M1, K2. Round 2: Knit all stitches (Note: if you are using dpn's you will want to start using the 4th needle on this row, and place some markers to separate the instep and sole stitches.) Round 3: Instep needle: K2, M1, knit until 2 stitches before the last stitch, M1, K2. Sole needle: K2, M1, knit until 2 stitches before the last stitch, M1, K2. Round4:Knit Repeat Rounds 3 & 4 until there are 74 stitches total (37 on each needle). Work 1 additional increase round on the instep only - 39 instep stitches, 76 total stitches. Optional Eye of Partridge Toe: I like some extra reinforcement in my toes so I came up with this method. Note: All slipped stitches should be slipped knit wise Using Judy's Magic Cast On cast on 26 stitches (13 stitches on each needle). Round 1: Instep needle: K2, (Sl1, K1) to last 3 stitches, K3 Sole needle: Knit Round 2: Instep needle: K2, YO, Knit to last 2 stitches, YO, K2 Sole needle: K2, YO, (K1, Sl1) to last 3 stitches, K1, YO, K2 Round 3: Instep needle: K2, KB1, (K1, Sl1) to last 4 stitches, K1, KB1, K2 Sole needle: K2, KB1, Knit to last 3 stitches, KB1, K2 Round 4: Instep needle: K2, YO, Knit to last 2 stitches, YO, K2 Sole needle: K2, YO, (K1, Sl1) to last 3 stitches, K1, YO, K2 Round 5: Instep needle: K2, KB1, (K1, Sl1) to last 4 stitches, K1, KB1, K2 Sole needle: K2, KB1, Knit to last 3 stitches, KB1, K2 Round 6: Instep needle: K2, YO, Knit to last 2 stitches, YO, K2 Sole needle: K2, YO, (K1, Sl1) to last 3 stitches, K1 YO, K2 Repeat Rounds 5 and 6 until there are 74 stitches total (37 on each needle). Work 1 additional increase round on the instep only - 39 instep stitches, 76 total stitches. You may wish to work several rounds of the slip stitch pattern after you have completed all of the increases. The slip stitch pattern will make the rounds “shorter" than plain stockinette stitch, so you will need more rounds to make a toe the same length as a plain toe. Instep: Work the chart as it appears. Sole: Knit all stitches Continue following the chart until the sock measures 3.5 inches less than your foot length.
Instep:
Round 1: Make 1, Place Marker, continue working chart, PM, M 1. Knit the sole stitches. Round 2: Knit 1, Slip Marker, work chart, SM, knit 1. Knit the sole stitches. Round 3: M 1, K1, SM, work chart, SM, K 1, M 1. Knit the sole stitches. Round 4: K 2, SM, work chart, SM, K 2. Knit the sole stitches. Round 5: M 1, K 2, work chart, K 2, M 1. Knit the sole stitches. Round 6: K 3, SM, work chart, K 3, SM. Knit the sole stitches. Continue increasing in this fashion until you have increased 15 times. There will be 69 stitches on the instep needle, and a total of 106 for the entire sock. After the last gusset increases, increase 6 stitches, evenly spaced, in each gusset section. There will now be 21 gusset stitches, 81 instep stitches, 118 for the entire sock. Work one more round before beginning the heel. You may want to mark the last round you completed on the chart so you can find the right round easily when you have finished the heel.
Heel turn:
The heel turn will be worked back and forth over the center 37 sole stitches. All slipped stitches should be slippedknit wise. Row 1: (RS): (Sl 1, K 1) to the last 2 sole stitches, Wrap & Turn. Row 2: (WS): Purl to the last 2 sole stitches, Wrap & Turn. Row 3: (RS): (K 1, Sl 1) to the stitch before the wrapped stitch, Wrap & Turn. Row 4: (WS): Purl to 1 stitch before the wrapped stitch, Wrap & Turn. Repeat Rows 3 & 4 until there are 8 wrapped stitches on each side. (You may wish to add or subtract some wrapped stitches for the best individual fit.) Knit across the heel stitches to first wrapped stitch. Work the wrapped stitch and its wrap together. Do this until the last wrapped stitch. (There should be an unwrapped stitch behind it.) Knit the 2 stitches and the wrap together. Turn. Purl to the first wrapped stitch. Work the wrapped stitch and its wrap together. Do this until the last wrapped stitch. (There should be an unwrapped stitch behind it.) Purl the 2 stitches and the wrap together. You should now have 35 heel stitches. Turn.
Slip Stitch Heel Flap:
Row 1: Slip the 1st stitch. (K 1, Sl 1) to last stitch. Slip the last stitch, knit the 1st gusset stitch and pass the slipped stitch over. Turn Row 2: Purl to the last stitch. Purl this stitch together with the 1st gusset stitch. Turn. Row 3: Slip the 1st stitch. (Sl 1, K 1) to last stitch. Slip the last stitch, knit the 1st gusset stitch and pass the slipped stitch over. Turn Row 4: Purl to the last stitch. Purl this stitch together with the 1st gusset stitch. Turn Repeat these 4 rows until there is 1 gusset stitch remaining on each side. You should have a total of 76 stitches. Continue working the charted pattern on the instep stitches. The chart is worked 2 times for the leg. (Note: After working the heel, start the pattern for the back of the leg on the same row as the front. If you are in the middle of the chart it won't really make a difference.) Continue working the pattern until about 1 12 inches from the desired length. Ribbing: Work the ribbing pattern on page 7 and bind off loosely.
Cuff Down Directions
Cuff: Cast on 72 stitches. Join (be careful not to twist), and work ribbing chart on Page 7. Work Round 1 15 times, then work the set up round before starting the pattern. After the set up round you should have 76 stitches. Work the chart as it appears. The chart is worked 2 times. Work Rounds 1 -34 until desired length before starting the heel.
Heel Flap:
The heel is worked back and forth on 37 stitches (stitches 40-76). Arrange the stitches so that there are 37 stitches on one needle. All slipped stitches should be slipped knit wise. Row 1: (Sl 1, K1) to last stitch. End with K1. Row 2: SI 1, P across. Row 3: Sl1, (Sl1, K1) to last stitch Row 4: Sl1, P across. Repeat these 4 rows, until the heel flap is 2.5" (6.4 cm) or your desired length. The last row should be a purl row.
Turn Heel:
Row 1: (Sl1, K1) 10 times (20 stitches), K2T, K1, turn. Row 2: SI 1, P 5, P2T, P1, turn. Row 3: Sl1, (K, Sl1) 3 times, K2T, K1, turn. Row 4: Sl1, P 7, P2 tog, P1, turn. Repeat Rows 3 and 4, adding 1 K or P stitch after the first slipped stitch until all side stitches are consumed, ending with a purl row. Turn and knit the heel stitches. Now you are ready to begin the gusset.
Gusset:
Pick up and knit the slipped stitches from the side of the heel flap, and knit 1 stitch in the gusset corner. You will now be working from the main chart. Work the appropriate row of the chart across the instep. Pick up and knit 1 stitch in the gusset corner. Pick up and knit the slipped stitches from the side of the heel flap. Knit across the turned heel stitches.
Gusset Decreases:
Round 1: Knit to the last 3 stitches before the start of the instep, K2T, K1. Work instep pattern according to chart. K1, SSK. Round 2: Knit all the sole stitches. Work the instep pattern according to chart. Repeat these 2 rounds until stitch count returns to 76. (You may wish to add or subtract some stitches from the sole for the best individual fit.)
Sock Foot:
le chart until foot measures 2 inches (5 cm) from the end of your longest toe. ShapeToe: Instep: K1, SSK. Knit across instep until 3 stitches remain, K2T, K 1. Sole: Knit. You should now have 37 stitches for both the sole and the instep. Knit 1 round.
Cuff Down Directions
Shape Toe:
Round 1: Knit the 1st instep stitch, SSK. Knit across instep until 3 stitches remain, K2T, K 1. Place 1st marker. Knit the 1st sole stitch, SSK. Knit across the sole stitches until 3 stitches remain, K2T, K1. Place 2nd marker Round 2:Knit. Round 3: Slip Marker. Knit the 1st instep stitch, SSK. Knit across instep until 3 stitches remain before the 1st marker, K2T, K 1. Slip Marker. K 1, SSK. Knit across the sole stitches until 3 stitches remain, K2T, K1. Repeat Rounds 2 & 3 until there are 26 stitches remaining. Graft using kitchener Stitch. Optional Eye of Partridge Toe: I like some extra reinforcement in my toes so I came up with this method. Note: All slipped stitches should be slipped knit wise Round 1: Knit the 1st 3 instep stitches, (Sl1, K1) until 3 stitches remain, K3. Place 1st marker. Knit the 1st 4 sole stitches, (Sl1, K1) until 3 stitches remain, K3. Place 2nd marker. Round 2: Knit Round 3: Knit the 1st instep stitch, SSK. (K1, Sl1,) until 4 stitches remain, K1, K2T, K1. Slip marker. Knit the 1st sole stitch, SSK. (K1, Sl1) until 4 stitches remain, K1, K2T, K1. Slip marker Round 4: Knit. Repeat rounds 3 & 4 until there are 26 stitches remaining. Graft using kitchener Stitch.
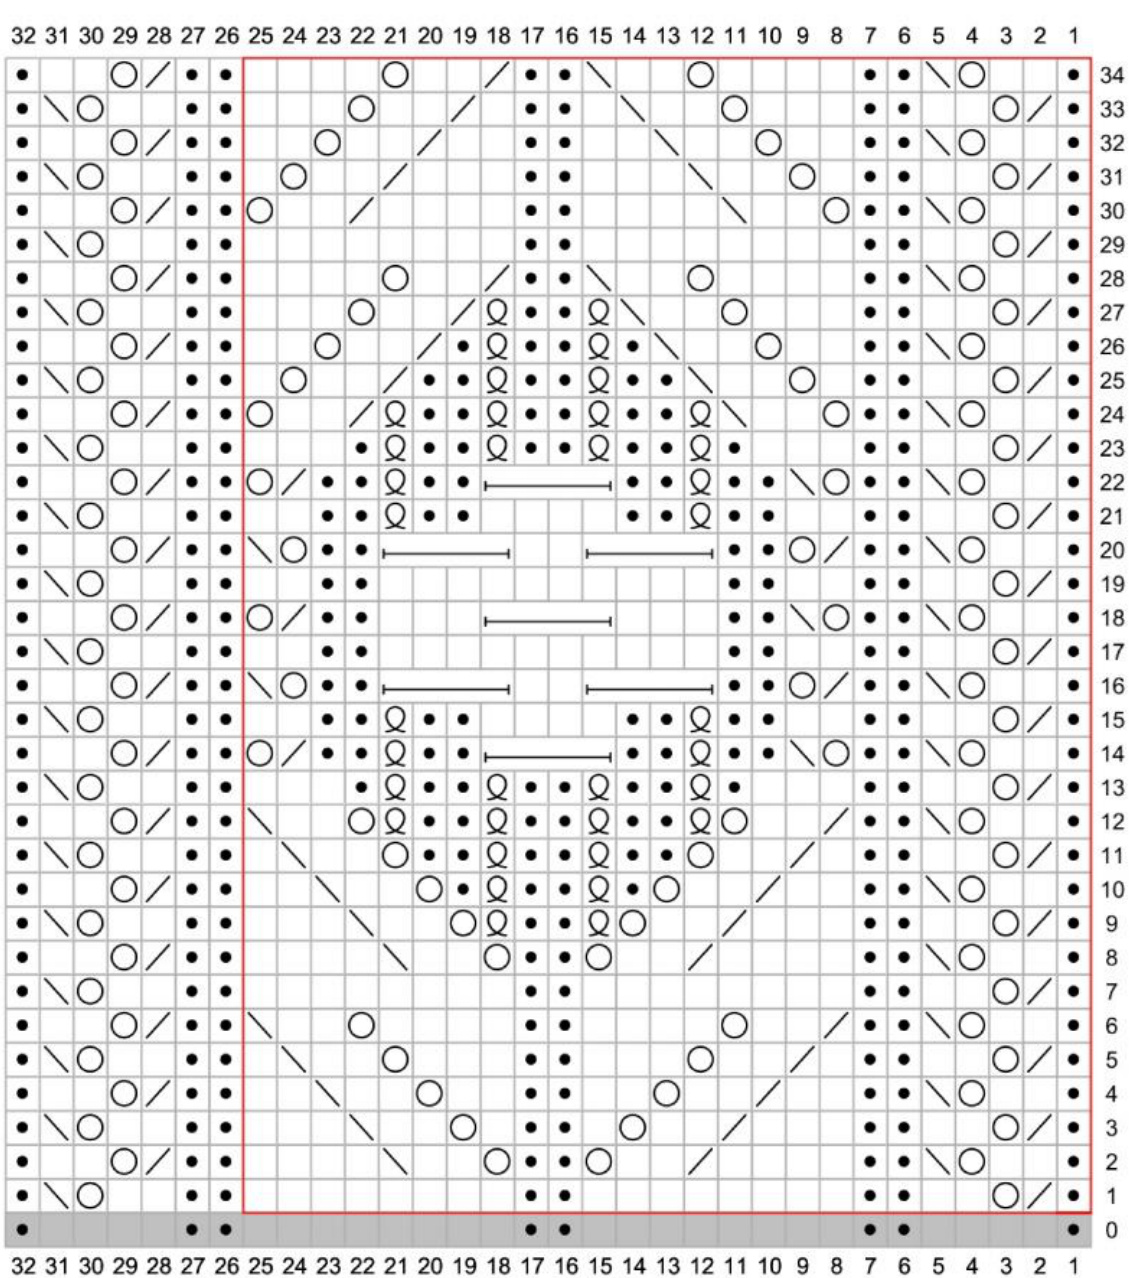
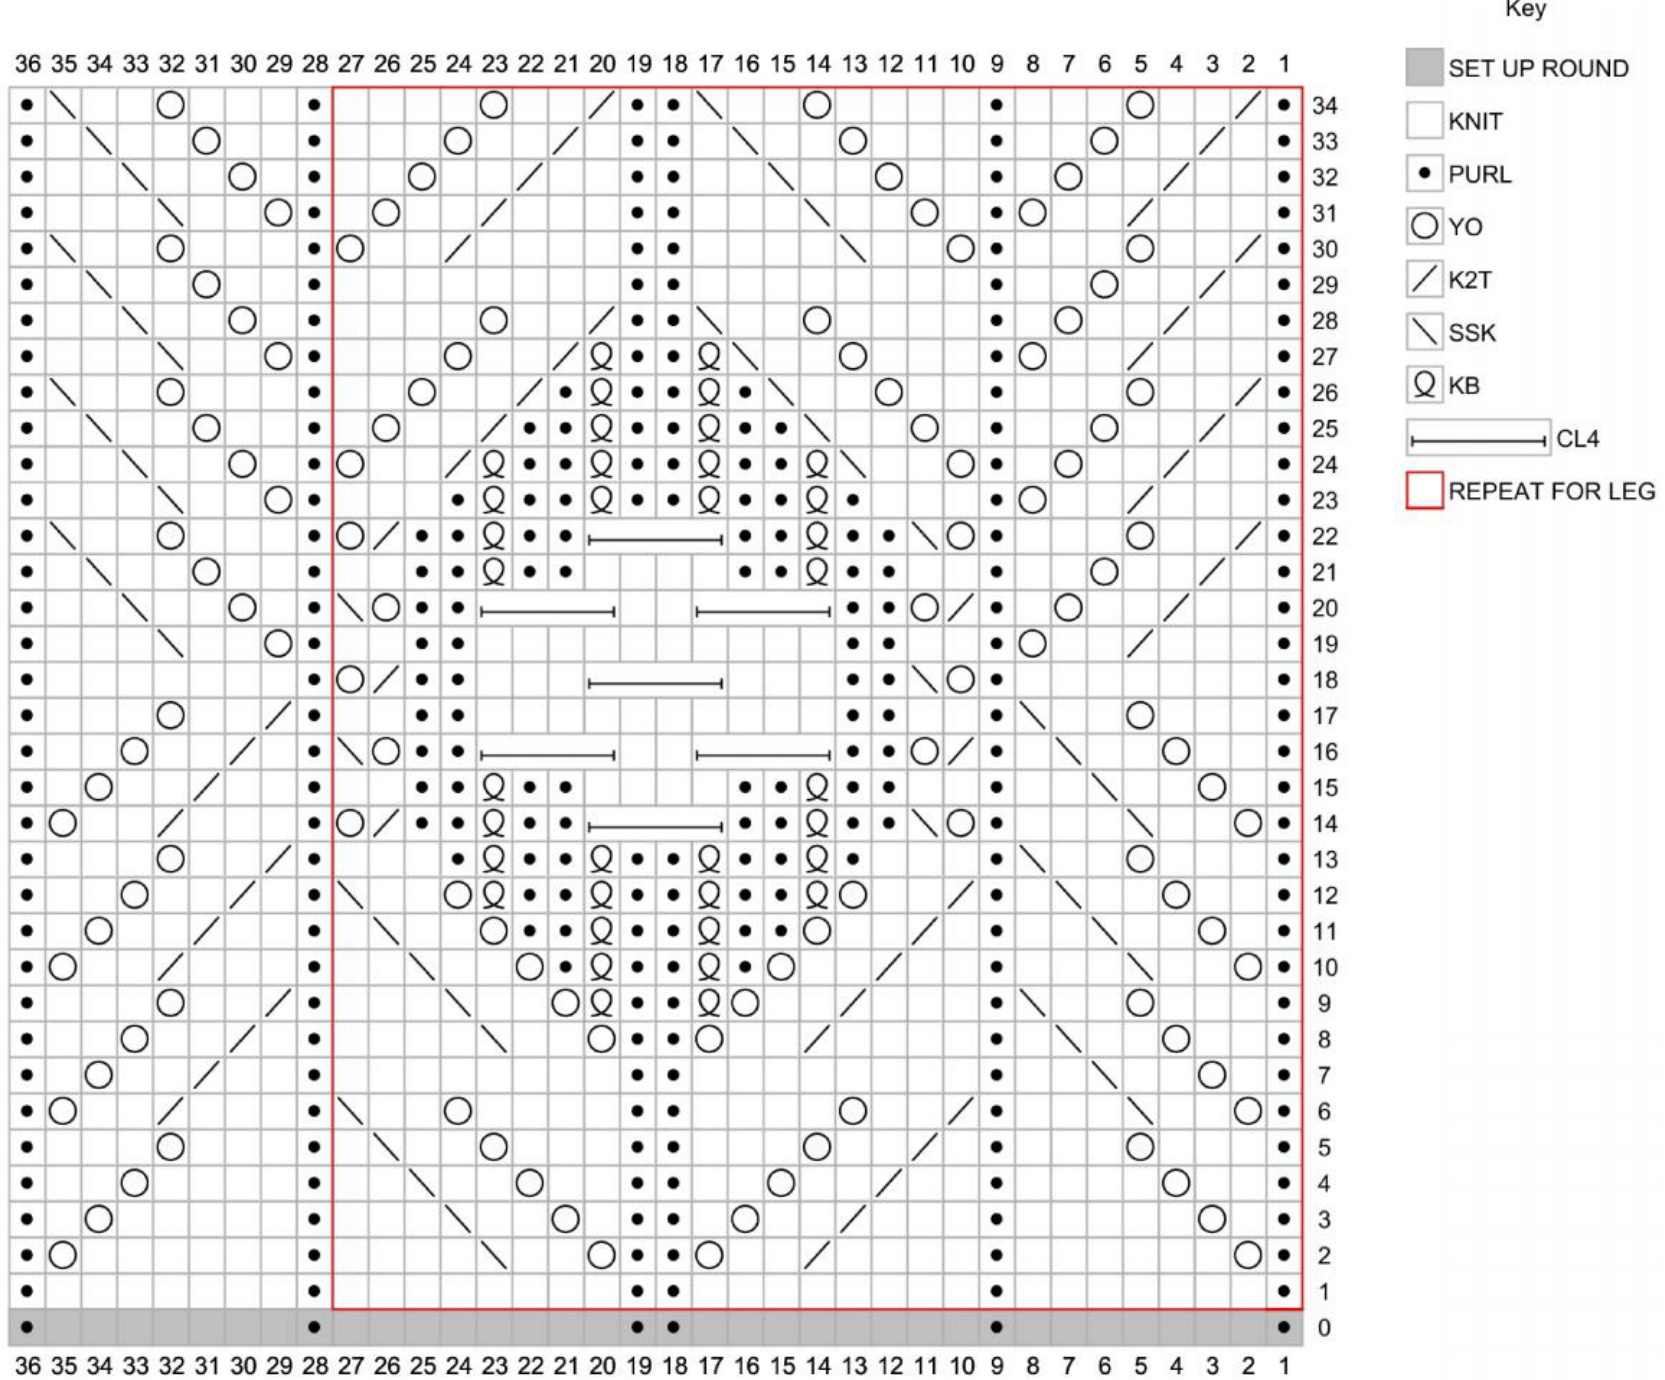
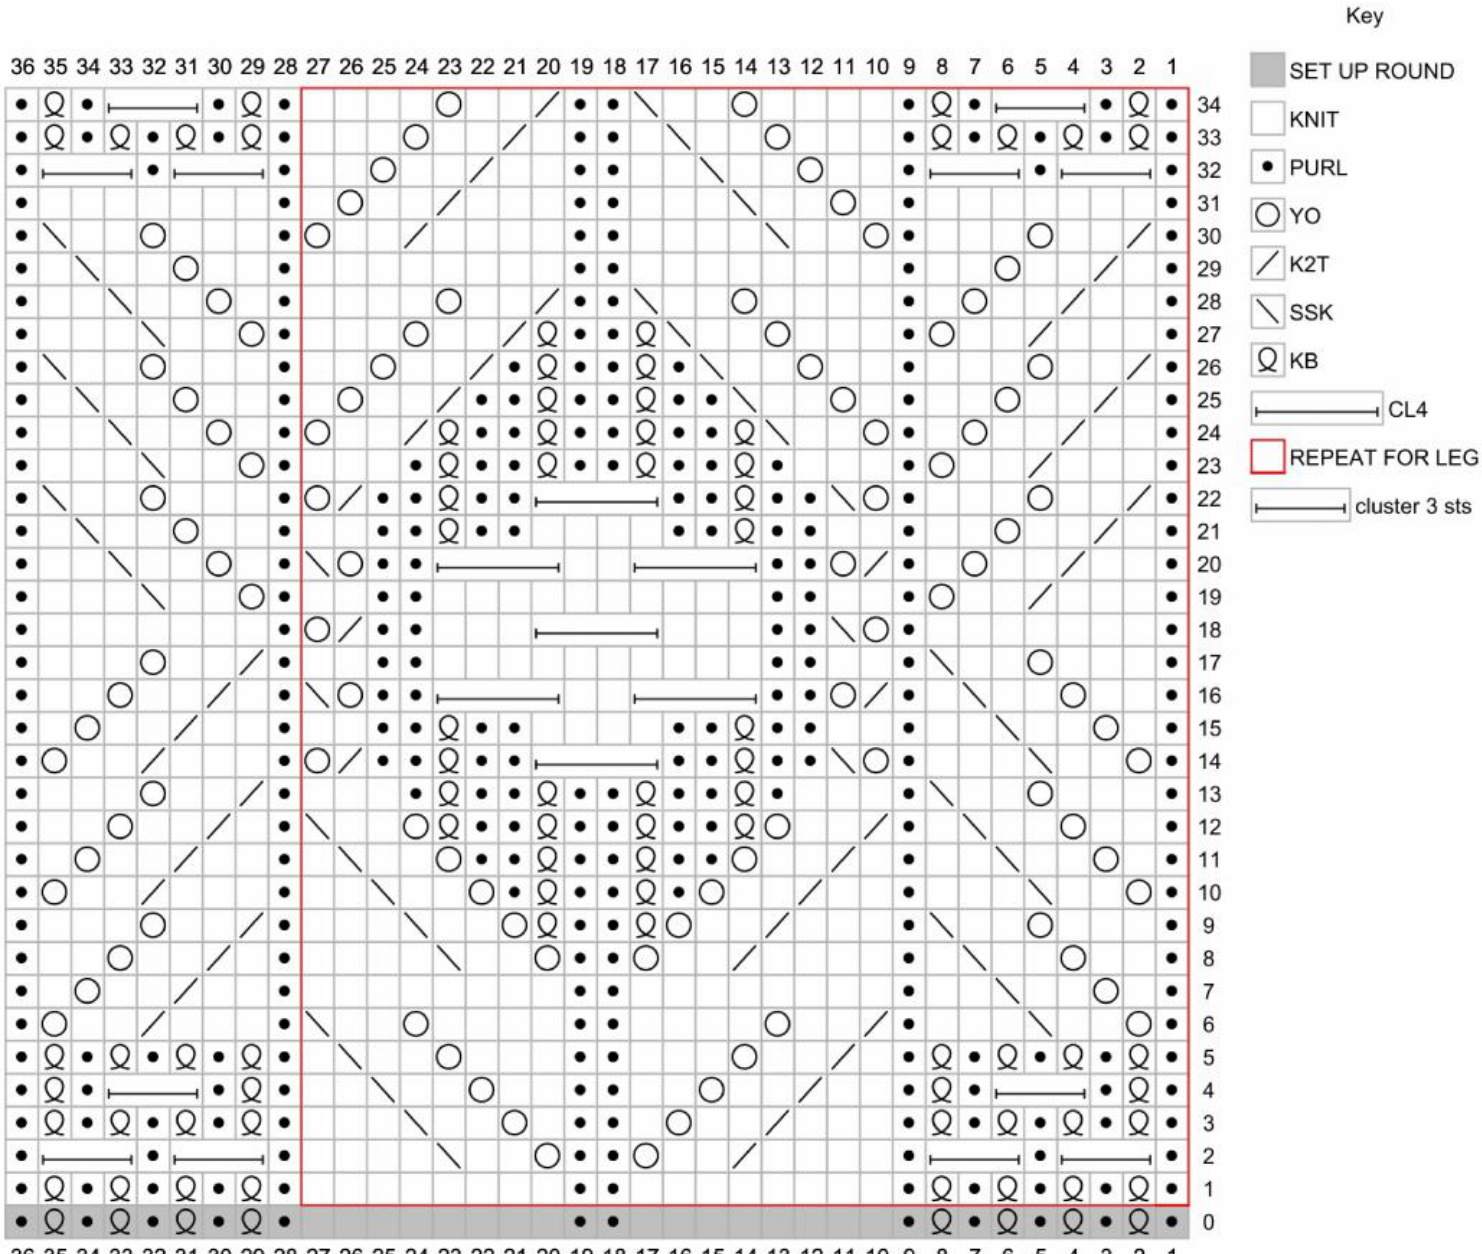
Stitch Chart (Note: The Set Up round should only be worked 1 time)
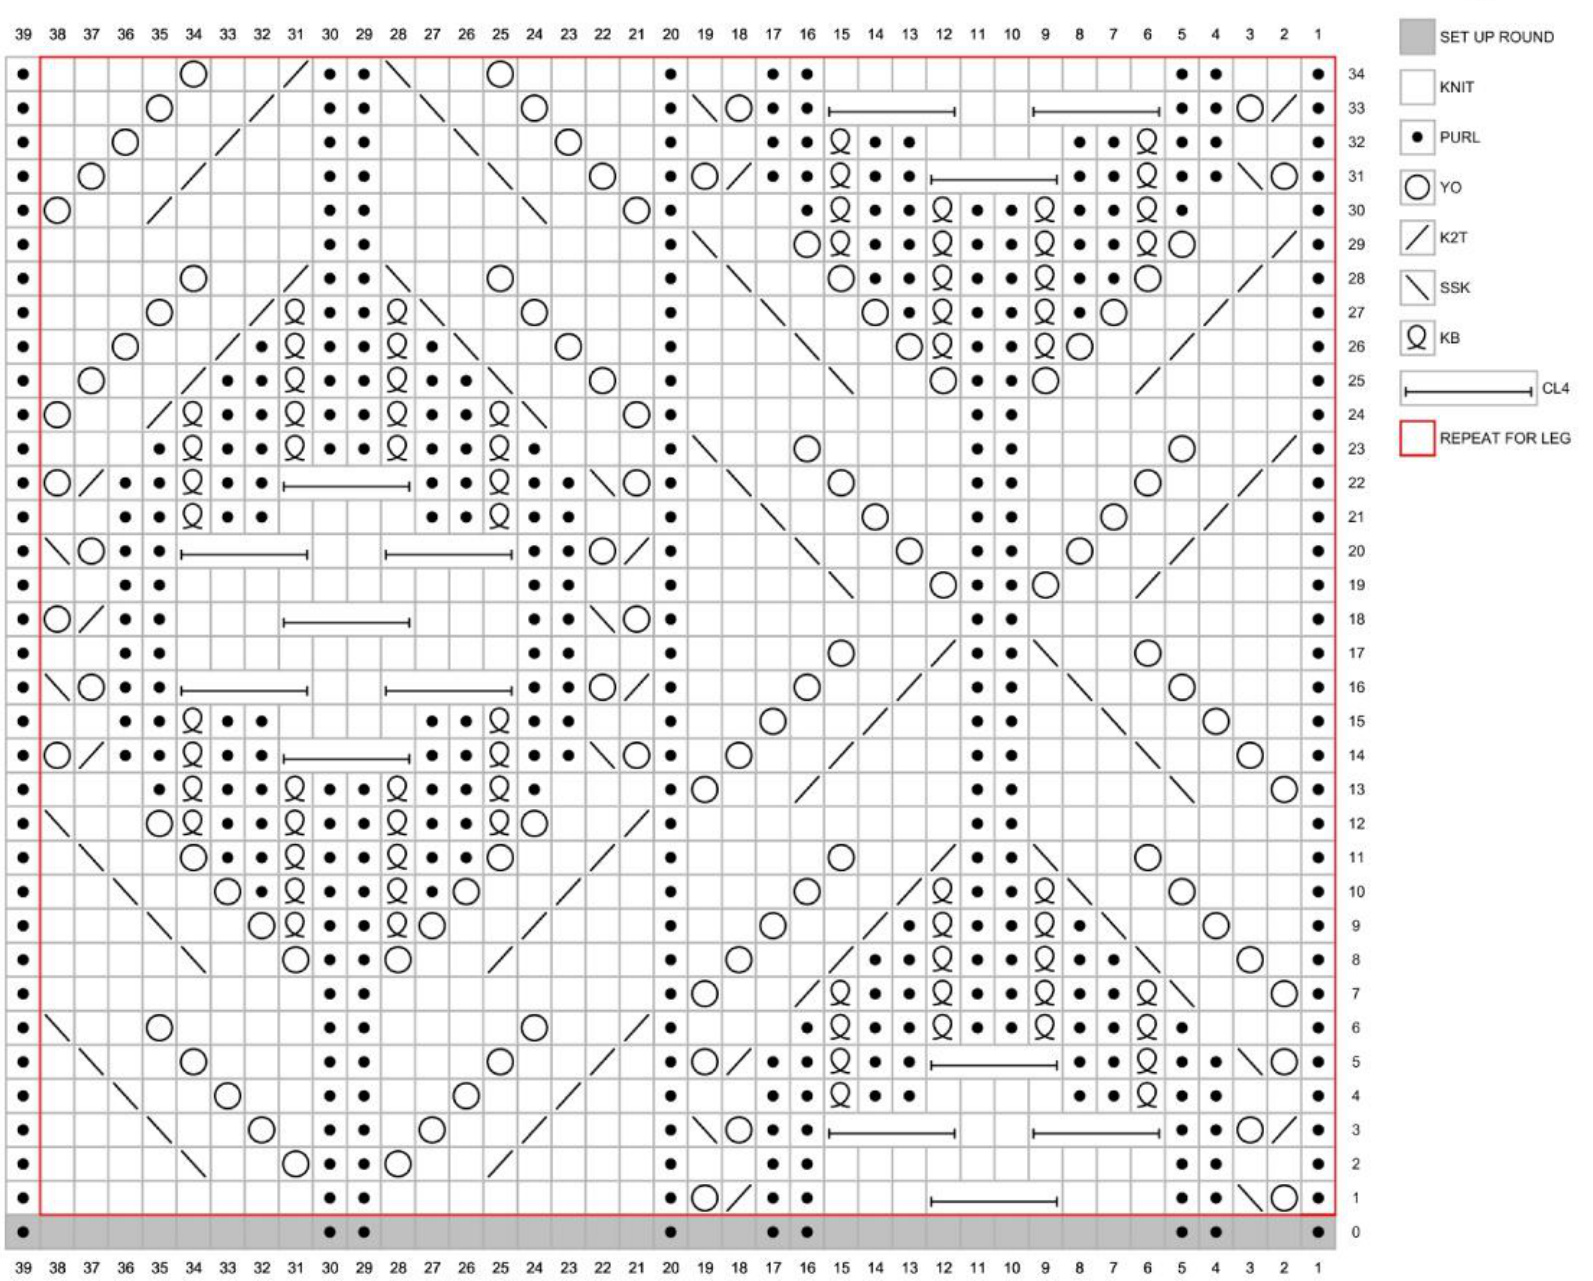
Stitch Pattem - Note: the stitch in [red] is only worked for the instep Set up Round: P1, K2, p2, K10, p2, K2, P1, K8, p2, K8, [P1]. R.1: P1, YO, SSK, p2, K3, CL4, K3, p2, K2T, YO, P1, K8, p2, K8, [P1]. R.2: P1, K2, p2, K10, p2, K2, P1, K4, K2T, K2, YO, p2, YO, K2, SSK, K4, [P1]. R.3: P1, K2T, YO, p2, CL4, K2, CL4, p2, YO, SSK, P1, K3, K2T, K2, YO, K, p2, K, YO, K2, SSK, K3, [P1]. R.4: P1, K2, p2, KB, p2, K4, p2, KB, p2, K2, P1, K2, K2T, K2, YO, K2, p2, K2, YO, K2, SSK, K2, [P1]. R.5 P1, YO, SSK, p2, KB, p2, CL4, p2, KB, p2, K2T, YO, P1, K, K2T, K2, YO, K3, p2, K3, YO, K2, SSK, K1, [P1]. R.6: P1, K3, P1, (KB, p2) x3, KB, P1, K3, P1, K2T, K2, YO, K4, p2, K4, YO, K2, SSK, [P1]. R.7: P1, YO, K2, SSK, (KB, p2) x3, KB, K2T, K2, YO, P1, K8, p2, K8, [P1]. R.8: P1, K1, YO, K2, SSK, (p2, KB) ×2, p2, K2T, K2, YO, K1, P1, K4, K2T, K2, YO, p2, YO, K2, SSK, K4, [P1]. R.9: P1, K2, YO, K2, SSK, P1, KB, p2, KB, P1, K2T, K2, YO, K2, P1, K3, K2T, K2, YO, KB, p2, KB, YO, K2, SSK, K3, [P1]. R.10: P1, K3, YO, K2, SSK, KB, p2, KB, K2T, K2, YO, K3, P1, K2, K2T, K2, YO, P1, KB, p2, KB, P1, YO, K2, SSK, K2, [P1]. R.11: P1, K4, YO, K2, SSK, p2, K2T, K2, YO, K4, P1, K1, K2T, K2, YO, (p2, KB) x2, p2, YO, K2, SSK, K1, [P1]. R.12: P1, K8, p2, K8, P1, K2T, K2, YO, (KB, p2) x 3, KB, YO, K2, SSK, [P1]. R.13: P1, YO, K2, SSK, K4, p2, K4, K2T, K2, YO, P1, K3, P1, (KB, p2) x3, KB, P1, K3, [P1]. R.14: P1, K1, YO, K2, SSK, K3, p2, K3, K2T, K2, YO, K1, P1, YO, SSK, p2, KB, p2, CL4, p2, KB, p2, K2T, YO, [P1]. R.15: P1, K2, YO, K2, SSK, K2, p2, K2, K2T, K2, YO, K2, P1, K2, p2, KB, p2, K4, p2, KB, p2, K2, [P1]. R.16: P1, K3, YO, K2, SSK, K, p2, K1, K2T, K2, YO, K3, P1, K2T, YO, p2, CL4, K2, CL4, p2, YO, SSK, [P1]. R.17: P1, K4, YO, K2, SSK, p2, K2T, K2, YO, K4, P1, K2, p2, K10, p2, K2, [P1]. R.18: P1, K8, p2, K8, P1, YO, SSK, p2, K3, CL4, K3, p2, K2T, YO, [P1]. R.19: P1, K4, K2T, K2, YO, p2, YO, K2, SSK, K4, P1, K2, p2, K10, p2, K2, [P1]. R.20: P1, K3, K2T, K2, YO, K1, p2, K1, YO, K2, SSK, K3, P1, K2T, YO, p2, CL4, K2, CL4, p2, YO, SSK, [P1]. R.21: P1, K2, K2T, K2, YO, K2, p2, K2, YO, K2, SSK, K2, P1, K2, p2, KB, p2, K4, p2, KB, p2, K2, [P1]. R.22: P1, K1, K2T, K2, YO, K3, p2, K3, YO, K2, SSK, K1, P1, YO, SSK, p2, KB, p2, CL4, p2, KB, p2, K2T, YO, [P1]. R.23: P1, K2T, K2, YO, K4, p2, K4, YO, K2, SSK, P1, K3, P1, (KB, p2) x3, KB, P1, K3, [P1]. R.24: P1, K8, p2, K8, P1, YO, K2, SSK, (KB, p2) x3, KB, K2T, K2, YO, [P1]. R.25: P1, K4, K2T, K2, YO, p2, YO, K2, SSK, K4, P1, K1, YO, K2, SSK, (p2, KB) ×2, p2, K2T, K2, YO, K1, [P1]. R.26: P1, K3, K2T, K2, YO, KB, p2, KB, YO, K2, SSK, K3, P1, K2, YO, K2, SSK, P1, KB, p2, KB, P1, K2T, K2, YO, K2, [P1]. R.27: P1, K2, K2T, K2, YO, P1, KB, p2, KB, P1, YO, K2, SSK, K2, P1, K3, YO, K2, SSK, KB, p2, KB, K2T, K2, YO, K3, [P1]. R.28: P1, K1, K2T, K2, YO, (p2, KB) × 2, p2, YO, K2, SSK, K1, P1, K4, YO, K2, SSK, p2, K2T, K2, YO, K4, [P1]. R.29: P1, K2T, K2, YO, (KB, p2) x 3, KB, YO, K2, SSK, P1, K8, p2, K8, [P1]. R.30: P1, K3, P1, (KB, p2) × 3, KB, P1, K3, P1, YO, K2, SSK, K4, p2, K4, K2T, K2, YO, [P1]. R.31: P1, YO, SSK, p2, KB, p2, CL4, p2, KB, p2, K2T, YO, P1, K1, YO, K2, SSK, K3, p2, K3, K2T, K2, YO, K1, [P1]. R.32: P1, K2, p2, KB, p2, K4, p2, KB, p2, K2, P1, K2, YO, K2, SSK, K2, p2, K2, K2T, K2, YO, K2, [P1]. R.33: P1, K2T, YO, p2, CL4, K2, CL4, p2, YO, SSK, P1, K3, YO, K2, SSK, K, p2, K, K2T, K2, YO, K3, [P1]. R.34: P1, K2, p2, K10, p2, K2, P1, K4, YO, K2, SSK, p2, K2T, K2, YO, K4, [P1].
Toe Up Ribbing Chart (Note: The Set Up round should only be worked 1 time)
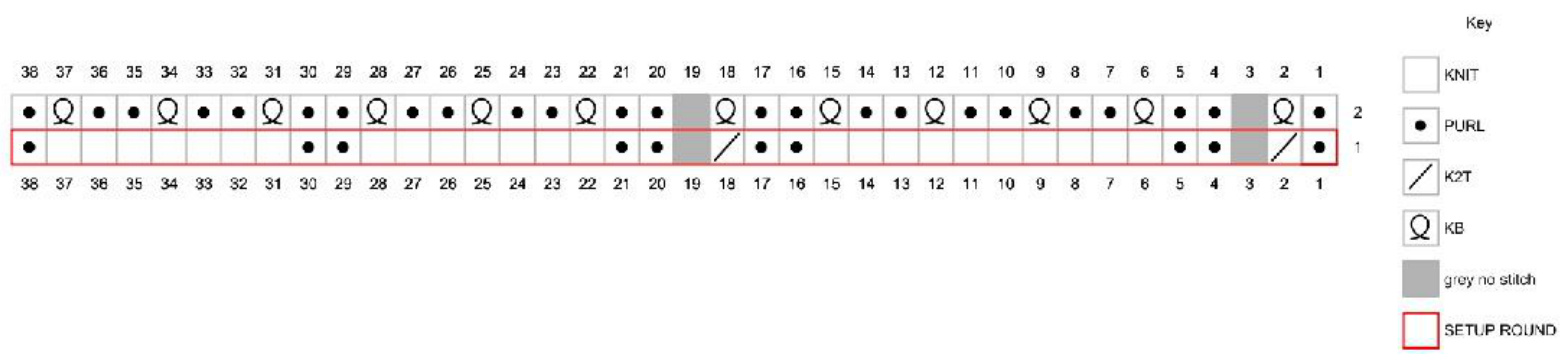
Toe Up Ribbing Pattern: Set Up Round: \*P1, K2T, P2, K10, P2, K2T, P2, K7, P2, K7, P1\* Ribbing Pattern: P1, \*KB, P2\*, Repeat \*\*. End with a P1
Cuff Down Ribbing Chart
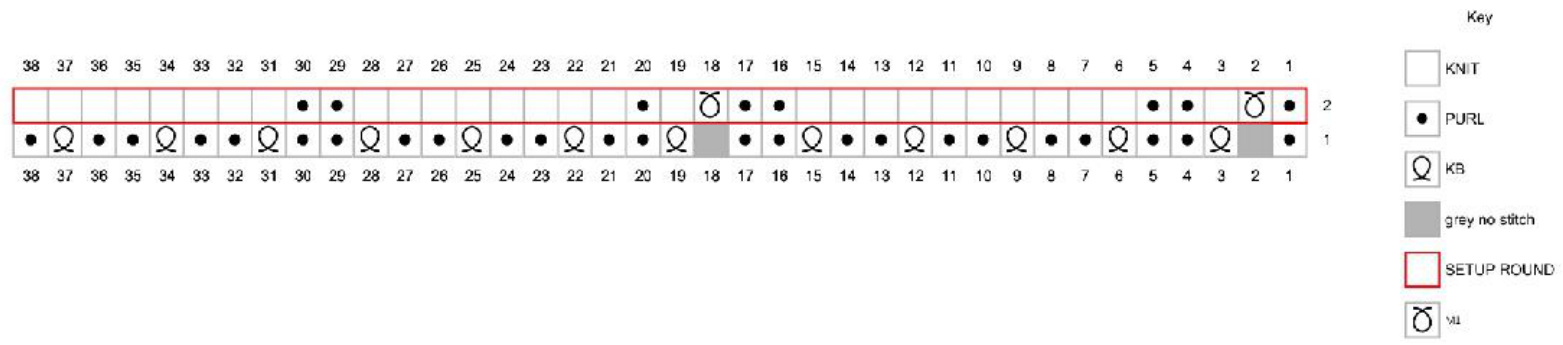
Ribbing Pattern: P1, \*KB, P2\*, Repeat \*\*. End with a P1 Set Up Round: \*P1, M1, K1, P2, K10, P2, M1, K1, P1, K8, P2, K8\*. Repeat \*\* 1 time Since everyone's feet are a bit different, and people have their own preference for how a sock should fit, here's some suggestions for getting the best individual fit for you. 1)TRYTHEM ON ASYOU GO! I can't think of anything worse than frogging a complete sock because it doesn't fit 2) Toes - If you prefer a wider toe, cast on more stitches. lf you are doing an EoP toe, you will probably want to do several rounds in the slip stitch pattern after you have completed your increases. And here are some links for asymmetrical toes - some people find these more comfortable. http://knitbettersocks.blogspot.com/2012/03/asymmetric-wedge-toe.html http://twistedpdx.com/2010/07/27/asymmetric-anatomical-toes/ 3) Ease The standard ease for a sock is 10% negative ease - that means a well fitting sock will be 10% smaller than your foot. So if your gauge is 8 stitches/inch and your foot circumference is 9 inches, a sock with no negative ease woulc have72 stitches. 10% negative ease would be 65 stitches (72-10%). Since lace patterns are stretchier I would I would use a few less stitches - say 60 - 63 depending on the lace pattern. 4) When to start the heel - I start my heel turn when the sock reaches the ball of my heel, slightly stretched. 5) Length of heel turn - If you wrap and turn fewer stitches than are called for in the pattern, the base of your heel will be shorter and wider. If you wrap and turn more stitches you will make the heel longer and narrower. I usually decide how many stitches to wrap by trying it on. I've found that I get the best fit if the wrapped stitch section of the heel comes just a smidge past my heel. When you have finished knitting up all of the gusset stitches it will tighten up the heel too. That way I get a nice snug fitting sock that doesn't scrunch up my toes. 6) Length of heel flap - If you like a longer heel flap, add more stitches to the gusset section before you start the heel turn. If you are doing a slip stitch heel you need to add more than if you are doing a stockinette heel flap. The slip stitches tighten the fabric vertically, so you need to knit more rows to achieve the same length as a stockinette heel. 7) Leg - I like a nice firm fabric for the foot of my sock, and prefer a bit more stretch when it comes to the leg. So I usually go up a needle size (or 2) when I begin the leg.
Links and Tips
Tip 1: I found my socks were wearing out where the bottom of slip stitch heel turn meets the sole. I've started working the sole in an eye of partridge stitch about 2" before I'm ready to start the heel turn. Round 1: Slip1, knit 1, repeat to last sole stitch Round 2: Knit Round 3: Knit 1, Slip 1, repeat to last sole stitch Round 4: Knit Tip 2: If you knit a row or 2 of plain stockinette stitch before you bind off, your cuffs willast longer. The stockinette stitch will "roll" slightly. This will keep the same section of yarn from always being in contact with your leg when you're wearing your socks. Tip 3: My favorite stitch marker for sock knitting is just a length of cotton thread (l use button thread). I loop it over the needle, and pass the working yarn in front every few rounds to weave it in. I never have to worry about it popping off (and being eaten by a dog!), and if I have to frog back a few rounds, it stays in place.

Judy's Magic Cast on - Wrapping and Turning - Stretchy Bind Offs - knitty.com/ISSUEspring06/FEATmagiccaston knitting.wikia.com/wiki/Wrapand turn knitty.com/ISSUEss11/FEATinterlock knitty.com/ISSUEfall09/FEATjssbo knitty.com/ISSUEsummer06/FEATsum06TTI
53433323130292827262524232221201918171615141312111098765432


