BreakingWaves Socks
Kate Sparkes designs
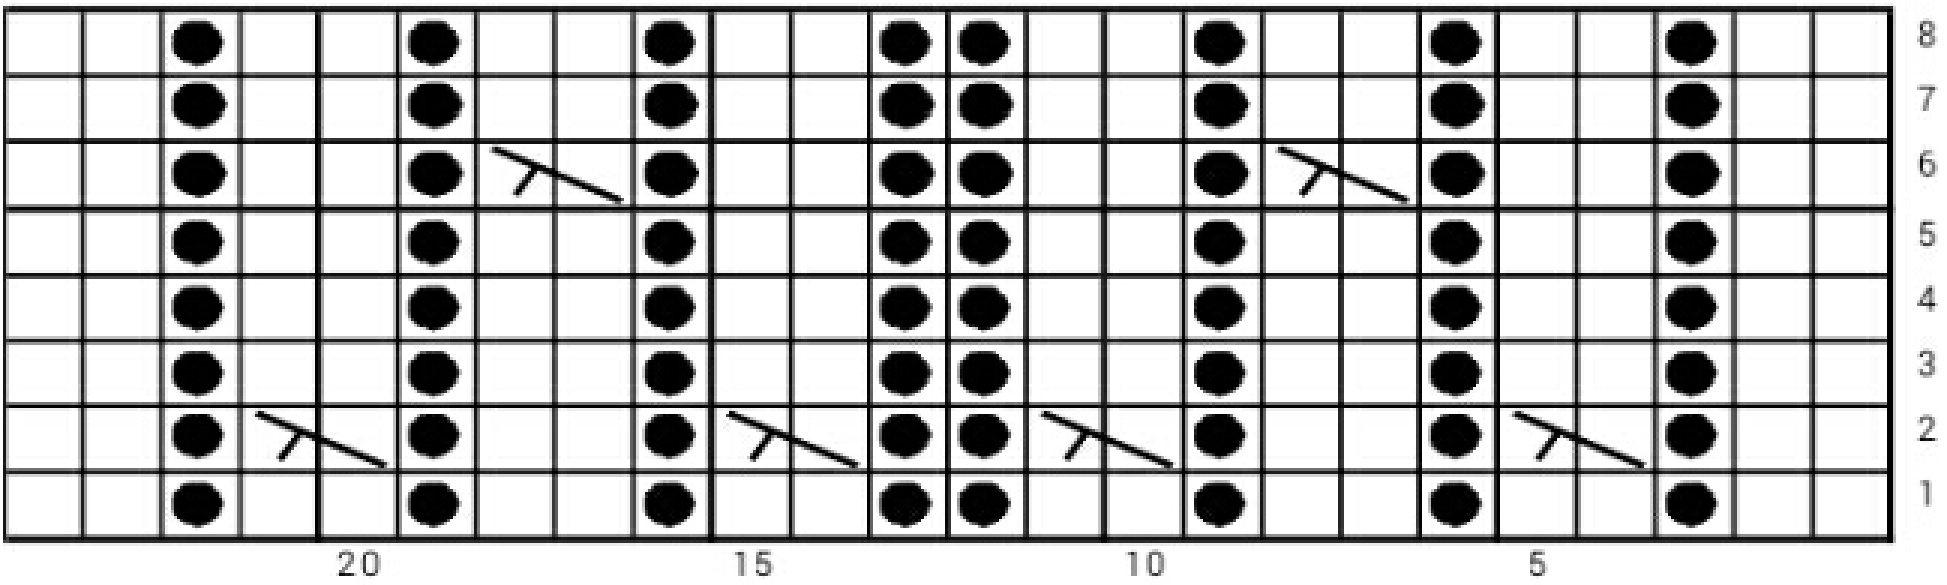
Toe up construction using dpns or circular needles and magic loop method.The pattern is over 20 sts on the top of the foot, continuing up the leg. It uses false cables to achieve the look of waves breaking on the shore without the hassle of using a cable needle, so it is quick to knit up. If you need a larger foot circumference,add to the knit stitches at either side of the foot or, if needed, you could increase the number of purl stitches in the rib. The two outerfalsecables on the topofthefoot aredoneevery4rows,whereas theinner3false cables have a 3 row repeat. Yarn: Rowan yarns Tapestry Needles:3.25mm Gauge:22 sts and 36 rows to 10 cm, stocking stitch
Abbreviations
K:knit K2c: false cable.Knit 2 tog then without slipping off the 2 sts,k into the back of the first of those 2 sts. Slip them off. This gives the appearance of a cable without having to use a needle. M1: make one stitch by knitting into the back of the loop in between the stitch you just knitted and the one you are about to knit next.This twists the loopmeaning that you get a nice,tidy increase without a hole appearing. P: purl Pm: place marker Ssk:slip st,k1,pass slipped st over St: stitch Cast on 16 sts using Turkish cast on method
Toe
R1: Divide for dpns if using.Pm for beginning of round, k8, pm for 1/2 way point, k8. R2:K1,m1,k to 1 st before half way marker,ml,k1.Rpt to end Rpt these 2 rounds until you have 48 sts or however many you need for your foot circumference. Foot R1:K2,p2,k2,pl,k1,pl,k6,pl,kl,pl,k2,p2,ktoendofround. R2:K2,p2,k2c,pl,k1,pl,k2c,k4,pl,k1,pl,k2c,p2,kto end of round. R3:K2,p2,k2,pl,kl,pl,k4,k2c,pl,k1,pl,k2,p2,ktoendofround R4:K2,p2,k2,pl,k1,pl,k2,k2c,k2,pl,k1,pl,k2,p2,k to end of round. R5:K2,p2,k2,pl,kl,pl,k2c,k4,pl,k1,pl,k2,p2,kto end ofround. R6:K2,p2,k2c,pl,kl,pl,k4,k2c,pl,k1,pl,k2c,p2,kto end ofround R7:K2,p2,k2,pl,k1,pl,k2,k2c,k2,pl,k1,pl,k2,p2,ktoend ofround. R8:K2,p2,k2,pl,kl,pl,k2c,k4,pl,kl,pl,k2,p2,k to end of round. R9:K2,p2,k2,pl,kl,pl,k4,k2c,pl,k1,pl,k2,p2,kto end ofround. R10:K2,p2,k2c,pl,kl,pl,k2,k2c,k2,pl,kl,pl,k2c,p2,kto end ofround. R11:K2,p2,k2,pl,kl,l,k2c,k4,pl,kl,pl,k2,p2,kto end ofround R12:K2,p2,k2,pl,k1,p1,k4,k2c,p1,k1,pl,k2,p2,kto end ofround. R13:K2,p2,k2,p1,k1,pl,k2,k2c,k2,pl,kl,pl,k2,p2,k to end of round Repeat from R2 until foot is 5 cm short of the desired length. Start heel shaping as follows.Can be started at any pattern row. R1:Pattern across top of foot tomarker.K1,ml,k to 1 st before end of round,ml,k1. R2: Pattern across top of foot,k across sole to end of row. Rpt these 2 rows 5 times (60). This makes the gusset.
Turn heel
Pattern across the top of the foot to marker,then leave the 24sts forthe topof the foot ona stitch holder or separate needle. The heel is now worked back and forth in short rows. K30, turn (leaving 6 sts on the needle) P2 tog,p22,turn (again,leaving 6 sts on the needle) Ssk,k21,turn P2 tog, p20, turn Ssk,k19, turn Continue like this, decreasing at the start of every row until you have 8 sts left
Heel flap
Starting with a k row, sll,kl to end. Pick up and knit 12 sts down the cast off edge. Turn. P to end, then pick up and p12 sts down the other cast off edge.Tun.6 sts gusset,32 sts heel,6 sts gusset =44sts on sole) K12, \* sll,k1,rpt from \* 3 times.K11, k2tog,turn (43 sts,including gusset) P to last st,p2 tog, turn.(42 sts) Rpt these 2 rows 5 times. All 12 gusset sts should have been used and 32 sts should remain on the sole. Start working in the round again. K12,\*sl1,k1,rp from \* time.K11,ktog,patten across topoffot,ssk,ktoend ofround.54 sts) Next round:pattern across top of foot,k to end of round Repeat these tworounds3 times,decreasing at either end of the sole on every otherround until 48 sts remain in total. If you like,you can start the pattern for the back of the leg whilst still decreasing but you would need to start with additional k sts to keep the pattern centralised.
Leg
Make this as long as you like or have wool and patience for. ittern as set for top of foot across front of leg.Pattern as follows across the back of theleg R1:\*K2,pl,rpt from \*3 times,\*pl,k2,rpt from \*3 times R2:\*K2,pl,k2c,pl,rpt from \*,\*p1,k2c,pl,k2 rpt from R3,4,5:As R1 R6:\*K2,pl,k2,p1,k2c,pl,k2,p2,k2,p1,k2c,pl,k2,p1,k2 R7, 8: as R1 Repeat these 8rows until the leg length is as5cm shorter than you want it to be. Cuff This keeps the rib format but has false cables on each pair of knit stitches. R1:K2,,k2c,,l,p,k,k2c,2c,l,k1,pl,k2c,p2,k2c,k2c,l,k2c,pl,k2c,l,k2,, k2c,pl,k2c,pl,k2c,pl,k2c. R2:K2,p2,k2,p,k1,pl,k6,p1,kl,p1,k,p2,k4,pl,k2,pl,k2,pl,k2,p2,k2,p,k2,p1,k,, k2. R3: as R2. Repeat these 3 rounds until cuff is long enough. I did 4 repeats.
Castoff
Use your preferred stretchy cast off.I did the following K2,slipboth stitches backonto otherneedle,ktog\*k1,slplast2sts onto otherneedle,k2tog.R from\*toend. Weave in all loose ends and block. Enjoy warm toes!
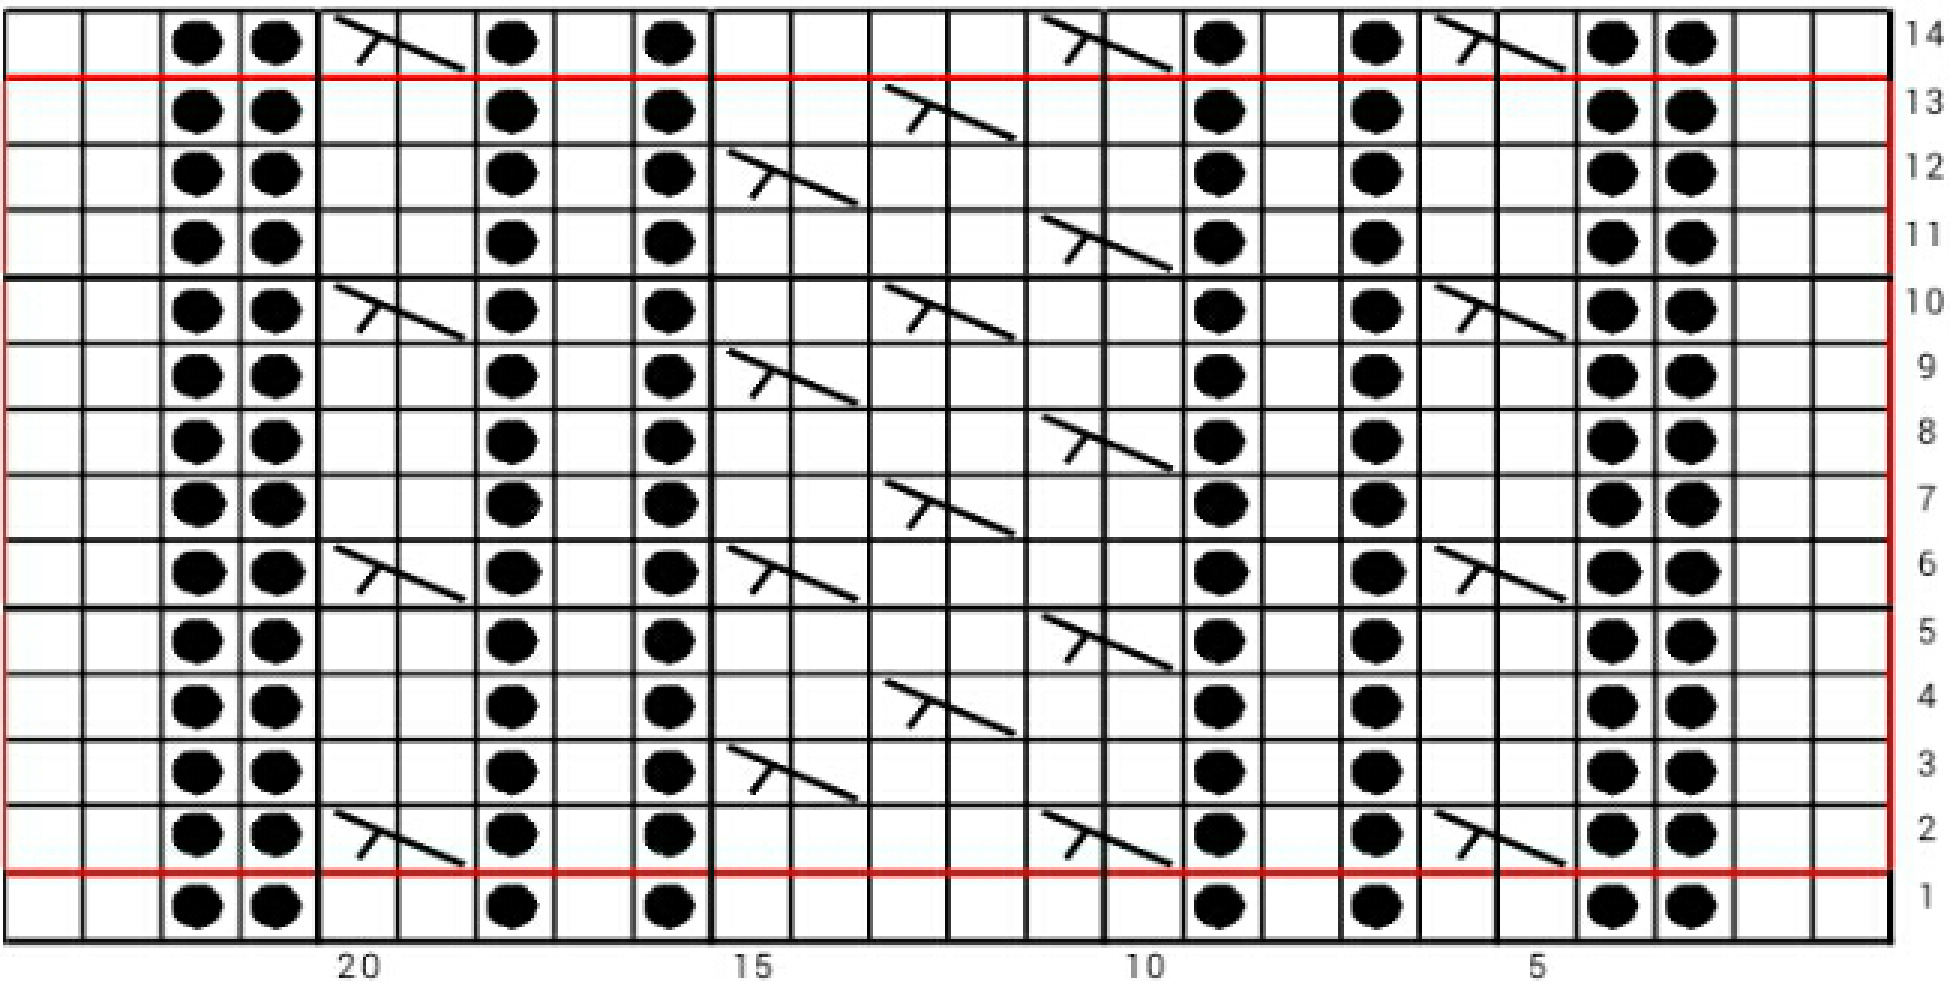
TopofFoot Back of Leg