CResCENDO! ! SOCKS by Laura Jenkins
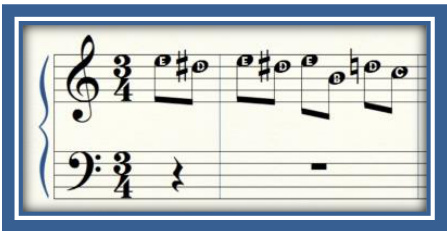
This sock was designed for the Solid Socks group August/September 2013 Mystery KAL and was knit, starting from the top, over a period of 4 weeks. I had two very different sources of inspiration for this sock: the first is the weather; since warm weather often makes it a bit more of a challenge to knit during the summer months, I definitely wanted to design a pattern with lace in it for this KAL. The second source of inspiration is very different: it is Fur Elise by Beethoven. As we were packing up for our house move, my daughter found some old sheet music of mine in a cupboard. She decided then and there to teach herself Fur Elise. The first time I heard those easy-to-recognise first notes of the piece, memories of my childhood piano lessons came flooding back. Playing that piece of music made me feel so... musical, and I loved the sense of anticipation as the crescendos built up. I find KALs a bit like that - every week the sock builds up and the anticipation grows with it. I hope you enjoy this design, and that it helps you to feel..knitterly.
SIZE
lium & Large [to fit a foot diameter of approximately 17cm/7" (20cm/8", 23cm/ 9") A note on the sizing: the words "small", "medium" and "large" refer to the width of the sock around the foot. There is quite a bit of elasticity in the pattern, so if in doubt about width, I'd suggest that you choose the smaller size. With this design, the length of the foot is also important - I'm afraid I've tried everything I can do to design for small feet, but the shortest foot that this design will fit needs to measure no less than 17.5cm/7.5" from the tip of your longest toe to theback of the heel. You will need to know your total foot length further along in the pattern - make a note of it (in either centimeters or inches)here:
MATERIALS
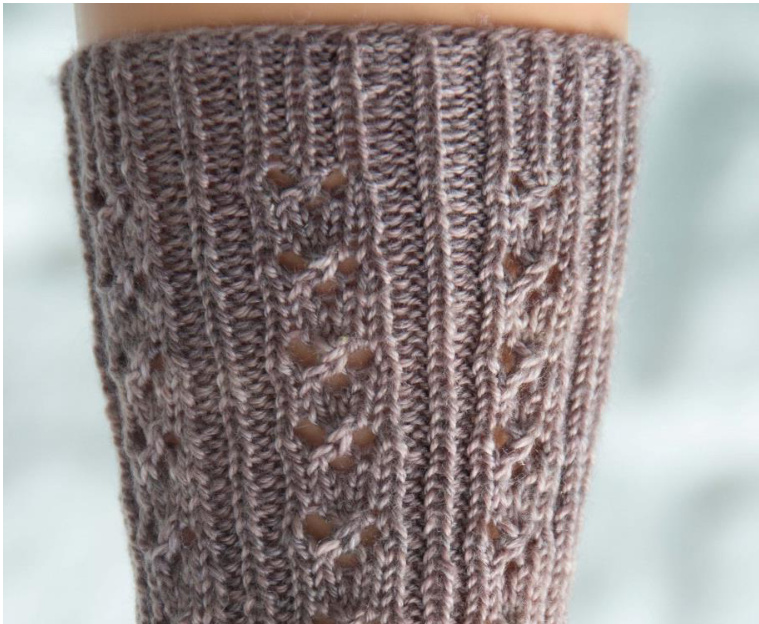
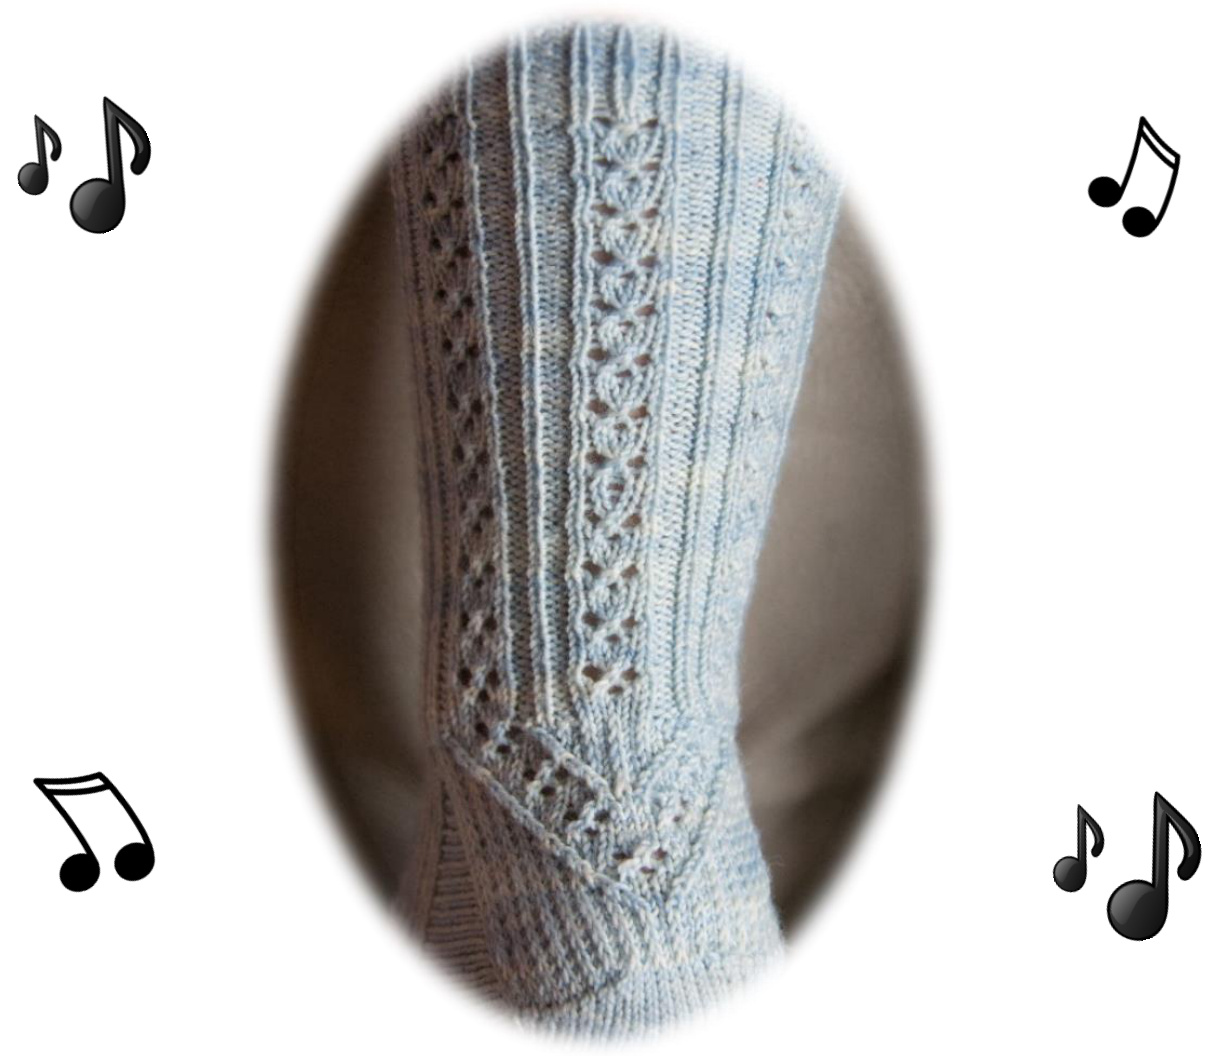
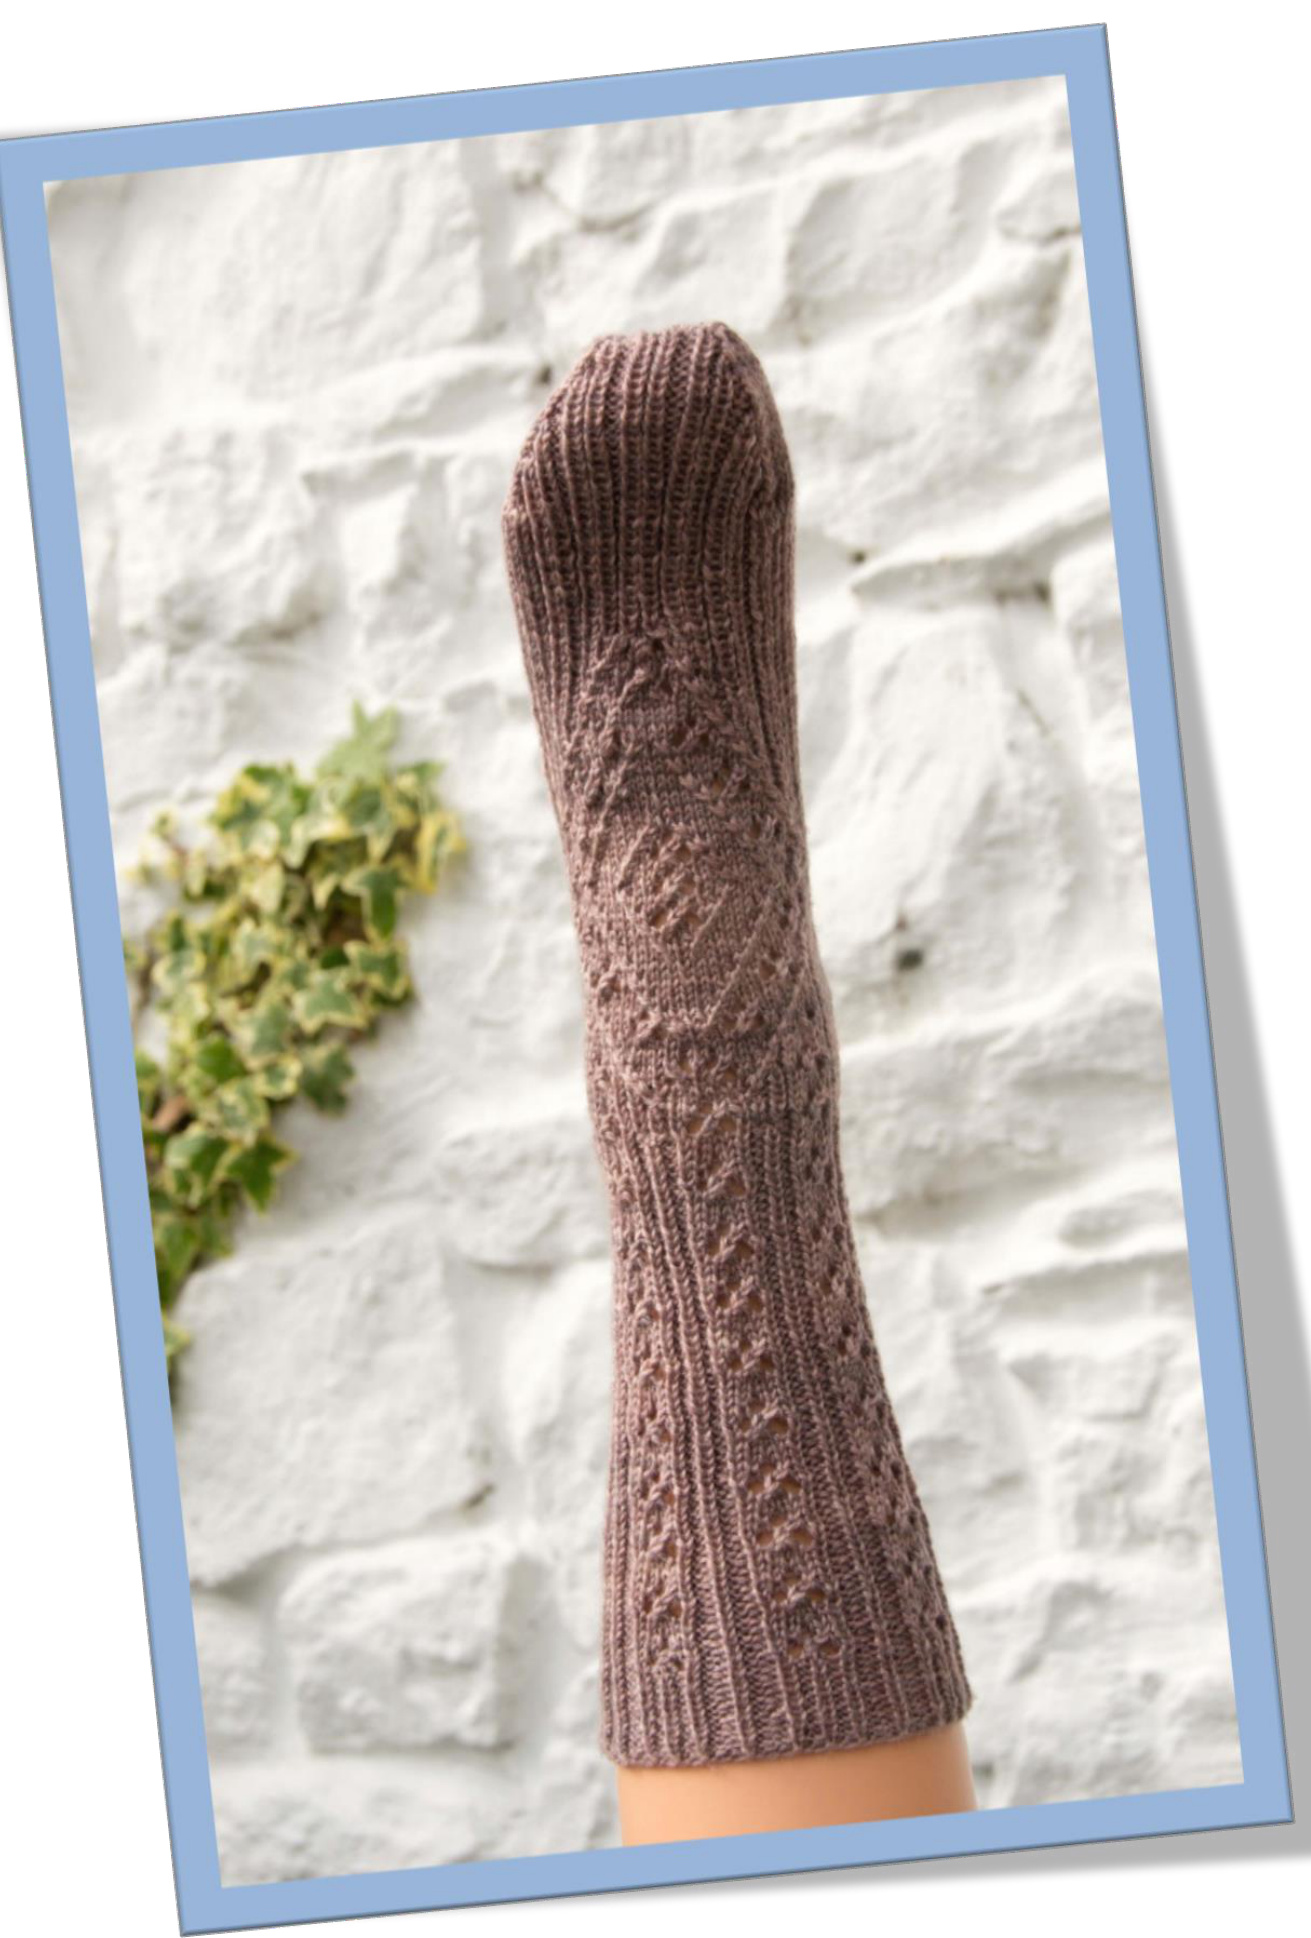
● 400 - 450m (370-415 yds) fingering weight/sock yarn. The socks in the photos were knit with 100% merino Classic Sock Yarn by the Sunrise Fiber Company, sponsor of this round of the Mystery KALs, in the colourway French Blue. Tapestry needle for grafting toe Stitch markers (optional)
RECOMMENDEDNEEDLES:
One or two circular 2.25mm/Us 1 needles, per your preference. Note 1: no matter what your choice in needle, always use the size that gives you the gauge listed below -- every knitter's gauge is unique, and can be different with different techniques. Note 2: I have written this pattern for knitting with one or two circular needles, however it can easily be adjusted to using five double-pointed needles (DPN's) - just divide the stitches of Needle 1 evenly over DPNs 1 & 2, and the stitchesofNeedle2overDPNs3&4. GAUGE: 8 sts = 2.5cm/1 inch in stockinette st
ABBREVIATIONS&CHARTSYMBOLS
| 1 | |
| T |
K = Knit P = Purl LHN = Left Hand Needle RHN = Right Hand Needle st st = Stockinette Stitch = K all right-side rows, P all wrong-side rows
Rev st st = Reverse Stockinette Stitch = P all right-side rows, K all wrong-side rows YO = Yarn Over = Bring yarn to front of work and then knit the next stitch by bringing the yarn over the right hand needle before wrapping it around the stitch. K2Tog = Knit two together = insert the tip of the RHN as if to knit into the front legs of the next 2 sts on the LHN, wrap yarn and knit, slipping both sts off the needle at once - one st decreased
K3Tog = K 3 Together = Insert the tip of the RHN as if to knit through the front legs of the next three sts on the LHN, wrap yarn and knit, slipping all three sts off the needle at once - two sts decreased.
P2Tog = Purl 2 Together = Insert the tip of the RHN as if to purl through the front legs of the next 2 sts on the LHN, wrap yarn and purl, slipping both sts off the needle at once - one st decreased.
No Stitch= No stitch - a decrease somewhere on the row being knit is not compensated by an increase, resulting in a net decrease in the number of stitches. When knitting from a chart, you need to ignore this stitch. ssk = Slip, Slip Knit = Slip one stitch knitwise onto the right hand needle, slip a second stitch purlwise onto the right hand needle, then insert the left hand needle through the front of both stitches just slipped, wrap yarn and knit them together. /YIB= Holding the yarn to the back of the work, slip one stitch purlwise onto the RH Sl1WYiF= Holding the yarn to the front of the work, slip one stitch purlwise onto the RHN T2R = Twist Right - K2Tog but do not drop the sts from the LHN. Insert the tip of the RHN into the first st on the LHN (that is, the st closest to the tip of the N) and K. Drop both sts from the LHN. This causes the sts to cross over one another, making them "lean" towards the right. T2L = Twist Left -=Slip two sts as if to knit one at a time to the RHN, then transfer both slipped sts back to the LHN. K the second st (that is second closest to the tip) TBL but do not drop the st. K both sts together TBL and then drop them from the LHN. This causes the sts to cross over one another, making them "lean" towards the left. K1TBL = Knit one through the back loop = Insert the tip of the RHN into the back loop of the st on the LHN, wrap and knit. This causes the stitch to twist, making it stand out against the fabric. When knitting flat or working a wrong side row, this st should be worked by inserting the tip of the RHN into the back loop of the st on the LHN, wrapping and purling. Turn = Turn the knitted fabric around so that the other side is facing you and start working st st in the other direction. You do this at the end of every row when working a flat piece, but when turning a heel using short rows, this turn occurs before you reach the end of a row. N1, N2 = Needle 1, Needle 2 Copyright 2013 Laura Jenkins. All rights reserved. For personal, non-commercial use only. Instructions and charts may be photocopied for personal use only.
NOTESBEFOREYOUSTART
Charts for each clue can be found at the end of the clue.
CLUE 1 (CUFF): - PIANISSIMO - PP
Cast on 64 (72, 80) sts using a loose cast-on (either the long-tail or German Twisted cast-ons are my favourites) and divide the stitches evenly across both needles => 32 (36, 40) sts per needle. Join all stitches in the round and work the size-appropriate RIBBING Charts across the sts of N1, then repeat across the sts on N2. Repeat the chart for at least another 11 rounds.
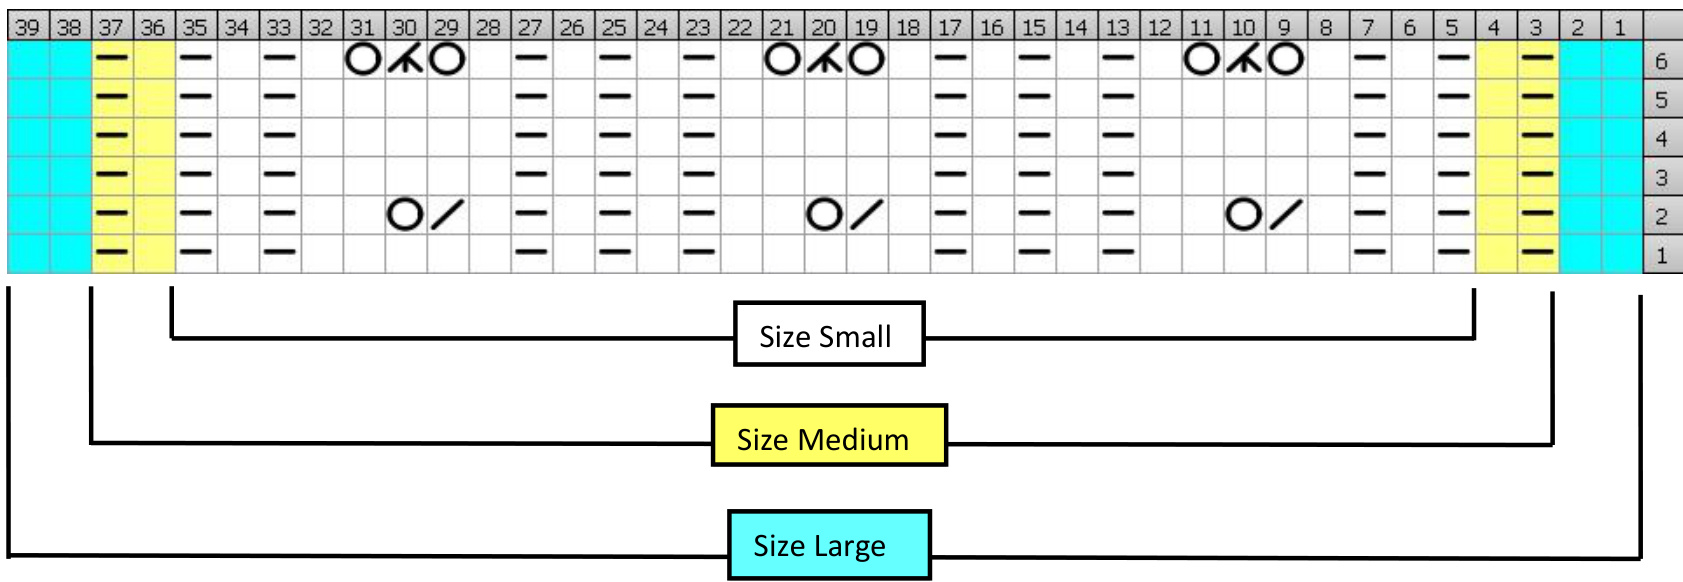
CLUE 1 RIBBING Chart for Sizes Small & Medium:

Work yellow coloured sts for size MEDlUM only.
CLUE 1 RIBBING Chart for Size Large:
| 40393837363534333231302928272625242322212019181716151413121110 | 6 8 | 7 | 6 | 5 | 43 | [2 | ||||||||||||||||||||||
| 一 | 1 | |||||||||||||||||||||||||||
| 1 |
Copyright 2013 Laura Jenkins. All rights reserved. For personal, non-commercial use only. Instructions and charts may be photocopied for personal use only.
CLUE 2 (LEG): - SFORZANDO, sfz
Work the first row of the size-appropriate LEG Chart once across the sts on N1 and then again across the sts on N2. Working the remaining rows of the chart as set, and then repeat the full chart as many times as necessary until the leg measures 20cm/8" from the cast-on edge. Note: You can customize the length of your sock by knitting fewer or more repeats of the Leg Chart - just make surethat: a) you do the same number of repeats on sock # 2 (you'd be surprised by how many times I've forgotten to write downthisinformation!)and b) that you end after a row 6 of the chart for all sizes
CLUE 2 LEG CHARTS
Small/Medium:
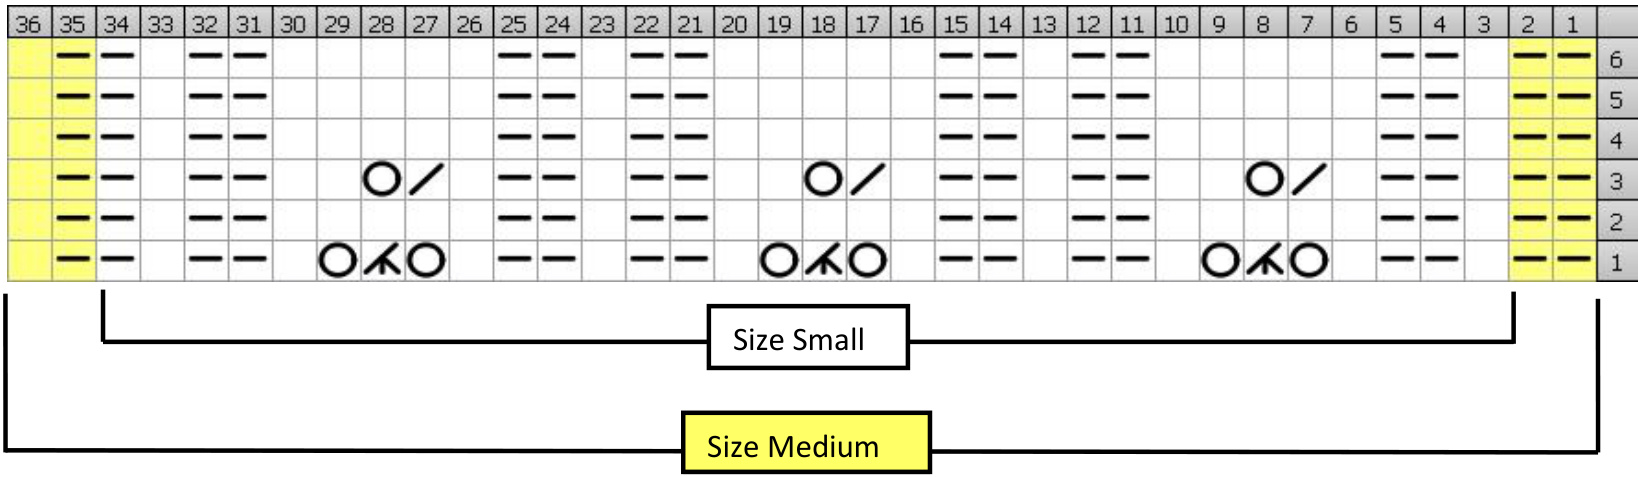
Work yellow sts for size MEDlUM only. Large:

Copyright 2013 Laura Jenkins. All rights reserved. For personal, non-commercial use only. Instructions and charts may be photocopied for personal use only.
CLUE 3 (HEEL)- MEZZOFORTE, mf
SET UP FOR HEEL: Im: Work the the size-appropriate HEEL SET-UP Chart once across the sts on N1 on Size Large: Knit the first three sts on N1 and transfer to the end of N2. Transfer the first three sts on N2 to the end of N1 → the ribbing will be shifted by three sts across the full round. Work the HEEL SET-UP Chart for size Large once across the sts on N1 only. uld now have 63 (71, 79) sts in total: 31 (35, 39) sts on N1 and 32 (36, 40) sts on N2.
HEEL FLAP:
Notes: The Heel Flap is knit FLAT- that is back and forth across the sts of N2 ONLY, leaving the sts on N1 on hold until you've turned the heel. Make sure that you remember to read the ODD rows on the chart from right to left as you knit and the EVEN rows from left to right. You can customize the length of your heel flap by working as many repeats of rows 27 and 28 of the chart as you need. Knit all rows of the HEEL Flap Chart, paying close attention to st 39 of the chart, which is worked for ALL sizes. Work as many repeats of rows 27 and 28 as necessary to obtain a heel flap that suits your instep. (an average heel flap length measures approximately 6.5cm/2.5" - the higher your instep, the longer the heel flap should be). End ready to work a right side row.
TURN THE HEEL:
Row 1 (Right Side): Sl1, K17 (19, 21) sts, ssk, K1, Turn work. Row 2 (Wrong Side): Sl1, P7 sts, P2tog P1, Turn work. Row 3 (Right Side): Sl1, K8 sts, ssk, K1 Turn work. Row 4 (Wrong Side): Sl1, P9 sts, P2tog P1, Turn work. Repeat Rows 3 and 4, increasing the number of sts between the decreases by one st each row until all sts are used up →19 (21, 23) sts remain on the needle, ending after working a wrong side row. Turn work so that the RIGHT side is facing you.
PICK UP GUSSETS
Note: You are about to start knitting the foot of the sock, and so will return to knitting in the round. The sts on N2 will form the sole of the sock, and will be knit in plain stockinette st from now on; the sts on N1 will form the topof thefoot and will bepatterned. Knit across all heel stitches, then continuing with N2, pick up and knit into each of the chain sts along the edge of the heel flap, plus one st in the space between the heel flap edge and the stitches being held on N1. Knit Row 1 of the size-appropriate GUsSET Chart across the 31 (35, 39) sts on N1. Use N2 to pick up one st in the space between N1 and the first slipped st of the heel edge, then pull the loop so that the foot sts are held on the cable of your needle and the st you just picked up is alone on N1. Continuing Copyright 2013 Laura Jenkins. All rights reserved. For personal, non-commercial use only. Instructions and charts may be photocopied for personal use only. with N1, pick up and knit the same number of chain sts as you did on the other side of the heel flap. You should now be at the start of the heel sts you worked. Continuing with N1, K across the heel sts and down the gusset sts until 3 sts remain on N2, K2 tog, K1. Your sts should now be distributed such that the 31 (35, 39) FOOT sts are on N2, and the GUSSET AND SOLE sts are on N1. Note: At this point I will change my terminology and call the sts on N1 the "SOLE" sts and the sts on N2 the "FOOT" sts as they are now easy enough to differentiate visually. The round now starts with the FOOT sts -you can place a marker here to indicate this if it helps.
GUSSETDECREASES
Round 1: FOOT: Work Row 2 of the size-appropriate GUsSET Chart across all sts. SOLE: K1, ssk, K to end Round 2 FOOT: Work the next row of the size-appropriate GUSSET Chart across all sts SOLE: K across to the last 3 sts on the needle, K2Tog, K1 Round 3: FOOT: Work the next row of the size-appropriate GUsSET Chart across all sts. SOLE: K1, ssk, K to end Repeat rounds 2 & 3 once more, ending with row 6 of the chart. Remember when I asked you to measure your total foot length - this is where it is important! If your total foot length is less than 21.5cm/8.5", Clue 3 ends here (row 6 of the chart) for you. If your total foot length is between 21.5cm/8.5"and 24cm/9.5", repeat rounds 2 & 3 a further 3 times (6 more rows worked) and then end Clue 3 here (row 6 of the chart). If your total foot length is greater than 24cm/9.5", repeat rounds 2 & 3 a further 6 times (12 more rows worked) and then end Clue 3 here (row 6 of the chart). Note: For every pair of rounds you knit, you will be decreasing the gussets by one stitch on each side. These decreases mustn't continue indefinitely- if you are knitting for a longer foot length and you reach a total of 31 (35, 39) sole sts, stop the decreases and work the sole in plain stockinette st only until you complete Clue 3.
HEEL SET-UP CHARTS
Small:
| 3231302928272625242322212019 | 181716151413 | 12 | 1110 | 9 | 8 | 7 | 654 | 3 | 2 | ||||||||||||||||
| OYO | OXO | OXO | 1 | ||||||||||||||||||||||
| 1 |
Medium:
| 98 | 3534333231 | 3029282726252423222120191817161514131211 | 10 | 9 | 87 | 6 | 5 | 4 3 | |||||||||||||||||||
| OXO | OKO | OKO | 2 | 1 | |||||||||||||||||||||||
| 1 |
Large:
| 40 3635343332313029282726252423222120191817161514131211109 | 3837 | 8 | 7 | 6 | 5 | 4 3 | ||||||||||||||||||
| OKO | OKO | 1 | OKO | 2 | 1 1 |
Copyright 2013 Laura Jenkins. All rights reserved. For personal, non-commercial use only. Instructions and charts may be photocopied for personal use only.
HEEL FLAP CHART
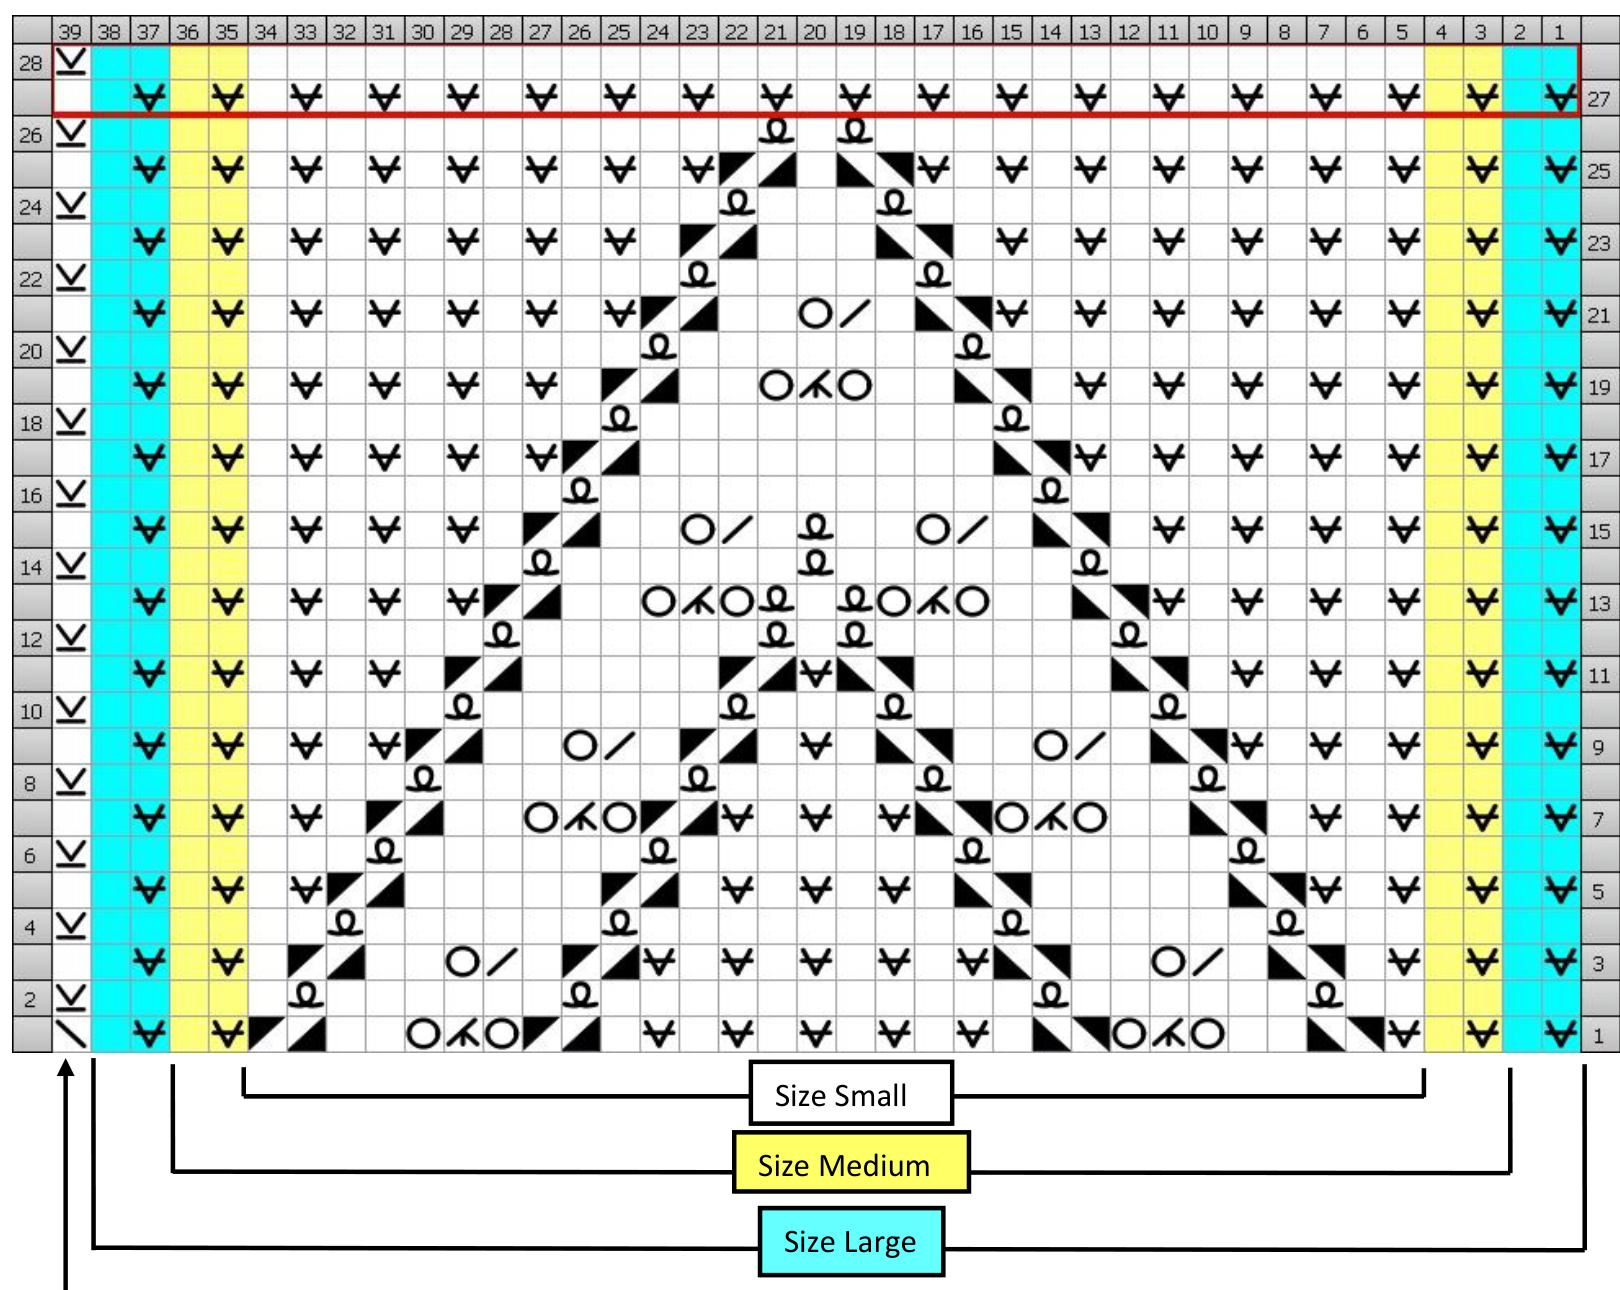
Notes:
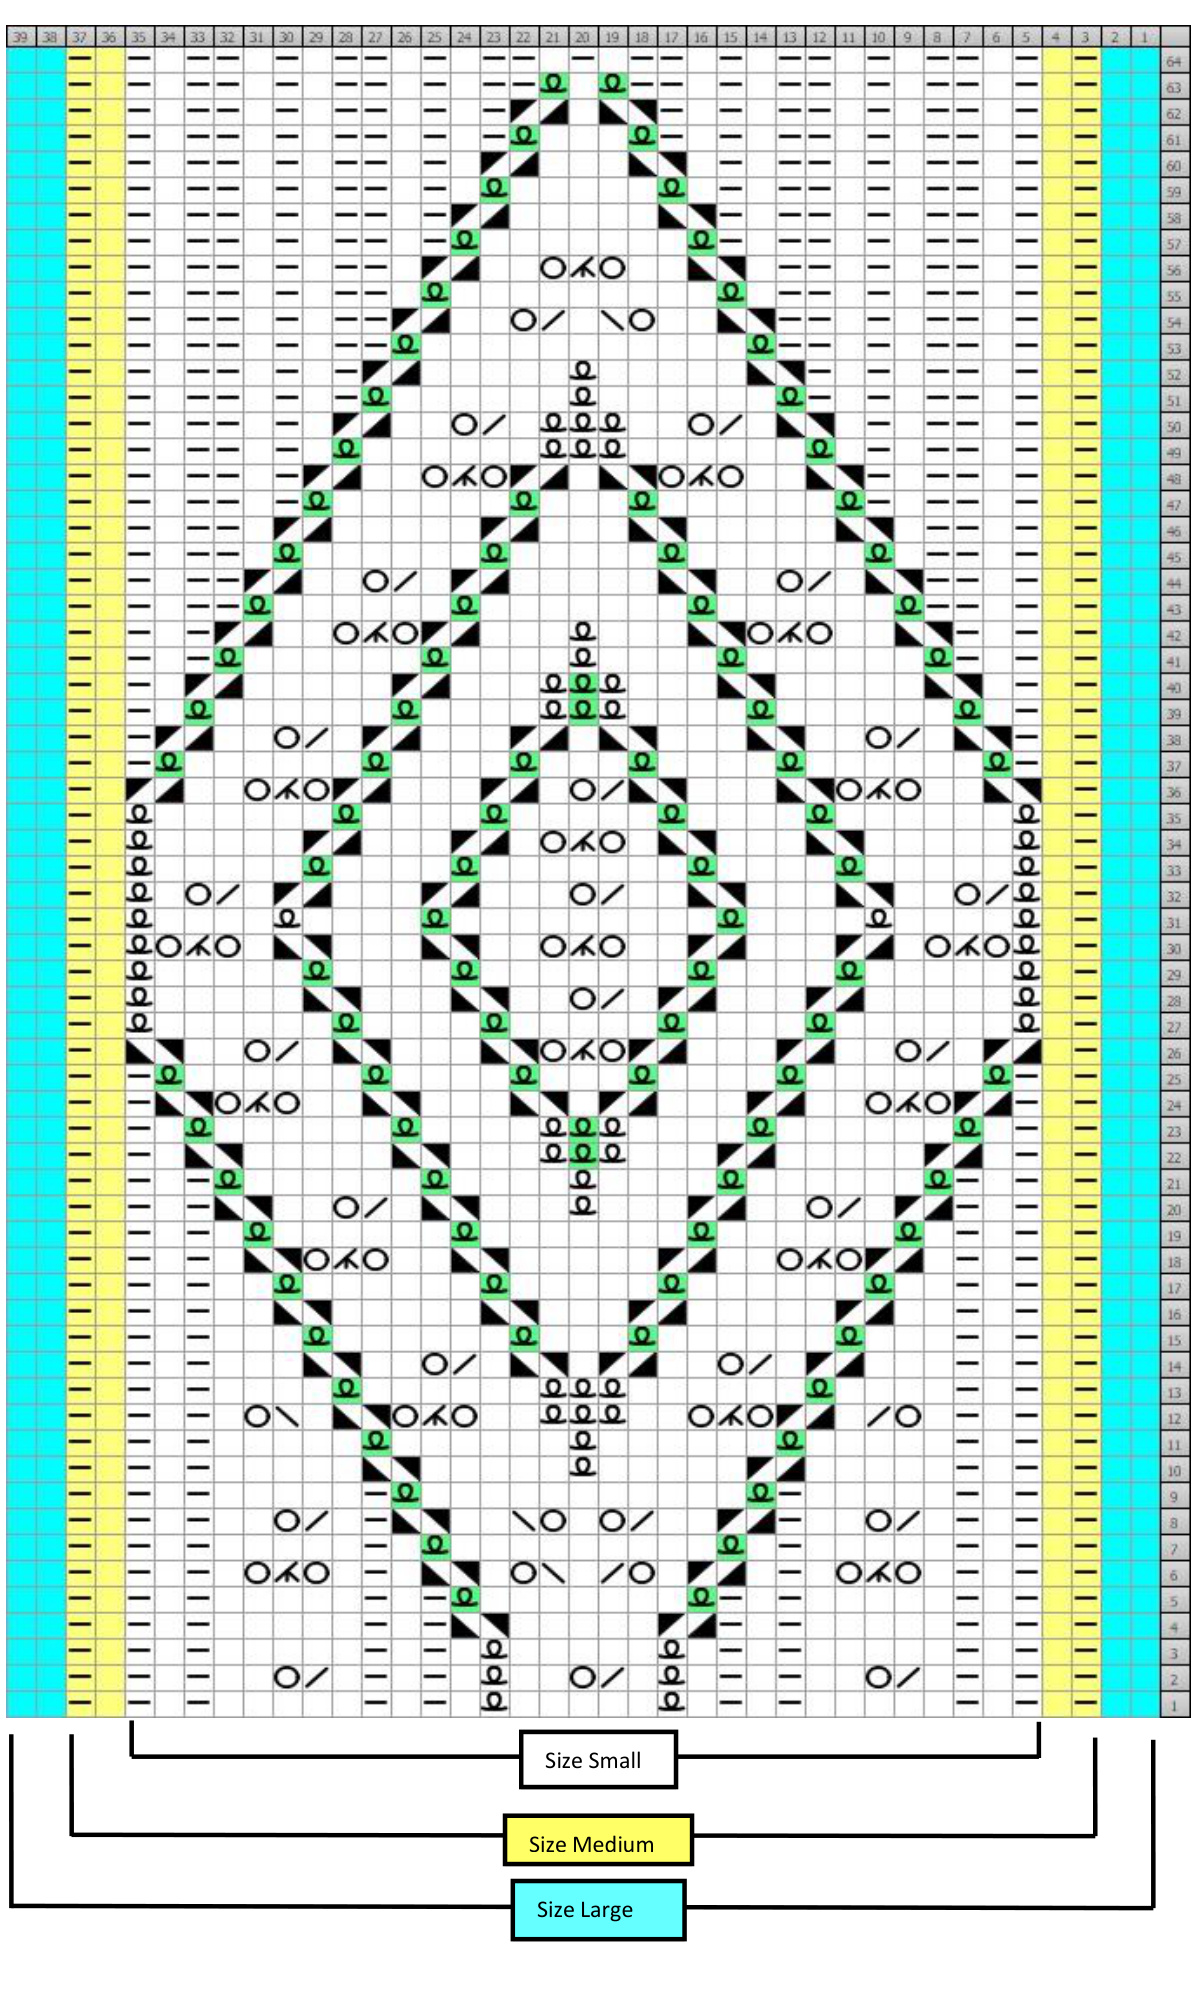
1. The last st of row one is a ssk - this decreases the st count for the heel flap to 31 (35, 39) sts. 2. To work K1TBL on a wrong side row, insert the tip of the RHN into the back loop of the st on the LHN, wrap andpurl. 3.Pay close attention to the colour-coding of the stitches!! 4. Work yellow sts for size MEDIUM only. Work BOTH yellow AND Turquoise sts for size LARGE only 5.Work st 39 of each row of the chart for ALL SIZES
GUSSET Chart:
/ sts for size MEDIUM only. Work BOTH yellow AND Turquoise sts for size LARGE onl.
Copyright 2013 Laura Jenkins. All rights reserved. For personal, non-commercial use only. Instructions and charts may be photocopied for personal use only. ALL Sizes: Foot: Starting with row 1, work the FOoT Chart for the appropriate size across the foot. Sole: Continue working the gusset decreases as set in Clue 3 until you reach 31 (35, 39) sole sts, then continue working all sts in plain stockinette st (no decreases). Once all rows of the FOOT Chart have been worked, repeat row 64 until the foot measures 5cm/2" less than the total desired foot length. Note 1: Depending on your row gauge, you may have to start the toe decreases a few rows before you reach the end of the FOOT Chart - this is OK, just finish offthe FOOT Chart at the same time as you are decreasing for the toe, making note of the row you started the decreases on (for when you knit the second sock). Note 2: The twisted stitches highlighted in green on the chart are worked tbl to give a bit of extra definition, but you can substitute plain st st if that's easier on your wrists.
TOE
Round 1:
Foot: K1, ssk, work sts according to pattern set to 3 sts remaining on the needle, K2Tog, K1. Sole: K1, SSK, knit to 3 sts remaining on the needle, K2Tog, K1. Foot: K2, work sts according to pattern set to 2 sts remaining on the needle, K2. Sole: K all sts.
Round 2:
Repeat Rounds 1 and 2 until 22 (26, 26) sts remain [11(13,13) sts on each needle], ending with a Round 1.
FINISHING
Graft toe using Kitchener st, weave in ends. Knit another sock to match the first!
CLUE 4 FOOT CHART
Copyright 2013 Laura Jenkins. All rights reserved. For personal, non-commercial use only. Instructions and charts may be photocopied for personal use only.
Copyright 2013 Laura Jenkins. All rights reserved. For personal, non-commercial use only. Instructions and charts may be photocopied for personal use only.


