A LINE BAG米
worked diagonally in stocking stitch with button fastening and shoulder strap 米 this pattern can be worked in ANY YARN - commercial or handspun
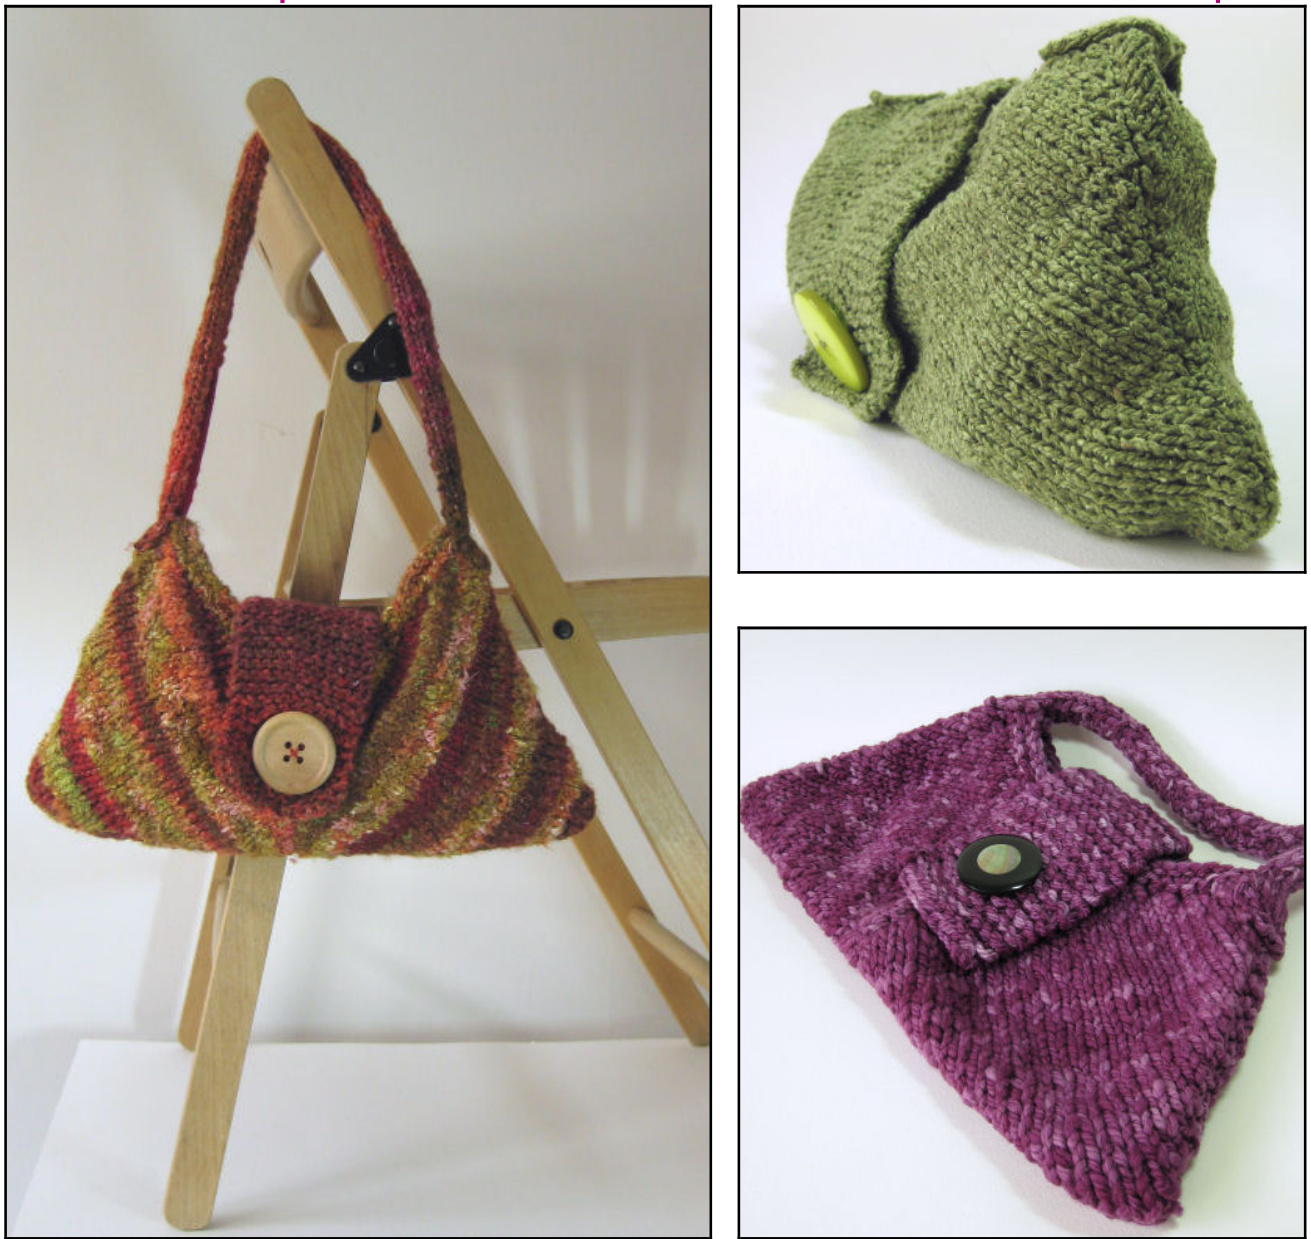
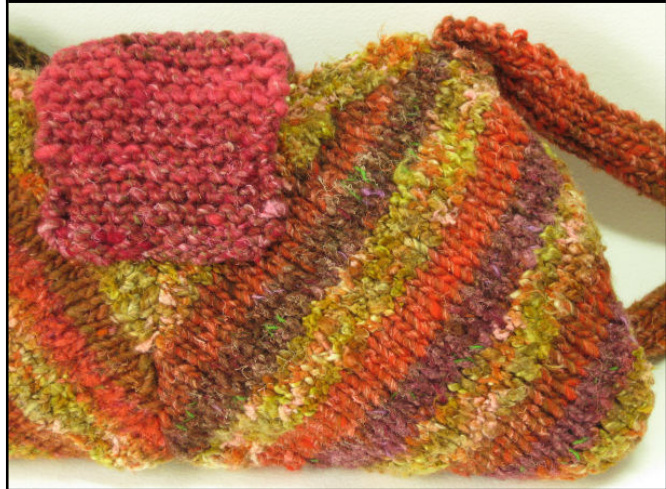
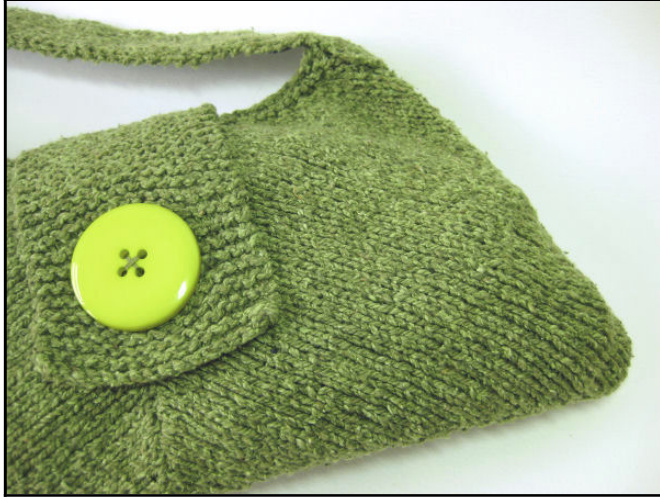
Clockwise from top: Green bag worked in aran-weight cotton/silk mix Purple bag worked in chunky-weight handspun wool Striped bag worked in three aran-weight yarns Finished Size: 40cm (16in) wide at base, 20cm (8in) high excluding handles
INFORMATION -read through the pattern before starting to knit
You can use any thickness (or weight) of yarn for this pattern and most textures of yarn. The instructions are written without reference to tension or needle size. Tension isn't important; the bag is knitted to measurements rather than a stitch or row count. You decide which needle size to use for your yarn.
Step 1 Choosing Your Yarn
Use any thickness of yarn from 4ply to big, commercial or handspun. Use a textured yarn but one that still shows the stitches clearly (you need to be able to count them). Using variegated, multi-coloured, hand painted or magic ball yarns will emphasise the diagonal knitting. Or work in stripes using two, three' or more yarns. Magic ball yarns are made up of all the part balls in your stash. Use shades of one colour, or contrasting colours, or every colour in your stash. Simply pull out three arms lengths from the first yarn, then four from the second and knot them together. Carry on in the same way with your other yarns, pulling out a different length each time and winding into a ball. Try to keep the thickness of the yarn about the same; use several strands of thin yarn to make a thicker one. Refer to the yarn table to see how much you will need.
Step 2 Choosing The Correct Needle Size
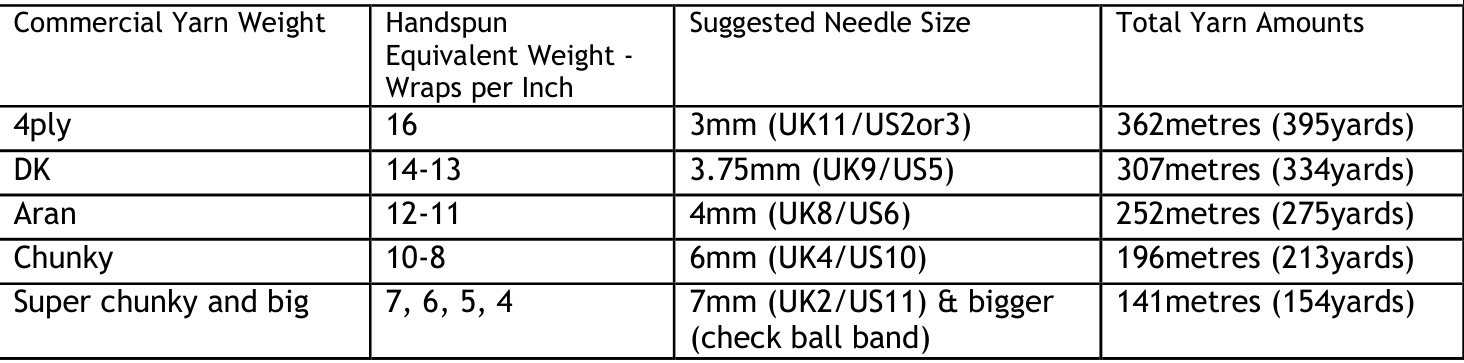
Use the table below to find the most suitable needles to use. I recommend using a size smaller than usual to make a firmer, denser fabric. Look on the ball bands of big yarns to check the needle size.
Step 3 Yarn Amounts
The table below will also help you work out how much yarn is needed to make a bag in your chosen. yarn. With commercial yarns look on the ball band for the length of yarn (metres/yards) contained in one ball. For handspun yarn, you can use a niddy-noddy to measure a skein. These yarn amounts are intended as a guide only; you may use more or less depending on your knitting tension and the type of yarn. If in doubt, add an extra ball or skein.
Extra Materials
5cm (2in)button. Alength of tape or webbing toline the strap.Sewing thread. Pins. Tape measure or ruler.
Creative Bit
When you see this heading it means that you have to decide something so you can go on to the next stage. It simply involves measuring your knitting to work out how many stitches to cast on for the fastening flap, how many stitches to cast off for the buttonhole and how many stitches to cast on for the strap. All these are fully explained in the instructions.
Abbreviations and Techniques
cm - centimetre, in- inch(es), k - knit, mm - millimetre, p - purl, Rs $-$ right side, st(s) - stitch(es),st st - stocking stitch (1 row k, 1 row p), Ws - wrong side k2tog -knit 2 sts together - insert the right hand needle as though to knit through 2 sts and knit together as 1 stitch p2tog - insert right hand needle as though to purl through 2 sts and purl together as 1 stitch
k2tog tbl - knit 2 sts together through back of loops - insert the right hand needle from right to left through the back loop of 2 sts and knit together as 1 stitch
kf&b - knit into front and back of same stitch - knit into the front of the stitch as normal, da not slip the stitch off the needle but insert the right hand needle from right to left through the back loop and knit into it again p2tog tbl - purl 2 sts together through back of ioops
- insert the right hand needle from left to right through the back loop of 2 sts and purl together as 1 stitch
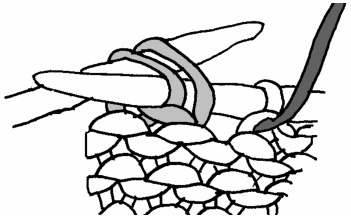
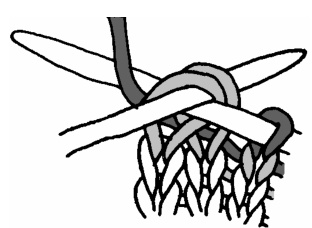
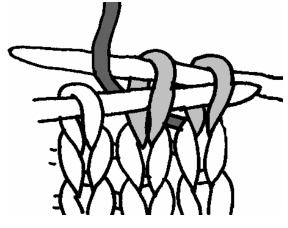
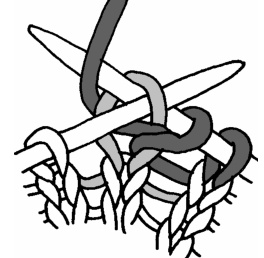
Picking up stitches along a diagonal edge- for the top edging, sts are picked up along the chain of edge sts. Use one needle for this. - insert the right hand needle under both loops of the first chain stitch, wrap the yarn round the needle as though to knit and pull a loop through. Insert the needle under both loops of the next chain stitch, wrap yarn round needle and pull a loop through. Repeat along the edge to the end.
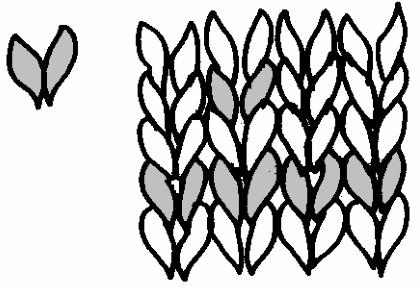
Identifying stitches - to count the number of stitches to cast on for the fastening flap. - on the right side of the stocking stitch, a single stitch looks like a V. A row of stitches look like a row of Vs.
BAG - START KNITTING HERE
SIDE PIECES (make 4 the same) Cast on 3 sts. Row 1 ws Purl to end. Row 2 Kf&b into first st, kf&b into second st, k1. 5 sts Row 3 Purl to end. Row 4 Kf&b into first st, k2, kf&b into next st, k1. 7 sts Row 5 Purl to end. Row 6 Kf&b into first st, k to last 2 sts, kf&b into next st, k1. Row 7 Purl to end. Keep increasing as set on every RS row by repeating rows 6 and 7 until side measures 20cm (8in) from point to sts on needle, ending with a purl row.
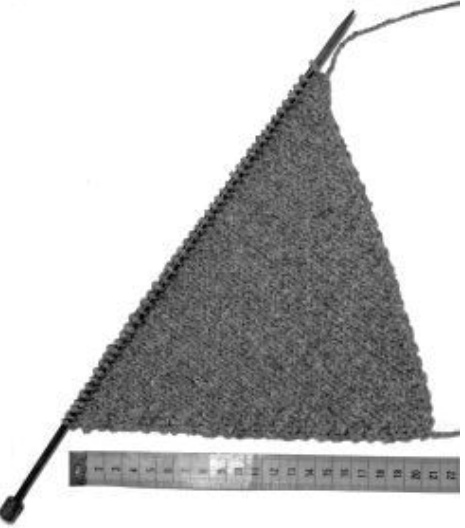
Helpful Hint: count the number of sts on your needle and make a note of it. Simply increase to this number for the other three pieces and they will all be the same size without you having to measure them. Next Row Rs K2tog tbl, k to last 2 sts, k2tog. Next Row P2tog, p to last 2 sts, p2tog tbl. Keep decreasing as set on every row by repeating the last 2 rows until only 3 sts remain. Depending on the number of stitches you had before beginning to decrease, you can finish on either a knit row or a purl row. Either is correct. If the next row is a purl row work as follows: Slip first st, p2tog tbl, pass slipped st over. If the next row is a knit row work as follows: Slip first st, k2tog, pass slipped st over. Cut yarn and pull through last st. Block and press the side pieces according to instructions on manufacturer's ball band or in a way suitable for the fibre. Straighten edges and pull out corners. Place two pieces side by side with the short edges of the kite shape together. Sew the centre seam.
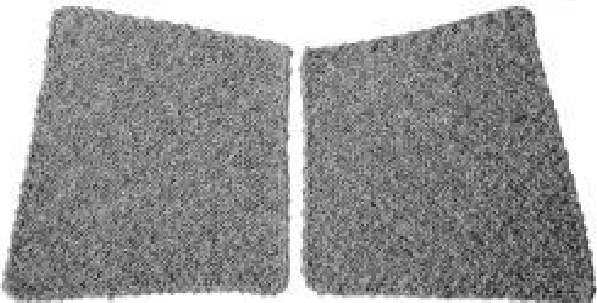
Repeat for the other two pieces. These form the back and front of the bag.
TOP EDGING
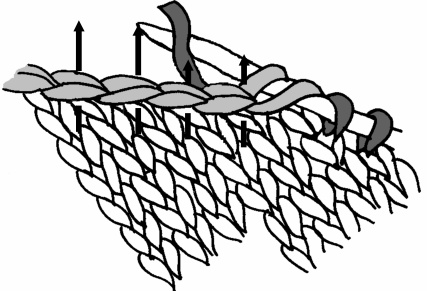
The top edging is worked into the chain of stitches that lies along the top edge of the back and front. With Rs of work facing, pick up and knit 1 stitch into every chain stitch along top edge of front (see Techniques above). Knit 2 rows. Cast off loosely knitwise. Sew in yarn ends. Work a top edging on the back in the same way.
FASTENING FLAP Creative Bit
Lay the front flat with the knit (RS) side upwards. Place a ruler or tape measure on top along a row; be careful not to place it diagonally across the rows.
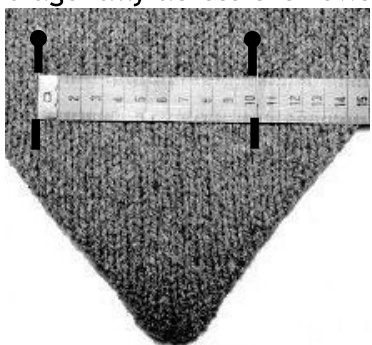
Push a pin into the knitting at the beginning of the measuring scale and another at 10cm (4in). Remove the ruler or tape measure and count the number of sts between the pins. Make a note of it. This is the number of sts to cast on for the fastening flap so that it is 10cm (4in) wide. Cast on this number of sts. Work in garter stitch (knit every row) until flap measures 18cm (7in).
Creative Bit
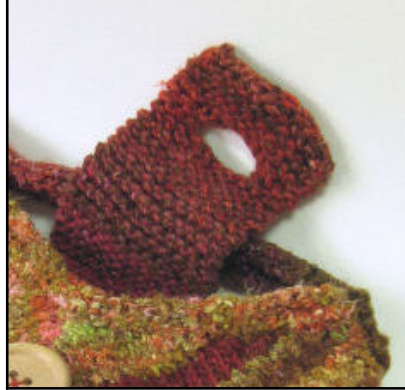
Lay the flap down. Place your button just below the needle in the middle of the flap with the same number of stitches on each side. Push a pin into the knitting either side of the button at the widest part. Remove the button. If the pin is through half a stitch, move it towards the middle. Buttonhole Row 1 Knit to first pin, cast off buttonhole sts to next pin, knit to end. Remove pins. Buttonhole Row 2 Knit to cast off sts, turn work and cast on same number of sts, turn work and knit to end. Work another 4cm (1%in) in garter stitch. Cast off loosely knitwise. Press flap as before. Join the back and front along the base seam. Join the side seams.
STRAP
Creative Bit
Cast on half the number of stitches that you cast on for the flap. Work in st st, beginning with a knit row, until strap measures 66cm (26in), ending with a p row. Keeping the sts on the needle, pin the ends of the strap to the bag at each side seam about 3cm (1in) below the top and try the bag on your shoulder. You can alter the length to suit you. You may prefer the strap shorter so the bag tucks under your arm. Add more rows or pull back some rows for the correct length. Cast off loosely. Press the strap as before.
Pin the flap onto the back 5cm (2in) below the top, making sure it is central over the seam and sew into place. Cut a piece of webbing or tape the same length. Pin onto the wrong side (puri side) of the strap and slip stitch into place. Pin each end onto the bag at each side seam 3cm (1in) below the top edge, taking care not to twist the strap. Sew securely in place, through all thicknesses. Sew the button 6cm (2%in) down from top edge on centre front seam.
The Knitter's Bible Knitted Accessories Knitted Bags Knitted Throws & Cushions ISBN 0715317997ISBN 0715326007ISBN 0715323261ISBN 0715327380 Pattern queries please email: clairecrompton100@yahoo.co.uk Buy patterns: www.clairecrompton.etsy.com See books and workshops: www.clairecrompton.co.uk


