Windy City Skirt
In the Round, Bottom Up Skirt Pattern
Recommended Yarn: Noro Iro Skeins needed: Depends on length of skirt, I'd pick up 6 to be safe, but I like below the knee skirt lengths. Skirt width at bottom hem: 40 inches (this is the length of your walking stride) Skirt length from waist to hem: 18 inches (for just above the knee) and 20 inches (for at the knee) - NoTE: Skirts grow lengthwise and shrink widthwise as you wear them. Bear this in mind when doing measurements!! Skirt width at top waist: 37 inches (measure where your waist is the smallest, because this is where the elastic will tuck in) al materials needed: Four feet of 2 inch thick elastic, needle and threa. Needle size: 10, circular Gauge: 4 st to 1 in over stockinette Desired ease: None or positive ease (none means the skirt is the exact same size you are, positive ease means the skirt is bigger than you)(negative ease means the skirt is smaller than you are and you need to wiggle a bit to get it to fit). [l recommend knitting this skirt with positive ease of two inches] Note to anyone knitting this pattern: See the above measurements? Those are my measurements. You need to figure out your own measurements so that you can make a skirt that fits you. So, get a measure tape and start measuring! You need three measurements: width at top waist, width at bottom hem, and length of skirt. About yarn, needle size and gauge: These things can change. Pick out the yarn you like, the needle you like, and knit a stockinette gauge swatch. You will get a number of stitches per one inch of stockinette. This is your horizontal gauge. Remember it. A little math: The number of your cast on stitches is calculated as follows: horizontal gauge (x) width of skirt at bottom hem. For me, that is 4 st to 1 in (x) [40 inches width at bottom hem + 2 inches positive ease] = 168 stitches. The pattern for the skirt is knit in multiples of three, so I have to check that 168 can be EVENLY divided into three. It CAN, so we are good to go. If your math does not come up with a cast on stitch number that can be divided by three, keep adding stitches until it does divide evenly.
PATTERN DIRECTIONS:
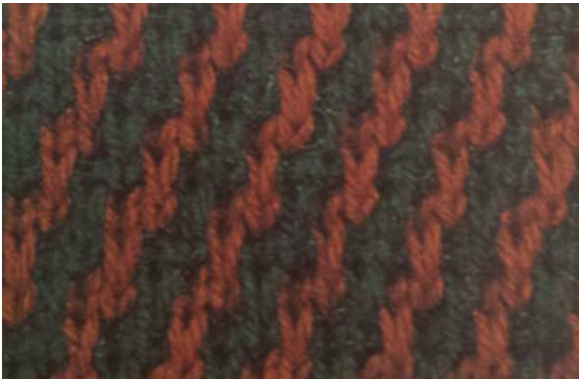
(l am using the number of cast on stitches that matches my measurements and the calculations above - you should cast on the number of stitches from the “A Little Math" section that are tailored to your measurements): 1. CO 168 st using long tail, two color long tail, or knitted cast on. 2. Join knitting in the round. 3. Using A, purl one round. 4. Using B, \*k2, sl1 5. Using B, \*sl1, k2 6. Using A, \*sl1, k2 7. Using A, \*k2, sl1 8. Using B, \*sl1, k2 9. Using B, \*sl1, k2 10.Using A, \*k2, sl1 11.Using A, \*sl1, k2 12.Using B, \*sl1, k2 13.Using B, \*k2, sl1 14.Using A, \*sl1, k2 15.Using A, \*sl1, k2 16. Repeat rows 4-15 until skirt is the length you want it. For me, that is
WAISTBAND:
17. Using A, p one row. 18. Using A, k. (This row stops the pattern stitch above and changes to stockinette stich for the inside of the waistband). 19. Repeat row 18 until stockinette stitch measures 1.25 inch. 20.Bind off loosely, nothing fancy, using a bind off that is stretchy and flat. Leave a long 6 foot tail of yarn attached to the skirt. This will be used to whip stitch the waistband. 21. Fold over waistband at row 17's p row. That purl row is the top of the waistband and will sit at your waist. 22. Whip stitch the bind off row to the skirt. There should be a 2.5 inch space. Make the stitches fine and neat so they don't show on the pattern side. 23. When you finish whip stitching the bind off row, you will still have a small 2.5 inch vertical slit left open in the skirt. This is where the elastic waistband will be inserted. 24. Measure out elastic waistband to your waist - it should be comfortable. Don't cut it yet! Tie one end with a big baby sized safety pin, and thread through the 2.5 inch space all around the waistband of the skirt. When you get to the beginning, try it on. Make the elastic tighter or looser depending on how you like the fit. Sew the two sides of the elastic waistband together. 25. Using your yarn, sew that 2.5 inch gap in the waist closed. Weave in any loose ends. 26. Enjoy your new skirt!


