28064212 Ehae is when the world uill ehd
One of my favourite movies of all time, particularly as we get closer to Hallowe'en, is Donnie Darko. Whether you see it as a Science Fiction/Fantasy tale, or one young man's journey into madness, it's a great way to spend a couple of hours.
Materials:
Gauge: approx 8st/inch. Yardage: approx 440-500 yards fingering weight yarn. Yarn: Solids preferred Needles: US 2.5mm or whatever will give you gauge. Beads: 2 vials #8 beads in gunmetal grey (or, if your yarn is too dark, one vial can be swapped for 1 vial #8 beads in frosted white) I prefer the Magic Loop method, so my instructions will reflect that. You may need to rearrange your stitches differently.
Cuff & Leg:
These socks are intended to be fraternal, but you can knit them any way you like. The one caveat is this: The more beading you want, the more beads you'll need! I recommend repeating the individual cable pattern down the back-center ofSock#2.
CO 64(72) sts and divide evenly onto needles. Join to work in the round using whatever seamless join you prefer, making sure not to twist. Work K2P2 cuff for approx 12 rounds or 1-1.5" (your preference)
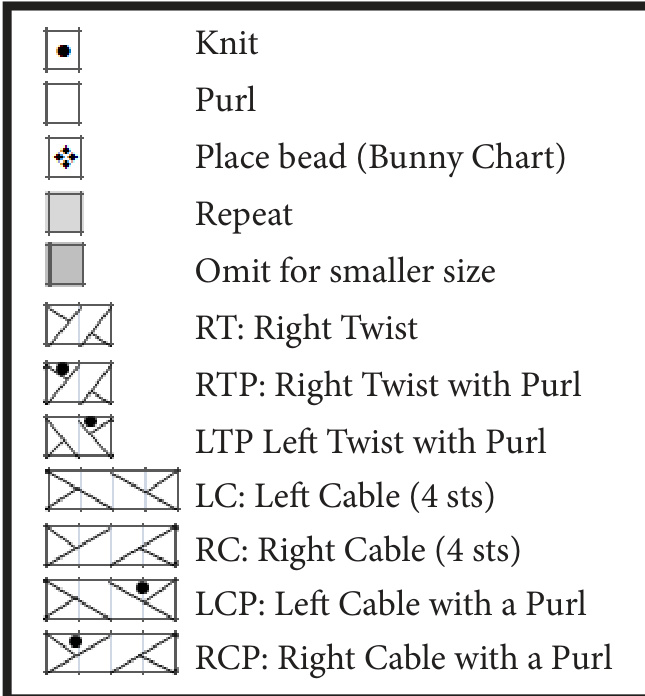
Chart Terms Explained
RT: knit the second stitch on the left needle, then the first one, then slide them off together RTP: knit the second stitch, purl the first and slide them off together..
Sock #1:
LTP: purl the second stitch on the left needle, then knit the first one, then slide them off together Start front and back charts, using the written directions for rounds 1 & 2 below as setup rows: LC: Place first two stitches on cable needle, drop to front. Knit next two stitches from left needle, then both stitches from cable needle. 1. k2, p2, rt, p2, k2(3), p10(12), k2(3), p2, rt, p2, k3, move last st to Needle 2, k all to 2nd last st. move to beginning of Needle 1. New start of round. 2. k3, p2, k2, p2, k2(3), p10(12), k2(3), p2, k3, k to end LCP: As above, but purl the first stitch off left needle. RC: Place first two stitches on cable needle, drop to back.. Knit next two stitches from left needle, then both stitches from cable needle. Begin Frank the Bunny chart on third row for Needle 1, Back of leg bead chart for Needle 2. RCP: As above, but purl the last stitch from the cable needle.
Heel:
After you've finished the back ofleg bead chart, knit across Needle 1 in pattern and knit across Needle 2 and turn. You'llbe working back and forth across Needle 2 for your heel. Starting on the wrong side: 1. k3, \*sll, p1\* across to last 3 stitches, k3, turn 2. knit to end, turn Repeat these two rows until you have 32(36) rows total (pro tip: I usually count the floats on the back side and multiply by two to keep my place)
Turn heel:
k17(19), ssk, k1 sll, p3, p2tog, pl sl1, k to 1 stitch before gap, ask, k1 sll, p to 1 stitch before gap, p2tog, pl Repeat rows 3 & 4 until allstitches are worked. You should end on a purl row, with 20 stitches remaining. sl1, k9 sts across and create new start of round. If you're using the magic loop method, rearrange sts so that the loop is just off-center. You want to be able to knit across to your gusset decreases and top of foot, but not disturb the Frank the Bunny motif down the topcentre of the sock! I rearranged needie 1 to end between stitches 11 and 12 of the instep. If you are using a really long cable (ie: 42"), you can probably divide your sock in thirds so that the instep is intact. k10 stitches and pick up stitches in the bumps down side of sock. If necessary, pick up additional stitches in the gap between the last bump and the frst stitch of the top of the foot. Place marker. knit acrostop of sock in pattern. Place marker Pick up stitches in the gap (if necessary) and bumps up the opposite side of the sock and knit to start of round.
Gusset Decrease Rounds:
1. Knit to 3 stitches before marker, k2tog, k1, slip marker, k in pattern across instep, slip marker, k1, sk, kto end of round. 2. Knit 1 round plain, in pattern over instep. Continue to decrease until there are 18 stitches between each marker and the start of round (72 sts total). At this point you can rearrange your stitches again so that all the top stitches are on one needle and the sole stitches are on another. If you're anything like me, you probably have 3 finished instances of Frank the Bunny running down the front of the sock, and have started the fourth. This will be the last time you will knit Frank, as we don't want beads digging into the tops of our feet when we shove ém into our shoes. After you've finished knitting your last Frank, go another 10 spacer rounds then taper that centre purl area to a point by knitting the outside 2 purls the next few times you go around.
Toe
You will be continuing the cable panels down the sides of the foot until you reach the toe, which should be about 2 inches from your planned end of foot. I usually give about 1/2 an inch to 1 inch of negative ease, so if I'm knitting for a 10" foot, I'll start my toe around the 7” or 7.5" mark so that it will ft nice and snug. 1. knit across the sole until 3 sts from the end of the needle. k2tog, k1 2. k1, ssk, knit to 3 sts from the end of the needle, k2tog, k1 3.kl, ssk, k to end of sole 4. knit a round plain and repeat from #1. Continue in this way until you have about 12 stitches per needle (24 total). Graft together using kitchener stitch.
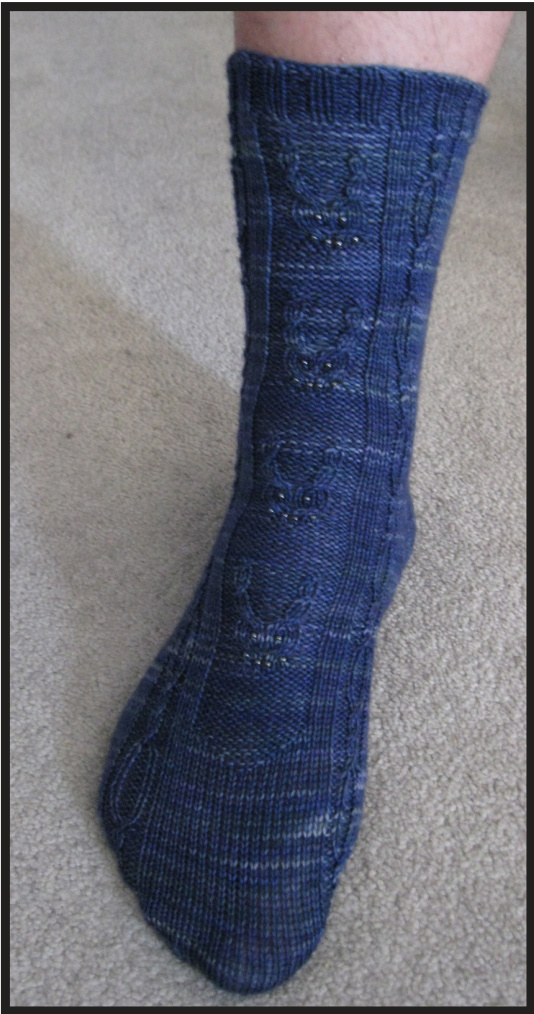
Frank the Bunny Chart
Work chart below on first 32(36) needles, starting at the bottom-right. The darker shaded colums are the rows omitted for the smaller size. The two side panels are shorter than the middle. We want to repeat the side panels at the point where we have the light shading (consider that repeating from row 1). The middle panel repeats after the 5th row of purls at the top of the chart. No, your panels will likely not align this neatly all the way through the pattern. This is just to get you started. Separate charts are included later for reference.

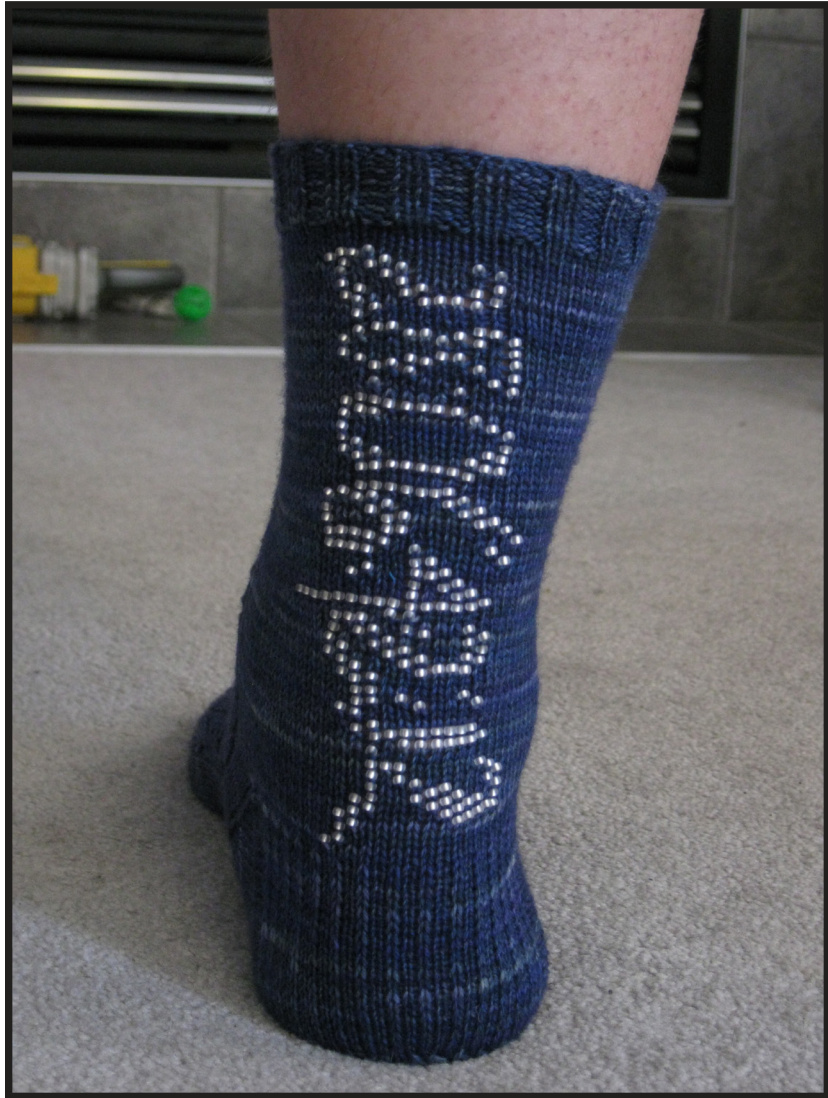
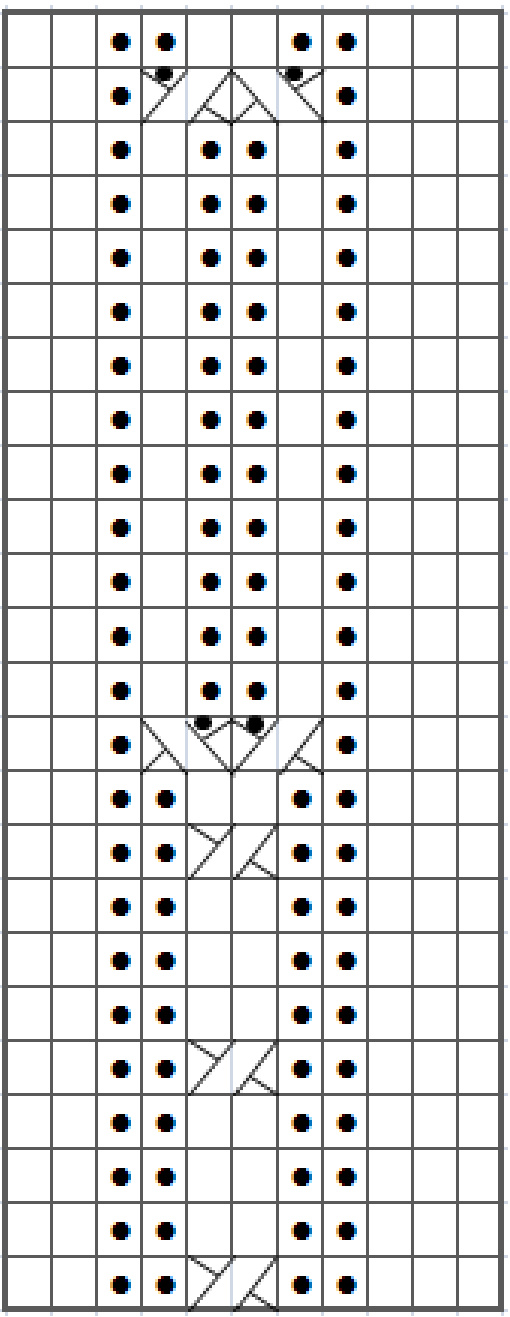
Back leg bead chart
Center the bead chart below on the back of the leg. I've marked the middle stitches for your reference. The dark outer stitches can be omitted for smallr sizing. The dark stitches down the middle are where you place your beads. The next page shows a rotated variation if that is your preference. Start at the top-right and read right-to-left, top-to-bottom.
| WW | |||||||||||||||||||||||||
Rotated Bead Variation
The husbeast recommended (after the first sock was already knit) that the bead pattern be rotated. Here is his variation, if you choose to give it a try. Start at the top right and work right-to-left, top-to bottom.
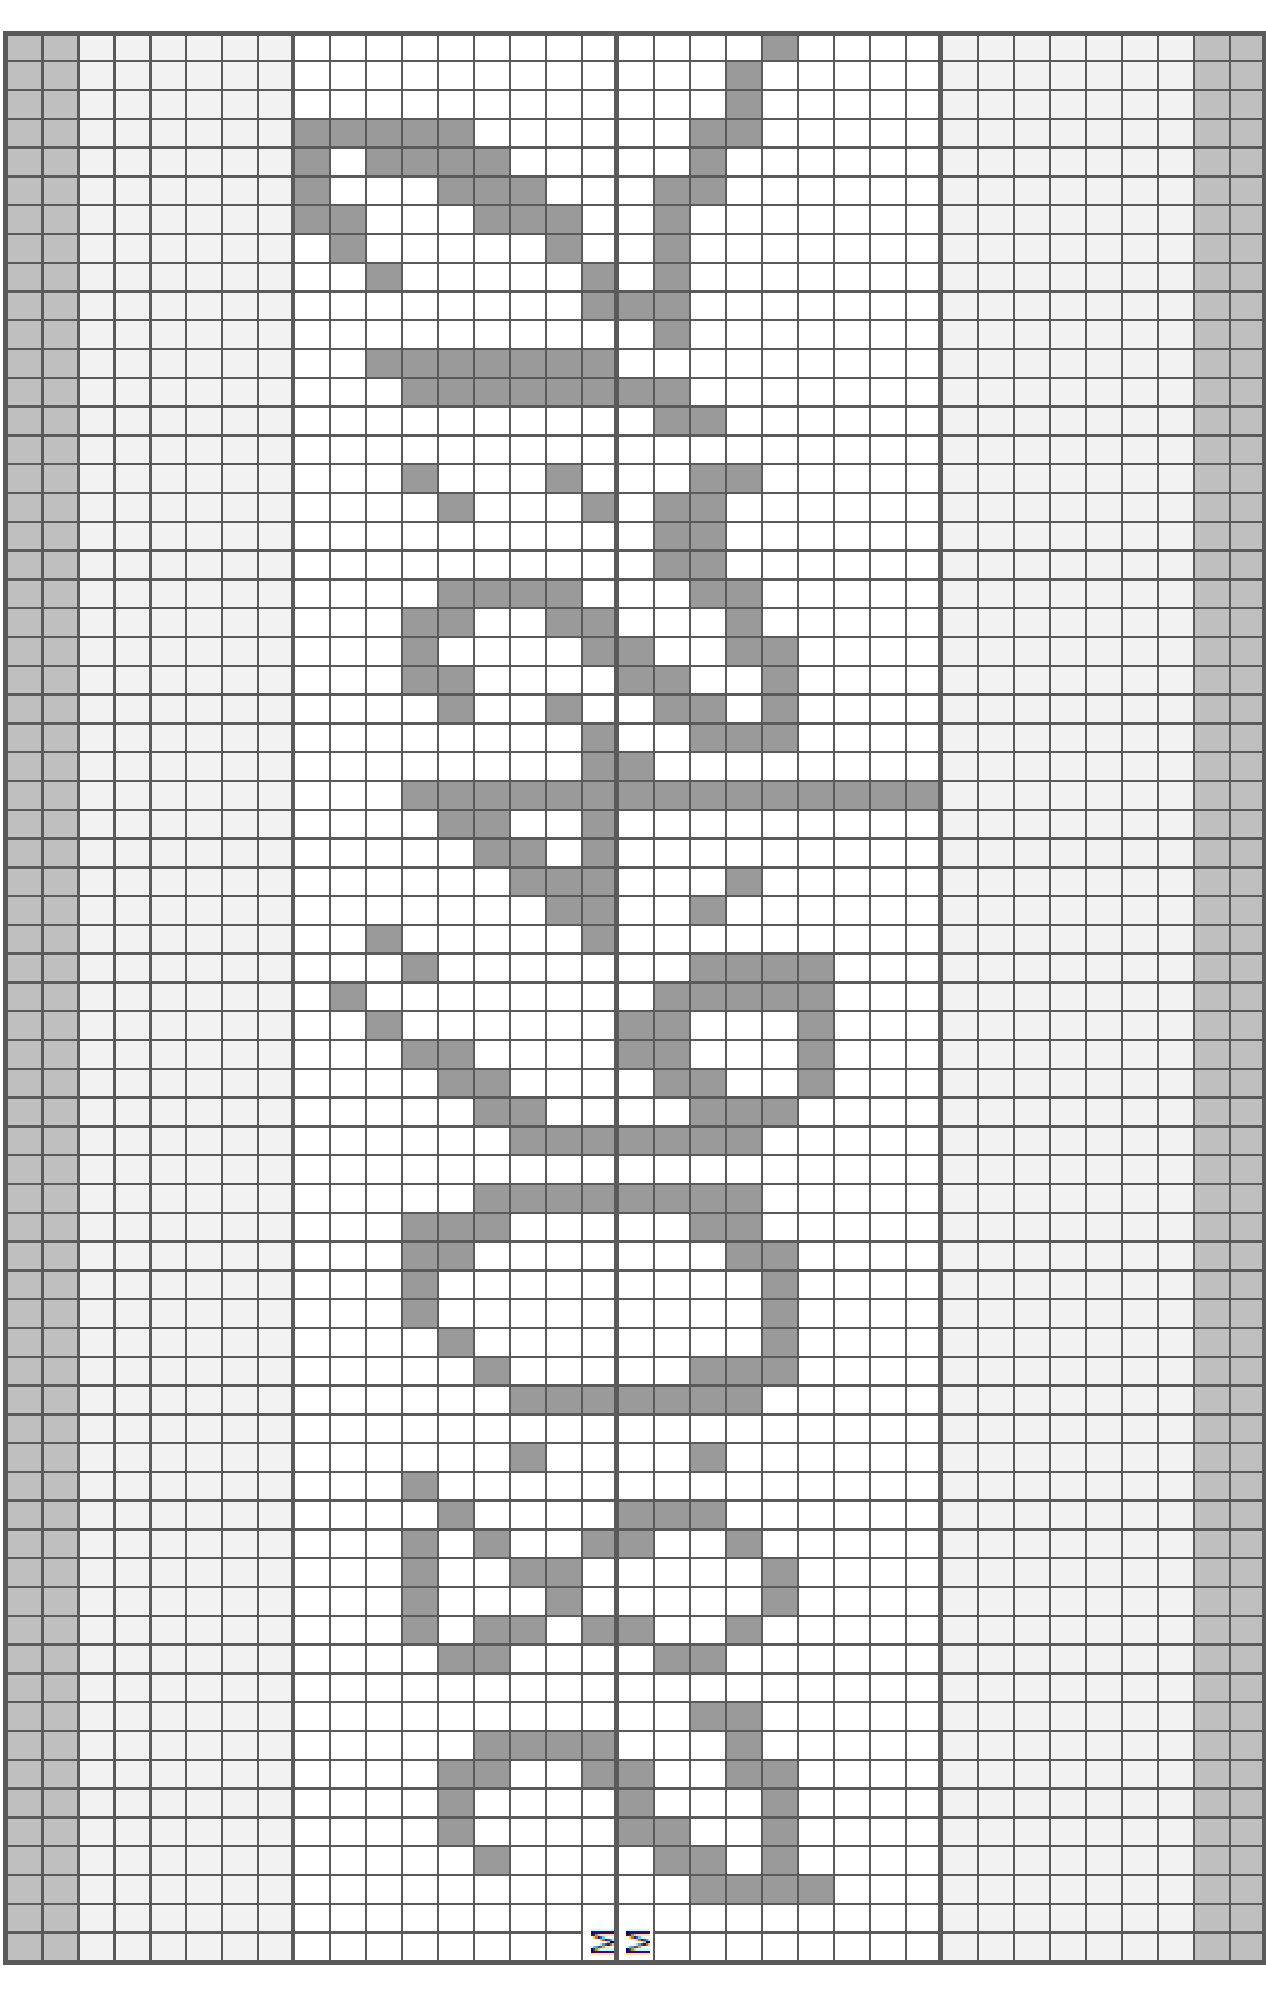
Additional Individual Charts
The individual cable chart and individual Frank the Bunny charts are included below. As mentioned previously, you can center the cable chart down the back of sock #2 for an interesting fraternal variation.
Maire Martin / Bats in the Attic October 2011
This pattern is for your personal, non-commercial use only. You are not allowed to make garments from this pattern for sale any. where. You are not allowed to mass produce this pattern or garments made from it.


