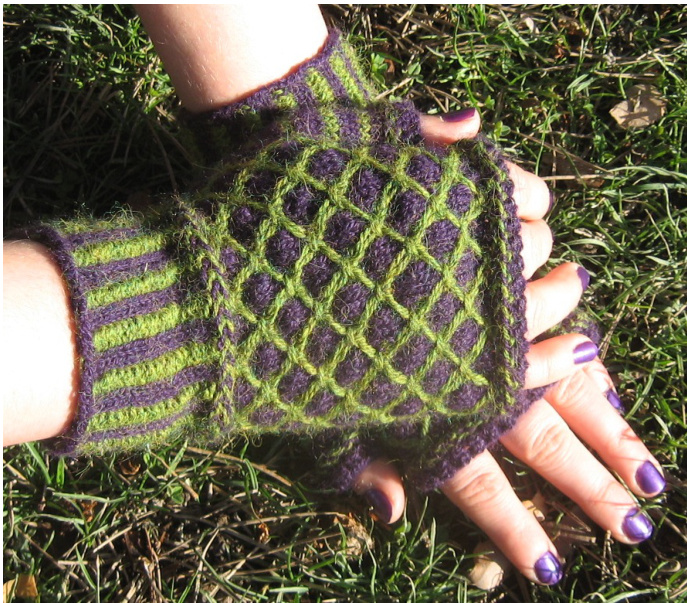
Faberge Royale Mitts
By Valerie Pollock
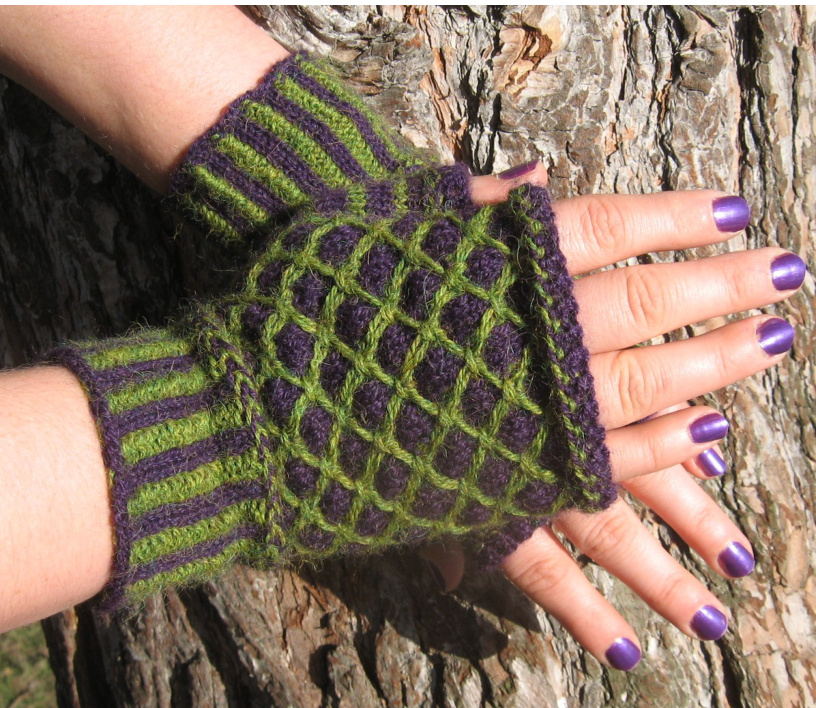
top edge of the glove and thumb are accented with purl and eyelet rows that recall a crown. I love the deep saturated purple of this yarn; it makes me think of royal purple. when I showed these fingerless gloves to a friend, she said the quilting/lattice pattern looked like a Fabergé egg. Hence, Fabergé Royale Mitts. while I didn't add any beading to these gloves, it would be easy to add a large bead to the centre of the diamond to make these even more elegant! The The corrugated ribbing of this pattern and the Latvian braid require colourwork (working with two colours at one time), but the cluster quilting pattern is a slip stitch pattern with only one colour being worked on any individual row. If you prefer to do your ribbing in a single colour, the only colourwork you would need to do would be the Latvian braid. Both the corrugated ribbing and the cluster quilting pattern impact the amount of give and stretchiness of the mitt. I have written instructions for two sizes of mitt, small and medium. Be aware, though, that because there is less give to these mitts, you might want to cast on for the larger size unless your hands are quite small. Instructions are given for small size with changes for medium in brackets. Medium actually measures about 3 3/8"/8.5 cm across (6 %"/17 cm circumference) and will stretch to about 7 V2" to 8"/19 to 20 cm palm circumference. Small will actually measure about 3"/7.5 cm across (6"/15 cm circumference) and should stretch to about 6 %"/17 cm to 7 '/"/18 cm palm circumference. Gauge: approximately 43 stitches and 57 rows = 4"/10cm across cluster quilting lattice pattern. Needles: US 0 - 2.0 mm DPNs or two US 0 - 2.0 mm circs US 1 %2 - 2.5 mm DPNs or two US 1 %2 - 2.5 mm circs or needles to achieve gauge. Yarn: Fingering weight/sock yarn DROPS Alpaca colour purple 4400 and green 7238 shown
Abbreviations:
MC main colour CC contrast colour KFB knit into front and back of same stitch (one stitch increased) dr drop the stitch from the needle SM slip marker repeat instructions between the asterisks to the end of round, or as indicated in pattern LRI left raised increase as follows: slip the needle into the 'grandmother' stitch of the stitch just knitted. You will find the grandmother stitch two stitches below the last stitch on your right hand needle. Lift this stitch up to the lefft hand needle and knit into it. (one stitch increased) RRI right raised increase as follows: slip the needle into the stitch below the stitch on your left hand needle. Lift the stitch up to your left hand needle, and knit it, then knit the stitch on the left hand needle that wasn't lifted. (one stitch increased) sl slip next stitch on left hand needle to the right hand needle without knitting it. All stitches in the cluster knitting pattern are slipped purlwise with yarn in back. Stitches for SSK are slipped knitwise. ssK Slip next two stitches knitwise, one at a time, to right hand needle. Insert left hand needle into the front of the two stitches and knit together. (one stitch decreased) K2tog Knit the next two stitches together. (one stitch decreased) Cl3 Cluster quilt three stitches together as follows: Pick up first dropped stitch and knit it, K1, pick up next dropped stitch and knit it, then cluster quilt these three stitches by slipping them back to LHN, bring yarn to front, slip them back to RHN, take yarn to back, slip a second time to LHN, bring yarn to front, slip back to RHN, bring yarn to back. Snug the wraps and Continueknitting. psso pass slipped stitch over the stitch just knitted.
Fabergé Royale Mitts (both alike)
With larger needles and MC, cast on 56 (60) stitches. Join to knit in round on 4 DPNs, two circs or magic loop. Work 2" (5cm) of corrugated 2x2 ribbing with MC knit and CC purl. Work one round Kl mC Kl CC. Latvian Braid (over two rounds) Bring yarn to front: all stitches in the next two rounds are purl, with yarn held to the front at all times. work first stitch MC, then, holding yarn down with thumb, bring CC over top of mC and work second stitch. Hold yarn down with thumb and bring MC over top of CC, work next stitch. Continue in this manner for one round. Second round, work first stitch MC, then, holding yarn up with thumb, bring CC Underneath MC and work second stitch. Hold CC up with thumb and bring MC underneath CC and work the next stitch. Continue in this manner to end of round. You are essentially doing colour work with the stranding on the public side of the garment rather than in back. Your yarn will become tangled as you work, but if you are able to stand it to the end of the first round, your second round should have you untangling the work! If it is too painful, you can stop and untwist every so often. If you like, you can finesse this pattern by reversing the order of these two rows on the second glove. You will then have one glove with the 'arrow' pointing left and the other with the 'arrow' pointing right. Small only: Work one round MC as follows: \*k4, KFB\*, place marker, k2. [67 stitches] total. Medium only: Work one round MC as follows: \*K3, KFB\* placing marker before last KFB (Two stitches will be on needle after marker for thumb gusset) [75 stitches] total Begin Cluster Quilting pattern. All slip stitches are slipped purlwise with yarn to the back of the work. Set up round: CC K1 \*K1 wrapping yarn twice, K5, K1 wrapping yarn twice, K1\* SM, K2 Round 1: MC K1 \*sl 1 dropping extra wrap, K5, sl 1 dropping extra wrap, K1\* SM, K2 Round 2: MC K1 \*sl 1, K5, sl 1, K1\* SM, RRl, K2, LRI [69 (77) stitches] Round 3: MC K1 \*sl 1, K5, sl 1, K1\* SM, K4 At this point, you may choose to take a waste yarn and darning needle and thread the waste yarn through all the slipped stitches in the round. You will be dropping these stitches in the next round, and while waste yarn is not necessary, it will help keep the stitches oriented the correct way for when you go to pick them up again in Row 5. RoUnd 4: MC K1 \*dr 1, K5, dr 1, K1\* SM, K4 RoUnd 5: CC \*sl 2, K1, CL3, K1, sl 1\* sl 1, SM, RRl, K4, LRI [71 (79) stitches] Round 6: CC \*sl 2, K1, K1 wrapping yarn twice, K1, K1 wrapping yarn twice, Round 11: CC K1, pick up dropped stitch and knit it, K1, \*sl 3, K1, CL3, K1\* sl 3, K1, pick up last dropped stitch and knit, K1, SM, RRl, k8, LRl [75 (83) stitches] Round 12: CC K1, K1 wrapping yarn twice, K1 \*sl3, K1, K1 wrapping yarn twice, K1, K1 wrapping yarn twice, K1\* sl 3, K1, K1 wrapping yarn twice, K1, SMK10. These 12 rounds form one repeat of the pattern. Work next repeat, following the thumb gusset increases in Rounds 2, 5, and 8 and 11, then again on Round 2 of third repeat. [20 stitches on gusset, 85 (93) stitches total] Continue working even in the gusset until Round 8 of the third repeat. Work Round 8 until the stitch marker, slip 20 thumb stitches onto waste yarn, cast on 4 stitches over gap [69 (77) stitches total] and continue to work in pattern as established, with following adjustments. Round 11: CC work to marker, SM, ssk, K2 tog. [67 (75) stitches]
Repeat 4
Round 1: mC work to two stitches before marker, SSK, remove marker, K2 tog. [65 (73) stitches] Round 3: MC work to last two stitches, ssk. [64 (72) stitches] From here on, you will have one fewer stitches to knit or slip at the end of the needle than stated in the previous instructions. Often, this is the K1 or sl 1 stitch after the asterisk. Round 11: CC sl 1, pick up dropped stitch, but DO NOT knit it, K1, \*sl 3, K1, cluster 3, K1\* sl 3, K1, pick up last dropped stitch and knit, K1, NOw knit the first stitch on your needle 1 and the dropped stitch, Cluster quilt with last stitch on needle 4. You can leave these stitches on needle 4 for the double wrap row and then redistribute them back to their correct needle before beginning the following round; as you will be changing colours for round 1, it should be easy to accomplish. If you forget to shift the two stitches back, your stitches will be out of sequence and the lattice pattern willlook crooked!
Repeat 5
Work rounds as before, ending with either Round 5 or Round 11. (Do not work a round with the double wrapping of the yarn). ly Work one round in MC, decreasing 10 stitches evenly over the round (K4, K2tog\*, k4) [54 stitches] Medium only Work one round in MC, decreasing 12 stitches evenly over the round. (\*K4, K2tog\*) [60 stitches] Next round: Work one round K1 MC, K1 CC. Bring yarn to front. Next two rounds: Work Latvian braid as specified above. If you wish to finesse the mitts and reverse the direction of the arrows on the two mitts, ensure that you begin with the same round as you did with the wrist braid. Leaving a length to weave in, cut the CC.
Change to smaller needles for last rounds.
Crown your mitt: MC only for next rounds. Work two rounds stocking stitch. Work one round purl in MC. Work one round \*K2 tog, YO\* Work one round purl. Bind off knitwise.
Thumb
With smaller needles and MC, pick up and knit 20 stitches from thumb gusset. Across the gap, pick up and knit one stitch from corner, four stitches across the cast-on stitches, and one stitch from corner [26 stitches]. Place marker for end of round. Round 2: MC knit Round 3: CC knit to last 6 stitches. SSK, K2, K2tog. [24 stitches] Round 4: CC knit. Cut CC, leaving an end to weave in. Round 5: MC knit to last 4 stitches. SSK, K2tog. [22 stitches] Round 6: MC knit Round 7: MC knit to last 2 stitches. Sl 1,
Work 'Crown' rounds as for the top of mitf. Weave in ends. Enjoy!


