Copyright @ 2015 by Deborah Tomasello All rights reserved. This book or any portion thereof may not be reproduced or used in any manner whatsoever without the express written permission of the publisher except for the use of brief quotations in a book review.
Dedication
For all my wonderful knitting friends on Ravelry
Acknowledgments
Nobody accomplishes anything in a vacuum. I would not—could not—-be able to envision an idea, let alone make it materialize, were it not for my connection with so many bright women who are willing to share with me. From interacting with fellow knitters, I can gather ideas for patterns, and with a lot of help, I can produce them and, occasionally, work a group of them into an e-book like this One. Sometimes, providence smiles on me. I found Debbie Cocker accidentally when I stumbled upon a Facebook post of hers. She was the perfect person to partner with on this project. Debbie owns and operates Knitbin.com, and we teamed up to produce several sock patterns that could be knit up and worn with jeans. 1 designed the patterns, and Debbie supplied the Regia sock yarn. Once I knitted the socks and wrote up the pattern, I sent it off to Debbie who spent hours acquiring supplies and producing the kits for eager knitters. Her attention to customer service and satisfaction is the best I've seen. I know I chose the right person for this project. Without Debbie's willingness to partner with me in this way, the whole idea of a sock series would never have worked. Thank you, Debbie, for your patience, your forthrightness, and for your professional approach throughout. The sock patterns, like any others, wouldn't mean much to the prospective knitter without pictures of what the socks will look like. My friend, Solange LaBonne, has perfect feet. Really. I can always count on her cheerful willingness to model socks, and for this I am so thankful. Pat Sample is an artist. She graphically manipulates images and comes up with layouts that make photographic images look great. Whenever I ask her to work her Photoshop magic for me, she does. Thank you, Pat for your talent and for your willingness to share. And to my friends on Ravelry and in my group, Colorworks by Debi, your support and enthusiasm for my work keep me going. Thank you for being with me every day via Ravelry (and Skype!). Some people differentiate between online friends and “real-life" friends. I cannot. You are all as real and close to me as any person I can hug up close. Thank you!
Contents
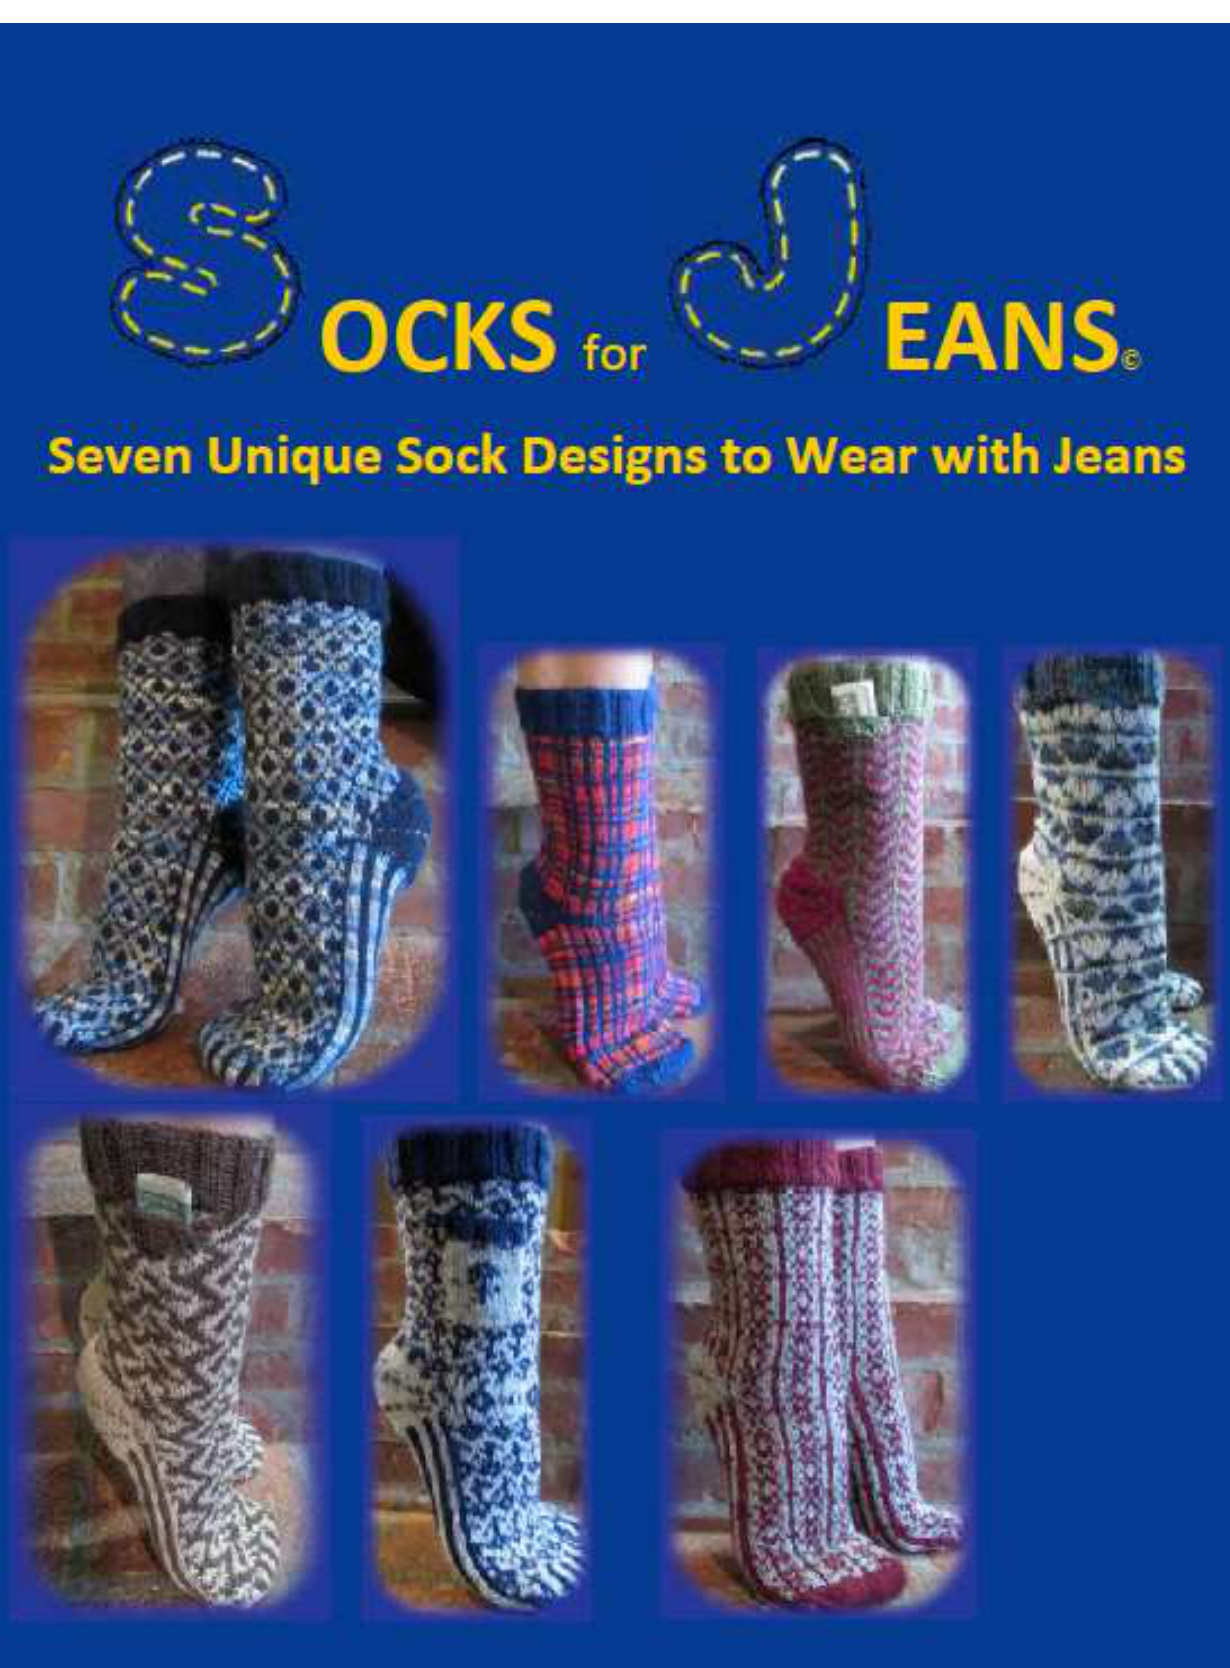
Dedication ii Acknowledgments ii Introduction 1 Abbreviations 3 A Word about Yarn (Color) Dominance 4 Helpful Tutorials 8 The Patterns 10 #1 Denim Dreams 18 #2 Fiesta! 22 #3 Casual Fridays 25 #4 The Ripple Effect 30 #5 Chocolate Parfait 35 #6 That Lovin' Feeling 40 #7 Spring is in the Air 44 About the Author 50 Contact Information 51
Introduction
Eons ago, when the earth was learning to revolve around the sun and I was a kid, we watched black and white TV. You've heard the stories. It's true. No color. I remember when the first TV was brought into our house. We became the center of the universe then, and the neighborhood began swirling around us for a time. TV was thrilling to watch, and the fact that color was absent from the screen was not an issue. It didn't bother me. Until it did. Once color was introduced, it became increasingly unsettling to sit and watch TV in black and white. The above story, though true, is a metaphor for colorwork knitting. Eons ago, when the earth was learning to revolve around the sun and I was a kid, I knitted garter stitch using one strand of yarn at a time. It was a joy, and I couldn't even conceive of the idea of knitting with two strands at once. Until I could. I was introduced to stranded knitting, the lights went on, and my knitting universe exploded with possibilities. It forever changed. The idea of going back to knitting with one strand of yarn at a time, for me, is like the thought of ditching the new, HD, flat-screen TV for an old, 12-inch screen black and white boob-tube that broadcasts on three stations for a few hours a day. (Yes, kids, there was a time when TV was not 24/7. It actually shut down at night, signing off with the national anthem being played while the stars and stripes waved on the screen. In black and white.) But I digress. I love knitting with color. It's what I do. It's who I am. Happily addicted, I get no greater joy than by enabling others to see the colorwork light. Whether you are a colorwork addict, like me, or an occasional user, or if you are brand new to stranding, I hope you will enjoy the colorwork designs I've created for the Socks for Jeans series. And knitting stranded socks is a great way to get your colorwork feet wet. Once you begin working with color, you must allow yourself time to learn the process (It's easy!), get comfortable holding your yarns and following charts. My bet is that you will find knitting with only one strand somewhat boring. Once we add a second strand into the mix, the heavens open up for design possibilities. Like those heavens, the possibilities are infinite. In Socks for Jeans, I have created seven, unique designs for knitting stranded socks to—well--to wear with jeans. You will find diamonds, zig-zags, plaids, hearts, and flowers. And more. As always with colorwork patterns, the yarns and colors listed are suggestions. You, as creator of your own projects are free to pick any colors you want. Feel free to branch out with color choices; don't feel limited to the palette I have used. For example, I designed pattern #4, The Ripple Effect, using colors of the holiday season because the pattern was released in December, but you can choose to make your ripples any two colors you'd like. Have a new purple sweater to wear with your jeans? Perhaps knit the socks in colors that match the sweater. A good rule of thumb, when choosing colors, is to use highly-contrasting shades. Two colors close in shade and saturation might be hard to differentiate from each other, thus obscuring the colorwork design. Likewise, variegated yarns, however lovely, will obscure a stranded design. It is better to use solids, unless there is very high contrast, as there is in Fiesta!, Sock #2 in the series.
Abbreviations
BO — bind off cO — cast on DPN — double-pointed needle Dec — decrease Inc — increase K —knit K2TOG — knit two stitches together MC — main color PM 一 place marker P— purl Rnd — round slipped stitches and knit them together from this position SSK — slip one stitch, then slip the next. Insert left needle into the front loops of the
A Word about Yarn (Color) Dominance
Yarn, or color, dominance refers to the way you carry your strands to produce a dominant color on the front of the knitted piece. You will want to pay attention to yarn dominance. Some designs show inconsistencies more than others, but as long as you hold the yarns in the same position each time you knit, you will avoid trouble. If you hold color A in your right hand, for example, and color B in your left..always hold them in those hands. If you get up to make a cup of coffee and come back and pick the yarns up the other way (A in your left hand and B in your right), you will have that disturbing color variation on the front. If you hold both yarns in one hand, remember to hold them in the same positions throughout the project.
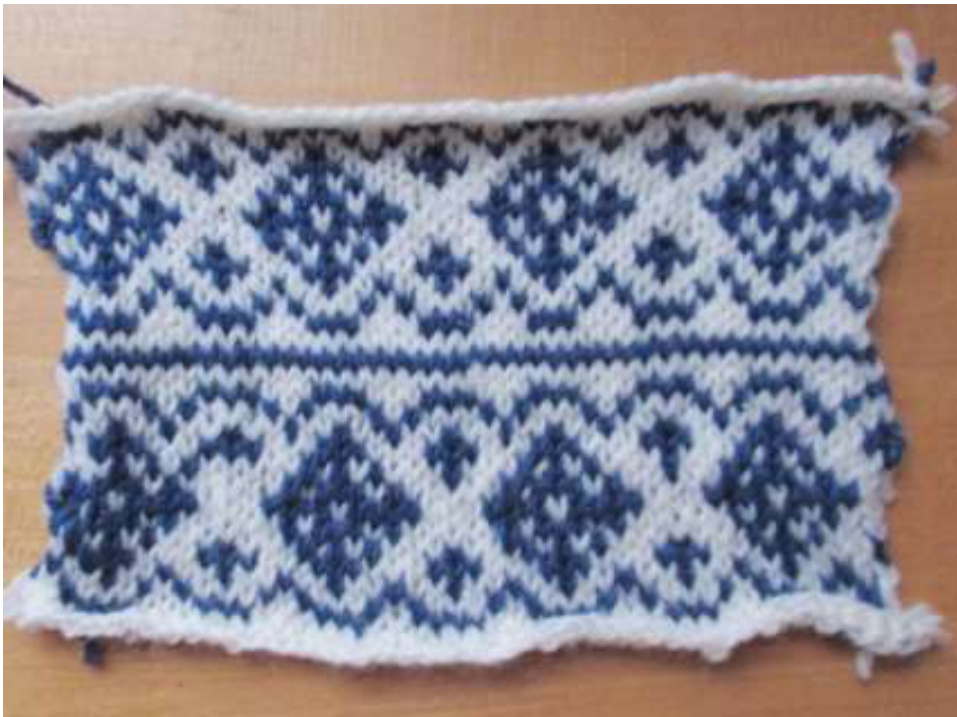
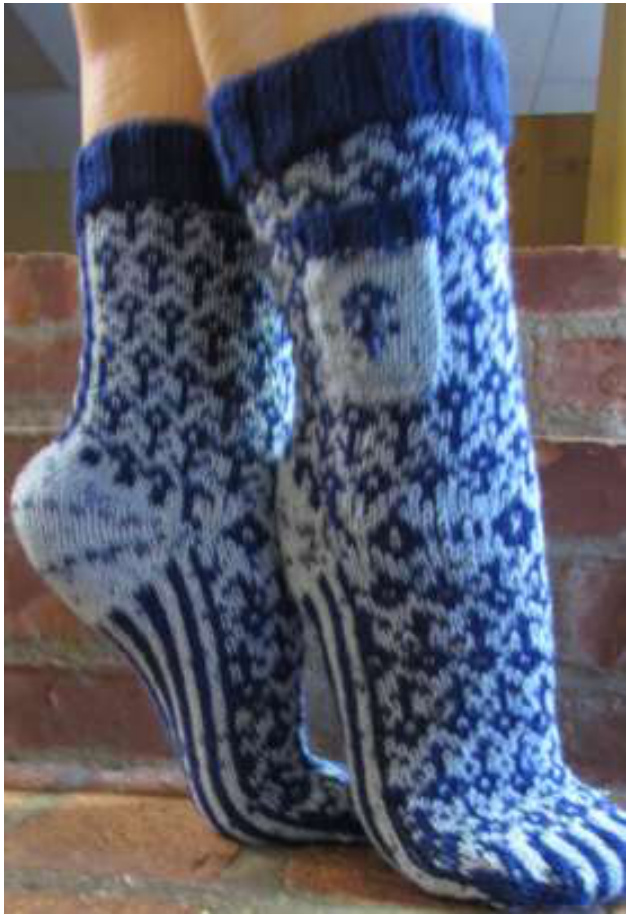
In the above swatch, I knitted the same motif across the piece, and then I repeated it. The only difference I made was the position in which I held my yarns. In the bottom half, I held my yarns so that the blue was dominant. That is to say the blue was more obvious than the white, on the front of the work, and the white receded into the background. On the top half, I knitted the same stitches but I held my yarns so that the white dominated and the blue receded. You see a definite difference in the appearance of the motifs when comparing the top and bottom halves of my swatch.
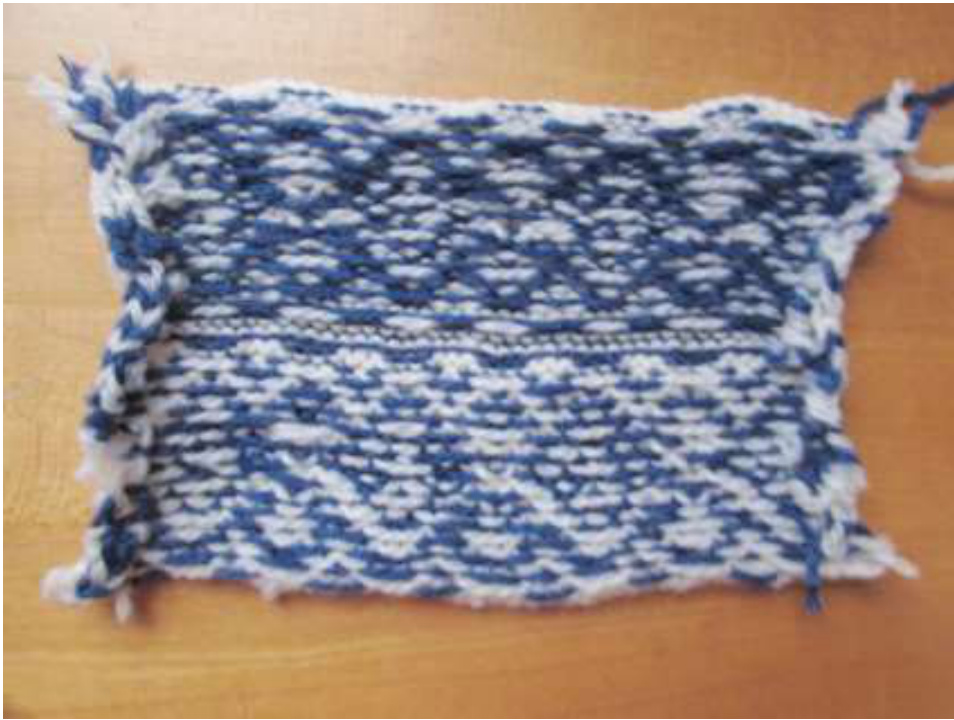
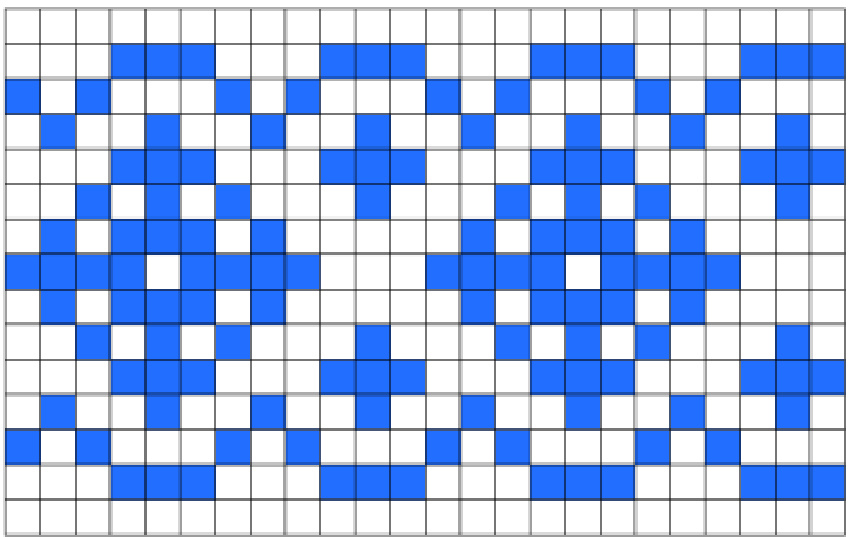
Viewing the swatch from the back, you notice that the color that dominated on the front recedes on the back, and the color that was recessive on the front dominates on the back. A color cannot be dominant both on the front and the back at the same time. So, how do you control for this? How does a color become dominant? I have read many explanations of color dominance, and frankly, they all leave me scratching my head. Terms such as "over" and "under" are used, which are nonsensical to me. Over where? Under where? Also, each knitter has her own yarn-holding method. We need an explanation that works no matter how we hold our yarns. First, it is important to point out that, whatever way you hold your yarns when stranding, you want to maintain the same position throughout the piece so that you catch your floats the same way, consistently. That said, here's how color dominance happens. (And it happens whether you like it or not!) The color that will dominate--or stand out—-on the front of your work is the color that consistently lies closer to your work as you go. In the above example, on the bottom half of the front of the piece, the blue is more prominent than it is on the top portion of the piece. This is because it lay closer to the piece as I was working the bottom half. How do we know this? Look at the back of the swatch. The bottom on the back shows more white relative to the top of the swatch. You see more white because the floating yarn, the white, is floating over, on top of, or around, the blue... It lies further from the piece and has farther to travel than the blue. Because the white lies closer to you on the bottom half when viewing the back, it is more visible to you than is the blue. Because it is more visibledominant—-on the back, it cannot be, at the same time, the dominant color on the front. No matter how you choose to hold your yarns, one in each hand, both in the right hand, or between your toes as I do, the above rules apply. Try a swatch as I did. Try knitting with the yarns in one position and then switching them. Take note of the color that has to travel to float around the color that lies closer to the work. The one that has to travel to float around the close color is not the color that will dominate on the front of your swatch, but it is the color that will be most evident On the back. self. Try knitting this chart with two, highly-contrasting colors and DPNs so that you are working in-the-round. Work the chart through once with your colors in a chosen position. Then work the chart again, this time switching the yarn positions. You will cut the swatch open when you complete it:
Helpful Tutorials
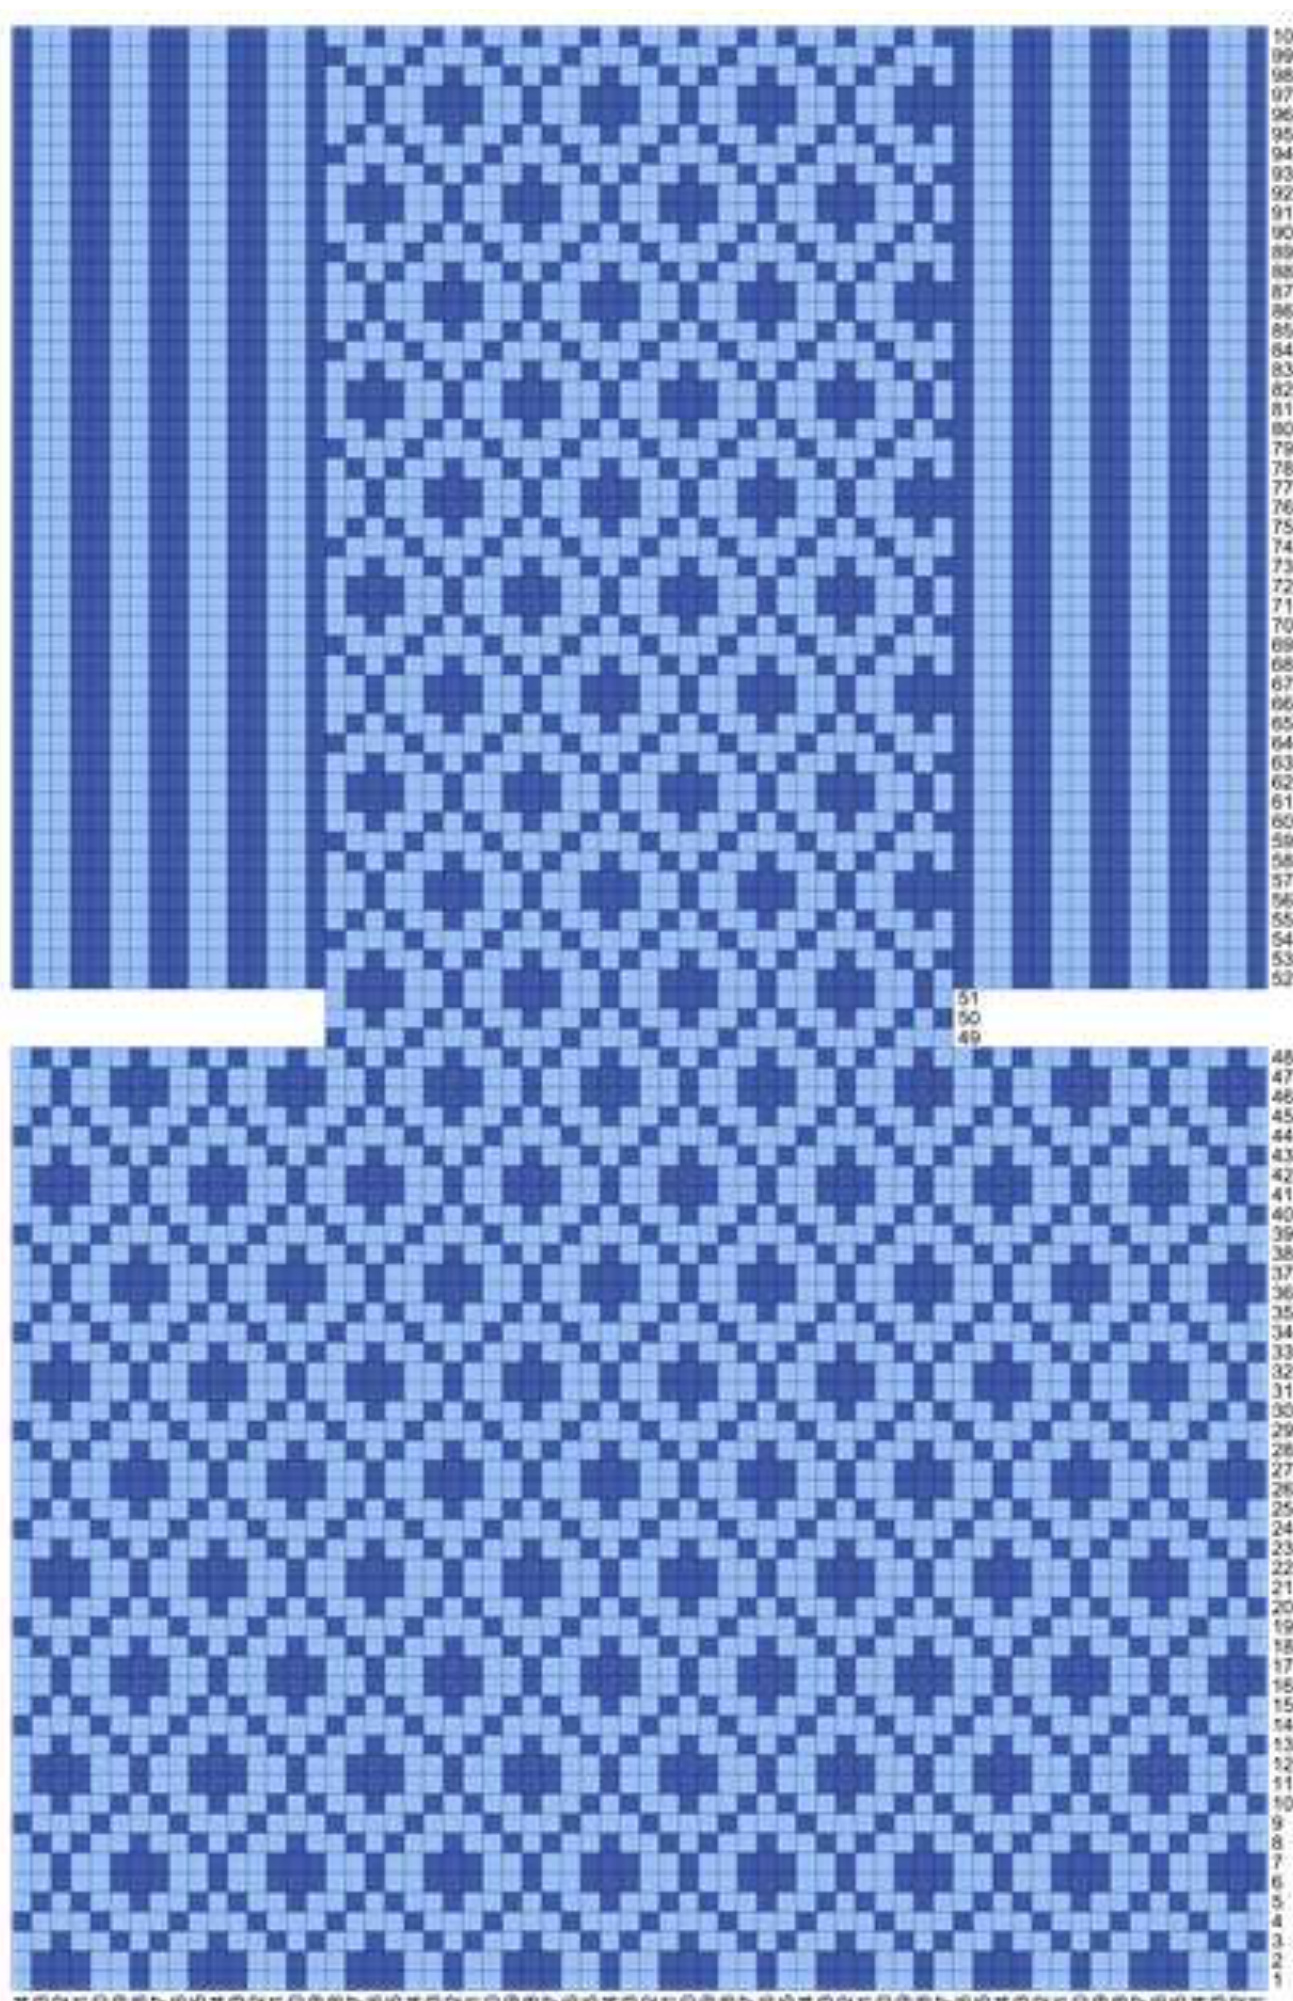
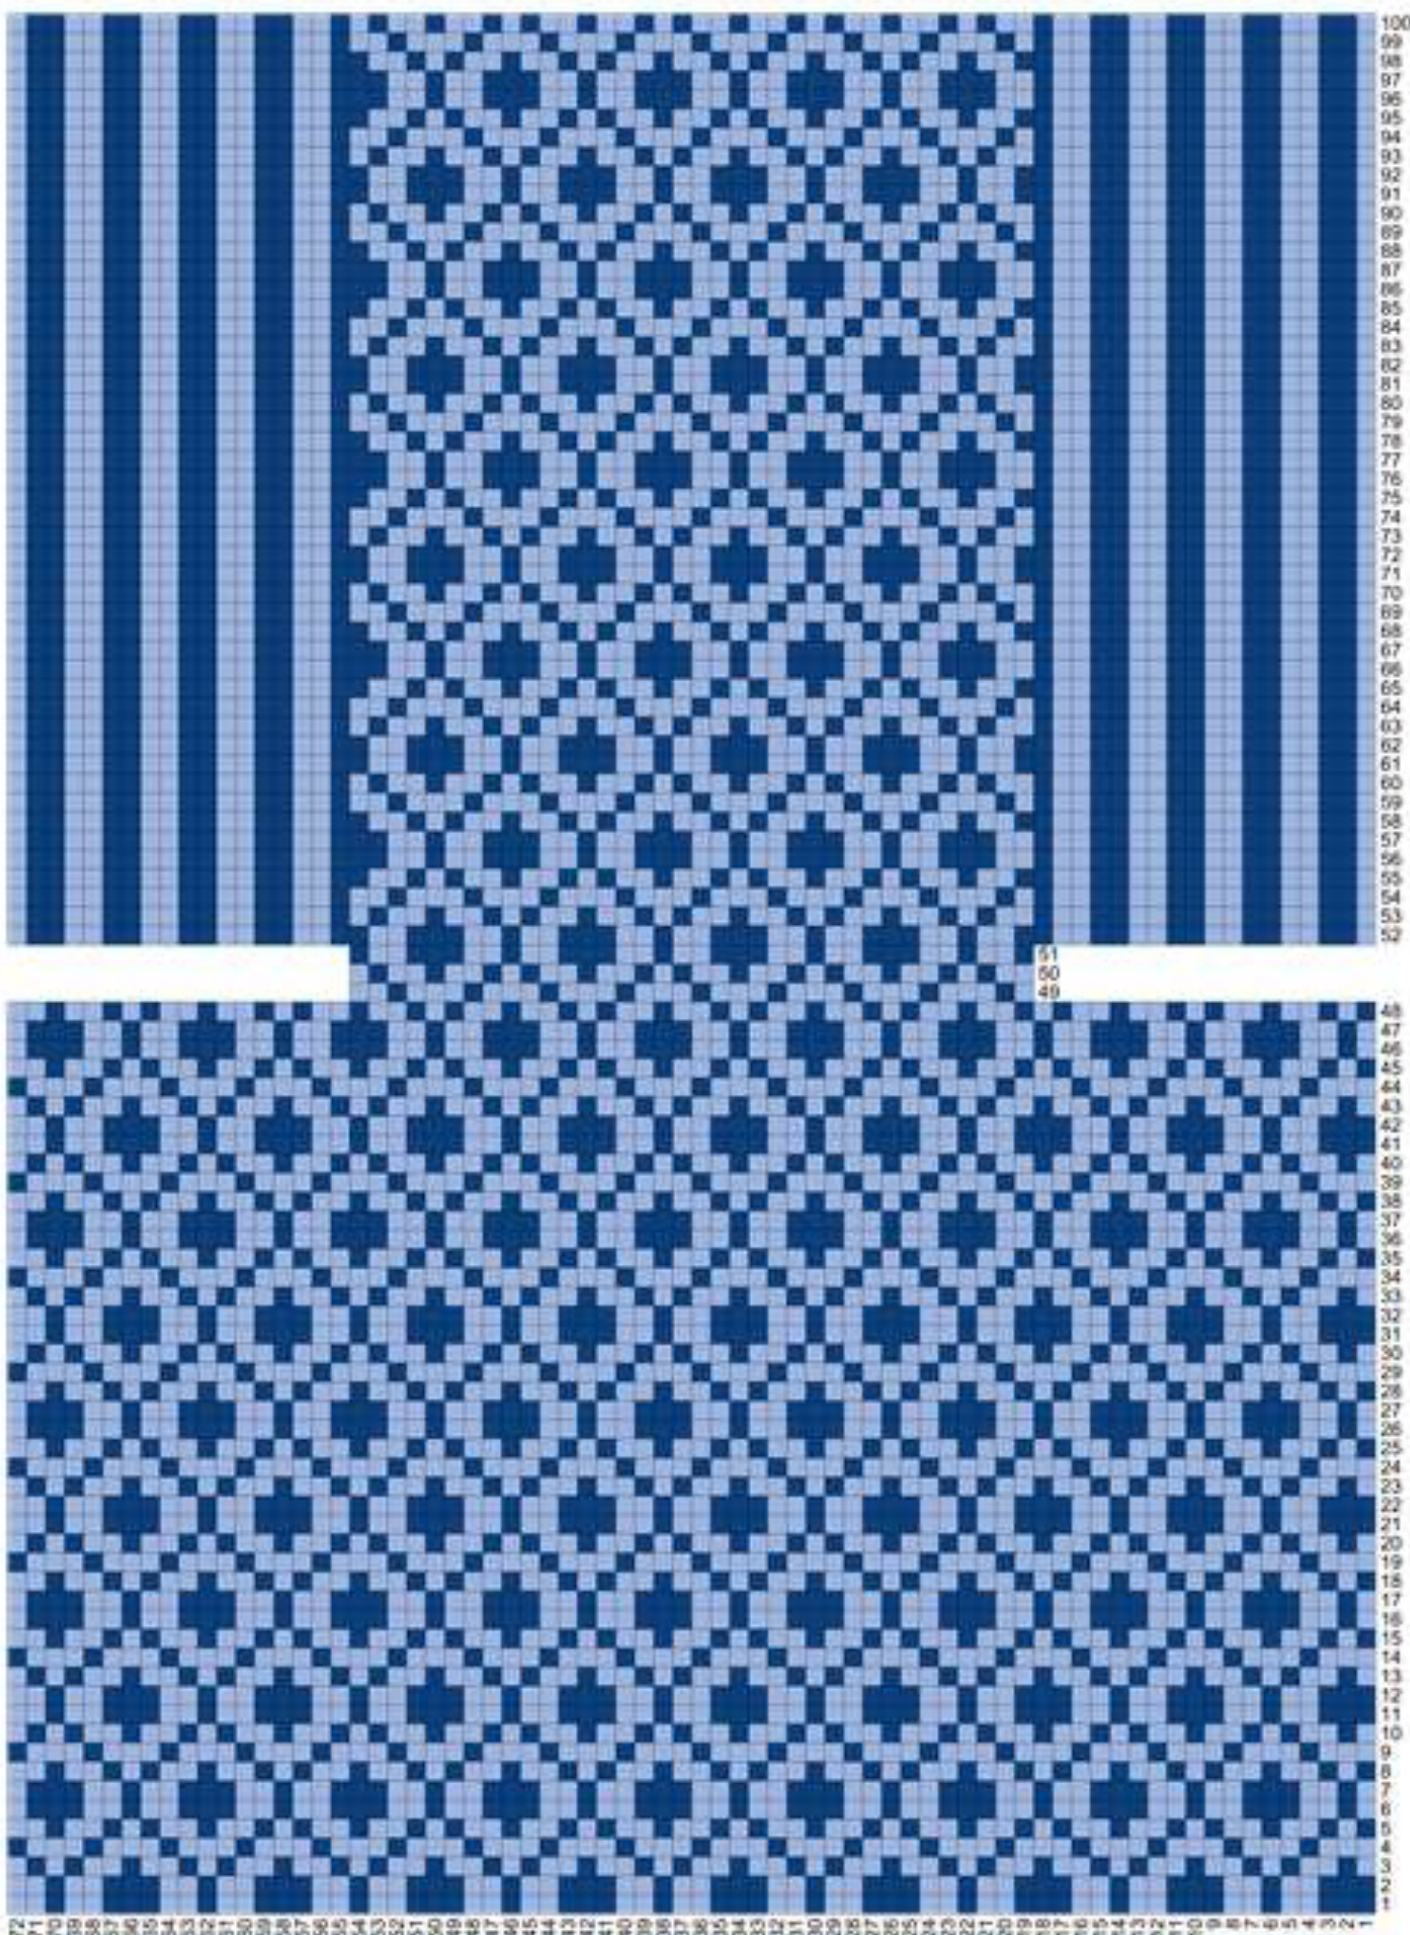
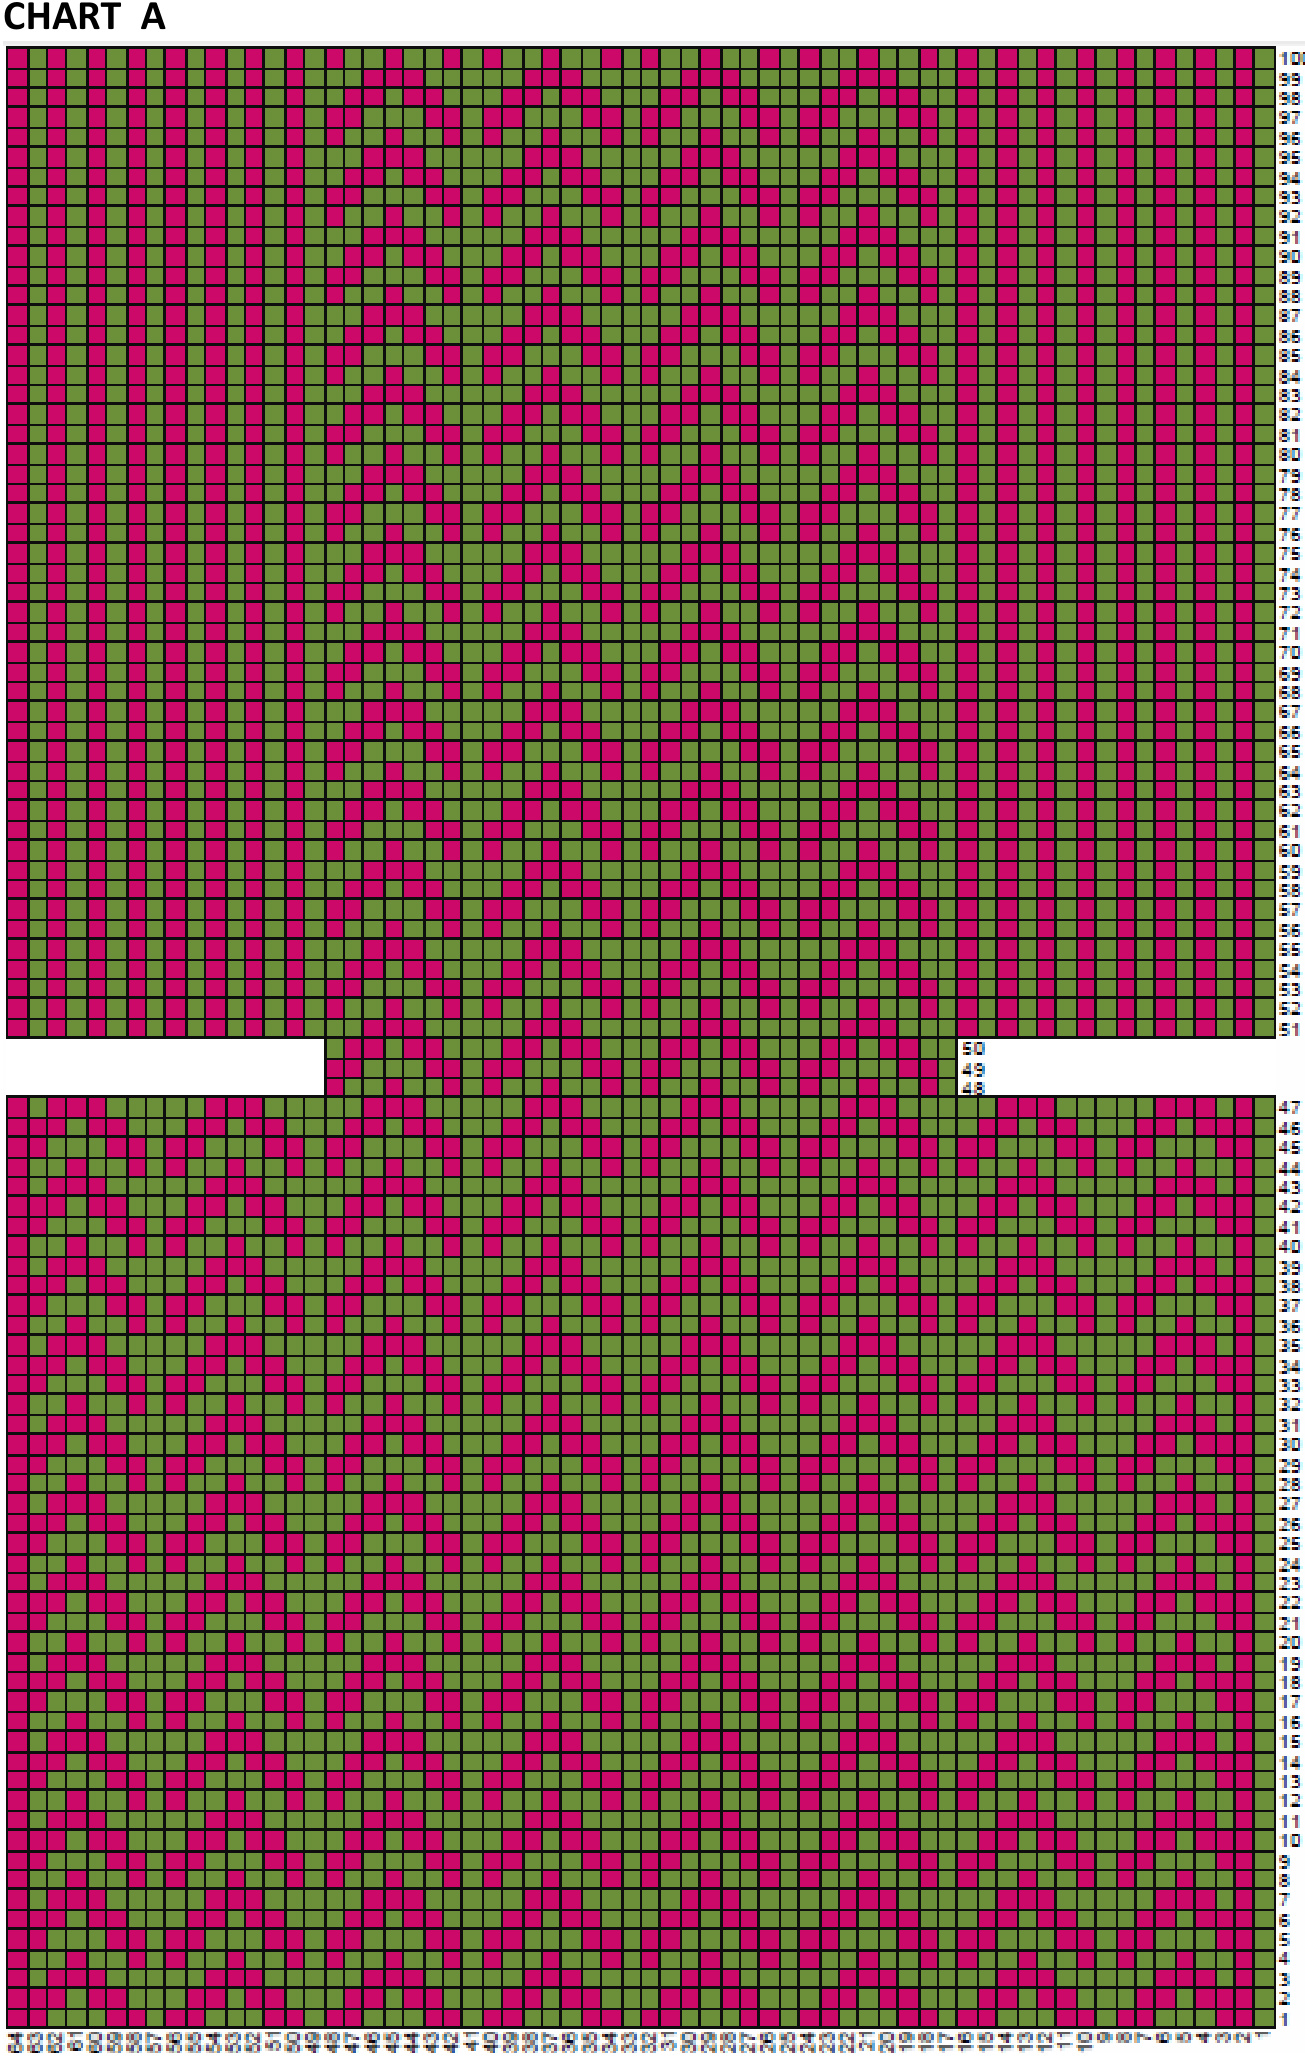
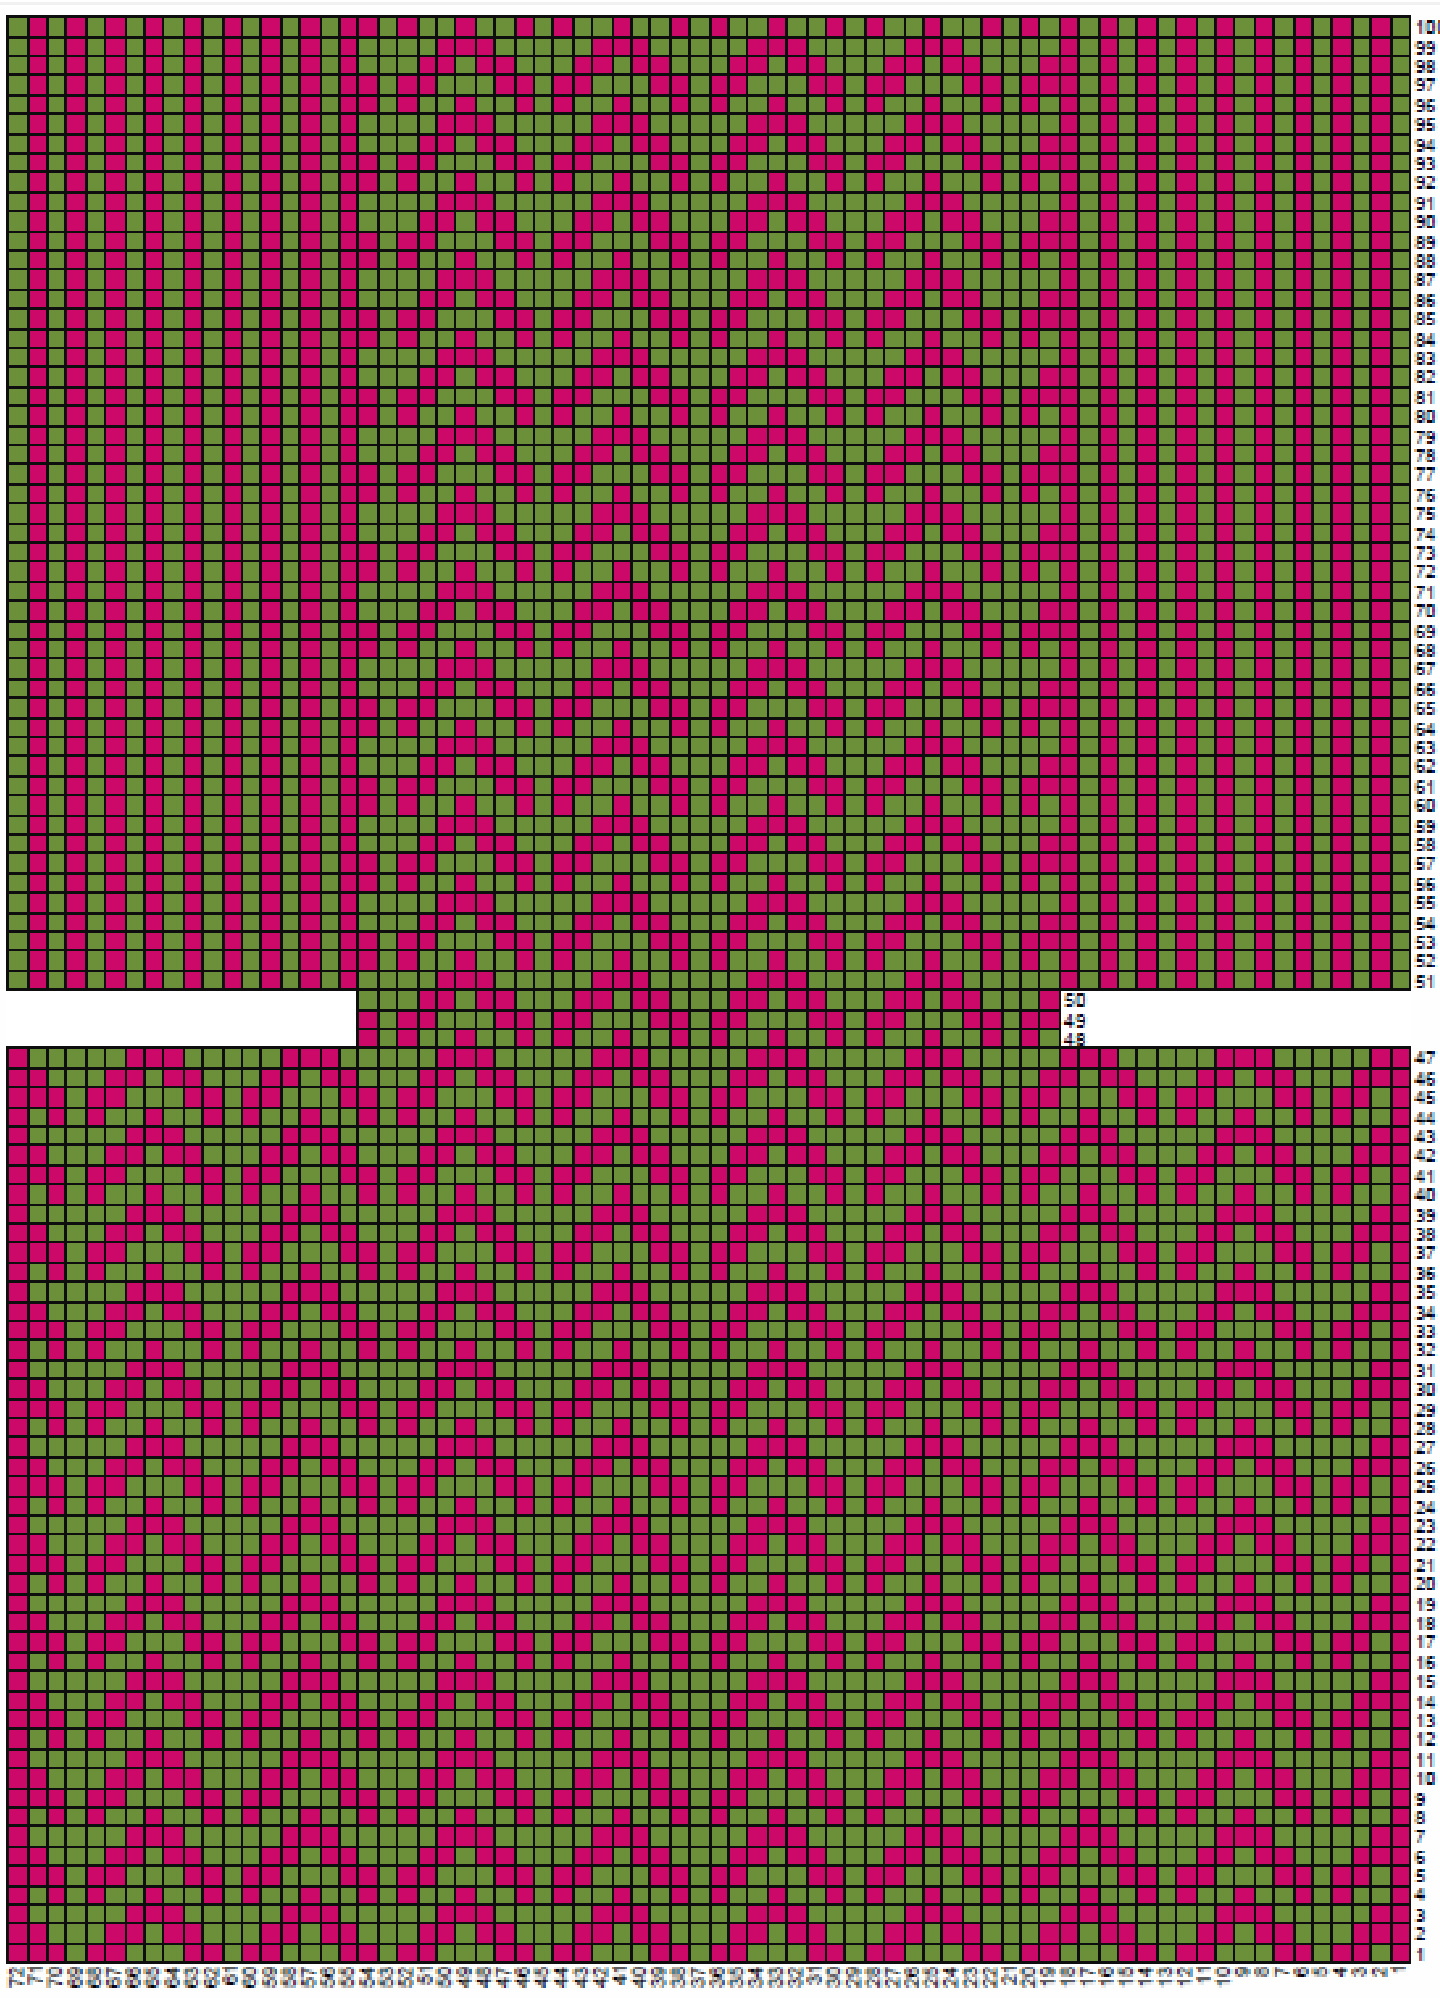
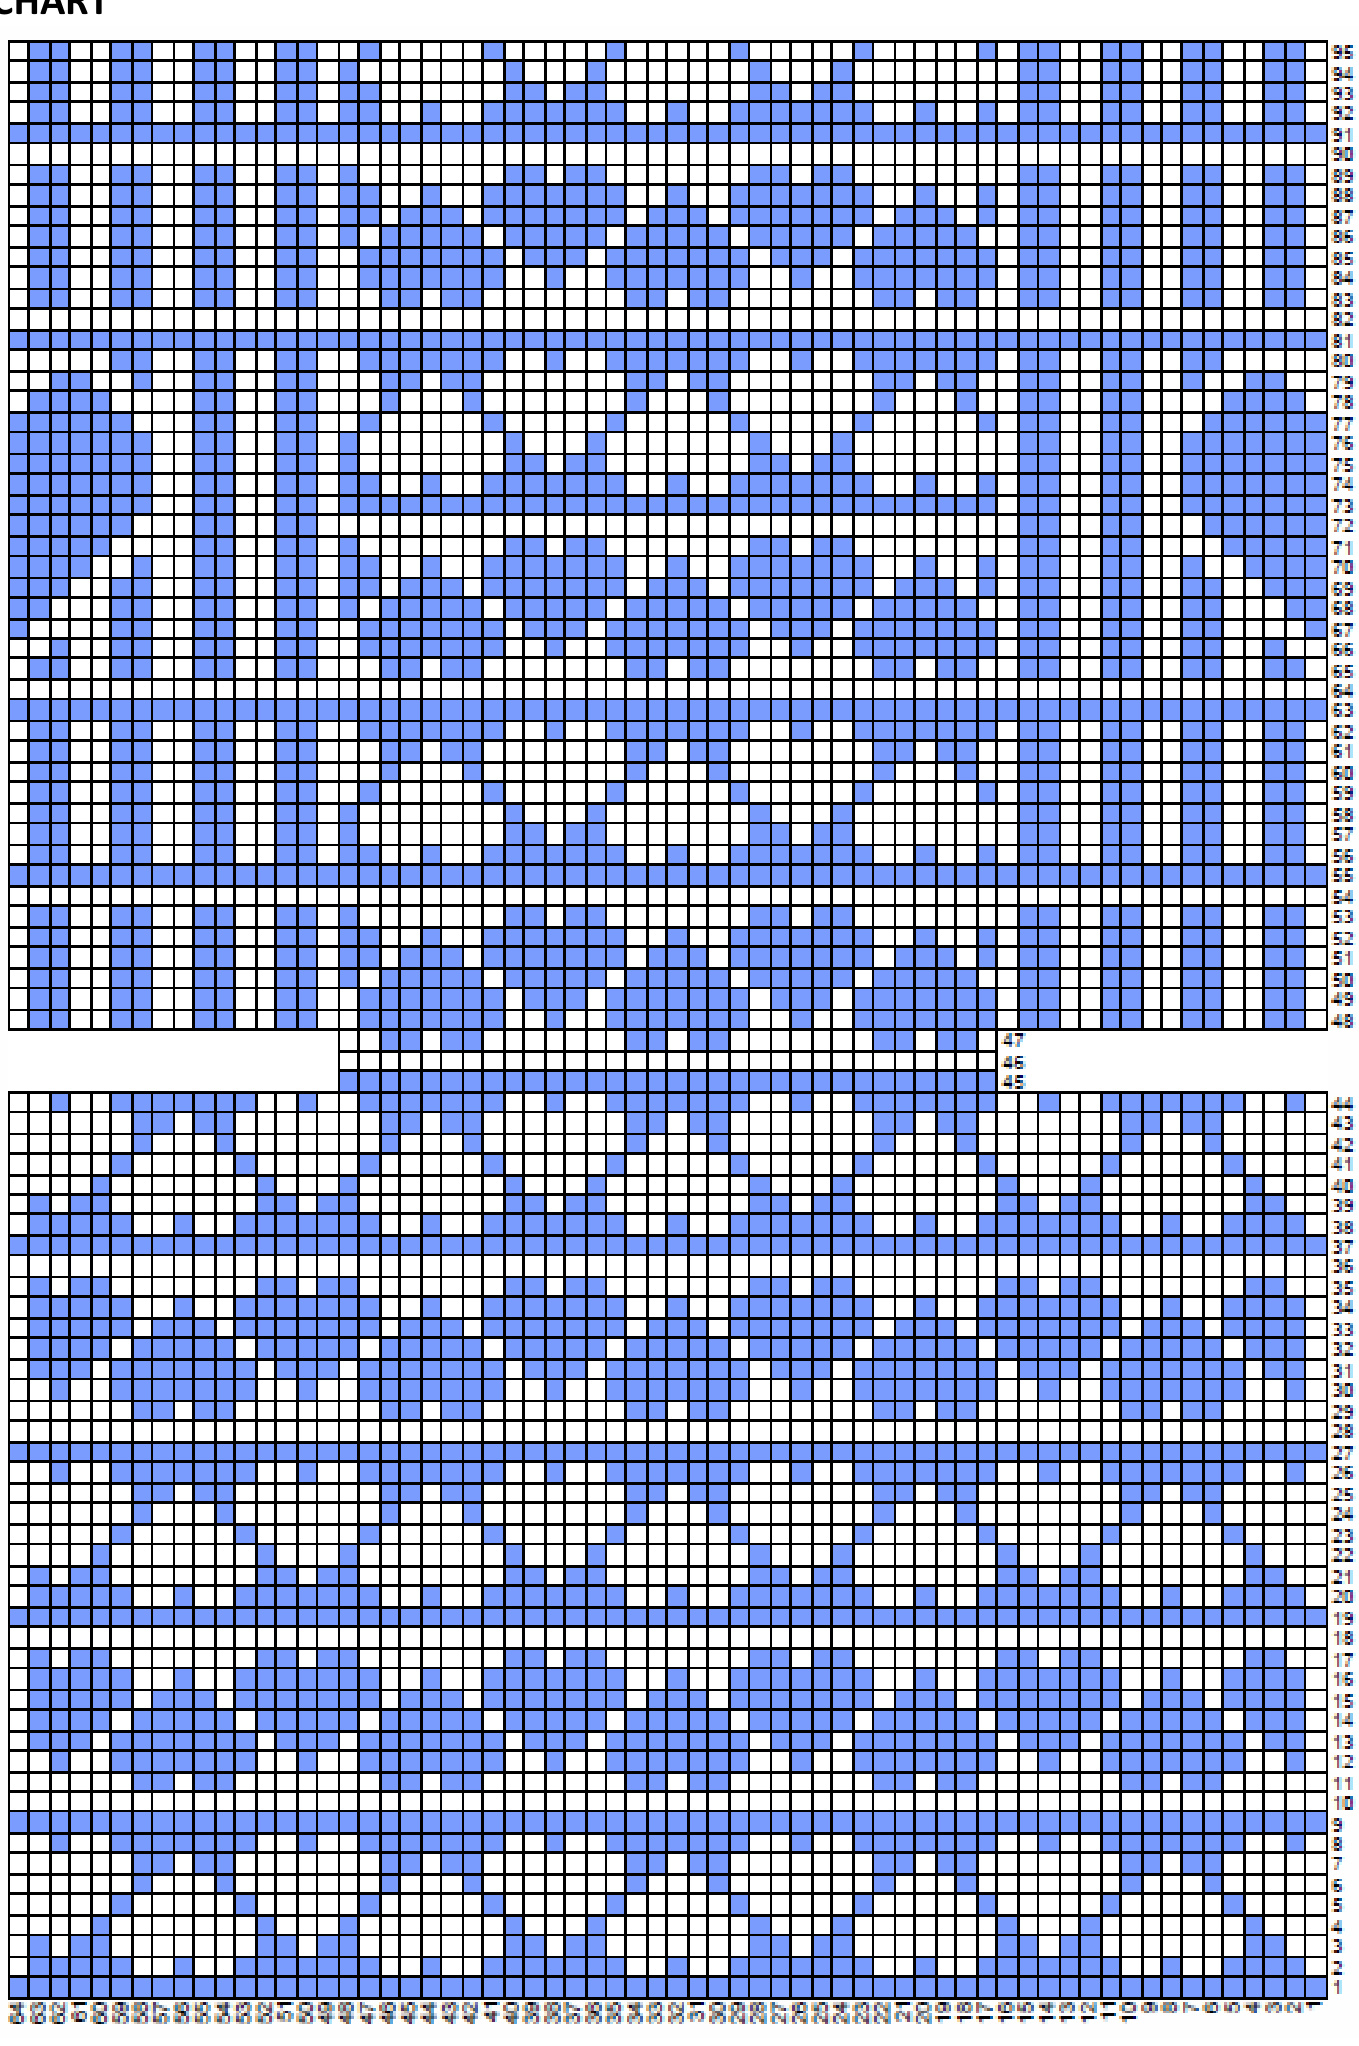
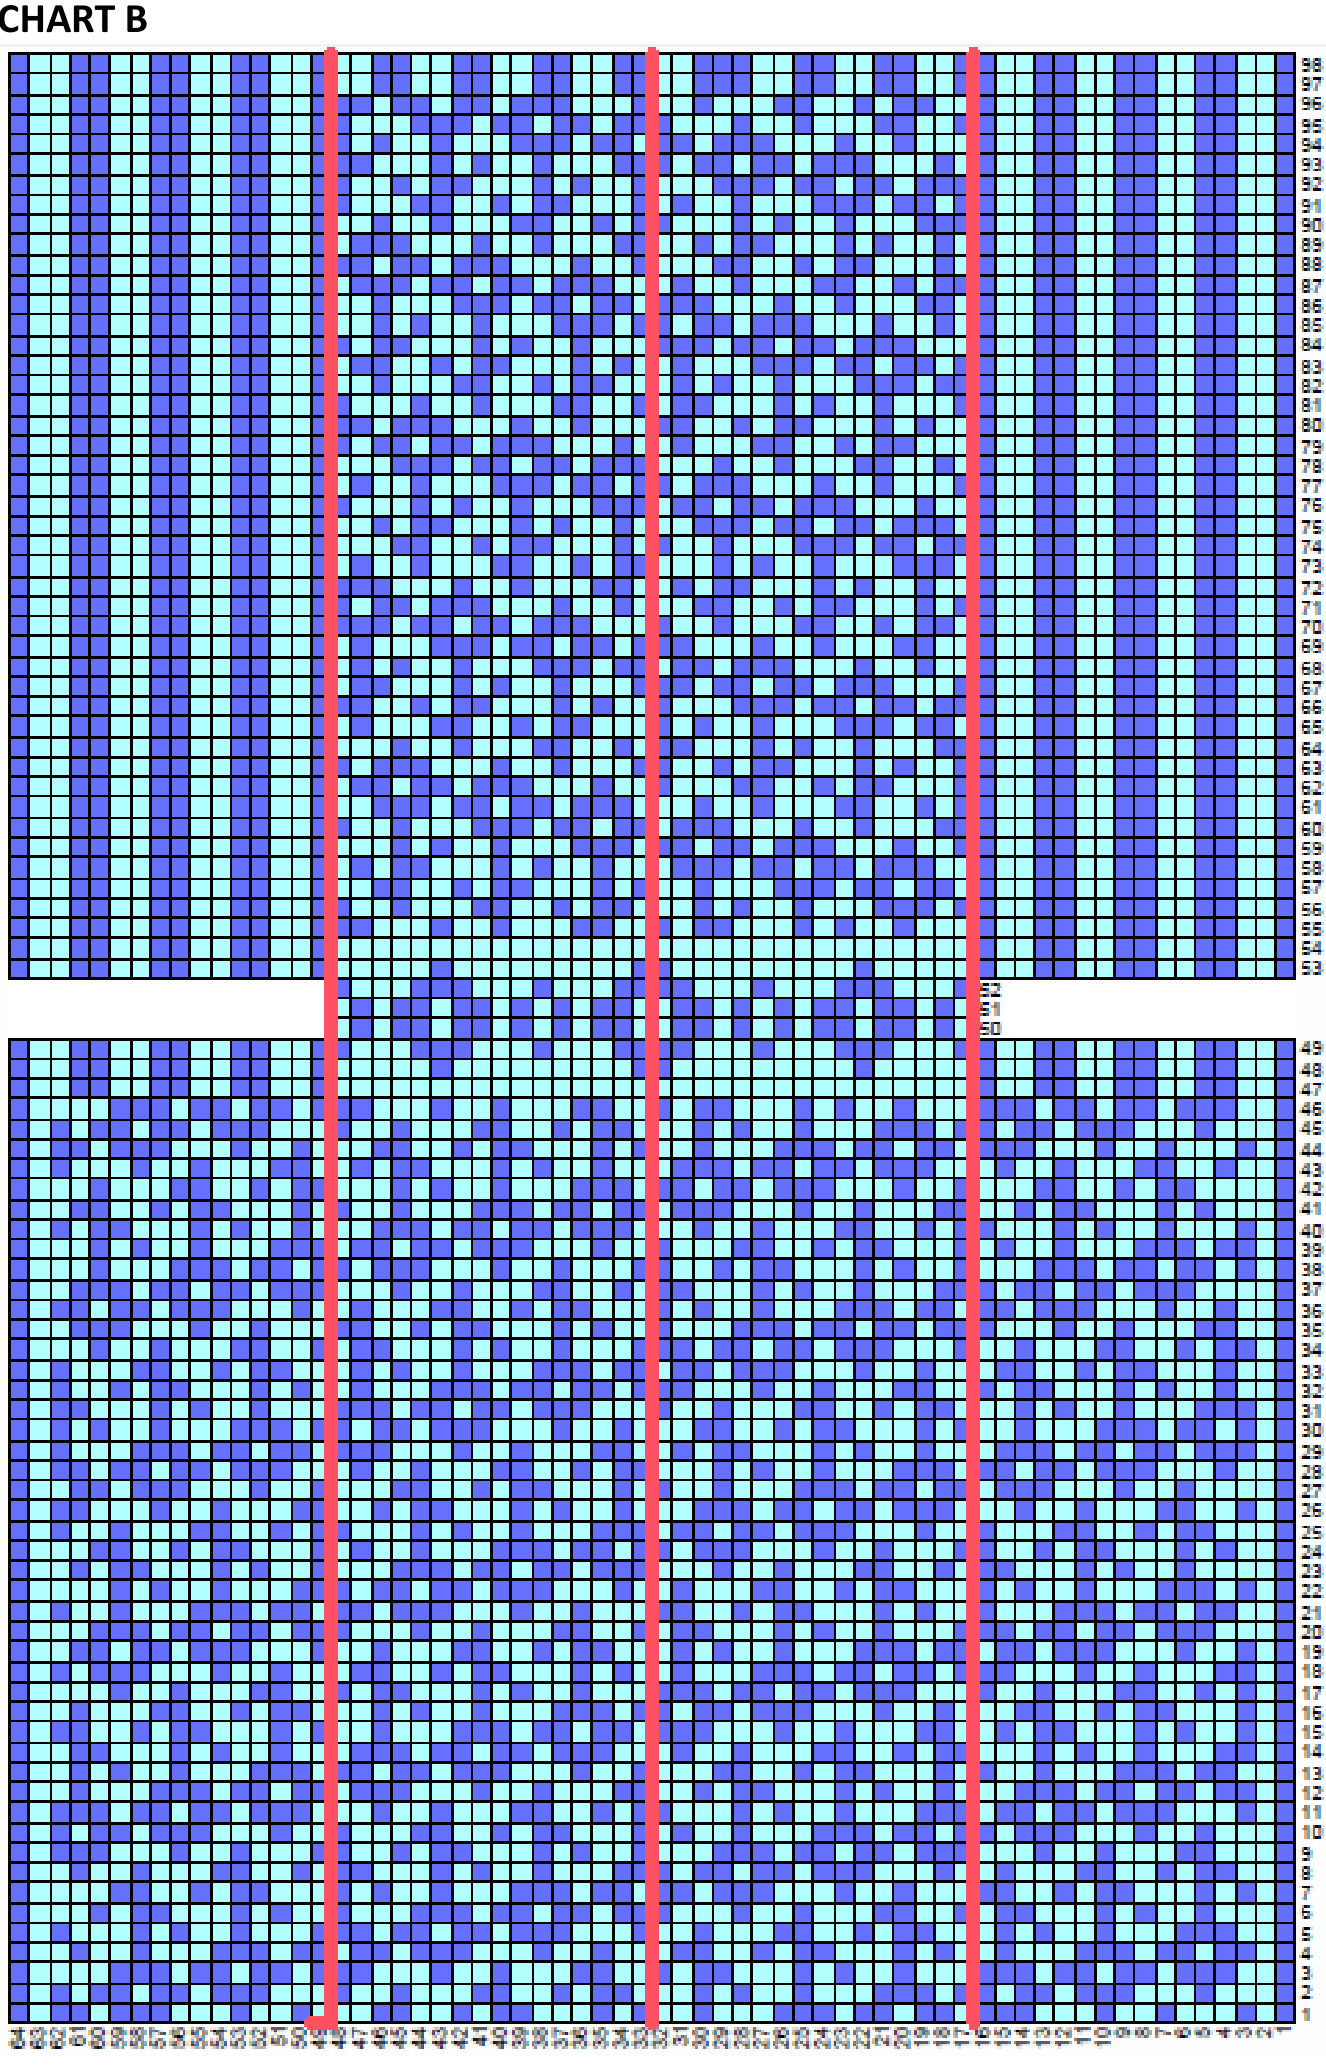
Reading Colorwork Charts: Reading colorwork charts is much the same as reading other knitting charts. But there are differences. Like most charts, colorwork charts are generally read from right to left and from bottom to top. If you are working rows back and forth, the purl rows will be numbered on the left, and you work them from left to right. In short, you start working on the side of the chart where you see the row number, and you work across from that point. Each square of the chart grid represents one stitch. Like lace charts, decreases and future increases on colorwork charts are denoted by blank spaces, showing the lack of stitch where one used to be or where one will be, eventually. Now for the major difference: Lacework chart squares are filled with symbols representing the type of stitch to be worked in that spot, and they are accompanied by legends that explain what the symbols mean. Colorwork charts are written differently. Because colorwork in the round is worked all in stockinette, the knit stitch is a given. There is no need to mark the stitch type, except occasionally when a purl stitch is required. The grid and or instructions will give directions. What the knitter does need to know is which color to work in a particular spot. So, colorwork charts have colors in the squares, rather than symbols, and color key legends where needed to describe what color stitches to make and where. See my YouTube video for instruction on reading my colorwork charts. https://www.youtube.com/watch?v=rMyZXlsxFhw And another: https://www.youtube.com/watch?v=NW7Un1gXRmc Floating and Tension: Tension, in this context refers to floating uniformity, not gauge. Tension is arguably the most critical element in stranded knitting. It is vital to keep an even, consistent tension when stranding. This takes a little practice. I say "a little" practice, because it really doesn't take much. I am fond of saying, "Remember LEO when floating. Float LOOSELY, EVENLY and OFTEN." See my YouTube video for help with the concept of floating and tension. https://www.youtube.com/watch?v=jQlc4UQWuzc Although you can knit the heel of your choice, I recommend one that does not interfere with the colorwork design, that is, choose one that does not require heel flaps and gussets. Cat Bordhi's Sweet Tomato Heel is a great choice for working colorwork socks. See the YouTube tutorial: https://www.youtube.com/watch?v=lRc3309JUyc I always use this heel because it allows the colorwork design to continue, uninterrupted through the instep. And because it doesn't have a need for gussets, the design can continue to flow into the foot after the heel is completed. It is also easy and fun to knit. The STH designer has said that her heel cannot be worked with more than one strand. This is not true. I do it all the time! To show how I achieve the jean-like stitching look between heel wedges, see my see my Youtube tutorial here: https://www.youtube.com/watch?v=VeryK-gB84M
The Patterns
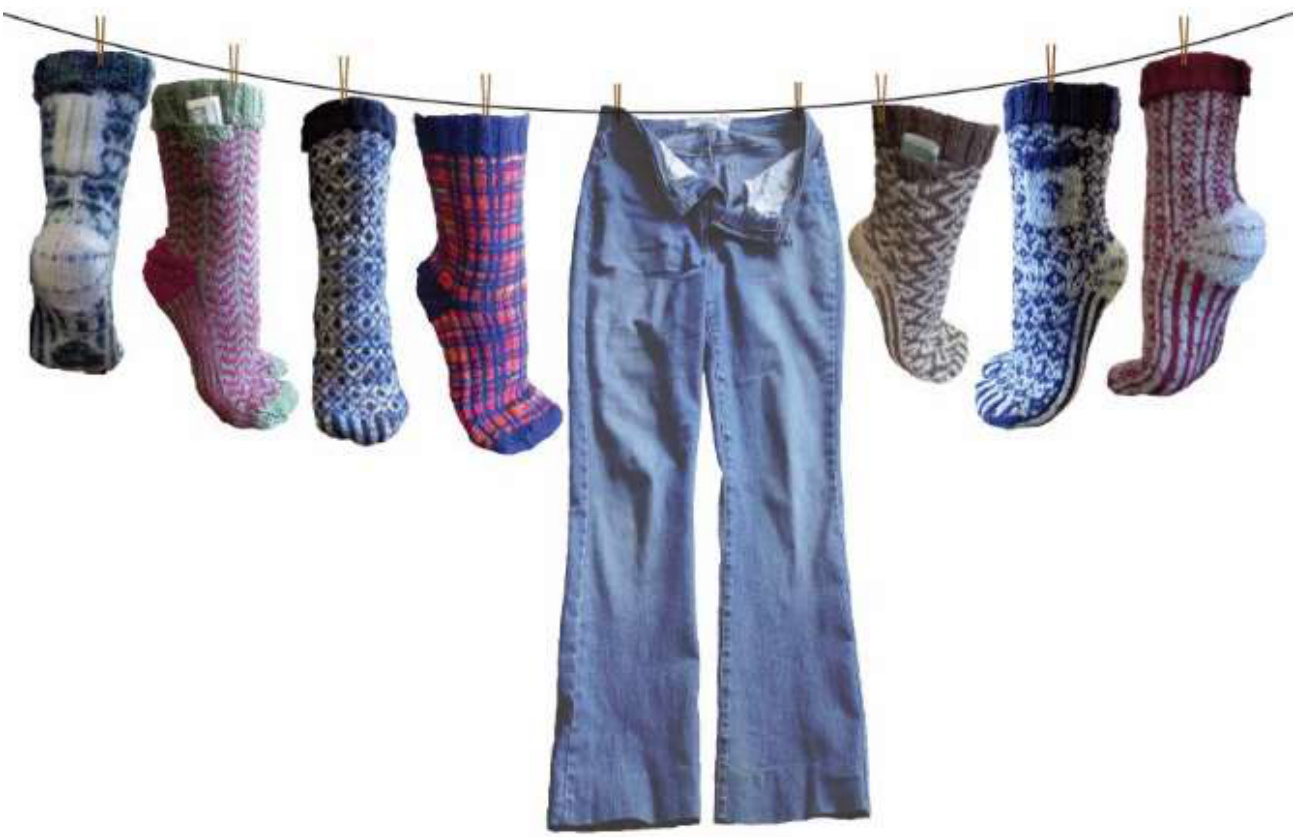
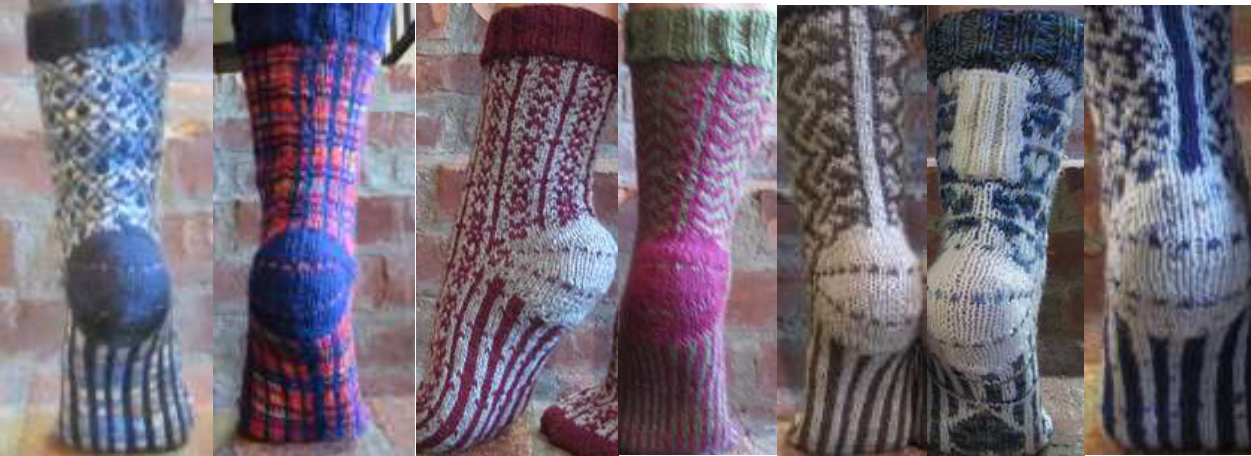
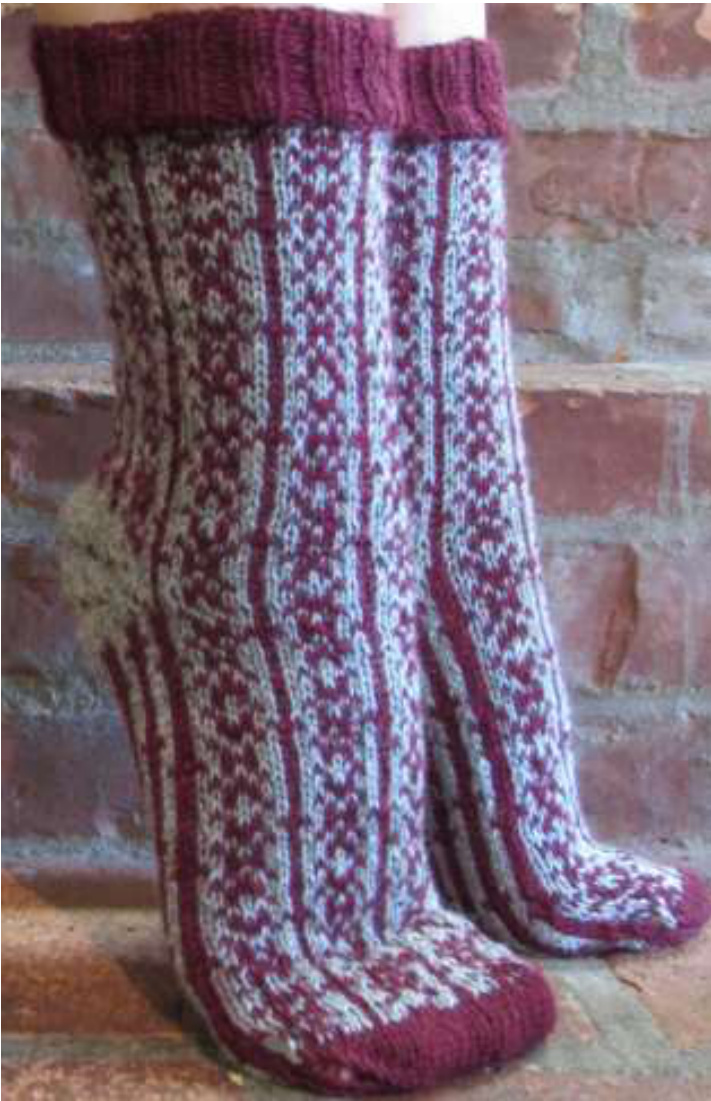
Artwork by Pat Sample, (Cozyknitsca on Ravelry) All of the patterns included here are stranded colorwork projects. Because they are worked with two strands of yarn to complete the colorwork design, the socks produced are doubly-wooly warm. Once a month, for seven months, I designed and published a "Socks for Jeans" pattern. Debbie from Knitbin.com made up kits, which included the pattern and yarn, and she offered special pricing to all her customers. She continues to offer all the kits for the patterns in the series, and she continues the special pricing. Find the kits here: http://www.knitbin.com/Socks-for-Jeans-Kits-exclusive c 193.html Debbie kits the patterns with the designated Regia sock yarn. Regia are the sockyarn people. I recommend using the yarn specified in order to achieve the results shown in each of the patterns, but you, as the creator of your own socks, are of course free to use any sock yarn and any color combinations you desire. Several of the patterns offer pocket options. And I have designed three pocket styles: a hidden pocket that is on the inside of the sock (see The Ripple Effect and Chocolate Parfait), an external, ribbed, add-on pocket (see That Lovin' Feeling), and a pocket that incorporates the sock design itself (see Spring is in the Air). Although specific patterns show specific pocket styles, you are free to use any style you want in any of the socks. Simply follow the instructions for the pocket style you want and work them into the sock pattern you are using. My stranded sock patterns all feature the Sweet Tomato Heel (STH). You may use the heel of your choice, but I recommend one that does not employ a flap or gussets because they disrupt the colorwork design as the instep is knitted. Using the STH allows the design to flow, uninterrupted, through the instep. For a tutorial on the STH, see this video: https://www.youtube.com/watch?v=IRc3309JUyc A common feature contained in all of the sock patterns in this series is the mock jean-stitching worked between the wedges in the sock heels. My video tutorial supplements the written instructions for accomplishing this feature, and the link is listed under the "Helpful Tutorials" heading (pg. 10). Heel mock stitching
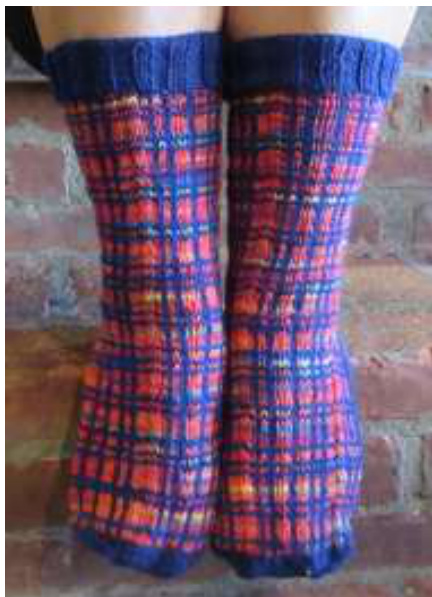
If you are choosing to knit one or more of the patterns in Socks for Jeans, you are likely already familiar with the stranded knitting technique. But for those of you who are new to the process, here are some pointers. First, because stranded projects are generally worked in-the-round, the chart rounds are numbered on the right, and the chart is read from right to left (see tutorial link listed under “Helpful Tutorials" (pg. 9)). Traditionally, rules have existed for the "proper" way to hold yarns while stranding. We have the Portuguese method where the knitter holds her yarns around her neck. The yarn is sometimes placed in a pin on her lapel. This practice frees up her hands, gives relief to that poor index finger used for tensioning in Continenta/ knitting, and yarn tension issues are taken care of almost unconsciously. The technique also helps prevent the yarns from tangling. Using this method, the knitter holds her dominant yarn in one hand and her background yarn in the other. She scoops the yarn she wants for a given stitch, as needed. Also, we have the practice of holding both yarns in one hand, called One-hand stranding. For knitters, like me, who are throwers, this method works best. By simply picking up the desired strand, knitting as needed, dropping it and grabbing the other strand, we accomplish our colorworkdesigns. There are no right-or-wrong rules when it comes to holding your yarn. Do what works for you. If you can accomplish a piece that looks as nice on the back as it does on the front, you are doing it correctly. Practice, and you will find a method that is comfortable for you. Most important is to find a way that makes stranding the joy it should be. The first release is Socks for Jeans #1: Denim Dreams. The pattern features an easy colorwork design and, although you can choose your own sock yarn, it was designed to use the wonderful sock yarn from Regia, the sock yarn people. The pattern includes instructions for women's and teens' small, medium and large socks, as well as how to adjust for men's sizes. If you are as crazy for plaid as I am, you will love the second sock in the series: Fiesta! This one is great fun to knit and, to my mind, nothing looks better with jeans than plaid. The pattern includes instructions for women's and teens' medium.
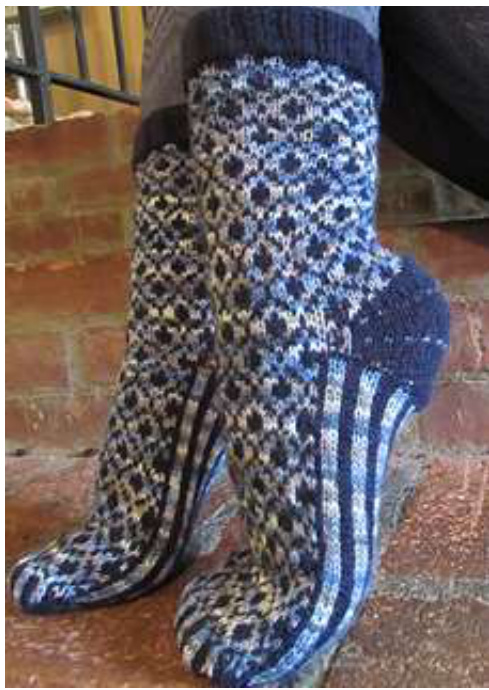
Because sometimes you don't want to wear blue, I created the third design using cranberry and gray. This pattern is Socks for Jeans #3: Casual Fridays. Cranberry and gray are not only beautiful together, but also they look great with jeans. The pattern includes instructions for women's and teens' medium and men's medium. Pattern #4 in the series is The Ripple Effect, and it holds a special surprise for you. Using colors befitting the season, The Ripple Effect pattern features a well-hidden, narrow and comfortable-to-wear pocket just large enough to hold cash and a key. Included are instructions for women's and teens' medium and men's medium.
We love chocolate in all its forms. This free and swirly design reminds me of a frothy, whipped chocolate mousse. Thus, its name. Sock #5 in the Socks for Jeans series is Chocolate Parfait. Like sock pattern #4, Chocolate Parfait also includes instructions for a well-hidden, narrow and comfortable-to-wear pocket just large enough to hold cash and a key. How romantic is this! This release is Socks for Jeans #6: That Lovin' Feeling. And look at the adorable heart design on the sock soles! The pattern includes instructions for women's and teens' medium. The socks also feature a small ribbed pocket in the back of each sock— perfectly convenient for holding a key and some cash.
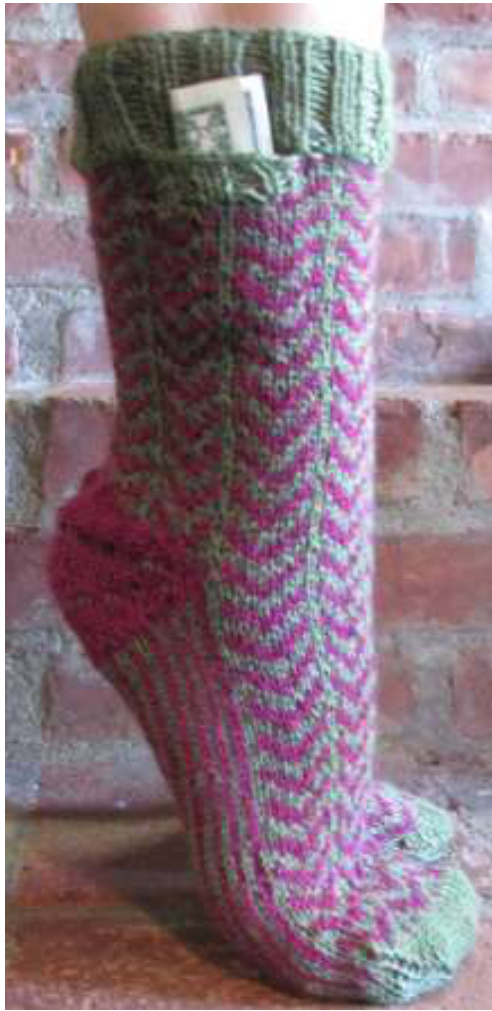
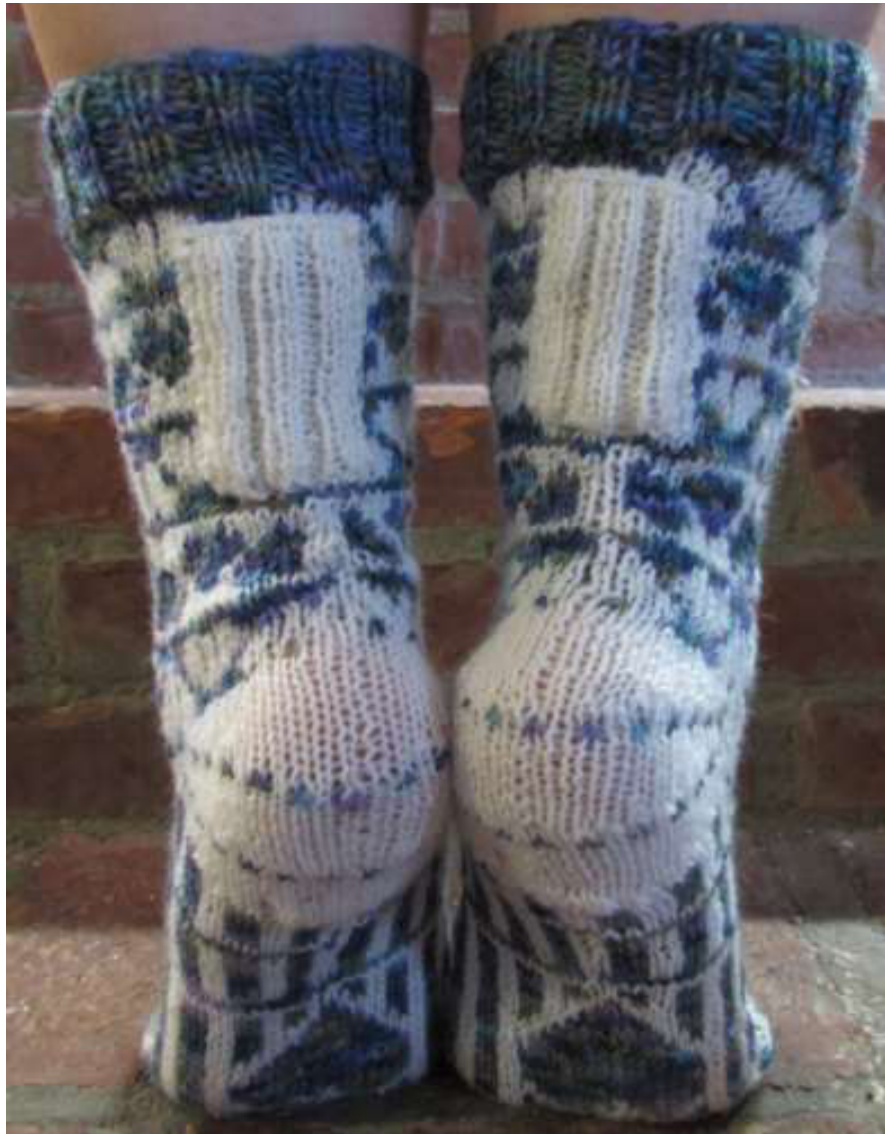
And finally, the seventh and final design in the series is Socks for Jeans #7: Spring is in the Air. It was a long winter, but spring is nearly here! Still even now, we need socks to go with our jeans. The pocket in sock #7 differs from those featured in other patterns of the series. It is more obvious than the others, and it is part of the design of the sock. Still, it is perfectly convenient for holding a key and some cash.
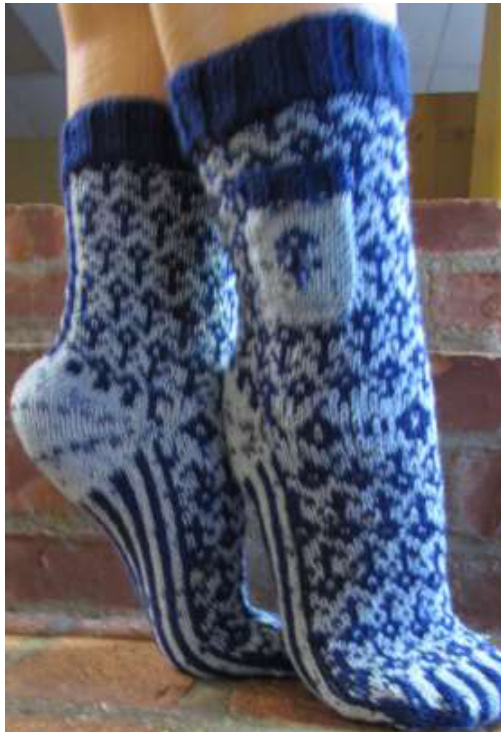
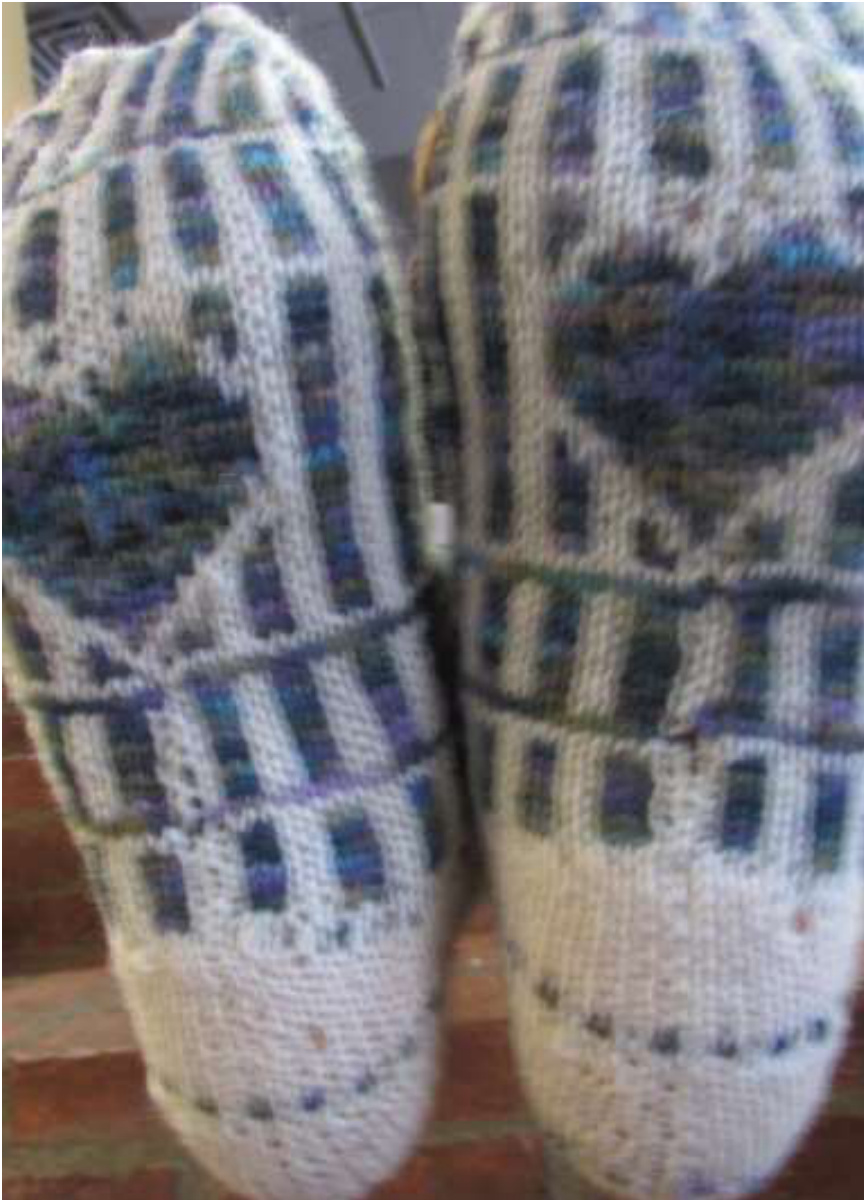
Denim Dreams

Size: Teen and Adult Woman, small medium and large (For men's small-med, use #3 DPNs and 2 skeins each of the yarns listed. Follow CHART B.) Materials: 1 skein each of Regia 4-ply sock yarn Regia 4-ply 00324 Marine and Regia 4-ply05030 Sylt (230 yds per skein 75% wool and 25% Polyamid) 5 DPNs size #2 for medium and large #1 for small tapestry needle Gauge: 32 stitches = 4" on #2 needles SOCKS: Make 2 Instructions: Socks are worked top-down.
LEG:
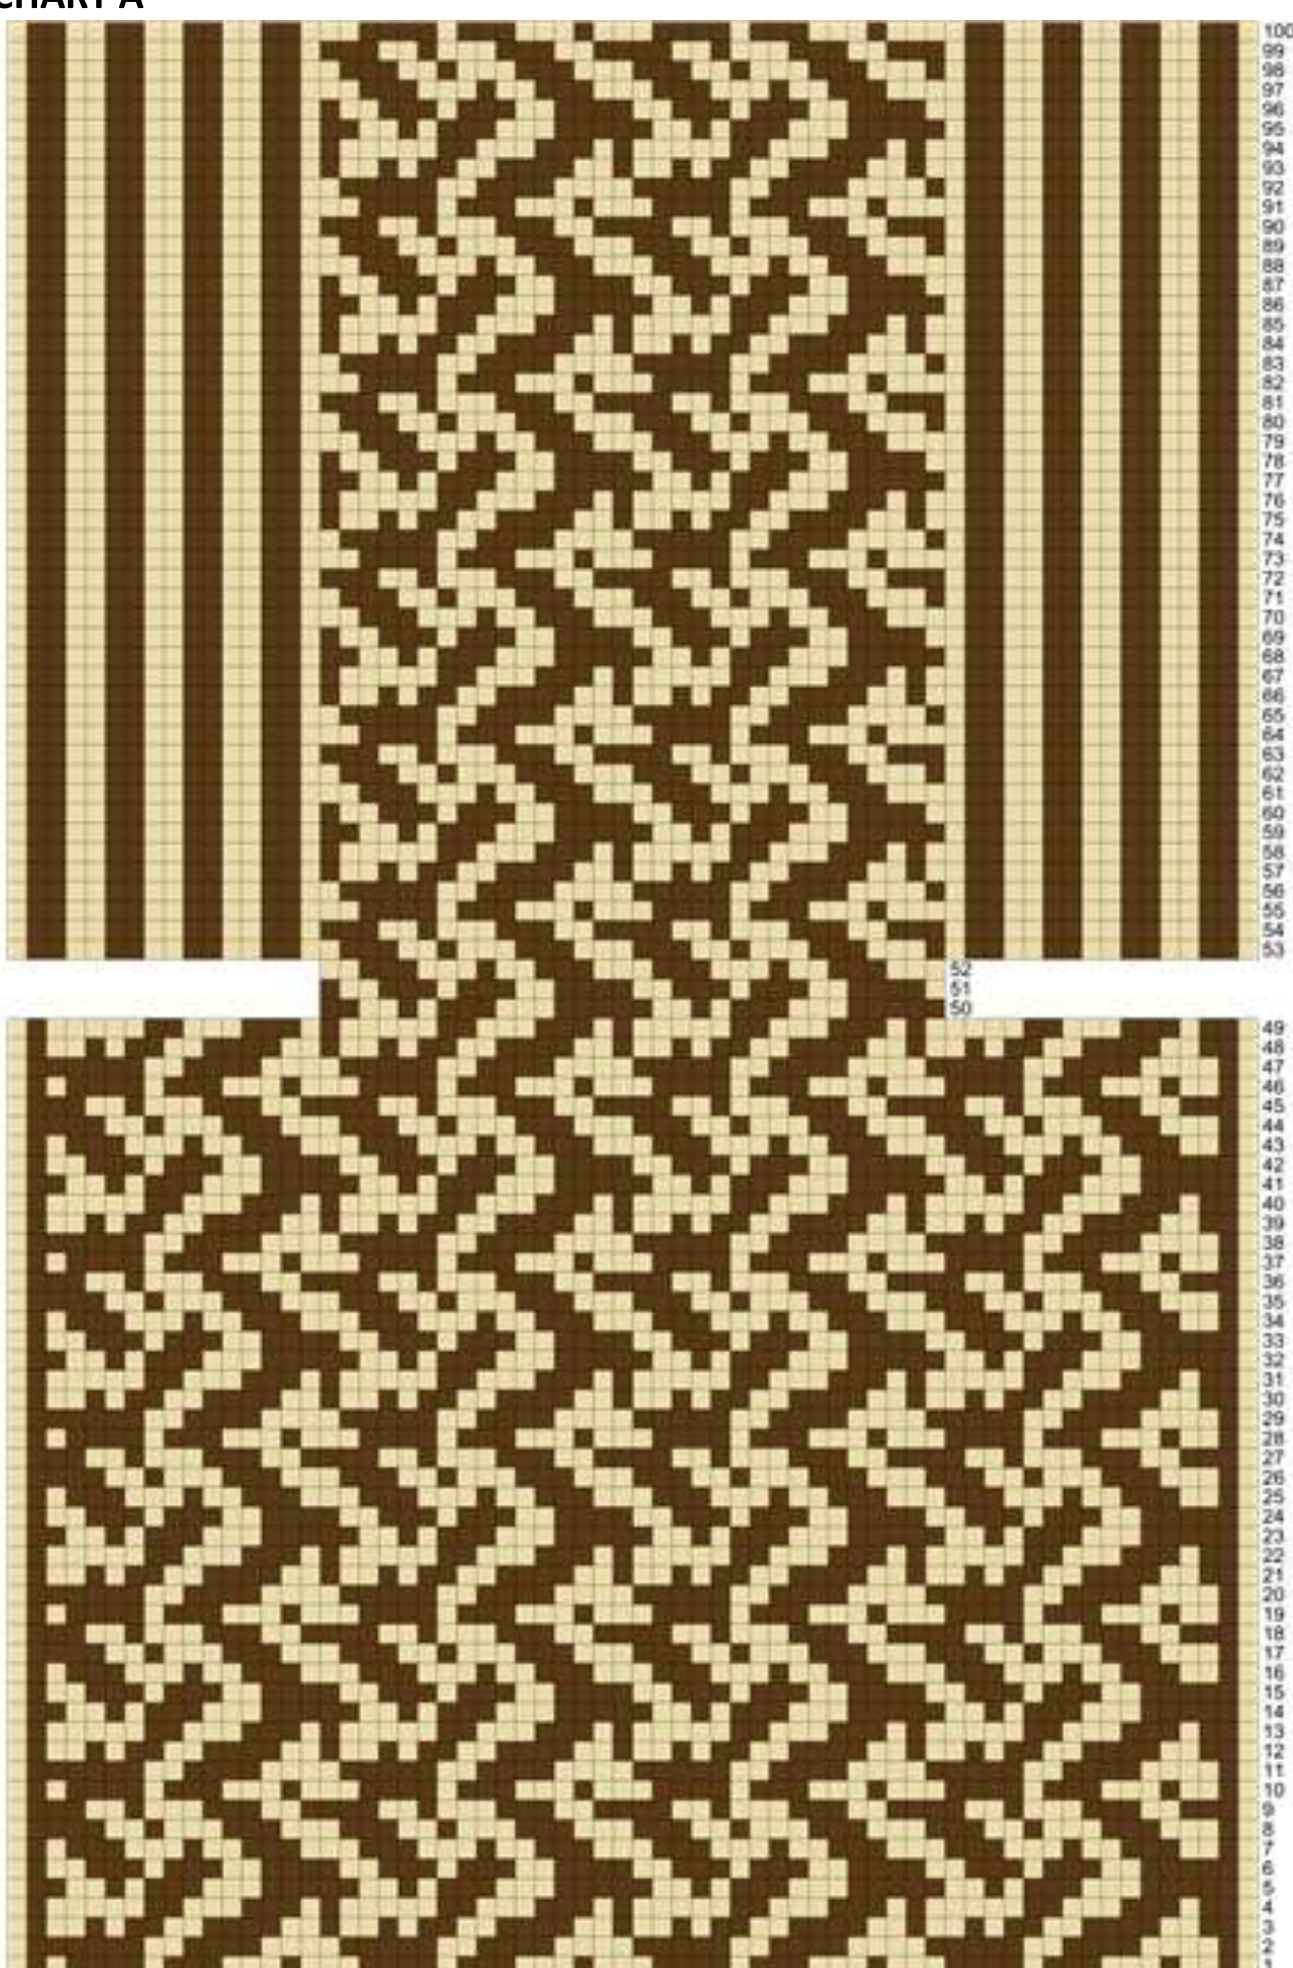
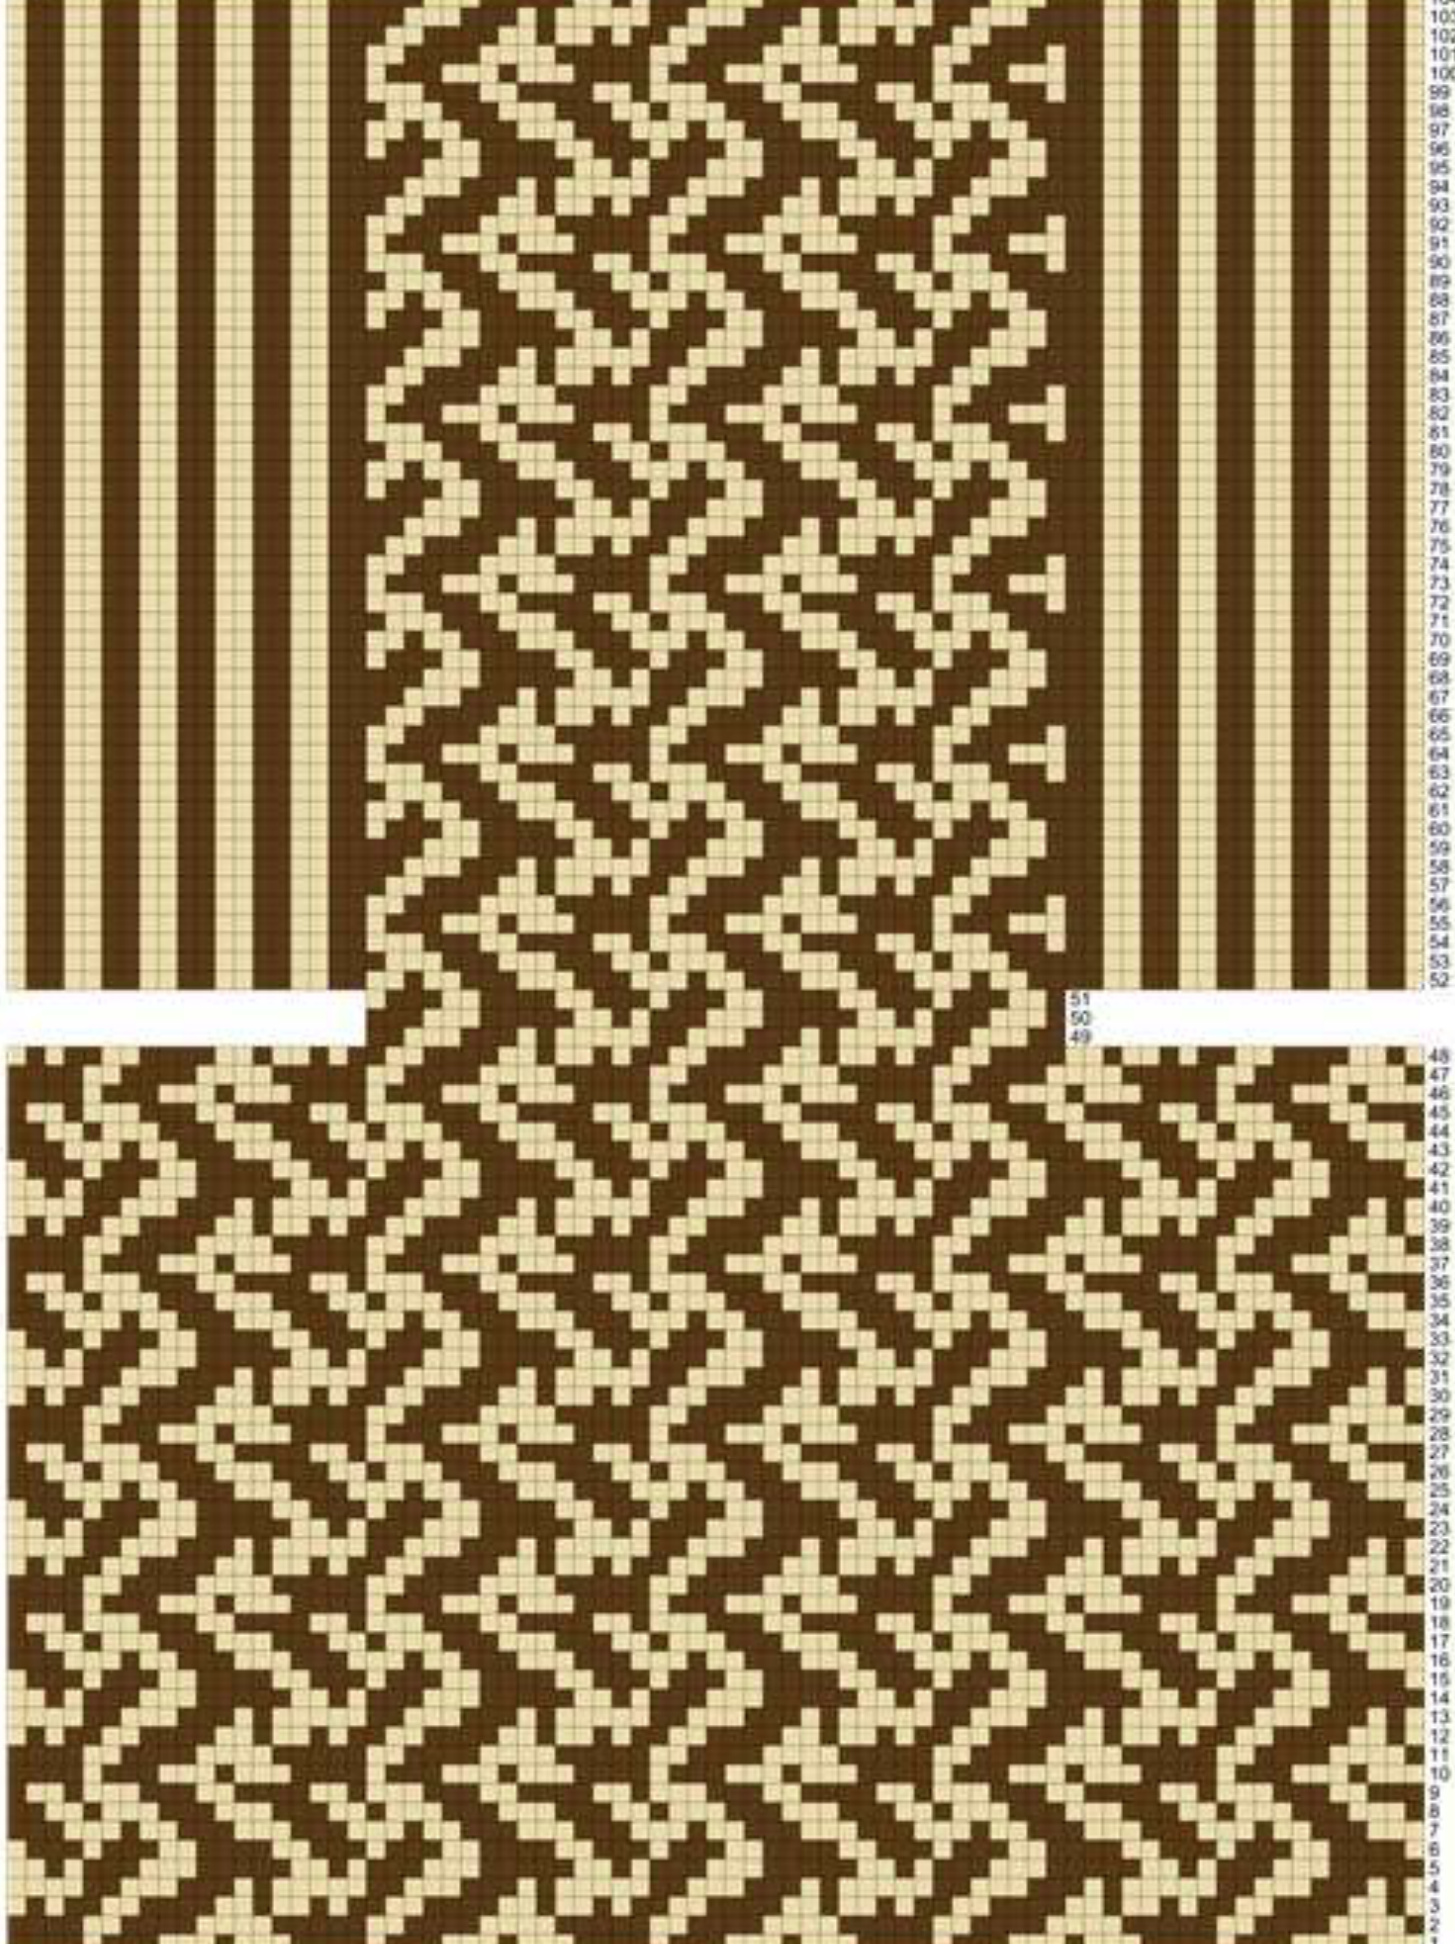
With DPNs (#2 or med or large---#1 for small) CO 64 sts (for small and medium) 72 sts (for large) using Marine. (16 or 18 sts on each of 4 DPNs). Join to work in round, placing marker and being careful not to twist stitches (if using a circular needle). Knit 15 rounds 2x2 rib. After ribbing, begin following sock CHART A for small and medium or CHART B for large.. Follow chart for 48 rounds.
HEEL:
Once you understand how to knit the STH, proceed using the STH heel instructions, knitting heel with Marine. Work three wedges on the 32 (36) sts on needles 1 and 4. Work wedges leaving 7 (8) stitch pairs on each side (4 heel sts left unpaired between pairs). Knit according to pattern across the instep stitches between wedges. Follow the chart for the instep stitches (the sts you have on needles 2 and 3). After working the first half of wedge one, work across the instep per round 49 of the chart, the 2nd wedge will use the appropriate part of round 50, and the 3rd wedge will use the appropriate part of round 51. Float, or knit every other stitch, Sylt down when starting each wedge so that it is placed at the beginning of the instep when you are ready for it. See my Youtube tutorial: https://www.youtube.com/watch?v=VeryK-gB84M
FOOT:
Working all sts on circular needle or split evenly on DPNs as with leg, 16 (18) sts on each of 4 needles Work chart from rounds 52-100.
TOE:
Using both colors in stripes, decrease for toe as follows: Needle 1: K to last 3 sts of NEEDLE 1, SSK, K1 Needle 2: K 1, K2TOG, knit until the last 3 stitches of NEEDLE 3 Needle 3: K to last 3 sts, SSK, K1 Needle 4: K1, K2TOG knit to last 3 sts of NEEDLE 1 Repeat this until there are 7 sts left on each needle. (6 for size small and 8 for size large) Place sts from needles 4 and 1 onto one needle (14sts---12, 16). Place sts from needles 2 and 3 onto another needle (14sts---12, 16). maining stitches together using Kitchener st, and weave in all end Finishing: Tie and weave in or trim all yarn ends at beginning and ends of rounds. Wash & block to fit.
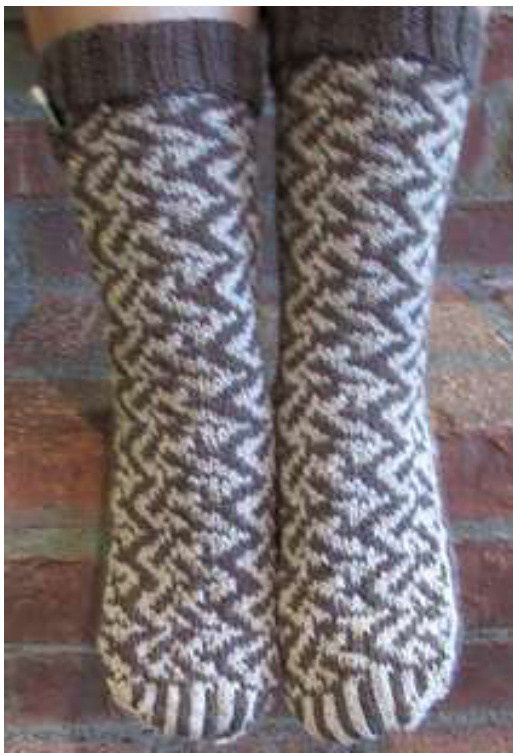
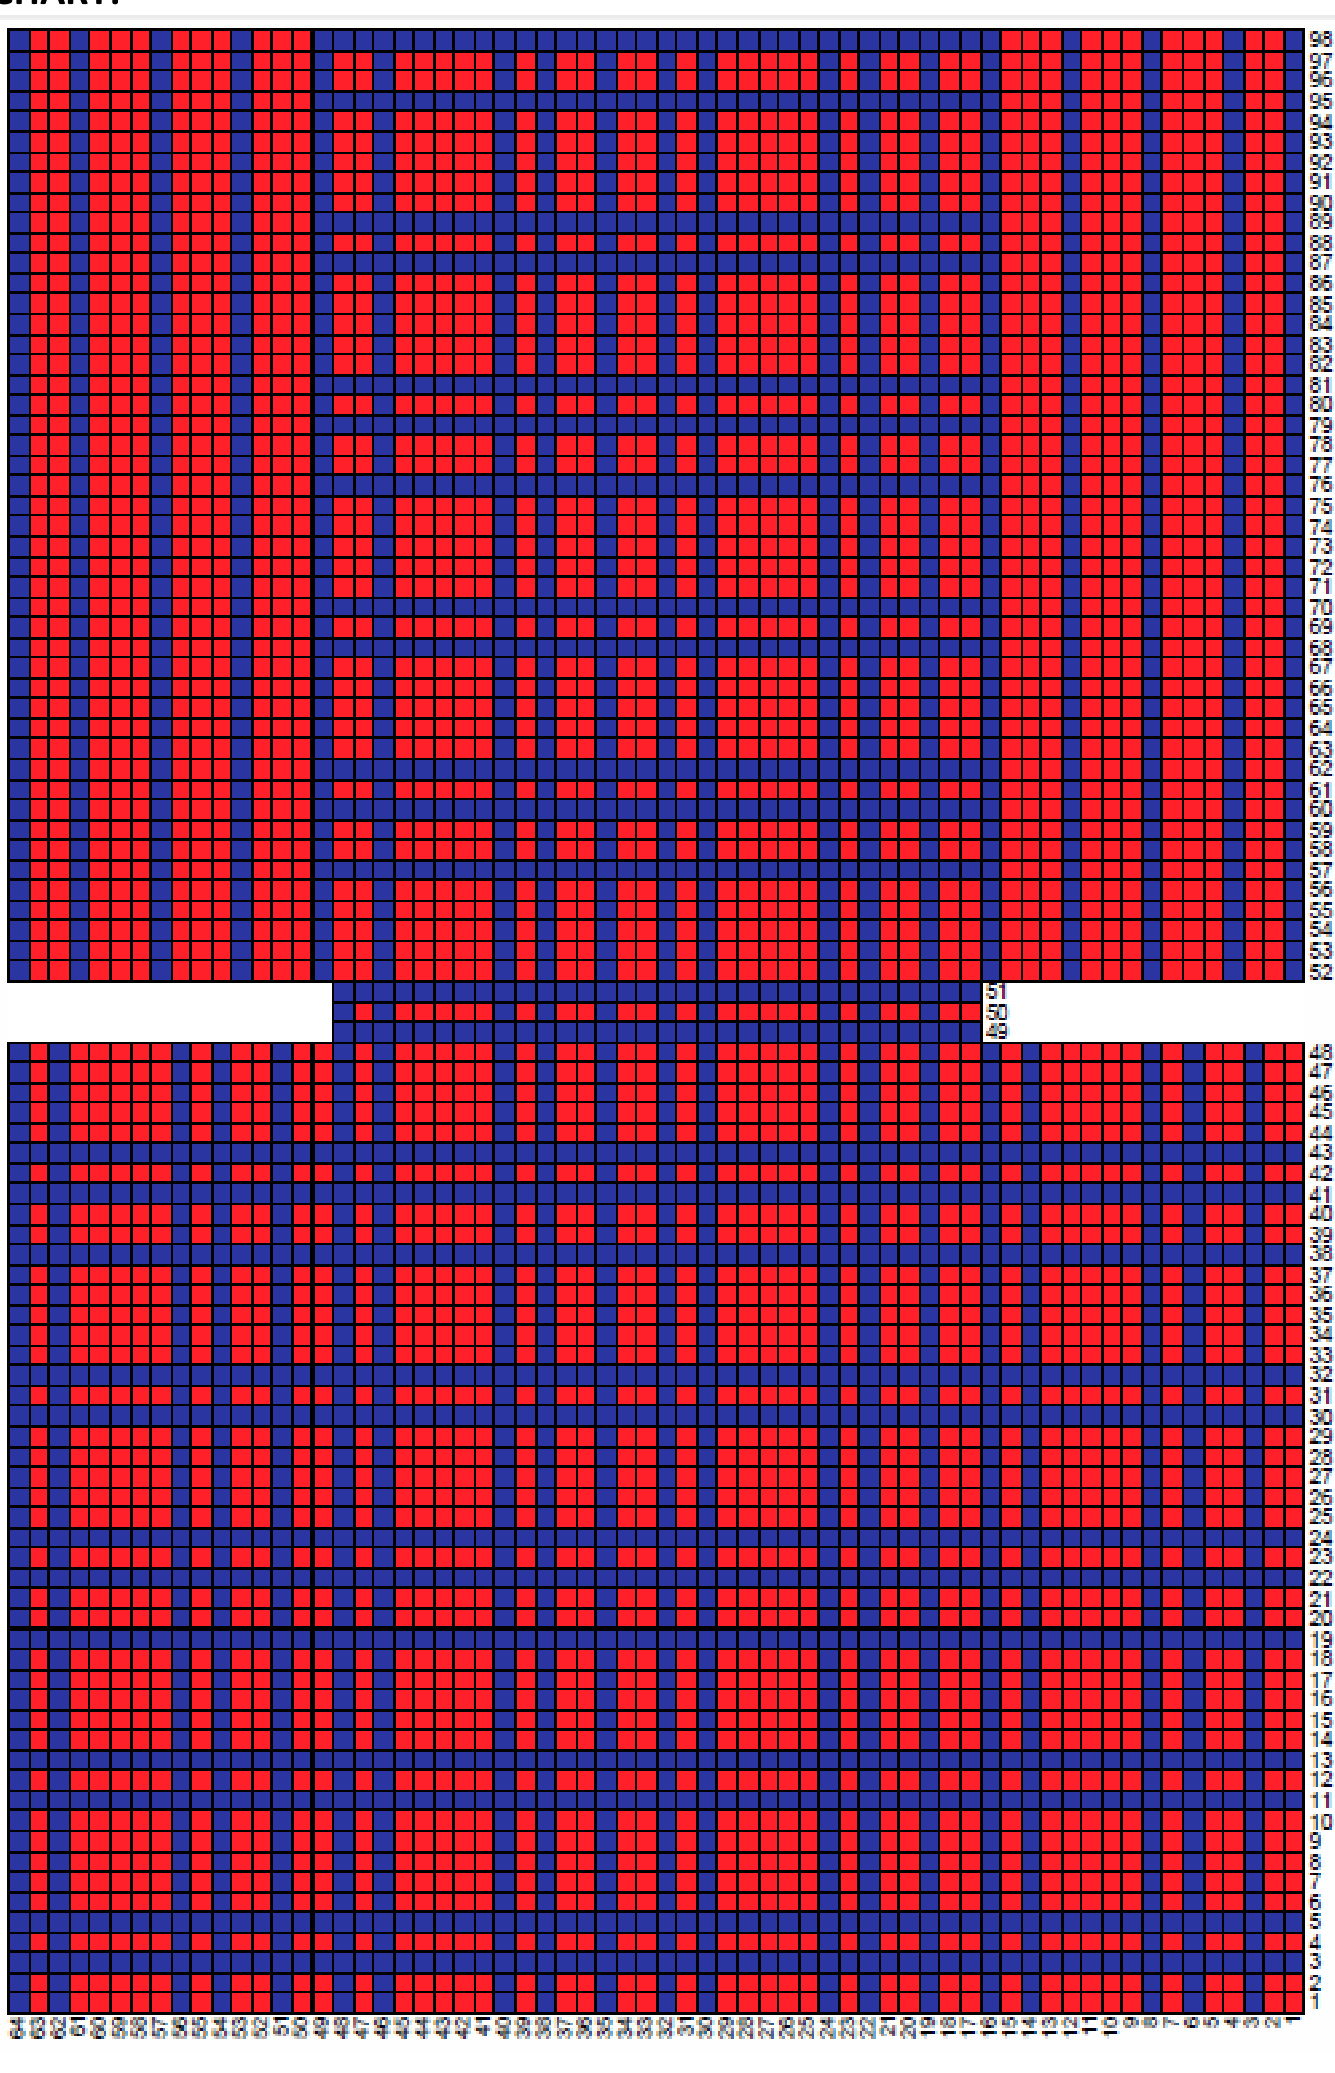
Fiesta!
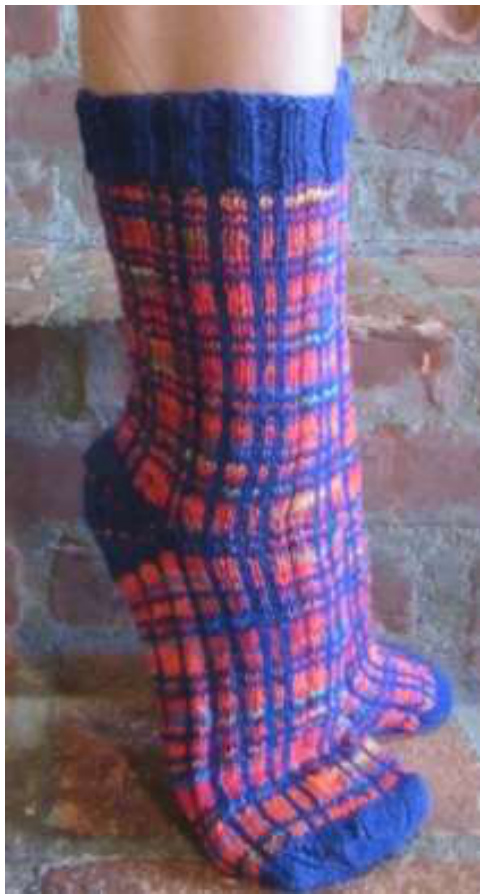
Size: Teens and Women, medium Materials: 1 skein each of Regia 4-ply sock yarn Regia 4-ply 00540 Royal and 01937ClassicsFunnyRed (230 yds per skein 75% wool and 25% Polyamide) 5 DPNs size #3 tapestry needle Gauge: 32 stitches = 4" on #3 needles
SOCKS: Make Two
Instructions: Socks are worked top-down. Teen and Women's info is listed followed by Men's in parentheses. NOTE: Float every 2-3 stitches to keep toes from getting caught in floats!
LEG:
With DPNs and Royal, CO 64 sts, 16 sts on each of 4 DPNs. Join to work in round, placing marker and being careful not to twist stitches (if using a circular needle). Knit 12 rounds 2x2 rib. After ribbing, add Classics Funny Red and begin following sock CHART. Continue working appropriate chart through round 48.
HEEL:
Once you understand how to knit the STH, proceed using the STH heel instructions, knitting heel with Royal. Work three wedges on the 32 sts on needles 1 and 4. Work wedges leaving 7 stitch pairs on each side (4 heel sts left unpaired between pairs). Knit according to pattern across the instep stitches between wedges. Follow the chart for the instep stitches (the sts you have on needles 2 and 3). After working the first half of wedge one, work across the instep per round 49 of the chart, the 2nd wedge will use the appropriate part of round 50, and the 3rd wedge will use the appropriate part of round 51. Float, or knit every other stitch, Classics Funny Red down when starting each wedge so that it is placed at the beginning of the instep when you are ready for it. And work second half of wedge pick-ups by alternating colors as seen in pic. See my Youtube tutorial: https://www.youtube.com/watch?v=VeryK-gB84M
FOOT:
Working all sts on circular needle or split evenly on DPNs as with leg, 16 sts on each of 4 needles Work chart from rounds 52-98.
TOE:
Using Royal, decrease for toe as follows: Needle 1: K to last 3 sts of NEEDLE 1, SSK, K1 Needle 2: K 1, K2TOG, knit until the last 3 stitches of NEEDLE 3 Needle 3: K to last 3 sts, SSK, K1 Needle 4: K1, K2TOG knit to last 3 sts of NEEDLE 1 Repeat this until there are 7 sts left on each needle. Place sts from needles 4 and 1 onto one needle: 14 sts. Place sts from needles 2 and 3 onto another needle: 14 sts. Graft the remaining stitches together using Kitchener st, and weave in all ends.
FINISHING:
Tie and weave in or trim all yarn ends at beginning and ends of rounds. Wash & block to fit.
CHART:
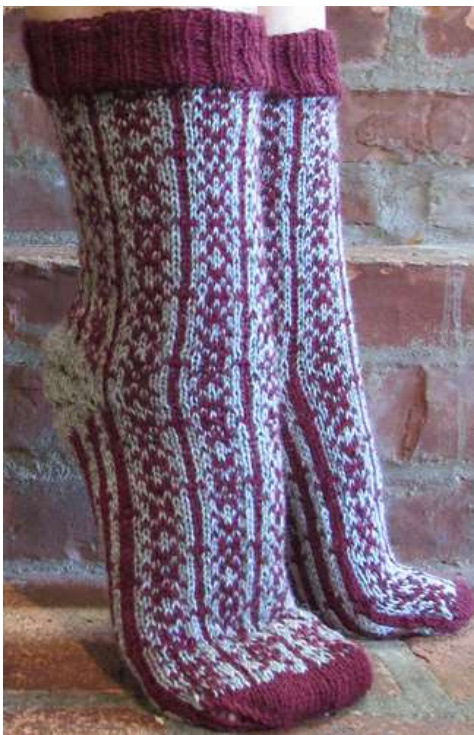
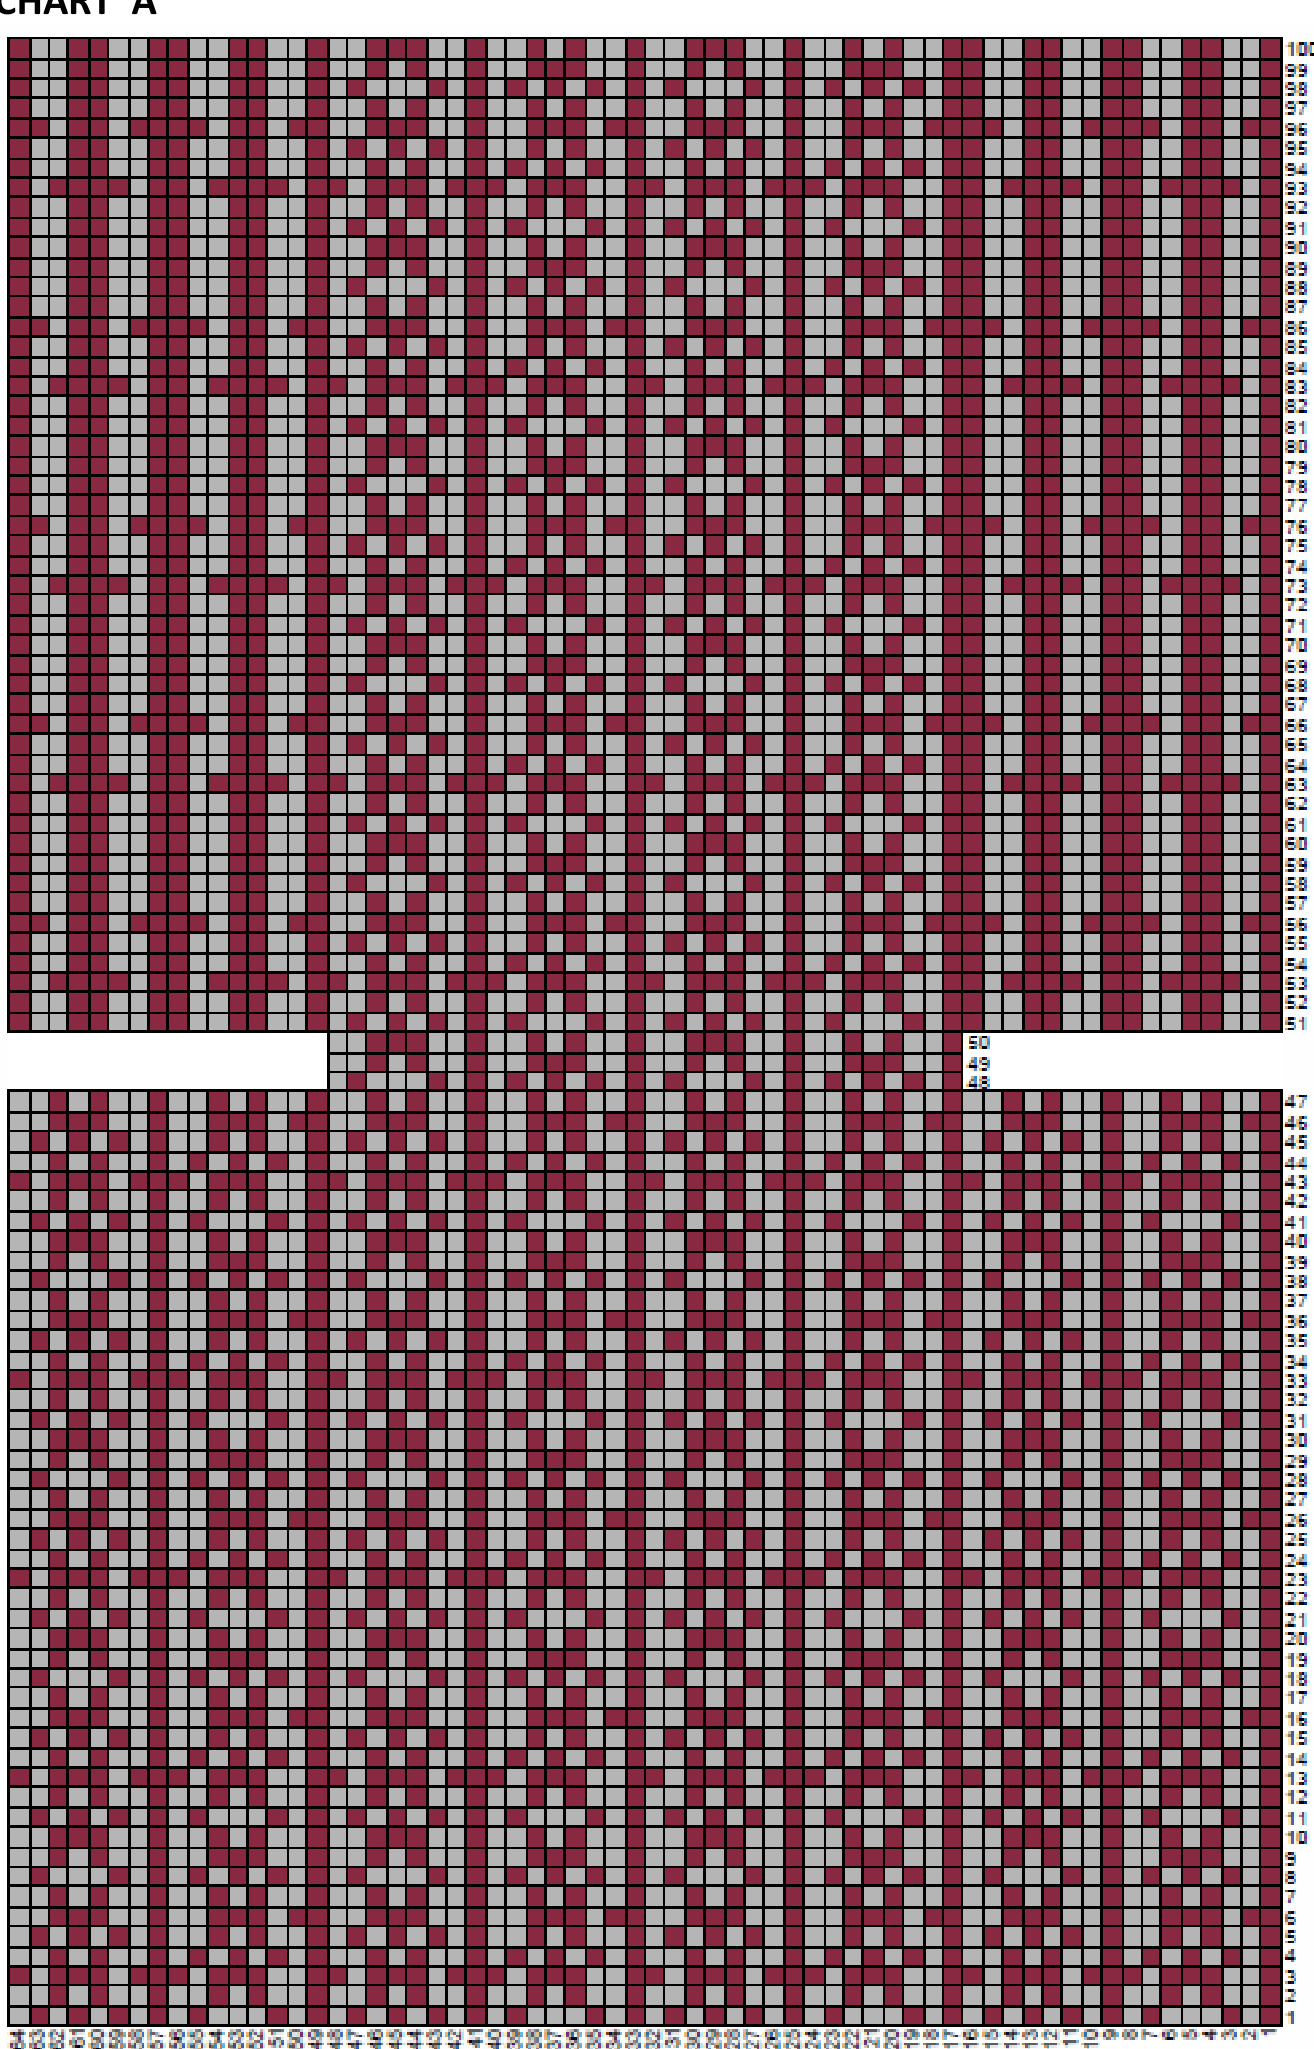
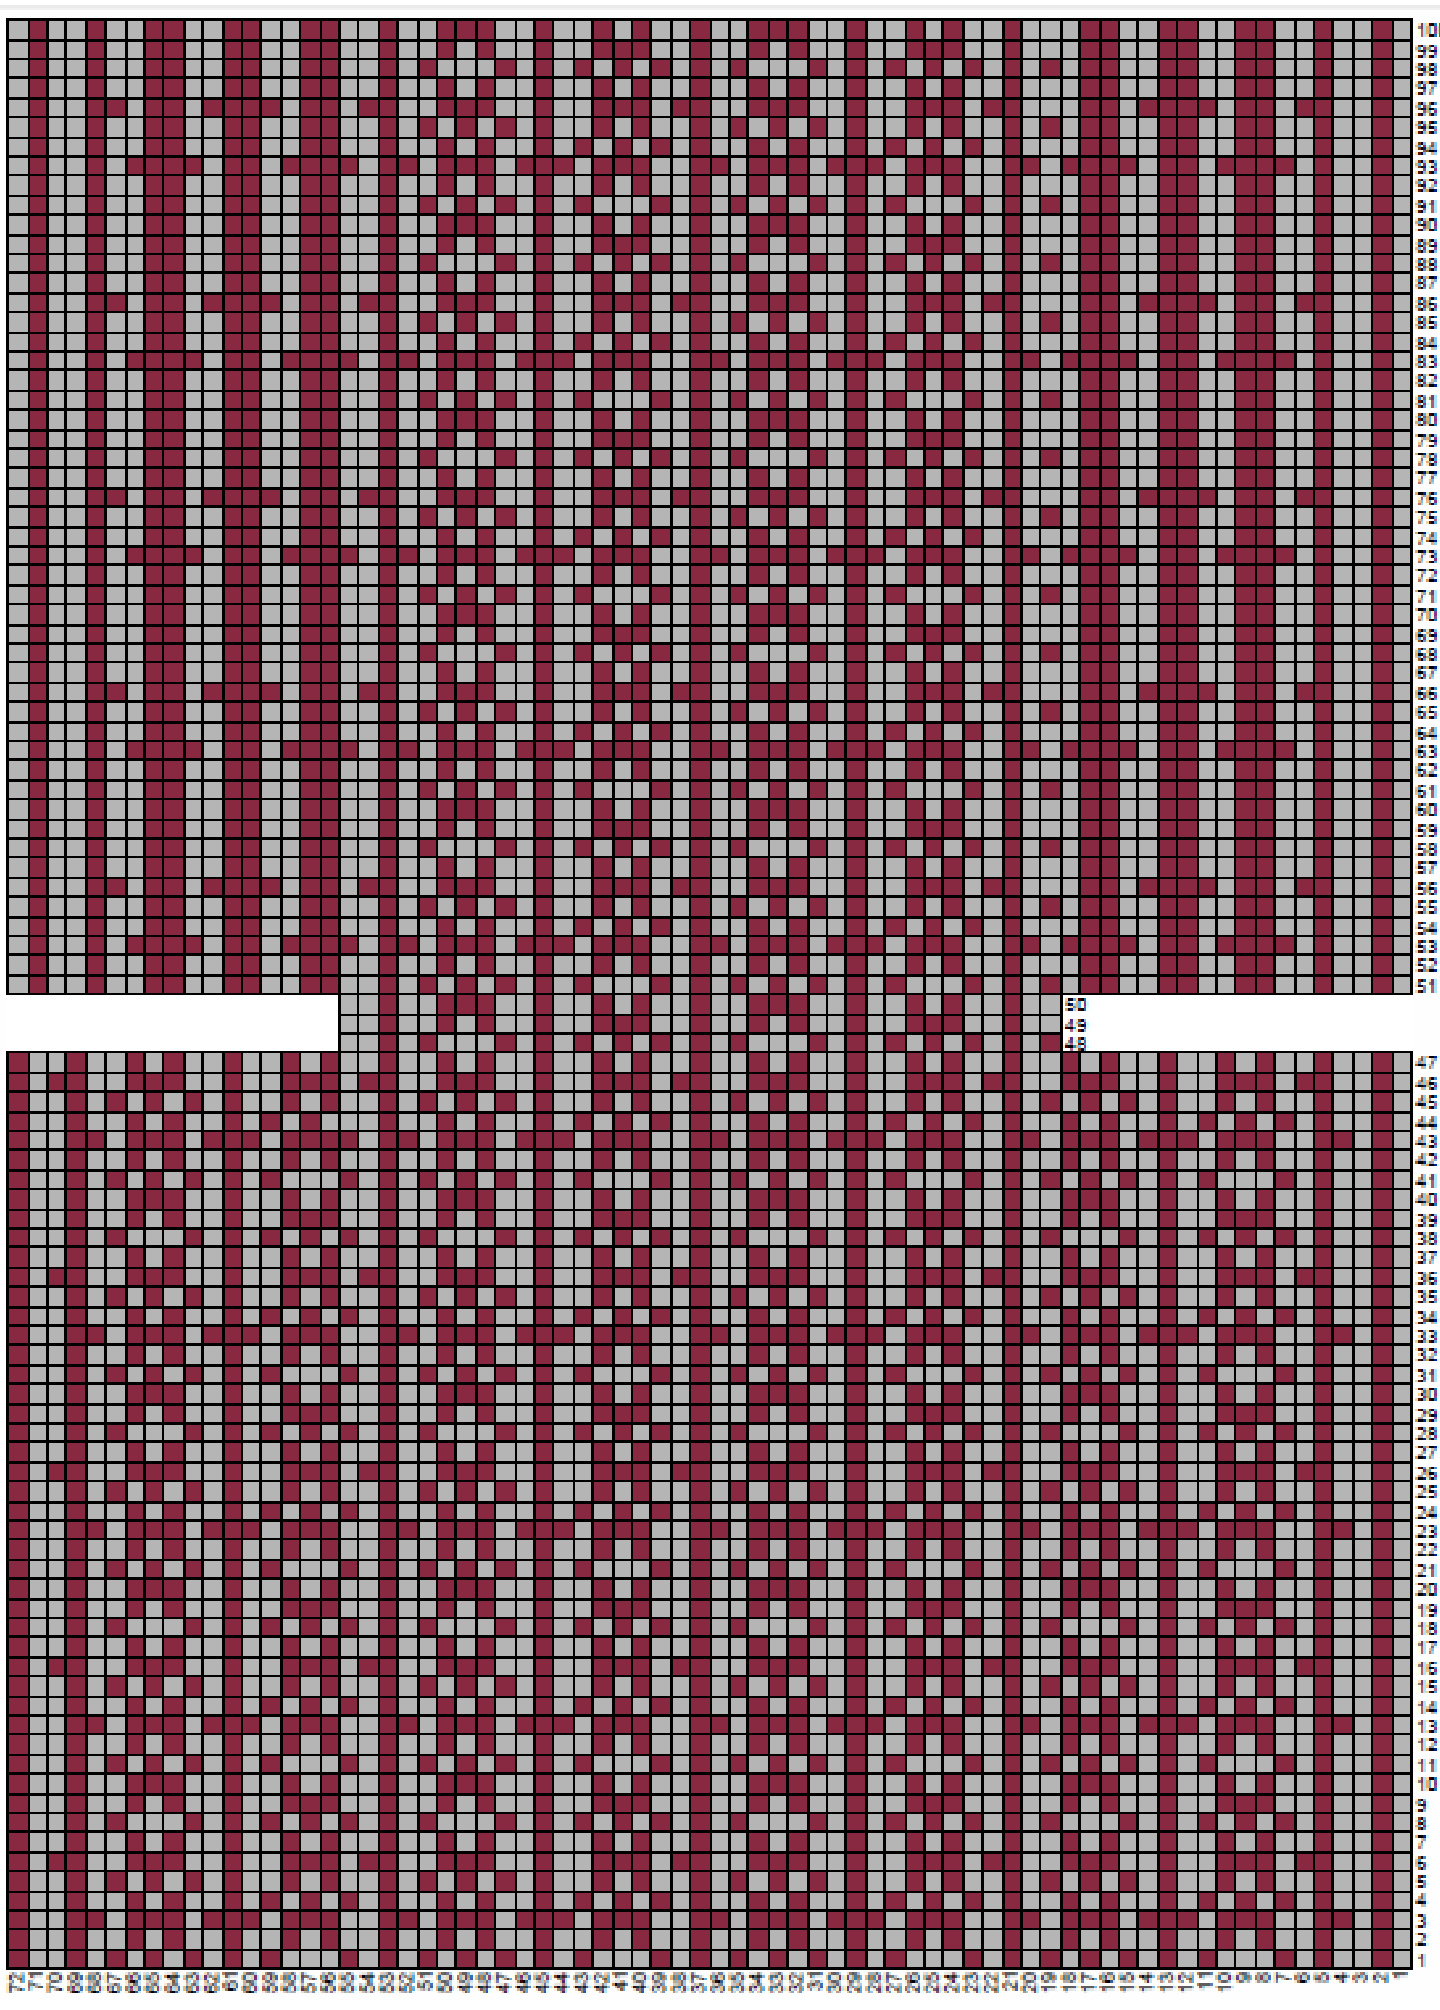
Casual Fridays
Size: Teens and Women, medium, and Men's medium Materials: 1 skein each of Regia 4-ply sock yarn Regia 4-ply 0315 Burgundy and 0033 FlannelMarl (230 yds per skein 75% wool and 25% Polyamid) 5 DPNssize #3 tapestry needle Gauge: 32 stitches = 4" on #3 needles
SOCKS (Make 2)
Instructions: Socks are worked top-down. Teen and Women's info is listed followed by Men's in parentheses. NOTE: Float every 2-3 stitches to keep toes from getting caught in floats!
LEG:
With DPNs and Burgundy, CO 64 (72) sts, 16 (18) sts on each of 4 DPNs. Join to work in round, placing marker and being careful not to twist stitches (if using a circular needle). Knit 14 rounds 2x2 rib. On last round of ribbing, if knitting the Men's size, inc. 3 sts around. (18 sts on needle 1, 19 sts on needle 2, 20 sts on needle 3 and 18 sts on needle 4). After ribbing, begin following sock CHART A for Teen/Women or CHART B for Men.
HEEL:
Once you understand how to knit the STH, proceed using the STH heel instructions, knitting heel with Flannel Marl. Work three wedges on the 32 (36) sts on needles 1 and 4. Work wedges leaving 7 (8) stitch pairs on each side (4 heel sts left unpaired between pairs). Knit according to pattern across the instep stitches between wedges. Follow the chart for the instep stitches (the sts you have on needles 2 and 3). After working the first half of wedge one, work across the instep per round 48 of the chart, the 2nd wedge will use the appropriate part of round 49, and the 3rd wedge will use the appropriate part of round 50. Float, or knit every other stitch, Burgundy down when starting each wedge so that it is placed at the beginning of the instep when you are ready for it. And work second half of wedge pick-ups by alternating colors as seen in pic. Then, do the same thing when beginning the next wedge to get the Burgundy down near the instep. See my Youtube tutorial: https://www.youtube.com/watch?v=VeryK-gB84M
FOOT:
Working all sts on circular needle or split evenly on DPNs as with leg, 16 (18, 19, 20, 18) sts on each of 4 needles Work chart from rounds 51-100 (or a few more rounds on mens socks if you want a longer foot). TOE: Using Burgundy, decrease for toe as follows: Needle 1: K to last 3 sts of NEEDLE 1, SSK, K1 Needle 2: K 1, K2TOG, knit until the last 3 stitches of NEEDLE 3 Needle 3: K to last 3 sts, SSK, K1 Needle 4: K1, K2TOG knit to last 3 sts of NEEDLE 1 Repeat this until there are 7 (8) sts left on each needle. Place sts from needles 4 and 1 onto one needle: 14 (16) sts. Place sts from needles 2 and 3 onto another needle: 14 (16) sts. Graft the remaining stitches together using Kitchener st, and weave in all ends.
FINISHING:
Tie and weave in or trim all yarn ends at beginning and ends of rounds. Wash & block to fit.
ocks for

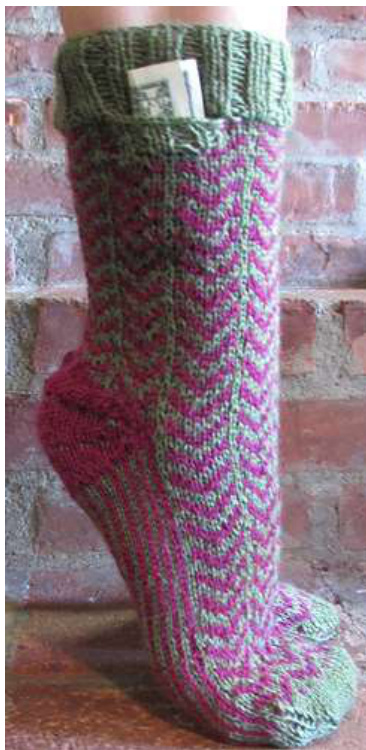
The Ripple Effecte
Size: Teens and Women, medium, and Men's medium Materials: 1 skein each of Regia 4-ply sock yarn Regia 4-ply 001078 Cardinal and 02744FoliageHeather (230 yds per skein 75% wool and 25% Polyamid) 5 DPNs size #3 (Plus one spare needle for working pocket, if desired) tapestry needle Gauge: 32 stitches = 4" on #3 needles
SOCKS (Make 2)
Instructions: Socks are worked top-down. Teen and Women's info is listed followed by Men's in parentheses. NOTE: Float every 2-3 stitches to keep toes from getting caught in floats!
OPTIONAL SECRET POCKET:
Work chart through round 6. On round 7, knit first11 stitches. Leaving long tail (approx.. 12"), detach Foliage Heather Using spare needle and Cardinal, knit last 5 sts on needle one plus first 5 sts from needle two onto spare needle. You now have 10 sts on your spare needle. Turn. Work back and forth ON THESE 10 STS ONLY, in stockinette, for 18 rows. BO. Set spare needle aside, Leaving another long tail, CO 10 sts using Foliage Heather knit, through the back loop, 5 sts of pattern, according to chart onto needle one. Knit the next 5 sts (through the back loop) plus 11 already on needle two. Keeping pattern accurate, complete round 7. Continue with chart and round 8 as written
With DPNs and Foliage Heather CO 64 (72) sts, 16 (18) sts on each of 4 DPNs. Join to work in round, placing marker and being careful not to twist stitches (if using a circular needle). Knit 14 rounds 2x2 rib. On last round of ribbing, if knitting the Men's size, inc. 3 sts around. (18 sts on needle 1, 19 sts on needle 2, 20 sts on needle 3 and 18 sts on needle 4).After ribbing, begin following sock CHART A for Teen/Women or CHART B for Men.
Continue working appropriate chart through round 47.
HEEL:
Once you understand how to knit the STH, proceed using the STH heel instructions, knitting heel with Cardinal. Work three wedges on the 32 (36) sts on needles 1 and 4. Work wedges leaving 7 (8) stitch pairs on each side (4 heel sts left unpaired between pairs). Knit according to pattern across the instep stitches between wedges. Follow the chart for the instep stitches (the sts you have on needles 2 and 3). After working the first half of wedge one, work across the instep per round 48 of the chart, the 2nd wedge will use the appropriate part of round 49, and the 3?d wedge will use the appropriate part of round 50. Float, or knit every other stitch, Foliage Heather down when starting each wedge so that it is placed at the beginning of the instep when you are ready for it. And work second half of wedge pick-ups by alternating colors as seen in pic. Continue to knit with alternating colors down to within 2 sts of instep as you begin first row only of each wedge so that Foliage Heather will be at the instep when you are ready to use it. See my Youtube tutorial: https://www.youtube.com/watch?v=VeryKgB84M
FOOT:
Working all sts on circular needle or split evenly on DPNs as with leg, 16 (18, 19, 20, 18) sts on each of 4 needles Work chart from rounds 51-100 (or more rounds if you want a longer foot on men's socks)
TOE:
Using Foliage Heather, decrease for toe as follows: Needle 1: K to last 3 sts of NEEDLE 1, SSK, K1 Needle 2: K 1, K2TOG, knit until the last 3 stitches of NEEDLE 3 Needle 3: K to last 3 sts, SSK, K1 Needle 4: K1, K2TOG knit to last 3 sts of NEEDLE 1 Repeat this until there are 7 (8) sts left on each needle. Place sts from needles 4 and 1 onto one needle: 14 (16) sts. Place sts from needles 2 and 3 onto another needle: 14 (16) sts. maining stitches together using Kitchener st, and weave in all end
FINISHING:
With long tails left from detaching and cO pocket sts, sew pocket down to inside of sock. On the front of the sock, pick up the 10 cO st loops and, using Foliage Heather, work a 2x2 rib (starting and ending odd rows with knit 2, and even rows with purl 2), back and forth for 6 rows. BO. Secure ribbing sides to sock. Tie and weave in or trim all yarn ends at beginning and ends of rounds. Wash & block to fit.
ocks for
Chocolate Parfait
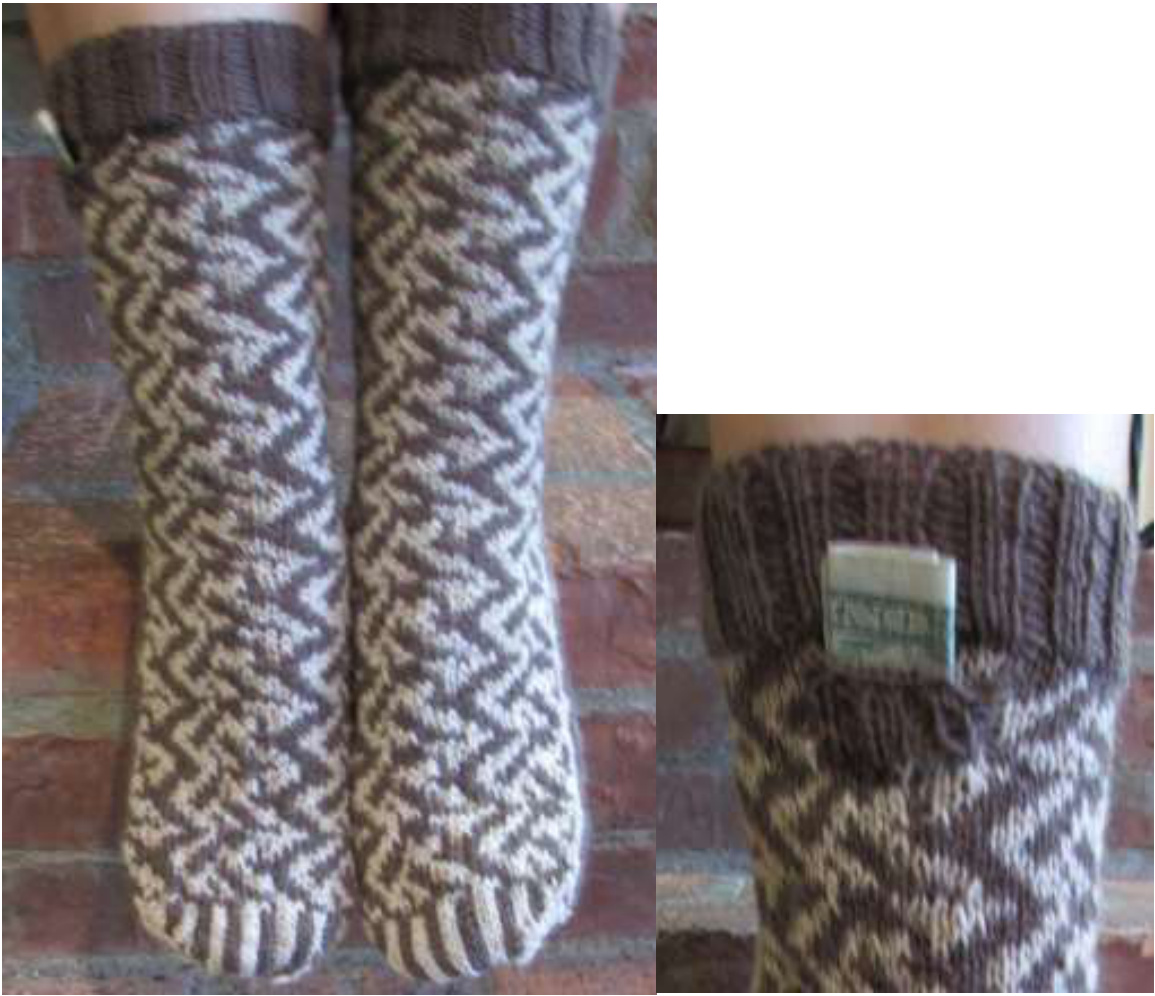
Size: Teens and Women, medium, and Men's medium Materials: 1 skein each of Regia 4-ply sock yarn Regia 4-ply 00017 Light Camel Marl and 02903DarkBrown (230 yds per skein 75% wool and 25% Polyamid) 5 DPNs size #3 (Plus one spare needle for working pocket, if desired) tapestry needle Gauge: 32 stitches = 4" on #3 needles
SOCKS (Make 2)
Working all sts on circular needle or split evenly on DPNs as with leg, 16 (18) sts on each of 4 needles Work chart from rounds 52-100. NOTE: Float every 2-3 stitches to keep toes from getting caught in floats!
OPTIONAL SECRET POCKET:
Work chart through round 6. On round 7, knit first11 stitches. Leaving long tail (approx. 12"), detach Dark Brown. Using spare needle and Light Camel Marl, knit last 5 sts on needle one plus first 5 sts from needle two onto spare needle. You now have 10 sts on your spare needle. Turn. Work back and forth ON THESE 10 STS ONLY , in stockinette, for 18 rows. BO. Set spare needle aside. Leaving another long tail, CO 10 sts using Dark Brown. Picking up at the appropriate spot in the chart, knit, through the back loop, 5 sts of pattern, according to chart onto needle one. Knit the next 5 sts (through the back loop) plus 11 already on needle two, keeping pattern accurate. Complete round 7. Continue with chart and round 8 as written.
LEG:
instructions, knitting heel with Marine. Work three wedges on the 32 (36) sts on every other stitch, Sylt down when starting each wedge so that it is placed atthe between wedges. Follow the chart for the instep stitches (the sts you have on needles 1 and 4. Work wedges leaving 7 (8) stitch pairs on each side (4 heel sts Continue working appropriate chart through round 49(48).
HEEL:
Once you understand how to knit the STH, proceed using the STH heel instructions, knitting heel with Light Camel Marl. Work three wedges on the 32 (36) sts on needles 1 and 4. Work wedges leaving 7 (8) stitch pairs on each side (4 heel sts left unpaired between pairs). Knit according to pattern across the instep stitches between wedges. Follow the chart for the instep stitches (the sts you have on needles 2 and 3). After working the first half of wedge one, work across the instep per round 50(49) of the chart, the 2nd wedge will use the appropriate part of round 51(50), and the 3rd wedge will use the appropriate part of round 52(51). Float, or knit every other stitch, Dark Brown down when starting each wedge so that it is placed at the beginning of the instep when you are ready for it. And work second half of wedge pick-ups by alternating colors as seen in pic. See my Youtube tutorial: https://www.youtube.com/watch?v=VeryK-gB84M
FOOT:
Working all sts on circular needle or split evenly on DPNs as with leg, 16 (18, 19, 20, 18) sts on each of 4 needles Work chart from rounds 53-100 (52-104).
TOE:
Using both colors in stripes, decrease for toe as follows: Needle 1: K to last 3 sts of NEEDLE 1, SSK, K1 Needle 2: K 1, K2TOG, knit until the last 3 stitches of NEEDLE 3 Needle 3: K to last 3 sts, SSK, K1 Needle 4: K1, K2TOG knit to last 3 sts of NEEDLE 1 Repeat this until there are 7 (8) sts left on each needle. Place sts from needles 4 and 1 onto one needle: 14 (16) sts. Place sts from needles 2 and 3 onto another needle: 14 (16) sts. Graft the remaining stitches together using Kitchener st, and weave in all ends.
FINISHING:
With long tails left from detaching and CO pocket sts, sew pocket down to inside of sock. On the front of the sock, pick up the 10 cO st loops and, using Dark Brown, work a 2x2 rib (starting and ending odd rows with knit 2, and even rows with purl 2), back and forth for 6 rows. BO. Secure ribbing sides to sock. Tie and weave in or trim all yarn ends at beginning and ends of rounds. Wash & block to fit.
ocks for

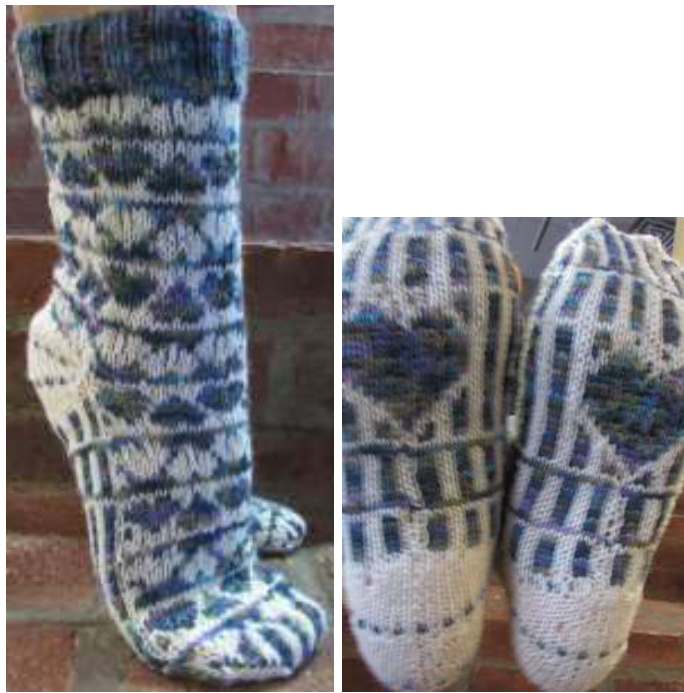
That Lvvin' Feeling
Size: Teens and Women, medium Materials: 1 skein each of Regia 4-ply sock yarn Regia 4-ply 5814 Romantic and 2080White 5 DPNssize #3 tapestryneedle Gauge: 32 stitches = 4" on #3 needles SOCKS (Make 2) Instructions: Socks are worked top-down. NOTE: Float every 2-3 stitches to keep toes from getting caught in floats!
LEG:
With DPNs and Romantic, CO 64 sts, 16 sts on each of 4 DPNs. Join to work in round, placing marker and being careful not to twist stitches (if using a circular needle). Knit 14 rounds 2x2 rib. After ribbing, begin following sock CHART.
HEEL:
Once you understand how to knit the STH, proceed using the STH heel instructions, knitting heel with White. Work three wedges on the 32 sts on needles 1 and 4. Work wedges leaving 7 stitch pairs on each side (4 heel sts left unpaired between pairs). Knit according to pattern across the instep stitches between wedges. Follow the chart for the instep stitches (the sts you have on needles 2 and 3). After working the first half of wedge one, work across the instep per round 45 of the chart,the 2nd wedge will use the appropriate part of round 46, and the 3rd wedge will use the appropriate part of round 47. Knit every other stitch, Romantic down when starting each wedge so that it is placed at the beginning of the instep when you are ready for it. And work second half of wedge pick-ups by alternating colors as seen in pic. Then, do the same thing when beginning the next wedge to get the Romantic down near the instep. See my Youtube tutorial: https://www.youtube.com/watch?v=VeryK-gB84M
FOOT:
Working all sts on circular needle or split evenly on DPNs as with leg, 16 sts on each of 4 needles Work chart from rounds 48-95 (or a few more rounds if you want a longer foot).
TOE:
Using both colors and striping with 2-st stripes, decrease for toe as follows: Needle 1: K to last 3 sts of NEEDLE 1, SSK, K1 Needle 2: K 1, K2TOG, knit until the last 3 stitches of NEEDLE 3 Needle 3: K to last 3 sts, SSK, K1 Needle 4: K1, K2TOG knit to last 3 sts of NEEDLE 1 Repeat this until there are 7 sts left on each needle. Place sts from needles 4 and 1 onto one needle: 14 sts. Place sts from needles 2 and 3 onto another needle: 14 sts. Graft the remaining stitches together using Kitchener st, and weave in all ends.
POCKETS:
Make two. With White, CO 14 sts. (You do not want 12 or 16 sts). Work a 2x2 rib for approx. 25 rows. B0 (not too tightly) leaving a long tail for sewing pocket to sock. Sew pocket to center back of sock, so that the top of the pocket starts just below the sock ribbing.
FINISHING:
Tie and weave in or trim all yarn ends at beginning and ends of rounds. Wash & block to fit.
ocks for

Spring is in the Air.
Size: Teens and Women, medium Materials: 1 skein each of Regia 4-ply sock yarn Regia 4-ply 0540 Royal Blue and 1401Bubblegum 5 DPNs size #3 (or size needed to obtain gauge) tapestry needle Gauge: 32 stitches = 4" on #3 needles SOCKS (Make 2: 1 CHART A and 1 CHART B) Instructions: Socks are worked top-down. NOTE: Float every 2-3 stitches to keep toes from getting caught in floats!
LEG:
With DPNs and Royal Blue, CO 64 sts, 16 sts on each of 4 DPNs. Join to work in round, placing marker and being careful not to twist stitches (if using a circ needle). Knit 14 rounds 2x2 rib. After ribbing, attach Bubblegum and begin following sock CHART A. (For second sock, follow CHART B.)
HEEL:
Once you understand how to knit the STH, proceed using the STH heel instructions, knitting heel with Bubblegum. Work three wedges on the 32 sts on needles 1 and 4. Work wedges leaving 7 stitch pairs on each side (4 heel sts left unpaired between pairs). Knit according to pattern across the instep stitches between wedges. Follow the chart for the instep stitches (the sts you have on needles 2 and 3). After working the first half of wedge one, work across the instep per round 50 of the chart,the 2nd wedge will use the appropriate part of round 51, and the 3"d wedge will use the appropriate part of round 52. Knit every other stitch, Royal Blue down when starting each wedge so that it is placed at the beginning of the instep when you are ready for it. And work second half of wedge pick-ups by alternating colors as seen in pic. Then, do the same thing when beginning the next wedge to get the Royal Blue down near the instep. See my Youtube tutorial: https://www.youtube.com/watch?v=VeryK-gB84M
FOOT:
Working all sts on circular needle or split evenly on DPNs as with leg, 16 sts on each of 4 needles Work chart from rounds 53-98 (or a few more rounds if you want a longer foot).
TOE:
Using both colors and striping with 2-st stripes, decrease for toe as follows: Needle 1: K to last 3 sts of NEEDLE 1, SSK, K1 Needle 2: K 1, K2TOG, knit until the last 3 stitches of NEEDLE 3 Needle 3: K to last 3 sts, SSK, K1 Needle 4: K1, K2TOG knit to last 3 sts of NEEDLE 1 Repeat this until there are 7 sts left on each needle. Place sts from needles 4 and 1 onto one needle: 14 sts. Place sts from needles 2 and 3 onto another needle: 14 sts. Graft the remaining sts together using Kitchener st, and weave in all ends.
POCKET:
Make one or two, if you want one on each sock. With Bubblegum, CO 13 sts. Knit either stranding or intarsia according to the POCKET CHART. (Chart is written to work pocket flat—intarsia.) After completing row 20, detach Bubblegum leaving a long tail for sewing poclet to sock. Starting with a long tail, attach Royal Blue and work a 2x2 rib (knit first two sts together the first time t0 get from 13 to 12 sts for working rib.) for 5 rows. BO (not too tightly) leaving a long tail for sewing pocket to sock. Using long tails, sew pocket to side of sock, so that the top of the pocket starts a few rows below the sock ribbing.
FINISHING:
Tie and weave in or trim all yarn ends at beginning and ends of rounds. Wash & block to fit.
| CHARTA | |||||||
| 868 8388 68886883 8868996492985888688 8886 8886 8888 | |||||||
| 995949 | |||||||
| 1886888588388684459939459885993986818858928068995992992998666404 | |||||||
POCKET CHART
About the Author
Deborah Tomasello designs knitting patterns. Deborah released her first book, Wrapped in Color: Stranded Knitting in the 21"t Century in 2013, and last year she released her second book, Knitting 2oth Century Art. In addition, she has produced several e-Books, and she has designed and published hundreds of colorwork patterns on Ravelry, Craftsy, Knit Picks and Patternfish. She has sold patterns to WEBs, and she won first place in Accord Publishing's 2014 Knitting Calendar for her Brilliant Twilight colorwork hat design. Her active Ravelry group, Colorworks by Debi comprises over 3600 members. Deborah resides with her husband and Jadzia, the feisty Pomeranian, on the beautiful Hudson River in Westchester, New York.
Contact Information
Email Address: CoeDeborah@aol.com Ravelry Group: http://www.ravelry.com/groups/colorworksbydebideborah-tomasello-designs


