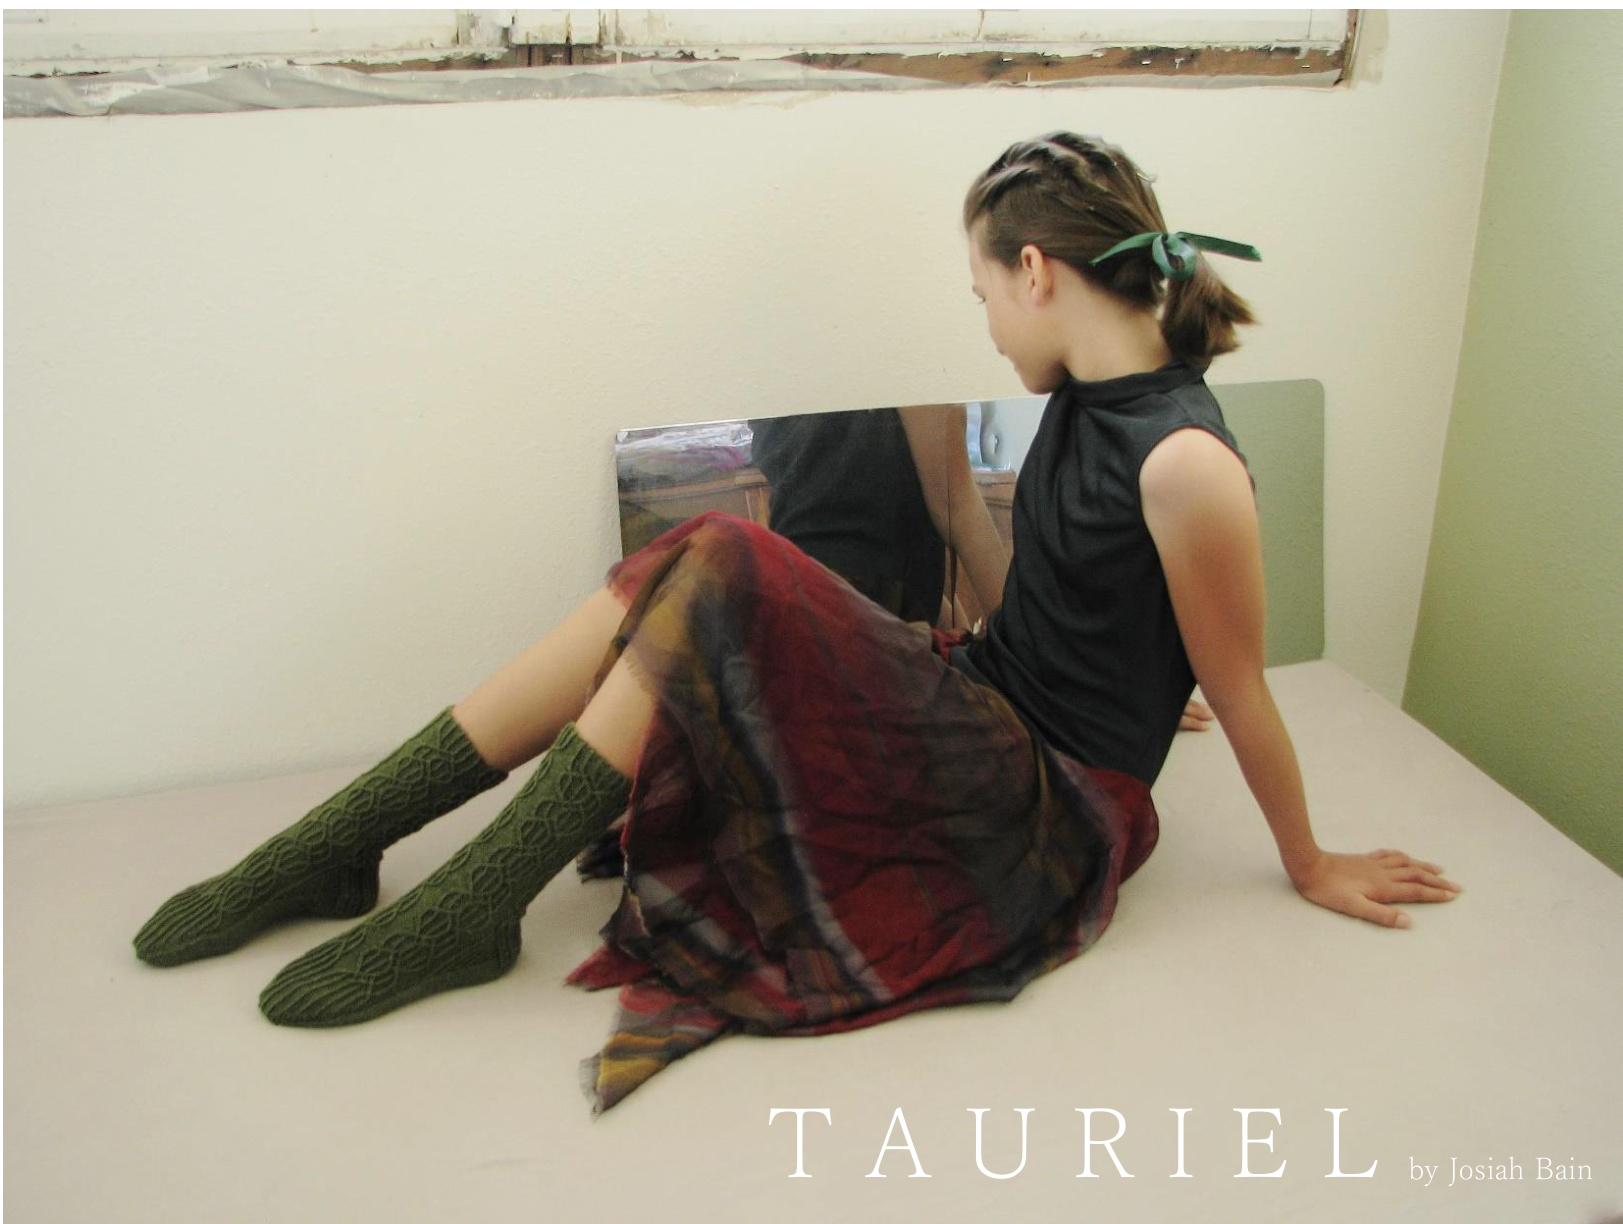
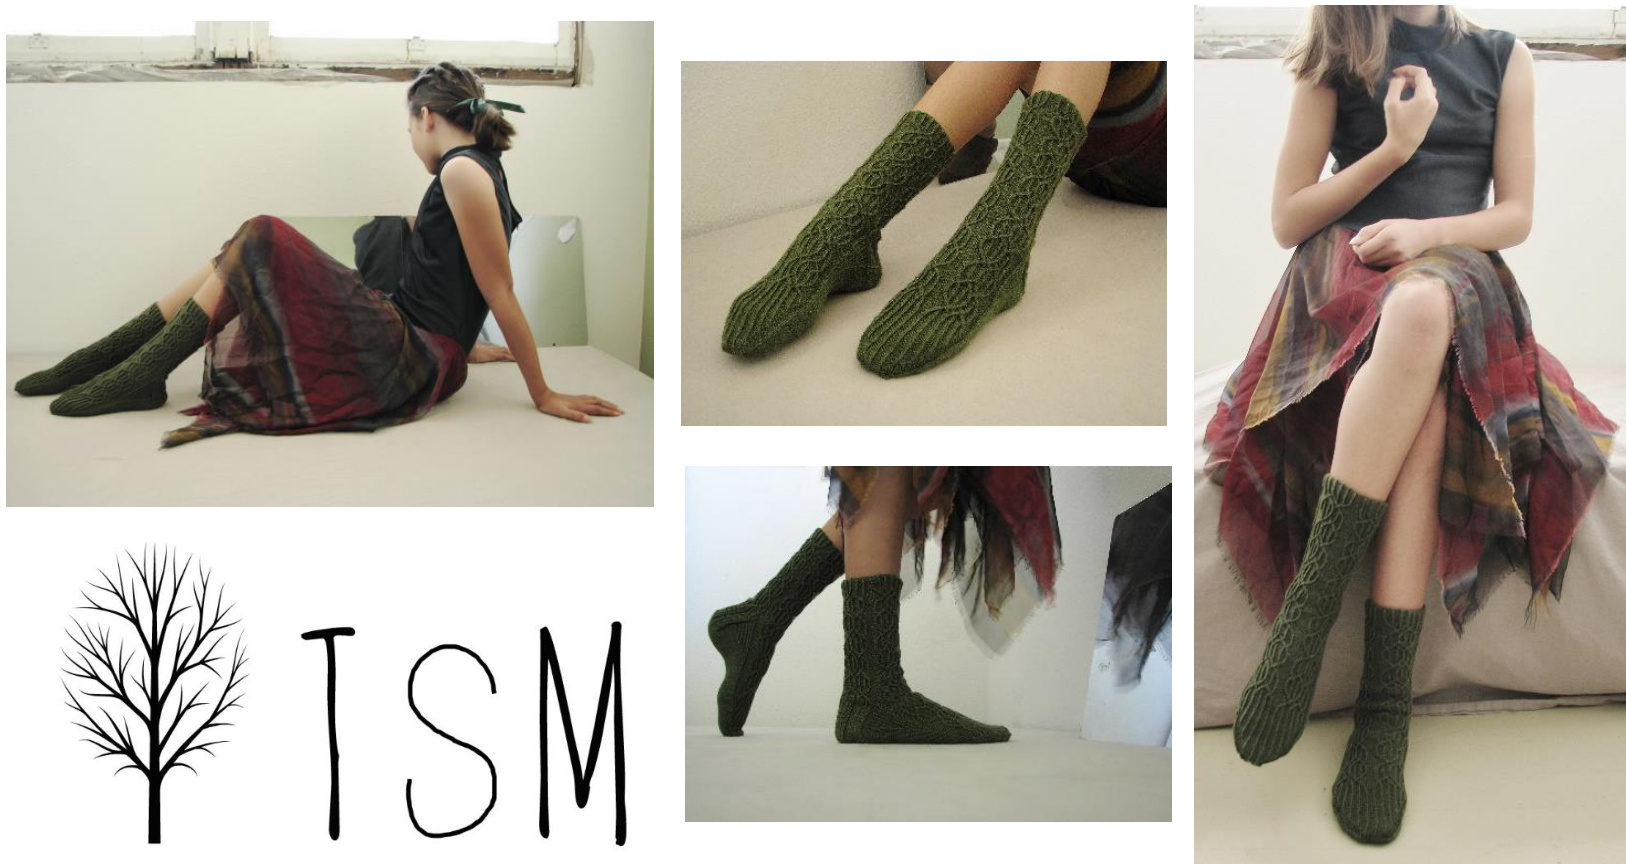
I wasn't happy with the biggest change Peter Jackson's team made with The Desolation of Smaug. I mean, a fabricated love interest for Legolas? What was world coming to? But that was before the movie came out. Along the journey, there were other deviations that weren't included in the book: Dol Guldur,the White Council, even Radagast for goodnessake. But Tauriel was going to be slightly harder to let slide. I was ready to loathe her; to tell my friends that she was terrible; to refrain from buying the Special Extended version just because of her presence in the film. But to my surprise, the opposite happened. Tauriel is inspired by the eponymous elf and architecture in Thranduil's palace. Depending on how you look at the intricacy of the twisted travelling stitch pattern, the socks could be soft and rounded, or hard and angular; just like Tauriel. The gusset stitches and toe feature a twisted stitch ribbing that adds to the downward flow of these socks. They are best knit in a solid or semi-solid color, so that any crazy color patterning doesn't have a jarring effect on your fabric. Tauriel was first published in the Winter 2014 issue of Knitty. S [M, L] FINISHED MEASUREMENTS Foot Circumference: 7[8, 9] inches Foot Cength: Adjustable to fit MATERIALS - Spud and Chloe Fine [80% Wool, 20% Silk; 248 yd/227 m per 65g skein]; color: Green Bean; 2 skeins - - US #1/2.25mm needles for working in the round - - Stitch markers - Cable needle Yarn needle GAUGE 32 sts/44 rounds = 4" in stockinette stitch 38 sts/44 rounds = 4" in pattern stitch PATTERN NOTES - Slip all slipped stitches purlwise with the yarn held to the wrong side of your work. - - Pay close attention to working the toe; on the first section, the instep stitches are the only ones decreased, and then on the second section, both sides (the instep and the sole) are decreased on the same rounds. - - Be sure to check your gauge in the cable pattern as well as in stockinette; if you cable too tightly, it willaffect your sock circumference. -
PATTERN
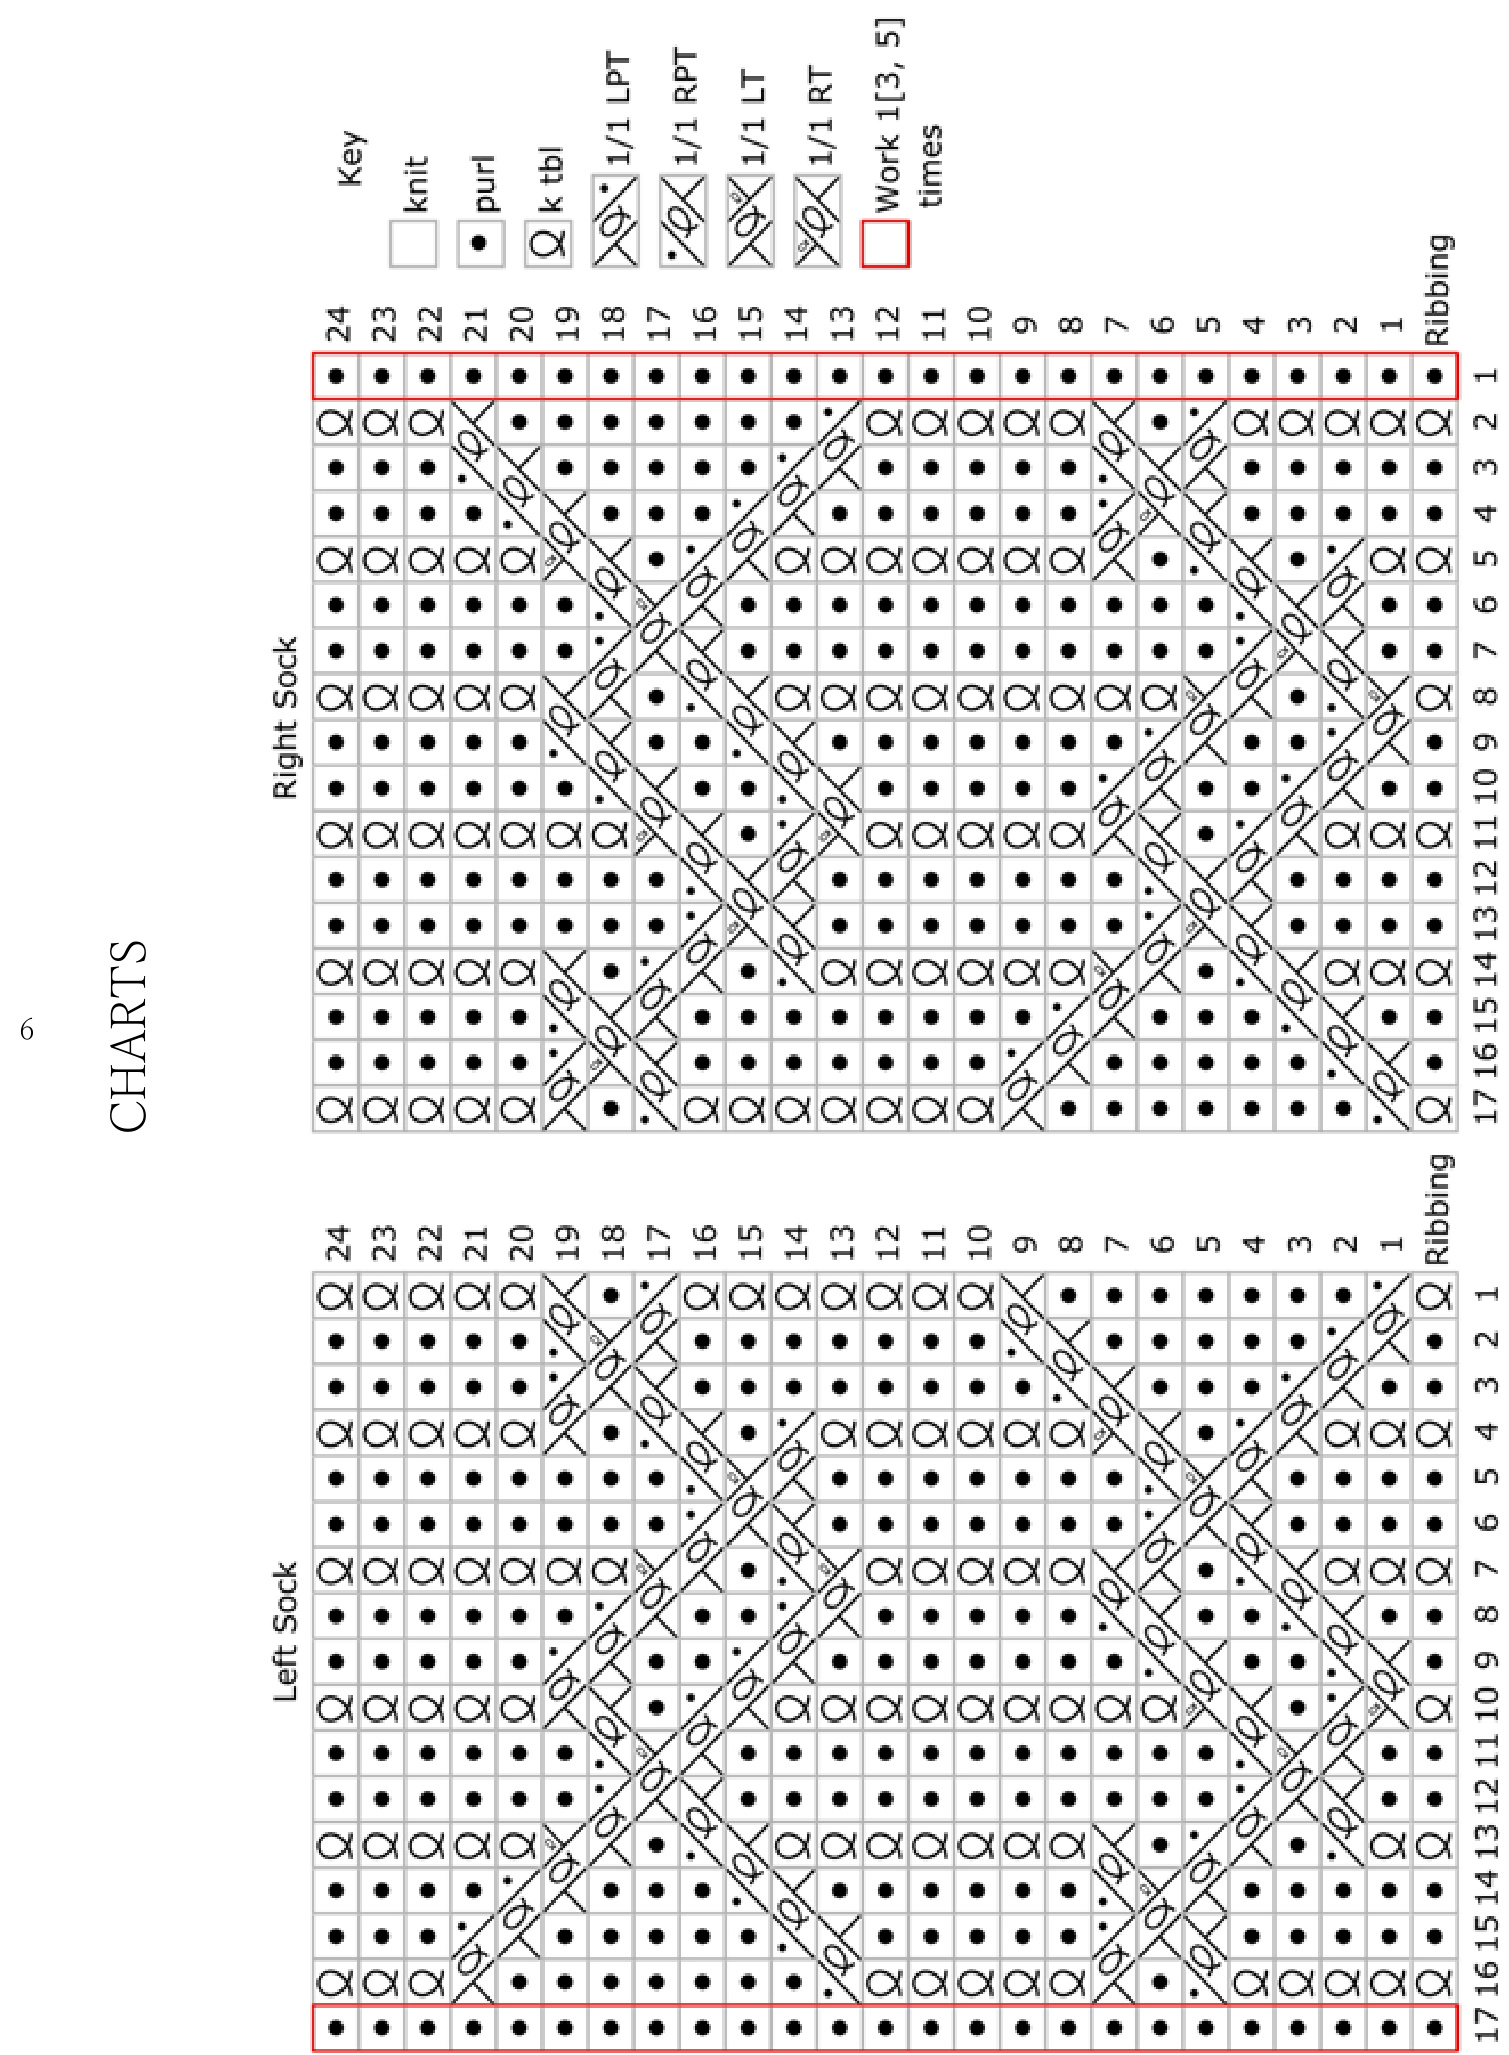
RIGHT SOCK Cuff CO 68 [76, 84] sts. Distribute sts across needle as you prefer and join for working in the round. Note: it's easiest if you arrange your stitches so that each needle has a multiple of 17 [19, 21] sts. Ribbing rnd: Work Ribbing row of Right Chart four times around. Rep this rnd until cuff measures 1 inch from cast on edge. Leg Work Right Chart four times over the round. 3 Work as set, repeating chart Rows 1-24 until you have completed 2 full repeats, and 21 rounds of a third repeat. Heel Set up: P1 [3, 5]. This is the start of the heel flap. Rearrange sts as you prefer. Begin to work back and forth in rows. Row 1, size S only [RS]: K7, p2, k7, pl, k7, p2, k7, turn. Row 1, size M only [RS]: K7, p2, k7, p2tog, pl, k7, p2, k7, turn. Row 1, size L only [RS]: K7, p2, k7, p2tog, p3, k7, p2, k7, turn. There are now 33 [34, 36] sts on heel flap; 35 [41, 47] sts remain on instep. Row 2 [WS]: Sl1, p6, k2, p7, k1 [2, 4], p7, k2, p7, turn. Row 3 [RS]: (Sl1, k1) 3 times, sl1, p2, (k1, sl1) 3 times, k1, p1 [2, 4], (sl, k1) 3 times, sl1, p2, (k1, sl1) 3 times, k1, turn. Rep Rows 2-3 until heel flap measures 2 [2.25, 2.5] inches, or until desired length, ending with a WS row. Row 1 [RS]: Sl1, k17 [18, 19], ssk, k1, turn. Row 2 [WS]: Sl1, p4 [5, 5], p2tog, pl, turn. Row 3 [RS]: S11, k5 [6, 6], ssk, k1, turn. Row 4 [WS]: Sl1, p6 [7, 7], p2tog, pl, turn. Row 5 [RS]: Sl1, k7 [8, 8], ssk, k1, turn. Row 6 [WS]: Sl1, p8 [9, 9], p2tog, p1, turn. Row 7 [RS]: Sl1, k9 [10, 10], ssk, k1, turn. Row 8 [WS]: Sl1, p10 [11, 11], p2tog, p1, turn. Row 9 [RS]: Sl1, k11 [12, 12] ssk, k1, turn. Row 10 [WS]: Sl1, p12 [13, 13] p2tog, p1, turn. Row 11 [RS]: Sl1, k13 [14, 14] ssk, k1, turn. Row 12 [WS]: Sl1, p14 [15, 15] p2tog, p1, turn. Row 13 [RS]: S11, k15 [16, 16] ssk, k1, turn. Row 14 [WS]: Sl1, p16 [17, 17] p2tog pl, turn. 19 [20, -] sts remain.
L size only
Row 15 [RS]: Sl1, k18, ssk, turn. Row 16 [WS]: Sl1, p18, p2tog, turn. 20 sts remain.
Return to working in the round as follows:
Next rnd: Sl1, k8 [9, 9], m1 [-, -]; pm for center of sole, k10 [10, 11]. Pick up and knit 1 st in every chain selvedge st and m1 in the corner between heel flap and instep. Over instep, work row 22 of chart 2 times, p1 [3, 5]. In the corner between the heel flap and instep, ml, pick up and knit 1 st in every chain selvedge stitch. K across 20 [20] 20] heel sts, and knit across the sole to the start of the instep. This is the new start of round. Next rnd: Work row 23 of chart 2 times, p1 [3, 5]. (K1 tbl, p1) to 13 [15, 17] sts before center of sole marker, noting which stitch that you left off with (See Notes). K1, pm. K to the center of sole marker. K13 [15, 17], pm, k1, and work in 1x1 twisted stitch ribbing to the end of the round, beginning with the same stitch you left off with on previous ribbed section. Note: After this round, you may remove the center of sole marker. It is not needed any more. Rnd 1: Work next row of chart 2 times, p1 [3, 5]. Work sts as set in ribbing to 2 sts before marker, k2tog. Knit to the next marker, sm, ssk, work sts as set in ribbing to the end of rnd. Rnd 2: Work next row of chart 2 times, p1 [3, 5]. Work sts as set in ribbing to 1 st before marker, k1, sm. K to the next marker, sm, kl, work sts as set in ribbing to the end of the rnd. Repeat these 2 rnds until there is only 1 st between both markers and the instep. 28 [32, 36] sts remain on sole; 35 [41, 47] sts on instep- 63 [73, 83] sts total. Important Note: Read this next instruction fully before you proceed. Continue even as set, until the foot measures 2.5 [2.75, 3] inches less than desired length. You need to end the foot patterning on chart row 9, 12, 21 or 24. Measure the foot as you proceed: if you're getting close to the desired length when you hit one of those rows, stop and work even in the ribbing pattern as set until desired length is achieved.
Toe
Rnd 1: P- [1, 1], p2tog, work next 14 [16, 18] sts as set in ribbing pattern, pl [p2tog, p3tog], work sts as set in ribbing to 2 [3, 3] sts before the end of the instep, ssp, p- [1, 1]; k to end of rnd. 61 [70, 79] sts - 33 [38, 43] on instep, 28 [32, 36] onsole. Rnd 2: Work sts as set around. Rnd 3: P- [1, 1], p2tog work sts as set in ribbing to the last 2 [3, 3] instep sts, ssp p- [1, 1]. K to end of rnd. 2 sts decreased. Foot round: Work across instep as set; k to end of round. Rep rnds 2 and 3 1 [2, 2] more times, until 29 [32, 37] sts remain on the instep. 57 [64, 73] sts total. Next rnd: P- [-, 1], p2tog, work sts as set to the end of the instep sts, k to the end of the rnd. 56[-, 72] sts.
S and L sizes only
All sizes: Rnd 1: Work sts as set around. Rnd 2: P- [1, 1], p2tog, work sts as set in ribbing to the last 2[3, 3] instep sts, ssp, p- [1, 1]. Ssk, k to the last 2 sts, k2tog. 4stsdecreased. Foot Rep Rnds 1 and 2 8 [10, 11] more times, until 20 [20, 24], sts remain; 10 [10, 12] each on instep and sole. Work rnd 2 once more. 16 [16, 20] sts remain; 8 [8, 10] each on instep and sole. Cuff CO 68 [76, 84] sts. Distribute sts across needle as you prefer and join for working in the round. Note: it's easiest if you arrange your stitches so that each needle has a multiple of 17 [19, 21] sts. Ribbing rnd: Work Ribbing row of Left Chart four times around. Rep this rnd until cuff measures 1 inch from cast on edge. Work Left Chart four times over the round. Work as set, repeating chart Rows 1-24 until you have completed 2 full repeats, and 21 rounds of a third repeat Heel Work as for Right Sock, starting at Row 1. (Do NOT work the Setup.) Heel Turn Work as for Right Sock. Gussets Return to working in the round as follows: Next rnd: Sl1, k8 [9, 9], m1 [-, 1]; pm for center of sole, k10 [10, 11]. Pick up and knit 1 st in every chain selvedge st and m1 in the corner between heel flap and instep. Over instep, p1 [3, 5], work row 22 of chart 2 times. In the corner between the heel flap and instep, m1, pick up and knit 1 st in every chain selvedge stitch. K10 [10, 11], sm, k10 [10, 11] and knit across the sole to the instep. This is the new start of round. Next rnd: P1 [3, 5], work row 23 of chart 2 times over the instep. (K1 tbl, p1) to 13 [15, 17] sts before center of sole marker, noting which stitch that you left off with (See Notes). K1, pm. K to the center of sole marker. K13 [15, 17], pm, k1, and work in 1x1 twisted stitch ribbing to the end of the round, beginning with the same stitch you left off with on previous ribbed section. Note: After this round, remove the center of sole marker. It is not needed any more. Rnd 1: P1 [3, 5], work next row of chart 2 times. Work sts as set in ribbing to 2 sts before marker, k2tog. Knit to the next marker, sm, ssk, work sts as set in ribbing to the end of rnd. Rnd 2: P1 [3, 5], work next row of chart 2 times. Work sts as set in ribbing to 1 st before marker, k1, sm. K to the next marker, sm, k1, work sts as set in ribbing to the end of the rnd. Repeat these 2 rnds until there is only 1 st between both markers and the instep. 28 [32, 36] sts remain on sole. 35 [41, 47] sts on instep - 63 [73, 83] sts total. Foot Work as for Right Sock. Toe Work as for Right Sock.
FINISHING
With the Kitchener stitch, graft toe sts together and weave in ends. Block as desired.
pattern, photography, and charts @ 2016 Josiah Bain - for personal use only - jmbain.wordpress.com - ravelry.com/designers/josiah-bair
ACKNOWLEDGEMENTS
This was my second pattern in the acclaimed online magazine, Knitty. After it was published in December of 2014, it became an immediate hit with geeky sock knitters worldwide. But while the designing was done alone, the rest I couldn't dream of doing by myself. When I was just starting out with photography and needed to take every photo three times, my little sister Cora modeled patiently for a few hours. The team at Knitty was so kind and generous with me; Amy Singer thought I was “awesome,” and Kate Atherley gave me so much insight as to how a pattern should be written. I've met so many people because of this pattern, like my now-tech-ditor, Anna of Aersknits. I'd like to thank them for their support and encouragement. If you'd like more TSM patterns, you can find me on Ravelry and Instagram as mrjosiahbain, and on my blog at jmbain.wordpress.com.


