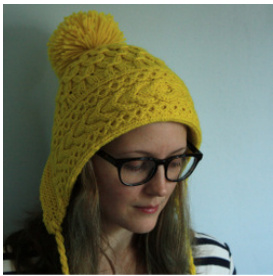
Undercurrent Socks + Collar // February 2013 by Lacey Volk // Volkstricken
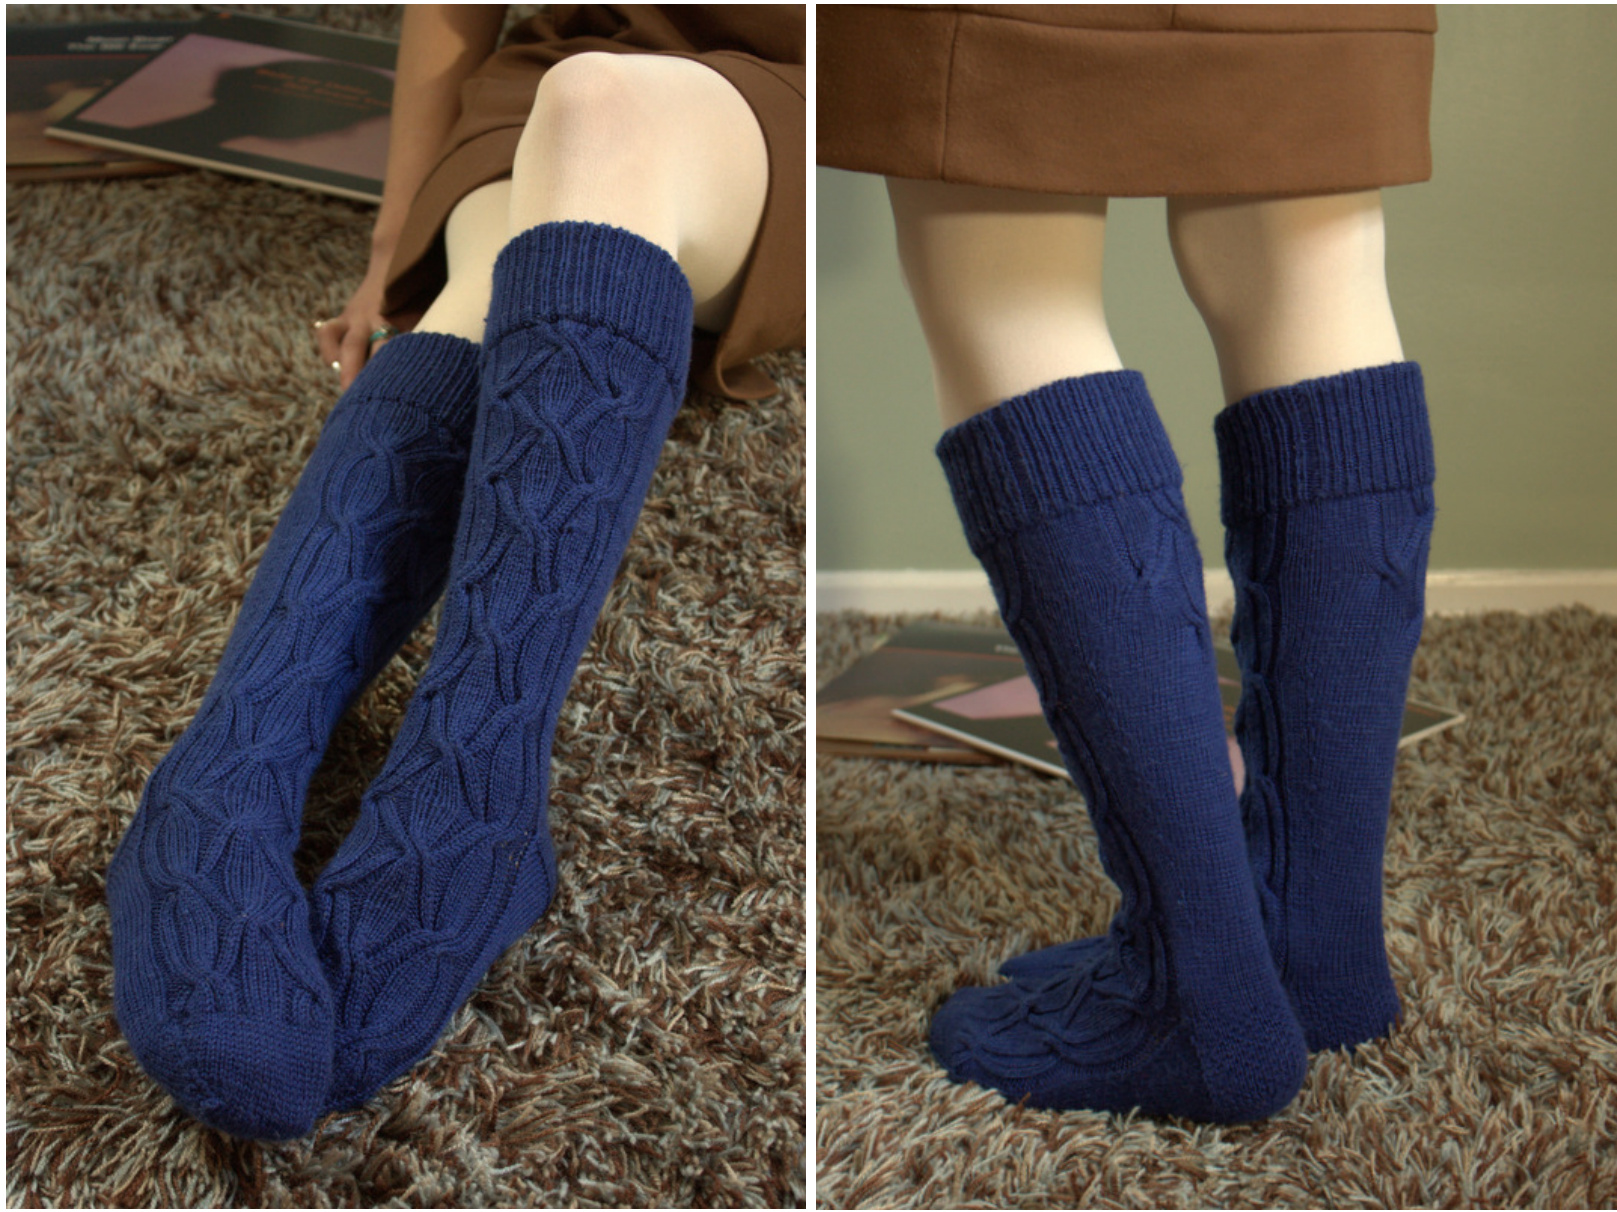
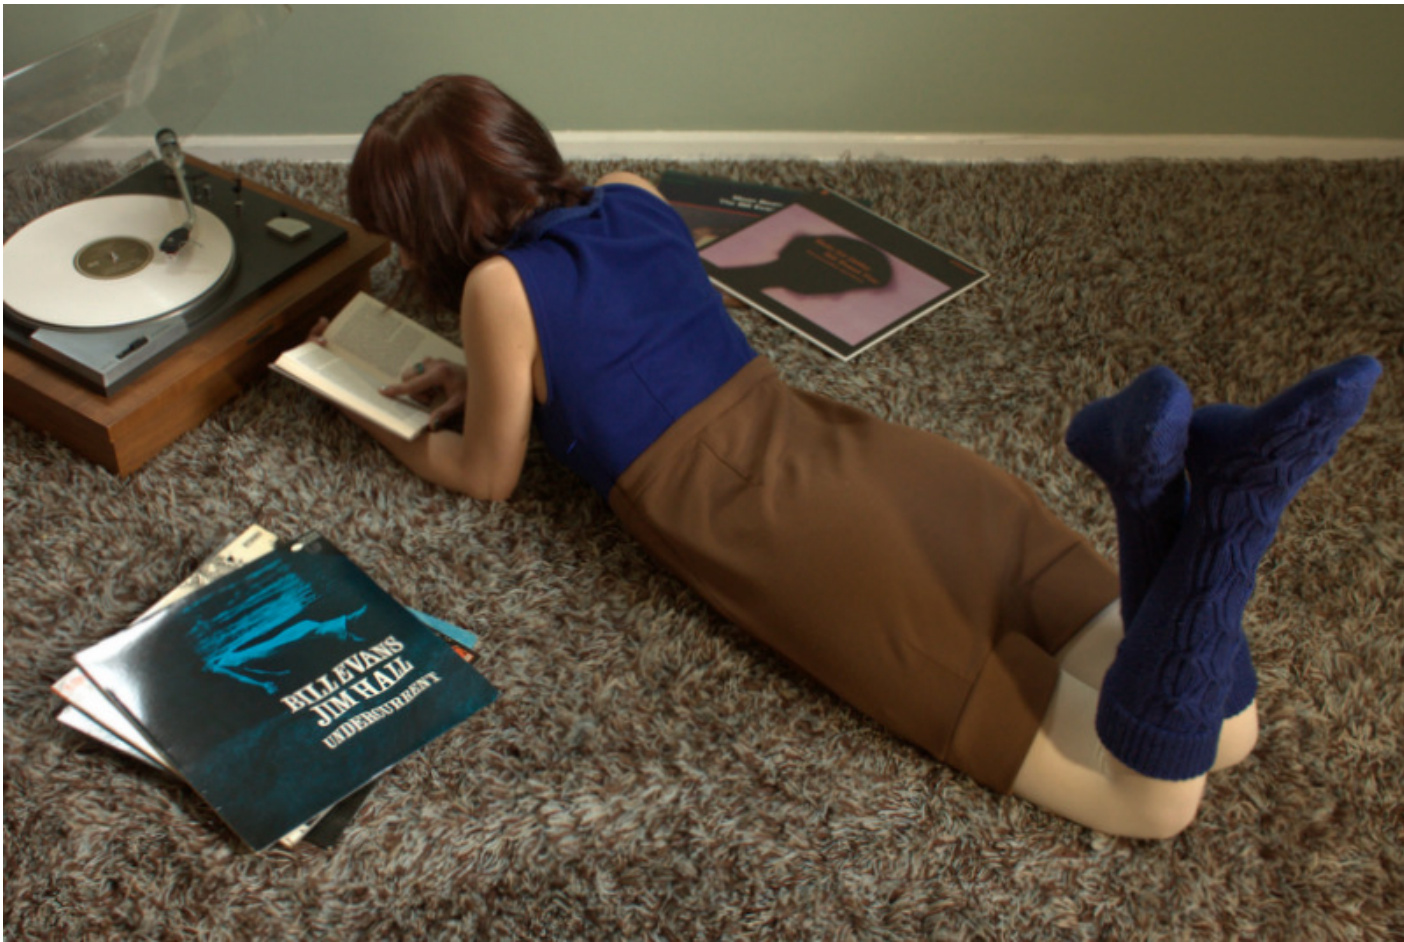
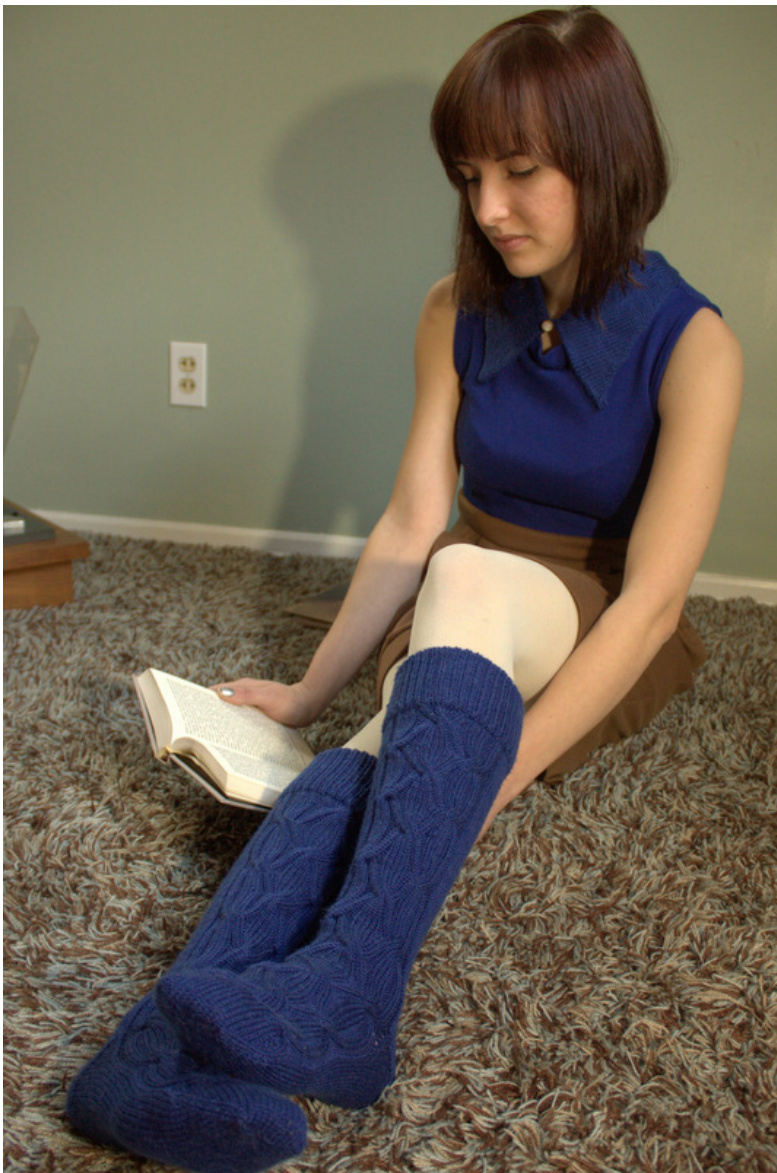
These undulating knee socks were imagined and knit to the soundtrack of the 1963 Bill Evans and Jim Hall album Undercurrent, played on repeat. The cable pattern seemed a fitting match for the effortless and nuanced way their piano and guitar intertwine, and the knee-high length adds an appropriately retro vibe. The cuffs are worked in 1x1 rib, knit extra long and then doubled over for a truly heirloom quality finish that will stand the test of time. The pattern also includes a standalone collar, which is quickly worked up from your leftover yarn. The simple but polished finished appearance is due to knitting on the bias in the round (which means no edges to curl up), with a few short rows added to hug the neckline. Topped off with a single button, it's a quirky way to add a bit of warmth and completethevintagelook.
SKILLS NEEDED:
SIZING: SocKs: One size, with custom height and foot length. Pattern will stretch to accommodate 11 - 14" calf circumference, and 7 - 9" foot and ankle circumference COLLAR: One size, suitable for neck circumference 11" - 13" YARN: 2 skeins of Cascade Heritage Silk [85% Merino Superwash/15% Mulberry Silk; 437 yards per 100g skein], or 880 yards of comparable sock-weight yarn. Sample shown in color 5603 Marine. GAUGE: SOcKS: 32 sts and 43 rows = 4" in stockinette COLLAR: 24 sts and 36 rows = 4" in stockinette
RECOMMENDEDNEEDLESIZES:
SOcKs: US 2 (2.5mm) circular, recommended 40" or longer for Magic Loop COLLAR: US 5 (3.75mm) circular, recommended 40" or longer for Magic Loop For the collar only, instructions are also provided for DPNs.
NOTIONS:
1 small button for collar Waste yarn for provisional cast on Cableneedle Additional Us 2 (2.5mm) or smaller needle for picking up provisional stitches 2 stitch markers (if using Magic Loop for collar)
SOCK1CHARTS
Stitch Key
| Purl Knit | 12stRightCablewithPurls Slip6ststocableneedleandholdinfront.K2,P2,K2frommain,thenK2,P2,K2fromcablenee 12stLeftCablewithPurls Slip6ststocableneedleandholdinback.K2,P2,K2frommain,thenK2,P2,K2fromcableneec | |||||||||||||||||||||||||||||||||||||||||
| Sock 1 Front | ||||||||||||||||||||||||||||||||||||||||||
| 24 23 | ||||||||||||||||||||||||||||||||||||||||||
| 22 21 | ||||||||||||||||||||||||||||||||||||||||||
| 20 19 | ||||||||||||||||||||||||||||||||||||||||||
| 18 17 | ||||||||||||||||||||||||||||||||||||||||||
| 16 | ||||||||||||||||||||||||||||||||||||||||||
| 15 14 13 | ||||||||||||||||||||||||||||||||||||||||||
| 12 11 | ||||||||||||||||||||||||||||||||||||||||||
| 10 6 | ||||||||||||||||||||||||||||||||||||||||||
| 7 4 2 32 31 30 29 28 27 26 25 24 23 22 21 20 19 18 17 16 15 14 13 12 11 10 6 8 7 5 4 3 2 | ||||||||||||||||||||||||||||||||||||||||||
| Sock 1 Back | ||||||||||||||||||||||||||||||||||||||||||
SOCK2 CHARTS
Stitch Key
| und | 12stRightCablewithPurls | 12stLeftCablewithPurls | Slip6ststocableneedleandholdinfront.K2,P2,K2frommain,thenK2,P2,K2fromcablenee | ||||||||||||||||||
| Knit | Slip6ststocableneedleandholdinback.K2,P2,K2frommain,thenK2,P2,K2fromcableneec | ||||||||||||||||||||
| Sock2Front | 24 | ||||||||||||||||||||
| 23 | |||||||||||||||||||||
| 22 | |||||||||||||||||||||
| 21 | |||||||||||||||||||||
| 20 | |||||||||||||||||||||
| 19 | |||||||||||||||||||||
| 18 17 | |||||||||||||||||||||
| 16 | |||||||||||||||||||||
| 15 | |||||||||||||||||||||
| 14 | |||||||||||||||||||||
| 13 | |||||||||||||||||||||
| 12 | |||||||||||||||||||||
| 11 | |||||||||||||||||||||
| 10 | |||||||||||||||||||||
| 6 8 | |||||||||||||||||||||
| 7 | |||||||||||||||||||||
| 6 | |||||||||||||||||||||
| 2 32 31 30 29 28 27 26 25 24 23 22 21 20 19 18 17 16 15 14 13 12 11 10 6 7 5 4 3 2 1 | |||||||||||||||||||||
| Sock2Back |
SOCK PATTERN:
SOCK CUFF:
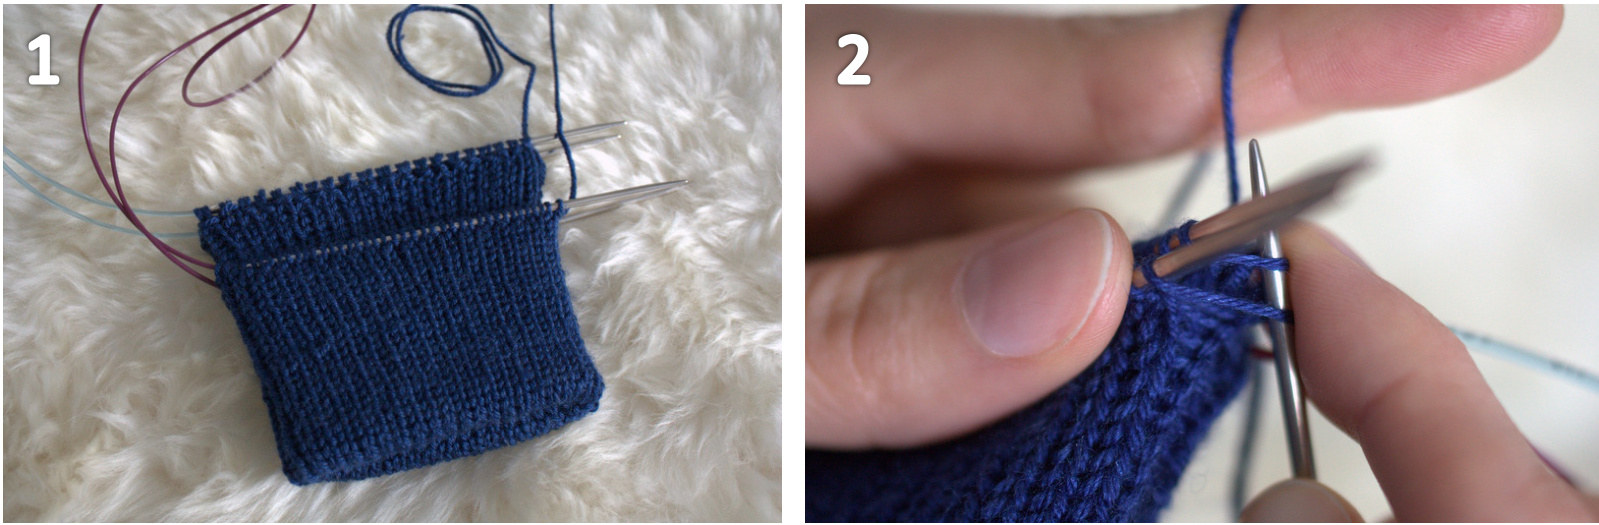
Using provisional cast on, C0 80 sts. Knit 60 rows in 1x1 ribbing. 1: Transfer provisional cast-on stitches to the spare Us 2 needle and fold this edge up inside the cuff, so the needle holding the cast-on row is now above the last ribbed row. 2: Close the cuff by inserting the working needle through the first stitch on both needles knit wise, then knitting them together as one stitch. Continue to k2tog in this way for a full round, until the cuff is completely closed. Yes, this is an incredibly boring amount of 1x1 rib - but I promise you, the final result will be so worth it! As a continental style knitter, I used this patternas anexcusetolearnhowto do the Norwegian purl, also known as purling with the yarn in back. I found this video on knittinghelp.com to be the most clear, and now that l confidently know this method, I may honestly never go back to purling any other way.
SOCK LEG:
INCREASE ROUND: K5, m1, \*K10, m1\* until 5 stitches are left, K5. 88 stitches. Divide for Magic Loop with 44 stitches on each side.
BEGIN CHARTS:
Note that you will only work the Back chart for one repeat, but will continue to repeat the Front chart for the entire length ofthe sock. Work front 44 stitches as charted in Left Sock Front, and back 44 stitches as in Left Sock Back. Continue in pattern as established until Round 32 has been completed. m Round 33 onward: Work front stitches as charted and knit across all back stitche:
CALF TO ANKLE DECREASES:
Decreases should be worked on every 6th row as follows: Round 43: Work front stitches as charted. On back stitches: sl2k, knit until 2 stitches remain, k2tog. Rounds 44 - 48: Knit in pattern as established (charted stitches across front, knit all stitches across back) Continue to decrease every 6th round until you have a total of 66 stitches. Reorient your magic loop so that you have 36 stitches on the front loop and 30 stitches on the back. This sets you up for working the heel flap across just 30 stitches Iater. Continue to work in pattern until desired length to reach the top of the heel. It is best to end with either Round 1 or Round 13, midway between cable rows.
HEEL FLAP:
The heel flap will be worked across 30 stitches. Row 1 [Rs]: \* SL 1, K 1\*, repeat across, ending with K 1. Row 2 [ws] and all even rows: SL 1, purl across row. Row 3: SL 2, \* K 1, SL 1,\* repeat across row ending with K 2. Row4:RepeatRow 2. Repeat rows 1-4 until you have completed 30 rows. You will have 15 slipped stitches on each side of your heel flap. TURNHEEL: Foundation row [RS]: K20, SKP, turn Row 1 [Ws]: Sl1, P10, p2tog, turn Row 2 [RS]: SI1, K10, SKP, turn Repeat Rows 1 and 2 until all the stitches from the heel flap have been worked. When complete, RS will be facing and you will have 12 stitches remaining.
GUSSET:
Sl1 and k11 across heel. Pick up 15 stitches along the side of the heel flap, pm, work front as charted, pm, and pick up 15 more stitches. 78 stitches total.
DECREASE ROUNDS:
Round 1: K to 2 st before marker, k2 tog, sl m, work front as charted, sl m, ssk, k to end of round. Round 2: K to marker, sl m, work front as charted, sl m, k to end of round. Repeat a total of 6 times until 66 stitches remain. Knit in pattern as established until 1.5 inches shorter than desired foot length.
TOE:
Foundation Round: Decrease across the cable pattern as follows: p2tog, k2, p2tog, k4, p2 tog, k2, p2, k4, p2, k2, p2tog, k4, p2tog, k2,p2tog. Knit to end of round.60 stitches remain. Round 1: Ssk, k to last 2 stitches on front needle, k2tog. Ssk, k to last 2 stitches on back needle, k2tog.
Round 2: Knit.
Repeat rounds 1 and 2 until 28 stitches remain, 14 on each needle. Use kitchener stitch to graft the live stitches closed. Weave in all ends and block as desired.
SECOND SOCK:
Knit the second sock identical to the first, substituting Right Sock Front and Back charts.

COLLAR PATTERN:
The collar is knit from the center back outward, on the bias, with short rows added for shaping. Instructions provided for both DPNs and Magic Loop.
CENTER BACK:
CO 6 stitches using waste yarn, and knit a short i-cord (1 inch or less). Round 1: Switch to MC and K 1 round plain, as if continuing the i-cord. Round 2: \*K1, m1, k1, m1, k1, m1\* repeat to end of round. 12 stitches.
IF USING DPNs:
Divide on 4 DPNs so that each needle has 3 sts. Round 3: K1 round plain. Round 4: \*k1, m1, k1, m1, k1\*, repeat \* to \* to end of round. Round 5: K1 round plain. Round 6: \*k1, m1, k to 1 stitch before end of DPN, m1, k1\*, repeat \* to \* to end of round. Round 7: K1 round plain. Repeat rounds 6 and 7 until you have 25 sts on each DPN, 100 sts total.
IF USING MAGIC LOOP:
Divide on circular for Magic Loop so that each half has 6 sts. Round 3: K1 round plain. Round 4: \*k1, m1, k1, m1, k1, pm, k1, m1, k1, m1, k1\*, repeat \* to \* to end of round. Round 5: K1 round plain. Round 6: \*k1, m1, k to 1 stitch before marker, m1, k1, slip marker, k1, m1, kto 1 stitch before end of this half of the loop, m1, k1 \*, repeat \* to \* to end of round. Round 7: K1 round plain. Repeat rounds 6 and 7 until you have 50 sts on each half of your loop, 100 sts total.
BOTHMETHODSCONTINUE:
Slip next 50 sts to waste yarn, and join remaining 50 for working in the round. If continuing using Magic Loop, you should have 25 sts on each side. If using DPNs, you should have 12 sts on first and third needles, and 13 stitches on second and fourthneedles.
COLLAR BODY:
Round 1: Ssk, k22, m1, k1. K1, m1, k22, k2tog Round 2:Knit Repeat rounds 1 and 2 a total of 4 times, then repeat Round 1 once more.
SHORT ROW SHAPING ROW:
Knit 40 stitches, create a Shadow Wrap stitch, and turn. Purl 30 stitches, create a Shadow Wrap stitch, and turn. Knit until end of round, being sure to knit the twinned Shadow Wrap stitch as one. \*Repeat COLLAR BODY Rounds 1 and 2 a total of 4 times, then work Round 1 once more. Work short row shaping as above.\* Repeat from \* to \* twice more, for a total of 4 short row sections. Since you are knitting on the bias, you'll notice that one edge of the collar is longer than the other. Repeat rounds 1 and 2 until the shorter edge measures 8 inches. Using Kitchener stitch, graft the live stitches closed to finish the first half of your collar. Weave in ends before moving on to the second half. My preferred method of short-row shaping is the Shadow Wrap, explained in this blog post? from Alice at Socktopus.You may substitute with a traditional wrapand-turn method if you prefer. To do so, wrap and turn everytime the instructions indicate to create a Shadow Wrap stitch, then pick up and knit the wraps on the following round.
SECOND HALF:
Place stitches held by waste yarn back onto needles, and orient them so that you'll begin knitting on the shorter edge. Follow cOLLAR BODY instructions again for 8", until short side measures 16" total. Leave one stitch unworked in the final round. Do not graft closed.
BUTTON LOOP:
Using US #2 (2.5mm) needles, knit the last stitch of your last round and the first stitch of the next round. While holding all remaining stitches on your larger needles, knit a 1 inch i-cord (or longer for a larger buttonhole) using these 2 stitches. Slip the i-cord stitches back onto their original needles, one to the front and one to the back. Use Kitchener stitch to graft the live stitches closed. Weave in all ends and block as desired. Pattern and images copyright2013 LaceyVolk. This pattern is sold for personal use only and may not be reproduced. Itemsmadeusingthispatternmaynotbesold.
CONTACT: lacey.volk@gmail.com http://www.volkstricken.com


