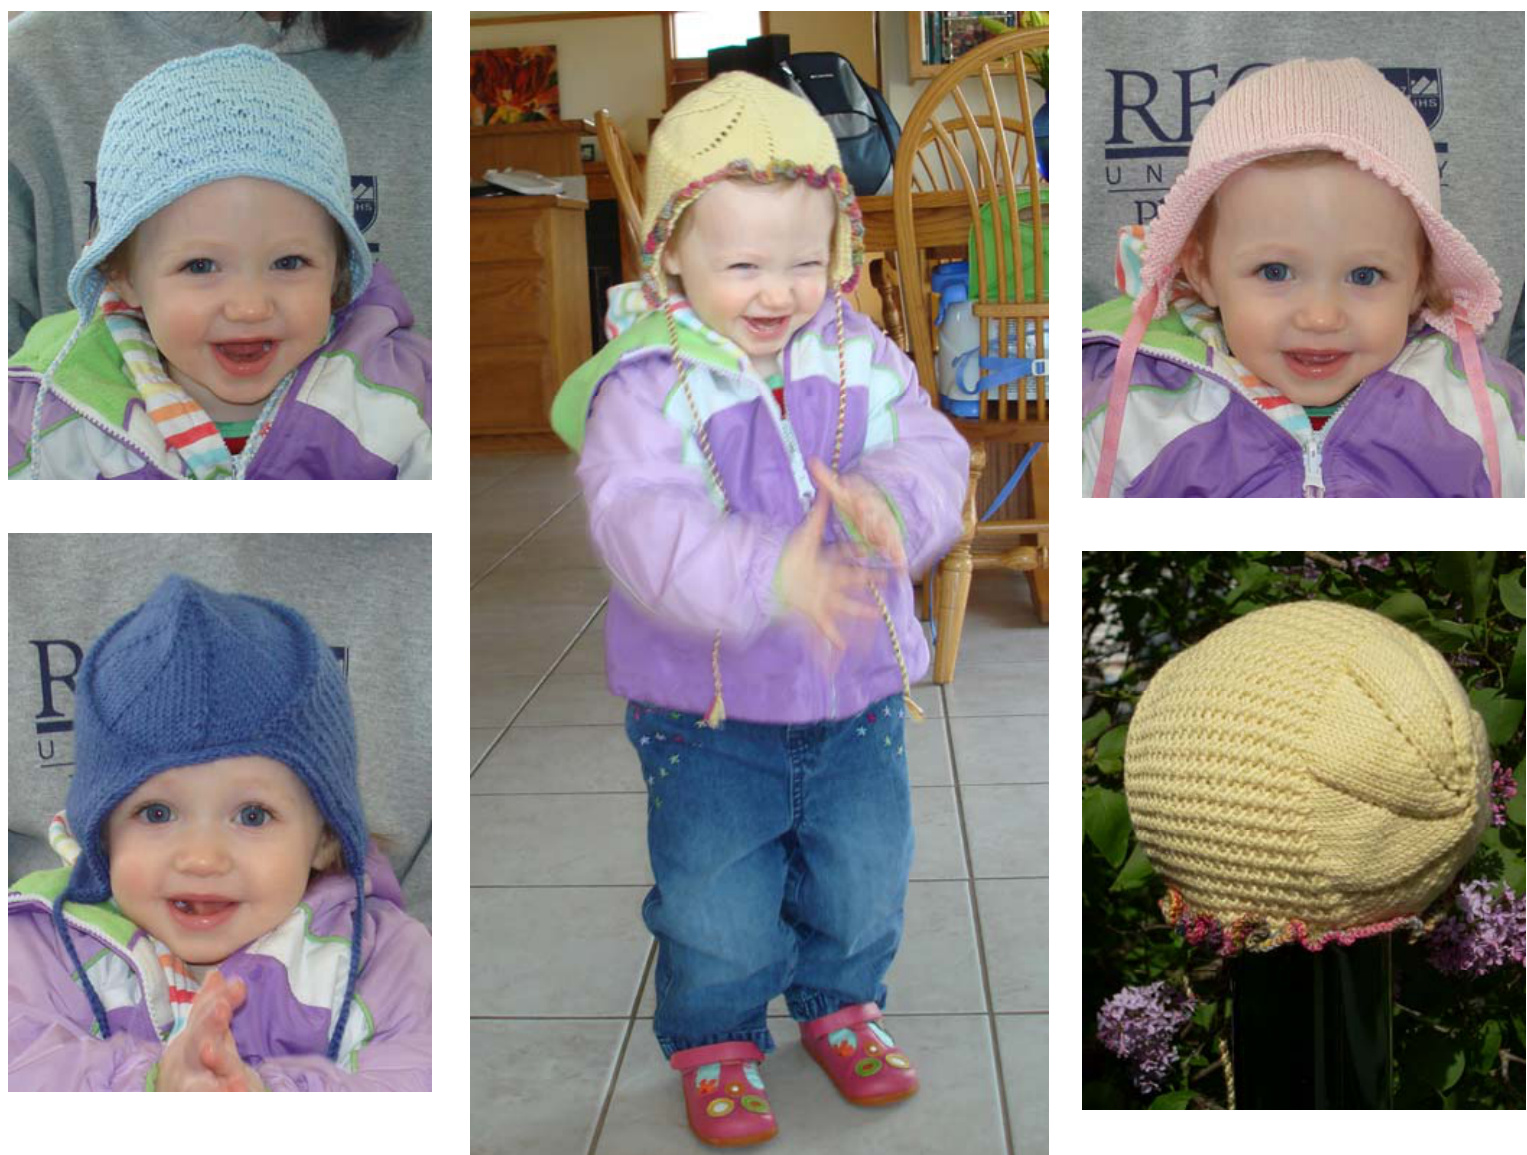
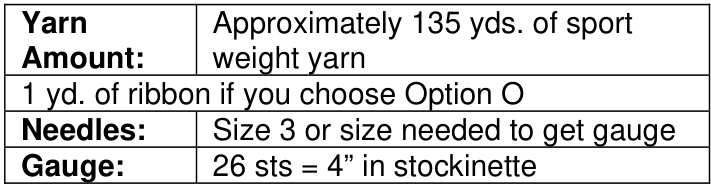
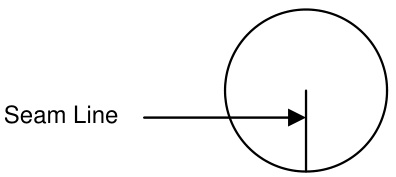
Is little Ellie laughing because she has some of her hats on upside down and backwards? For the pink hat, I chose Options A, D, F, J, and L. For the light blue hat, I chose Options A,C, E, I, and K. For the dark blue hat, I chose Option B, C, H, I, K, and N. For the yellow hat, I chose Options A, D, G, I, M, and O. A Classic Baby Bonnet with Lots of Options Advanced Beginner Skill Level One Size to Fit Infants up to Age 1 Sport Weight Yarn
PEEKABOO?
design by Amy E. Anderson I have a confession to make --Ilove babies. Not kids, just babies. And here's something I've noticed about babies.. people keep having them. I've also noticed that, when people know you're a knitter, they expect handknit baby gifts. This design was inspired by those classic baby bonnets that tie under the chin and cover the ears and neck and even those chubby cheeks. I've broken the pattern into steps and given you lots of options along the way. By my calculation, there are 192 possible combinations, so you can make dozens of hats without ever making 2 that are exactly alike. Directions are given for one size that wilfi infants up to about age 1. If you'd like to make a bonnet for a slightly older child, use K weight yarn with size 4 needles.Follow the same directions,but in Step 3,make the main body of the hat about $^{1\!}/2^{\ast}$ longer. The piece is worked flat, starting at the center back and working toward the front. There will be a small seam to sew up at the back when you're finished.
Some Recommended Yarns:
I skein of: Baby Cashmerino by Debbie Bliss, Hacho by Marisol, Paton's Grace, Frog Tree Pima Silk, Classic One Fifty by Classic Elite, or Ultra Alpaca Light by Berroco.
STEP 1 - Working The Back of the Hat: Choose Option A or Option B.
Option A - With Openwork Eyelets in a Pinwheel Cast on 8 sts, leaving a $12"$ tail to sew up back seam. Row 1 and all wS Rows: Purl. Row 2: K1, \*yo, $\mathsf{K}\mathsf{1}^{\star}$ rep \* - \* to end. (15 sts total) Row 4: K1, \*yo, ${\sf K}{\sf{2}}^{\star}$ rep \* - \* to end. (22 sts total) Row 6: K1, \*yo, ${\sf K3^{\star}}$ rep \* - \* to end. (29 sts total) Row 8: K1, \*yo, $\mathsf{K4^{\star}}$ rep \* - \* to end. (36 sts total) Row 10: K1, \*yo, ${\sf K5^{\star}}$ rep \* - \* to end. (43 sts total) Row 12: K1, \*yo, $\mathsf{K}\mathsf{G}^{\star}$ rep \* - \* to end. (50 sts total) Row 14: K1, \*yo, $\mathsf{K}7^{\star}$ rep \* - \* to end. (57 sts total) Row 16: K1, \*yo, ${\mathsf{K}}{\mathsf{B}}^{\star}$ rep \* - \* to end. (64 sts total) Row 18: K1, \*yo, ${\sf K9^{\star}}$ rep \* - \* to end. (71 sts total) Row 20: K1, \*yo, $\mathsf{K}10^{\star}$ rep \* - \* to end. (78 sts total) Row 22: K1, \*yo, K11\* rep \* - \* to end. (85 sts total) Row 24: K1, \*yo, $\mathsf{K}12^{\star}$ rep \* - \*to end. (92 sts total) Stop after Row 24 and go to Step Two.
Option B - Solid Back
Work the same as Option A, except that every time the instructions say “yo", do a Make 1 instead. There are several techniques for a Make 1 -I used a backward loop. Go to Step 2.
STEP 2 - Working the Transition from the back to the main body of the hat. Choose Option C or Option D.
Option C - Creates a distinct fold line Rows 25 (WS) and 26 (RS): BO 6 sts, purl to end. Row 27 (Ws) Knit. Go to Step 3.
Option D - A smooth transition with no fold line.
Row 25 (WS): BO 6 sts, purl to end. Row 26 (RS): BO 6 sts, knit to end. Row 27 (WS): Purl. Go to Step 3. STEP 3 - Working the Main Body of the Hat. Choose Option E, F, G, or H.
Option E - Basketweave Texture
Note: If you chose Option D above, start on Row 3 for Basketweave. Row 1 (RS): Knit Row 2 (WS): Purl Row 3: \*K2, $\mathsf{P}2^{\star}$ , repeat \* - \* to end. Row 4: $^{\star}\mathsf{K}2$ , $\mathsf{P}2^{\star}$ , repeat \* - \* to end. Row 5: Knit Row 6: Purl Row 7: $^{\star}\mathsf{P}2$ , ${\sf K}{\sf{2}}^{\star}$ , repeat \* - \* to end. Row 8: $^{\star}\mathsf{P}2$ , ${\sf K}{\sf{2}}^{\star}$ , repeat \* - \* to end. Repeat Rows 1-8 for pattern. Continue until main body of hat measures $4\%^{\ast}$ , end so next row worked will have RS facing. Go to Step 4
Option F - Stockinette Stitch (Smooth)
Row 1 (RS): Knit Row 2 (WS):Purl Repeat Rows $\L1-2$ for pattern. Continue until main body of hat measures $4\%^{\ast}$ , end so next row worked will have RS facing. Go to Step 4.
PEEKABOO - Page Two
Step 3 (continued from Page One):
Option G - Rice Stitch (Pebbly Texture)
STEP 6 - Working the Lower Edging Choose Option K, L, or M.
Row 1 (RS): $^{\star}\mathsf{P}\,1$ , K1 in back of ${\boldsymbol{\mathsf{s}}}{\boldsymbol{\mathsf{t}}}^{\star}$ , rep \*-\* to end. Row 2 (WS): Knit Repeat Rows 1-2 for pattern. Continue until main body of hat measures $4\%"$ , end so next row worked will have RS facing. Go to Step 4
Option K - Garter Stitch & I-Cord Edging
With RS facing, PU 27 sts along lower left edge, PU 11 sts along lower back edge, PU 27 sts along lower right edge. (65 sts total). Knit 3 rows. Then, work l-Cord bind off same as in Option I. (DO NOT go down to a smaller needle) Go to Step 7.
Option H - Broken Rib (Ribbed Texture)
Row 1 (RS): $^{\star}\mathsf{K}\mathsf{1}$ , $\mathsf{P}\mathsf{1}^{\star}$ , repeat \* - \* to end. Row 2 (WS): Purl Repeat Rows 1-2 for pattern. Continue until main body of hat measures $4\%"$ , end so next row worked will have RS facing. Go to Step 4. STEP 4 - Working the Front Edging. Choose Option I or Option J Option I- I-Cord Bind Off Note: If you want this edging to snug in, go down one or two needle sizes.
Option L - A Flared Skirt with Eyelets
PU 65 sts along the lower edge, same as in Option K. Row 1 and all wS Rows: Knit Row 2: K6 \*yo, ${\mathsf{K}}{\mathsf{B}}^{\star}$ rep \* - \* ending yo, K3. Row 4: K6 \*yo, ${\sf K9^{\star}}$ rep \* - \* ending yo, K4. Row 6: K6 \*yo, $\mathsf{K}10^{\star}$ rep \* - \* ending yo, K5. Row 8: K6 \*yo, $\mathsf{K}1\,\mathsf{1}\,^{\star}$ rep \* - \* ending yo, K6. Row 9: Knit across, binding off all sts. Go to Step 7.
Option M - A Ruffled Edging
Note: If you choose this option, you will need about 20 yards more yarn than specified. If you like, the ruffle can be worked in a contrasting color. Cast on 2 new sts. Work as follows: $^{\star}\mathsf{K}2$ ,K2tog through the back of the loops, replace the 3 sts onto the Left needle\* rep \* - \* until only 3 sts remain. Cut yarn, draw through the remaining 3 sts and tie off Go to Step 5. PU 65 sts along the lower edge, same as in Option K. Row 1: Knit into the front and back of every stitch. (130 sts total) Row 2: Same as Row 1 - (260 sts total). Row 3: Knit across, binding off all sts. Go To Step 7.
Option J - Picot Edging
Rows 1 (RS) and Row 2 (WS): Purl Row 3: Knit Row 4: Purl Row 5 (RS): K1 \* yo, K2tog \*, repeat \* - \*, ending yo, K2tog, K1. Row 6: Purl Row 7: Knit Row 8: Purl across, binding off all sts. Cut the yarn, leaving a 24" tail for sewing. On Row 5, you worked an entire row of little eyelets, side by side. Fold the hem to the inside and the row of eyelets wil magically form little picot points. Thread the tail of yarn on a blunt needle and baste the hem to the inside. Go to Step 5.
STEP 7 - Making the Ties Choose Option N or Option O
Option N - Braided Ties
Cut 3 strands of yarn, about 36" long. Thread them on a blunt needle and run them through the lower tip of the hat, evening up the 6 ends. With double strands, work a braid about 12" long. Tie in an overhand knot and snip the ends off about $\%"$ long. Repeat for other side.
Option O - Ribbon Ties
Cut 2 pieces of ribbon, about $18"$ long. Fold ends over about $^{1}\!/\!4^{"}$ to create a finished edge, then sew the ribbon onto the lower corners of the hat.
STEP 5 - Sewing up the back seam.
Thread the tail from your Cast On onto a blunt needle and sew up the back seam. Do NOT sew up the 6 sts you bound off in Step 2. Go to Step 6.
Finishing: Weave in loose ends. Block gently with a steam iron.
Abbreviations:
$\mathsf{K}=$ Knit $\mathsf{P=P}\mathsf{u r l}$ ${\sf W S}=$ wrong side Rep $=$ repeat yo - yarnover $\mathsf{S t}(\mathsf{s})=$ stitch(es) $\mathsf{B O}=$ Bind off ${\sf R S}=$ right side $P U=p i c k\downarrow$ p K $2\mathtt{t o g}=\mathtt{K}$ Init 2 together


