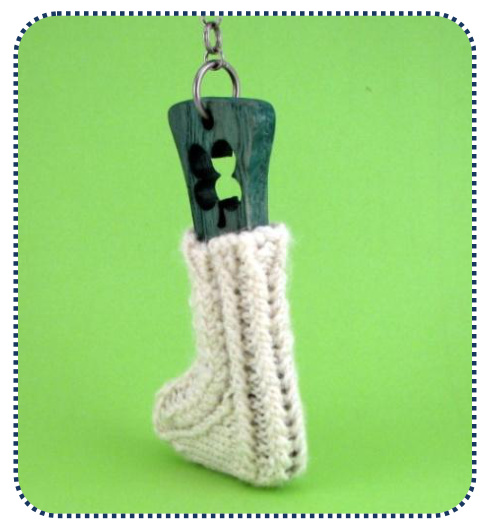
A Year of Wee Tiny Socks
15 Patterns from the first year of the Wee Tiny Sock Club
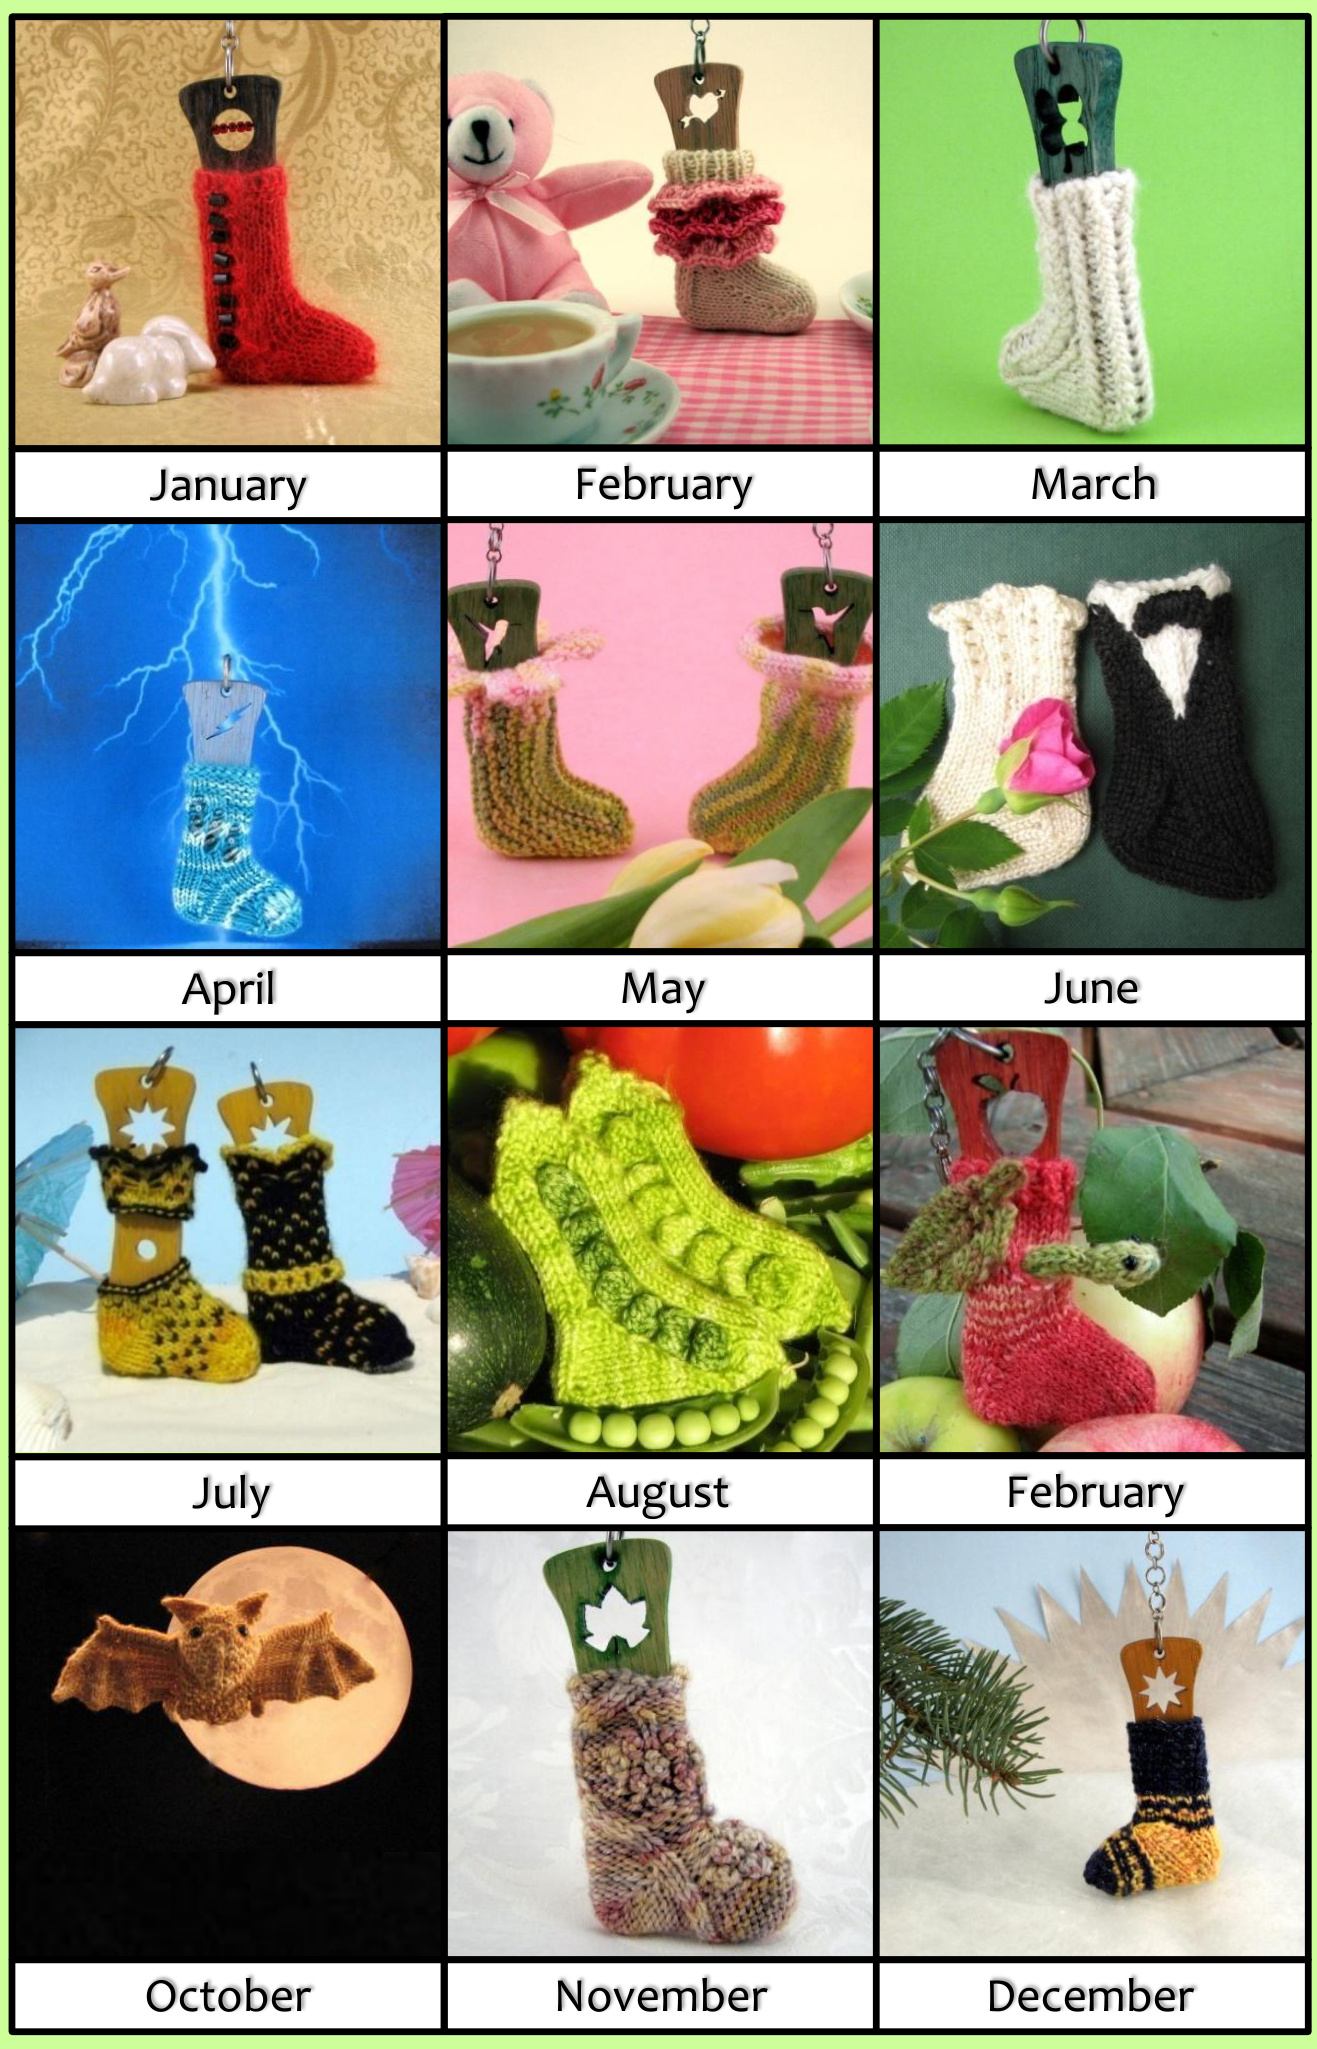
Contents
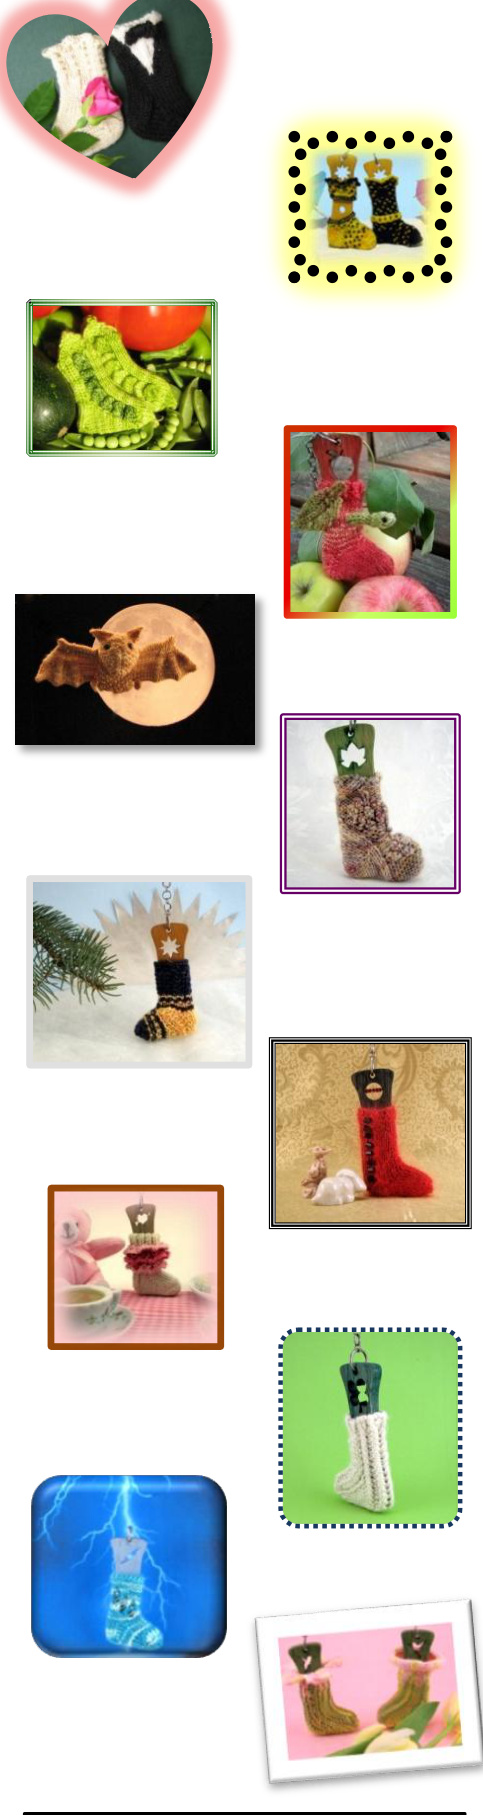
Top-down construction ↑ Toe-up construction Alternative construction
Wee Tiny Bride and Groom Socks (June)
Q Beading, Intarsia in the round tutorial p.3 Itsy Bitsy Teenie Weenie Yellow Polka Dot Sockini (July) U Stranded colorwork tips, top down and toe up options p.7 Wee Tiny Peapod Sock (August) Bobbles and a recipe p.12 Wee Tiny Apple Sock (September) ① Buttonhole , i-cord, sock blank dyeing, and a story p.15 Wee Tiny Bat Sock (October) ① Provisional cast-on, wings, ears and eyes! p.19
Wee Tiny Grapevine Sock (November)
Q Cables, with both written directions and a chart p. 22
Wee Tiny Solar Sock (December)
Heel out construction, slipped stitch colorwork p.26
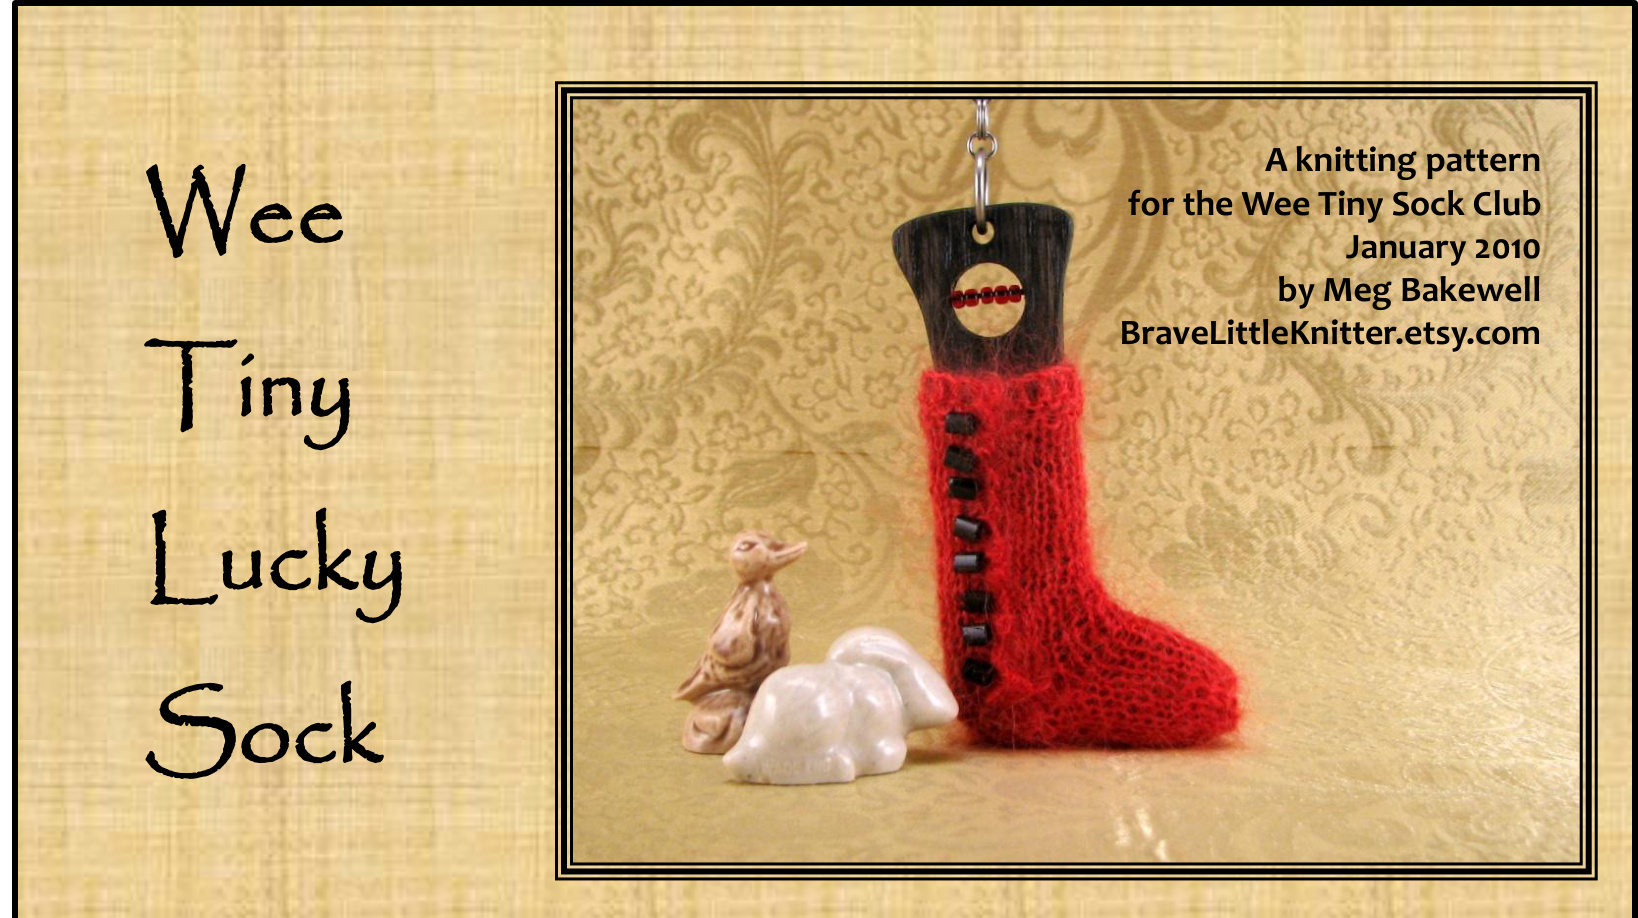
Wee Tiny Lucky Sock (January)
① Laceweight yarn, beads, partially worked flat p.28
Wee Tiny Sugar'n'Spice Sock (February)
Ruffles, ruffles, ruffles! A toe-up sock with a gusset p.30
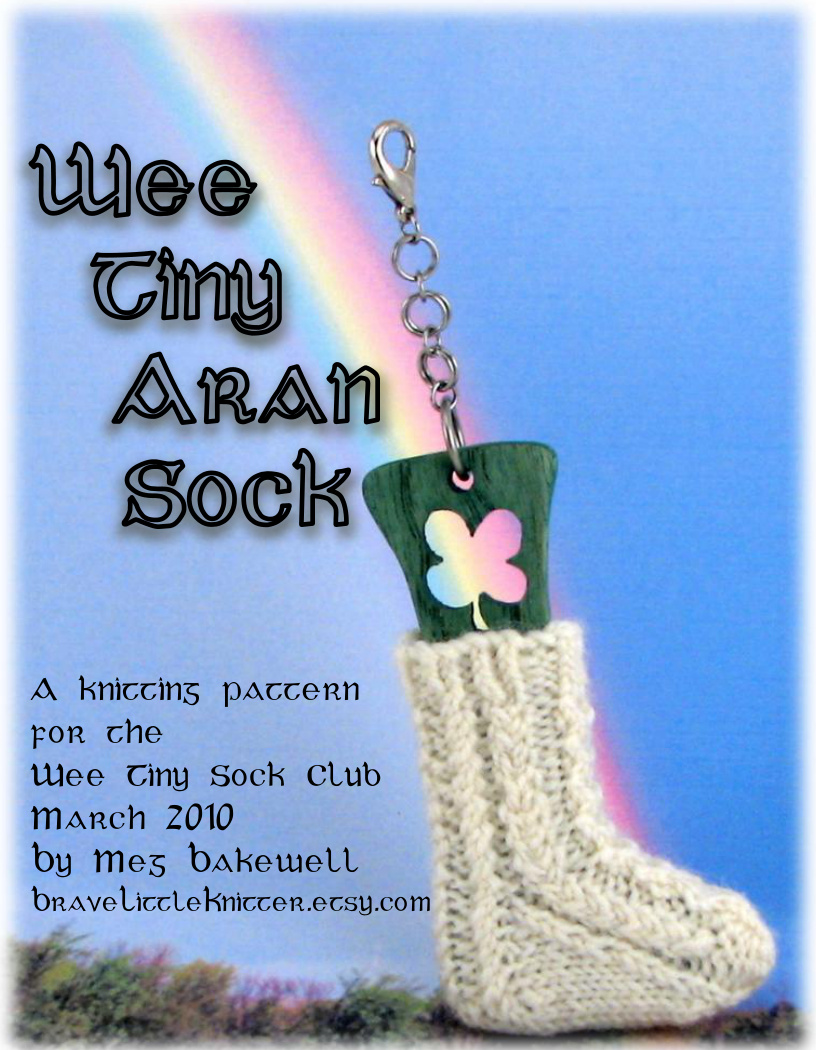
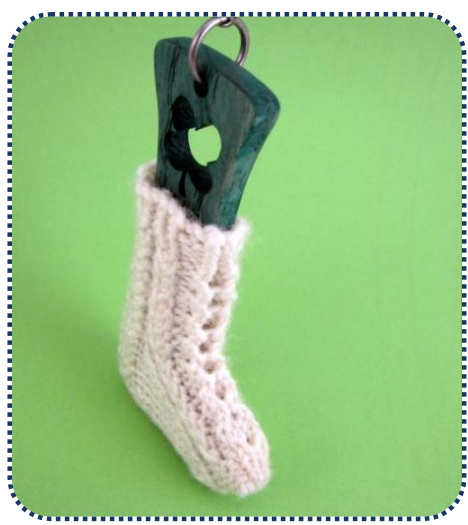
Wee Tiny Aran Sock (March)
① Twisted stitches, charted & written, and a mini dyeing tutorial p.32
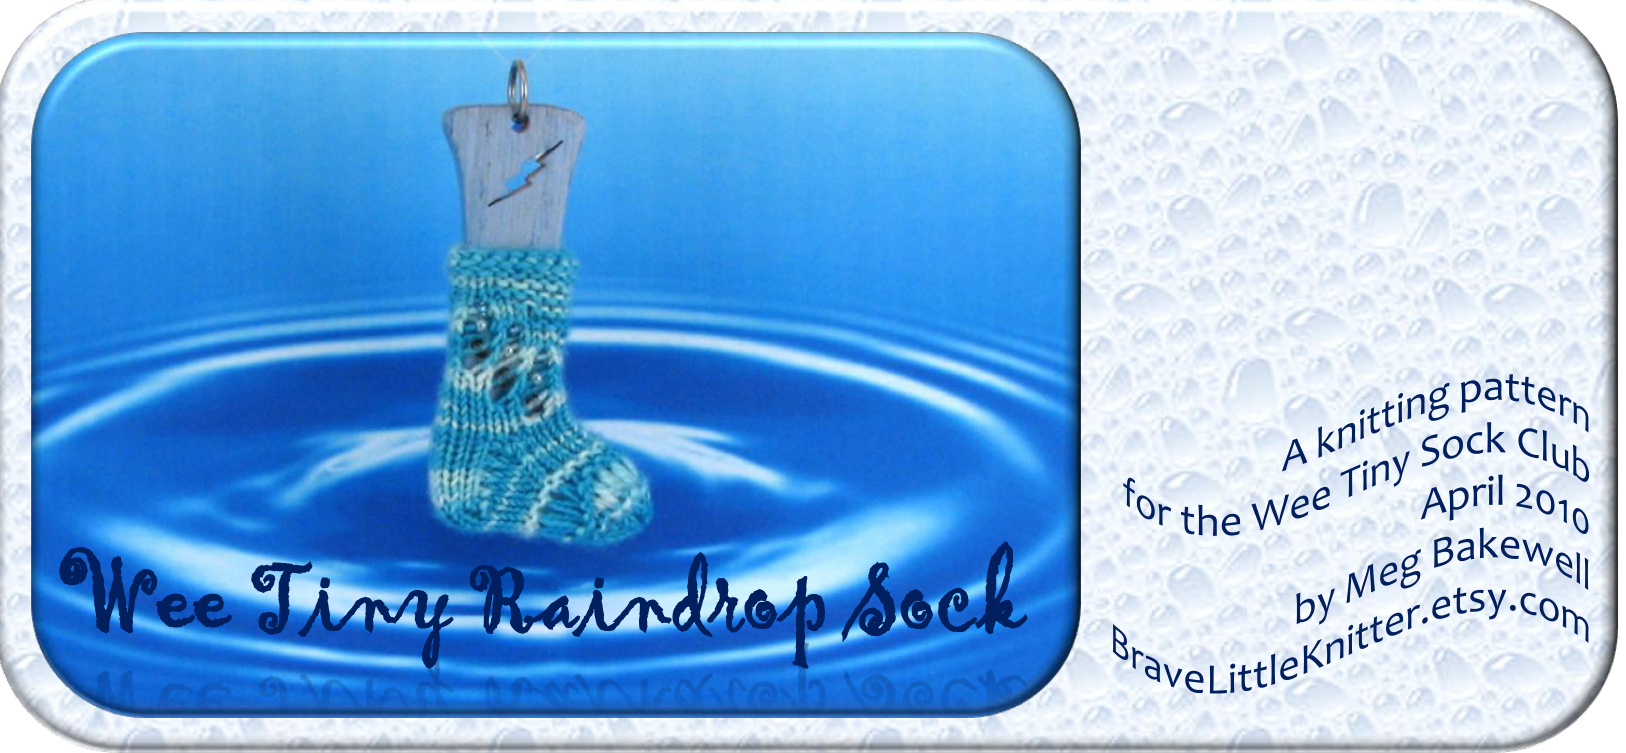
Wee Tiny Raindrop Sock (April)
Q Dropped stitches and beads p.34
Wee Tiny Flower Sock (May)
A sideways sock knit on 2 needles with 2 pattern options p.37
Glossary
Abbreviations and handy techniques p.40

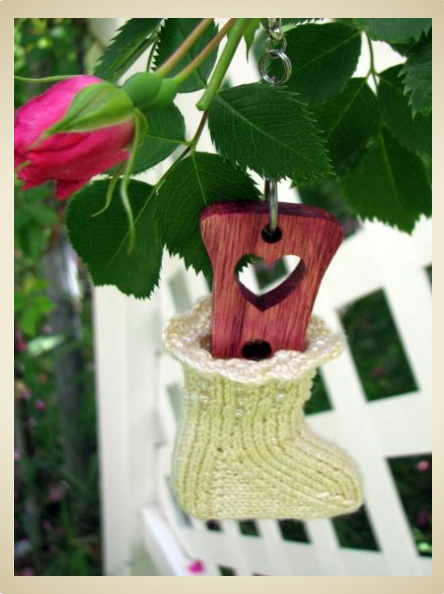
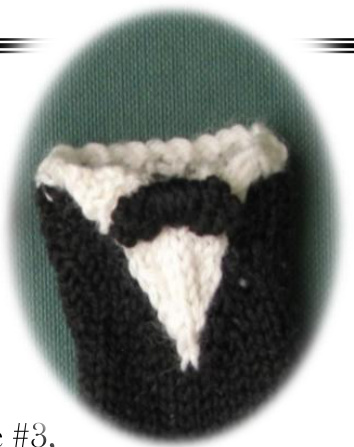
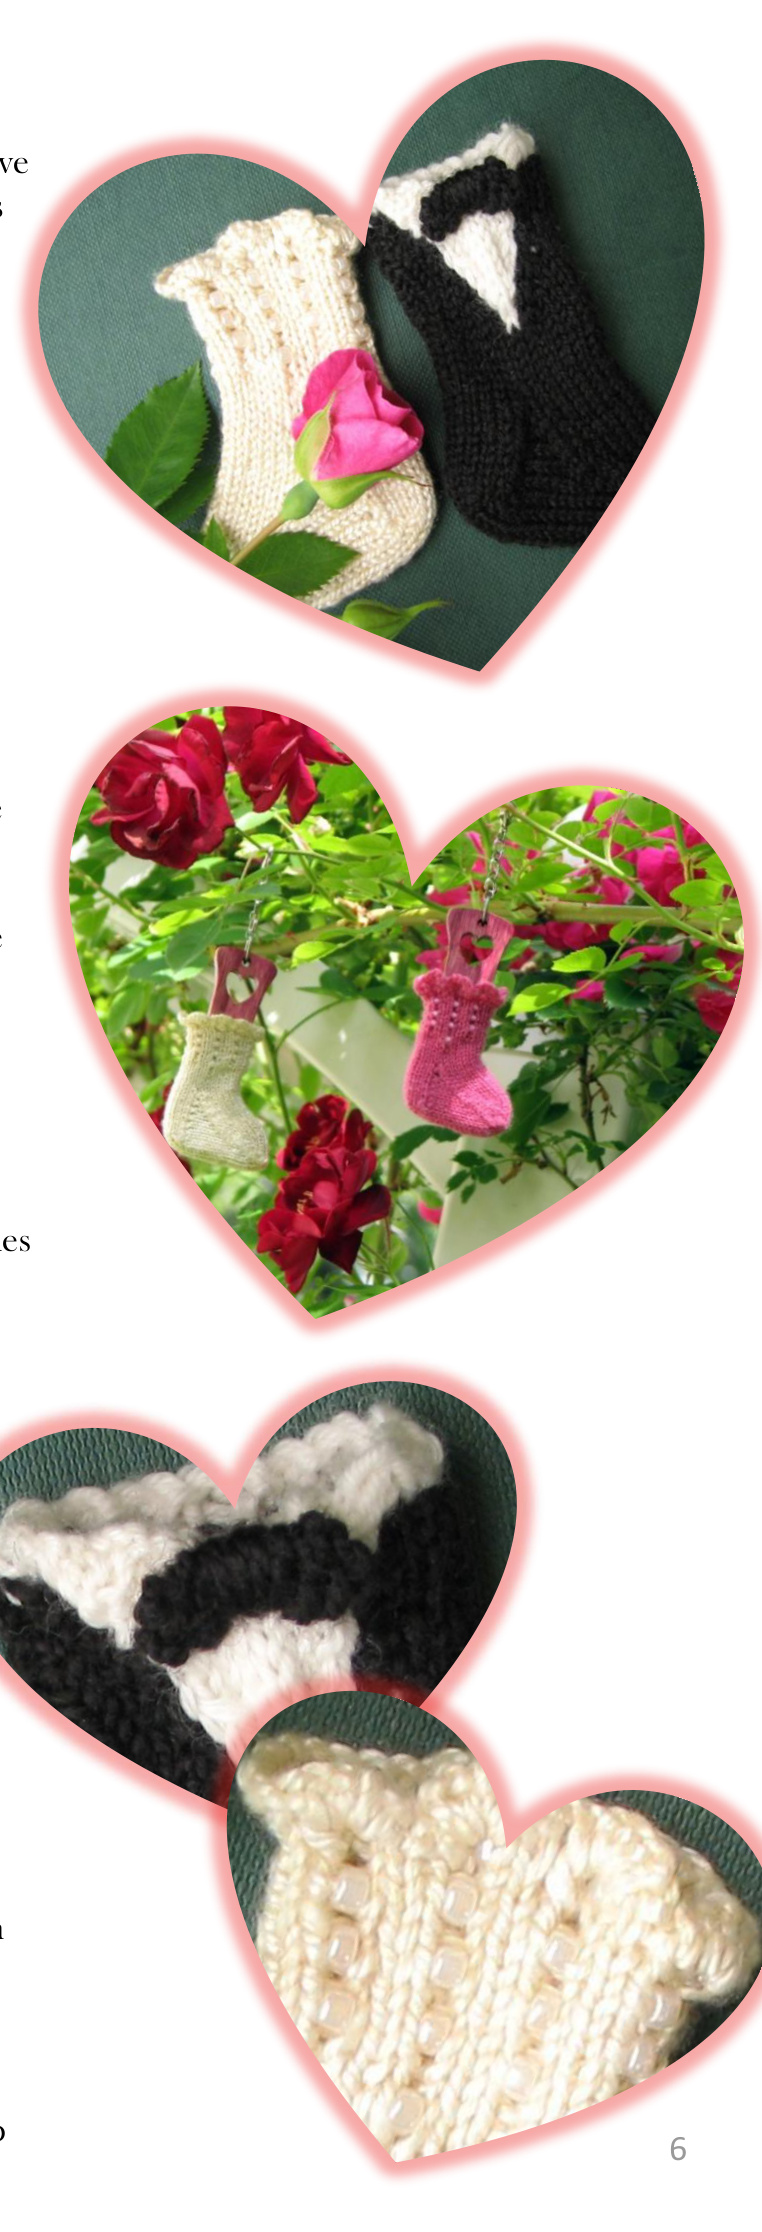
The Wee Tiny Bride Sock was inspired by the beautiful Champagne colorway in a luxurious silk yarn. It seemed like the perfect way to begin the Wee Tiny Sock Club as its very first pattern in June 2009. The knitting begins with a special beaded scalloped edge. In the ribbed leg section, pearly beads are slipped into place as you knit. The companion to the Wee Tiny Bride Sock is the Wee Tiny Groom Sock, designed to resemble a traditional tuxedo in black and white. This pattern uses intarsia in the round for the white shirt. The bowtie is worked separately and attached to the collar at the end.
Materials
\* Fingering weight yarn, about 25 yards white and 15 yards black. \*Suggested yarn: Sunshine Yarns Sunsilk $100\%$ Silk in Champagne (for the bride) Beyond Basic Knits Prima Sock in Innocence (CC for the groom) Malabrigo Sock in black (MC for the groom) 36 size 8 glass beads Set of 4 US size 1 (2.25mm) DPNs Set of 2 US size 00 $(1.75\;\mathrm{mm})$ DPNs (for the bowtie trim only) Gauge is not critical, but 9 stitches and 14 rows per inch produces socks that are about $2{-}^{1}\!/\!_{2}$ inches tall and about 2 inches from heel to toe.
pecial Hbreviations
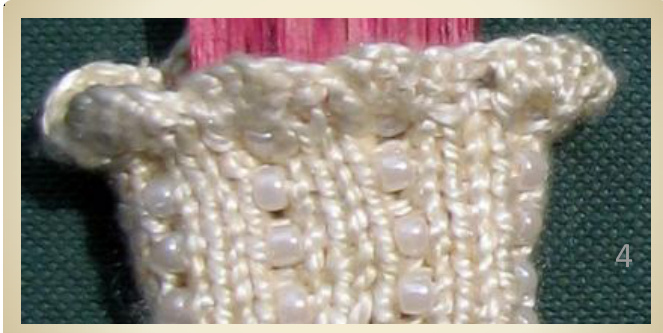
PBYO (Place Bead in Yarn Over) Instructions: Slide the bead on the yarn up close to the needl. Then do a yarn Over as normal. The bead willbe on the yarn over. PBSS (Place Bead in front of a Slipped Stitch) Instructions: Bring the yarn to the front side. Slide the bead on the yarn right up to the working needle. Slip the next stitch purlwise. Bring the yarn to the back side again, keeping the bead in front.
Round 2: Knit all stitches. Round 3-4: \* Knit 1, Purl 1, knit $1^{\ast}$ , repeat from \* around. Round 5: \*Knit 1, PBSS, knit $1^{\ast}$ , repeat from \* around. Note: The beads will line up over the purl stitches in the ribbing. Rounds 6-11: Repeat rounds 3-5 two more times. Rounds 12-13: Repeat rounds 3-4. Round 14: \* Knit 1, PBSS, knit $4^{\ast}$ , repeat from \* around. Round 15-16: \*Knit 1, purl 1, knit $4^{\ast}$ , repeat from \* around. Rounds 17-21: Knit.
Helfap
Setup: Knit 2 stitches from needle 1. Slip these stitches onto needle 3. Knit 11 more stitches (the rest of needle 1 and all but the last 2 stitches from needle 2). Slip the last 2 stitches from needle 2 onto needle 3. Now you have your heel flap stitches (11) on needle 1, and your instep stitches (13) on needle 3. Turn Work. Row 1: Slip 1, purl 10. Turn work. Row 2: Slip 1, knit 10. Turn work. Rows 3-10: Repeat these 2 rows 4 more times. Row 11: Repeat Row 1.
Jurn heel
Row 1: Slip 1, knit 5, k2tog, knit 1, turn work. Row 2: Slip 1, purl 2, p2tog, purl 1, turn work. Row 3: Slip 1, knit 3, k2tog, knit 1, turn work. Row 4: Slip 1, purl 4, p2tog, purl 1, turn work.
Susset
Knit across 7 remaining heel stitches. Continuing with needle 1, pick up and knit 7 gusset stitches along the edge of the heel flap. Using needle 2, knit across 13 instep stitches. Using needle 3, pick up and knit 7 gusset stitches on the other side and knit 3 heel stitches off of needle #1. There are 34 stitches and the stitch arrangement is now 11/13/10 on needles $1/2/3$ .Beginning of round is at the center of the sole.
Begin bride pattern
Using beading needle, string 36 beads on the silk yarn. Slide these away from the working end of the yarn. The beads will simply be pushed along until you need them. Using larger needles, cast on 48 stitches. Arrange on 3 DPNs with 18 stitches on needle #1, 12 stitches on needle #2, 18 stitches on needle #3. Join to knit in the round, being careful not to twist. Round 1, scallop edging: \* knit 2, pass the stitch you just knit back to the left needle. Slip the next 4 stitches from the left hand needle over this stitch and off the needle. Note: These are four stitches you never knit, just pass them over the knitted stitch and off they go. PBYO. Knit the stitch on the left hand needle again.\* You should now have 3 stitches on the right hand needle. Repeat from \* around. 24 stitches remain.
Susset, continued
Round 1: Knit to 2 stitches before the end of needle 1, k2tog. Knit 13 on needle 2. Ssk, Knit to end of needle 3. Round 2: Knit. Rounds 3-12: Repeat rounds 1 and 2 five more times. 22 stitches remain. Slip one stitch from needle 2 to needle 1, and one from needle 2 to needle 3. Stitch arrangement is now $6/11/5$ Rounds 13-14: Knit.
Joe QShaping
Round 1: Knit to 2 stitches before the end of needle 1, k2tog. Ssk, knit to 2 stitches before the end of needle 2, k2tog. ssk, knit to end of needle 3. Round 2 and 4: Knit. Rounds 3 and 5: Repeat round 1. Knit the stitches from needle 1 onto needle 3.
Finising
You should have 5 stitches on needle #3 and 5 stitches on needle $\#2$ . The yarn is attached to the last stitch on needle 3. Cut yarn, leaving a tail of about 12 inches. Close the toe using kitchener stitch. Weave in ends. Celebrate!
Intarsia is a knitting technique that allows you to produce isolated patches of contrasting color. This is different from stranded or Fair Isle techniques, which carry both main color (MC) and contrasting color (CC) across the entire work. When intarsia is worked flat, MC is used until the desired location of CC. Then, CC is joined and worked for several stitches. MC may be stranded across the back, or a separate ball of MC can be used on the other side of the CC section if it is large. When the next row is worked, you simply pick up each color as it appears, twist the new color with the old color to avoid a hole, and continue across the work. If you think about it though, this won't work for knitting in the round. When you approach a new color section, the working yarn is at the far side of the section, where you left it left after working it on the previous round. There are different approaches to solving this problem. Here, I describe a technique I learned from a tutorial by Moth Heaven. Basically, after knitting across a CC section, you are going to turn the work around and purl back across the CC stitches. This puts the yarn in the right place where you can use it on the next round. Good, but, this creates a new problem - you have 2 rows of stitches in the CC but only one row in the MC. So, after you finish the first round, you'll knit an extra round where all the CC stitches get slipped, while the MC stitches are knit. Then, everything will line up just right. In the Wee Tiny Groom Sock, rounds 1-12 will be worked in pairs. In the first round of the pair, MC will be worked as normal, CC will be knit forward, then purled back. In the second round of the pair, MC will be worked, and CC will be slipped. Ready to try it?
Begin groom pattern
Using larger needles and cable cast on, cast on 26 sts with CC. The first three rows are worked flat, as follows:
Row 1 (RS): sl 1, (p1, k1) to the last st, p 1. Row 2 (WS): Repeat row 1. Break CC. Row 3 (RS): Sl 3. Using MC, k 19. Using CC, k4. Arrange sts on 4 needles to prepare for knitting in the round. Working from the end where the working yarn is, put the first 6 sts onto needle #4 (4 CC and 2 MC), the next 7 on needle #3, the next 8 on needle $\#2$ and the last 5 on needle #1. Round 1: Join for knitting in the round, and knit the 3 CC stitches from needle #1 onto needle #4 using CC. Knit the $1^{\mathrm{st}}$ MC st onto needle $\#4$ . Bring the CC yarn over the top of the MC yarn, twisting them together, and then knit the last MC st in MC. End of needle #4. Now, needle #4 has 11 sts. Let's call it needle #1 from now on. Start of round will be the start of needle #1. Turn work and slip 2 MC sts. Purl 7 CC sts. Slip 2 MC sts. The MC working yarn is now in position to begin on needle #2. Knit remaining sts on needle $\#2$ and $\#3$ in MC. Round 2: Using MC, k1, twist MC and CC yarns, k1, sl 7, stranding MC loosely across the back, k to end of round. Round 3: K2MC, K7CC, K1MC, twist MC and CC yarns, K1MC. Turn work. Sl 2MC, P7CC, sl 2 MC. Knit across needles #2 and #3 using MC. Round 4: K1 MC, twist MC and CC yarns, K1 MC, sl 7, k to end of round in MC. Rounds 5-8: Repeat rounds 3-4 two more times. Round 9: (K1, kfb) in MC, (ssk, k3, k2tog) in CC, (kfb, twist MC and CC yarns, K1) in MC. Turn work. Sl 3 MC, p5 CC, sl 3 MC. Knit across needles #2 and #3 using MC. Round 10: K2MC, twist MC and CC yarns, K1MC, sl 5, k to end of round in MC. Round 11: (K2, kfb) in MC, (ssk, k1, k2tog) in CC, (kfb, twist MC and CC yarns, K2) in MC. Turn work. Sl 4 MC, p3 CC, sl 4 MC. Knit across needles #2 and #3 using MC. Round 12: K3MC, twist MC and CC yarns, K1MC, sl 3, k to end of round in MC. Round 13: (K3, kfb) in MC, (slip 2 sts together knitwise, K1, pass both slipped sts over the knit st) in CC, (kfb, twist MC and CC yarns, K3) in MC. Knit across needles #2 and #3 using MC. Break CC and continue using MC only. Round 14: K to 3 sts before the end of needle #2. Ssk, k1, k2tog, k to end of round. Round 15-18: K in MC. Setup: Knit 5 stitches from needle 1. Slip these stitches onto needle 3. Knit the next 13 stitches onto needle $\#1$ Now youhave your heel flap stitches (11) on needle 3, and your instep stitches (13) on needle 1. Row 1: Slip 1, knit 10. Turn work. Row 2: Slip 1, purl 10. Turn work. Rows 3-10: Repeat these 2 rows 4 more times.
Jurn heel
Row 1: Slip 1, knit 5, k2tog, knit 1, turn work. Row 2: Slip 1, purl 2, p2tog, purl 1, turn work. Row 3: Slip 1, knit 3, k2tog, knit 1, turn work. Row 4: Slip 1, purl 4, p2tog, purl 1, turn work.
guset
Knit across 7 remaining heel stitches. Continuing with the same needle, pick up and knit 6 gusset stitches along the edge of the heel flap. Using another needle, knit across 13 instep stitches. Using the third needle, pick up and knit 6 gusset stitches on the other side and knit 3 heel stitches off of the first needle. There are 32 stitches and the stitch arrangement is now $10/13/9$ on needles 1/2/3. Beginning of round is at the center of the sole. Round 1: Knit to 2 stitches before the end of needle 1, k2tog. Knit 13 on needle 2. Ssk, knit to end of needle 3. Round 2: Knit. Rounds 3-10: Repeat rounds 1 and 2 four more times. 22 stitches remain. Slip one stitch from needle 2 to needle 1, and one from needle 2 to needle 3. Stitch arrangement is now $6/11/5$ Rounds 11-12: Knit.
Joe
Shape the toe and graft the same as for the Wee Tiny Bride Sock.
Finising
Make bowtie: Using smaller needles, cast on 3 sts. Knit one row. Continue in garter stitch, slipping the first st of every row, until bow tie measures $\%^{\bullet}$ . Bind off and weave in ends. From the beginning of the pattern where the first 3 rows were knit, there is a slit in the knitting at the “collar" area. Fold down the white tips like a shirt collar. Fasten the tips in position using the yarn tails, then weave in on the inside and trim ends. Weave in other ends. Cut a length of black yarn 8-12 inches long. Using this yarn, fasten the bowtie to the appropriate location on the sock. Wrap the yarn several times around at the center to make the knot of the bowtie. Weave in ends. You may kiss the bride.
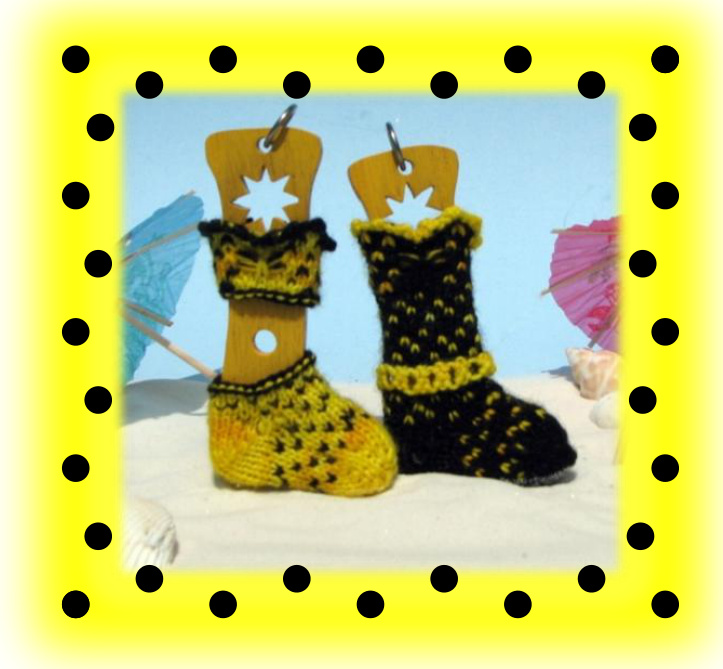
Beach Party!
I'm having a beach party and Id love it if you could come. Well relax and enjoy the sun, with some fruity umbrella drinks for refreshment. Make sure to bring your suit and towel for a dip in the lake. Ill be wearing my pew suit - it's an
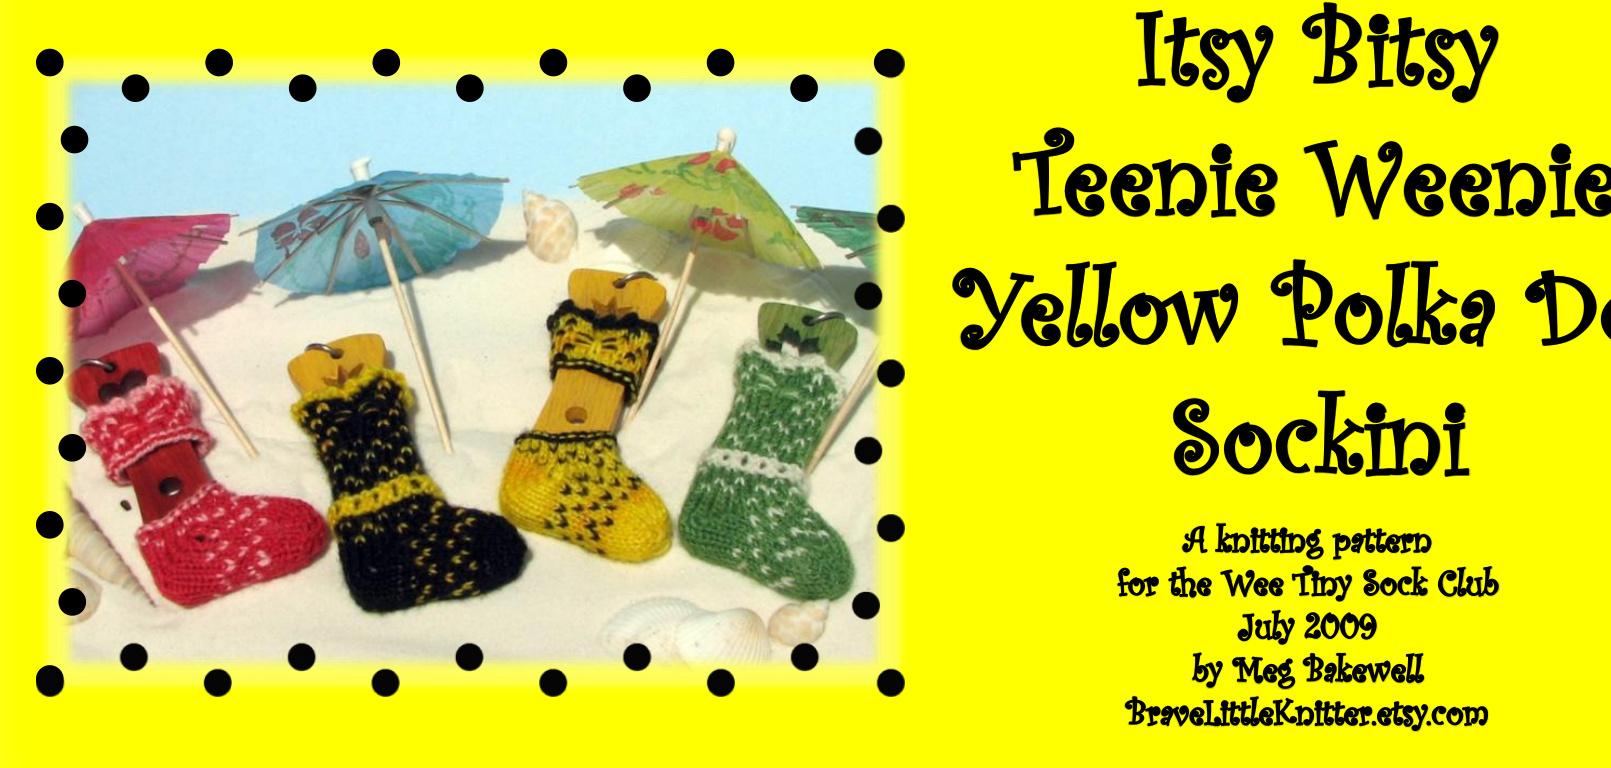
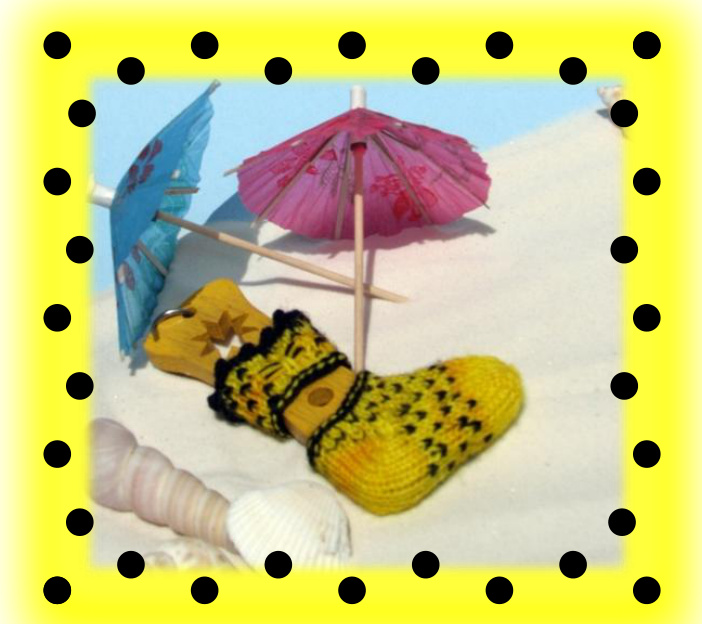
Itsy Bitsy Teenie Weenie Yellow Poka Dot Sockini!
The Sockini pattern has two options: a top-down tankini worked in one piece & a bikini with a top down top and a bottom up bottom. It features optional short row shaping, stranded colorwork and a bow stitch detail at the top.
Materials
Fingering weight yarn in 2 contrasting colors. For bikini: about 10 yards MC and 5 yards CC. For tankini: about 12 yards MC and 7 yards CC. Suggested yarn: Beyond Basic Knits Prima Sock in Mezzonite (black) and Just Call Me Happy (yellow) Set of 4 US size 1 (2.25mm) DPNs Set of 4 USsize00 $(1.75\,\mathsf{m m})$ DPNs Note: If you don't have size O0 needles, do not despair. The smaller needles are only used for the picot cast-on at the top. Using larger needles than Oo will result in a rufflier edge. Or if you prefer, you can use a regular cast on for alessruffly look.
# Begin pattern 1: Bikini
Bikini Top
Note: The first 2 rows after the cast on are worked flat, and then the work is joined in the round for the third row. This makes the optional short row shaping in Row 2 easier to do. This short row shaping creates the neckline of the "sockini" - alternative row 2 instructions are given if you'd rather not do the short rows. Using smaller needles and the knitted cast-on, begin with CC, $^{*}\mathrm{CO}$ 3, k2tog, (now you have one st on each needle), slip the stitch from the right hand needle back to the left\*. 2 sts on the left needle. Repeat from \* to \* 11 more times. 24 sts cast on. Break yarn. Row 1: Using larger needles and MC, starting at the end where you finished the cast on, purl 14, YO, purlto end. 25 sts. Continue with rows 2-9 following Chart 1 or written instructions below. Row 2 with optional short row shaping: Knit (1CC, 4MC, 1CC, 4MC), w&t, (you are wrapping the YO from the previous row) Purl (2MC, 1CC, 3MC), w&t, Knit (1CC, 5MC, 1MC tWW, 3MC, 1CC, 2MC), w&t, Purl (1cC, 5MC), w&t, mark this wrap with a safety pin or split ring marker (mark the wrap only, not the stitch), Knit (2MC, 1CC, 3MC, 1CC tww, 3MC, 1CC, 3MC) Whew! With any luck, you are now at the end of needle 3. You did it! Row 2 without short row shaping: Knit (1CC, 3MC) twice, knit 5MC, knit (1CC, 3MC) three times. Divide sts among 3 needles to prepare for knitting in the round. Needle #1 (the needle you will knit first when joining in the round) gets 8 sts, needle #2 gets 10 sts, and needle #3 gets 7 sts. Join for knitting in the round, Row 3: Knit (2MC, 1CC, 1MC tww, 2MC, 1CC, 1MC). Bring CC to front, knit 5MC, bring CC to back, knit 2MC, knit (1CC, 3MC) twice, knit (1CC, 1MC). Row 4: Drop (but do not cut) CC color yarn. This round will use only MC. Knit 8MC, bring MC to front, slip 5 sts, bring MC to back, knit to end. Row 5: Knit (1MC, 1CC, 3MC, 1CC, 2MC). Bring CC to front, knit 5MC, bring CC to back. Knit 1MC, knit (1CC, 3MC) twice, knit (1CC, 2MC). Row 6: Knit (3MC, 1CC) twice. Bring MC to front, leave CC in back. slip 5 sts, bring MC to back. Knit (3MC, 1CC) three times.
Row 7: Knit (1CC, 3MC) twice, knit 2MC. With the right hand needle, pick up the marked wrap. Note: You are picking up the wrap, not the stitch itself. Remove the marker. Also pick up the 4 floats on the front of the work. Place these 5 strands on the left hand needle and knit them together with the next stitch through the back loop, using MC. Note: This is kind of like knit 6 together. A little hard to do, but it makes a pretty bow. $\circledast$ Be careful to pick up only one stitch from the working needle when you are making the bow knot. You should have 7 stitches left on the needle after you make the knot. Knit 2MC. Knit (1CC, 3MC) three times. Row 8: Knit (2MC, 1CC, 3MC, 1CC, 8MC). Knit (1CC, 3MC) twice, knit (1CC, 1MC) Row 9: Using MC only, (knit 3, K2tog) 5 times. Break MC. 20 sts remain. Bind off purlwise in CC.
Continue pattern 1: Bikini
The bikini bottom is worked toe-up with a short row heel.
Toe
Using MC and larger needles, cast on 8 sts. Continue toe in MC. Row 1: (Knit 1, sl 1) four times. Row 2: Repeat Row 1. Next, transfer 4 stitches to each of 2 DPNs, alternating between the 2 needles for each stitch. In other words, transfer the first stitch to needle #1, the second to needle #2, the third to needle #1, the fourth to needle #2, and so on. Now if you hold the 2 needles side by side and look at the knitting you have done, you will see that one side has a clear ridge from the cast-on, while the other side is smooth. The side with the ridge is the inside of the sock. Using a third DPN, divide the stitches on needle #2 so that each needle has 2 sts. Begin working in the round as follows.
Round 1: (Kfb, knit 1) four times. 12 sts. Round 2: (Kfb, knit 3, kfb, knit 1) twice. 16 sts. Round 3: Knit. Round 4: (Kfb, knit 5, kfb, knit 1) twice. 20 sts. Round 5: Knit. Round 6: (Kfb, knit 7, kfb, knit 1) twice. 24 sts.
Foot
Follow Chart 2 for Rounds 1-5 twice, or the written instruction below. Round 1: Knit 2MC, knit (1CC, 3MC) 5 times, knit 1CC, 1MC. Round 2: Knit (1CC, 3MC) 6 times. Round 3: Knit (3MC, 1CC) 6 times. Round 4: Knit 1MC, knit (1CC, 3MC) 5 times, knit 1CC, 2MC. Round 5: Knit in MC. Round 6-10: Repeat round 1-5.
Short row heel
Using MC, knit 11, w&t, purl 10, w&t, knit 9, w&t, purl 8, w&t, Knit 7, w&t, purl 6, w&t, knit 5, w&t, purl 4, w&t, Knit 4, knit 1 tww, w&t, (this stitch now has 2 wraps), purl 5, purl 1 tww, w&t, Knit 6, knit 1 tww (picking up both wraps on this and allsubsequent stitches), w&t, purl 7, purl1 tww, w&t, Knit 8, knit 1 tww, w&t, purl 9, purl 1 tww, w&t, knit 10, knit 1 tww. You should now be ready to knit across the instep. There is one double wrapped stitch left at the other side of the heel. When you reach this stitch next round, knit it together with the wraps.
Leg
Follow Chart 2 for Rounds 1-5, or the written instruction below. Rounds 1-5: Repeat Rounds 1-5 from foot. Using CC. bind off purlwise.
Finishing
Weave in ends. If you plan to display it on a sock blocker, it will stay in place quite well without any further finishing. However, if you'd like to hang it up on its own, use a loop of sewing thread to attach the top to the bottom at the sides. Use a short piece of CC yarn to create a "strap" that goes from the top point of the neckline on one side, around the "neck" and attaches at the other side of the neckline, with which to hang your sockini. Time to hit the beach!
Begin pattern 2: Tapkini
Leg
Begin as for Bikini top through Round 8. Round 9: Knit 10, k2tog, knit to end. 24 sts remain. For rounds 10-14, follow Chart 3 rows 1-5, or written instructions below. Round 10: Knit 1MC, knit (1CC, 3MC) 5 times, knit 1CC, 2MC. Round 11: Knit (3MC, 1CC) 6 times. Round 12: Knit (1CC, 3MC) 6 times. Round 13: Knit 2MC, knit (1CC, 3MC) 5 times, knit 1CC, 1MC. Round 14: Knit in MC. Rounds 15-19: Repeat Rounds 10-14. Round 20: Using CC, knit all sts. Round 21: Using CC, purl all sts. Round 22: Using CC, (p2tog, YO) around. Round 23: Repeat Round 21. Round 24: Using MC, knit all sts. Rounds 25-28: Repeat rounds 10-13. Round 29: Knit in MC until 2 sts before the end of the round. Leave these last 2 sts unworked; they will be part of the short row heel.
Short Row Heel
Rearrange sts as follows: the next 12 sts are on needle #1, the following 6 sts on needle #2 and the remaining 6 sts are on needle #3. Work the short row heel in MC as for Bikini. (Even though that was toe up and this is top down, the heel is worked exactly the same!)
Foot
Follow Chart 4 rounds 1-5 twice, 0r written instructions below. Round 1: Knit (3MC, 1CC) 6 times. Round 2: Knit 1MC, knit (1CC, 3MC) 5 times, knit 1CC, 2MC. Round 3: Knit 2MC, knit (1CC, 3MC) 5 times, knit 1CC, 1MC. Round 4: Knit (1CC, 3MC) 6 times. Round 5: Knit in MC. Rounds 6-10: Repeat Round 1-5. Break CC.
Toe
Work toe in MC only. Round 1: (SSK, knit 8, k2tog) twice. 20 sts remain. Rounds 2 and 4: Knit Round 3: (SSK, knit 6, k2tog) twice. 16 sts remain. Round 5: (SSK, knit 4, k2tog) twice. 12 sts remain. Round 6: (SSK, knit 3, k2tog) twice. 8 sts remair
Finishing
Graft toe and weave in ends. Don't forget your sunblock!
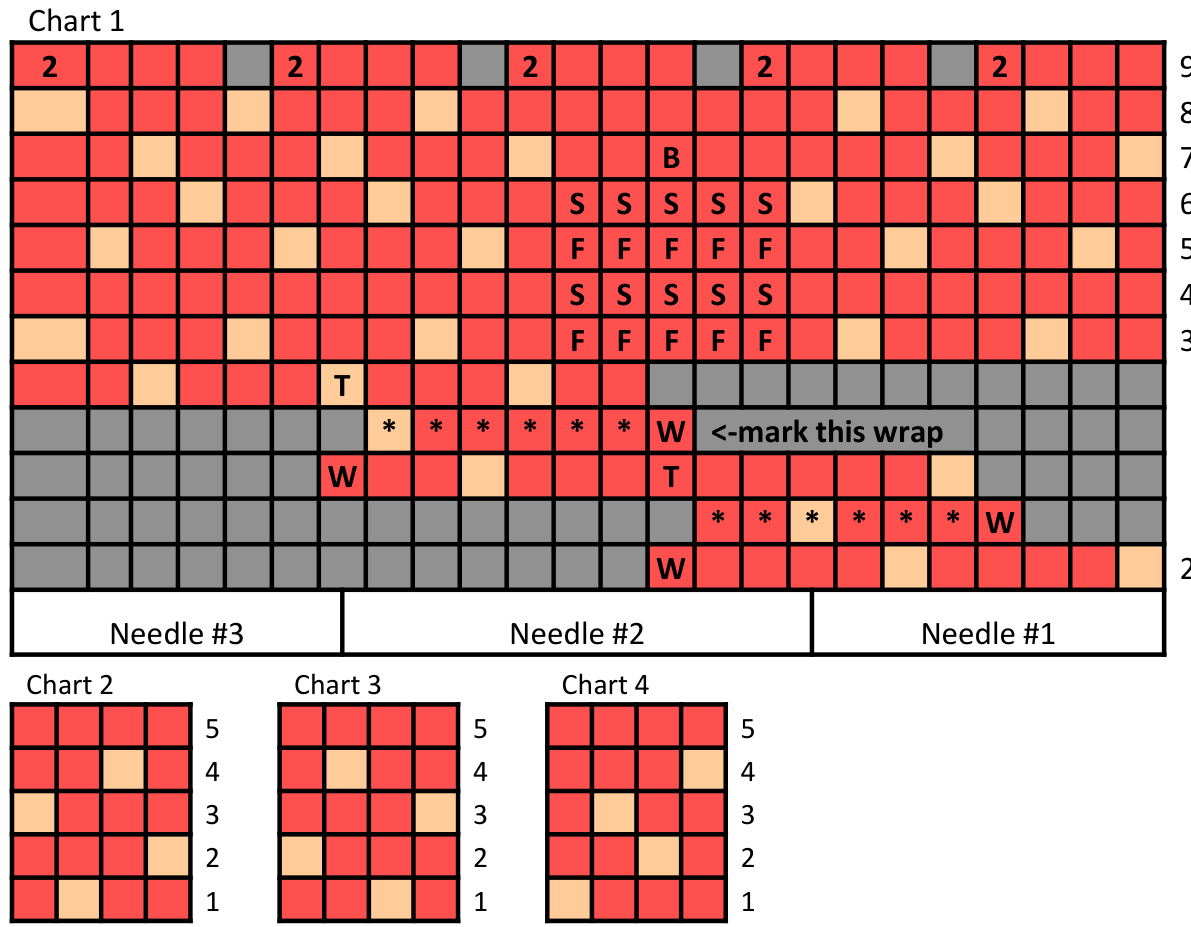
Chart Legend
$\mathsf{W}=$ wrap and turn ${\sf T}=$ knit this stitch together with the wrap $\mathsf{F}=$ Knit in MC, CC is carried in front ${\boldsymbol{\mathsf{S}}}=$ slipst, MC is carried infront $\mathsf{B}=$ bow knot, see written instructions. $2=1{\times}2{\tt t o g}$ $=$ nostitch/unworkedstshere =knit in MC =knit in CC 米=purl in MC$=$ purl in CC
Tips for knitting your sockini
This pattern uses a bunch of fun techniques - starting with a picot cast on, and also including short row shaping, stranded color work and a short row heel - there were so many details I wanted to pack in to this design, I may have gotten a bit carried away! As always, I hope you will enjoy knitting the pattern, so there are a few ways it can be simplified if you prefer a more relaxing summer knit. \* You could substitute your normal cast on for the picot cast on. +You could eliminate the short row shaping at the top. + You could knit the leg and foot in a single color, too, if you don't mind a polka-dot-less sockini. If you do this, consider repeating round 4, alternating with a knit only round, a couple more times to make the bow knot in one color. \*+ You could even skip the bow knot. If you decide to do this, skip the YO in Row 1 (24sts) and maintain the colorwork pattern around the entire top. The k2tog in round 9 of the tankini would become unnecessary in this case. If you are new to toe up socks, the bikini bottom is a great way to give it a try. I chose my favorite toe and heel construction for toe up socks, but of course there are many others out there.
Tips for stranded colorwork kpitting
If this will be your first colorwork project, you are about to explore a great new adventure in knitting. It can be a bit intimidating (it was for me at first!) but after a little practice I think you'll find it's simple, fun and opens up many possibilities. Here are a few things to keep in mind: \* There is no need to hold both yarns at once. It comes naturally to some, but for me, not so much. My right hand is very dominant, and I'm a thrower, so I just pick up the yarn I'm going to use in my right hand as usual, knit the stitches as indicated, and when it comes to the next color, I drop the first one and pick up the other. It probably slows me down a bit, but that's OK! Whatever technique you settle on, make sure it's comfortable for you. \*+ As you alternate between the 2 yarns, you want to avoid twisting them too much. You can do this by carrying one yarn on the top, and the other on the bottom. Whenever you use the top yarn, just pick it up above the bottom yarn, and vice versa. This will result in nice even lines of stitching on the back of the work, too. The strands that are carried across the back of the work are sometimes called floats. \* Sometimes you need to twist the yarns - this happens when there is a long stretch knitted in a single color. In this case, every 3 stitches or so, twist the yarns on the back of the work. Basically, just take your working yarn, and bring it around the other color, then keep going. This will trap the opposite color yarn against the back of the work so you don't get a big long float on the back. \*Tension is a little different when working with 2 colors. It is important to keep your floats long enough that they don't cause the work to bunch up once it's off the needles. The best way I know of to make sure your floats are long enough is to stretch the work out on the needle whenever you change colors. This way your float has to reach across the work when stretched, and it will be long enough. Generally, it's better to have them too long than too short.
$$
\therefore\cos\circ\cos\circ\therefore\cos\circ\frac{2\sqrt{3}}{2} $$
A KNITTING PATTERN FOR THE WEE TINY SOCK CLUB AUGUST 2009 BY MEG BAKEWELL BraveLittleKnitter.etsy.com
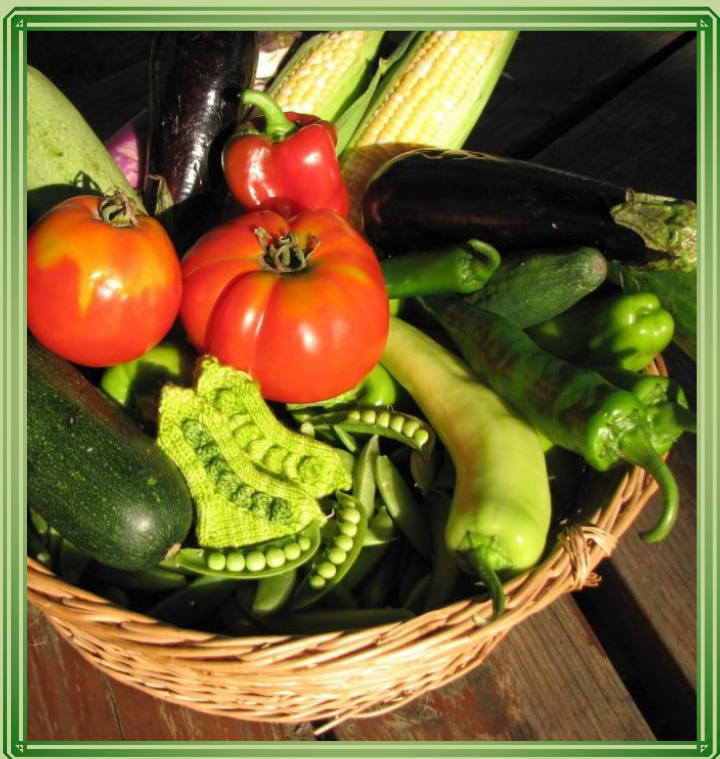
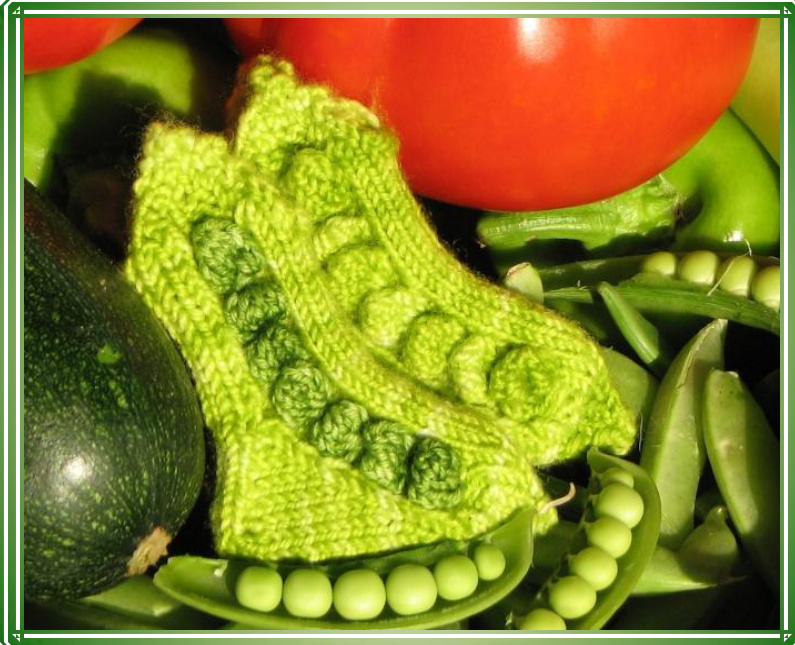
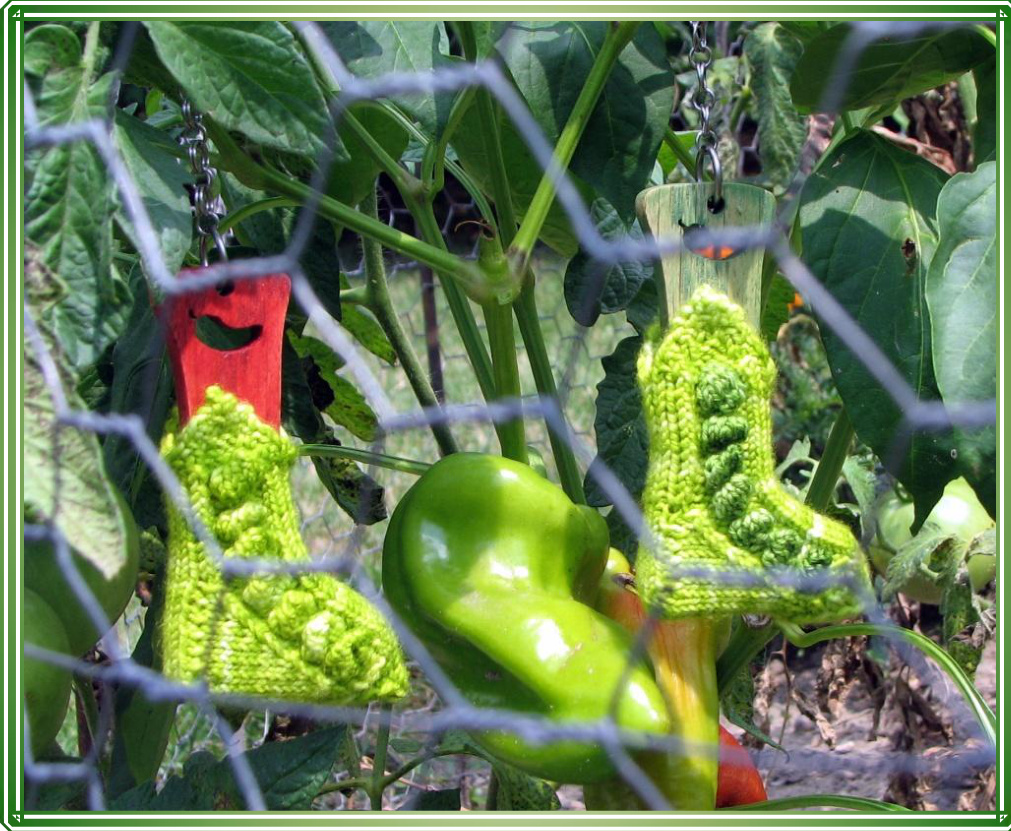
WEE TINY PEAPOD SOCK
WELCOALGARDEN HA PNIC AND BB9
It's been a good yearin the garden, fortomatoes, cukes and peppers, and especially peas. Come on over Saturday afternoon, anytime after 3. Bring a dish to pass and your favorite tasty beverage. We'll have lots of fresh-picked veggies, corn from the farmer's market, chicken on the grill with my friend Jim's special BBQsauce, and veggie burgers, too. Save room for dessert - Mom's making her peach cobbler. (Yum!) After dinner, the kids, grandkids and puppies can play inthe backyard untilthe fireflies come out.l'm pretty sure the guysll hang out in the garage - Russ got a new drill press, and he wants to show it off. ;) That'll give us time to enit, so don't forget your knitting bags. @
MATERIALS
Fingering weight yarn, about 17 yards fresh peapod green (MC) and about 5 yards contrasting green for peas, (CC) . Alternatively, a single color ay be used for the entire pattern. Suggested yarn: Claudia Handpainted in Limeade (MC) Beyond Basic Knits in Sea Grass (CC) Set of 5 US size 1(2.25mm) DPNs Gauge is not critical, but about 9 sts and 14 rows/1"' will give a sock about 2 inches heel to toe.
ABBREVIATIONS
MB: (Make bobble) All bobble in this pattern are in between 2 purl sts, so you will have your working MC yarn in the front. Bring MC to the back of the work and begin using CC for the bobble. To start the bobble, knit into the front and then the back, then the front, then the back, and one more time into the front of the stitch (5 stitches made from 1). Turn work. P5, turn work. K5, turn work. P5, turn work. K5. Slip the second, third, fourth and fifth stitches, one at a time, over the first stitch and off the needle (1 stitch made from 5). It's a bobble. $\circledcirc$ Bring MC behind the bobble and back to the front to continue working with it. Carry the CC from one bobble to the next on the back of the work. Note: If you are a tight knitter,try to loosen up a bit when working the first part of the bobble (making 5 sts from 1). It will be hard to do if you are pulling the yarn very tight.
BEGINPATTERN
The sock begins as 2 separate pieces worked flat. These are later joined together for knitting in the round. Cast on 1 st. Row 1 (RS): Kfb. Row 2, 4, 6 and 8 (ws): P across. Row 3: Kfb twice. (4 sts) Row 5: (Kfb, K1) twice (6 sts) Row 7: Kfb, k3, kfb, k1 (8 sts) Row 9: Kfb, k5, kfb, k1 (10 sts) This completes the point that will be at the top of the sock on the back side when displayed on a mini sock blocker. Break yarn and begin working point for the front. Cast on 1 st. Rows 1-6: Same as for back point. Row 7 (RS): Kfb, K1tbl, p2, kfb, k1. (8 sts) Row 8 (WS): p3, k2, p3 Row 9: Kfb, k1tbl, p4, kfb, k1 This completes the front side point. Place both points together on one needle, making sure the right sides are facing the same way. When you are looking at the wrong side, the front side point is on the right, with the working yarn coming from the right-hand side of the needle, ready to work a ws row. Row 10 (WS): p3, k4, p13. Row 11: K12, k1tbl, p1, pfb, p2, k1tbl, k2. (21 sts)
LEG
For the leg potion, you'll use 4 DPNs, so divide stitches among 3 needles - starting where the working yarn is, put 11 sts on one needle, 5 on the next and 5 on the third. Now join for knitting in the round. Knit across 10 sts and place marker for beginning of round. Stitch arrangement is now (11/5/5 on needles #1/2/3). The purl sts are in the middle of needle #1. Round 1: K2, kitbl, p5, k1tbl, k12. Round 2: K2, k1tbl, p2, MB, p2, k1tbl, k12. Round 3 and 4: Repeat round 1. Rounds 5-12: Repeat rounds 1-4 two more times. (3 peas in the pod)
HEEL FLAP
This sock has a very narrow heel flap, worked over only 6 sts to maintain the symmetry of the pattern while keeping the peas centered on the side of the sock blocker. K2, kitbl. Slip these 3 sts you just knit from needle 1 to needle 3. Turn work. Row 1: sl 1, p5. (put 2 extra un-knit sts from needle 3 onto needle 2 at this point.) Turn work. Row 2: sl 1, k5. Turn work. Rows 3-10: repeat rows 1-2 four more times. Row 11: repeat row 1.
HEELTURN
Knit 4, w&t, p2, w&t, k2, k1tww, w&t, P3, p1tww, w&t, k4, kitww.
GUSSET
Now you will pick up the gusset sts and redistribute the sts. For this part, you will use 5 needles, so the needles will be renumbered. Pick up and knit 6 gusset sts onto the heel needle (now called needle #1). This needle now has 12 sts. Divide instep 15 sts between 2 needles (call them needle #2 and needle #3). Needle #2 has 8 sts and needle #3 has 7 sts. Across instep, p5, kitbl, k9. Using the last needle (callit needle #4), pick up and knit 6 gusset sts on other side. Knit 3 heel sts from needle #1 onto needle #4. Stitch arrangement is now $9/8/7/9$ on needles #1/2/3/4 (33 sts total) Beginning of round is at the bottom of the sole. Begin gusset decreases. Round 1: Knit to last 2 sts of needle #1, k2tog, p2, MB, p2, kitbl, k9, ssk, kto end of round. Round 2: Knit all sts on needle #1, p5, kitbl, knit to end of round. Round 3: Knit to last 2 sts of needle #1, k2tog, p5, kitbl, k9, ssk, k to end of round. Round 4: Repeat Round 2. Rounds 5-11: Repeat Rounds 1-4, and then rounds 1-3 once more. 21 sts remain. 6 peas in the pod. Note: When the number of sts on needles #1 and #4 becomes small, it may be easier to put all of these sts on one needle. Just put in a stitch marker to indicate the beginning of round when you do this.
FOOTGTOE
At the end of round 11, you are at the bottom of the foot. Rearrange stitches so that the next 11 sts are on one needle (needle #1), the following 5 sts are on needle #2, and the last 5 sts are on needle #3. You will continue with 4 DPNs. Round 9: (Ssk, k2, k2tog) twice. (8 sts) Round 11: (Ssk, k2tog) twice.(4 sts) Round 12: Knit. Round 1: K2, k1tbl, p5, k1tbl, k12. Round 2: K2, kitbl, p2, MB, p2, k1tbl, k12. Seven peas in the pod. Round 3: K2, k1tbl, p5, k1tbl, k12. Round 4: K2, k1tbl, p2, p2tog, p1, k1tbl, k12. (20 sts) Round 5: Ssk, k1, k1tbl, p2, k1tbl, k1, k2t0g, ssk, k6, k2tog. (16 sts) Round 6: k2, k1tbl, p2, k1tbl, k10. Round 7: (Ssk, k4, k2tog) twice. (12 sts) Round 8 and 1o: Knit. Break yarn and thread through remaining sts. Weave in ends. I find that the points wants to curl a bit, but a little shot of steam from your iron will take care of that problem. Eat your veggies!

BONUS RECIPE! BLACK AND WHITE BEAN SALSA
Ingredients
3 tablespoons vegetable oil Corn kernels from about 5-6 ears of grilled corn (best) or fresh corn or a 16 oz bag of frozen corn, cooked 1 16-ounce can black beans, rinsed, drained 1 15-ounce can Great Northern white beans, drained 1 red bell pepper, chopped fine % cup finely chopped red onion 4 tablespoons fresh lime juice (about 2 limes) % tsp garlic powder 1 tablespoon minced fresh oregano or 1 teaspoon dried $1\,\%$ tablespoons chili powder $1\,\%$ teaspoons ground cumin Heat the oil in heavy large skillet over high heat. Add corn and saute about 3 minutes. Transfer to large bowl. Add everything else and mix it up. Salt and pepper to taste. Cover and chill. Bring to room temperature before serving. Great with corn chips, but even better wrapped up in warm flour tortillas with Monterrey Jack cheese, sour cream and hot sauce!

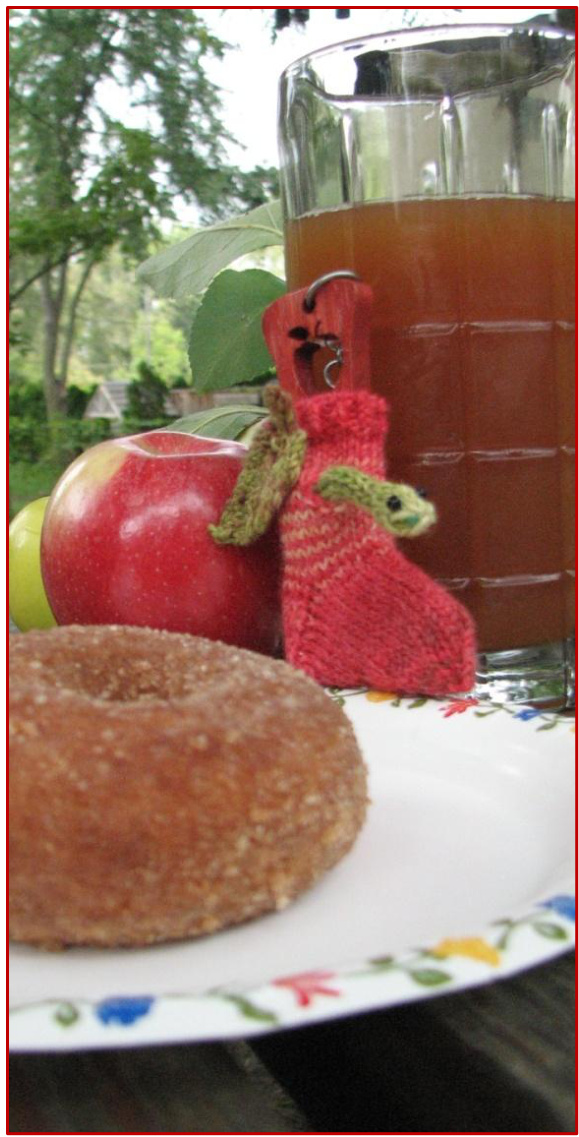
WEE TINY APPLE SOCK
A knitting pattern for the Wee Tiny Sock Club September 2009 by Meg Bakewell BraveLittleKnitter.etsy.com Fall is here, and the apples are crisp and juicy, brilliant red and gold and green on the trees. They're so good this little inchworm just couldn't resist. I hope you'll feel the same way!
MATERIALS
Fingering weight yarn, about 20 yards total mostly in apple color (MC), with a few yards of leaf color (CC1) and inchworm color (CC2) Note: The sample was knit from a wee tiny sock blank that was handpainted with Kool-Aid. For instructions, see dyeing tutorial at the end of the pattern. Sock blank was purchased from Mango's Fiber Fun, mango2oo.etsy.com. 2 black beads, size 8 2" length of fuzzy wire Set of 4 US size 1 (2.25mm) DPNs Gauge is not critical, but about 9 sts and 14 rows/1"' will give a sock about 2 inches heel to toe.
SPECIALINSTRUCTIONS
One row button hole: Bring yarn to front, sl 1, bring yarn to back. (Sl1, psso) three times. (This is like binding off 3 sts.) Move the last slipped st back to the left hand needle and turn work. Bring yarn to the back. Cable cast on 4 sts, but before passing the last of these from the right needle to the left, bring yarn to the front. Turn work. Sl1 knitwise, pass the last st that was cast on over this st.

BEGIN PATTERN
Begin unraveling sock blank at the red end by snipping off the waste yarn. If not using a sock blank, begin with Mc. Cast on 24 sts. Divide evenly among 3 needles and join for knitting in the round, being careful not to twist.
LEG
GUSSET
Round 1: (K1tbl, p1) around. Rounds 2-5: repeat row 1. Rounds 6-12: K all sts. Round 13: (Worm hole row) K10, work one-row buttonhole over the next 4 sts, K to end. (still 24 sts) Rounds 14-24: K all sts.
HEEL FLAP
Row 1: K12. Turn work. Row 2: (Sl1, p1) 6 times. Turn work. Rows 3-12: Repeat rows 1-2 five more times.
HEEL TURN
Row 1: K 7, k2tog, k1, turn work. Row 2: Sl1, p3, p2tog, p1, turn work. Row 3: Sl1, k4, k2tog, k1, turn work. Row 4: Sl1, p5, p2tog, p1, turn work. Round 1: Using one needle, knit across 8 remaining heel sts, then pick up and knit 7 sts along the side of heel flap. Using a second needle, knit across 12 instep sts. Using a third needle, pick up and knit 7 sts along the other side of the heel flap and knit 4 sts from the heel. Stitch arrangement is now 11/12/11 on needles $1/2/3$ . (34 sts) Beginning of round is at the bottom of the foot. Round 2: K1, k2tog, k to last 3 sts before end of round, ssk, k1. (32 sts) Round 3: K all sts. Rounds 4-9: Repeat rounds 2-3 two more times. (28 sts at the end of round 9) Round 10: Repeat round 2. (26 sts) Round 11: Knit all sts, but leave the last st unknit. Round 12: Knit the last st of round 11 together with the first st of round 12. This st remains on needle 1. Knit to end of round. (25 sts) Rounds 13-15: K all sts.
STAR TOE
Round 1: (K3, k2tog) around. (20 sts) Round 2, 4, 6: K all sts. Round 3: (K2, k2tog) around. (15 sts) Round 5: (K1, k2tog) around.(10 sts) Round 7: K2tog around. (5 sts) Break yarn and slip through remaining 5 sts.
LEAF
Unravel the sock blank until you get to the interface between the red and the green. Or, maybe your apple sock has a green bottom already. Every apple is unique. Or, switch to CC1. Cast on 3 sts, leaving a yarn tail about 8 inches long. Rows 1-5: Work in i-cord. Row 6: Bring yarn from left to right across the back of the work as if to work another row in i-cord. K1, yo, k1, yo, k1. Turn work. (5 sts) Row 7 (WS): P all sts. Row 8 (RS): K2, yo, k1, yo, k2.(7 sts) Row 9 and all subsequent WS rows: P all sts. Row 10: K3, yo, k1, yo, k3. (9 sts) Row 12, 14, and 16: K2tog, k2, yo, k1, yo, k2, ssk. Row 18: K2tog twice, yo, k1, yo, ssk tiwce. (7 sts) Row 20: Dd, yo, k1, yo, dd. (5 sts) Row 22: K2tog, k1, ssk. (3 sts) Row 24: Dd. Continuing with green in sock blank, or CC2, cast on 5 sts. Work in i-cord for about $1-\sqrt{4}^{66}$ Next row, kfb five times. (10 sts) Continue in i-cord for 3 rows. Next row, k2tog five times. (5 sts) Break yarn and thread through 5 remaining sts.
FINISHING
Weave in ends on sock. Weave in bind-off end of leaf. Lightly steam block the leaf. Weave the cast on tail through the stem area and use it to attach the leaf to the cuff of the sock. Bend the fuzzy wire so that it is about $1-\sqrt{2}^{\alpha}$ long. Insert the bent end into the cast-on end of the worm and slide it up to the head area. Trim off any excess fuzzy wire that sticks out. Weave in both yarn tails. Using black thread and a sewing needle, sew on the beads for eyes. Bend worm into a pleasing shape and insert into wormhole tail first. Enjoy with a glass of cider and a fresh apple cinnamon donut!

SOCK BLANK DYEING TUTORIAL
WHAT YOU'LL NEED
Sock blanks - these are machine knitted rectangles of sock yarn that you can dye and then unravel to knit with. Kool-Aid in various flavors. I used Tropical Punch, Lemonade, LemonLime, and Orange, 1 packet of each. Some type of applicator for your dye mixtures. You could simply use a spoon, but hair color mixing bottles (one for each color) work great. $\checkmark$ Pot or bowl for soaking your blanks. $\checkmark$ Microwave proof dish, large enough to lay blanks flat in it. $\checkmark$ Cooling rack. $\checkmark$ Microwave.
WHAT TO DO
1. Soak the blanks for about 20 minutes, just to get them good and wet before dying them. No need to add anything to the water. 2. Mix your colors. · For red, mix 1 packet Tropical Punch with 4 tablespoons water. ·For pale green, mix 1 packet Lemonade with 2 tablespoons water. In a separate container, mix 1 packet Lemon-Lime with 4 tablespoons water. Add 2 teaspoons of the Lemon-Lime mixture to the Lemonade. Save the rest of the Lemon-Lime for the darkgreen. For dark green, mix 1 packet of Orange with 4 tablespoons of water. Add 4 teaspoons of the Orange mixture to the remaining Lemon-Lime. The rest of the Orange is extra. 3. Squeeze most of the water out of your blanks (2 or 3 at a time if you are doing a lot of them) and lay them flat in the microwave safe dish. Squirt or spoon the dye mixture onto the blanks as shown. Do not over saturate the blanks with dye - some white spots are OK. The dye will naturally migrate to fill in these spots. 4. Microwave on high for about 30 seconds. You want to get them nice and steaming hot. Just be careful you don't let them go so long they start to dry out, as I'm pretty sure you run the risk of burning your yarn if that happens. The house smells really fruity after this step. :) 5. Lay the blanks on a cooling rack for about 10 minutes, until they are completely cooled. 6. Rinse until the water runs clear and lay them out to dry.
THELITTLEREDHOUSEWITHNODOORSANDNOWINDOWSANDASTARINSIDE
There was once upon a time a little boy who was tired of playing with his toys and tired of his books and puzzles. "What shall I do? He asked his mother. And his mother, who always knew fun things for little boys to do, said "Why not go and find a little red house with no doors and no windows and a star inside." This really made the little boy wonder. Usually his mother had good ideas, but he thought that this one was very strange. "Which way shall I go?" He asked his mother. "I don't know where to find a little red house with no doors andnowindows". "Go down the lane past the farmer's house and over the hill," said his mother, "and then hurry back as soon as you can and tell me all about your journey." So the little boy put on his hat and his jacket and started out. He had not gone very far down the lane when he came to a merry little girl dancing along in the sunshine. Her cheeks were like pink blossom petals and she was singing like a robin. "Do you know where I shall find a little red house with no doors and no windows and a star inside?" asked the little boy. The little girl laughed. "Ask my father the farmer," she said. "Perhaps he knows." So the little boy went on until he came to the great brown barn where the farmer kept barrels of fat potatoes and baskets of yellow squash and golden pumpkins. The farmer himself stood in the doorway looking out over the green pastures and yellow grain fields. "Do you know where I shall find a little red house with no doors and no windows and a star inside?" asked the little boy of the farmer. The farmer laughed too. "l've lived a great many years and I never saw one," he chuckled, "but ask Granny who lives at the foot of the hill . . . She knows how to make homemade cookies, taffy, and popcorn balls . . . and red mittens! Perhaps she can tell you." So the little boy went on farther still, until he came to the Granny sitting in her rocker on her front porch. She had lots of wrinkles and a big smile on her sweet face. "Please, dear Granny, said the little boy, "where shallI find a little red house with no doors and no windows and a star inside?" The granny was knitting a red mitten and when she heard the little boy's question, she laughed so cheerily that the wool ball rolled out of her lap and down to the little stone path. "l should like to find that little house myself," she chuckled. "lt would be warm when the frosty night comes and the starlight would be much prettier than a candle. But ask the wind who blows about so much and listens at all the chimneys. Perhaps the wind can tell you." So the little boy took off his cap politely to the granny and went on up the hill rather sadly. He wondered if his mother, who usually knew almost everything, had perhaps made a mistake. The wind was coming down the hill as the little boy climbed up. As they met, the wind turned about and went along, singing beside the little boy. It whistled in his ear, and pushed him along and dropped a pretty leaf into his hands. "I wonder," thought the little boy, after they had gone along together for awhile, "if the wind could help me find a little red house with no doors, and no windows and a star inside." The wind cannot speak in our words, but it went singing ahead of the little boy until it came to an orchard. There it climbed up in the apple tree and shook the branches. When the little boy caught up, there, at his feet, lay a big red apple. The little boy picked up the apple. It was as much as his two hands could hold. It was as red as the sun had been able to paint it, and it had no doors and no windows. Was there a star inside? The little boy called to the wind, "Thank you", and the wind whistled back,"You're welcome." The little boy hurried back down the lane with the big, red apple in his hand. When he reached his house the little boy gave the apple to his mother. His mother said, "You have found a house with no doors and no windows but where is the star?" His mother took a knife and cut the apple through the center. Oh, how wonderful! There inside the apple, lay a star holding five brown seeds. "lt is too wonderful to eat without looking at the star, isn't it?" the little boy said to this mother.
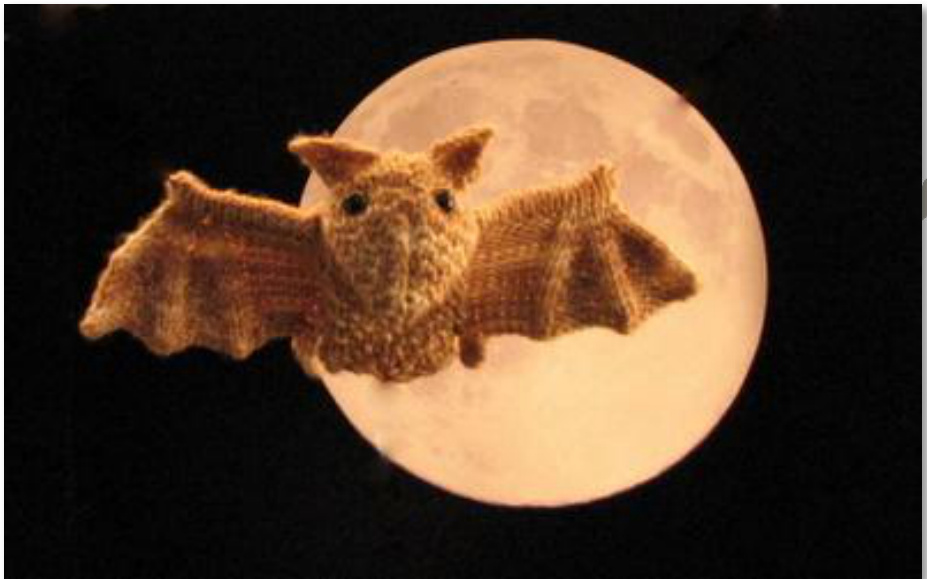
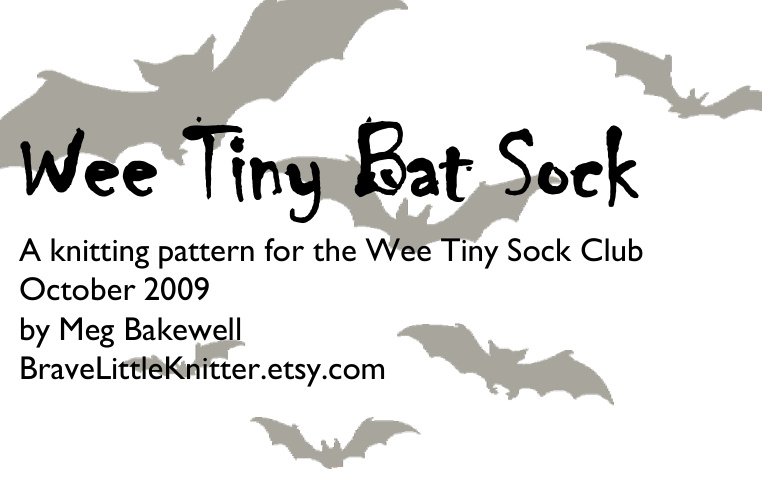
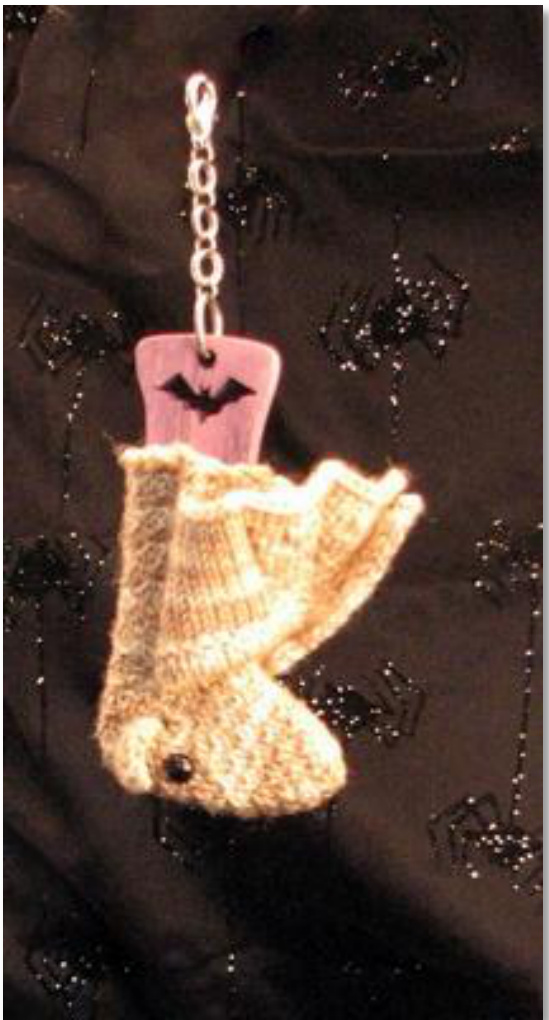
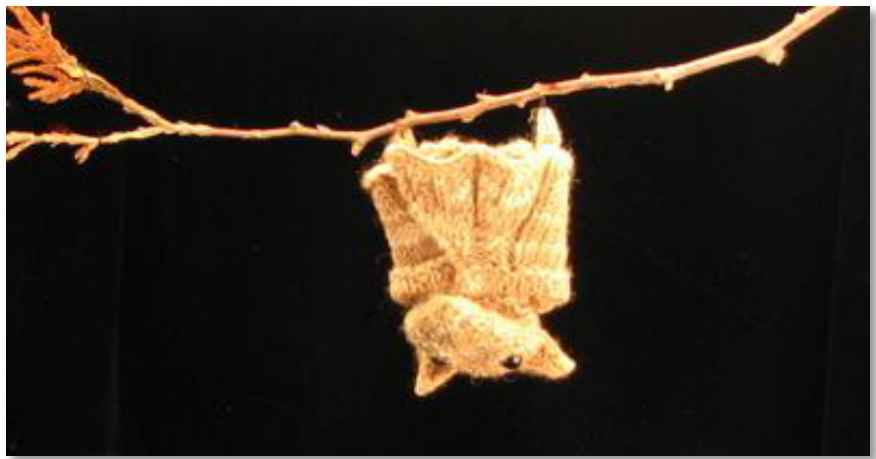
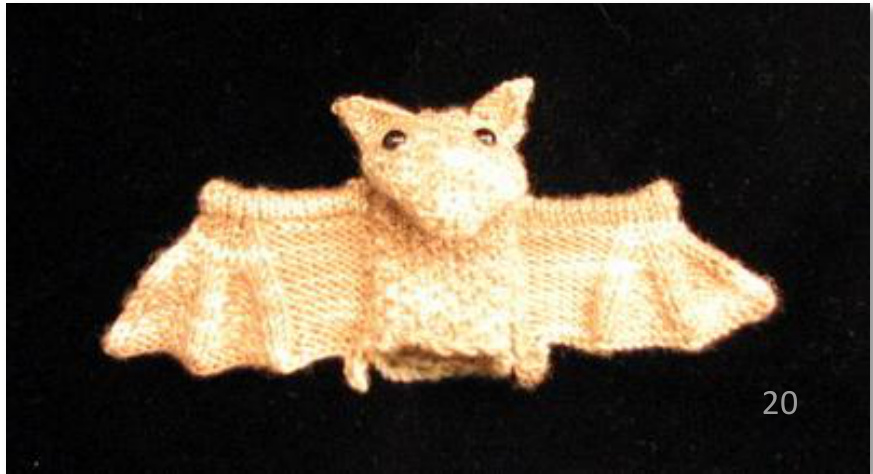
It's Oetober and that means it's time for some tricks and some treats. This wee tiny sock is dressed up as a
bat for Halloween.A top down sock with a textured stitch pattern is disguised with the addition of wings and eyes and ears. Now this little sock is all ready for trick-or-treating. The pattern was inspired by a finger puppet of the fruit bat Stellaluna from the book of the same name by Jannell Cannon. WVhen the sock is hanging on a sock blocker, it's like a bat resting up for a night of flying in the moonlight.
Materials
Fingering weight yarn, about 27 yards in light brown Suggested yarn: Cherry Tree Hill Supersock Select in Apricot Two 6mm black safety eyes Optional: about 6 inches of wire to help pose wings. 8" waste yarn Set of 4 US size I (2.25mm) DPNs Gauge is not critical, but 8 sts and I13 rows per inch gives a bat with 6" wingspan and 3" nose to tail measurement.

Begin Pattern
Leg
Heel Flap
Heel turn Cast on 20 sts. (Use your normal cast-on.) Divide among 3 needles with 7 sts on needle #I 6 sts on needle #2 and 7 sts on needle #3.Join for knitting in the round, being careful no1 t\~ t..iict Row I: K all sts. Row 2: (Pl, kl) around. Row 3: K all sts. Row 4: (KI, pl) around. Rows 5-22: Repeat rows I-4, ending after row 2. Row I: Sl I, k9, turn work. SI I K5, w&t, (Rearrange sts if desired.) Kl, pl, w&t, Row 2: Sl I, (pl,kl) to the K3, w&t, last st, kl. (Kl, pl) twice, w&t, Row 3: sl I,k to end. K5, w&t, Row 4: sl I, (pl, kl) to the p2, (kl, pl) twice, w&t, last st, pl. k7, w&t, Rows 5: repeat rows I-4. (pl, kl) to end, Row 9-I0: Repeat rows I-2. turn work.

Gusset, Foot and Toe
Note that the toe of this sock is very short and pointy, like a bat's nose. $\circledast$ Using needle #I, sl I, k9, pick up and k 6 gusset sts. Using needle #2, k across instep. Using needle #3, pick up and knit 6 gusset sts on the other side, k 5 from sole. Beginning of round is center sole. (32 sts)
Left Wing
Provisionally cast on I2 sts. (See Special Techniques, p. XX) Row I: Knit. Row 2: Purl. Rows 3-6: Continue in stocking stitch. Remove the waste yarn and put cast on sts onto an extra needle and fold work in half with knit side out. (There will be Il cast-on sts.) Row 7: Knit the first II sts together with the I1 sts from the cast on. (The needles are parallel to each other and you are forming a tube, or a hem.) K1.
Round I: (kl, pl) around Round 2: kl4, ssk, k2tog, kl4. Round 3: (pl, kl) around. Round 4: kl3, ssk, k2tog, k13. Round 5: repeat round I Round 6: k12, ssk, k2tog, k12. Round 7, 9, 11, 13, 15: repeat round 3 Round 8: k2tog, k9, ssk, k2tog, k9, ssk. Round 10: k2tog, k7, ssk, k2tog, k7, ssk. Round 12: k2tog, k5, ssk, k2tog, k5, ssk. Round 14: k2tog, k3, ssk, k2tog, k3, ssk. Round I6: k2tog, kl, ssk, k2tog, kl, ssk. Break yarn and pull through remaining 6 sts. Right Ear /l cai CO 5 sts. CO 5 sts. Row I: K5. Row 2: p5. Row 2: p5. Row 3:k3, k2tog. Row 3: ssk, k3. Row 4: p4 Row 4: p4 Row 5: k2, k2tog. Row 5: ssk, k2 Row 6: p3 Row 6: p3 Row 7: dd. Row 7: dd. Break yarn and pull through Break yarn and pull through last st. last st.
Left wing, continued
Row 8 (WS): P4, k8. Row 9 (RS): P8, kl, ml, k2, ml, kl. (14 sts) Row I0: P6, k8. Row Il: P8, kl, kfb, kl, kfb, k2. (16 sts) Row I2: (P2, kl) twice, p2, k8. Row I3: P8, (kl, kfb, pl) twice, k2. (18 sts) Row I4: (P2, ml, k2, ml) twice, p2, k8. (22 sts) Row 15: P8, $(\mathsf{k}2,\mathsf{p}4)$ twice, k2. Row I6: (P2, ml, k4, ml) twice, p2, k8. (26 sts) Row I7: P8, (k2, p6) twice, k2. Row 18: (P2, ml, k2, k2tog, k2, ml) twice, p2, k8. (28 sts) Row I9: P8, (k2, p7) twice, k2. Row 20: (P2, mI, k2, dd, k2, ml) twice, p2, k8. Row 2l: Repeat Row 19. Row 22: (P2, mI, k2, dd, k2, ml) twice, p2, kl, ml, kl, ssk, k2tog, kl, mI, kl. Row 23: Repeat row 19. Row 24: P2tog, bind off 7 sts, p2tog, bind off 8 sts, p2tog, bind off 7 sts, k2. (3 sts remain) Row 26: K3. Row 27: P2tog, pl. Row 28: K2tog. Break yarn, leaving an 8-l0" tail for sewing on to the sock, and pull through last remaining st.
Right Wing
Rows I-7: Same as Left Wing. Row 8 (Ws): K8, p4. Row 9 (RS): Kl, ml, k2, ml, kl, p8. (14 sts) Row I0: K8, p6. Row I l: Kl, kfb, kl, kfb, k2, p8. (16 sts) Row I2: K8, p2, kl, p2, kl, p2 Row I3: (KI, kfb, pl) twice, k2, p8. (18 sts) Row I4: K8, (p2, ml, k2, ml) twice, p2. (22 sts) Row I5: (K2, p4) twice, k2, p8. Row I6: K8, (p2, ml, k4, ml) twice, p2. (26 sts) Row I7: (K2, p6) twice, k2, p8. Row 18: K8, (p2, ml, k2, k2tog, k2, ml) twice, p2. (28 sts) Row I9: (K2, p7) twice, k2, p8.
Finishing
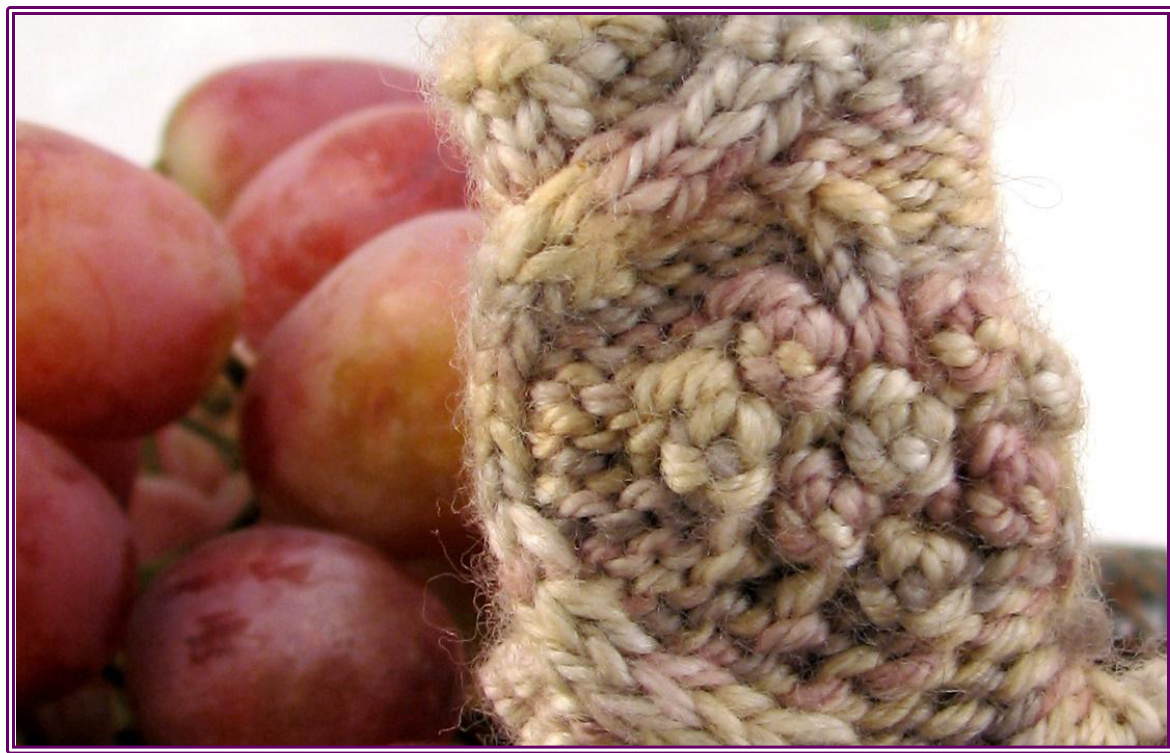
Block ears and wings, using pins to form scalloped edge on the wings. Weave in yarn ends on sock. Weave in cast on tail on wings. Weave bind off tail of ears along the side of the ear down to the cast on edge. For sewing on the ears and wings, it may be convenient to put the sock on a blocker first. See photo for placement of ears. Use bind off tail to sew ears to heel of sock. Push safety eyes through sock, checking for symmetry and placement relative to ears. Turn sock inside out and push safety eye backing on. Using a pair of wire cutters or kitchen shears or similar strong scissors, cut off excess “stem" of safety eyes, leaving just enough so that the backing will stay on. WVeave both yarn tails from the ears into the inside of the sock. Turn right side out. Weave bind off tail of wing down edge of knitting in the “foot"' section about 5 rows. Using bind off tail, sew wing to side of the leg portion of the sock, starting about 3 rows from the top of the cuff and ending just above the heel flap. The side of the wing that has knit ridges on a purl background is the front side, which faces the same way as the toe of the sock. Repeat for other wing, checking as you go for symmetry. Weave in ends. Optionally, thread wire through the top of the wings to help with posing them. Eek, it's a bat! (She's a fruit bat, and she's hungry for a mango.) 21 The Wee Tiny Grapevine Sock represents harvest time, celebration time, holiday time, all the joyful parts of the end of the year. It's also a remembrance of my first ever wee tiny sock, worked with a similar vine and grape motif for a swap in October 2oo8. The yarn I used for the Wee Tiny Grapevine Sock is Handmaiden Casbah Sock in the colorway lvory, a muted mixture of grapes and grays that reminds me of the subdued colors of late autumn in my corner of the world.
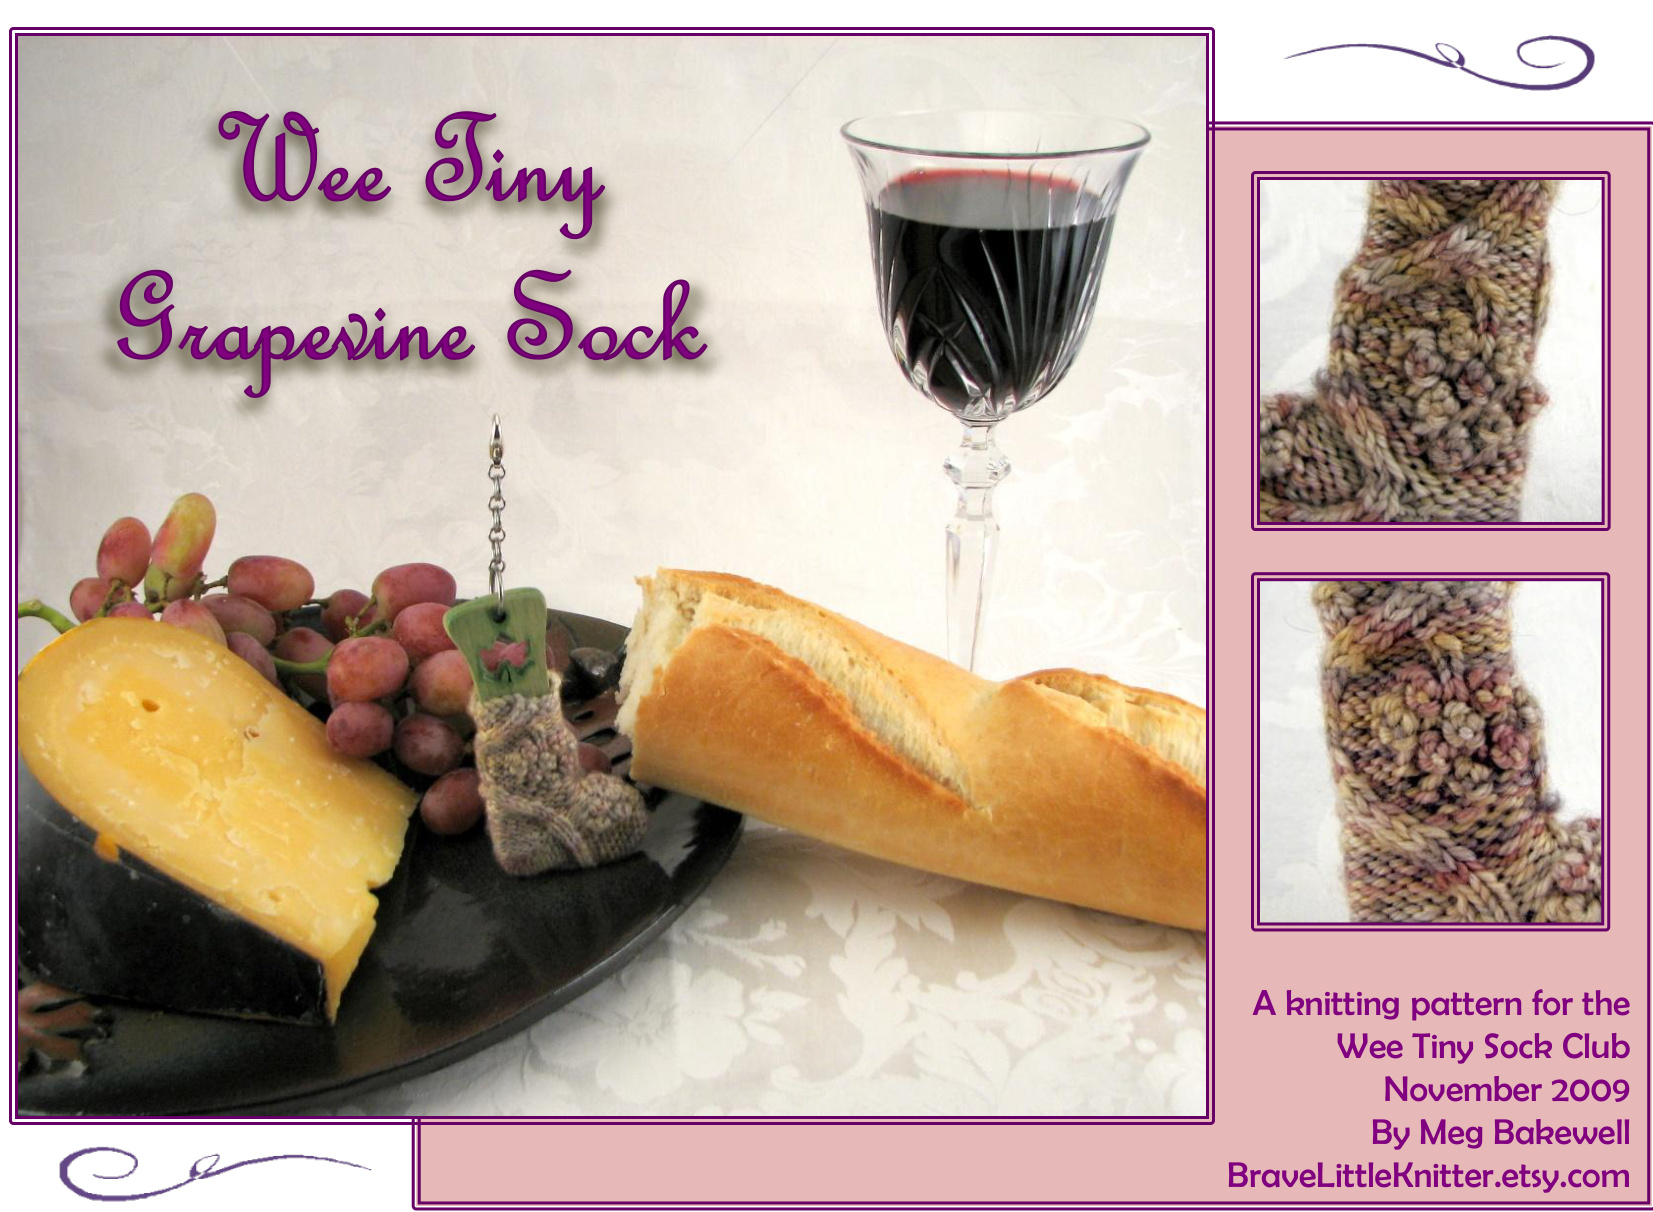
Maleial
Fingering weight yarn, about 20 yards in a subtle grey-grape variegated Suggested yarn: Handmaiden Casbah Sock in lvory Set of 4 US size1(2.25mm)DPNs Gauge is not critical, but 8 sts and 14 rows per inch in stockinette gives a sock about 212"cuff to heel and $13/4^{\prime\prime}$ heel to toe.
Special QBbrevialions
PKP: Purl, knit, purl into the next st. (2 sts increased)

Cr2L: Slip 1 st to cable needle, hold in front. P1, k1 from cable needle. Cr2R: Slip 1 st to cable needle, hold in back. K1, p1 from cable needle. Cr3L: Slip 2 sts to cable needle, hold in front. P1, k2 from cable needle. Cr3R: Slip 1 st to cable needle, hold in back. K2, p1 from cable needle. Cr4L: Slip 2 sts to cable needle, hold in front. P2, k2 from cable needle. Cr4R: Slip 2 sts to cable needle, hold in back. K2, p2 from cable needle. Short Ron JCeel Snstuclions P9, w&t, k8, w&t, p7, w&t, k6, w&t, p5, w&t, k4, w&t, p3, w&t, k2, w&t, p3, w&t, k4, w&t, p5, w&t, k6, w&t, p7, w&t, k8, w&t, p9.
Fatlern
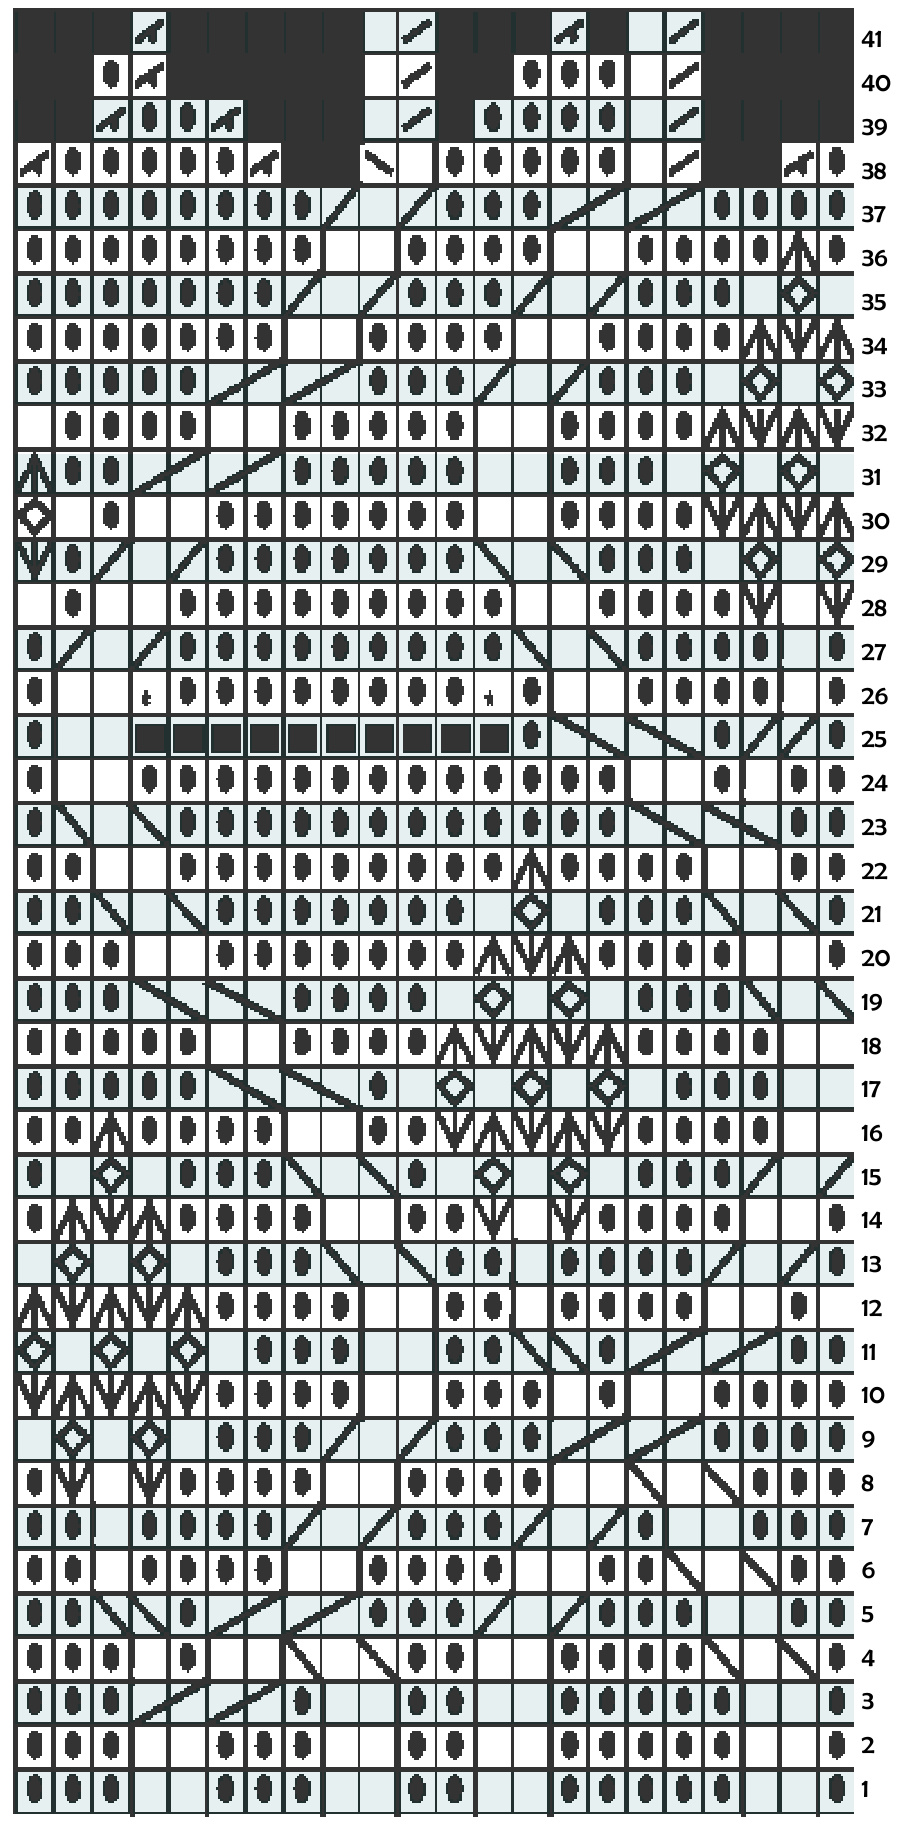
Using cable cast-on, cast on 22 sts. Distribute sts so that there are 6 sts on needle #1, 10 sts on needle #2 and 6 sts on needle #3. Being careful not to twist, join for knitting in the round. Work rounds 1-41 from the chart or from written instructions. Note: The st count will vary from round to round. Don't worry. $\circledast$ Break yarn and thread through remaining 6 sts. Weave in ends and block. Cheers!
Writlen Snstruclions Round 1: P1, k2, p5, k2, p2, k2, p3, k2, p3. Round 2: repeat round 1. Round 3: P1, k2, p5, k2, p2, k2, p1, Cr4R, p3. Round 4: P1, Cr3L, p4, k2, p2, Cr3L, k2, p1, k1, p3. Round 5: P2, k2, p3, Cr3R, p3, Cr4R, p1, Cr2L, p2. Round 6: P2, Cr3L, p2, k2, p4, k2, p4, k1, p2. Round 7: P3, k2, p1, Cr3R, p3, Cr3R, p4, k1, p2. Round 8: P3, Cr3L, k2, p4, k2, p4, PKP, k1, PKP, p1. Round 9: P4, Cr4R, p3, Cr3R, p3, k1, p3, k1, p3, k1. Round 10: P4, k2, p1, k1, p3, k2, p4, PKP, k3tog, PKP, k3tog, PKP. continued on the next page...

Wrillen Snstruclions, continued Round 11: P2, Cr4R, p1, Cr2L, p2, k2, p3, k1, p3, k1, p3, k1, p3. Round 12: K1, p1, k2, p4, k1, p2, k2, p4, k3tog, PKP, k3tog, PKP, k3tog. Round 13: P1, Cr3R, p4, k1, p2, Cr3L, p3, k1, p3, k1, p3, k1. Round 14: P1, k2, p4, PKP, k1, PKP, p2, k2, p4, k3tog, PKP, k3tog, p1. Round 15: Cr3R, p3, k1, p3, k1, p3, k1, p1, Cr3L, p3, k1, p3, k1, p1. Round 16: K2, p4, PKP, k3tog, PKP, k3tog, PKP, p2, k2, p4, k3tog, p2. Round 17: K2, p3, k1, p3, k1, p3, k1, p3, k1, p1, Cr4L, p5. Round 18: K2, p4, k3tog, PKP, k3tog, PKP, k3tog, p4, k2, p5. Round 19: Cr3L, p3, k1, p3, k1, p3, k1, p4, Cr4L, p3. Round 20: P1, k2, p4, k3tog, PKP, k3tog, p7, k2, p3. Round 21: P1, Cr3L, p3, k1, p3, k1, p7, Cr3L, p2. Round 22: P2, k2, p4, k3tog, p9, k2, p2. Round 23: P2, Cr4L, p12, Cr3L, p1. Round 24: P2, k1, p1, k2, p13, k2, p1. Round 25: P1, Cr2R. p1, Cr4L. P1. Work short row heel as instructed above. K2. p1. Round 26: P1, k1, p4, k2, p11, checking for gaps or holes at the corners of the heel. If necessary, pick up an extra st from the row below and purl together with the current st to close a hole. K2, p1. Round 27: P1, k1, p4, Cr3L, p9, Cr3R, p1. Round 28: PKP, k1, PKP, p4, k2, p9, k2, p1, k1. Round 29: P3, k1, p3, k1, p3, Cr3L, p7, Cr3R, p1, PKP. Round 30: K3tog, PKP, k3tog, PKP, p4, k2, p7, k2, p1, k1, p3. Round 31: K1, p3, k1, p3, k1, p3, k2, p5, Cr4R, p2, k3tog. Round 32: PKP, k3tog, PKP, k3tog, p4, k2, p5, k2, p4, k1. Round 33: P3, k1, p3, k1, p3, Cr3R, p3, Cr4R, p5. Round 34: K3tog, PKP, k3tog, p4, k2, p4, k2, p7. Round 35: K1, P3, k1, p3, Cr3R, p3, Cr3R, p7. Round 36: P1, k3tog, p4, k2, p4, k2, p8. Round 37: P4, Cr4R, p3, Cr3R, p8. Round 38: P1, p2tog, k2tog, k1, p5, k1, ssk, p2tog, p5, p2tog. (Note that the final p2tog in this round requires using the first st from the next round. Just slip it to the right needle before doing the p2tog.)18sts Round 39: K2tog, k1, p4, k2tog, k1, p2tog, p2, p2tog. (12 sts) Round 40: k2tog, k1, p3, k2tog, k1, p2tog, p1. (9 sts) Round 41: k2tog, k1, p2tog, k2tog, k1, p2tog. (6 sts)

Coble Symbol (Rounds 3-37) Cr2L 1 Cr2R Cr3L Cr3R Cr4L Cr4R PKP P3 K3tog JHCeel ymbol (Rounaa 25-26) SRH Gap Joe Symbol (Rounas 38-41) SSK K2tog NS P2tog

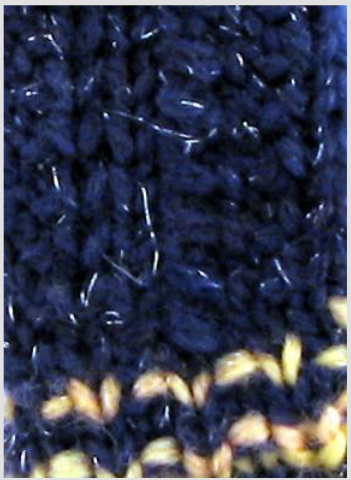
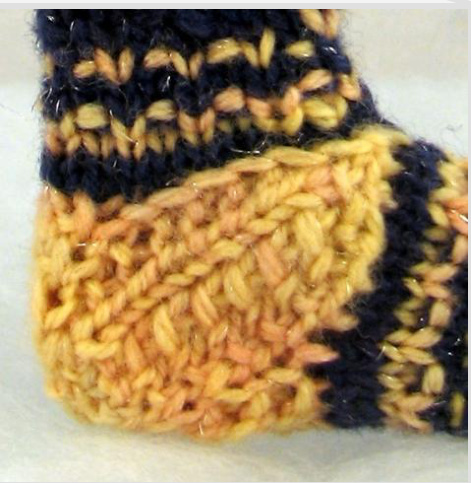
WEE TINY SOLAR SOCK
My inspiration for the Wee Tiny Solar Sock is older than time - the Sun that brings light and life to Earth - but the construction technique is something new, and so is the yarn. Toe up and top down are like old friends for me, but this sock is knit from the heel out! You'll cast on at the tip of the heel, knit a little cap in the round, then work back and forth in rows to knit gussets on either side of the heel. Next, you'll pick up stitches along the edge of the gusset to knit the foot, and then pick up stitches from the other side of the gusset to work the leg. Merino wool is an old friend, too, but this yarn introduces something new - silver fibers for a bit of sparkle!
MATERIALS
Fingering weight yarn, about 10 yards midnight blue (MC) and about 6 yards butter yellow (CC) Suggested yarn: Dream In Color Starry in Midnight Derby (MC) and Butter Peeps (CC) US size 1 DPNs Gauge is not critical, but 8 sts and 14 rows per inch in stockinette gives a sock about $2{^{1}\!/\!_{2}}^{\bullet}$ cuff to heel and $2^{\bullet}$ heel to toe. IMPORTANT NOTES! Be sure to read the important notes in the right margin of the next page as yu work the pattern! Using CC, cast on 4 sts. Heel See the important note on the right!. Round 1: Knit all sts. Round 2: Being careful not to let the sts twist, and using needle #1, kfb twice. Using needle #2, kfb. Using needle #3, kfb. (8 sts) Round 3: Kfb around. (16 sts) Even rounds 4-10: K all sts. Round 5: (Kfb, k1, p1, kfb) 4 times. (24 sts) Round 7 & 9: (Kfb, k1, skpo, k1, pl) 4 times. Row 1, 3, 5: Kfb, k1, skpo, kl, p1, k1. After Row 1, put next 5 sts on a stitch holder, the next 7 sts on another stitch holder and the remaining 5 sts on a third stitch holder. Row 2 and all even gusset rows: Sl 1, p to end. Row 7: K1, pl, skpo, k1, pl, k1. Row 9: K1, sk2po, k2tog. Row 11: Sk2po. Break yarn and pull through the last loop to bind off. Place 7 sts from holder back on a needle and repeat rows 1-11 for the other gusset. After the second gusset, you may break the yarn, or if you want to save on weaving in ends, leave it attached for use in the foot round 2.
Foot
Using MC, pick up and knit 7 sts from along the gusset edge, starting with the point and ending where there are 5 sts on a holder. Knit the 5 sts from the holder and then pick up and knit 7 more sts from the other gusset edge, ending at the point of the gusset. Using the backward loop method, cast on 1 st. (20 sts) Round 1: Join the work for knitting in the round by bringing the 2 gusset points together, and knit all sts in MC. Round 2-3: Using CC, k all sts. Round 4: Using MC, (p1 k1) around. Round 5: Using MC, k all sts. Round 6: Using CC, k all sts. Round 7: Using MC, (p1, sllwyib) around. Round 8: Using MC, k all sts.
Toe
Toe is worked using only MC. Round 1: (K2tog, k3) around. (16 sts) Round 2: K all sts. Round 3: (K2tog, k2) around. (12 sts) Round 4: (K2tog, k1) around. (8 sts) Round 5: K2tog around. (4 sts) Break yarn and run tail through 4 remaining sts.
Leg
Pick up 19 sts as for foot, but rather than casting on an extra st, pick up one st from the back of the st you cast on in MC for the foot. (20 sts) Rounds 1-8: Repeat Rounds 1-8 from the foot. Break CC, last used in Round 6. The rest of the leg is worked in MC. Round 9: Knit all sts. Round 10: (Kfb, k1, skpo, k1) 4 times. Rounds 11-22: Repeat rounds 9 and 10 six more times. Bind off loosely.
Finishing:
Weave in ends. Shine on!
Read me before working the heel! Rounds 1 & 2 of the heel are worked like i-cord. For each of these rounds, begin by sliding the sts to the right side of the needle, with the working yarn at the left side. Bring yarn across the back from left to right to begin working these 2 rounds.
Read me before working the gusset! Gusset is worked back and forth in rows. After the first row extra sts are placed on stitch holders for later. One set of 5 held sts will be used for the foot, and the other set of 5 will be used for the leg. The group of 7 held sts will be used for the second gusset.

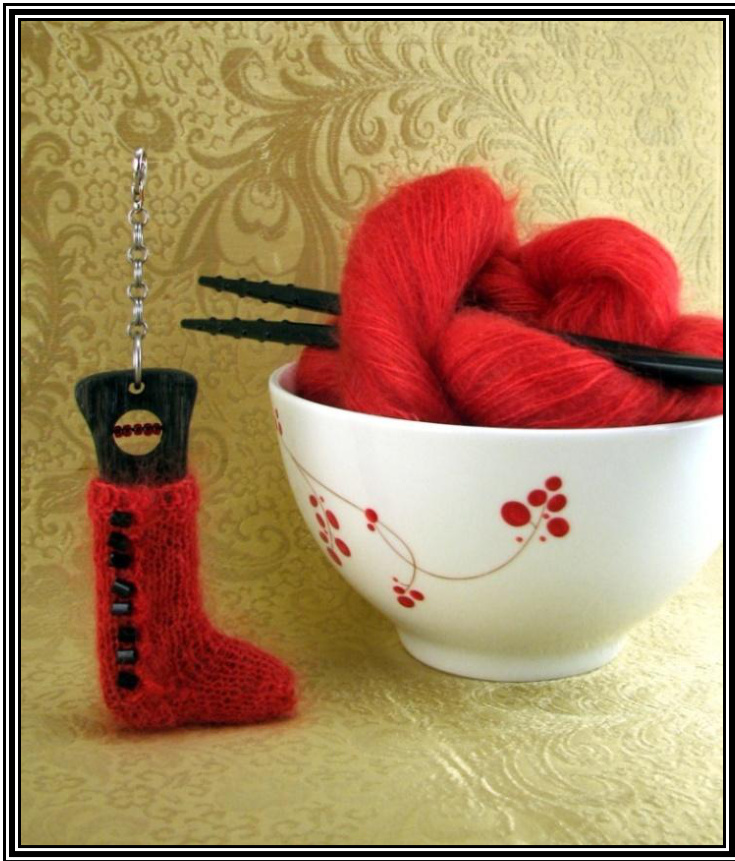
The mohair & silk yarn called Silk Cloud lives up to its name. It's a confection of softness and airiness and knits up into a sock so light you'd hardly be surprised if it floated away like a little cloud of silk. The experience of knitting this yarn is soothing and sensuous. The pattern begins at the cuff, knitting back and forth, and then joins in the round at the ankle, finishing with a short row heel and wedge toe. Beads are sewn in as the leg seam is closed. The pattern and theme of this sock are entirely driven by the yarn - the colorway “Chinese Red" and the silk content made me think of the Chinese spring festival or lunar new year. 2010 is the Year of the Tiger and the new year beginsFebruary $14^{\mathrm{th}}$ . The sock is lucky because the color red is thought to scare away evil spirits and the number 8 (the 8 beads on the sock) is associated with wealth. Red envelopes containing money are traditionally given for luck and prosperity in the new year. Enjoy every stitch!
Materials
Laceweight mohair blend yarn, about 15 yards Suggested yarn: ShibuiKnits Silk Cloud in Chinese Red 8 small black beads Set of 5 US size 2 (2.75 mm) DPNs Suggested gauge: 8 sts and 14 rows per 1'"/2.5cm in stockinette
Begin pattern
Using knitted cast-on, cast on 20 sts. This is a top down sock, but the top of the sock will be worked flat, so do not join! Rows 1-5: Knit. Even rows 6-26: Knit 2, purl 16, knit 2. Odd rows 7-27: knit. Work should measure about 2"/5cm at this point. Divide sts onto 4 DPNs asfollows: 4 sts on needle #1 (working yarn on this needle), 6 on needle #2, 6 on needle #3 and 4 needle #4. Arrange needles as if to begin knitting in the round, but overlap needles #1 and #4 so that you can place them parallel to each other. (Figure 1) Needle #4 is on the inside of the work, and the stitches on needle #4 are right behind the sts on needle #1. Keep the working yarn (at the left side of needle #1) on the outside. Using the fifth DPN, slip one st knitwise from the right hand side of needle #4 to needle #5. Next slip 1 st from the right hand side of needle #1 to needle #5. Continue slipping sts to needle #5, alternating between needles 4 and 1, until all 8 sts from needles 1 and 4 are on needle #5. Begin knitting in the round where the working yarn is. (Figure 2) This is the beginning of the round, so renumber the needles 1, 2 and 3 (6/6/8 sts). Knit 12 sts (needles 1 and 2). K2tog twice. P2tog twice. (16 sts remain.) Knit 1 round. Knit 8 sts of the next round onto one needle. Place the other 8 sts on a second needle to begin the short row heel. Short Row Heel Knit 7, w&t, P 6, w&t, K5, w&t, p4, w&t, k3, w&t, p2, w&t, k3, w&t, p4, w&t, k5, w&t, p6, w&t, k7. Instep Now we'll start the instep, renumbering the needles as we go. Using needle #1, pick up the 2 wraps from last st you just knit and 1 extra st in the gap and knit these 3 loops together. Continuing with needle #1, knit 6 more sts. (7 sts on needle #1). Using needle #2, knit 2 sts. Continuing with needle #2, pick up one st in the gap and the 2 wraps from the next st on your left needle. Knit these three loops together. Knit 4 more sts onto needle #2. (7 sts on needle #2) Knit the remaining 4 sts onto needle #3. (4 sts on needle #3, 18 sts total)

Foot& Toe
Round 1: k2tog, k7, k2tog, k7. (16 sts) Round 2-15: Knit. Round 16: (ssk, k4, k2tog) twice. (12 sts remain) Round 17: (ssk, k2, k2tog) twice. (8 sts remain) Round 18: (ssk, k2tog) twice. (4 sts remain) Break yarn and thread through remaining sts. Weave in ends.
Finishing
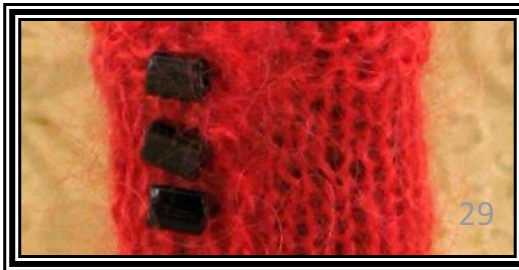
Using a sewing needle with a small eye, attach black thread to the inside of the sock at the ankle, just below the opening. Overlap the edges by 2 stitches and bring the needle up through both edges, coming out 1 stitch away from the right hand edge. \*Thread a bead onto the needle, and push the needle back through to the inside one stitch to the left. Come back up 3 rows higher (closer to the cuff), and one stitch from the edge. \* Repeat from \* to \* until eight beads have been added. Securely weave in the end of the thread.
Make a wish! A knitting pattern for the Wee Tiny Sock Club -February 2010 by Meg Bakewell BraveLittleKnitter.etsy.com ugar and spice and all things nice, that's what lite girls are made of. Ruffles and ribs and all things wool, that's what wee tin socks are made of This little sock was inspired by the little ruffled anklets my girls wore when they were babies. My sister and I wore them, too, once upon a time. The toe-up construction begins with a provisional cast-on for a short row toe. Then gusset increases are worked, followed by a flap heel that involves no picked up stitches. The leg is worked in ribbing and contrast color ruffles are knit inside the sock. When the sock is complete and cuffed over, the ruffles show on the outside.
Materials
and 5 yards bright pink (CC2) Suggested yarn: Beyond Basic Knits Prima Sock in Innocence (MC), Powder Puff (CC1), and Pink Pout (CC2) Set of 4 US size l $(2.25\mathrm{{mm})}$ DPNs Gauge is not critical, but 8 sts and 14 rows per inch in stockinette gives a sock about $2\,\%$ cuff to heel and $2^{\circ}$ heel to toe.
bpecial fote about Parn vers
When doing a yarn ver between a purl st and a knit st, leave the yarn in front of the needle after the purl st, and immediately knit the next st, bringing the yarn over the top of the needle. When doing a yarn over between a knit st and a purl $^{s t}$ , bring the yarn forward under the needle, and then to the back over the needle, and then to the front again under the needle. 30
Begin Pattern
Using MC, provisionally cast on 10 sts. Short Row Toe Kl0, turn work. P9, w&t, k8, w&t, P7, w&t, k6 , w&t, P5, w&t, k4, w&t, P4, pltww, w&t, k5, kltww, w&t, P6, pltww, w&t, k7, kltww, w&t, P8, pltww, w&t, k9, kltww. Remove waste yarn and place 10 sts from provisional cast-on onto 2 needles, 5 sts each. (20 sts total) Place marker for beginning of round at the location of the working yarn. Knit 5 rounds.
Gusset
Round 1: Kl, mlR, k8, mlL, K to end of round. (22 sts) Round 2, 4, 6, 8: Knit. Round 3: K2, mlR, k8, mlL, K to end of round. (24 sts) Round 5: K3, m1R, k8, mlL, K to end of round. (26 sts) Round 7: K4, mlR, k8, mlL, K to end of round. (28 sts) Round 9: K5, m1R, k8, mlL, K to end of round. (30 sts) Round 10: K20. Note: You should have just knit across the 2 instep needles, which have 10 sts each. The heel turn will be worked on the third needle, which also has 10 sts.
Eeel Curn
Kl, sll, k6, w&t, sll, p5, w&t, sll, k4, w&t, sll, p3, w&t, sll, k2, w&t, sll, pl, w&t.
eel flap
Note: The decreases worked in the heel flap will bring you back to 20 sts. Each time you work a ssk or p2tog. you will be using one st from the heel needle and one st from the adjacent instep needle. There will be 10 sts on the heel needle the whole time, but the number of sts on the instep needles will decrease down to 5 each by the time the heel flap is done. If you prefer, you can rearrange the sts now. Move 5 sts from each instep needle to the heel needle, so that the st arrangement is 5/5/20. Row l: sll, kl, kltww three times, ssk. Turn work.
(29 sts)
Row 2: Sll, p5, pltww three times, p2tog. Turn work. (28 sts) Row 3, 5, 7, 9: (Sl 1, k1) 4 times, sll, ssk. Turn work. Row 4, 6, 8, 10: Sl, p8, p2tog, turn work. (20 sts at the end of Row 10)

Setup round: Sll, k9. Pu 1 st in gap, kl0, pu 1 st in gap, k10 (22 sts) Work in kl, pl rib for $1.5^{\circ}$
Ruffle
Turn the sock inside out. Do not break MC yarn, but keep it on the inside of the work. Switch to CC1 for the first ruffle. Round 1: K2tog, k to end of round. (21 sts) Round 2: (Kl, p2) around. Round 3: (yo, kl, yo, p2) around. (35 sts) Round 4: (K3, p2) around. Round 5: (yo, k3, yo, p2) around. (49 sts) Round 6: (K5, p2) around. Bind off in pattern - knitting the knit sts and purling the purls. Break CC yarn.
Between rfle section
Turn the sock right side out again, and tuck the ruffle to the inside. (It will be kind of bulgy, but it's OK.) Starting at the beginning of round, pick up 22 sts from the last MC row below the ruffle. Pick up the right leg of each st so it will not be twisted on the needle. Just pick them up and get them on the needles first. Then, using MC, work in kl, pl rib for 6 rounds. If you picked up from the beginning of round, the first st should be a knit st so your ribbing lines up with the previous ribbing section.
More rufles
Repeat ruffle and between ruffle section for second ruffle, using CC2. Break MC. Repeat ruffle section one more time using CC1.
finishing
Weave in all ends. Turn sock right side out (knit side showing in the foot section) and cuff the sock so the ruffles are on the outside. Invite your friends for a tea party! 31 Fingering weight yarn, about 20 yards in natural

Dream in Color Smooshy in Crying Dove Set of 4 US size 1 (2.25 mm) DPNs Gauge is not critical, but 8 sts and 14 rows per inch in stockinette gives a sock about 212"cuff to heel and ${}^{2^{\circ}}$ heel to toe. he wee Tiny Aran Sock Was imspireo by An heirloom ARAn SWeATeR Siven co me by my Aunc pacrie.ic is hano-knic in brillianc sreen Ano cableo all oveR uich plaits, horseshoes, honeycombs, Ano oiamonos pilleo uich seeo Sticch. my Sranopa Reo, uho WAs more chan A wee bic irish, broushc ic home rrom irelano FOR my Aung in 1972 OR '73, alons wich one in nacural uhice FOR my mom, Ano A liccle one FOR me, just A baby AT che Time. my Aun hanoeo che sreen one oown TO me when Was sixteen. This wee Ciny SOck uses Twisteo sticches TO RecReAte in miniAcure some oF che mocips FROm che sweAceR. i knic chis SOcK in unoyeo wool, buc i'm seriously consioerins sivins ic A bach in sreen K0 0 1 一A 1 0

Chart 1 (Leg)

Chart 2 (Heel Flap)

Note: For a wee tiny dyeing tutorial related to the Wee Tiny Aran Sock, see the last page of the Glossary!

Tuisteo Sticch les Section
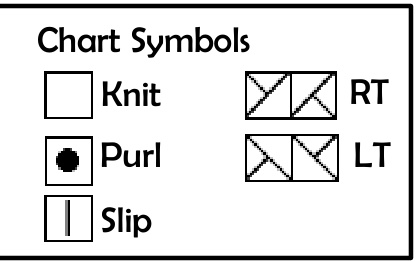
besin paccern Using cable cast-on, cast on 24 sts. Work the first row flat as follows: Follow Chart 1 or written instructions below for rounds 1-4 Round 1: (N1) K to Round 1: P1, LT, P1, LT, RT, P1, RT, P1, K1, RT, P1, RT, LT, P1, K1, RT. 3 sts before the Round 2: P1, K2, P1, K4, P1, K2, P1, LT, K1, P1, K4, P1, LT, K1. end, k2tog, p1. Round 3: P1, LT, P1, LT, RT, P1, RT, P1, K1, RT, P1, LT, RT, P1, K1, RT. (N2) LT, K1, P1, K4, Round 4: repeat round 2. P1. LT. K1. (N3) P1. ssk, k to end. P1, K2, P1, K1, P2, K1, P1, K2, (P1 K1) 2X, P2, K2, P2, K1, P1, K1. Now, join for knitting in the round, with 8 sts on each of 3 needles. Repeat the first row for the first 3 rounds. The leg pattern consists of mini cables using twisted sts. The order of the cables from the beginning of the round is: 2 st left twisting cable, 4 st horseshoe cable, 2 st right twisting cable, 3 st plait, 4 st honeycomb and 3 st plait. Repeat Rounds 1-4 three more times, for a total of 16 rounds in pattern. Each cable is separated by 1 purl st.
heel plap The 2 st left twisting cable, 4 st horseshoe cable, and 2 st right twisting cable continue down the heel flap. Follow Chart 2 or written instructions below for Rows 1-2. Row 1: SI 1, LT, P1, LT, RT, P1, RT, P1. Row 2: SI 1, P2, K1, P4, K1, P2, K1. Repeat rows 1 and 2 six more times, for a total of 12 rows in the heel flap.
heel Turn
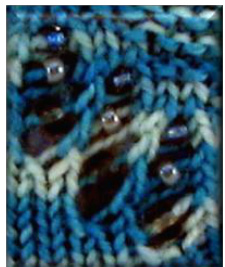
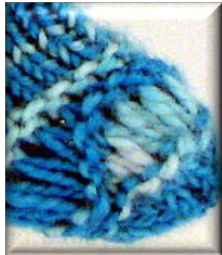
Sl1, k6, k2tog, k1, turn work, Sl 1, P3, p2tog, p1, turn work, Sl1, K4, k2tog, k1, turn work, Sl, p5, p2tog, p1, turn work. Sl1, k7. (8 sts remain on heel needle.) Pick up and knit 6 sts along heel flap edge. Pick up and purl 1 st in the gap. Along instep needle, K1, RT, P1, RT, LT, P1, K1, RT. Pick up and purl 1 st in the gap. Pick up and knit 6 sts along heel flap edge. K4. Place marker for beginning of round. (34 sts) Rearrange sts starting at the beginning of round marker so there are 11 on Needle 1 (N1), 12 on needle 2 (N2) and 11 on needle 3 (N3). Round 2: (N1) K to 2 sts before the end, k1tbl, p1. (N2) K1, RT, P1, LT, RT, P1, K1, RT. (N3) P1, k to end. Round 3: Repeat Round 1. Round 4: (N1) K to 2 sts before the end, k1tbl, p1. (N2) K1, RT, P1, RT, LT, P1, K1, RT. (N3) P1, k to end. Repeat rounds 1-4 one more time and then repeat rounds 1-2 once more. 24 sts remain. Toe oecreAses Round 1: (N1) K1, DD, k1tbl, p1. (N2) DD, p2, k2, p2, dd. (N3) P1, kitbl, dd, k1. (16 sts) Round 2: K2, kitbl, p4, k2, p4, k1tbl, k2. Round 3: K1, k2tog, p2, p2tog, k2, p2tog, p2, ssk, k1. (12 sts) Round 4: K2, p3, k2, p3, k2. Round 5: k2tog, p1, p2tog, k2, p2tog, p1, k2tog. (8 sts) K 2 sts from needle 1 onto needle 3. Break yarn, leaving 12" tail. Graft toe closed & weave in ends. Hide the sock from leprechauns! Raindrops keep falling on my head, and stitches keep dropping off my needles. No worries on either account, though, because the rain is falling on my gardens, too, and all the dropped stitches are intentional. This little sock incorporates two different kinds of dropped stitches. In the leg section, stitches are dropped down several rows, allowing beads knit into the sock to show. In the foot section, stitches are knit with the yarn wrapped around the needle extra times. The extra wraps are dropped in the next row, resulting in a wavy pattern of elongated stitches.
Materials
Fingering weight yarn, about 12 yards in watery blue Suggested yarn: Cherry Tree Hill Supersock Select in Cornflower 18 small glass beads, total 6 in size 8, crystal blue (A) 6 in size 8, light gray (B) 6 in size 6, medium gray (C). Set of $4\,\cup\varsigma$ size 0 (2 mm) DPNs Suggested gauge: 9 sts and 16 rows per 1"/2.5cm in stockinette
bpecial Abbreviatiors
k2w/k3w/k4w: Knit, wrapping yarn around the needle 2/3/4 times. PB: Slide the next bead on the working yarn right up to the needle. DP: Drop the next st and unravel the 5 sts below it, down to the YO (at bead A). It takes a bit of work to unravel them! Pick up the top strand of yarn (the st you just dropped) by inserting the needle from front to back, and knit it through the back loop. This frees up 3 beads knit into the work in previous rows so they can slide and show on the front of the work, but does not change the stitch count.
&trirg beade
Using a beading needle, string the beads on the yarn in the following order: CCBBCCAABBCCAABBAA. The first bead on (C) will be the last bead knitted. The last bead on (A) will be the first bead knitted. The suggested yarn is very squishy, so if you have trouble getting it through the eye of the beading needle, cut a piece of sewing thread about 6 inches long. Put both ends of the thread through the eye of the needle, then put the yarn through the loop of thread. Use the thread to pull the yarn through the needle.
Begir pattern
Cast on 18 sts. Divide evenly among 3 needles and join for knitting in the round, being careful not to twist. Rounds 1-23 are written out below, and charted on the next page. Round 1, 3: P all sts. Round 2, 4, 6, 8: K all sts. Round 5: P2, k2, p10, k2, p2. Round 7: P1, k3, p10, k3, p1. Round 9: K1, k2tog, PB (A), YO, k1tbl, k1, p8, k1, k2tog, PB (A), YO, k1tbl, k1. Round 10: K3, k1tbl, k12, k1tbl, k1. Round 11: K2, PB (B), k1, k1tbl, k2, p6, k3, PB (B), k1, k1tbl, k1. Round 12: K3, k2tog, PB (A), YO, k1tbl, k6, k2tog, PB (A), YO, k1tbl, k1, k1tbl, k1. Round 13: K2, PB (C), k1, k1tbl, k1, k1tbl, k2, p2, k4, k1tbl, PB (C), k1, k1tbl, k1. Round 14: K3, k1tbl, PB (B), k1, k1tbl, k7, PB (B), k1, (k1tbl, k1) 2 times. Round 15: K2, DP, k1tbl, k1, k2tog\*, PB (A), YO, k1tbl, k2, k2tog, PB (A), YO, k1tbl, k1, k1tbl, DP, k1tbl, k1 \*Note that you will need to slip 1 st from the next needle to do this k2tog. Round 16: K4, PB (C), (k1, k1tbl) twice, k4, k1tbl, PB (C), k1, k1tbl, k3. Round 17: K5, k1tbl, PB (B), k1, k1tbl, k3, PB (B), (k1, k1tbl) twice, k3. Round 18: K4, DP, k1tbl, k1, k1tbl, k4, k1tbl, DP, k1tbl, k3. Round 19: K6, PB (C), k1, k1tbl, k3, PB (C), k1, k1tbl, k5. Round 21: K7, bp, kItbh, 3,bDP, kitb, s. Begin heel flap
Row 1: K5. Slip the 6th st from this needle onto the adjacent needle. TW. Row 2: Sl1, p8. Slip the 2 unworked sts from the end of the needle to the adjacent needle. TW. You should have 9 sts on the heel needle and the other 9 sts divided between 2 other needles. Row 3, 5, 7: Sl 1, k8. Row 4, 6, 8: Sl1, p8.
Jurn heel
K5, k2tog, k1, TW, Sl1, p2, p2tog, p1, TW, Sl1, k3, k2tog.
Begir gusset
Continuing with the heel flap needle (needle 1), pick up and knit 5 sts along edge of heel flap. Pick up 1 extra st in the gap between heel flap and instep sts. (12 sts on needle 1) Knit 9 instep sts onto needle 2. (9 sts on needle 2) Using needle 3, pick up and knit 1 st in the gap between the instep and the heel flap. Pick up and knit 5 sts along the edge of the heel flap. Ssk, k1. Stitch count is now $9/9/8$ on needles $1/2/3$ .Bottom of sole is beginning of round.
gusset decreades
Round 1: K to last 2 sts of needle 1, k2tog, k all sts on needle 2, ssk, k to end of needle 3 Round 2,4,6,8: Repeat round 1. Round 3,5,7: K all sts. Note: After round 8, 18 sts remain.
Feot ard Joe
Round 9: purl all sts. Round 10: (k2w, k3w, k4w, k3w, k2w, k4\*) 2x. Note: The first 5 sts have extra wraps. The next 4 sts are just knit normally. Round 11,13: Purl all sts, dropping the extra wraps. Stitch count will still be 18 at the end of round. Round 12: (knit 4, k2w, k3w, k4w, k3w, k2w) 2x Round 14,15,16: k to last 2 sts of needle 1, k2tog, ssk, kto last 2 sts of needle 2, k2tog, ssk, kto end of needle 3. After round 16, 6 sts remain.
Finishing
Break yarn and thread through the remaining 6 sts. Weave in ends. This sock benefits from a wet blocking. Immerse it in warm water for 15 minutes or so, squeeze it gently in a towel, and put it on a mini sock blocker to stretch out and smooth out the dropped sts. If any of the beads have gotten out of place, slide them back into position. Time for a rain dance!
Chart
Ghart symbols
- = purl blank $=$ knit $2={\tt k}2{\tt t o g}$ $\mathsf{A}=\mathsf{P B}$ (A), YO. ${\mathsf{B}}={\mathsf{P B}}$ (B), k1. ${\mathsf{C}}={\mathsf{P B}}$ (C), k1. ${\mathsf{D}}={\mathsf{D}}{\mathsf{P}}$ (see abbreviations)

Wee tiny socks are blooming everywhere! Cast on stem in green, petals in variegated pink and yellow, and work back and forth on 2 needles around the Wee Tiny Flower Sock. Choose “Daisy", a garter stitch version with 5 petals, or “Glory", a stockinette version without separate petals. Either way, you'll work increases, decreases and short rows to shape the heel, and then graft the side seam to finish.
Materiaes
Fingering weight yarn, about 12 yards variegated spring green (MC) and about 10 yards variegated pastel pink (CC) Suggested yarn: Blue Moon Fiber Arts Socks that Rock Lightweight in Lemongrass (MC) and Peek-a-Boo Peony (CC) Suggested gauge: 8 sts and 14 rows per 1"/2.5cm in stockinette Set of 2 US size 1(2.25mm) needles
Speciae Abbreviations
Only standard abbreviations are used in this pattern. Important notes about changing colors: The basic idea is to make sure the colors are twisted together at the join, so that there will be no gaps or holes in your sock. Also, the non-working yarn is sometimes carried over a couple stitches when it is picked back up again. This is always done on the wrong side of the work.
On a RS row, or a Ws (purl) row in the stockinette version only:
If the new color is already to the right of the old color, just drop the old and start knitting with the new. If the new color is to the left of the old color, bring it under and to the right of the old color. Then bring it up over the old color to continue working with the new color.
On a WS row in the garter stitch version:
Bring the old color to the front of the work (wrong side). Then proceed as above.
Begin Pattern
Using waste yarn and crochet provisional cast on, cast 0n 32 sts. Set up row: Leave a tail of at least 5'" for each color. K24 MC, k8 CC. Begin first pattern section, following written instructions to the right, or chart below. Note: When you cast on extra sts in row 7 of the "Daisy" version, use the backwards loop method. Rows 10-27: ReDeats rows 1-9 two more times.
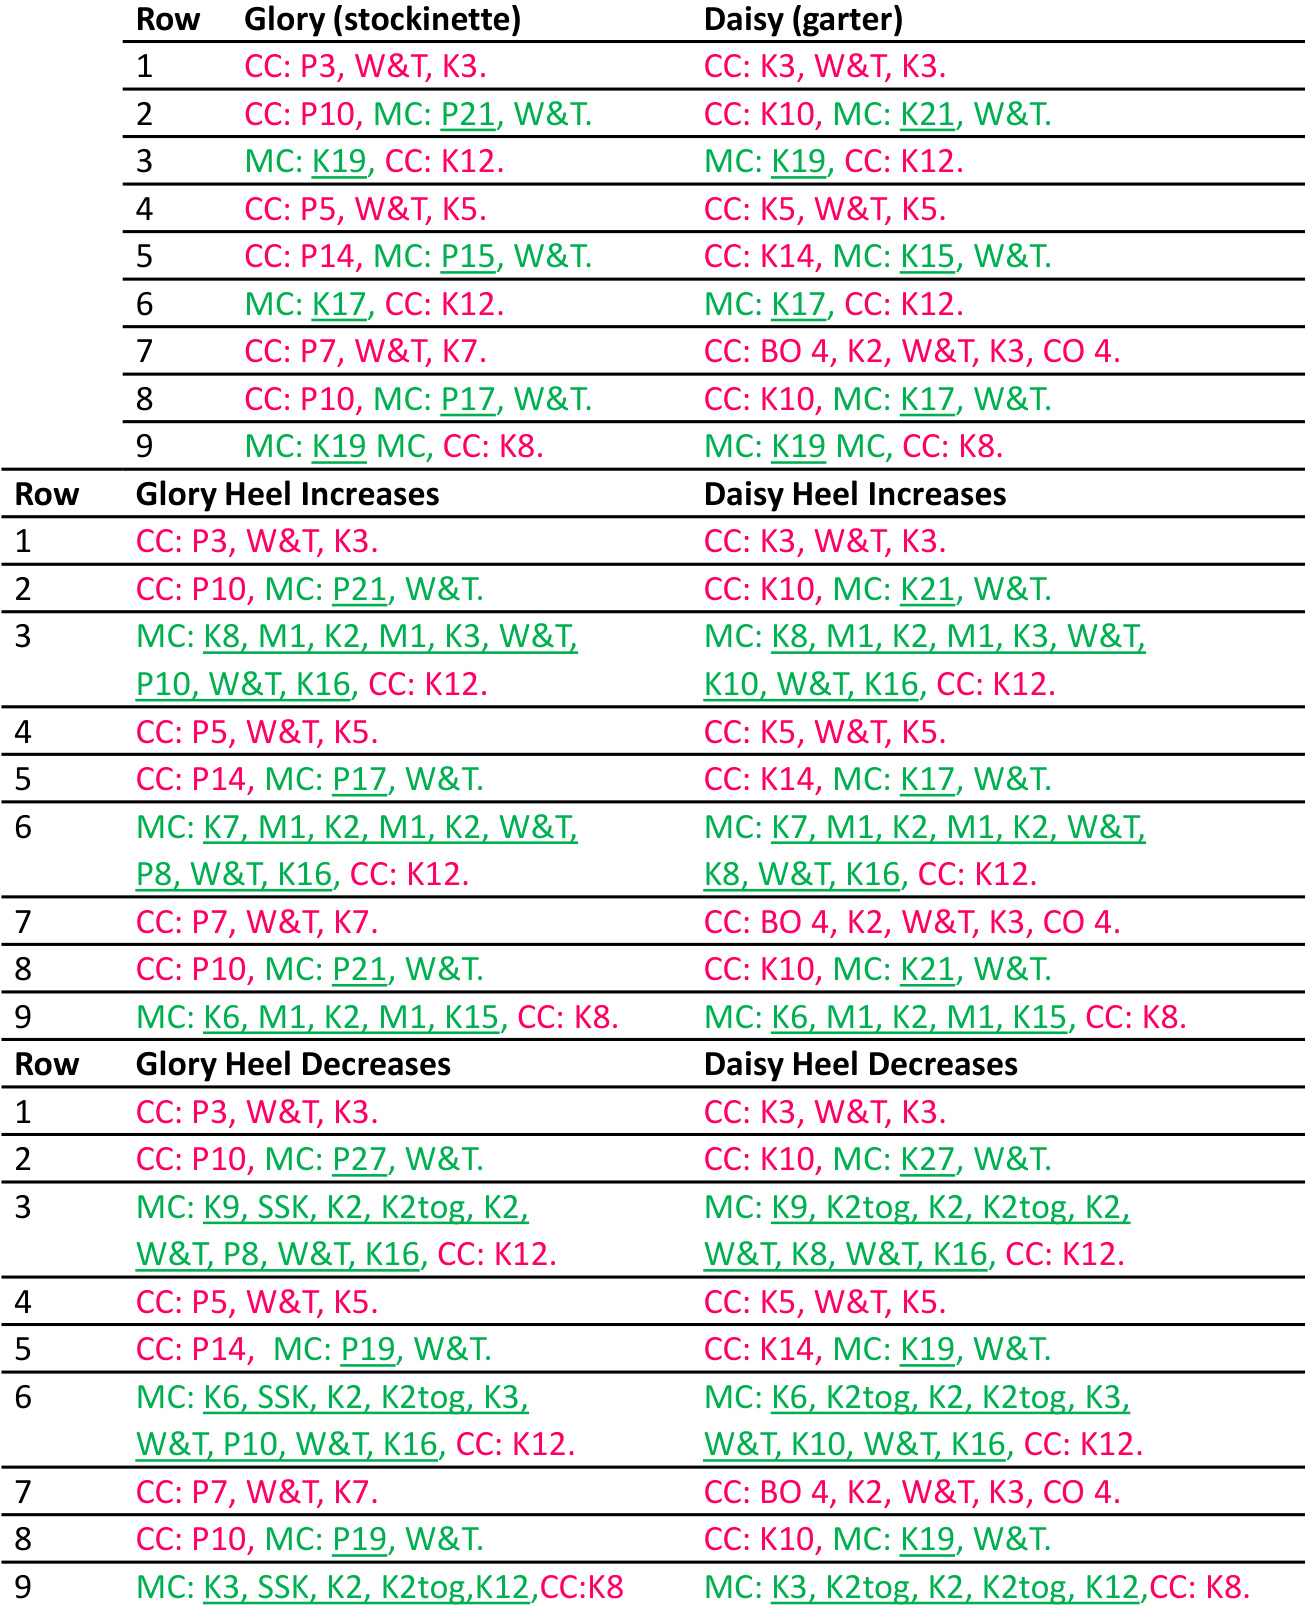
The heel sections are almost the same at the previous sections, except the underlined instructions from sections 1-3 are replaced by increase/decrease & additional short rows. Workheel increase section using written instructions to the right, or chart below. Work heel decrease section, following third set of written instruction to the right or chart below.
Finisking
Break MC yarn leaving an $18^{\prime\prime}$ tail. Break CC yarn leaving an 8" tail. Remove waste yarn from crochet cast on and place sts on a needle. You will have 7 CC and 23 MC sts from the provisional cast on. Bring the 5"' cast on tail from CC to the right side of the work, wrap over the needle to the wrong side, and weave in the tail on the inside, forming an extra st in Cc. Repeat this process for MC at the toe of the sock. There are now 32 sts on each of 2 needles, 24 MC and 8 CC. Graft these together starting with the CC at the cuff of the sock. (see next page for details) and weave in ends. Don't forget to stop and smell the flowers!
Notes on chart
1. The gray squares indicate there is no st worked in this location. For example, after working a w&t, remaining sts in that row are gray because you are not working in that direction anymore. 2. See written instructions for row 7 on the Daisy version for details on binding off and casting on to create the separate petals. 3. The short rows at the top of the sock (worked in CC in rows 1, 4, and 7) are omitted from the heel chart for simplicity, but remember to work them as set in the previous sections.
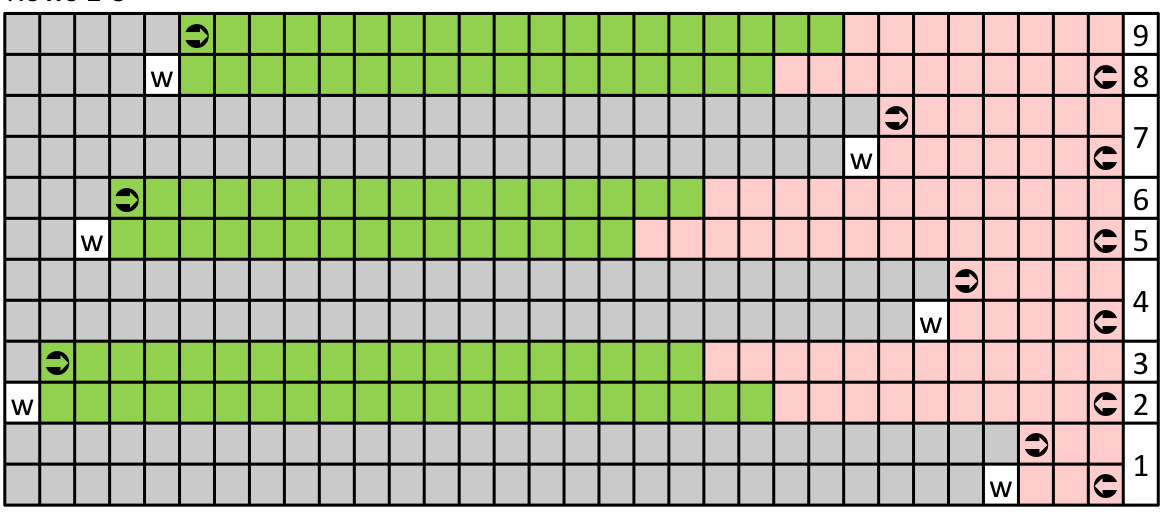
Chart Legend
& indicate the direction of work For Daisy, all sts are knit. For Glory, knit on RS and purl on WS.
Grafting the side seam
Bring the 2 needles together so the sock is right side out and hold the work so the needle with the working yarn tail is in back and the cuff of the sock is to the right. Thread a tapestry needle with the CC yarn tail. You will graft the first 8 sts with CC, then switch to MC. Grafting in stockinette and grafting in garter st proceed slightly differently. Bring the yarn through the first st on the front needle as if to purl. Bring the needle through the first st on the back needle as if to knit. \*Bring the yarn through the first st on the front needle as if to knit, and slip it off. Bring the needle through the second st on the front needle as if to purl. Bring the yarn through the first st on the back needle as if to purl and slip it off. Bring the yarn through the next st on the back needle as if to knit.\* Repeat until all sts are gone: Knit, knit and off, purl, purl and of... Bring the yarn through the first st on the front needle as if to purl. Bring the needle through the first st on the back needle as if to purl. \*Bring the yarn through the first st on the front needle as if to knit, and slip it off. Bring the needle through the second st on the front needle as if to purl. Bring the yarn through the first st on the back needle as if to knit and slip it off. Bring the yarn through the next st on the back needle as if to purl.\* Repeat until all sts are gone: Purl, knit and off, purl, knit and off... Abbreviations and special techniques
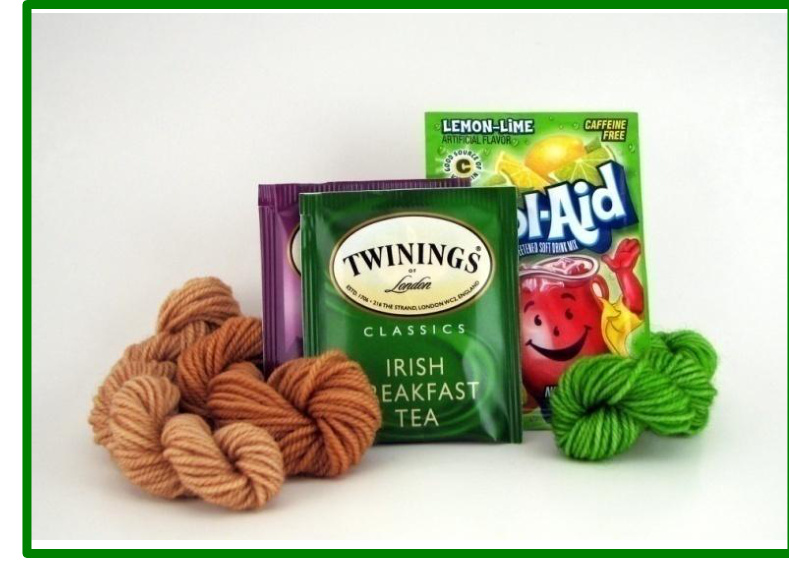
If you'd like to try knitting a Wee Tiny Aran Sock in green, here's an easy method to dye a mini skein of natural white wool: Pour the contents of a packet of Lemon-Lime KoolAid into a mug. Add boiling water to almost full. Untwist the mini skein and put it into the mug, pressing with a spoon to submerge. Leave it sit until the water has cooled to room temperature, about 30 minutes. The water will be clear after the yarn absorbs all the color! Rinse the yarn well and hang to dry. Easiest way to dye a mini skein ever! You can also get a lovely natural brown by brewing a cup of tea, removing the tea bag and adding the yarn to the hot tea. Darjeeling produces the lighter brown (left), while Irish Breakfast produces the darker shade (right). 42


