Knitted Moon esiqns
Wild Orbit Jumper
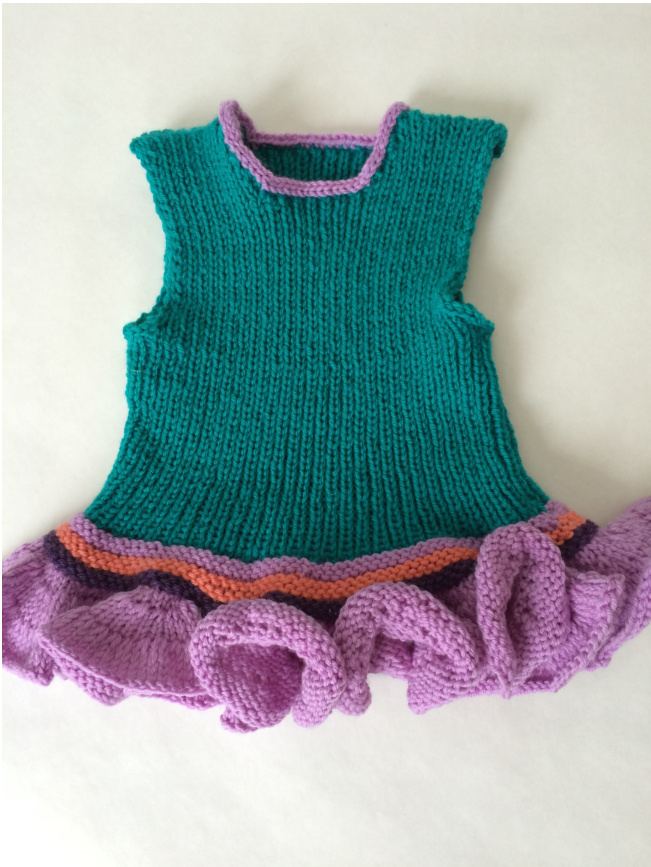
The Scoop: This jumper top is designed for the girl on the go. It has a stretchy middle to keep things in place and at the same time, a ruffle that can dance. Perpetual motion never looked so good. The body is worked from the bottom up and the rings and ruffle are worked last. You can use stash yarn for the details, even mix up the ruffle colors if you want. This jumper, as shown, is made with Cascade Superwash 220 but any kid friendly fiber will do. Offered in 3 general sizes:12-18 months, 24 months-2T, and 3T-4T. A great layer piece one can add to T's and tights, long enough to be dressy but short enough for everyday play. Materials: Cascade 220 Superwash wool (100gr/3.5oz) 220 yds. Two main colors and two small detail colors. For size 12-18mos and 24mos-2T: 1 skein for each main color or approx. 220 yds each also about 15 yds, for each detail color. For size 3T-4T: 2 skeins for each main color or approx. 310 yds for each and about 15 yds for each detail color. The main colors shown in model picture are Teal and Light Iris with the detail colors being Heather and Coral. The hanger jumper's main colors are Celery and Deep Ocean with the details in Peach and Heather. Size 6 circular needles in 16" and 24" (or size for gauge) Size 4, 5 or 6 double pointed needles for I cord trim Crochet hook - to pick up stitches Stitch markers Stitchholder Blunt end needle for finishing Gauge: 20 sts = 4 ins in stockinette Cascade 220 Superwash has a gauge of 20-22sts = 4" in size 6 or 7 needle US Sizes: three sizes Size 12-18 months, size 24 mos- 2T and size 3T-4T
Instructions:
The garment is worked from the hip to the shoulders and in the round. You can either cast on with provisional stitches or your favorite one - either way, once the top section is done, you will have to pick up stitches at your cast on edge to finish the bottom section. Sizes as shown: 12-18mos, (24m-2T, 3T-4T) Cast on 108, (120, 132) sts with shorter needles for smaller sizes. Then K1, P1 and continue until end of round. When joining, be careful not to twist your work. Add marker in second round. Continue in K1, P1 pattern and work the piece until it measures 4, (4.5, 5.5) ins Divide for front and back. Place 54, (60, 66) sts on stitch holder for back. Begin working on the front section and start armhole shaping. Continue in the K1. P1 pattern throuahout. Bind off 2 sts at the beginning of the next two rows. Then decrease 1 st at the beginning of the next two rows 1 time, (2 times, 3 times) for a total of 48, (52, 56) sts. Work front section until the armhole measures 4, (4, 4.5) ins. ending with WSrow. Front Neckline shaping: (RS) Work pattern for 17, (20, 21) sts then bind off 14, (12, 14) sts. Then work in pattern for 17, (20, 21) sts. (WS) Attach another section of yarn so you can work both sides at the same time. Work this row in pattern. (no decrease) Row A (RS): Decrease each neck edge side by working the pattern until last 2 sts, then K2tog. On left side, Ssk then work in pattern to the end of row. Row B (WS): Work in pattern. Repeat Rows A & B - 2 more, (3 more, 4 more) times. There will be 14, (16,16) sts on each shoulder and armhole measures approximately 5, (5, 5.5) inches. Place sts on stitch holder - cut the yarn and leave a tail about 24" for later 3- needlebind off. Back section: Attach yarn and begin working on the back section and at the same time, start armhole shaping. Continue in the K1, P1 pattern throughout. Bind off 2 sts at the beginning of the next two rows. Then decrease 1 st at the beginning of the next two rows 1 time, (2 times, 3 times) for a total of 48, (52, 56) sts. Work back section until the piece reaches the front section neckline ending withWSrow. Back Neckline Shaping: (RS) Work pattern for 15, (17, 18) sts then bind off 18, (18, 20) sts. Then work in pattern for 15, (17, 18) sts. (WS) Attach another section of yarn so you can work both sides at the same time. Work this row in pattern. (no decrease) Row A (RS): Decrease each neck edge side by working the pattern to the last 2 sts, then K2tog. On left side, Ssk then work in pattern to the end of row. Row B (WS): Work in pattern. Repeat Rows A & B - 0 more, (0 more, 1 more) time. There will be 14, (16,16) sts on each shoulder. Work until this side until it matches the front in length. Use 3 needle bind-off to attach the shoulders. Bottom section:
Stripes:
If you did a provisional cast on - pick up the stitches in a contrast yarn. If you did use a regular cast on to start, then starting at side, pick up the cast on stitches in the contrast yarn. Place marker to mark the beginning of the round. Round A: Knit all stitches in the round Rounds B & C: Purl all sts in the round Repeat Rounds A, B and C for each color round that you want to add. We did three different colors - suggested number for sizes 12-18 mos and 24mos - 2T. Add one more for the size 3T-4T for a minimum of 4 rounds. Ruffle: Change to desired color. Round 1) Knit one round Round 2) \*K1, knit f&b, and repeat from \* to end of round. Rounds 3 and 4) Knit all sts Round 5) Knit f&b of each stitch Rounds 6 to 9) Knit all sts Round 10) Knit f&b of each st Rounds 11 to 14) Knit all sts (Size 12-18mos and 24mos-2T): Bind off all sts purlwise (Size 3T-4T): Knit 4 more rounds then bind off all sts purlwise
Finishing:
Use blunt ended needle to weave in any loose ends. Armholes: Use a crochet needle and starting at the bottom of the armhole, make a single crochet stitch around the armhole in the body color. Neckline: two options here and choices of either contrast or same body yarn 1) (as shown) Work an i-cord edge in a contrast color. We used the size 6 needle for this. Look for our YouTube video for an I-cord edge.
I-cord edge
Using two #5 or #6 double pointed needles - cast on 3 sts on one of the needles. Then with the wrong side facing, starting at the back edge of neckline, pick up one stitch on needle with dpn sts. \*DO not - turn the needle. Keep yarn in back and slide the stitches across the needle to the right. (hold needle in your left hand) Take RH needle and knit the first 2 sts, then K2tog tbl. (you now have 3 sts) Pick up the next neckline st. And repeat from\*. Note: try to keep tension even and loose enough so the edge doesn't gather. With the size #5 needles, you should be able to pick up almost every st along the neckline edge. Complete the neckline, bind off last 3 sts and seam together to other end of Icord. 2) Work a single crochet edge starting at the back of the neckline. Level of Difficulty: Easy Intermediate


