Thumb
Pick up all 25 sts from the stitch-holder or waste yarn and divide them over 4 needles. Pick up 2 extra sts by picking up the loop between the sts at the point where the hand of the glove continues and knitting this loop both front and back. Start knitting in the round, working each st as it presents itself (i.e. \*kltbl, p2, repeat from \*) The 2 sts you've just picked up are purls. Continue knitting these 27 sts for 30 rounds or until only the very tip of your thumb is visible when you try on the glove. Knit the tip: R1: \*kltbl, p2tog, repeat from \* to end of round (18 sts) R2: \*s1, kl, psso, repeat from \* to end of round (9 sts) R3: [s1, k1, psso] x 4, k1 (5 sts) Break off yarn, leaving a 4 in (10 cm) tail. With a darning needle, weave the end through all 5 sts and pull tight. Turn thumb inside out to weave in yarn.
Whole gloves, right hand
Start pattern as described on pages 1 and 2. Work 2 more rounds, finishing with row 23 of the lace chart. Start the following round, working 32 sts in twisted 2/2 rib, finishing with k2tbl. The last 18 sts you worked will form the little finger. Follow the instructions to knit the fingers as before (page 5), creating a mirror image (when you start the 1st round of a finger by picking up sts connecting it to the previous finger, you proceed by knitting the sts on the back of the hand, then connecting sts, join in the round and finish by working the palm sts). Use the ends of yarn between the fingers to close any little gaps between sts and weave in ends.
Finishing
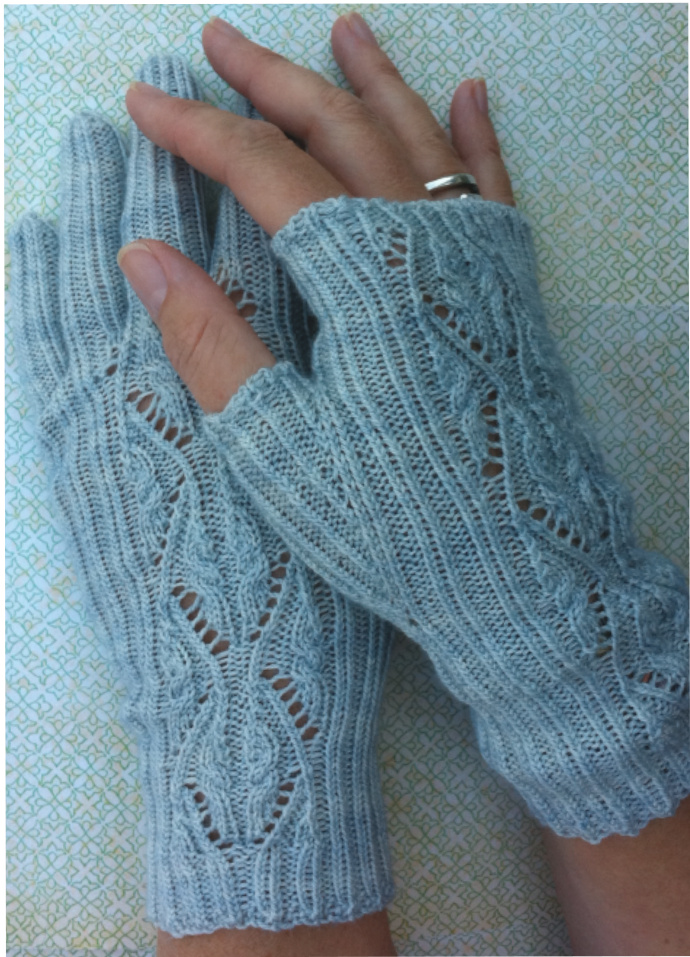
This pattern includes instructions for both types of gloves shown in the picture. The gloves are knitted in a 2/2 rib pattern with twisted knit stitches, which makes for the nice crisp lines running along the gloves. A lace section with small cables runs along the back of the hand. . One hank of Soliloquy is enough to knit 2 pairs of gloves (one pair with and one pair without fingers) . Great pattern for gift knitting V. Ribbed knit allows for wide variety of sizes
About this paltern
Difficulty: Measurements: Materials: Metreage: Intermediate The pattern fits a wide variety of hand sizes (from adult size 6 ladies up to a size 9 men) 50 - 60 gr of Soliloquy sock yarn Fingerless: 250 m per pair With fingers: 350 m per pair 40 sts and 56 rows measure 10 x 10 cm. in st.st one set of five 2.0 mm dpn's (if necessary use bigger to achieve the right gauge; up to 2.5 mm will work) 2 stitch holders or some waste yarn Optional: 2 stitch markers Tension: Notions:
Abbrevialions
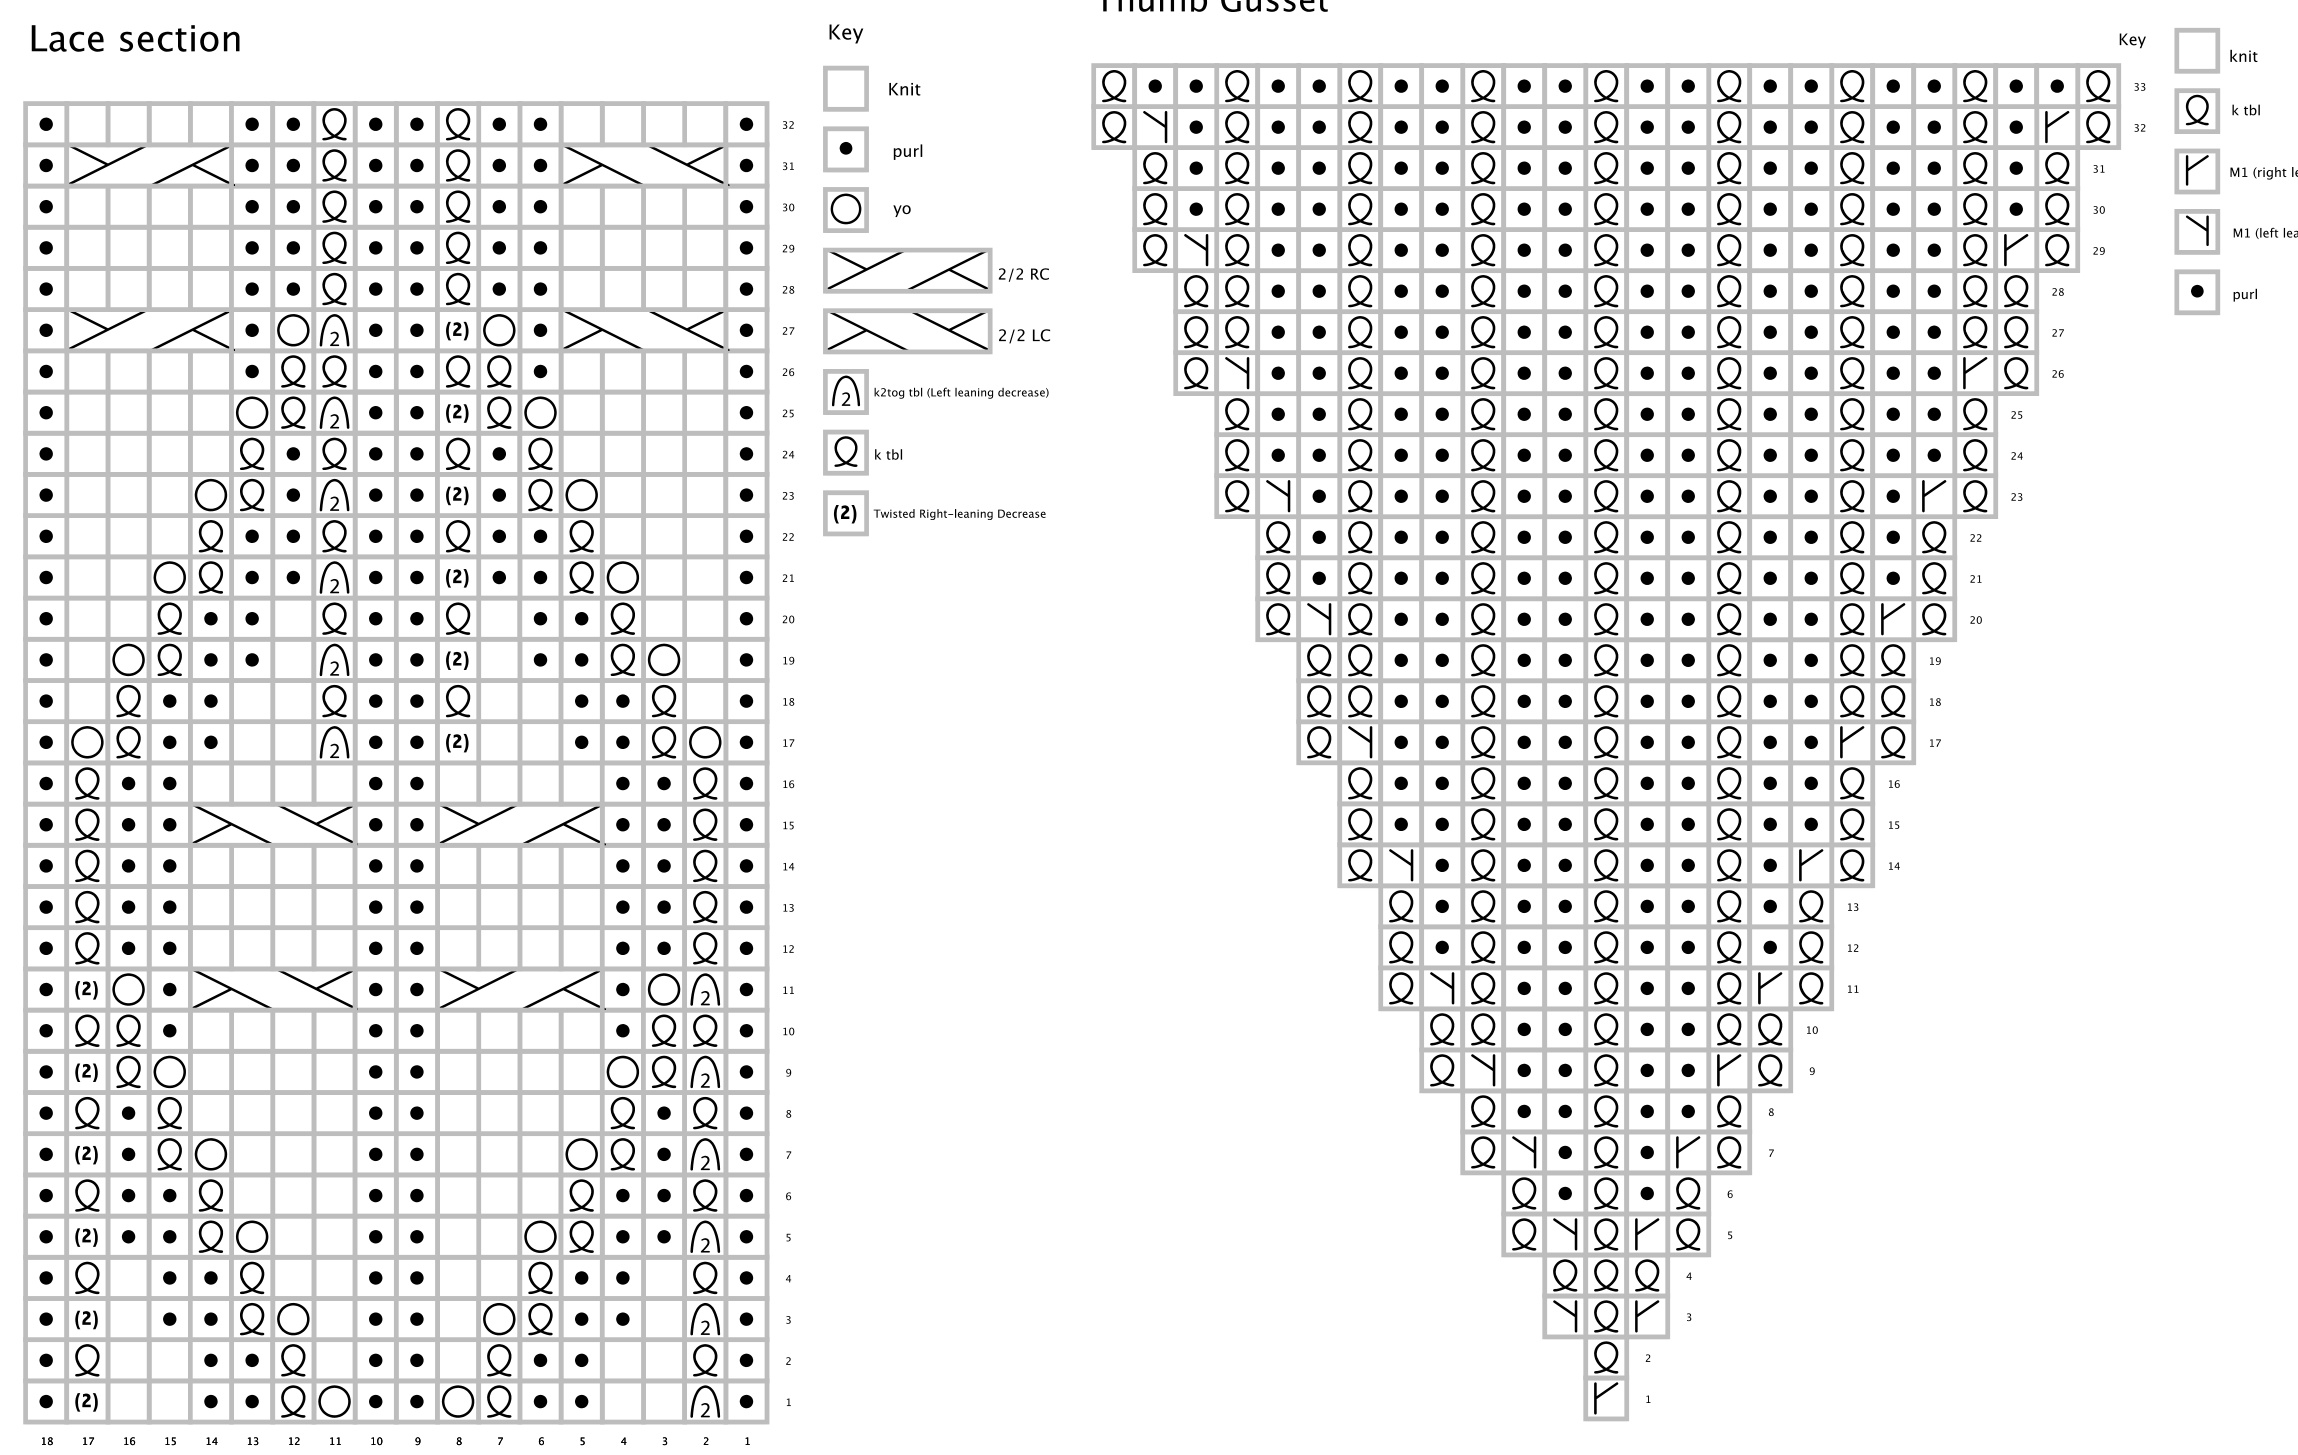
st = stitch, sts = stitches, k = knit, p = purl, PM = place marker, sM = slip marker, k1tbl = knit 1 through back loop (twisted knit stitch), s = slip, yo = yarn over, 2/2 RC = right-leaning cable over 4 sts (place 2 sts on cable needle behind work, k2, k 2 sts from cable needle), 2/2 LC = left-leaning cable over 4 sts (place 2 sts on cable needle in front of work, k2, k 2 sts from cable needle), k2togtbl = knit 2 together through back loops), TRLD = twisted right-leaning decrease (kltbl, bring tip of right needle behind next st on left needle and insert it, from left to right, into the back leg of the st, dropping the st from the left needle. This will twist the st as it is slipped to the right needle. Slip both sts purlwise back to left needle; pass slipped st over knit st, then sl back to right needle), M1R = make 1 st right-leaning (insert left needle, from back to front, under horizontal strand of yarn running between last st on left needle and first st on right needle; k this st through front loop), M1L = make 1 st leff-leaning (insert left needle, from front to back, under horizontal strand of yarn running between last st on lefft needle and first st on right needle; k this st through back loop), psso = pass slipped st over the knitted st, p2tog = purl 2 together.
Paltern
Cuff
Using your preferred cast-on method, cast on 72 sts. Divide sts over 4 needles and join in the round, taking care not to twist your stitches. R(ound) 1: PM to mark the start of your round if you find it helpful \*k2tbl, p2, repeat from \* to end of round R2 - 10: Sm, \*k2tbl, p2, repeat from \* to end of round
Left glove, hand section
NOTE: for right glove, see top of page 5. On each row, the lace section is indicated between brackets {} and is knitted using the chart on page 3. Place PM's at the start and finish of the lace panel if you prefer. The other sts are worked as they present themselves, in a k2tbl/p2 rib. Release the next 16 sts from the stitch markers or waste yarn (8 sts on the palm side and 8 sts on the side with the lace panel) and divide them over 4 needles. Start knitting by picking up and knitting 2 sts where the little finger borders on this next one, the ringfinger, then [p2, k2tbl] x 2 on the palm side, make 2 extra stitches , then proceed to [k2tbl,p2] x 2 on the lace side. Continue to work these 20 sts in the round for 39 rounds (or more or less depending on size required). Knit tip as described on page 5. For the middle finger, release 10 sts of the lace panel and 10 sts on the palm side and divide them over the needles. Pick up and work 1 st along the connection with the ring finger,[p2, k2tbl] x 2, p2 across the palm side, make 2, then join in the round (23 sts) and finish the round by working the remaining sts as follows: [p1, kltbl] x 2, p2, kltbl, pl, k2tbl. Start knitting the middle finger in the round, as follows: P3, [k2tbl, p2] × 2, k2tbl, [p1, k1tbl] × 2, p2, kltbl, p1, k2tbl (23 sts) Knit for 45 rounds (or until only 1/4 in of your finger is visible), work the tip as follows R1: p2tog, p1, [k2tbl, p2tog] x 2, kltbl, [sl,kl, psso] x2, kltbl, p2tog, s1, k1, psso, k2tbl (16 sts) R2: p2tog, [k2togtbl, p1] x 2, kltbl, k2togtbl x 3, k1tbl (10 sts) R3: k2togtbl x 5 (5 sts) Finish finger as described for the others on page 5. For the index finger, transfer the remaining 18 sts onto your needles. Pick up and make 6 additional sts along the edge with the middle finger (these will be worked as p2, k2tbl, p2). Join the new total of 24 sts in the round and knit 40 rounds (or until only 1 /4 in of your finger is visible). Knit the tip: Next round: [k2tbl, p2tog] x 6 (18 sts) Next round: [k2togtbl, p1] x 6 (12 sts) Next round: [s1, k1, psso] x 6 (6 sts) Finish finger as described for the others on page 5.
Right glove, hand section
This glove is knitted as a mirror image of the left one. Knit the cuff \*p2, k2tbl\*, so each round starts with 2 purls. After the cuff, continue as follows: R1-32: SM, [p2, k2tbl] x 9, {lace panel}, [k2tbl, p2,] × 4, k2tbl Next, start the thumb gusset: R1-32: SM, [p2, k2tbl] x 9, {lace panel}, [k2tbl, p2] x 2, kltbl, <gusset chart>, kltbl, [p2, k2tbl] x 2 R33: Sm, [p2, k2tbl] x 9, {1st row lace panel}, [k2tbl, p2] x 2, kltbl, <last row of gusset chart>, kltbl, [p2, k2tbl] x 2 R34: SM, [p2, k2tbl] x 9, {2nd row lace panel}, [k2tbl, p2] x 2, kltbl, place the 25 sts of the gusset on a stitch holder or a piece of waste yarn to finish later, k1tbl, [p2, k2tbl] x 2 Continue the glove as you did the left glove, see instructions on page 2 from \*\*.
Y. Whole gloves cont'd...(left glove)
NOTE: for right glove, see back page... Work 2 more rounds, finishing with row 23 of the lace chart. Start the following round, work the lace chart, then work another 22 sts in twisted 2/2 rib, finishing with k2tbl. The last 18 sts you worked will form the little finger. Place all other sts on 2 stitch holders or on a piece of waste yarn and divide said 18 sts over 4 needles. Increase 2 by knitting 2 sts onto the last st you worked. Join these 20 sts in the round and continue knitting them in the twisted 2/2 rib (the 2 sts you made become purl sts). Work 30 rounds (or until just the last 1/4 inch of your little finger sticks out when you try the glove on. Knit the tip: Next round: [k2tbl, p2tog] x 5 (15 sts) Next round: [k2togtbl, p1] x 5 (10 sts) Next round: [s1, kl, psso] x 5 (5 sts) Break off yarn, leaving a 4 in (10 cm) tail With a darning needle, weave the end through all 5 sts and pull tight. Turn finger inside out to weave in yarn. R1-32: SM, [k2tbl, p2] x 4, k2tbl, {lace panel}, [k2tbl, p2] x 9 You will now start the thumb gusset as charted on page 4. The thumb gusset is indicated by these brackets < > Place markers at each end of the gusset section if you prefer. R1-32: SM, [k2tbl, p2] x 2, kltbl, <gusset chart>, k1tbl, [p2, k2tbl] × 2, {lace chart}, [k2tbl, p2] x 9 R33: SM, [k2tbl, p2] x 2, kltbl, <last row of gusset chart>, kltbl, [p2, k2tbl] x 2, {first row of lace chart}, [k2tbl, p2] x 9 R34: SM, [k2tbl, p2] x 2, kltbl, place the 25 sts of the gusset on a stitch holder or a piece of waste yarn to finish later, continue round, working row 2 of the lace chart \*\*Continue knitting in twisted 2/2 rib, SM at start of round, working the lace chart as before, until you have finished round 21. From this point, the instructions for the whole gloves continue on page 5 from ?. For fingerless gloves, continue on this page. Next round: Sm, work sts in twisted 2/2 rib, then instead of lace panel: p1, [kltbl, p2] x 5, kltbl, p1, continue round in twisted 2/2 rib. work 4 more rounds, Sm at start, working each st as it presents itself. The best cast off for the fingerless gloves is called the "sewn kitchener rib bind off". The best tutorial for it can be found here: http://rosemarygoround.blogspot.com/2009/06/tutorial-sewn-kitchener-rib-bind-off.html Alternatively, work 2 more rounds, then cast off all sts loosely.
Thumb
Pick up all 25 sts from the stitch-holder or waste yarn and divide them over 4 needles. Pick up 2 extra sts by picking up the loop between the sts at the point where the hand of the glovec ontinues and knitting this loop both front and back. Start knitting in the round, working each st as it presents itself (i.e. \*kltbl, p2, repeat from \*) The 2 sts you've just picked up are purls. Continue knitting these 27 sts for 4 rounds, then either cast off using the sewn kitchener stitch bind off or working 2 more rounds and casting off all sts loosely. Weave in all ends.