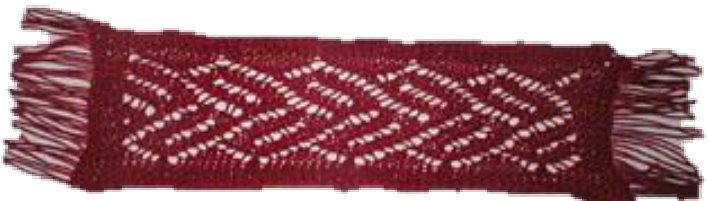
Versailles Bookmark
This self-fringing bookmark is knit length-ways. Versailles Pattern is from Barbara Walker's Second Treasury. I used Opera No. 20 Crochet Cotton and 1.75 mm needles. Using a provisional cast-on (this one works wonderfully!), cast on 68 stitches. Set up row: K 7, place marker, K 54, place marker, K 7. 1. (RS) K 4, P 1 TBL, K 2, knit across to second marker, K 2, P 1 TBL, K 4. 2. (WS) K 4, K1 TBL, K2, knit across to second marker, K2, K1 TBL, K4. Repeat R1, R2, then R1 - 6 rows in total, including the set-up row. The outermost seven stitches on each end are border stitches and the portion between the markers will be knit in the lace pattern. The format is four garter stitches, 1 reverse stockinette twisted on every row, two garter stitches, marker, pattern, marker, 2 garter stitches, 1 reverse stockinette twisted on every row, four garter stitches. The reverse twisted stockinette stitches are important -- don't forget them. The lace pattern is irregular. Don't bother trying to put markers between the repeats, because it won't work. When you reach the second marker, sometimes you'll be able to do a full repeat, but sometimes you'll have extra stitches left over or not enough for a full repeat. Just end before the second marker with the stitches indicated after the word "end". (I don't like doing P2tog-TBL, so instead I did "Purl 1 and slip it back to the left needle, lift the second stitch on the left needle over the stitch just purled and off the needle, slip the stitch back to the right needle." ) Keeping the border in pattern, knit the lace between the markers. 1. (WS) Purl. 2. K2 \* YO, SSK, K8 \* end K2 3.K2 \*YO, P2tog, P5, P2tog-TBL, YO, P1 \* end K2 4. K4 \* YO, SSK, K3, K2t0g, YO, K3 \* 5.K2, P2 \* YO, P2tog, P1, P2tog-TBL, YO, P5 \* end P3, K2 6. K6 \* YO, Sl1-K2tog-PSSO, YO, K7 \* end K5 7. K2 \* P3, P2tog-TBL, YO \* end K2 8. K3 \* YO, SSK, K3 \* end K1 9. K2, P1 \* P2tog-TBL, YO, P3 \* end P2, K2 10. K5 \* YO, SSK, K3 \* end K2 11. K1 \* P2tog-TBL, YO, P3 \* end P1, K2 12. K2 \* YO, SSK, K3 \* end K2 13.Same as Row 3 14.Same as Row 4 15.Same as Row 5 16.Same as Row 6 17. K2, P1 \* P3, YO, P2tog \* end K1 18. K5 \* K2tog, YO, K3 \* end K2 19. K2, P1 \*YO, P2tog, P3 \* end P2, K2 20. K3 \* K2tog, YO, K3 \* end K1 21. K2 \* P3, YO, P2tog \* end K2 22. K1 \* K2tog, YO, K3 \* end K3 23.Same as Row 3 24.Same as Row 4 25.Same as Row 5 26.Same as Row 6 27. Purl. Starting with a RS row, knit six rows of garter stitch as at the beginning, keeping the border stitches in pattern. Binding off, RS facing: K 4, P1-TBL, K1, \* return the last two stitches to the left needle and knit them together through back loop, K1 \* repeat until you reach the second reverse twisted stockinette, P1-TBL, replace the last two stitches onto the left needle and knit them together through back loop. Cut the yarn, leaving a tail long enough to weave in. You are left with four stitches on the right needle and four on the left. Pull the needles out and just let those stitches hang there for the moment. Take the tail that you just cut and weave it in on the wrong side through the column of twisted stockinette. Pick up the stitches from the provisional cast-on and bind off in a similar fashion. (Depending on which cast-on you used and how you picked the stitches up, you could be on either the wrong side or the right side. Just be sure that you're twisting the stitches that need twisting and not binding off the four outermost garter stitches on each end.) Finishing: Unravel the four garter stitches on each end up to the twisted stitch. The twisted stitch will not unravel. Snip the outermost end of the loops so that each loop becomes two strands of fringe. Wet block, stretching it out so the pattern shows well and the ends and sides are straight. Smooth out the kinks in the fringe so it is straight. When dry, unpin and trim the fringe ends evenly.


