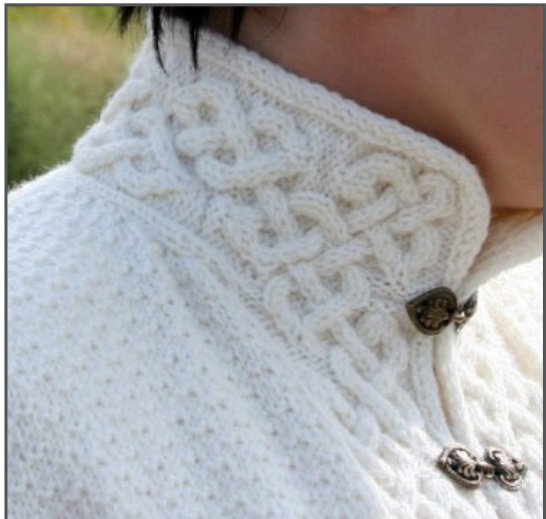
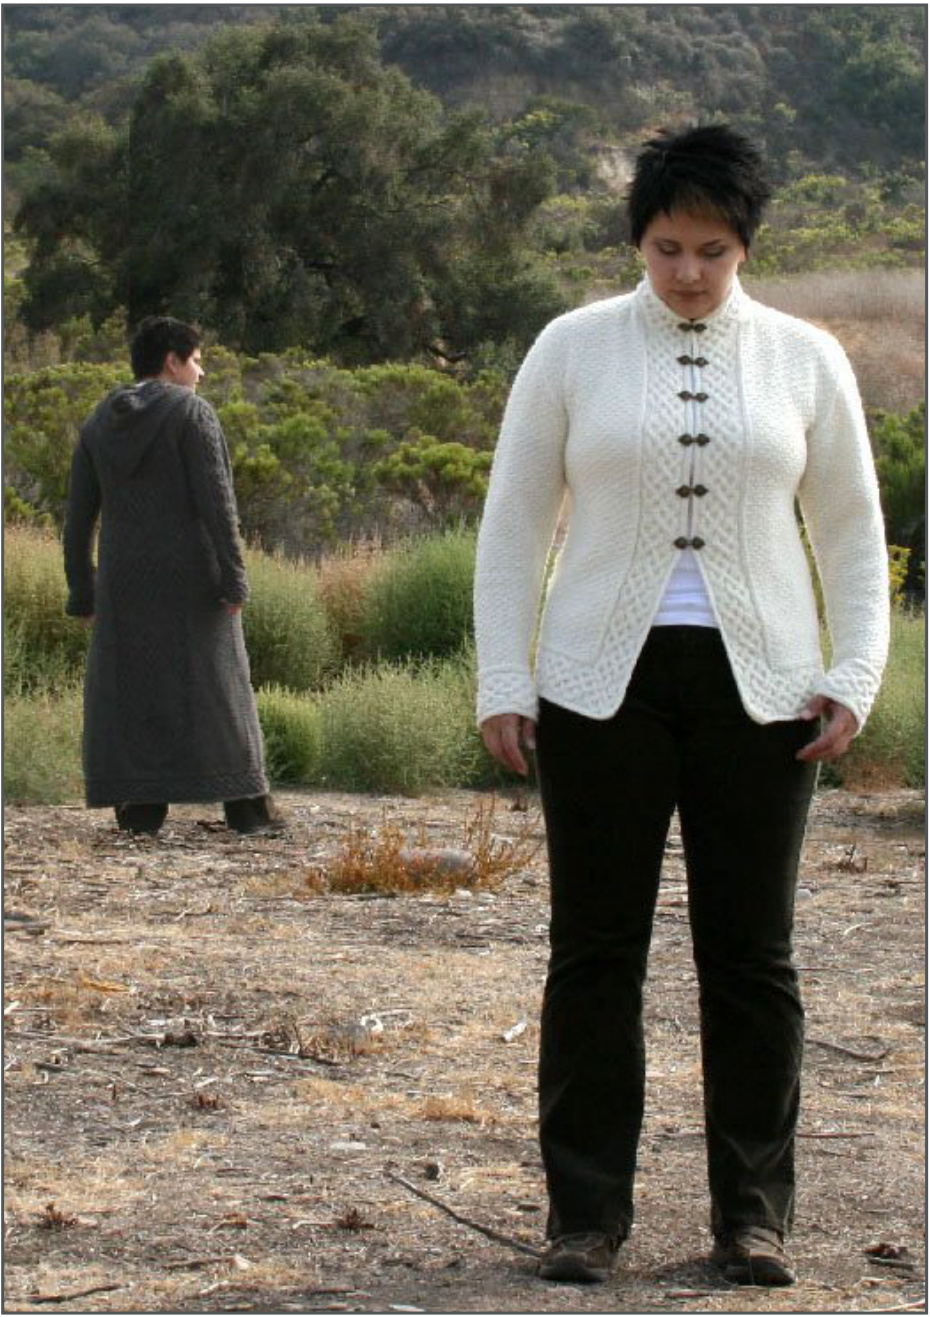
Louhi Coat and Pohjan Neito Cardigan
About the Design
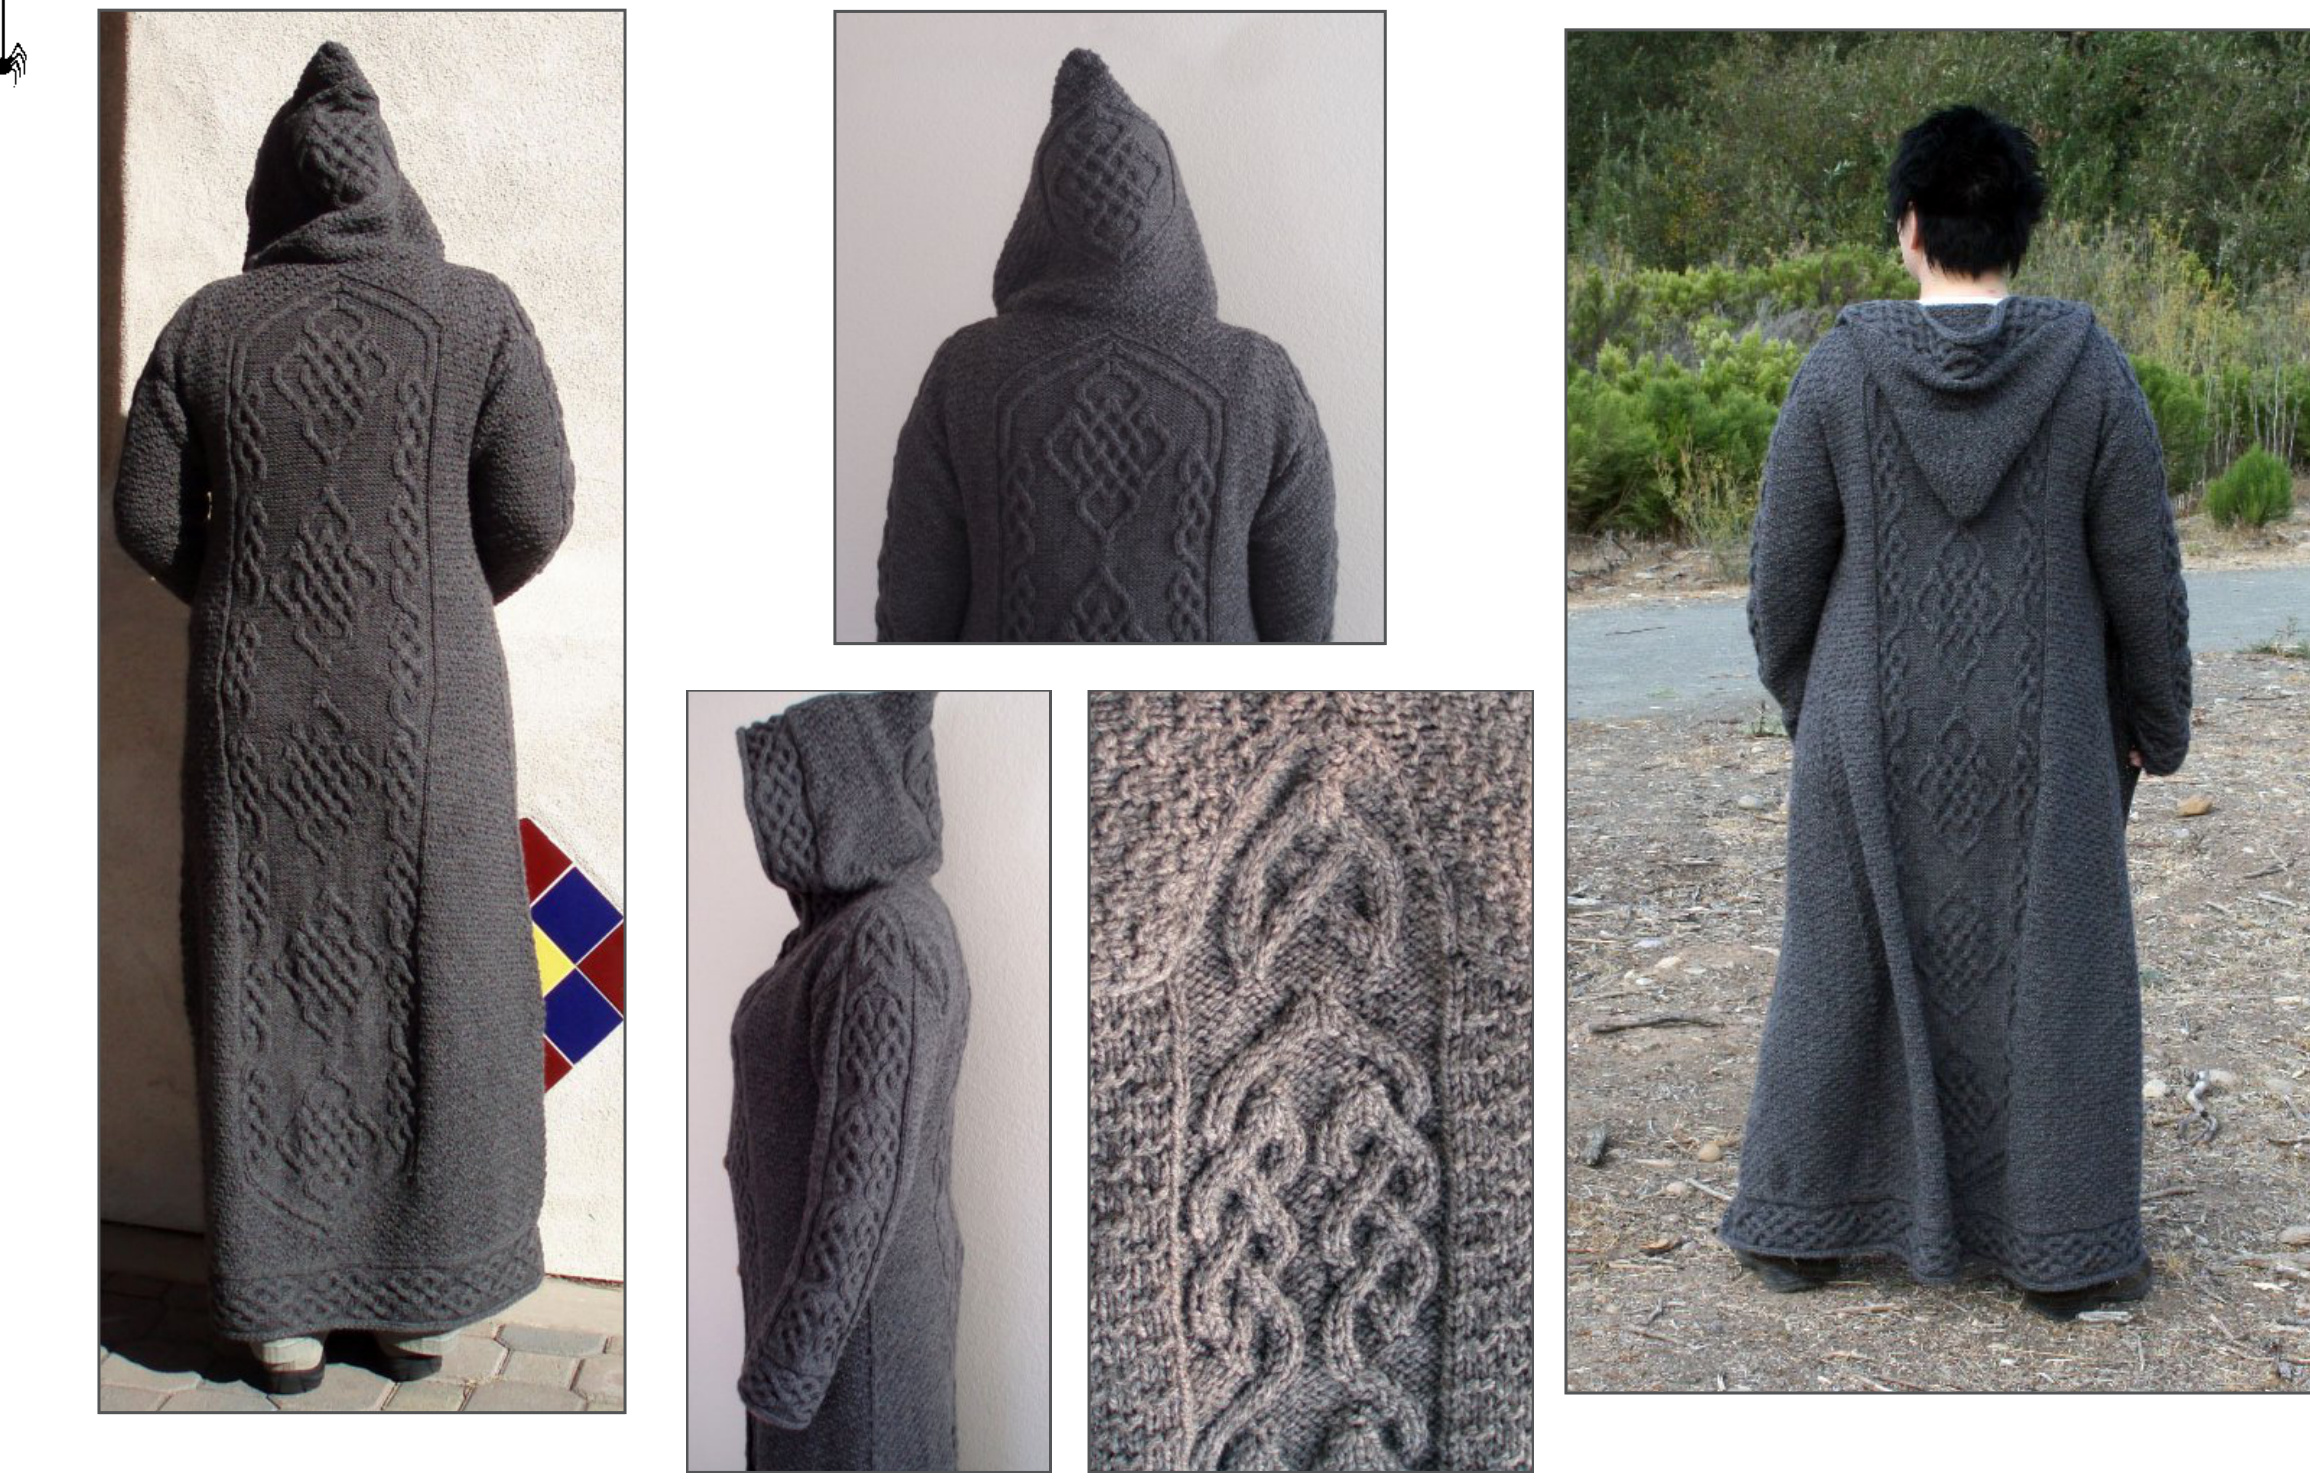
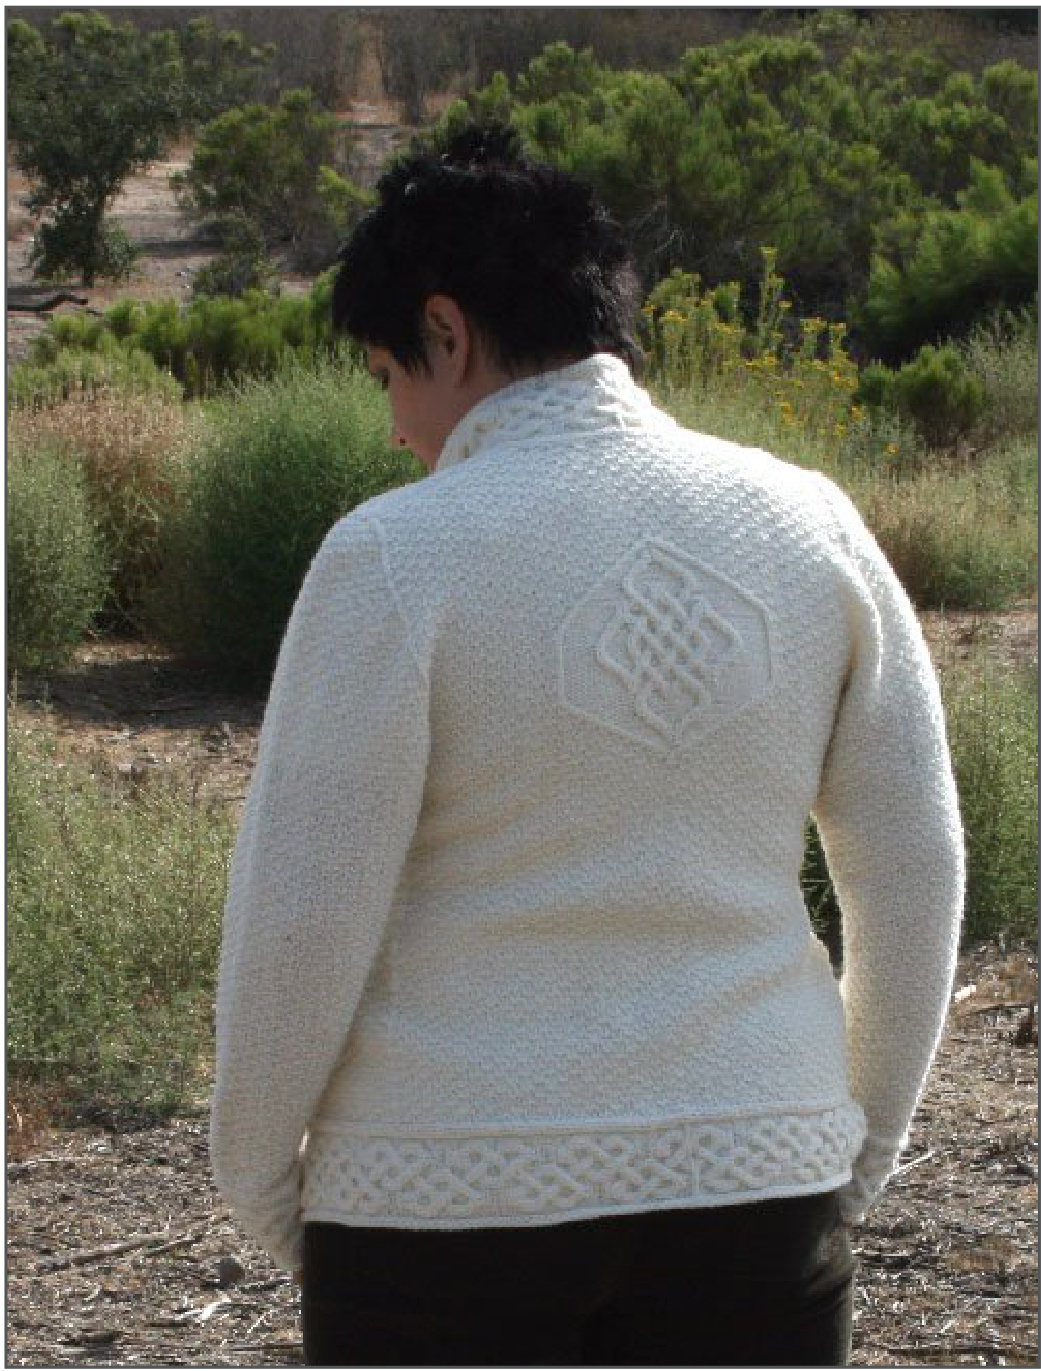
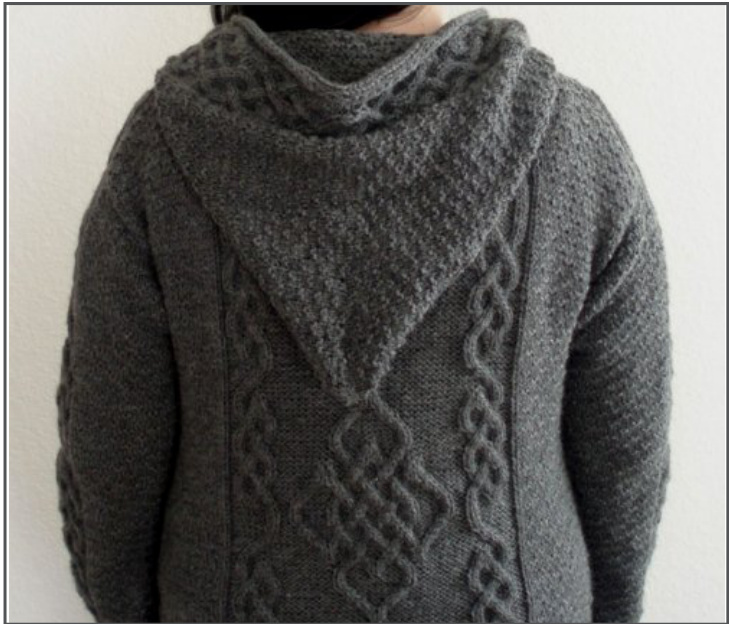
My friend gave me grey yarn as a birthday gift a year ago, and in November 2006 I knitted the Louhi Coat.The original pattern for Louhi was unfortunately lost, and also I wanted to knit a shorter, more close-fitting version of it, and that became eventually Pohjan neito, the white cardigan. Louhi is a powerful, witch-like character in Finnish national epic Kalevala. She is essentially the ruler and queen of the North. Her daughters are called Maidens of the North, Pohjan neito on Finnish. It was thus fitting that the coat bearing Louhi's name should be eccentric and a giant project, while Pohjan Neito is a bit simpler, yet elegant cardigan. The cardigans are similar in many ways, which is why the pattern is essentially the same for both.The more detailed pattern is for Pohjan neito. The additional information for Louhi is given separately and marked accordingly in the pattern. Few notes about this pattern:As I am not a professional designer, I apologize beforehand for all the errors in the pattern. (Trust me, there must be several.) Secondly, this pattern is not so much a strict pattern but guidelines for knitting. It is not intended for beginners but advanced knitters who are willing to adapt and modify pattern as they go along. In general, if you take up either project, plan your knitting well ahead. There are several things happening at the same time, so keeping track of what you have done is essential. Of the similarities and differences between the two: Basically, these two are the same. Think of it this way: Pohjan neito is the basic cardigan, Louhi is the same with some additional cable patterns and a lot of length. In fact, they even share the same stitch count. Louhi is a lot bigger because of thicker yarn and bigger needles.Also, Louhi has a bit more complex, arched sleeve cap, while in Pohjan neito, the sleeves are seamless set-in sleeves. Louhi has a big cable pattern in the back, while in Pohjan neito, there is only one minor St. John's Cross motive in the back. It is even possible to leave out the back patterns all together, and knit only the hem and front bands of overhand knots. Do feel free to play with the given patterns and motives. I've given only one size for the pattern, but it is posible to adjust the size to your needs. The pattern includes some notes for this. I use the same techniques and motives as Elsebeth Lavold uses in her Viking Patterns for Knitting. It is possible to knit these two without the book, but you should be familiar (or at least not afraid of) cable-knitting. The charts given are drawn by me, and their copyrights belong to me. I have Ms. Lavold's permission to use her motives in this pattern. I will give out this pattern only for personal use.Any commercial use is strictly prohibited. If you have any questions, suggestions or corrections, please let me know. Happy knitting!

Yarn
For Pohjan neito: Telemark Drift, 100% Peruvian wool 50g / 1,75 oz = approx. 103 yds, 19 balls. The cardigan shown is about size L.
For Louhi:
Patons Classic Wool, 100% merino 100 g /3,5 oz = 223 yds, 15 balls. The coat is about size XL.
Gauge
For Pohjan neito: 23 st and 36 rows (in seed st pattern) = 4" (10 cm).
For Louhi:
17-18 st and 26 rows (in seed st pattern) = 4" (10 cm). Seed stitch pattern: R1 (WS): p2, k2. R2 and R4: knit. R3: k2,p2.
Needles
For Pohjan neito: US #3 (3 mm) circular needle and DPN's. For Louhi: US #8 (5 mm) circular needle and DPN's. Adjust needles sizes to achieve the correct gauge.
Notions
Cable needle Stitch markers Stitch holders 6 buttons, 1" in diameter (for Louhi) or 6 clasps (for Pohjan neito).
Size
Pohjan neito:
Shoulder to hem: approximately 27" (67 cm). Sleeve (without cap): approximately 19" (48 cm). Body circumference: approximately 46".
Louhi:
Shoulder to hem: approximately 53" (134 cm). Sleeve (without cap): approximately 22" (56 cm). Body circumference: approximately 48". This pattern, if nothing else is mentioned, is for Pohjan Neito Cardigan.Any additions or changes for Louhi are mentioned in the pattern. Please read the pattern carefully through before casting on. I use the standard Knitty abbreviations. In pattern, there is an abbreviation SS, which indicates selvage stitch (you can knit this st or slip it, according to your liking).

Sleeves
For the sleeves, you will knit a strip with a cable pattern for the cuff and pick up stitches for the "body" of the sleeve along one side of this cuff strip. In Pohjan neito, the sleeves are knitted in the round before joining them to the body, after which they are knitted together with the body to form seamless set-in sleeves. It is possible to knit them flat or with a regular set-in sleeve, but if you want to do this, you might need to adjust the pattern yourself, as no instructions for such sleeves are given in the pattern. The sleeves in Louhi are knitted in back and forth, separately from the body, and the cap is arched with cable motive. If you wish to omit the cable motive and knit simpler set-in sleeves, see instructions for Louhi below.
Sleeves for Pohjan neito
Cast on 26 sts with a provisional cast-on. Knit R24 in chart 1.Tip: To make the outer edge of the cuff firmer and neater, knit the 3 sts in the outer edge as follows. WS: \*p1, sl1 pwise, SS\*,rpt \*-\*. RS: k3 (k the selvage stitch, and k2). Note: In the right sleeve, the outer edge is on the right edge of the chart, and on the left sleeve it is on the left side of chart 1. Right sleeve: Knit rows 1-24 in chart 1, a total of 3 times. Pick up stitches along the cast-on edge (depending on the provisional cast on you used), and join the cuff strip by either grafting or with 3 needle bind-off. Pick up 51 stitches for the sleeve. (If you slipped stitches on the outer edge, pick up these stitches along the other edge.) The sleeve is knitted in the round. Knit the first st of every row (do not knit the seed stitch pattern), this is the seam st. Knit the increases in the sleeves on both sides of this seam st. Knit 3 repeats of seed stitch pattern before the first increase. Increase round: k1 (=seam st), M1, k pattern as set to end of row, M1 = 2 sts increased. Knit a total of 21 increases, between increases knit 5 rows without changes (i.e.increase every 6th row), according to seed stitch pattern =93 sts. After last increase, knit without increases according to seed stitch pattern, until the sleeve measures approximately 19" (including the cuff). Leave stitches on holder, until you are ready to join them together with the body. Knit the left sleeve as the right one, but begin the cuff on chart R12, knit rows 13-24,and rows 1-24 twice, and rows 1-12 once more.
Sleeves for Louhi
Cast on 26 sts for the cuffs using the long-tail method. Knit the cuff strips as in Pohjan neito, but do not join the cuff. Pick up stitches along the inside edge (just like in Pohjan neito), and knit the sleeves back and forth. Pick up 17 sts, pm, pick up 18 sts, pm, pick up 17 sts =52sts. Always knit the first 2 and last 2 sts of every row in stockinette st. Increase (on the right edge of the sleeve, in the beg of a RS row) after these two sts, and (on the left edge, in the end of a RS row) before these two stitches.The 18 sts picked up, between markers, are for the cable pattern (chart 2). On both sides of the cable pattern, knit 1 st in stockinette st (these are not shown in chart 2, the chart shows only the cable pattern sts). After picking up sts, knit rows 1-34 in chart 2, repeat rows 8-34 a total of 2 times (the area marked in red in chart 2). Knit rows 8-26 once more (Note: you will begin decreases for the sleeve cap on R24, see below). Continue chart 2 from 35 to end.Knit R47 straight after R46. Sleeve cap: When knitting R24 for the last time (see above), begin decreases for the sleeve cap. BO in both ends 1 x 5 sts every row. Decrease 2 x 1 st every 2 rows,2 x 1 st on every row, 2 x 2 st on every row. On the next row, BO 17 sts in both ends. You will be on R47 in chart 2. Continue according to chart 2, every st of every row is included in chart. After the last row, cut yarn and pull yarn through all sts. If you choose not to knit the arched sleeve cap, BO all sts on R47. (Seebelow.)
Body
Begin the body by knitting a hem strip just like in the sleeves. If you like, you can slip sts in the outer edge (see instructions for the cufs). The right side of the hem strip: Cast on 26 sts with a provisional cast-on.Knit R24 in chart 1.Knit rows 1-24 in chart 1,a total of5 times. Knit rows 1-20 in chart 1, and then knit the right corner in chart 3. Note: in chart 3, the rows before and after the corner are marked in slightly lighter color. Do not repeat these rows.After knitting R20 in chart 1, you will continue to R7 in chart 3. If you chose to slip sts in the outer edge, do so in the corners too. After finishing the corner on R56 in chart 3, leave the sts on stitch holder to wait for the knitting of the whole body. Note: It is possible to knit the front cable strips separately and the body separately, if you like. I did this in Louhi. I recommend this method, if you make any changes to the length of the garment, as the length of the whole garment cannot be modified without changing the number of chart 1 pattern repeats in the front strips. If you shorten or lengthen the cardigan, the length of the garment depends on the number of pattern repeats. If you change the length of the garment, estimate the length needed, measure one pattern repeat in hem strip (the chart for the hem and the front strips is the same), and add or substract one pattern repeat length of the total length of the garment. Knit the body first, then finish the front strips, and sew the pieces together. Left side of the hem strip: Take out the provisional cast-on, pick up sts and knit rows 13-24 in chart 1.Knit rows 1-24 a total of 5 times, and knit rows 1-8 before the corner. Knit the left corner according to chart 3.After the corner, place sts on holder to wait for the knitting of the body.
Hem strip in Louhi
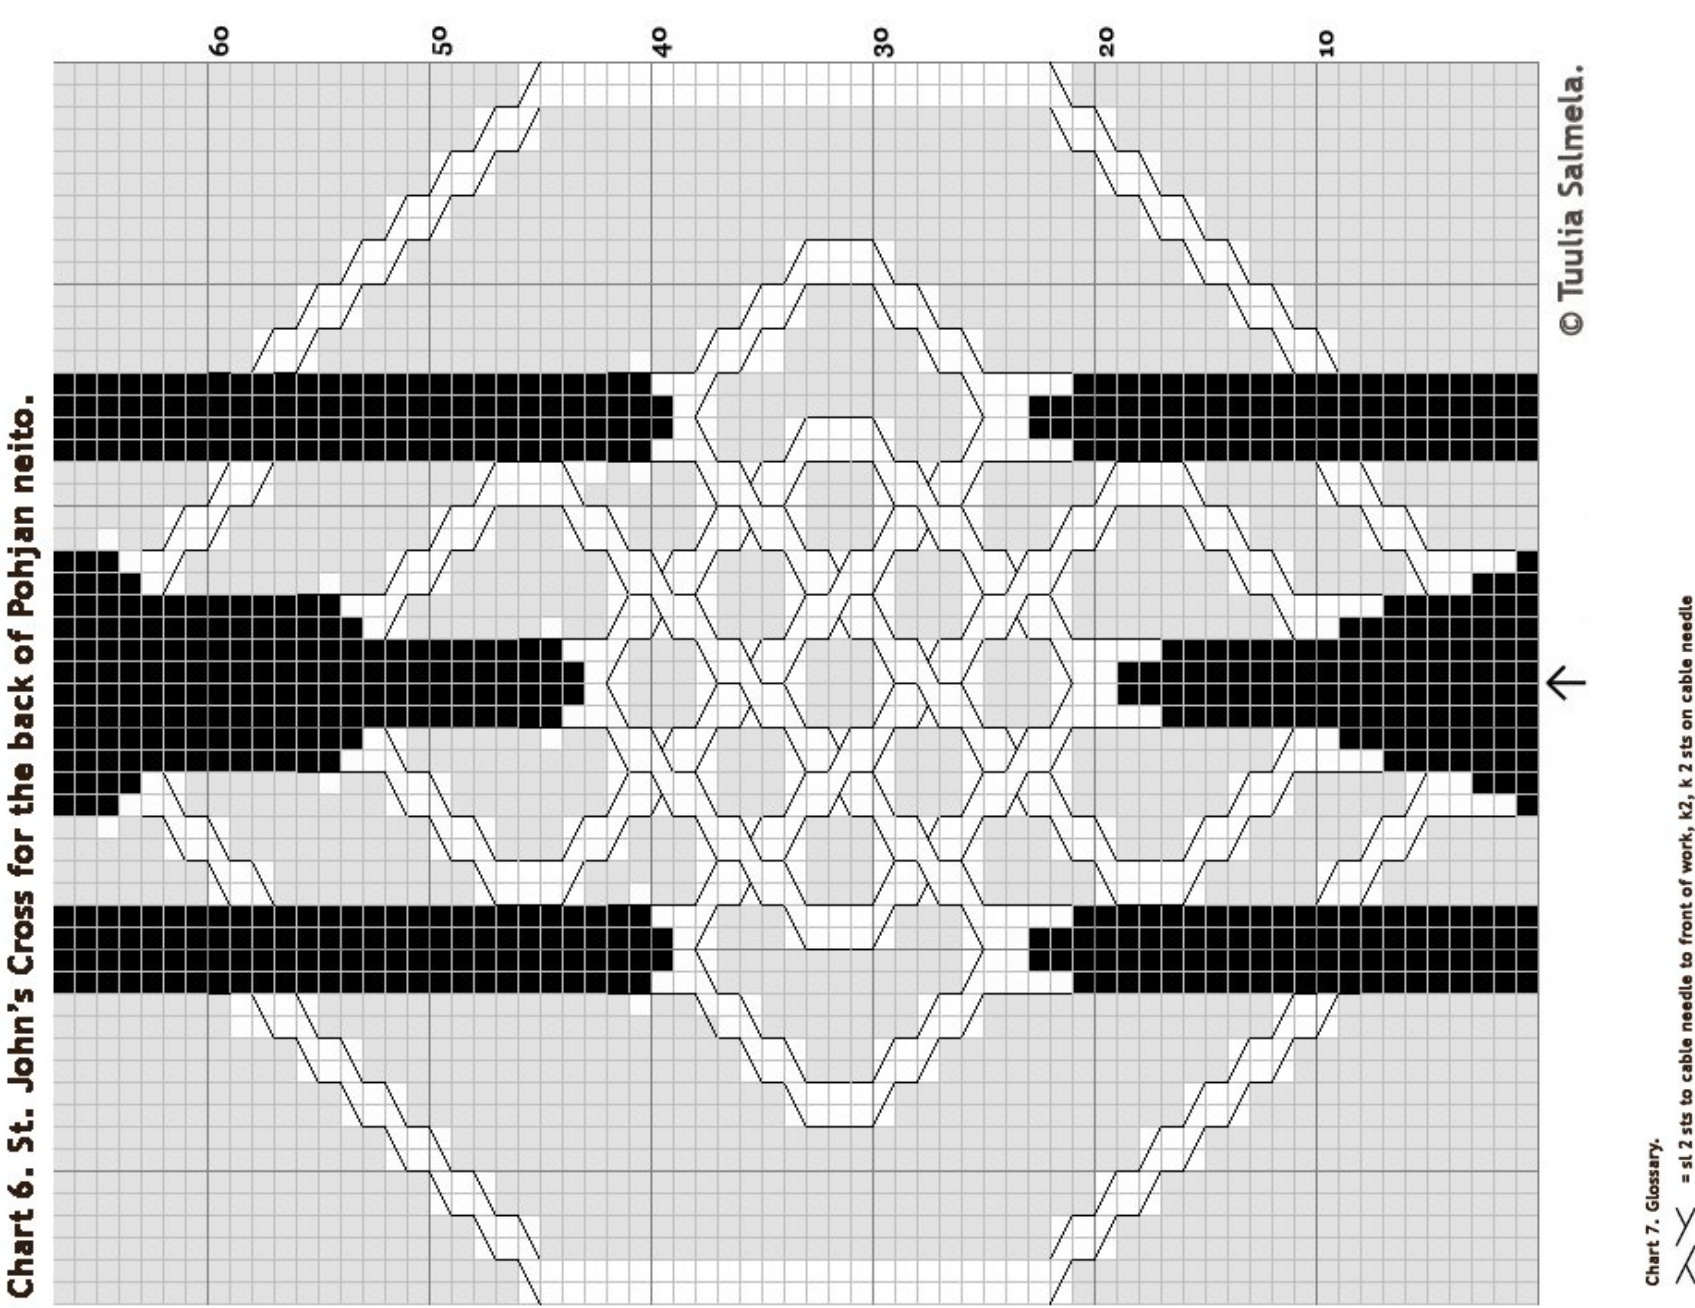
Knit the hem strip in Louhi as instructed above for Pohjan neito. After finishing the corners, pick up along the hemstrip 42 sts for the right front, 1 sts (seam st), 106 sts for the back, 1 sts (seam st), and 42 sts for the left front. It might be practical to mark your seam sts with a removable stitch marker (such as a safety pin). Knit the seam sts always in stockinette st. Every decrease and increase in the body will be knitted using the seam sts. For the body, pick up also the front strip stitches you left on stitch holders after knitting the corners. Knit the body in seed st pattern. Knit the strips in pattern as set (chart 1), beginning on R7 in right front strip and on R18 in left strip. Knit the seam sts in stockinette st. Knit 3,5" (9 cm) in seed st pattern before dec's. On the next RS row, knit in set patterns until you have 1 st rem before the seam st. Slip these two as if to k2tog, k the next st on left needle, pass slipped sts over the knitted st = 2 sts dec'd. Repeat this decrease in the other "seam". Repeat these decreases twice every 12 rows, and twice every 8 rows.Knit 2,5" (6,5 cm) in patterns as set without decreases. Begin increases on both sides of seam sts: increase on st on both sides of the seam st by picking up the thread between the sts, twist it and knit it = 4 sts increased per row. Repeat these increases after 12 rows, and increase twice more every 8 rows. Knit according to set patterns until the body measures 19" (47 cm), including the hemstrip. Note:At the same time, begin the St. John's Cross motif in chart 6, on the last increase row before underarms.
Note:
At the same time, begin short rows in fronts.After the last increase row, knit 2 rows, and then knit
Left front
R1 (WS): knit the strip pattern according to chart 1, knit 31 sts in seed st, turn. R2: knit according to patterns.
R3:
knit the strip pattern according to chart 1, knit 29 sts in seed st, turn. Knit the next row without changes (as R2). On the next row (WS), knit the entire row as set in patterns, and then knit the short rows for the right front as described. (Your R1 will be a RS row - you will turn the short rows after 31 sts and 29 sts on RS rows in the right front).After finishing the short rows in right front, knit 3 rows of the whole body without changes, and repeat the short rows 2 more times in both fronts. Note: You will knit some of the short rows after attaching the sleeves to body. After your body piece measures 19" (47 cm) BO in both sleeves and in the body 5 sts + the seam st + 5 st = 11 sts.These stitches will become a small seam in the underarms, and you will need to sew the seam. You can do this before continuing the sleeves and body (which I found the best method as I picked up 1 st on both sides of this seam to become new seam sts between the front/back and the sleeve). So now you should have the left front, the left sleeve, the back, the right sleeve and the right front on one single needle. Knit accross all pieces in patterns as set. (If you chose to pick up the new seam sts, knit these in stockinette st always.) Mark the seams with stitch

markers.You have 4 seams. Decrease in every seam 2 x 2 sts every 2 rows (knit these decreases as you knitted the decreases in the body), 3 x 1 st every row, and 3 x 1 st every 2 rows. Continue knitting the seed stitch pattern without any more decreases in the fronts.You will continue decreasing in the sleeves, to shape the sleeve cap seamlessly. (This means, you practically knit the sleeve cap and attach it at the same time. Or you can think of it as an odd raglan. Technically, this method is no different to knitting raglan sleeves.)Knit decreases as follows: Knit (left front) until the next st on the left needle is the seam st, SSK. Knit in seed st pattern (for the sleeve), until you have 1 st remaining before the seam st, k2tog. Repeat this for the right sleeve and right front, too. The seam st will be always remain, and the sleeve sts will decrease. For the sleeves, continue knitting in seed st pattern between the seam sts, and continue decreases. Decrease 1 sts perseam (4 sts decreased per row) on every 2 rows until you have 12 sts between the seam sts.Then, decrease 1 st on every row, until you have no sts remaining between the seam sts. For sleeves, you will need to decrease on the WS rows, too. On WS rows, instead of the k2tog-decreases on RS, p2tog. Instead of the SSK-decreases, knit as follows. Knit until you have 1 st remaining before the seam st. Sl 2 sts knitwise, one at a time, onto the right needle. Put left needle through both slipped sts, from right to left (as to knit them together in reverse), and slip sts back onto the left needle.You should notice both sts are twisted,so that the 1st is now the 2nd st. Purl these 2 sts together.This method will imitate the SSK-decrease on the WS rows. (It sounds trickier than it is.) On the next row, begin the short rows for the shoulders. On both fronts and both shoulders of the back, knit in seed st pattern, and turn your short rows 8 sts and 16 sts from the neck opening. (Note:At this point, you will knit both shoulders separately.The back will be split into neck opening and two shoulders. See below.) Knit 1 row accross and BO shoulders using the 3 needle bind-off. Note: When you knit the sleeves, you will also shape the fronts and the neck opening in the back. See below.
The neck opening in the fronts:
When the sleeve "seams" measure 3" (7,5-8cm), decrease 1 st in both fronts, inside the cable strips. Repeat this after 12 rows. When the sleeve seams measures 7,5" (19 cm), put the cable strip stitches on stitch holder. BO 5 seed sts in the fronts for the neck opening. Decrease 2 x 2 sts, and 3 x 1 st every 2 rows for the neck opening, inside the selvage st. (Continue knitting the sleeves as described above.)
The neck opening in the back:
When you begin the short rows in the shoulders, BO the 28 sts in the middle of the back for the neck opening. Knit the short rows in the shoulders as in the front pieces (in fact you will knit the left shoulder and the right shoulder separately, both left back shoulder and left front shoulder together, and similarly in the right shoulder). As you knit the short rows in the shoulder, decrease 2 x 1 st in the back every 2 rows, inside the selvage st.
Collar:
Left side: Pick up the sts you left on holder, and knit the left corner according to chart 3. (You should be on R8 in the left strip and on R20 in the right strip before corners.Because of this, and if adjustment is needed, I strongly recommend you knit the strips separately.) After the corner, knit rows 18-24 in chart 1,and rows 1- 24 once more and rows 1-13. Leave sts on holder. Right side: Pick up sts you left on holder, knit the right corner according to chart 3.After the corner, knit rows 6-24 in chart 1, knit rows 1-24 once more. Graft the left and right sides of the collar together. Mark the middle of the neck opening in the back, and pin the collar to the neck opening carefully. The collar is shorter than the neck opening, so be careful when sewing the seam. Attach clasps onto the front strips.Attach the left part of the clasp on to the left strip on R13 (in chart 1) and on the right side, on R24.
Weave in all ends and block gently.
The body in Louhi
The body in Louhi is essentially similar to the one in Pohjan neito, it's just a lot longer. Knit the hem strips as described below, and pick up sts for the body as in Pohjan Neito. Continue in seed st pattern as in Pohjan Neito, but begin decreases after the body measures 15" (38 cm).Then, knit the decreases and increases just like in Pohjan neito, and knit the short rows similarly. Once you reach the underarms, separate fronts from the back and knit all pieces separately. BO in all pieces 5 sts for the underarms, and 2 x 1 st every row and 2 x 1 st every 2 rows. Continue without decreases until your piece measures 6,5" (16 cm) from the underarms. Then knit the part that you will attach to the arches in sleeves: BO 5 sts for the arch, then decrease 2 x 1 st every 2 rows, 2 x 1 st on every row, and 2 x 2 sts on every row, BO 10 sts for the shoulder. Note:in the fronts, you will not decrease or shape the neck opening at all. Continue knitting the front strips according to chart 1 as set, and continue in seed st pattern everywhere else. Remember the short rows in the fronts (before and after binding off for underarms), the binding off for underarms and the arch shaping as described above. Pick up 54 st for the hood around the neck.Knit the hood in seed st and continue the front strips in cable pattern. Begin the St John's cross motif (chart 6) for the hood after the hood measures roughly 3" (7,5-8 cm).After knitting all rows in chart 6, knit 2,5" (6 cm) in seed st OR until you reach R24 (in left front) and R13 (in right front). BO the hood using the 3 needle bind-off method. If you want, you can knit the button strips according to chart 5 (you can knit all pieces separately or together, depending on your preference). I recommend knitting the strips separately, beginning with the one with no buttonholes. Then, measure the length of the buttonhole strip, and space the buttonholes evenly accross the strip. The original Louhi had only 6 buttons, but you can choose to use more buttons.Also, it is possible to omit the buttonhole strips and attach clasps on the fronts just like in Pohjan Neito.
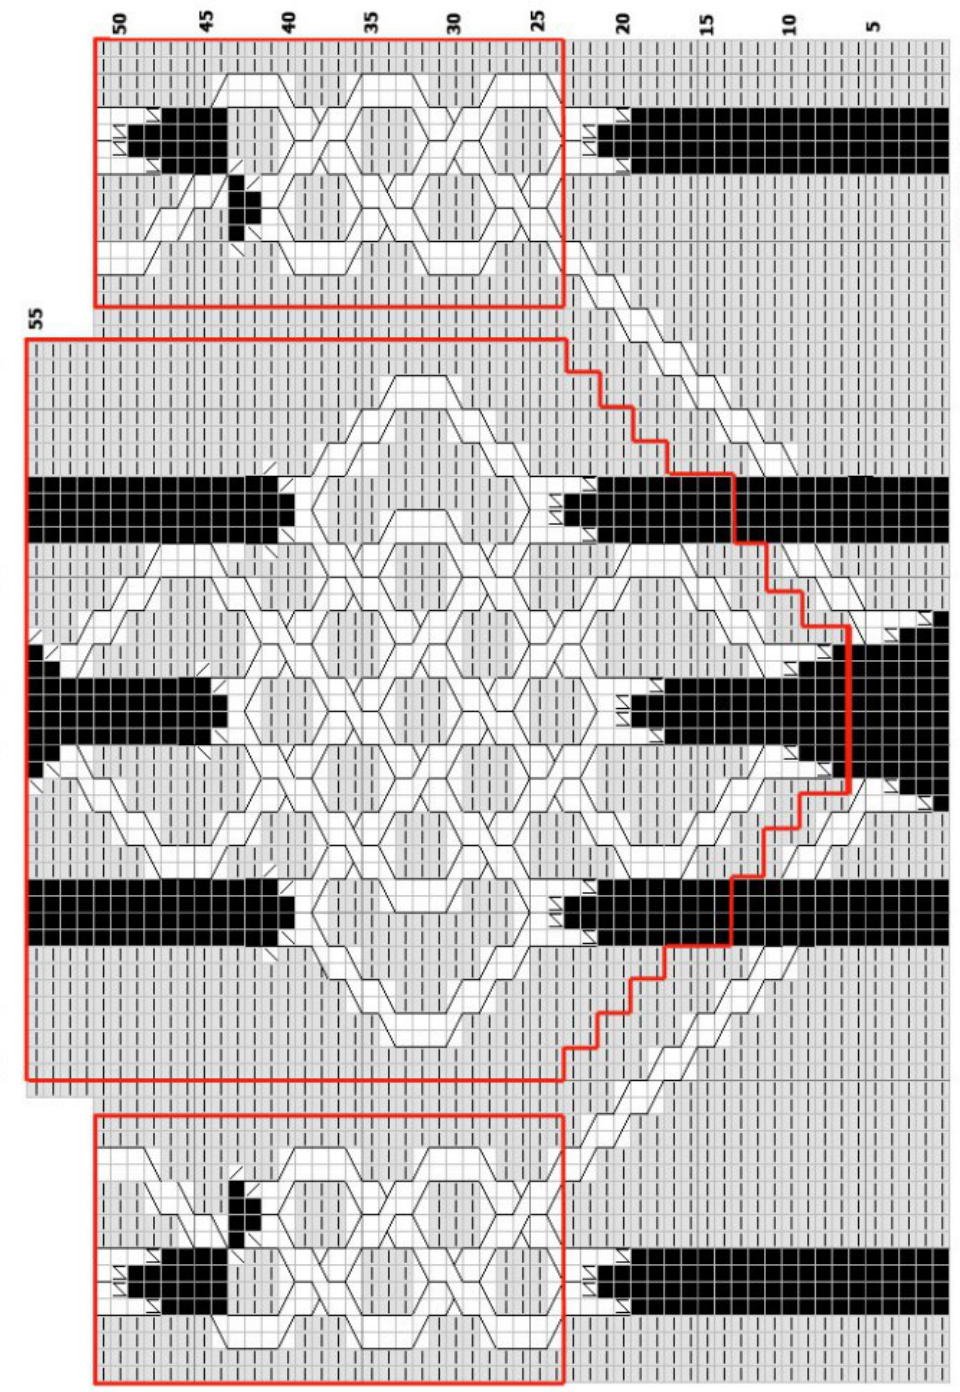
The back cable pattern in Louhi
In my Louhi coat, I wanted a giant St. John's Cross motif in the back. I have included the pattern for this in chart 4. The pattern repeats are marked with red. The bottom part is set-up section for the wide St. John's Cross motif, knit that only once. Also, the top part of the chart is what you will knit after the last repeat. Please note, that the pattern repeats are different. If you choose to use these motives for the back of Louhi, print the charts or draw the entire section, before knitting the back. Decide how many cross motif repeats you want, space them evenly, and then add the bottom and top parts of chart 5. Between these, space the side cable pattern repeats evenly. This way, you will avoid unnecessary ripping and frustration. Different sizes: As you have noticed, both cardigans are very similar. I used a bigger needle size for Louhi, and got a big coat. Pohjan neito is a bit smaller and I achieved this with only changing to smaller needle size. You may use this method to achieve a smaller cardigan, but sometimes this is not enough. If your chest is smaller than 46" (in Pohjan neito) or 48" (in Louhi), you can shorten the cuff and hem strips. Keep in mind, that the strips look better, if you begin and end them symmetrically. For example, you can begin the cuff strip on R6. End the strip on R19 or R20.The pattern will not continue seamlessly, but it will look better as the pattern is symmetrical on both sides of the seam. In the hem strip, note that the right side cable pattern begins on R1 but in the left, it begins on R13. (See above) If you want a shorter hem strip, you may choose to knit less pattern repeats, or knit both strips 1/2 repeats shorter than in the original instructions. So, instead of R1,begin right side on R13, and vice versa on the left side. Do this, so that there would not be any discontinuation in the cable motif in the strip. The cable motives are very similar to those in Elsebeth Lavold's Viking Patterns for Knitting, and I have Ms. Lavold's permission to use the motives in my original designs and charts. If you have any questions or suggestions, please let me know.
Copyright
This pattern is offered for non-commercial, personal use only. Any other use, including commercial reproduction or modification, distribution, transmission or republication in electronic or any other means without prior written permission from the designer is strictly prohibited and is a violation of copyright and intellectual property rights. If you have any questions regarding the use of this pattern, please contact me via email and I will be happy to assist. Tuulia Salmela 2007-13. http://tuulia.blogspot.com tuulia.salmela@gmail.com http://www.ravelry.com/people/Tuulia
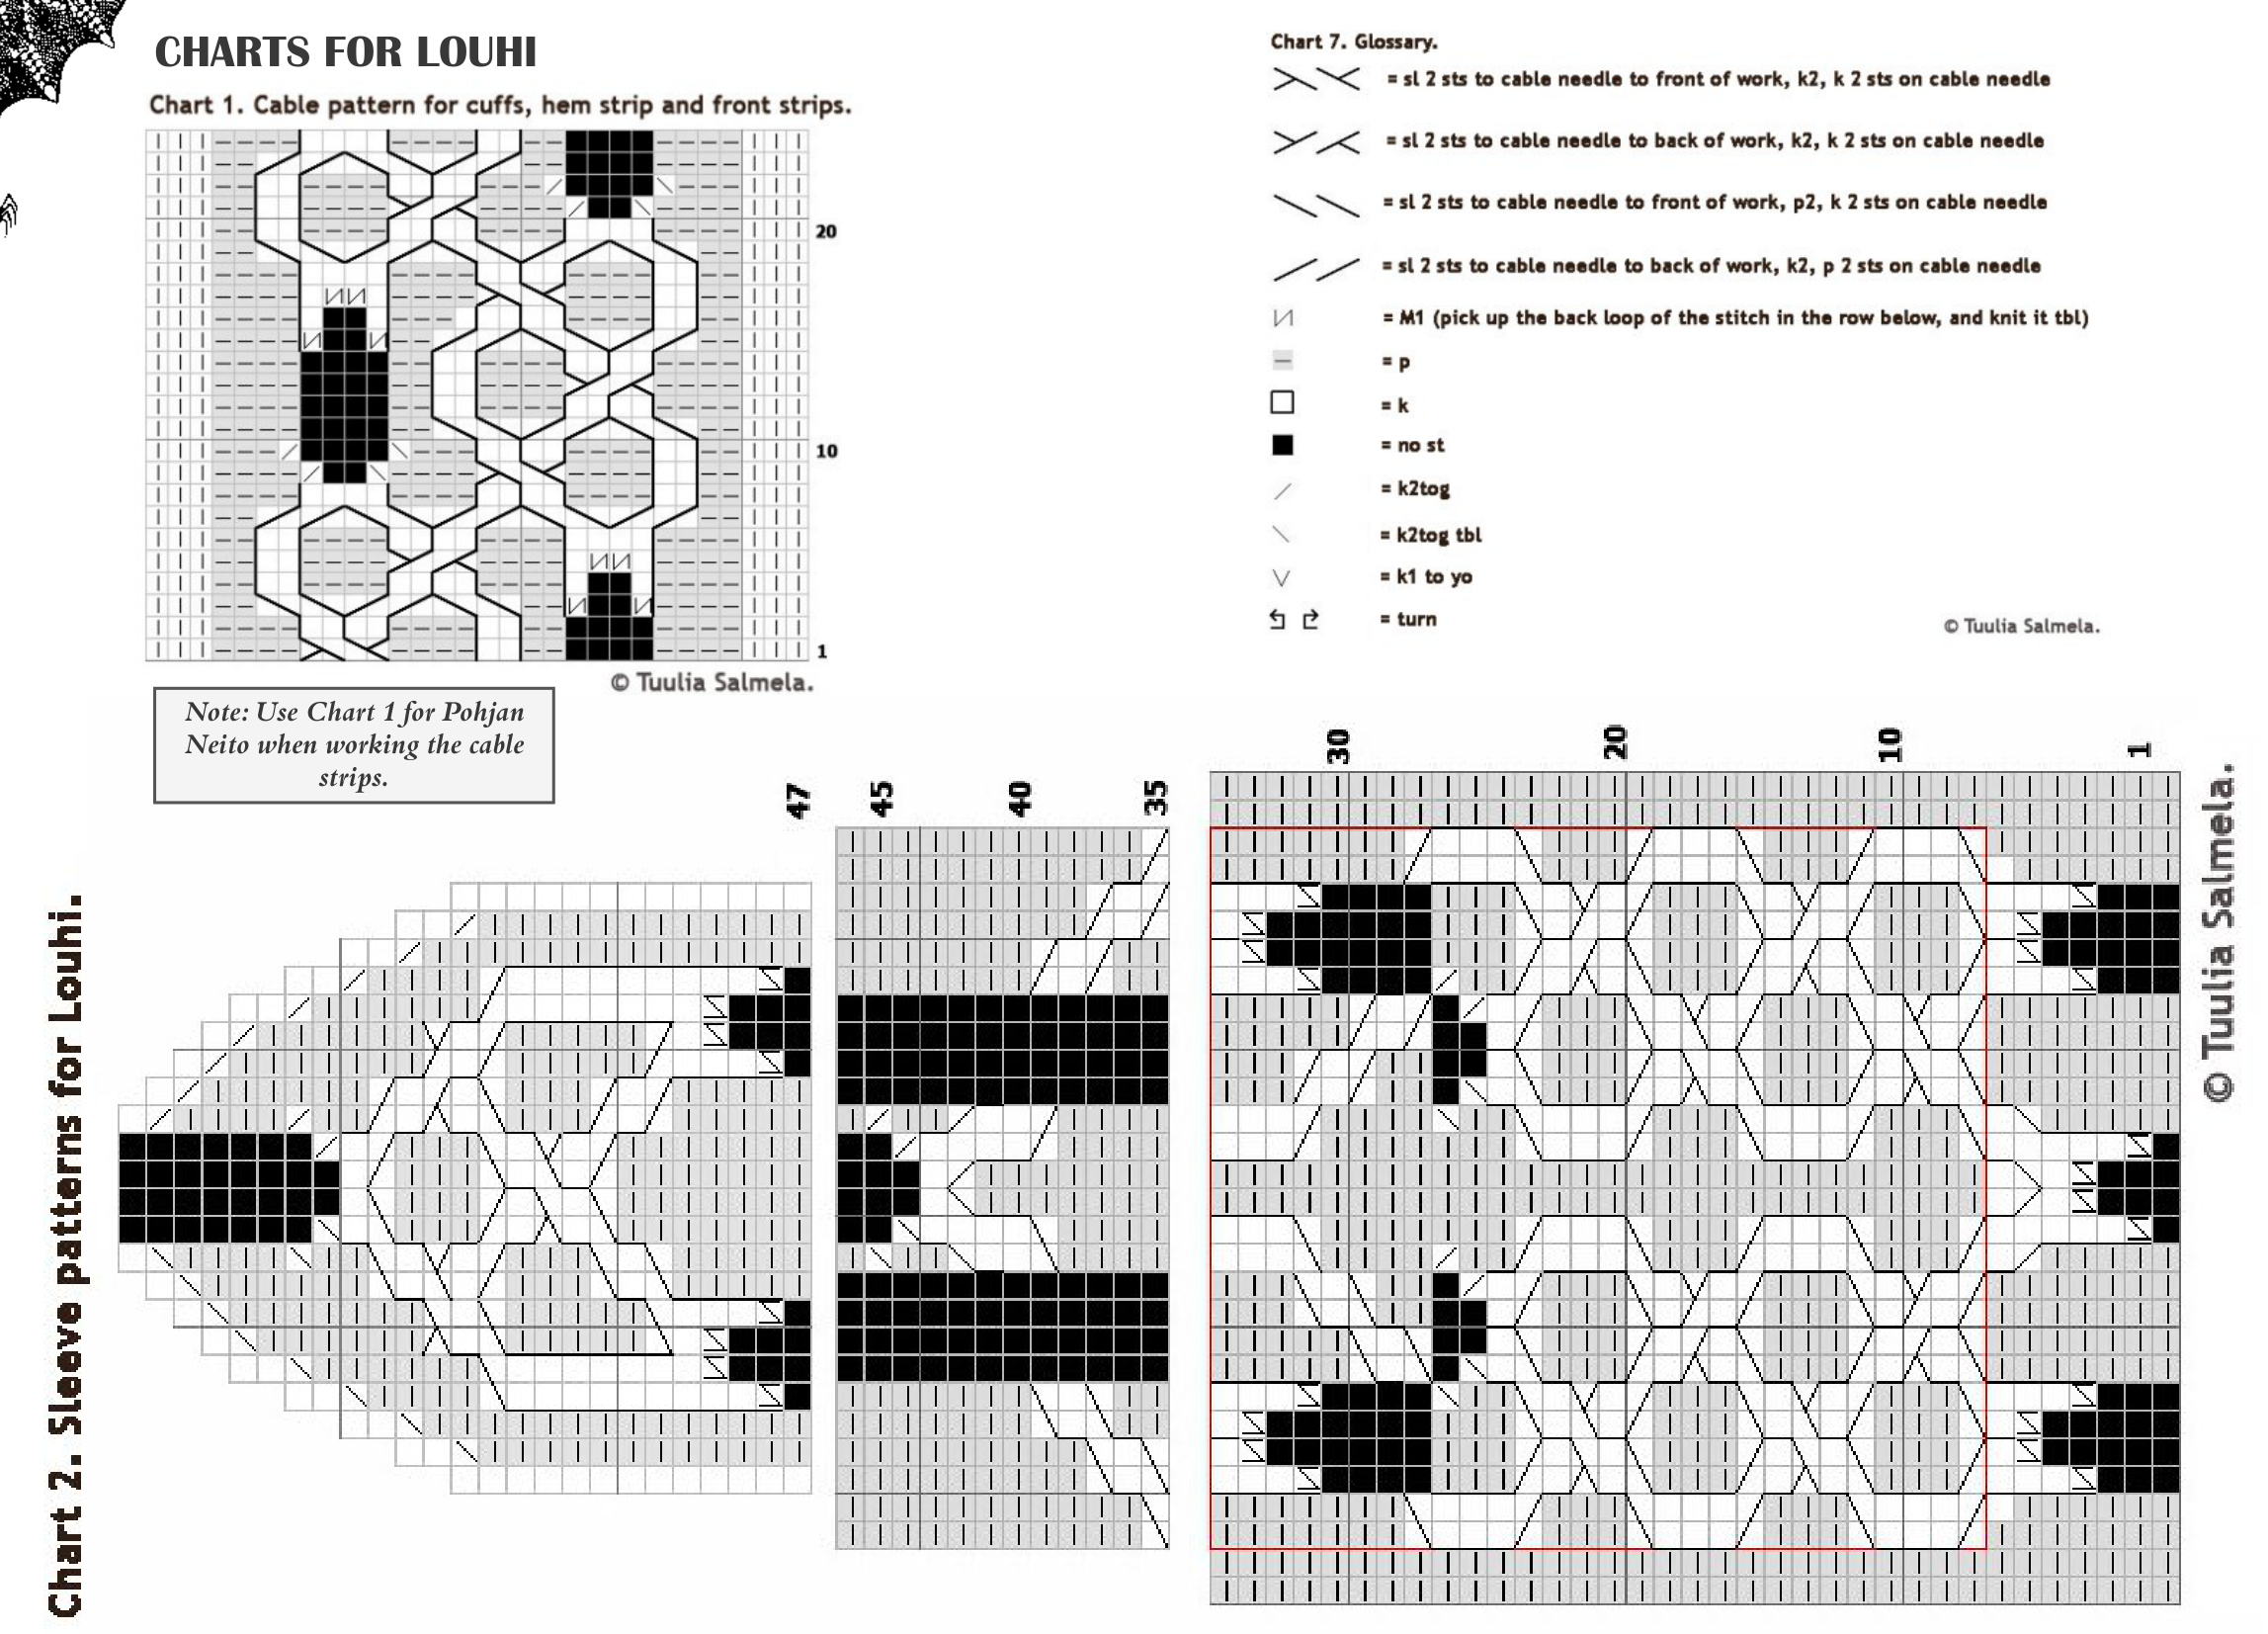
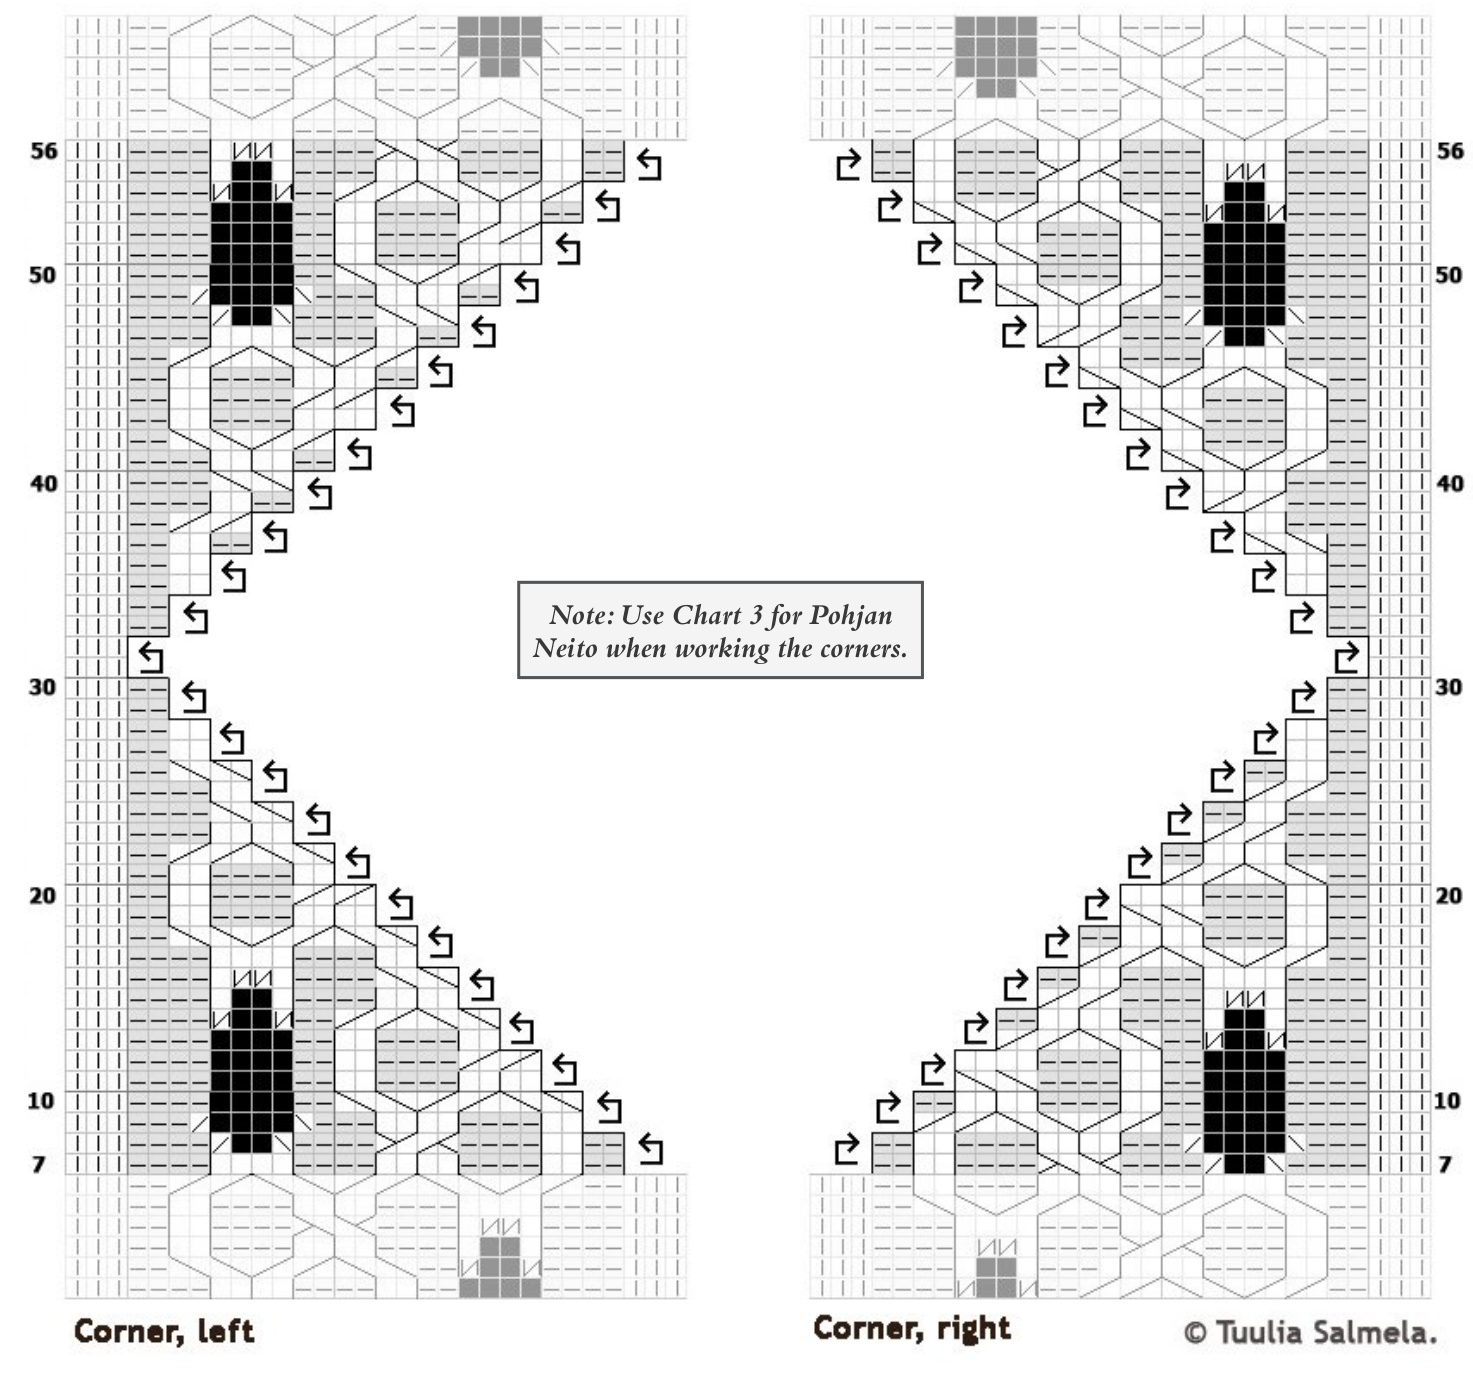
Chart 3. Corners. Chart 5. Buttonholes and buttonhole strip.