Three Oaks
Materials:
350 meters / 383 yards of fingering weight yarn (shown in Wollmeise 100% superwash, colorway Jeton), about 100 g / 3,5 oz 2,25 mm circular needle (or size to get the given gauge) long enough for magic loop Waste yarn Tapestry needle Three split ring stitch markers, 3 different colors work best. Four buttons, app. 1,7 cm / 0.67" in diameter. Sewing needle small enough to sew on the buttons. Cable needle (if preferred)
Gauge:
36 stitches and 48 rows on 10 cm / 4" in stockinette stitch. Size:
| Size | Hand circumference |
| S | 18 cm / 7" |
| M | 19 cm/ 7,5" |
| L | 20,5cm/8" |

Notes:
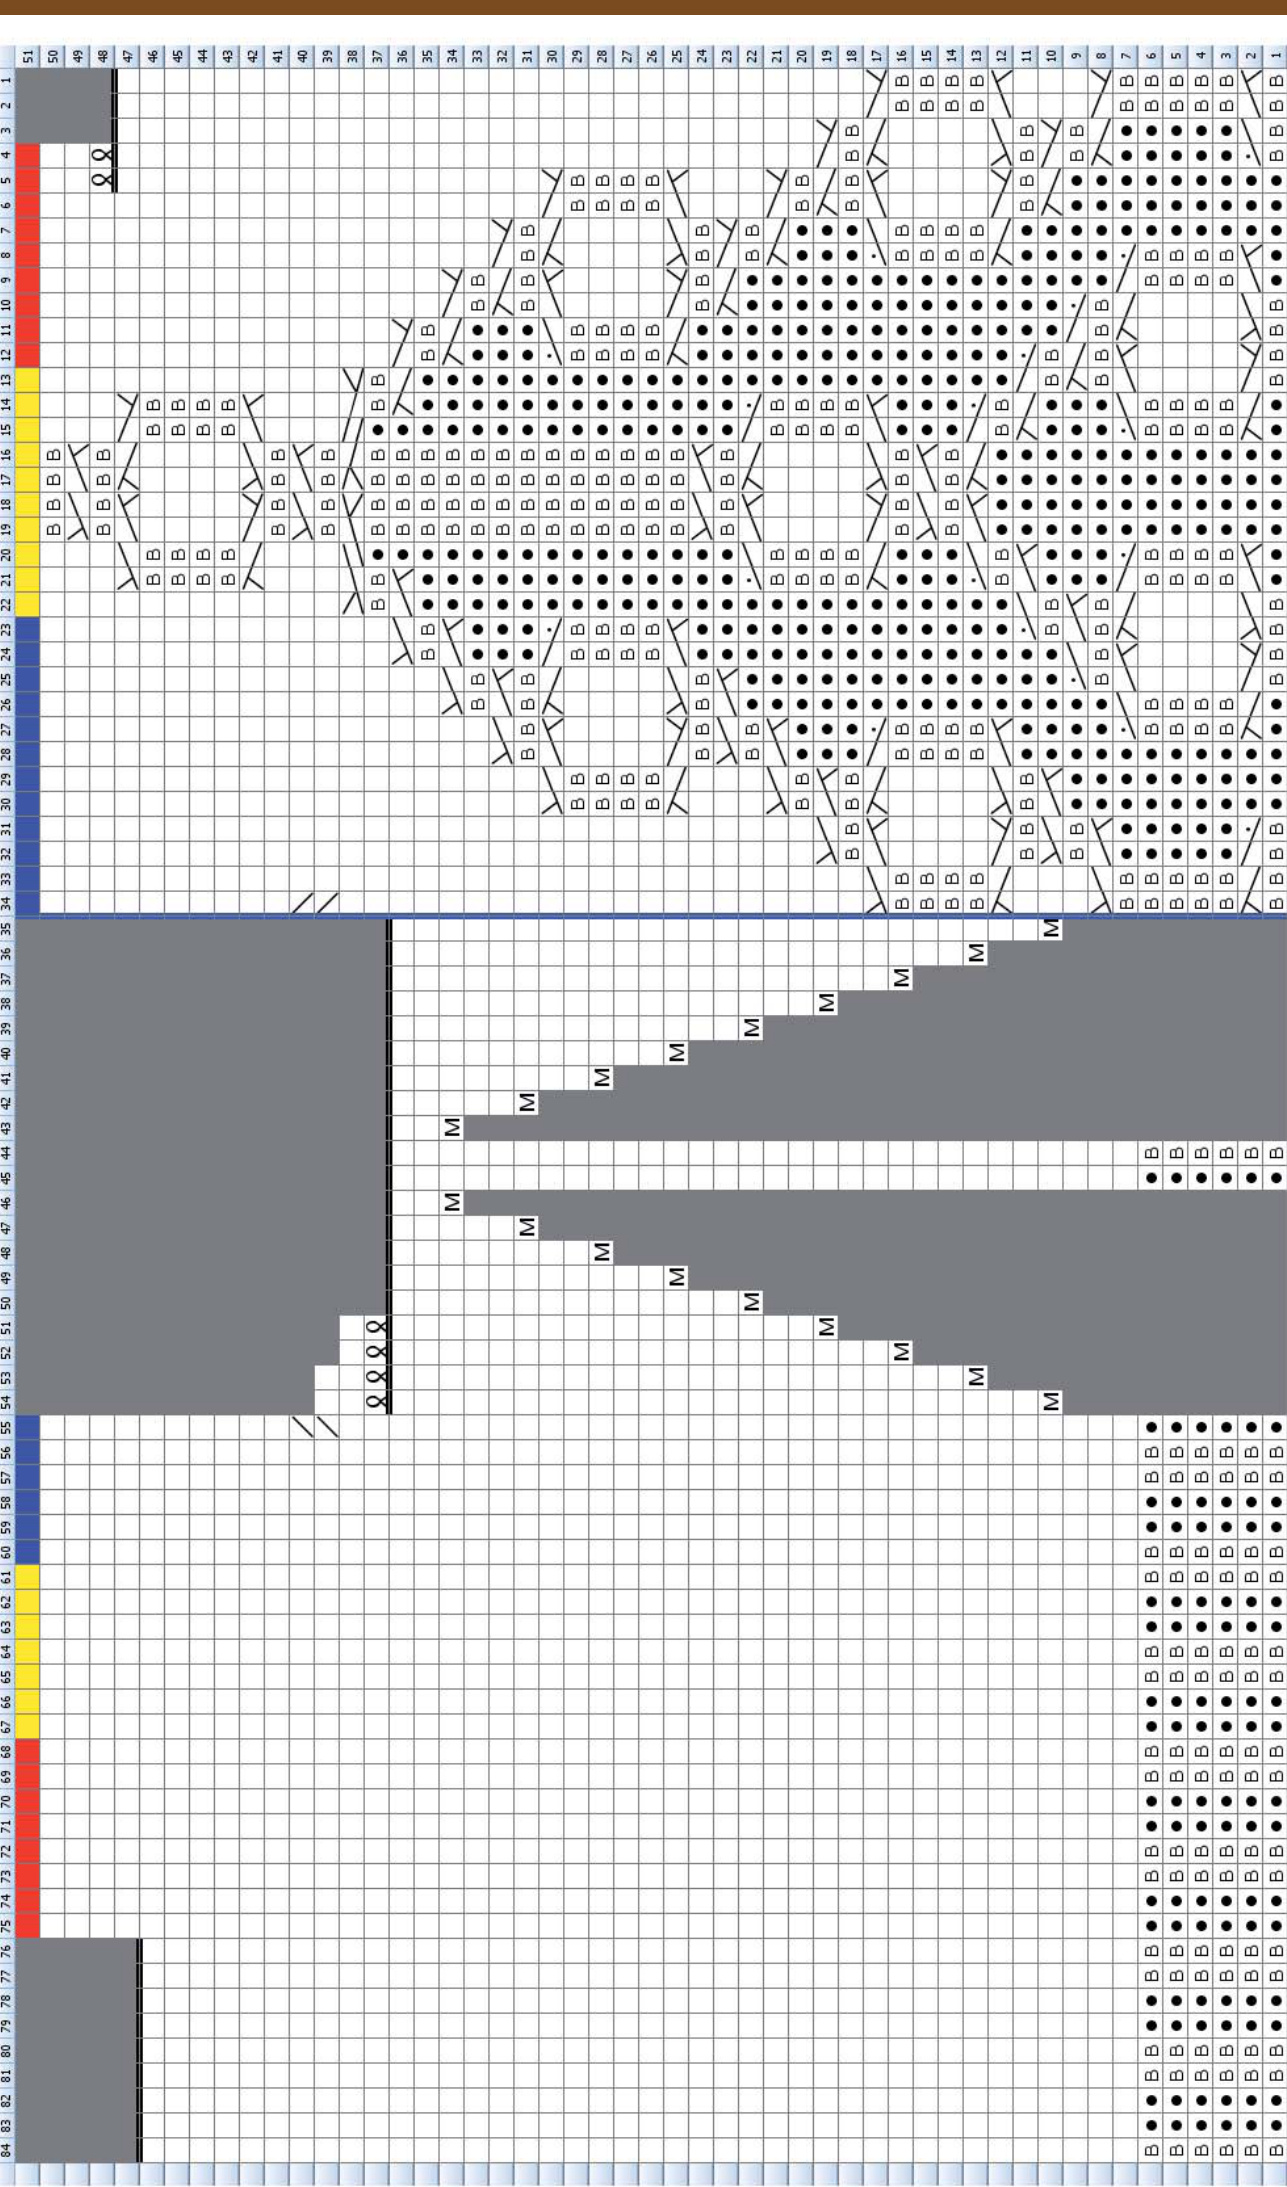
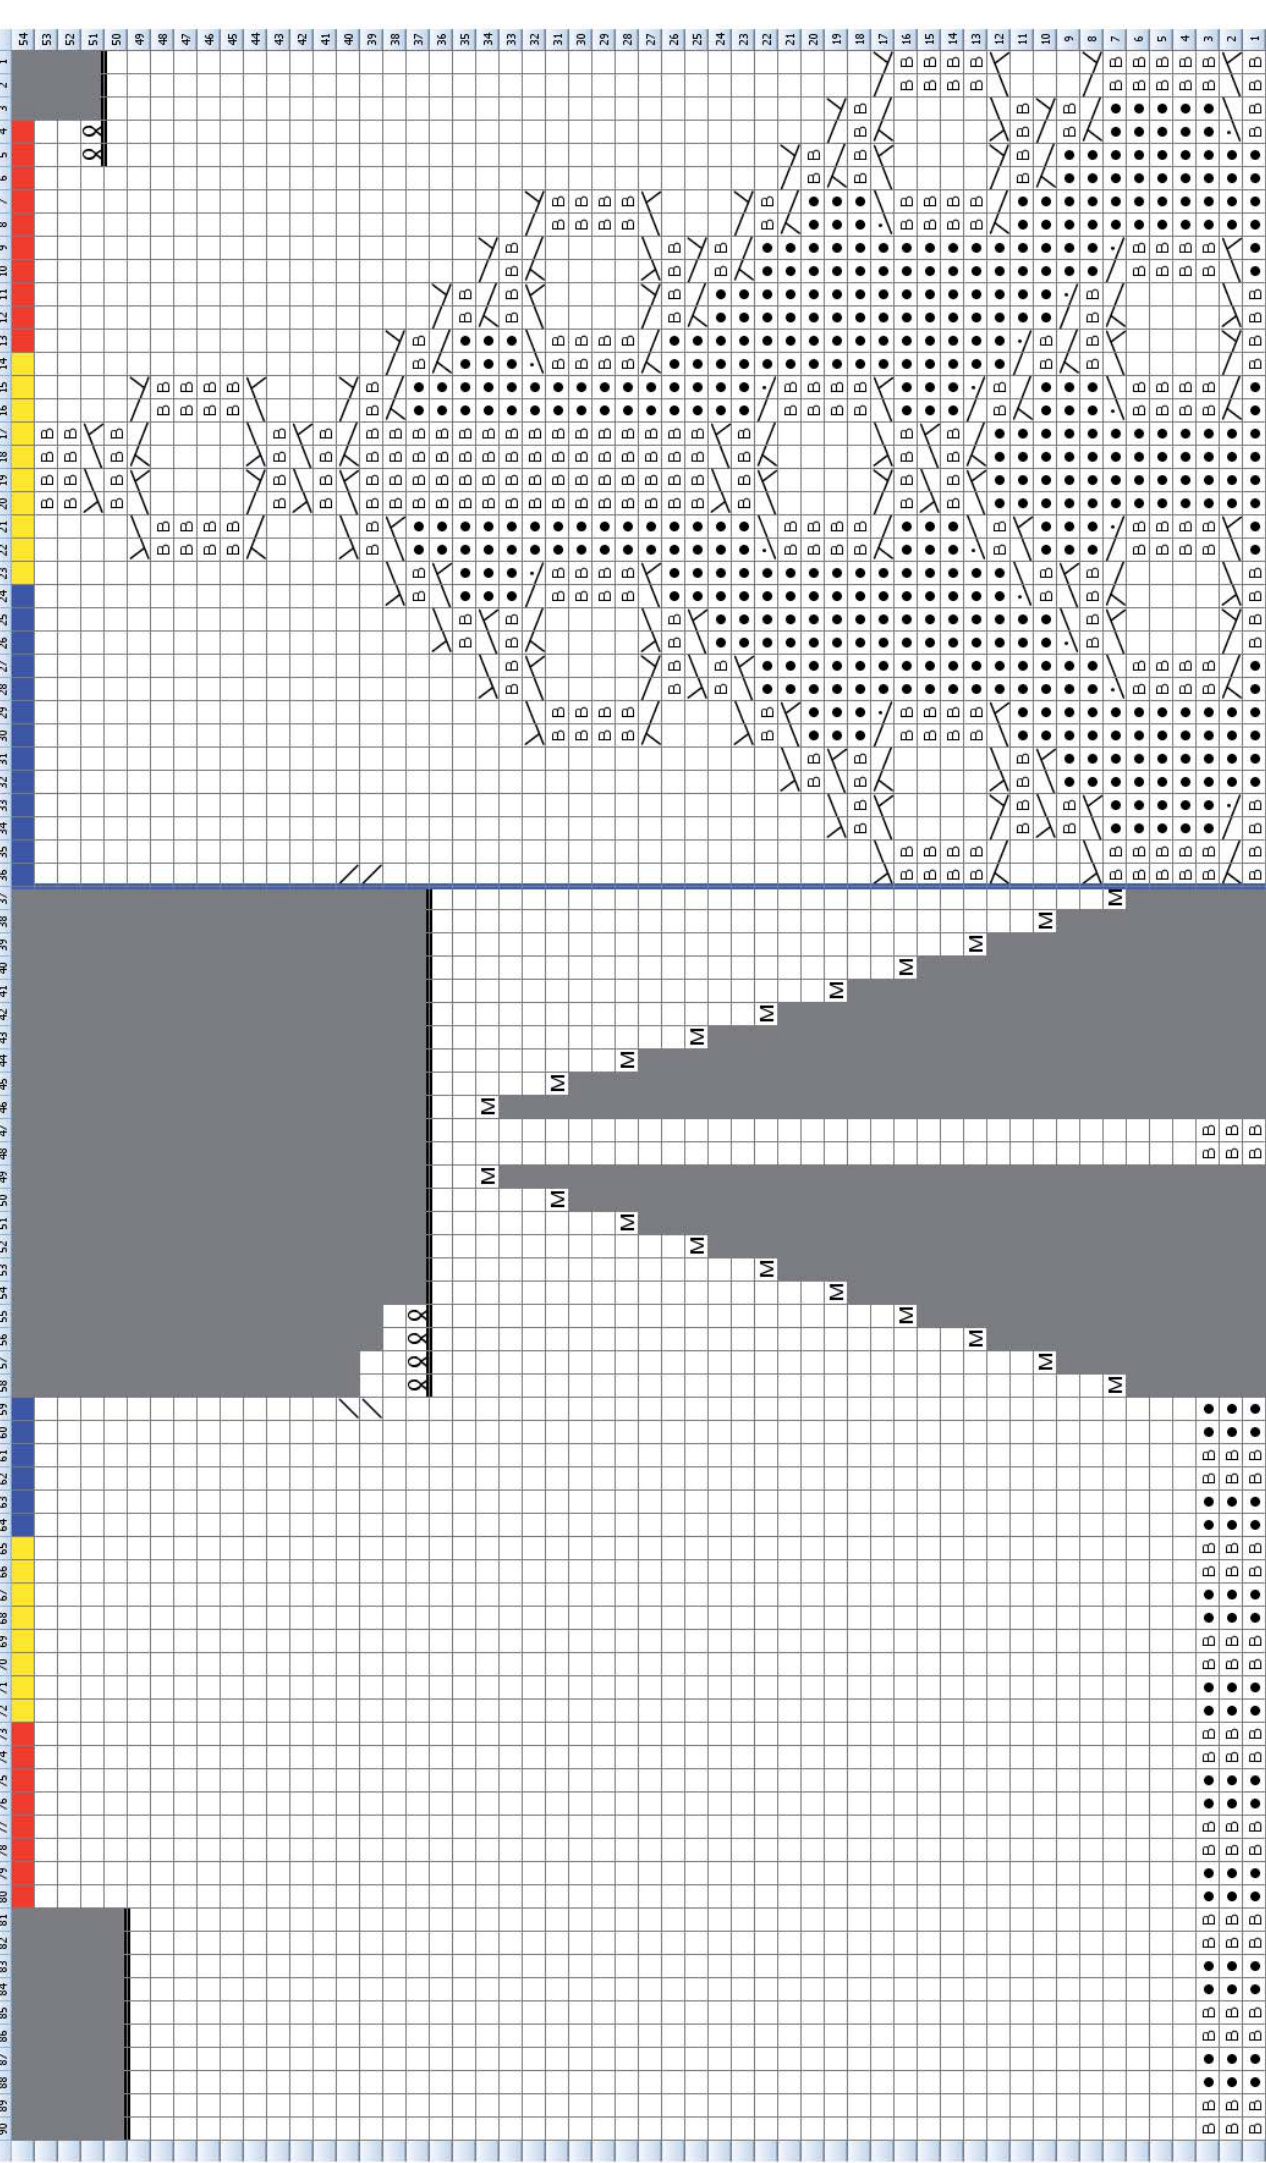
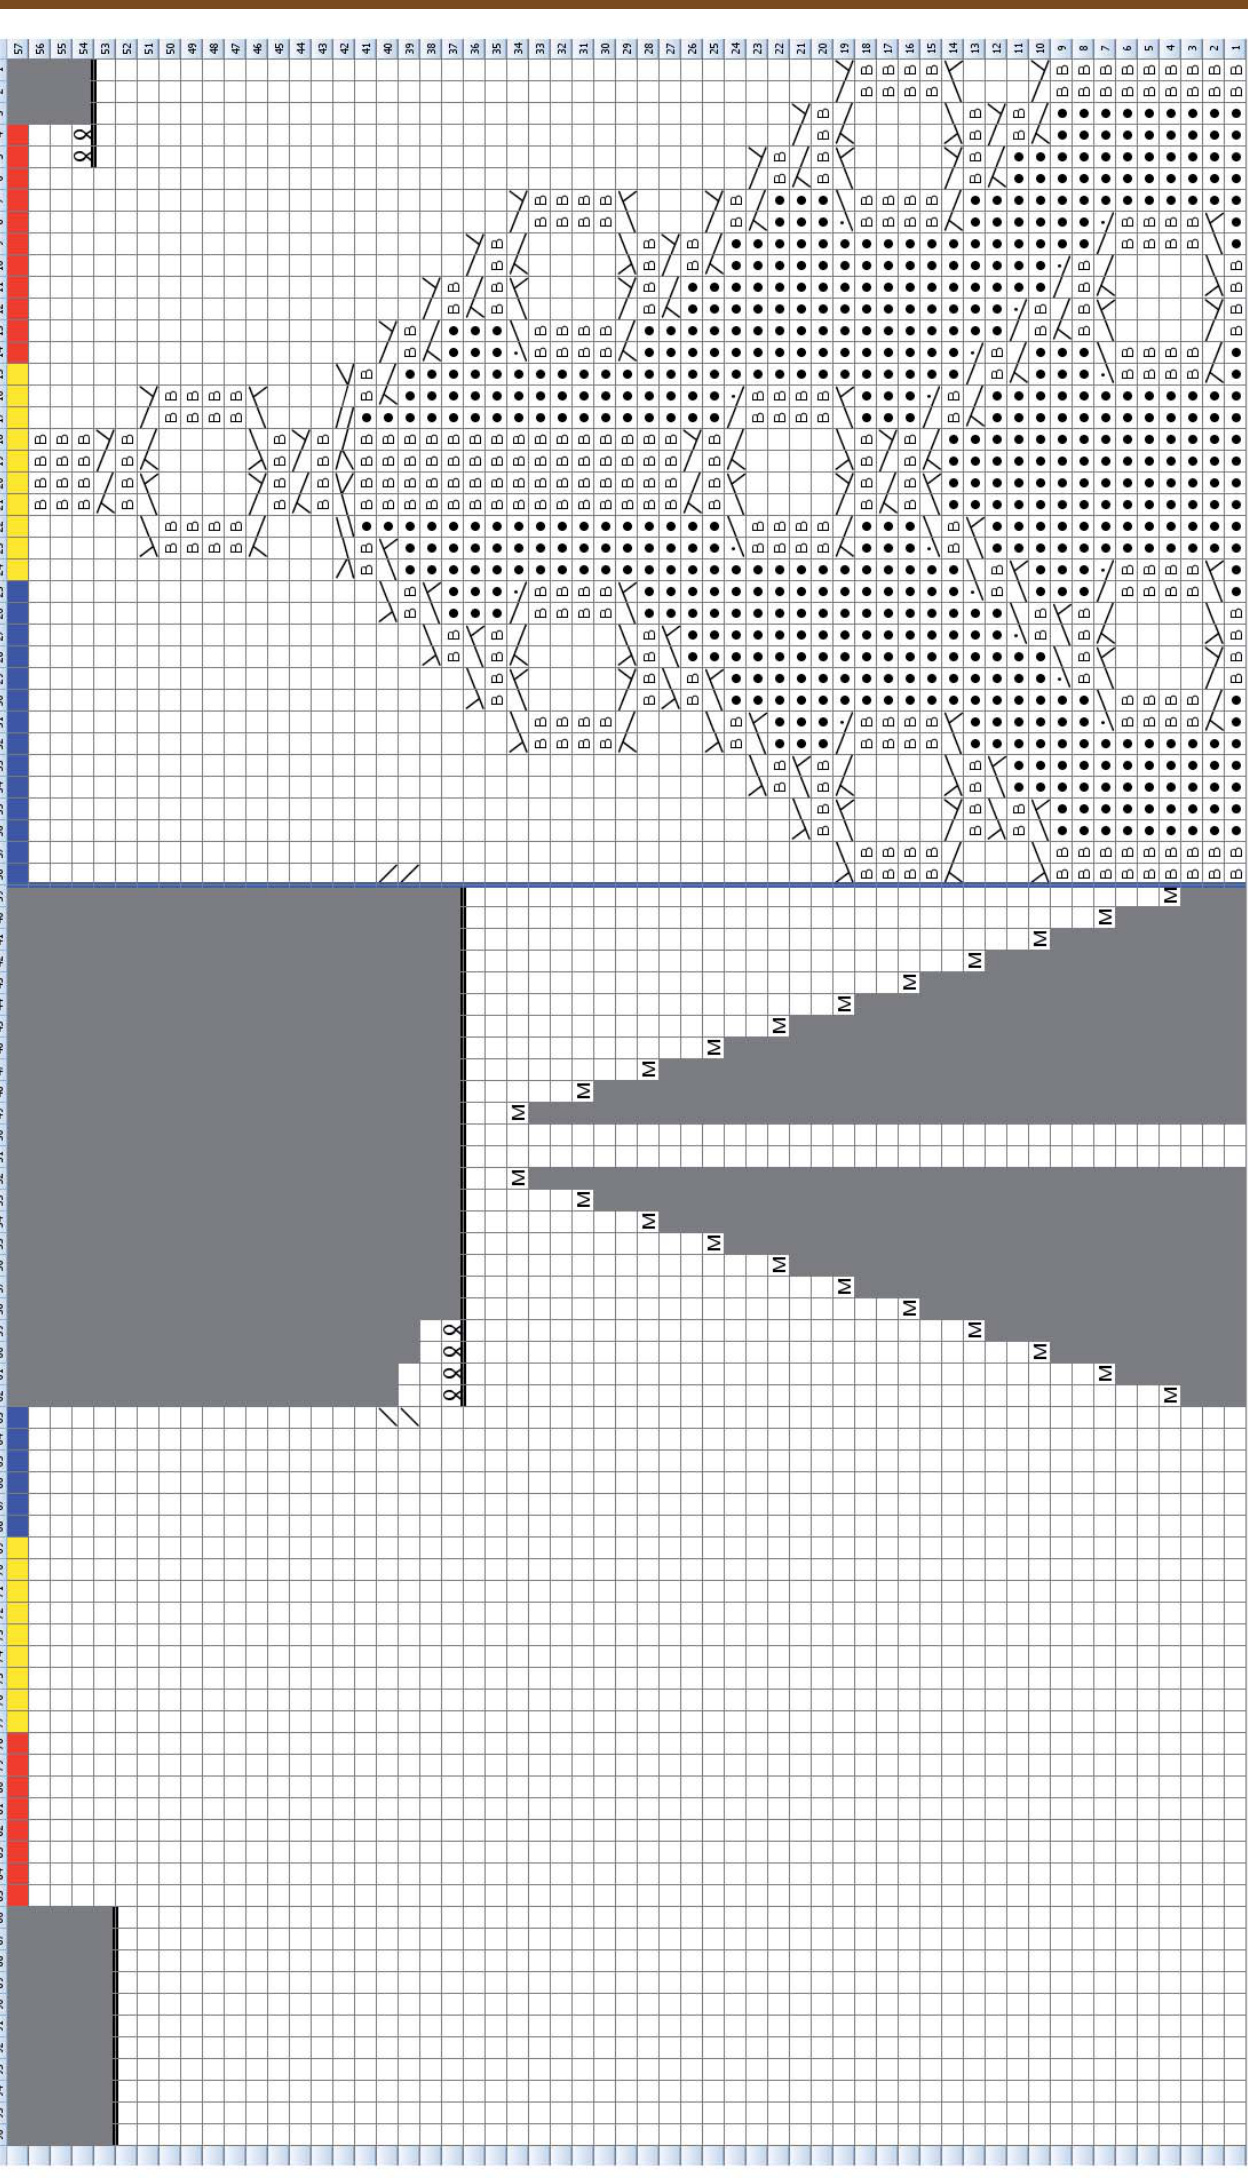
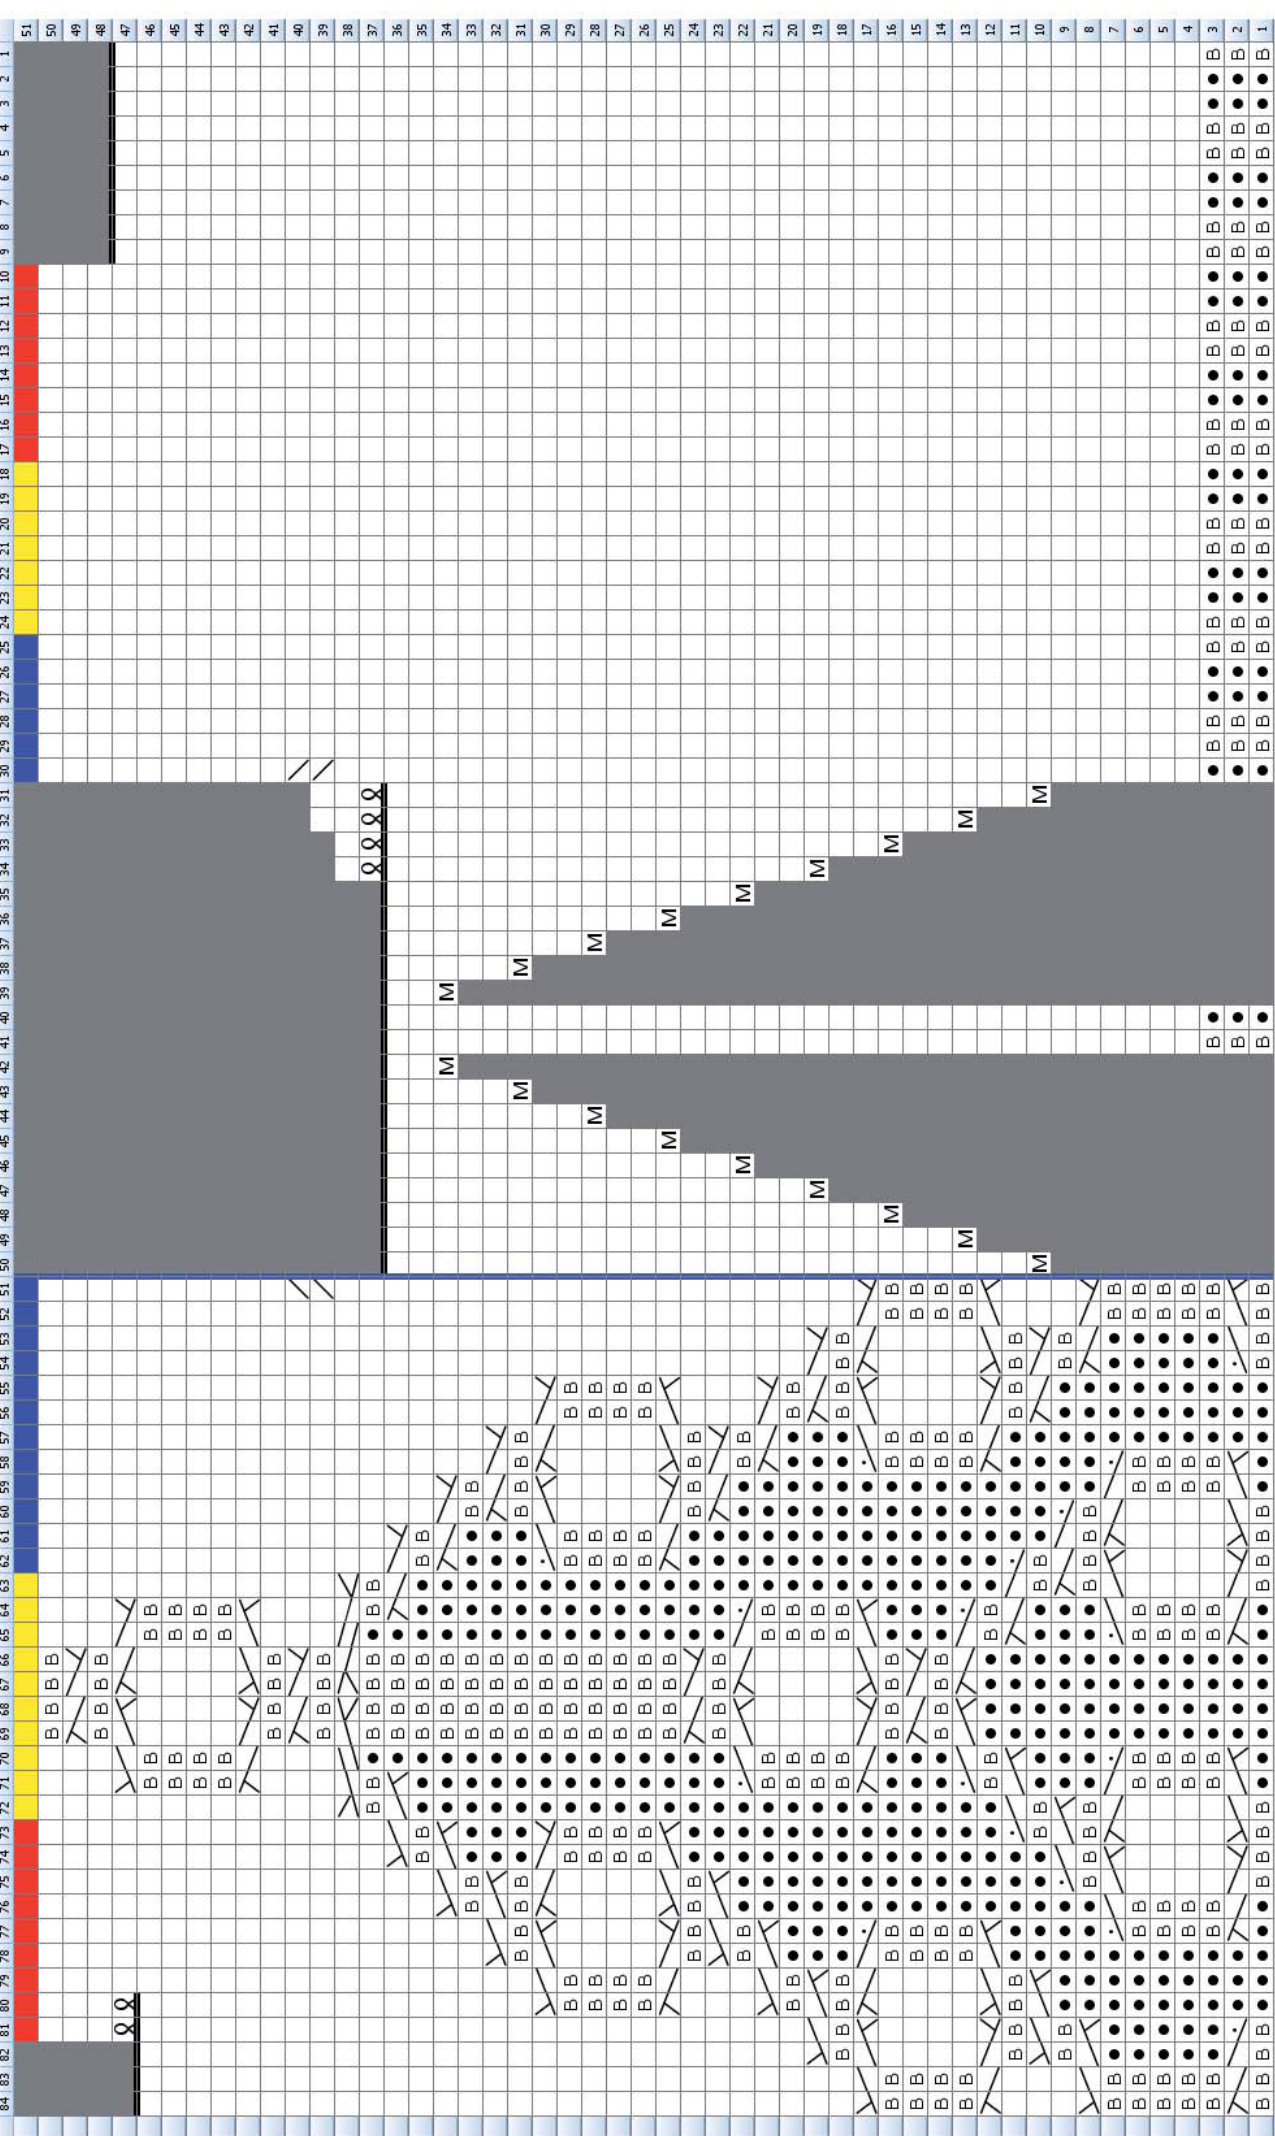
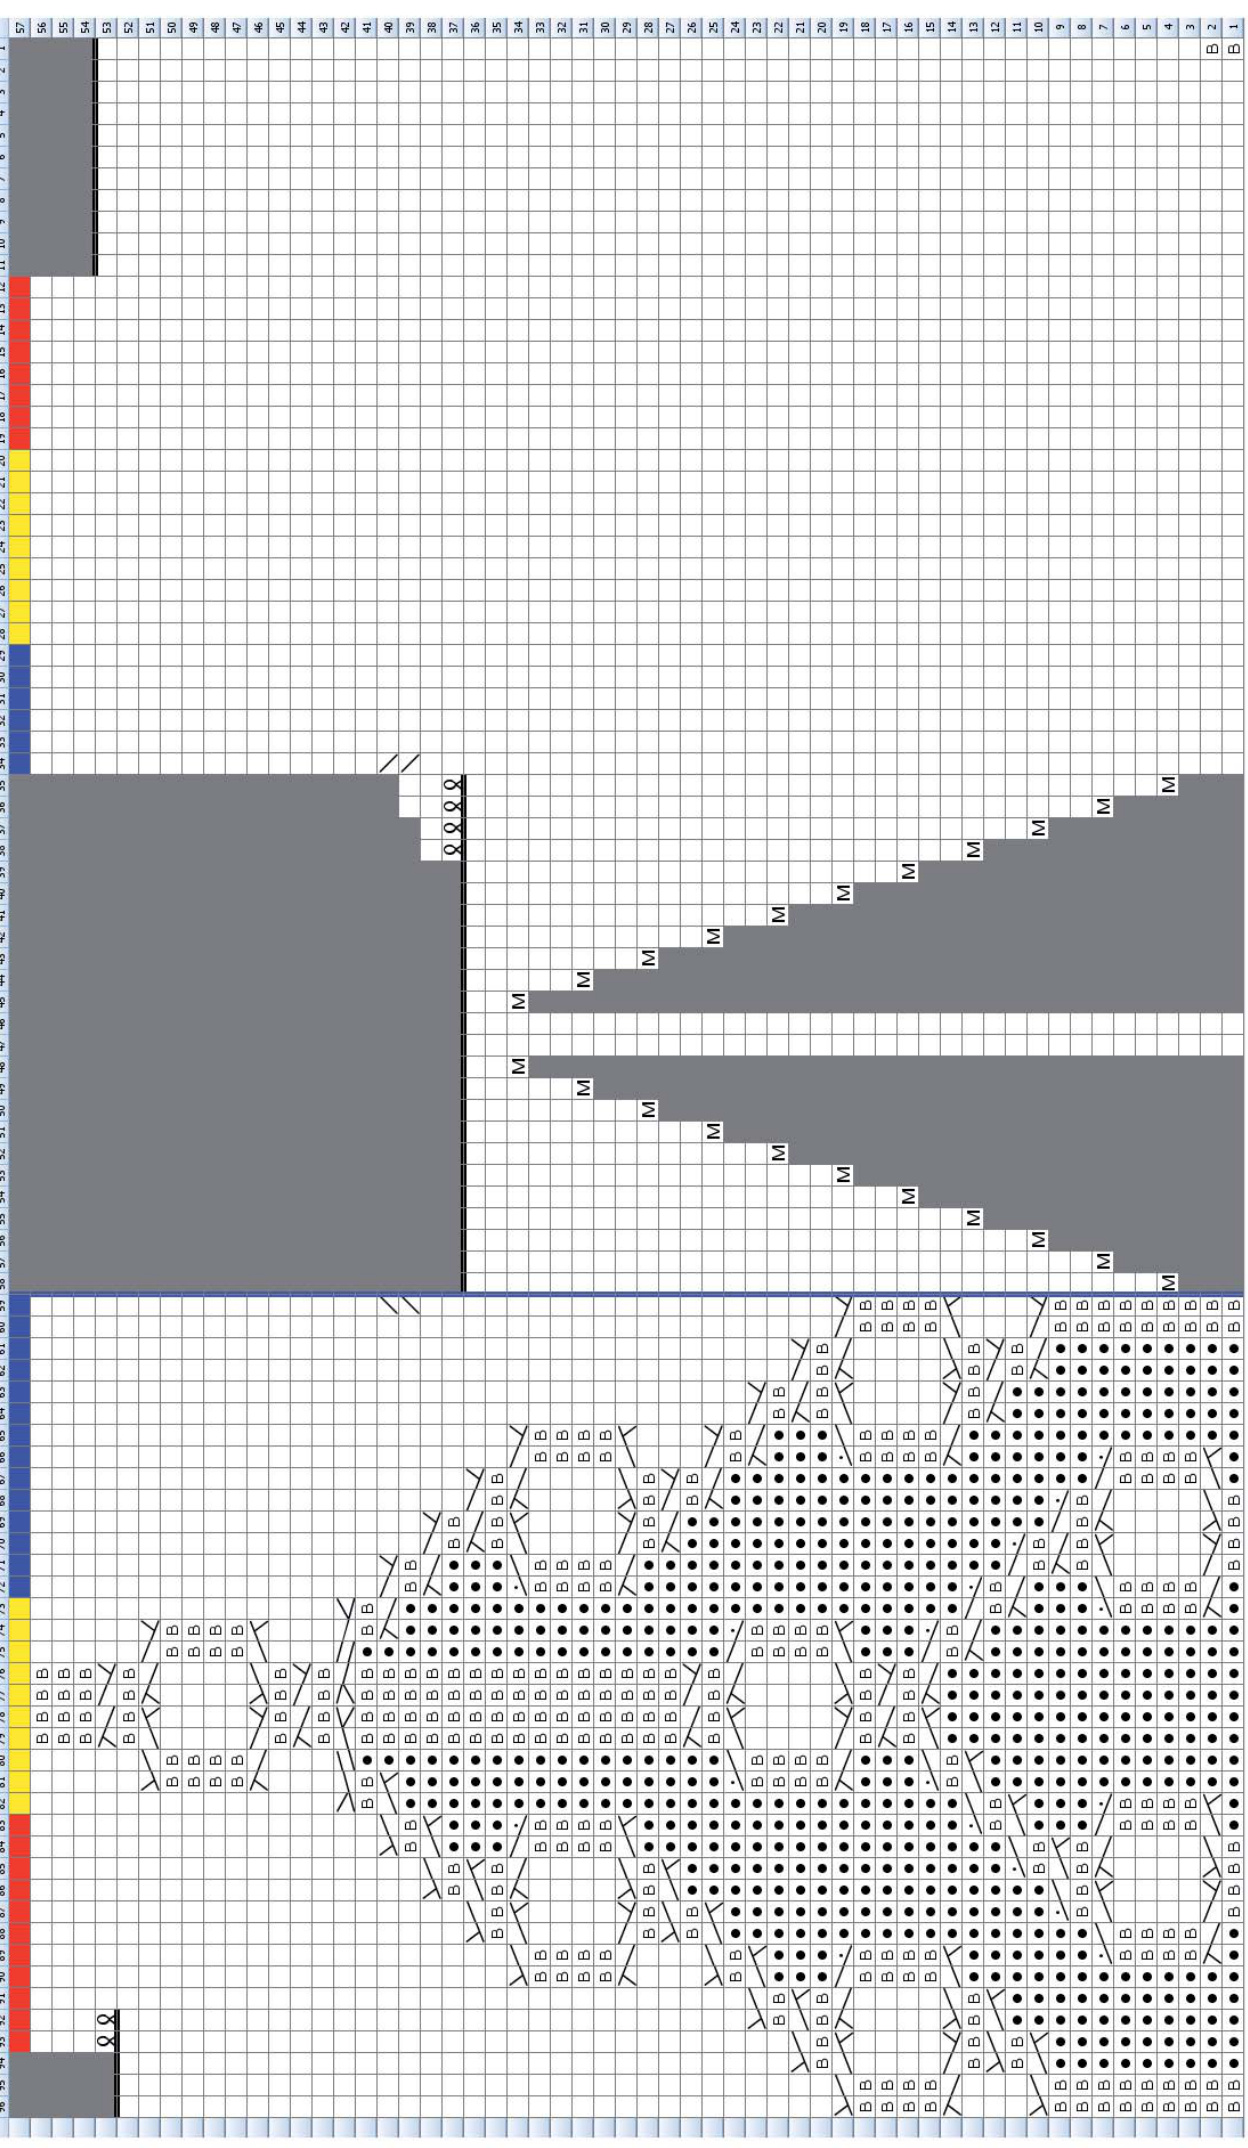
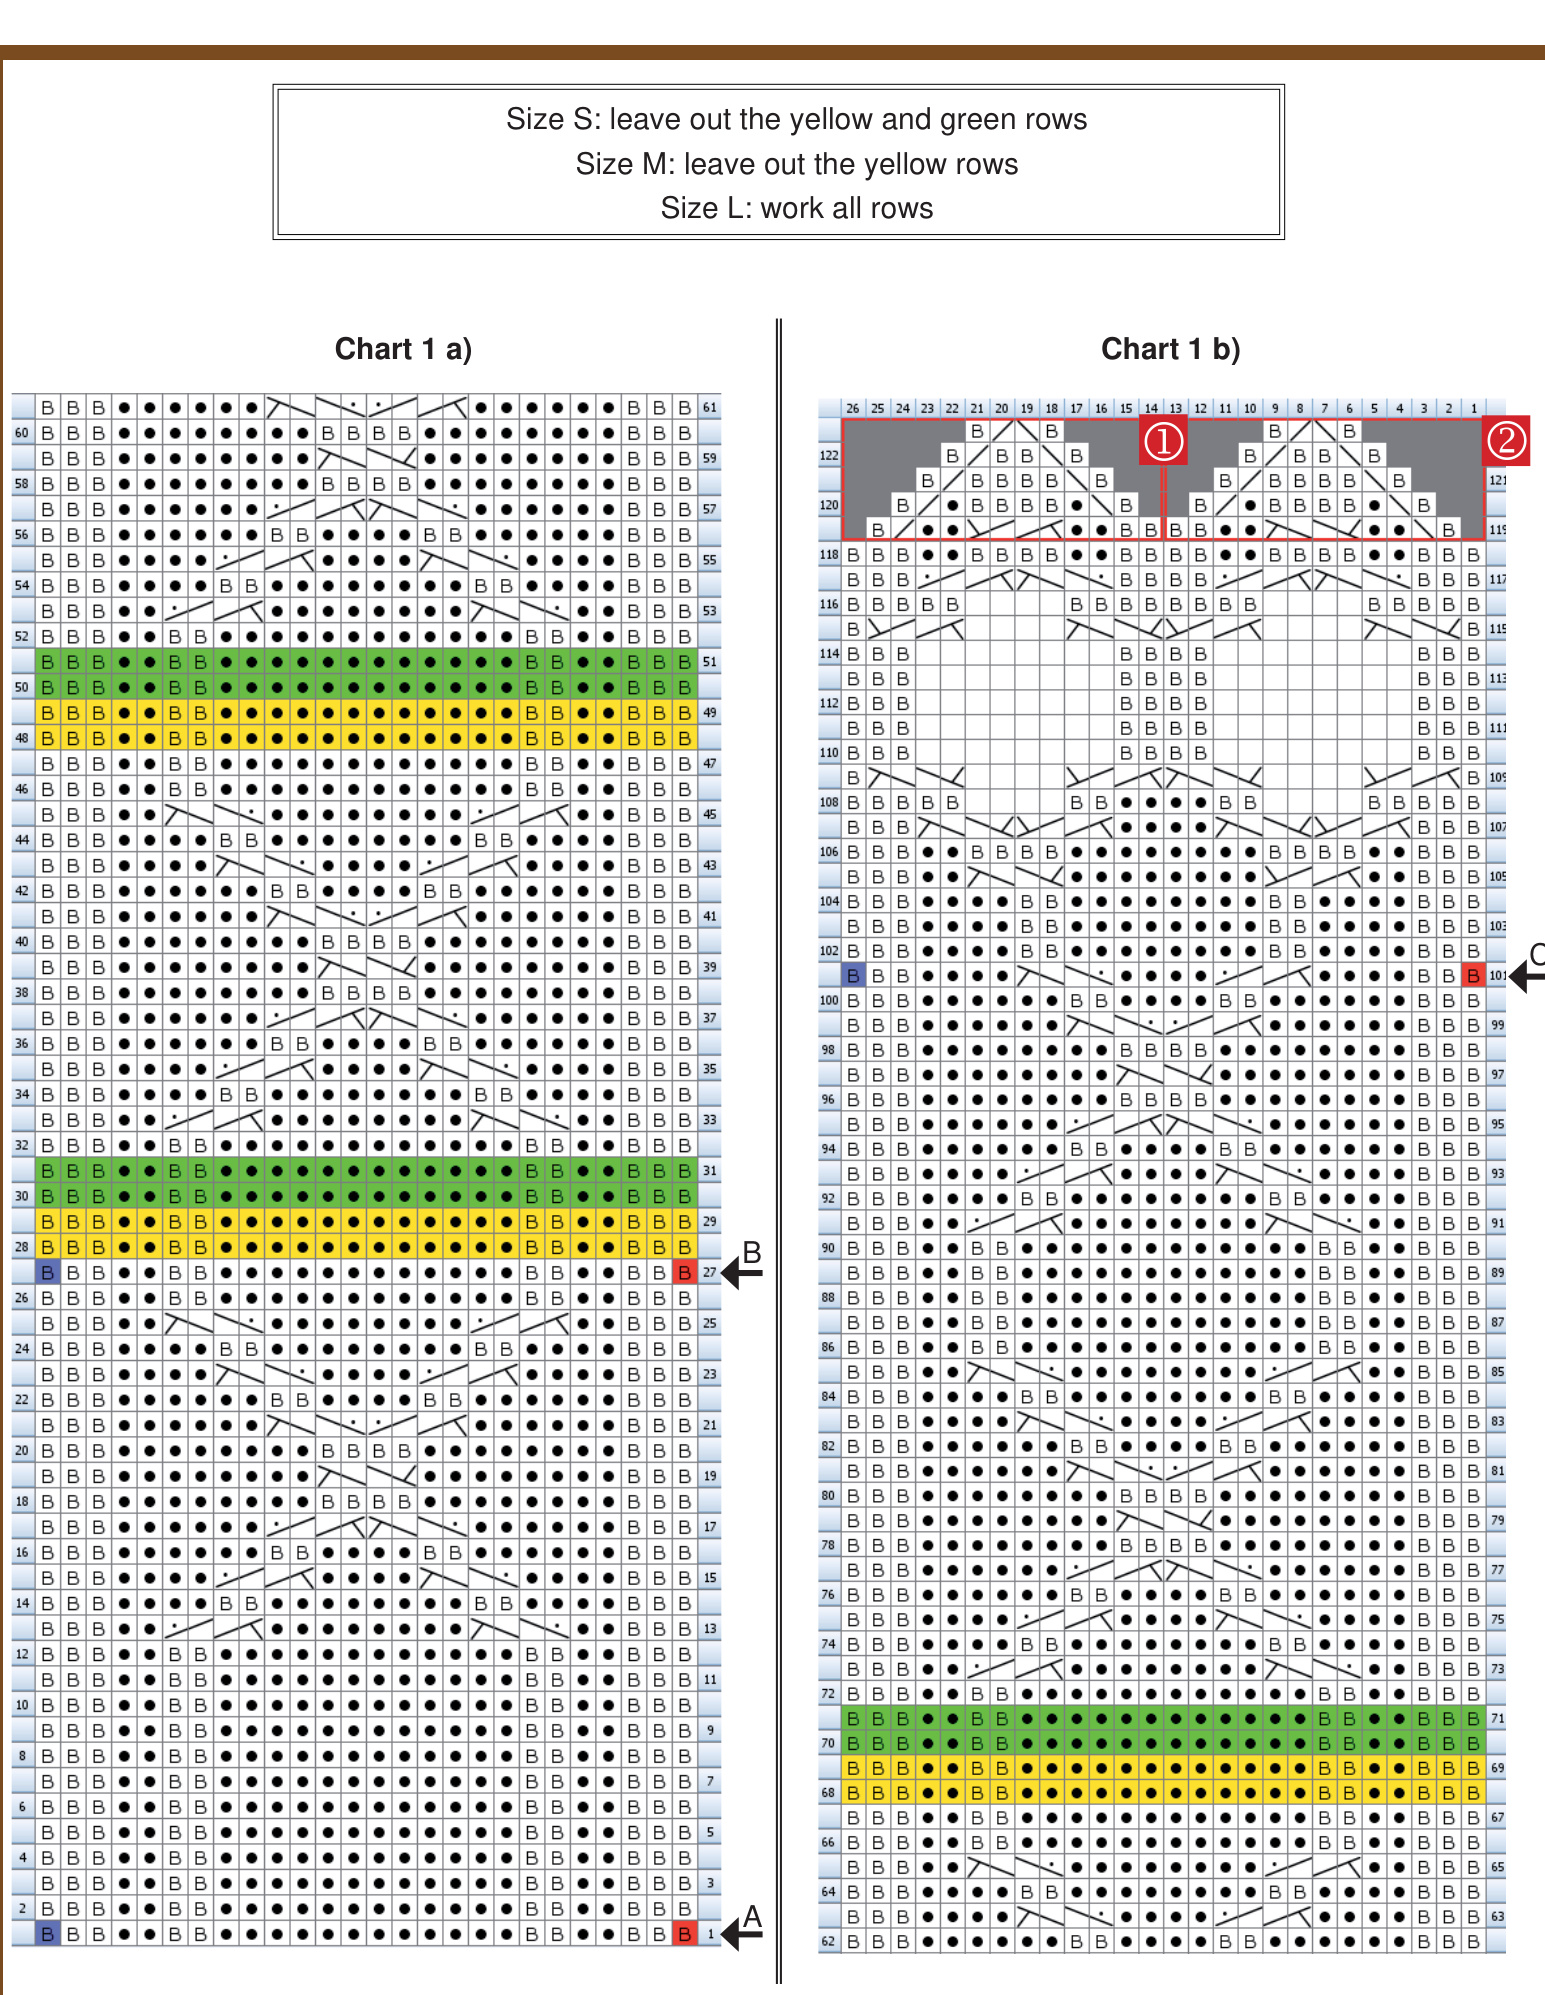
These gloves are knit using the ,magic loop" method, however,you can use doublepointed needles ortwo circular needles if you prefer. Just be aware that the instructions often refer to needle 1 and 2 (meaning each half of the total stitchcount). Where stitch counts vary depending on the size, the following format is used: S [M, L]. the end of theround. The wristband is knitted flat: Right side rows are odd numbered and are read on the chart from right to left. Wrong side rows are even numbered and read from left to right. Symbols are reversed on right/wrong sides, therefore, a "knit" symbol on a right side row becomes a purl stitch when working a wrong side row. Refer to the Symbols table for specific assistance on all symbols. RG = Instructions for the right glove LG = Instructions for the left glove READ THE WHOLE PATTERN BEFORE YOU START KNITTING!
Wristband
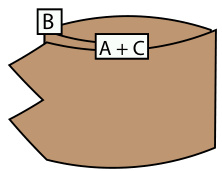
Cast on 26 sts using the long-tail cast-on. Work Chart 1 a), putting a split ring stitchmarker (marker A) in the first stitch (marked red in the chart) when working the LG. For the RG put the marker in the last stitch of the first row (marked in blue in the chart). Leave out the rows not necessary for your size! In Row 27 put another split ring marker in the first stitch (marker B) for the LG and in the very last stitch for the RG.
by Julia Muller
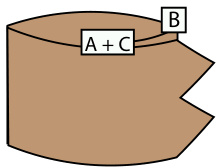
After you reached the last row, continue with chart 1 b). Do thesame inRow101withmarker C. Once you finished row 119 of chart 1 b), knit the part in the red boxmarkedwith,1"onthefirsthalfof thestitches.Afterthelast row break the yarn and thread the tail through the remaining 4 sts using a tapestry needle. Pull tight. Rejoin the yarn (in the middle of the band, at stitch column 13 in the chart). Now work the red box marked with 2 on the remaining sts. Finish as describedforpart 1. RG: Start at marker B picking up stitches (ratio: 3 sts from 4 rows) from the side of the wristband till marker A, then continue picking up sts between marker C and B to form a ring/continuous band.
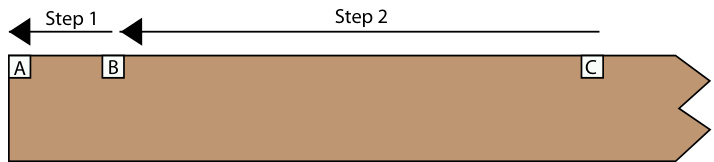
After you finished step 2 it should look like this:
66 [70, 74] sts total. The beginning of the round is located at marker B! LG: Start at marker B picking up stitches (ratio: 3 sts from 4 rows) from the side of the wristband till marker C, then continue picking up sts between marker A and B to form a ring/continuous band.
After you finished step 2 it should look like this:
66 [70, 74] sts total. The beginning of the round is located at marker B!
| Symbols | ||
| Knit | [Purl on a wrong side row] | |
| B | Knit through the back loop. [Purl through the back loop on a wrong side row] | |
| Purl | [Knit on a wrong side row] | |
| No stitch | Knit two together. | |
| N | A | [purl two together on a wrong side row] Slip one stitch knitwise, then slip the next stitch knitwise. Insert left needle into the |
| back loops. | front loops of the slipped sts and knit them together from this position through the [purl 2 together through theback loops on a wrong side row] | |
| Cast on sts using backward loop method. Make oneby lifting strand in between | ||
| stitch | just worked and the next stitch, knit into back of this thread. | |
| Slip two onto cable needle, hold in front, k2tbl, k2tbl from cable needle. Slip two onto cable needle, hold in back, | ||
| k2tbl, k2tbl from cable needle. Slip two onto cable needle, hold in front, | ||
| p2, k2tbl from cable needle. | ||
| Slip two onto cable needle, hold in back, k2tbl, p2 from cable needle. | ||
| Slip two onto cable needle, hold in front, k3tbl,k2tblfromcableneedle. | ||
| k2tbl,k3tblfromcableneedle. | Slip three onto cable needle, hold in back, | |
| Black horizontal lines indicate sts which need to get transferred onto wasteyarn (as necessary for the thumb and the pinky in the charts). In the given example: The first round (normal knit symbols) are worked asusual.Onthesecondround, you thread 5 sts on waste yarn. | ||
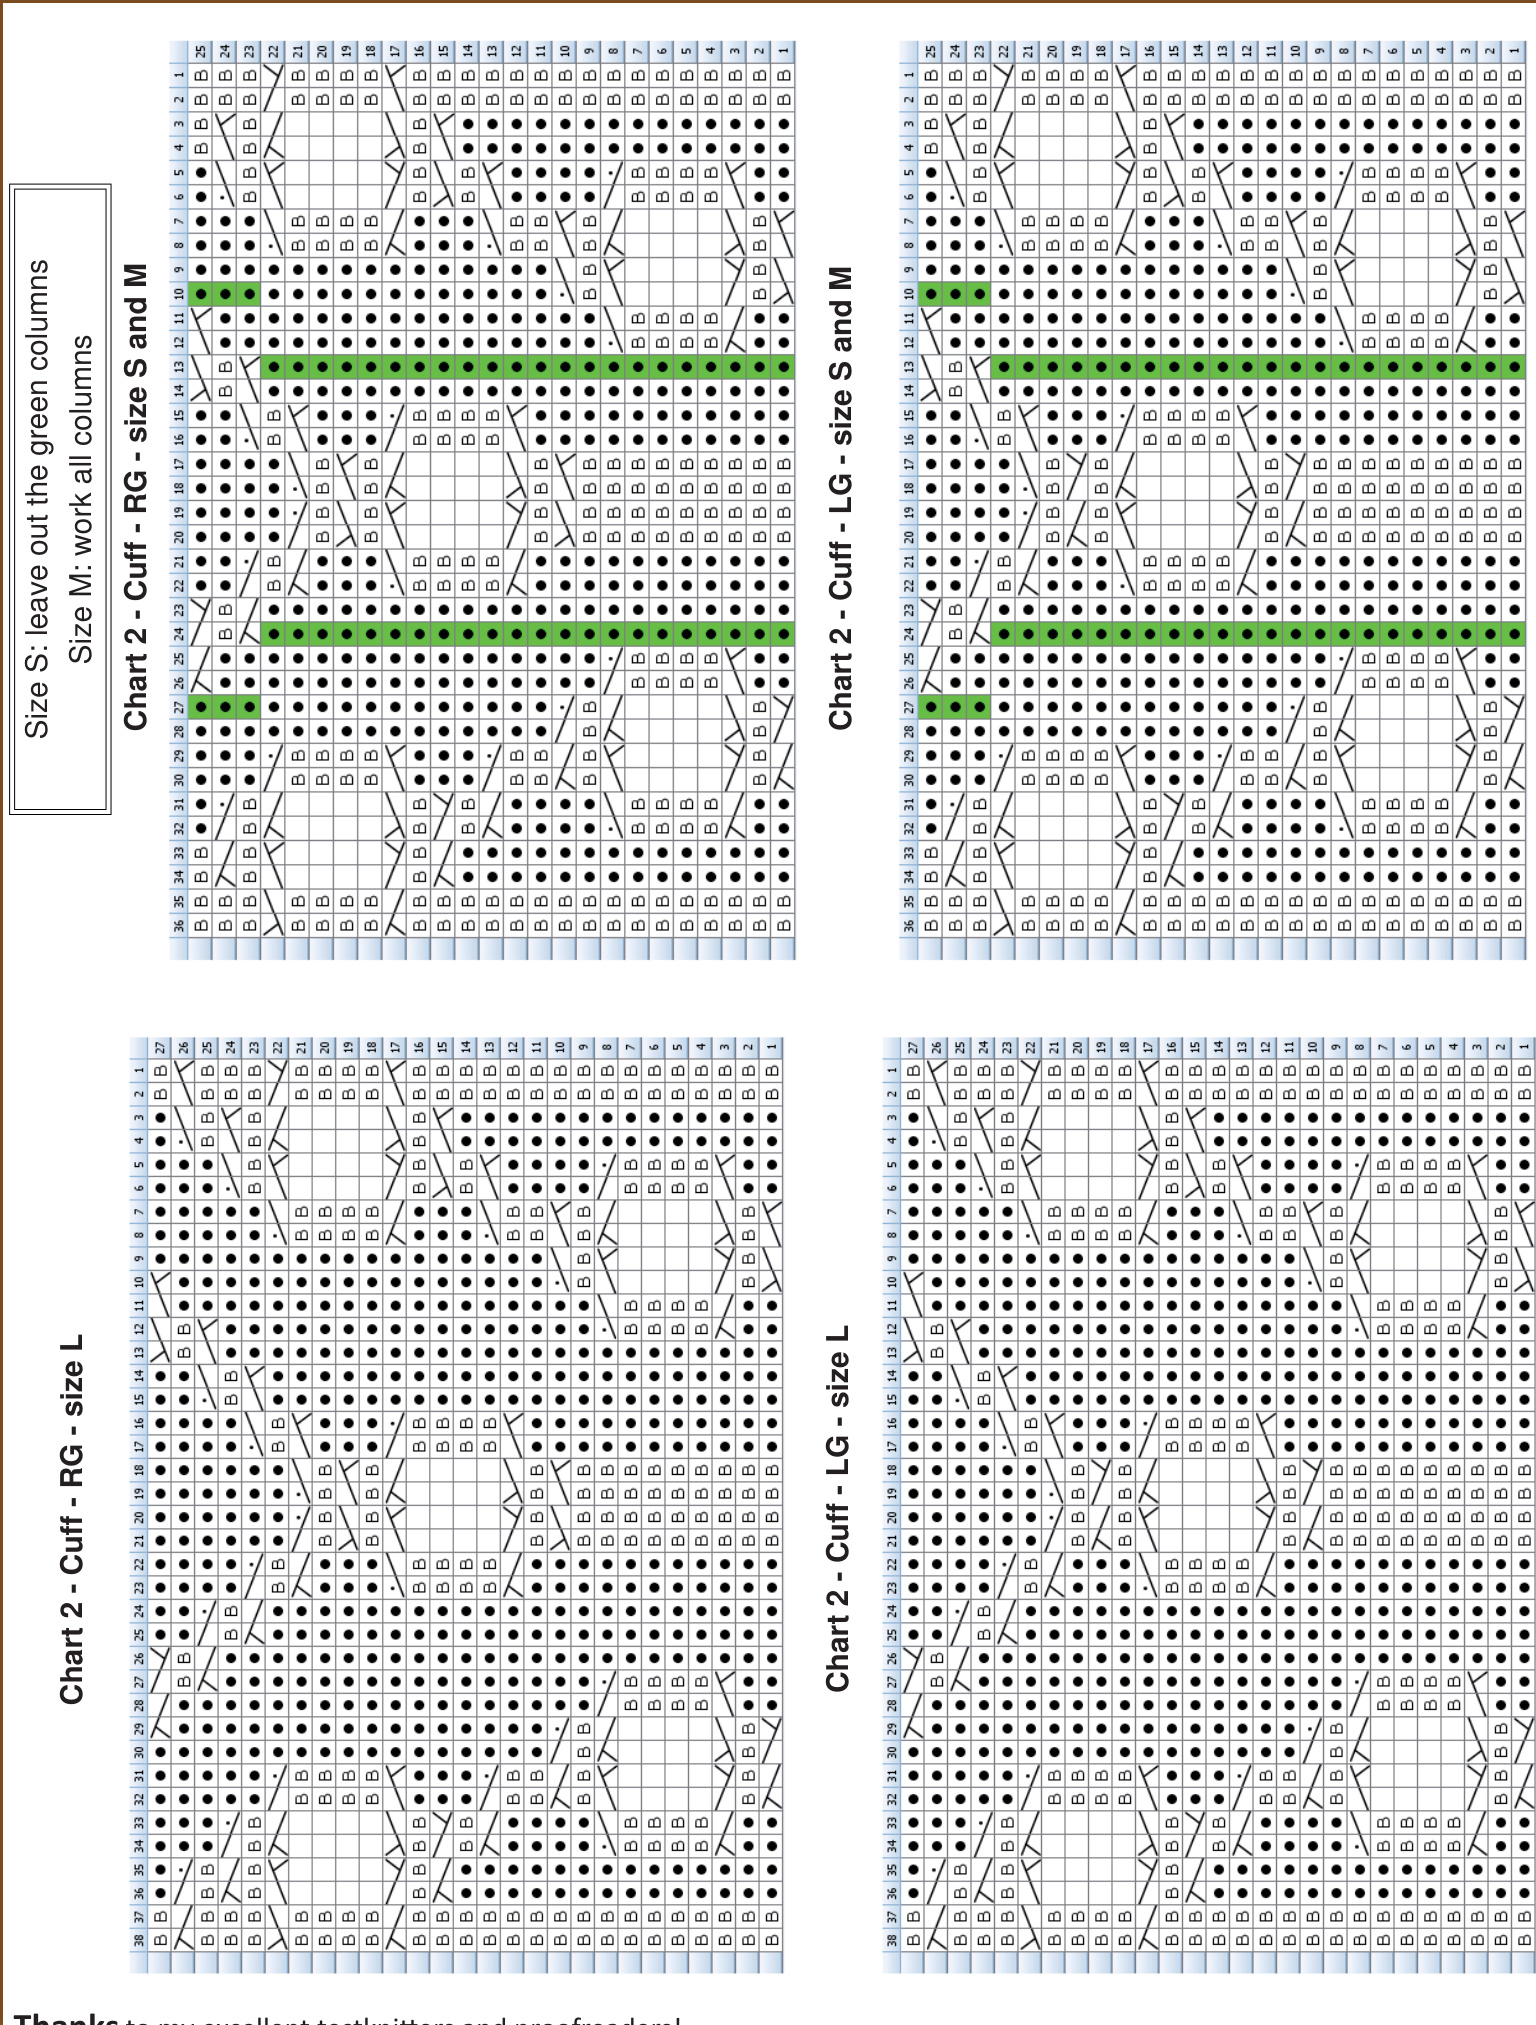
Blue vertical lines indicate where the sts are separated (needle 1 / 2). RG Separate into 34 [36, 38] sts on N1 and 32 [34, 36] sts on N2. Size S: K2tbl, p4, k4tbl, p5, k4tbl, p5, k4tbl, p4, k2tbl,\*k1tbl, p2, k1tbl\* 8 times, for 5 rounds. Size M: k2tbl, p4, k4tbl, p6, k4tbl, p6, k4tbl, p4, k3tbl, \*k1tbl, p2, k1tbl\* 8 times, k1tbl for 7 rounds. Size L: K2tbl, p4, k4tbl, p7, k4tbl, p7, k4tbl, p4, k2tbl \*k1tbl, p2, k1tbl\* 9 times for 9 rounds. Work chart 2 (cuff) - RG corresponding to your size, leaving out the columns not necessary for your size on N1 and continue in the established ribbing pattern on N2. LG Separate into 32 [34, 36] sts on N1 and 34 [36, 38] sts on N2. Size S: \*k1tbl, p2, k1tbl\* 8 times, k2tbl, p4, k4tbl, p5, k4tbl, p5, k4tbl, p4, k2tbl for 5 rounds. Size M: k1tbl, \*k1tbl, p2, k1tbl\* 8 times, k3tbl, p4, k4tbl, p6, k4tbl, p6, k4tbl, p4, k2tbl for 7 rounds. Size L: \*k1tbl, p2, k1tbl\* 9 times, k2tbl, p4, k4tbl, p7, k4tbl, p7, k4tbl, p4, k2tbl for 9 rounds. Continue in the established ribbing pattern on N1 and work chart 2 (cuff) - LG corresponding to your size, leaving out the columns not necessary for your size on N2.
Hand RG
Work chart 3 corresponding to your size. Round 37: In this round, the sts for the thumb gusset need to be put on hold. Work the sts on needle 1 in stitchpattern, then transfer 20 [22, 24] sts to a piece of waste yarn, cast on 4 sts using the backward loop method, work the remaining sts as charted. Round 47 [50, 53]: In this round, the sts for the pinky need to be put on hold. Knit all sts until 9 [10, 11] remain on needle 2. Place these 9 [10, 11] sts onto waste yarn. At the beginning of the next round, transfer 5 sts on the same piece of waste yarn, cast on 2 sts using the backward loop method. Do NOT work round 51 [54, 57]! It's only purpose is to highlight which sts are used for which finger! Transfer all sts on a spare circular needle (same size you use for the pattern or smaller) or waste yarn.
LG
Work chart 3 corresponding to your size. Round 37: In this round, the sts for the thumb gusset need to be put on hold. On needle 1, knit 30 [32, 34] in stitchpattern, then transfer 20 [22, 24] sts to a piece of waste yarn, cast on 4 sts using the backward loop method, work the remaining sts ascharted. Round 47 [50, 53]: In this round, the sts for the pinky need to be put onhold.Knit all stsuntil 5remain onneedle 2. Place these 5 sts onto waste yarn and cast on 2 sts using the backward loop method. At the beginning of the next round transfer 9 [10, 11] sts on the same piece of waste yarn. Do NOT work round 51 [54, 57]! It's only purpose is to highlight which sts are used for which finger! Transfer all sts on a spare circular needle (same size you use for the pattern or smaller) or waste yarn.
Fingers
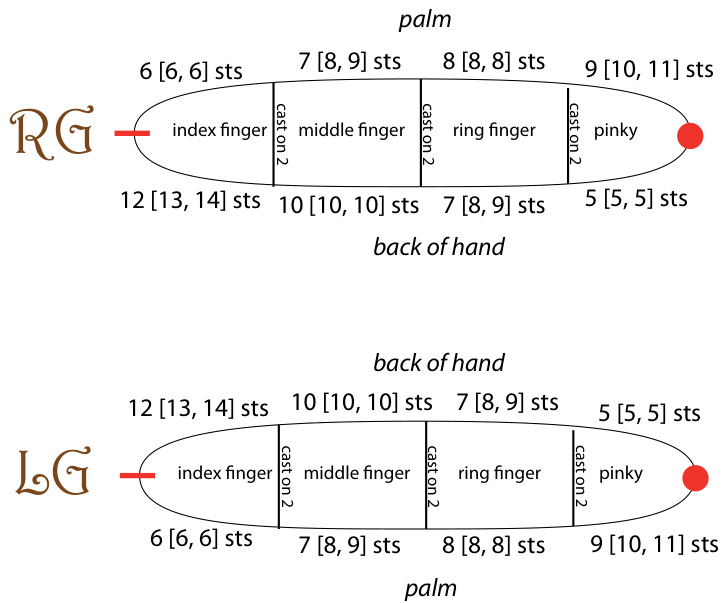
On the bottom of this page, you see an illustration highlighting which sts are used for which finger as a guidance. The red dot shows the beginning of the round and the red rectangle the point where the stsare divided betweenN1and N2.
RG
Ring finger:
Put 2 sts (resulting from the cast-on edge of the pinky) plus 7 [8, 9] stitches from the back of the hand back side on needle 1 and 8 stitches from the palm side back on needle 2. Knit the stitches on N1 (back of hand), cast on 2 stitches using the backward loop method and knit the stitches on N2 (palm). Continue working these 19 [20, 21] sts till the finger is 3 mm shorter than your ring finger when wearing the glove. Work k2tog to the end of the round (if the total stitch count is odd: knit the remaining stitch). Break the yarn and thread it through the remaining stitches twice. Pull tight and weave in the end.
Middle finger:
Put 10 stitches from the back of the hand back on needle 1 and 7 [8, 9] stitches from the palm side back on needle 2. Knit the stitches from theback of the hand,cast on2 stitches using the backward loop method, knit the stitches from the palm and pick up 2 stitches from the cast-on edge to the ring finger. Continue working these 21 [22, 23] sts till the finger is 3 mm shorter than your middle finger when wearing the glove. Work k2tog to the end of the round (if the total stitch count is odd: knit the remaining stitch). Break the yarn and thread it through the remaining stitches twice. Pull tight and weave in the end.
Index finger:
Put the remaining 18 [19, 20] sts back on the needle. Knit all sts and pick up 2 stitches from the cast on edge to the middle finger. Continue working these 20 [21, 22] sts as described for the middle finger.
Pinky:
Put 9 [10, 11] sts from the palm side on needle 1 and 5 sts from the back of hand side on needle 2. Knit the stitches from the palm, afterwards the sts from the back of hand side, then pick up 2 stitches from the cast-on edge to the ring finger. Continue knitting these 16 [17, 18] sts as described for the middle finger.
LG
Ring finger:
Put 8 stitches from the palm on needle 1 and 7 [8, 9] stitches from the back of hand side plus 2 stitches (resulting from the cast-on edge of the pinky) back on needle 2. Knit the stitches from the palm, cast on 2 stitches using the backward loop method and knit the stitches from the back of hand. Continue working these 19 [20, 21] sts as described for the ring finger (RG).
Middle finger:
Put 7 [8, 9] stitches from the palm on needle 1 and 10 stitches from the back of hand side on needle 2. Knit the stitches from the palm, cast on 2 stitches using the backward loop method, knit the stitches from the back of hand side and pick up 2 stitches from the cast-on edge to the ring finger. Continue working these 21 [22, 23] sts as described for the middle finger (RG).
Index finger:
Same as for the RG
Pinky:
Put 5 sts from the back of hand side on needle 1 and 9 [10, 11] sts from the palm on needle 2. Knit the stitches from the back of hand side, knit the sts from the palm, then pick up 2 stitches from the cast-on edge to the ring finger. Continue knitting these 16 [17, 18] sts as described for the middle finger.
Thumb
Move the 20 [22, 24] sts back on your needles. The beginning of the round is placed 3 sts to the left from the cast-on gap (this makes weaving in the yarn tail easier!). Rejoin the yarn and k 17 [19, 21], pick up one st from the gap between the st on your needle and the cast on edge, pick up 4 sts from the cast-on edge and again pick up one stitch from the gap, k3. - 26 [28, 30] sts total - k 16 [18, 20], ssk, k4, k2tog, k to end. - 24 [26, 28] sts total - k 16 [18, 20], ssk, k2, k2tog, k to end. - 22 [24, 26] sts total - k 16 [18, 20], ssk, k2tog, k to end. - 20 [22, 24] sts total - Continue as described for the ring finger. Using the sewing needle, sew on the buttons (while wearing the glove) through both layers of the wristband (in the middle of the cables on the end of the band, exact position is in chart 1 b), line 112, cols 7/8 and 19/20). Weave in all ends. Close any holes if necessary while wearing the glove.
Thanks to my excellent testknitters and proofreaders! Please note: This pattern is for personal use only. Any commercial use is strictly prohibited. This includes distribution of this pattern through electronic or print media. If you have any questions, suggestions or corrections, please get in contact with me: byemail: info@laris-designs.com orthroughmywebsite atwww.laris-designs.com