Folksy Tree Trims by Knitti Politi
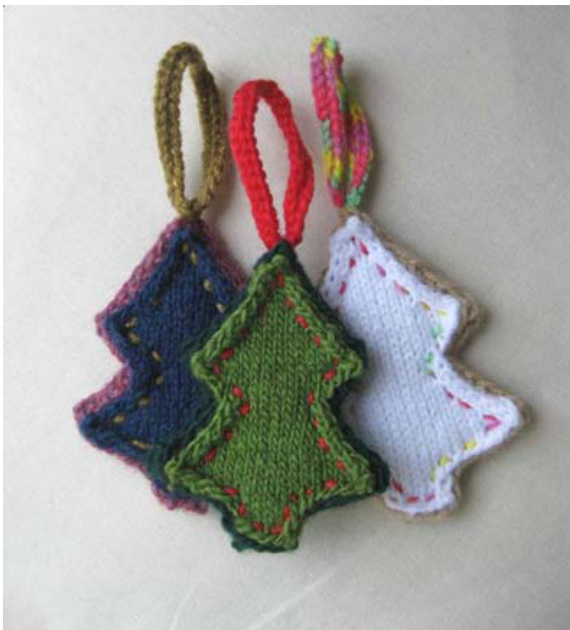
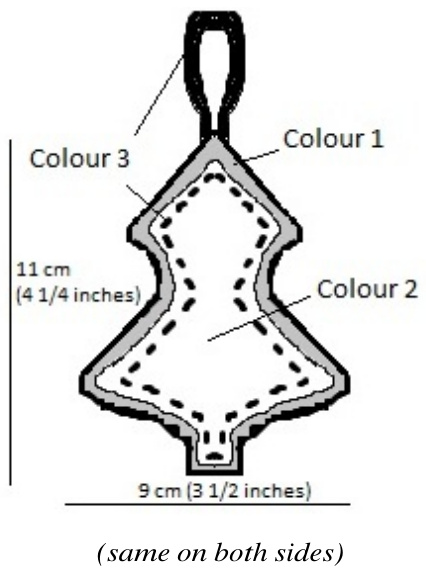
Decorate your tree with mini trees! Easy-to-knit hanging ornaments, made from simple shaped pieces that are worked flat and sewn together. There is no need to worry about neat sewing in this pattern; the tree is sewntogether using largecontrasting stitches that are quick to work and are a visible folk-style design feature! Finished off with a little knitted hanging loop. Size of finished ornament: Approximately 9 cm x 11 cm (3 1/2 x 4 1/4 inches) Tested by: Heather Friedrich Windle

Yarn
@ DK weight yarn. Three colours, approximately 10g, 10 metres (11 yards) of each. Trees shown use: Blue: New Lanark DK, Green: Brown Sheep Lanaloft Sports, White: B & M Supreme double knitting. Needles and Notions 3.25 mm (US 3\*) needles 3.00 mm (US 2\*) needles Or size needed to obtain gauge Sharp pointed large eyed sewing needle for making up Gauge: 6 stitches and 8 rows to 1 x 1 inch (2.5 x 2.5 cm) in stockinette stitch, using the larger needles.
Abbreviations
CO: Cast on k: knit ssk: slip, slip, knit the two together (decrease) k2tog: knit two together (decrease) p2tog: purl two together (decrease) sl: slip RS: Right side of work WS: Wrong side of work
\*US needle sizes given are for guidance only. US sizes 2 and 3 may differ in mm, depending on the brand. Check with a needle gauge if you are unsure of the exact size in mm.
Copyright ? Ellen Kapusniak 2013
Instructions
(All slipped stitches are slipped purlwise. Where new stitches are cast on to existing rows, use any suitable method such as backwards loop, knitted, or cable cast-on) sing larger needles and colour 1, make two of the tree shape as follow Tree Shape Cast on 6 sts Row 1: sl1, knit to end Row 2: sl1, purl to end Rows 3-4: repeat rows 1 and 2. Row 5: (RS) CO 8 sts, sl1, knit to end. (14 sts) Row 6: (WS) CO 8 sts, sl1, purl to end. (22 sts) decreaserows Row 7: (RS) sl1, ssk, k to last 3 sts, k2tog, kl Row 8: (Ws) sll, purl to end. Rows 9-20: Repeat decrease rows 7 and 8 until 10 sts remain, ending with a WSrow. Row 21: (RS) CO 4 sts, sl1, knit to end. (14 sts) Row 22: (WS) CO 4 sts, sl1, purl to end. (18 sts) Rows 23-36: Repeat decrease rows 7 and 8 until 4 sts remain, ending with a WSrow. Row 37: ssk, k2tog (2 sts) Row 38: p2tog Draw yarn through remaining stitch and fasten off. Next, using smaller needles and colour 2, make two more of the tree shape. You will have two larger tree shapes in colour 1, and two slightly smaller tree shapes in colour 2. Weave in ends. Copyright ? EllenKapusniak 2013 For pattern support and enquiries,email: ellen@knittipoliti.com
Hanging loop (make one)
Using colour 3, and smaller needles: cast on 35 sts, and then bind off all 35 sts.
To Make Up
1. Place the two larger tree shapes together, with the wrong sides of the work together and the right sides of the work facing outwards. 2. Position each of the smaller tree shapes in the centre of each of the larger tree shapes, with the right sides facing outwards. Pin the layers together to secure the work whilst stitching. 3. Thread the sewing needle with colour 3. Tie a knot in the end, place the needle in the middle of the tree “sandwich" where the knot will be hidden, and sew through to the outside, with the needle emerging just inside the edge of the smaller tree shape. 4. Next, stitching all the way through all four pieces of the tree “sandwich", sew all around the smaller tree shape, just inside of the raised edge, using a long running stitch. 5. When you have sewn the pieces together all around the shape, thread the yarn inside the ornament to conceal the end and fasten off. Attach the hanging loop Weave one of the yarn tails into the knitted strip. Thread the other onto the sewing needle. Fold the strip in half and, using the tail, stitch the two ends together to form a loop. Sew the loop in place at the top of the tree ornament. Crafty suggestions.. Decorate the centre ofyour treeswith buttons and beads Embroider initials in the middle for a personal touch Knit two of the larger shapes, stitch together and stuff to make a soft tree Glue single or layered tree shapes onto card for knit-themed greetingscards.


