TARDIS BAG
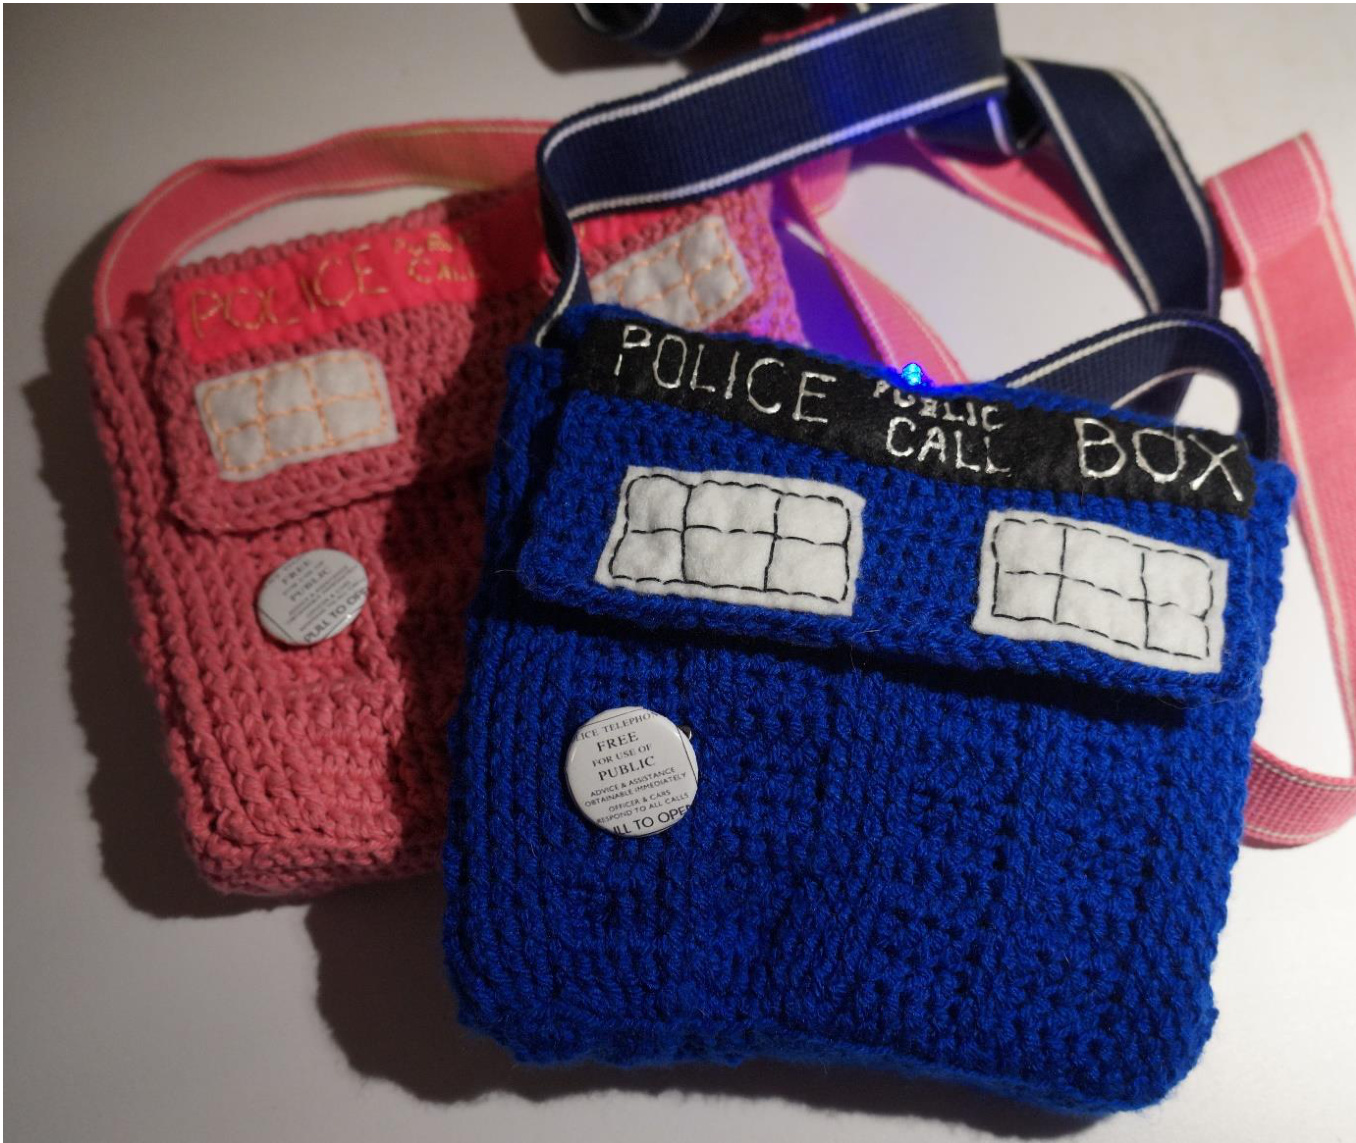
bettyvirago@gmail.com bettyvirago.wordpress.com Also on Etsy, Folksy, Ravelry, Pinterest, Facebook and Twitter.. (let's just say I'm on the internet!) The crochet pattern for the bag is made in Double Crochet (US terms) that's triple crochet for us Brits. It's a simple enough bag that uses the raised effects of back post stitches to create the door panel effect of the Tardis. What is fantastic about this pattern is that it introduces you to the world of e-textiles. Remember when you started crocheting and someone told you to be careful because buying yarn was addictive? Well so are e-textiles. This pattern will show you how to work the most basic of electric circuits, a single LED light. It also includes a bit of sewing, but I'm sure you'll be fine. Remember, as always, I'm happy for people to email me for help. Don't be afraid to ask, especially with the electronic bit. I'm sure you'll be okay though. WHAT YOU WILL NEED: 3mm Hook DK Yarn in Dark Blue 100g Bag strap material 1-2" wide, 2 metres length Sewing thread Sewing needle Magnetic Bag Clasp Black felt White Embroidery thread White Felt Black Embroidery thread 2 x A4 sheets of felt for the lining Metal Snap Fastener (Not plastic) Sewable coin cell Holder\* Coin cell battery\* Blue flashing LED light\* Conductive thread\* Round nose plyers Police box badge\* re having trouble finding the e-textiles items, these items are available in a pack I've put together andFolksy shops.
MAIN CROCHET BAG INSTRUCTIONS
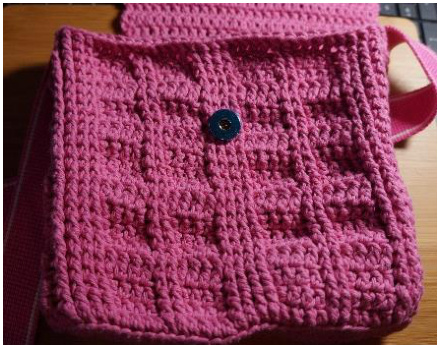
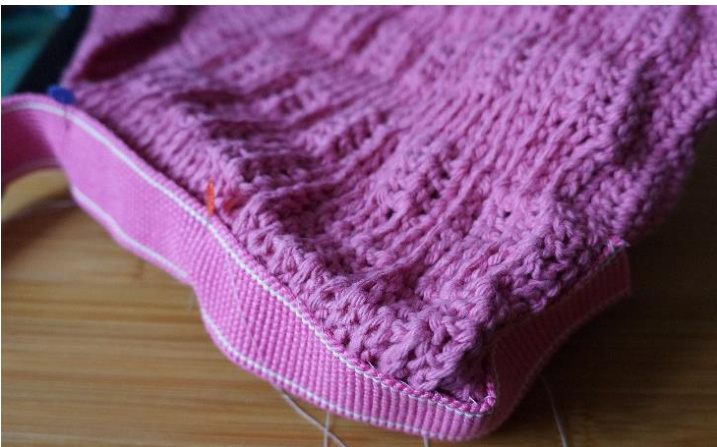
Before you begin.. Chains at the start of the round makes the first st This pattern is in US terms Starting at the base of the bag. Yes, some photos are in pink!I know the Tardis is Blue, but the pink bag shows the stitches better in photos. Ch 31 1) 2dc in 4th ch from hook, dc in next 26 ch, 6dc in last, now working on the other side of the chain, 26 dc, 3dc in last, join, ch 3 (64) 2) 3dc in next, 28dc, 3dc in next, 2dc, 3dc in next, 28 dc, 3dc in next, 1dc, join, ch3 (72) 3) BLO, dc in each stitch around, join, ch3 (72) 4) BPDC in each stitch around, join, ch3 (72) Round 5 works the main pattern for the bag 5) 1 x DC, 4x BPDC 4 x DC, 2 x BPDC, 4x DC, 4x BPDC, 4x DC, 2 x BPDC, 4x DC 4 x BPDC, 4x DC, 4x BPDC 4 x DC, 2 xBPDC, 4x DC, 4x BPDC, 4x DC, 2 x BPDC, 4x DC 4 x BPDC, 2 x DC, Join, ch3 (72) 6-7) Repeat round 5 8) BPDC around, Join, ch3 (72) 9-24) Repeat rounds 5-9 four times. At the end of round 24m FO. Looking at the bag you can see it has four sides, the thinner side panels have 2 x BPDC, 4 x DC, 2 x BPDC and the front and back panels have 2 x BPDC, 4x DC, 2 x BPDC, 4 x DC, 4 x BPDC, DC x 4, 2 x BPDC, 4 x DC, 2 x BPDC It might make it easier if you put markers in the corners of the bag. Remember these four sides, because you'll need them to add the bag flap and straps.
THE BAG FLAP
Join yarn to the first bpdc on the back panel (at this point you can chose which longer side is the front or back) Ch 3 does NOT count as a stitch 1) Ch 3, 28 dc across, ch 3, turn (28) 2-10) dc in each dc across, ch 3, turn 11) dc in each dc across, FO
THE ELECTRIC SWITCH FLAP
While you've got your yarn out, crochet the flap for the switch. We'll attach it to the bag later, so once made put it aside. Leave a 30cm length to sew later and ch11 1) sc in 2nd ch from hook and in each ch across, ch 1, turn (10) 2-4) sc in each stitch across, ch 1, turn (10) 5) sc in each stitch across, FO (10)
THE BAG STRAP
I was going to crochet a strap and you can do that if you want, I find crocheted straps stretch the bag, so wanted to use something stronger. I found three alternatives in my local haberdashery shop. The strap needs to be 1-2" wide, I bought 2 metres which makes a shoulder length bag.
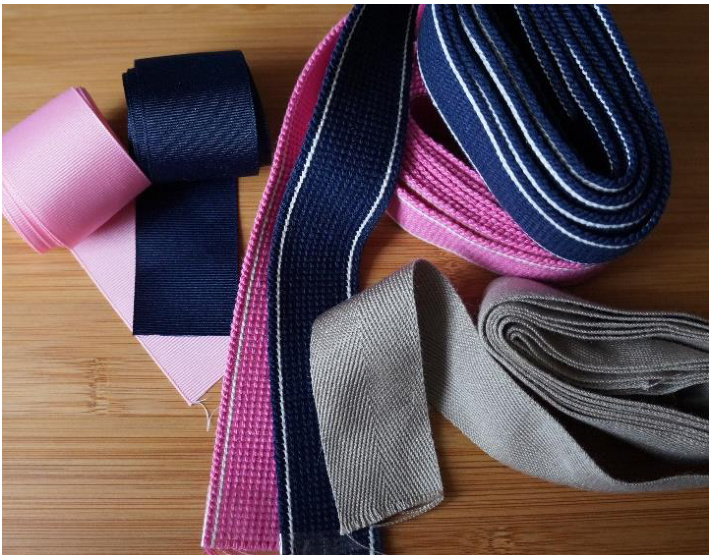
I found wide, strong ribbon, which might work well with a crochet strap sewn on top. I also found a proper bag strap and material called herringbone ribbon, which is similar to the straps on tote bags. The choice comes down to what is available to you. If you're really stuck let me know. My friend Annie says buy a cheap fabric belt from a charity shop instead! Turn the bag inside out, starting on the bottom of the bag and with a whipping stitch, stitch the strap in place along the base and up the side.
Once at the top of the bag, stitch across the bag then back down the other side and along the bottom to the start of the strap. Now measure the strap and cut to the length you require, sew the other end of the strap in plac. This should give some more structure to the bag and as the strap is sewn along the bag should make the handle very secure.
THE BAG CLOSURE
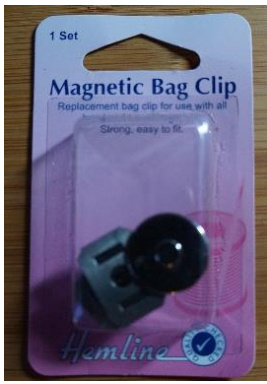
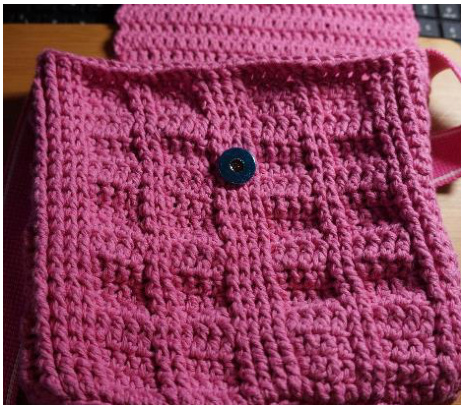
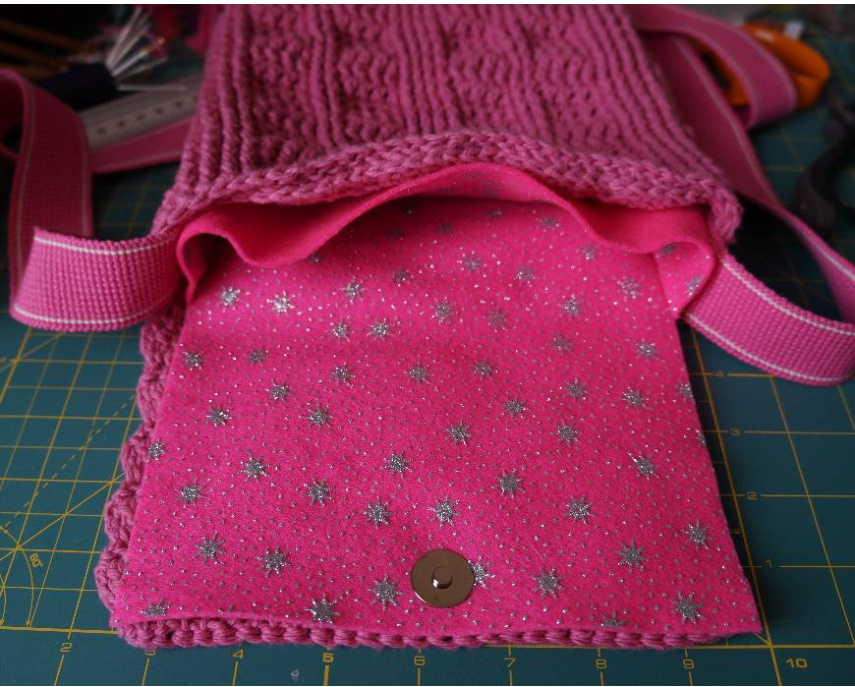
I used a magnetic bag clasp because it is hidden when closed and the back of the clasp will be hidden by the bag lining. Attach the clasp to the front of the bag, but wait for the other half until the lining is made.
THE POLICE BOX SIGN
Cut a piece of black felt 7" by 1". With a white pencil or piece of chalk write the message onto the felt. Another option is to copy the wording onto a piece of tracing paper and stitch over the felt and paper. Once finished tear the paper away from the felt. Using white embroidery thread stitch the wording onto the felt With sewing thread stitch the felt onto the front of the bag.

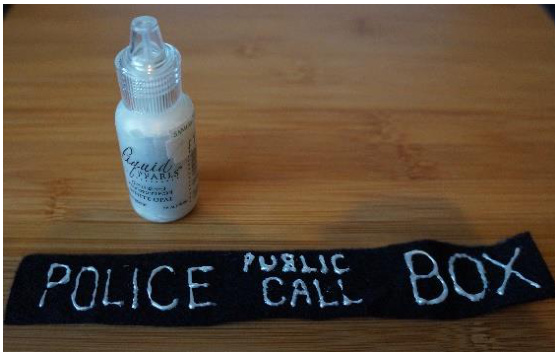
If you really can't face the embroidery an alternative is to use a fabric gel or liquid pearls by ranger. Just let it dry, you can carry on the rest of the bag and sew this on later.
WINDOW PANELS
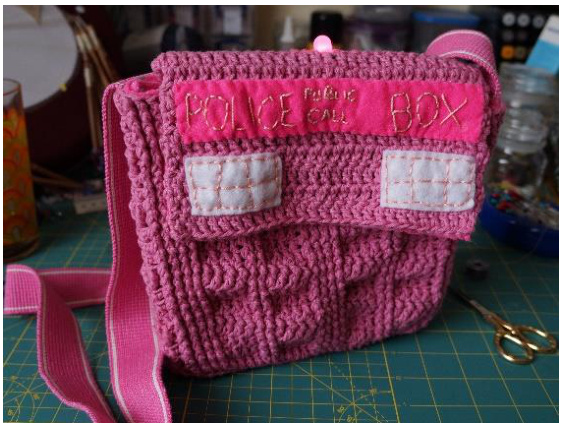
Cut two pieces of white felt, 2" x 1" With black embroidery thread stitch the window panes onto the felt, then sew onto the bag. I know I used Pink, but if you're making a blue Tardis, black thread is better.
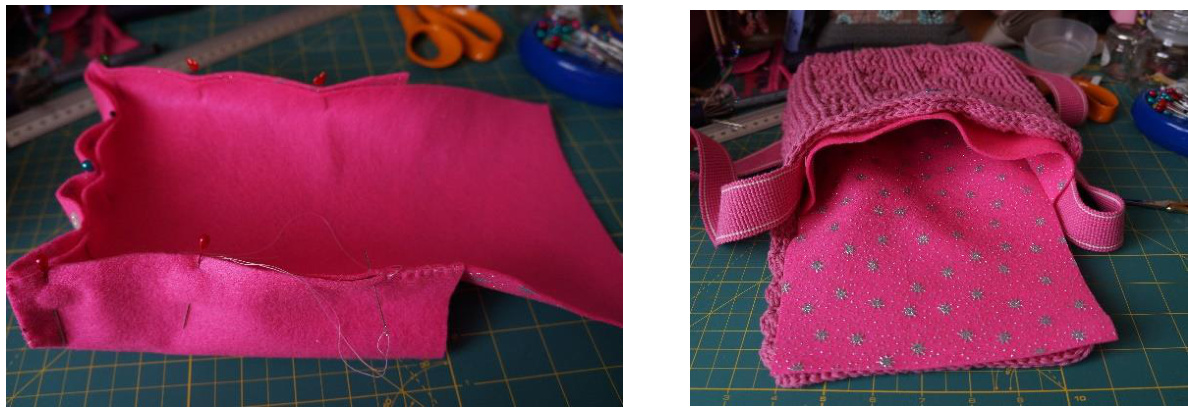
BAG LINING
For the lining I used felt because it doesn't fray so is great for beginners. Two A4 size pieces works well. You could use another material but make sure you leave space to make a hem.
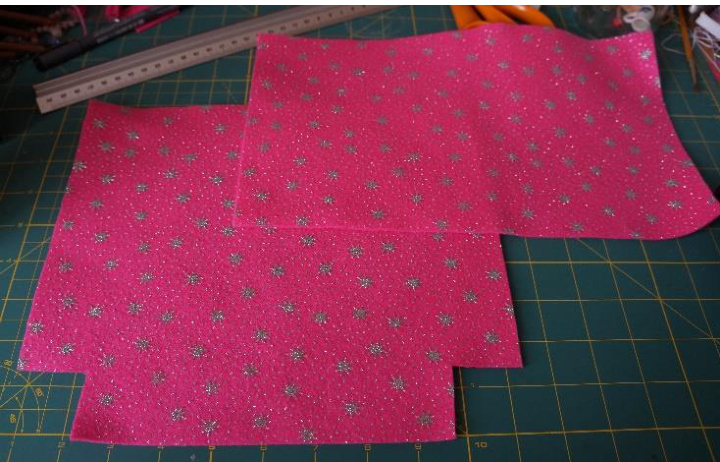
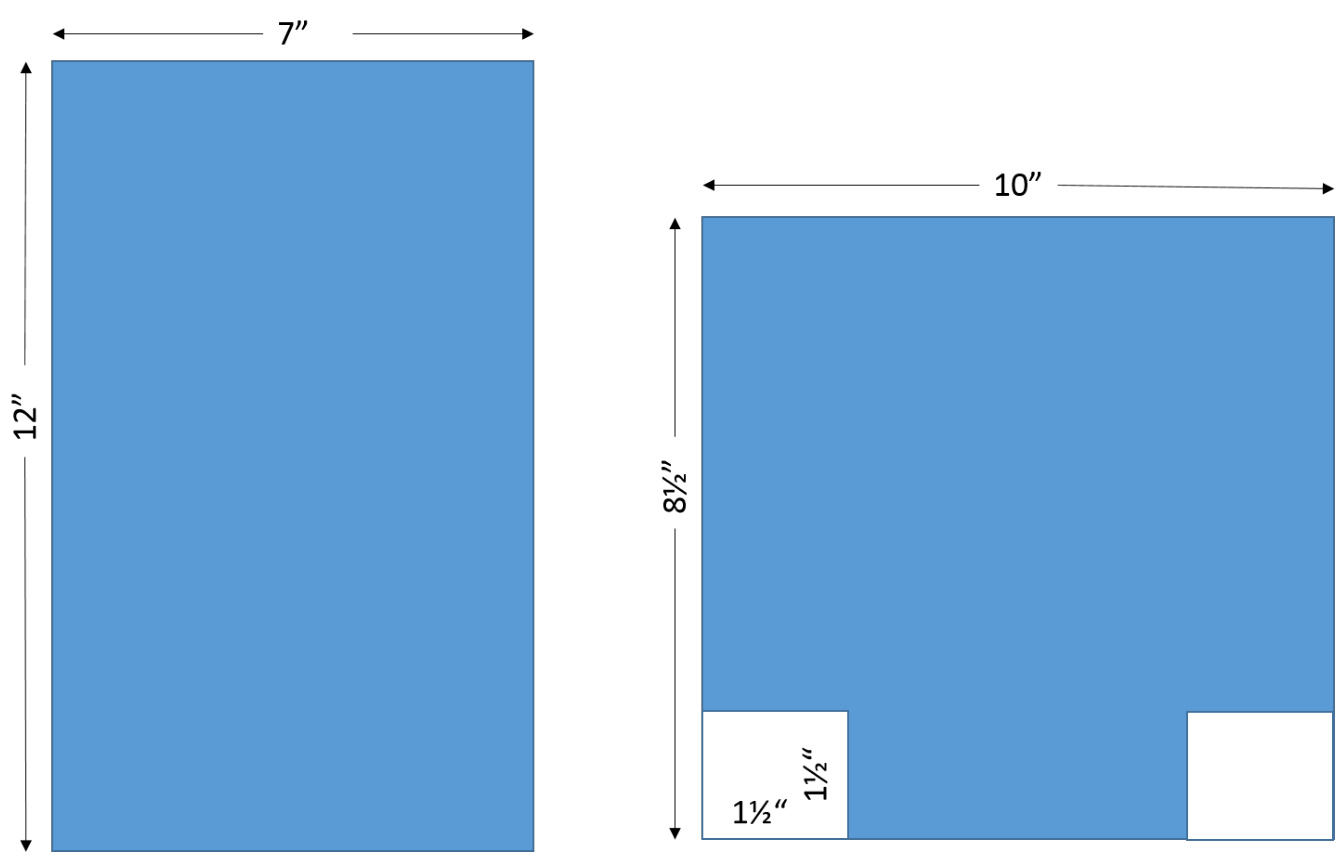
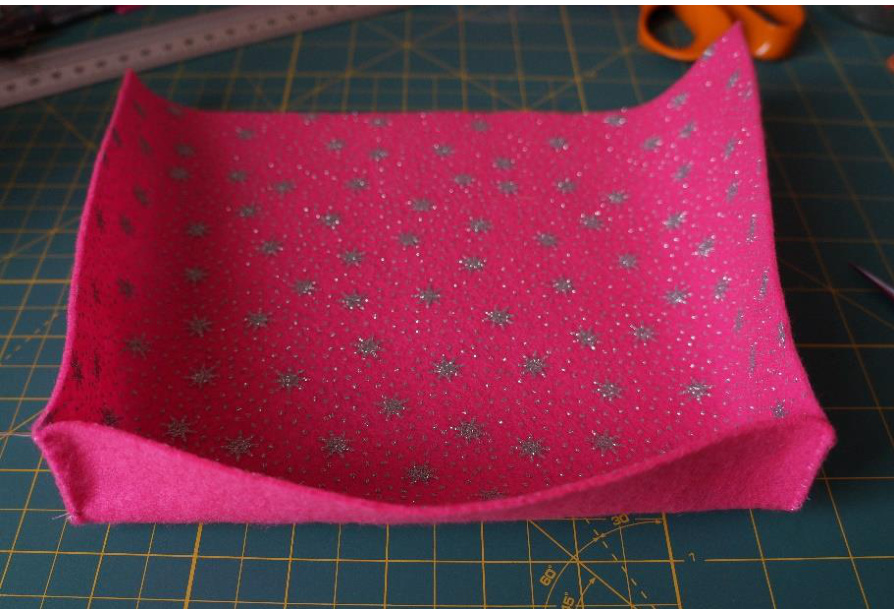
Cut one piece of lining 12" x 7" this piece is for the back side of the bag from the bottom through to the end of thebag flap. Cut a second piece 10"x 8%", then cut two small squares 1%" on the two bottom corners.
With front sides facing sew the two corners together.
Pin and stitch the two pieces together. Make sure it fits in the bag but don't sew it in place because there are some things to do first.
THE OTHER HALF OF THE CLASP
Put the lining into the bag and mark where to place the clasp. Fit the other half of the clasp, this way the back of the clasp is hidden behind the lining.
THE ELECTRIC SWITCH
Remember the crochet flap that you put aside? inside of the flap facing you, sew the flap on the edge of the right side of the bag, near to the str:
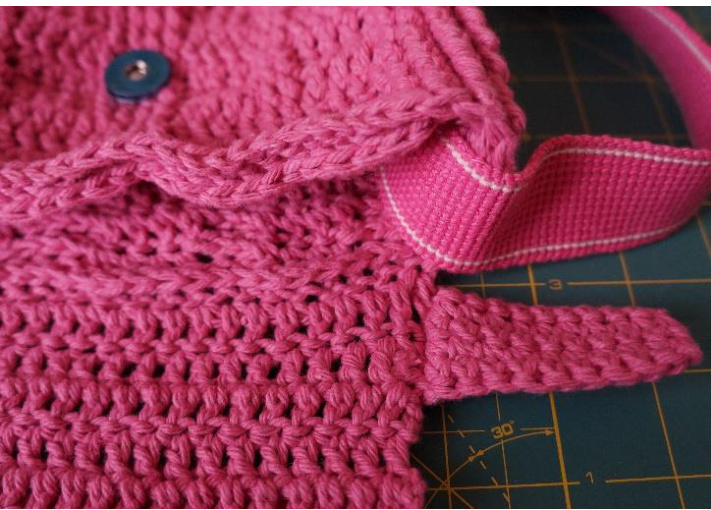
This flap has two uses,it's going to hide the battery for the light and become the on/offswitch.
PUTTING IN THE LIGHT
If, like me, you slept through science classes you might not have the first idea about electric circuits. The circuit we are making is a basic one and as long as the instructions are read and followed there should be no problems adding the light to your bag. There are several websites that make e-textile components so you shouldn't have any problems finding what you need. I have also put together a kit from all the components I used which I will list on my Etsy and Folksy shops. That should make it easier if you don't find what you need in electrical shops. These are the components that you need:
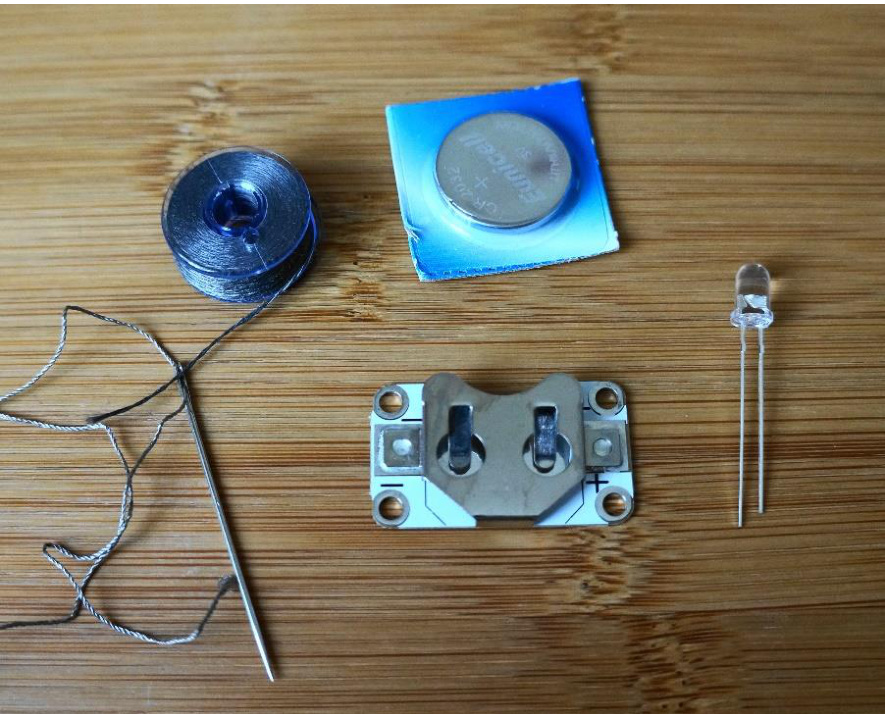
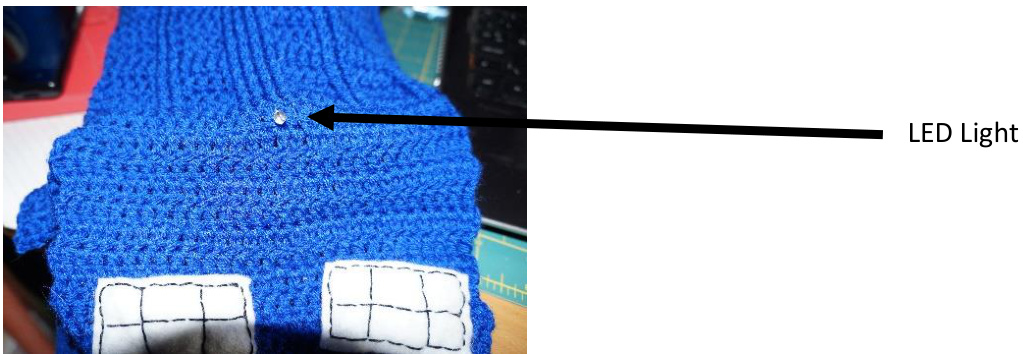
LED Light
I used a Flashing Blue light, which can be difficult to find, but suits the tardis. You can use any LED light you choose. For the red bag I found a colour changing light. it has two prongs pointing down, one is longer than the other and indicates the positive side of th ng the positive and negative sides is important!
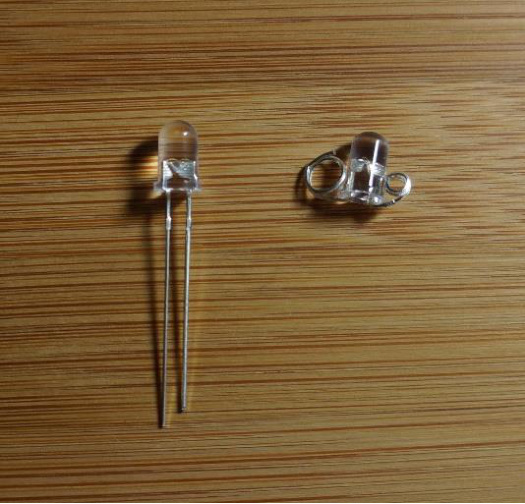
Using round nose plyers curl the prongs up to the light. Remember which side is positive, either by tying a bit of wool through the hole made, or by making the positive side larger than the negative. The round wires are what you will use to sew the light to the bag.
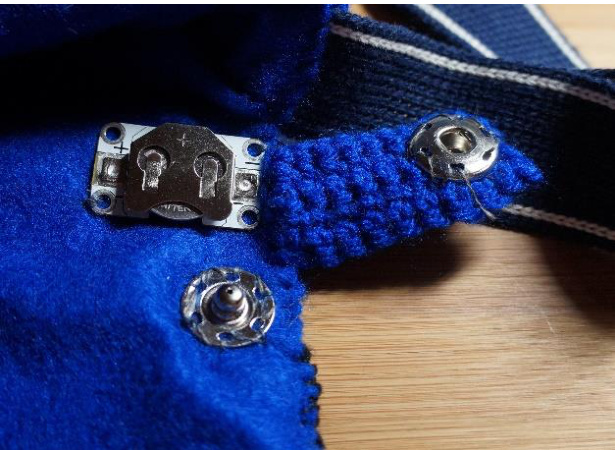
Snap Fastener
Any snap fastener will do as long as it is metal and not plastic. This will become the switch that turns on and off the light. When opened it cuts the flow of electricity making the light stop working, then when closed it connects the electric current switching on the light.
Sewable coin cell holder and coin cell battery
Make sure both are compatible with each other. The sewable holder is the battery pack and has both negative and positive marked clearly on the front. It also has holes next to the negative and positive marks. The holes both attach the holder to the bag and make the current flow.
Conductive thread
tiles we use conductive thread instead of electric wire. It's a really fantastic product that allows t urrent to flowthrough it like itwould dowithwires. One important thing to remember is not to cross the thread. The circuit works like a... well, like a circuit (circle). The current flows from the positive side of the battery to the light, then back to the negative side of the battery, as long as the electric current can flow freely the light will work. Below is a diagram of the circuit we will be making, the lines indicate the conductive thread, notice they don't cross. Keep that in mind when sewing.
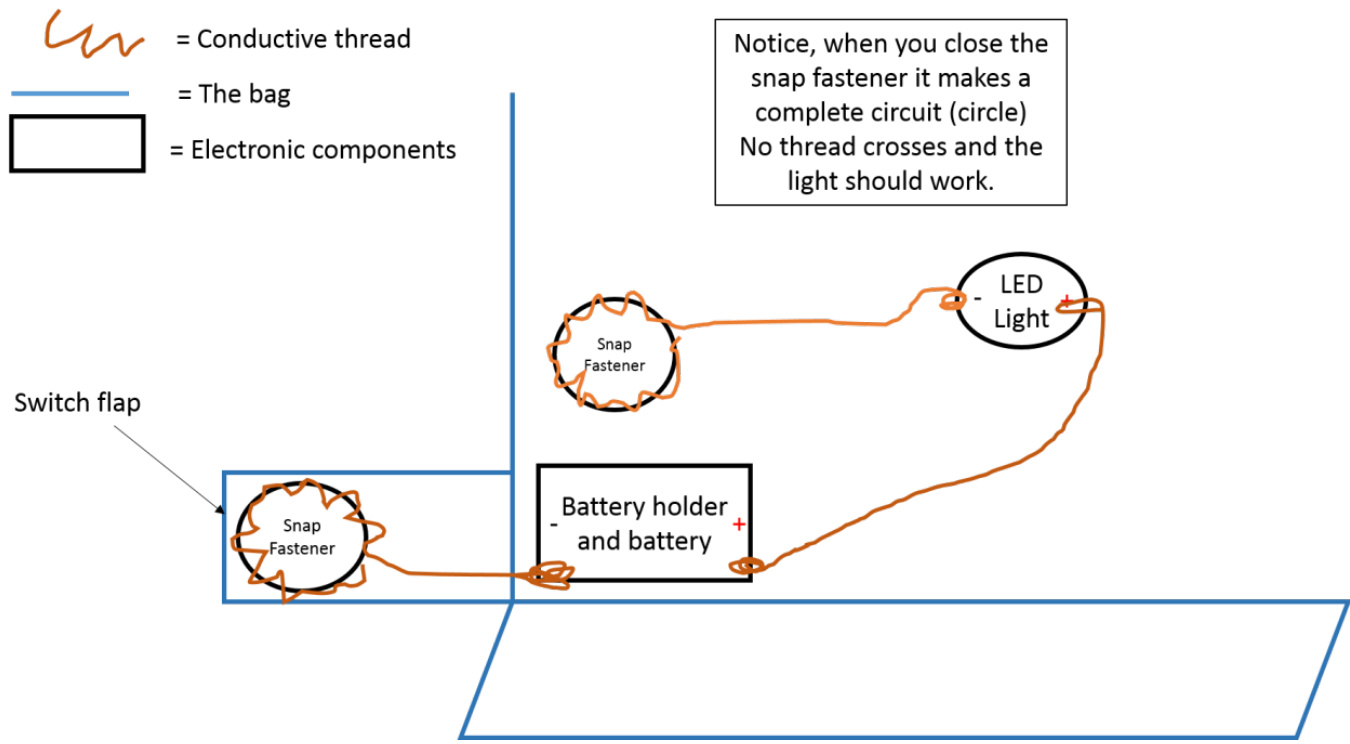
1. Using conductive thread, sew the female part of the snap to the end of the flap 2. continue the thread along the bottom edge of the flap.
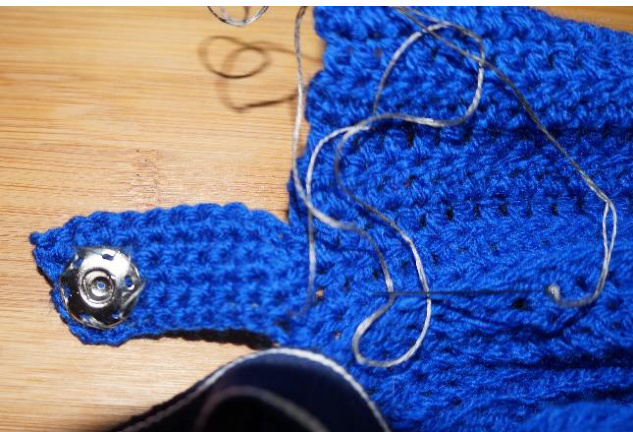
3. Place the lining in the bag and continuing with the conductive thread sew one hole of the negative battery holder on top of the felt. Secure and cut the thread.
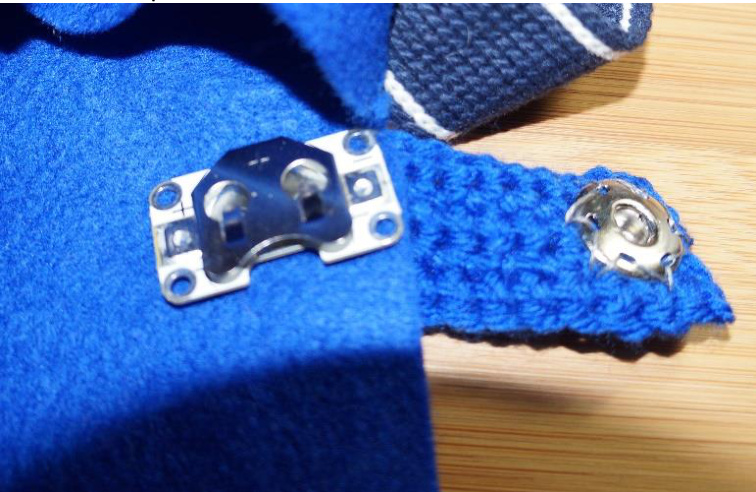
4. Using conductive thread, sew through one of the positive holes of the battery holder, carry the thread through to the crochet bag behind the lining (where possible we will be sewing between the two layers to hide the thread)
5. The light goes in the middle of the top of the bag, I placed mine in row 2 of the bag flap. Push the light through the flap, between two stitches. 6. Sew along the bag to the positive side of the light, sew through the positive side, attaching it to the bag, thensecure and cutthethread. 7. Attach the conductive thread to the negative side of the light, again sew through the negative side attaching it to the bag.
8. continue the thread to a place where the female snap fastener can reach, bring the thread through the the lining side and sew the male fastener in place. 9. put the battery in the holder and close the snap fastener. If the light works Congratulations!!!
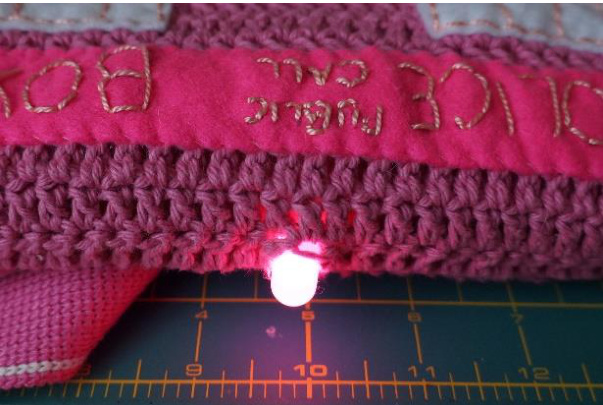
If the light doesn't work, check your sewing, do the threads cross? Is the LED light the right way round? Where you have joined and finished off thread does any stray thread touch other threads? If you are sure everything is sewn the right way around and threads don't touch or cross each other, check the battery and LED lights are working.
SEWING IN THE LINING
Once the light is working and you are happy with the bag, sew the lining to the crochet bag.
THE BADGE
I finished the bag with a badge I made of the notice found on the police boxes. I will put these in my Etsy and Folksy shops if you want one.

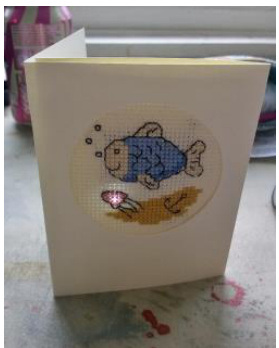
Well done if you've made it this far. Now you've made the perfect Whovian bag AND created an e-textile light. You can now put LEDs in many other projects like... Cross stitch cards... clothing... jewellery... I'm currently working on how to put the Tardis sound into the bag! Will let you know when I manage it.