How to dye yarn with Kool-Aid Tutorial : 1 C2009 Helen .Jacohs-Grant
email $:$ myheartexposed@me.com web : http://myheartexposed.co.uk ravelry.com ID : myheartexposed
Tutorial : 1
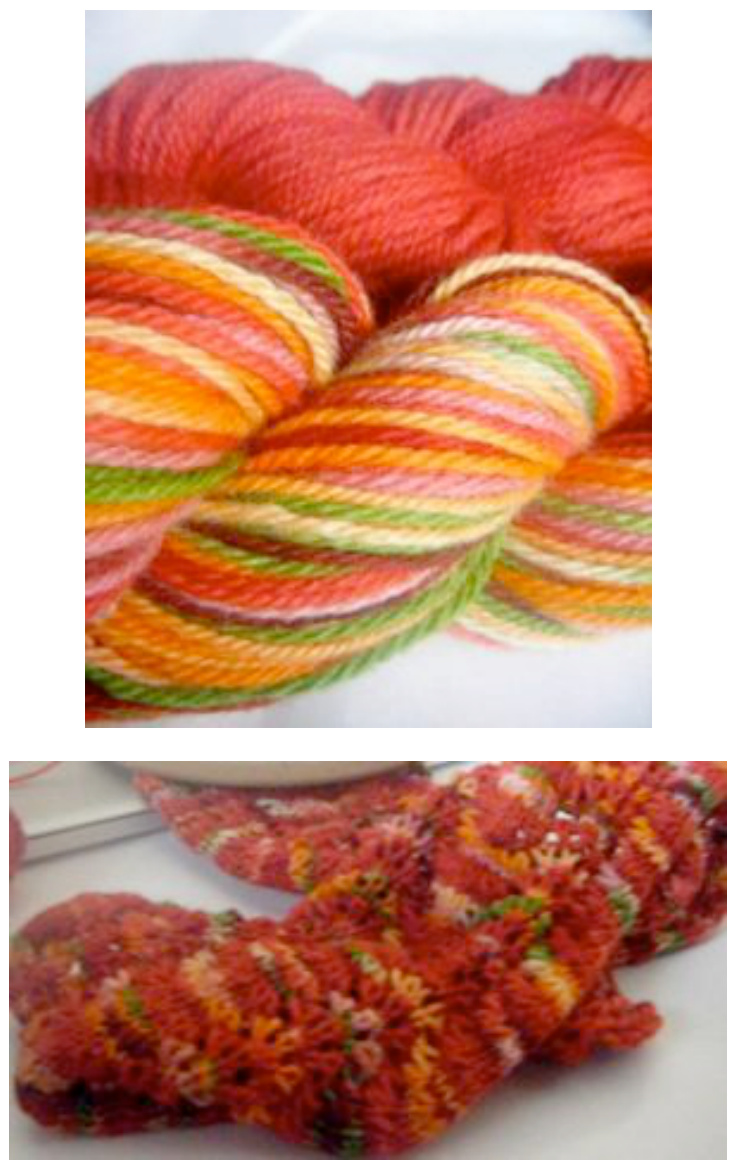
Instructions for dyeing two 100g skeins of pure wool : one semi solid 'chilli red', one the 'variegated salad colours' stove top method for the semi-solid and oven bake method for the variegated the use of ordinary tea bags to pre-darken the yarn Pattern : Feather Wavy Lace Stole at the end of the tutorial ThecoloursforthetwoseinsphtgraphedforthistutorialwereinsiredbytheAnglo-Indianfodthat Icookathmeeverydayfomy ownfamilyallrepecaeefrmyGranfathrandavebeenpassddwnthrouhtgeerationsRedandgreechilies apsicdadwhtnionfhcorianeengstaingredientsfensdinthdiswhicrovieewitod strongcoloupallfrmwithworkwithheyouenjydeingyouryasmchahavenoyddingandkitinietn putinlfdntnantilly
Why Use Kool-Aid?
Originallyfrom and widely available in the US and countries outside of the UK and Europe, Kool-Aid drinks powder sachets come in a wide variety of flavours / colours, are priced very cheaply, are kind to the environment as there are no harmful chemicals usually found in acid dyes making them safe for children to use and amazingly fun to work with. Care should be taken not to inhale the powder as it can be quite overpowering and possibly dangerous if inhaled directly from the packet into the nasal cavity but once dissolved is perfectly safe to workwith. Warning : Kool-Aid dyeing yarn is highly addictive so at the end of this tutorial is a list of suppliers for undyed yarn and the all important dye from within the UK that I have tried myself with great success. I have also included some links for online colour charts which will come in handy during your future dyeing experiments. Colours are permanent the same as with acid dyes and items made with Kool-Aid dyed yarn should be treated exactly the same as any hand knitted or crochet item, hand wash and allow to air dry naturally, keep out of direct sunlight.
What types of yarn to use :
any animal fibre : pure wool, bluefaced leicester BFL, alpaca, merino, angora etc. all dye exceptionally well with kool-aid, cotton and synthetic yarns do not take up the dye so a mixed fibre yarn that has a mostly pure wool content with a synthetic binder will work well but the binder will remain undyed so gives an unusual variation to your finished yarn. Vegetable fibres can be dyed such as silks, banana yarn and bamboo but I have not tried these out myself yet so can not comment on how well they work. There are lots of articles online so be sure to read up on these fibres if you want to try them out.
How much undyed yarn to dye :
Make sure you dye enough yarn for your project. To do this you need to know roughly how long your skein is so to measure how many meters in your skein simply hook the skein around your neck, measure all the way around it with a soft measuring tape then count how many loops you have in total total meters $=$ number of loops X measurement my 100g aran weight BFL skein measurement is : 143.52 meters the scarf pattern I want to make dictates more than 220 meters is needed to complete the project so I know I need to dye two skeins of yarn
How much sugar free Kool-Aid to use :
1 packet of Kool-Aid to 25g of yarn gives a good strong colour, use less for pastel colours, more for intensecolours (sachets listed in this tutorial below are needed to achieve the two skeins pictured at the top of this page) The amount of water is not as important as the amount of kool-aid powder, you can experiment with different solutions until you get a good combination that works for the results you want to achieve. The 1 sachet per 25g of yarn is the standard guide given to produce a good colour saturation.
Materials needed :
1 : large (larger the better) saucepan with lid 2 : large oven safe baking sheet, tray or dish 3 : six (or one for each variegated colour) glass, ceramic or stainless steel containers that can fit inside your oven dish 4 : wooden spoon (keep wooden spoon separate from ones used in cooking to use only for your dyeing projects) 5 : rubber gloves 6 : oven safe roasting foil 7 : SUGAR FREE kool-aid sachets (listed below) 8 : (optional) seven tea bags 9 : 1/4 cup vinegar
Step 1 : Soak Your Yarn
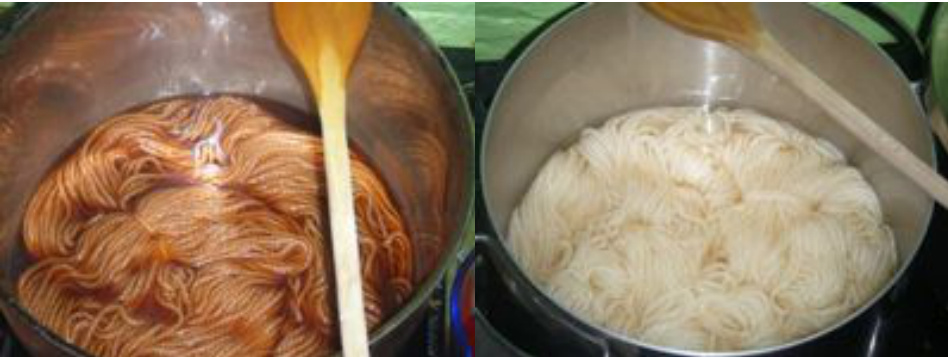
Put the tea bags inside your large saucepan halfilled with warm water and cook on high heat for fifteen minutes stir occasionally to release the tannin from the tea bags as this is what gives the undyed yarn a beautiful darker toffee colour which tones down the strong bright colours often found in the Kool-Aid colour pallet. after fifteen minutes turn down the heat and leave to simmer for half an hour turn off the heat and allow to cool until you can comfortably put your whole hand inside the water, discard the tea bags at this stage. meanwhile, pre-heat oven to $180^{\circ}\mathsf{C}$ / gas mark 4 Prepare your two skeins of yarn by laying them out flat and tying in two or more places with scrap yarn so that they do not become tangled in the dye baths or later when washing. Do not tie the ties too tightly as you want the yarn to move fairly freely to take up the colours evenly. Filla large saucepan, bowl or use your sink, with warm water, note water must not be hot just warm, add the vinegar and stir gentlylay your yarn skein on top of the water and vinegar solution, allow to sink into the water by itself as this prevents air bubbles building up in between the fibres and gives a more even take up of colour than if the yarn has been pushed under the water. Test your tea water solution and when cool enough for you to place your whole hand inside comfortably, lay your skein of yarn gently on top of the water and allow it to sink into the water by itself. You want your yarn to soak in both the plain solution and the brown solution for at least an hour, preferably longer or overnight but if you are like me and impatient to get started then an hour will be fine for the methods outlined in this tutorial. Afer an hour, gently move the yarn about under both solutions making sure it is all submerged andt here are no air bubbles floating to the surface of the water when the yarn is moving, if a lot of air bubbles are present leave to soak for half an hour more.
Step 2 : Prepare your colours :
scoop out parts of the tea bag brown water : one cup for the red two cups for the green two cups for the orange mix your colours directly into your containers standing in your oven safe tray or dish red pepper 1 tropical punch 1 cherry one cup tea water green pepper 2 lemon lime two cups of tea water orange pepper 2 mango 1 orange two cups of tea water red onions and dark pink radishes 1 strawberry 1 ice blue raspberry lemonade onion just plain water leave undyed chilli red (will be saved from the saucepan before adding the yarn)
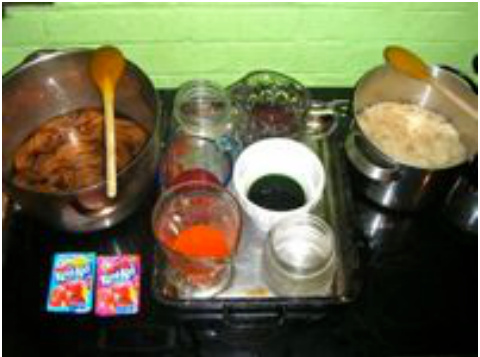
carefully remove yarn skein from the tea bag water and gently squeeze out any excess water add the dyes to the saucepan for the red chilli semi solid colour $4\,\times$ tronical nuinch 1 xcherry 1 x blackchery stir to dissolve the kool-aid then scoop out one cup for the red chillin the varieqated skein
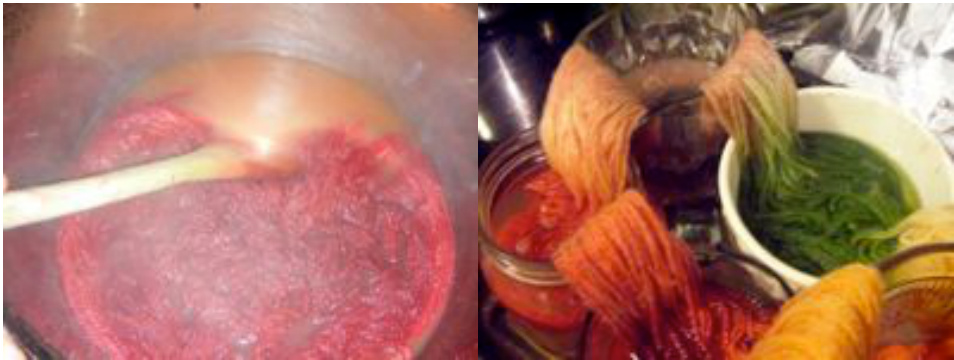
Step 3 : The Dyeing Process :
gently lower yarn back into the saucepan of red chili dye, gently move around with your wooden spoon until allthe yarn is submerged, turn on the heat to medium, pop on the lid and leave alone to simmer for half an hour. Move yarn gently in the water once during cooking to make sure there are no air bubbles caught in between the yarn strands. Squeeze out excess water then distribute the other skein across the top of the six jars on your baking tray making sure all of the bends make contact with the coloured water, carefully push down into the water then top up jars with warm water cover the whole baking tray, jars and yarn with foil making sure there are no holes and pop it in the hot oven You now need to wait until the dye baths have exhausted. This means that all the colour has come out of the water and been'drunk'by the yarn. The water should look like a cloudy toffe in the saucepan stove top method and clear or milky in the jars inside your oven, there should be no colour left in the water. The first time you check your yarn skeins should be at about twenty minutes into the cooking time, if the water still has dye colour in it leave to cook for longer checking every ten minutes after that until the water is clear or slightly milky in the jars, cloudy toffee colour in the saucepan on top of the cooker.
When your yarn has been cooked and the dye baths fully exhausted, turn off your oven and saucepan and leave to cool. This can take a while so to speed things up, after half an hour of leaving to stand I topped up the water in the saucepan with warm water from the tap and carefully poured cold water into the bottom of the baking tray so it surrounded the bottoms of the jars Once the semi solid yarn is cool enough to handle, it must not be hot or it willfelt during washing. carefully tip the saucepan of your red chilli coloured yarn into the sink and wash in warm water with a litle mild fabric softener gently squeezing under the water to ensure all the yarn is washed clean.
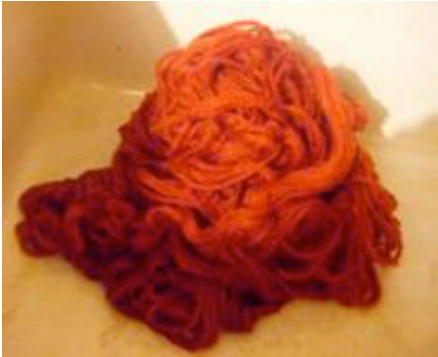
Do the same with the variegated skein, once both are clean they must be hung to dry. Carefully pick up one skein from the sink and try to get the skein back in shape, lay on to a towel and roll up giving a twist to get any excess water out of your yarn. Do the same with the second skein then hang to dry where they will not be disturbed. I use the top of my kitchen cupboard doors with the skeins around the hook part of hangers. Place a weight in the bottom loop of your skein when it is hanging up, a tin of beans or vegetables is ideal, I sometimes use a rolling pin going through both skeins at once for this part. Weighing down the skeins whilst drying gives the yarn back its 'memory' or bounce' during knitting, this is especially important for pure wool yarns as fibres become a litte tight during the dyeing process

Skeins must be left overnight and through the next day until they are actually dry otherwise you risk mould residue building up in between the trapped fibres which is not very pleasant at all.
Step 4 : Preparing to Knit :
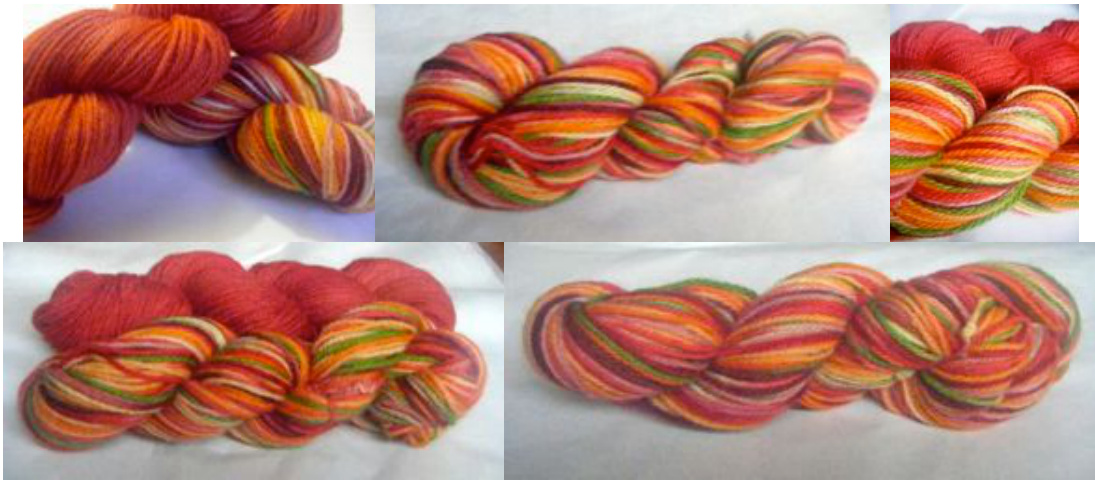
Once dry twist up your skeins and take lots of photographs to keep as a record, it is nice to have these to look back on later especially if you want to repeat the process again with the same colours. After the first set of photographs, re-skein the yarn.I use the four legs of an upturned dining chair but you can use anything that can hold the yarn fairly taut during the winding. I have found it fascinating to see the yarn in the skein before and after re-skeining as they look completely different.
before re-skeining
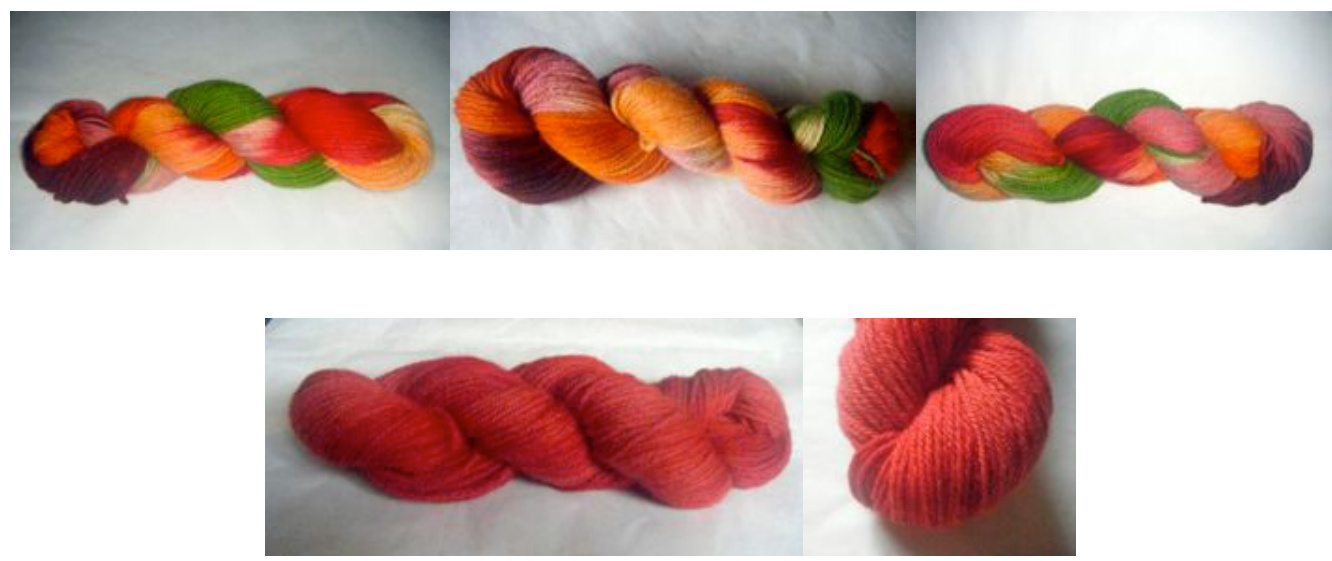
after re-skeining :
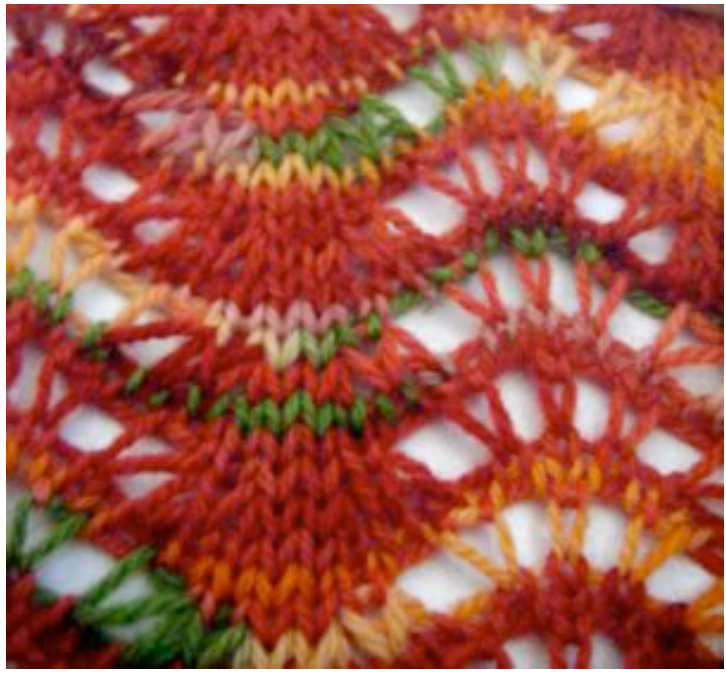
Knitting Pattern Feather Waves Lace Stole
both skeins of your hand dyed yarn size $5.5\mathsf{m m}$ needles / US 8 (larger for a more lacy effect) (size 5.5mm needles and $_{24+6}$ stitches was used in the example shown) cast on in multiples of 12 $(+6)$ stitches the extra six stitches are for a border of three stitches each side for the stripe ripple effect shown in the photos change yarn every four rows alternating between the two hand dyed skeins row 1 :knit row row2 :purlrow row 3 : knit 3 \*knit 2 together twice, yarn over knit 1 four times, knit 2 together twice\* (repeat from \* to \* to last three stitches, knit 3 row4:purlrow repeat your four row stitch pattern until your stole is long enough or the yarn is coming to the end and ending after a purl row, bind off
Notes and Information :
Keeping a Dyers Record
If you plan on dyeing lots of yarn in the future, consider keeping a little book or file on your computer as a 'dyers record' and make lots of notes including all your 'recipes', how many packets of each colour kool-aid flavour you used, what results you achieved, whether you were pleased with the finished colours and the ones you were not so happy with so you know not to repeat that combination again. 1 have a book with dated swatches that were knited with each of the yarns I have dyed since I started with notes on the same page, I have found this very useful indeed.
Undyed Yarn and Kool-Aid Sources
The internet is filled with sources for obtaining your undyed yarn. Here are a few suppliers I have tried and am very happy with both in terms of quality and service : Bluefaced Leicester, Alpaca and Merino Yarns http://bluefaced.com Certified Organic Merino http://yarnundyed.com Wide Variety of Undyed Yarns http://texereyarns.co.uk DT Craft and Design http://tcrafts.co.uk Other fantastic sources for undyed yarn are "Ebay," "Etsy" and "Folksy" which are all online, but I have also had great success finding old sweaters and other knitted or crochet items then recycling the yarn by un-knitting the item and winding the yarn into skeins ready for the dyeing process. Look around charity shops, classified ads, table top sales or request no longer wanted knitted items of clothing through your local recycling groups. Kool-aid is not so readily available within the UK or Europe. DT Craft & Design have a wide selection of flavours allsold for dyeing purposes, ebay UK often has a good choice and there are also dedicated American Food Suppliers online who import the kool-aid for Americans living abroad who want a taste of home: Kool-AidWorld http://www.koolaiduk.com/ there are lots more so doing a search online for Kool-aid is a good idea to keep your colours stocked up
Colour Charts :
Some handy colour charts which show what colour yarn you can achieve from the range of Kool-Aid flavours : KA Dyes for Wool http://www.wrappedrocks.com/koolaidye.html Spinning On A River http://www.memphisfiberarts.org/spin/instructions/colorchart.htm Sock Knitters KA Conversion Chart http://www.socknitters.com/Tips/KAcolorchart.htm Keep on Kniting in The Free World http://keeponknitinginthefreeworld.blogspot.com/2006/08/aguas-frescas-color-chart.html 2009 Helen Jacobs-Grant http://myheartexposed.co.uk


