Mattie's Flower 12" Afghan Square Designed by Stacey Lee
The Story of Mattie's Flower
In the 1980s, my Great Grandma Mattie started making afghans for each of her children, grandchildren and great grandchildren. She made a few different styles of afghan, but the one that she gave me (and a lot of my cousins) has the same flower at its centre as the one in this design. I reverse engineered the flower from the afghan I was given. One of my Great Aunts helped my Great Grandma make these afghans and she has continued to make them, even after my Great Grandma passed away in 1991. Having talked to her, she says she never saw the original pattern for this particular flower - it was only ever handwritten. We may never know where my Great Grandma got the original pattern, or if she saw a similar motif and figured out how to make it (she did this frequently), but my hope is that her flower will continue on through this pattern.
Copyright Statement
Original design by Stacey LW Lee 2016. Pattern and photographs may not be shared, altered, reproduced, sold or published in print or electronic form, in full or in part, without consent of the copyright holder. While you are free to sell items produced from this pattern, please credit the designer and use the full pattern name on any “for sale listings, advertisements, custom order offers, and on labelling of all said items. If you produce an “inspired by' pattern of your own design, please include a statement mentioning the origin of your inspiration (i.e. this pattern by its full name, as well as my name as designer of this pattern).
Acknowledgements
Many thanks to my testers, Nell, Ellen, Patty, Jilly, Bethany, Teresa, Edith, and Melody, whose input on this pattern helped to make it a much better (and correct!) version of itself. Terminology: American/US Skill Level: Intermediate or Adventurous Beginner. Testers recommend zero or limited distractions. Finished Size: 12 inches (Worsted) or 10.25 inches (DK) Materials (Note: Square was designed with worsted weight yarn, but tested with both worsted and DK): -3 colours worsted weight yarn (approx. 140 yds total) and 5.5 mm (I) hook, or hook size required to obtain gauge OR -3 colours DK weight yarn (approx. 140 yds total) and 4.0 mm (G) hook, or hook size required to obtain gauge -Yarn needle
Gauge:
8 rows dc and 16 st = 4 in. x 4 in. (worsted); 9 rows dc and 18 st = 4 in. x 4 in. (DK). Note: Pattern contains "Gauge Check" reminders. If you are measuring large or small at any of these checkpoints, even having adjusted your hook size, see “Suggestions for Modifications to Achieve Size” on Pg. 10. Most testers indicated that the designer's tension is very tight, as was the tension of the tester who provided the DK gauge check information, so be sure to do a gauge swatch and adjust your hook size in order to achieve correct gauge.
Abbreviations:
bptldc = back post top loops only double crochet bptlsc = back post top loops only single crochet ch-sp = chain space dc = double crochet dtr = double treble crochet hdc = half double crochet p = picot puff = puff stitch rnd = round SC = single crochet sk = skip stitch sl st = slip stitch tr = treble crochet trskrnd# = treble crochet in skipped stitch of round # yo = yarn over
Special Stitches:
Standing dc - with a slip knot on your hook, yo, insert hook into indicated stitch, yo, pull up the loop, yo, pull through 2 loops, yo, pull through 2 loops. Standing dtrc - with a slip knot on your hook, yo 3 times, insert hook into indicated stitch, yo, pullup the loop, yo, pull through 2 loops, yo, pull through 2 loops, yo, pull through 2 loops, yo, pull through 2 loops. Standing sc - with a slip knot on your hook, insert hook into indicated stitch, yo, pullup the loop, yo, and pull through 2 loops on hook. bptlsc - insert hook from back to front into the front and back loops (top loops) of indicated stitch, go around the post and insert your hook from front to back into the front and back loops (top loops) of the next stitch, yo, pull the yarn through all four stitch loops (3 loops remaining on hook), yo, pull through both loops on hook. Note for crocheters experienced with bp stitches: This is essentially a standard bp stitch, but with a modification - this stitch should not be worked around the third loop of any stitch. You are working into the \*stitches\* beside a given post and NOT into the \*spaces\* beside a given post. See photos on pg. 4 for visual help. bptldc - yo, insert hook from back to front into the front and back loops (top loops) of indicated stitch, go around the post and insert your hook from front to back into the front and back loops (top loops) of the next stitch, yo, pull the yarn through all four stitch loops (3 loops remaining on hook), yo, pull through 2 loops on hook, yo, pull through 2 loops on hook. Note for crocheters experienced with bp stitches: This is essentially a standard bp stitch, but with a modification - this stitch should not be worked around the third loop of any stitch. You are working into the \*stitches\* beside a given post and NOT into the \*spaces\* beside a given post. See photos on pg. 4forvisual help. P (picot) - ch3, insert hook into back loop of 3rd chain from hook, yo, pull through both loops on hook. puff - [yo, insert hook into indicated stitch, yo, pull up loop] 3 times (7 loops on hook), yo, pull through all loops on hook. Ch 1. Note: You \*must\* finish every puff stitch with a chl. This creates an “eye", which is what you will be working into in subsequent rounds. trskrnd # - treble crochet into the skipped stitch two rounds previous (the round number will be indicated), making sure not to work the stitch around the round above the named round. Eg. When working rnd 14, trskrnd12 means treble crochet into the next skipped stitch in rnd 12 without working around Rnd 13.
Back Post Top Loop Stitch Mllustrative Photos
Stitch Anatomy
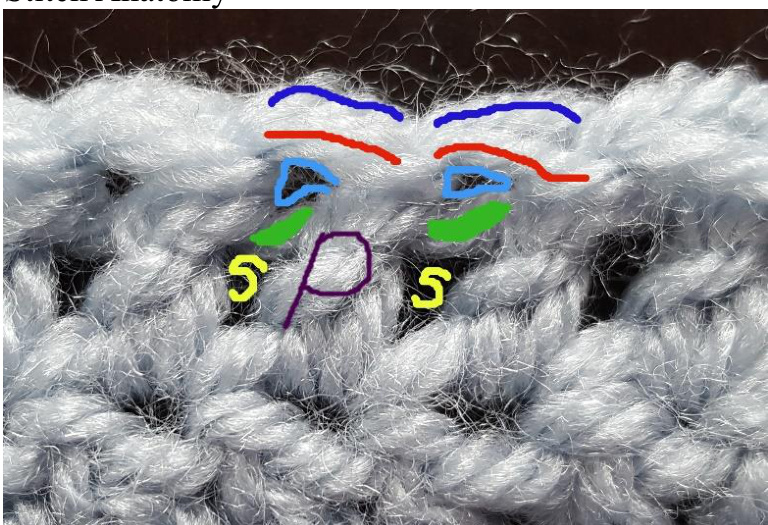
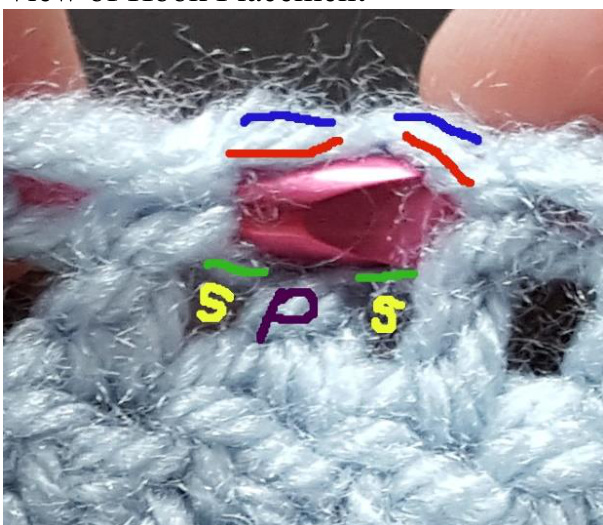
View of Hook Placement Dark Blue line = Back Loop Red line = Front Loop Green line = Third Loop Purple P = Post Light Blue = correct spaces to insert hook into Yellow S's = incorrect spaces to insert hook into Front view of completed row (1st 6 stitches bptldc, last 5 stitches regular bpdc)
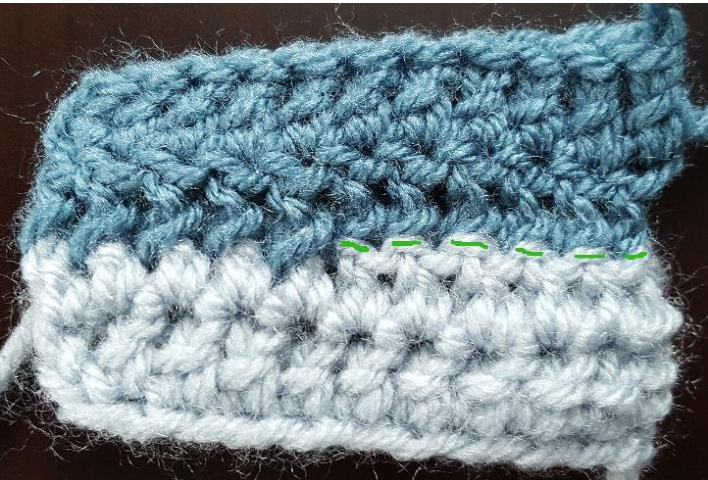
Back view (green line = third loop visible on back of bptldc stitches)
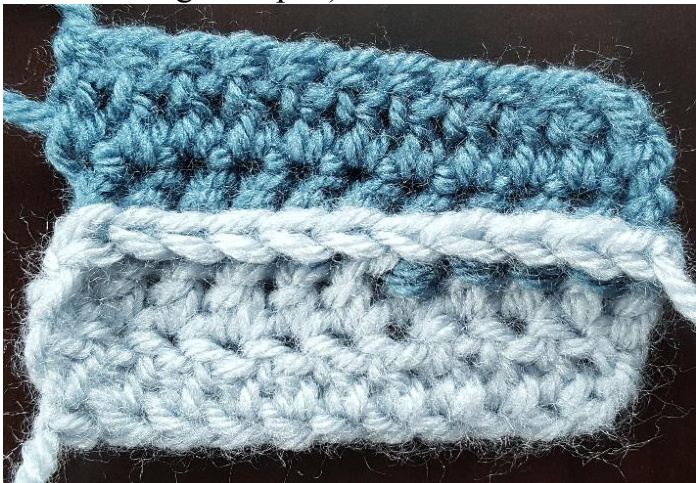
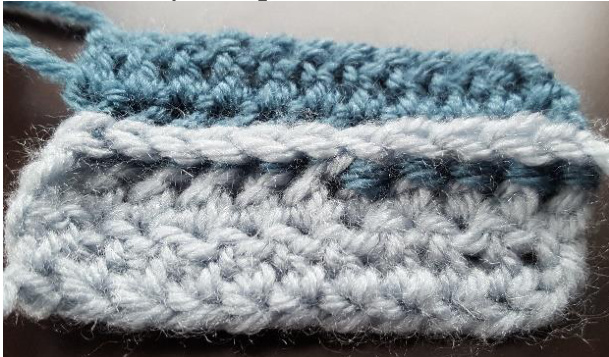
Notice that in the photo on the left, you can see the dark blue around the posts of the standard bpdc stitches, but it is less visible on the bptldc stitches. You can also see that the bptldc stitches are taller than the bpdc stitches. The bptl stitches also lay flatter, as illustrated by this photo:
Stacey LW Lee, 2016. All Rights Reserved.
Pattern
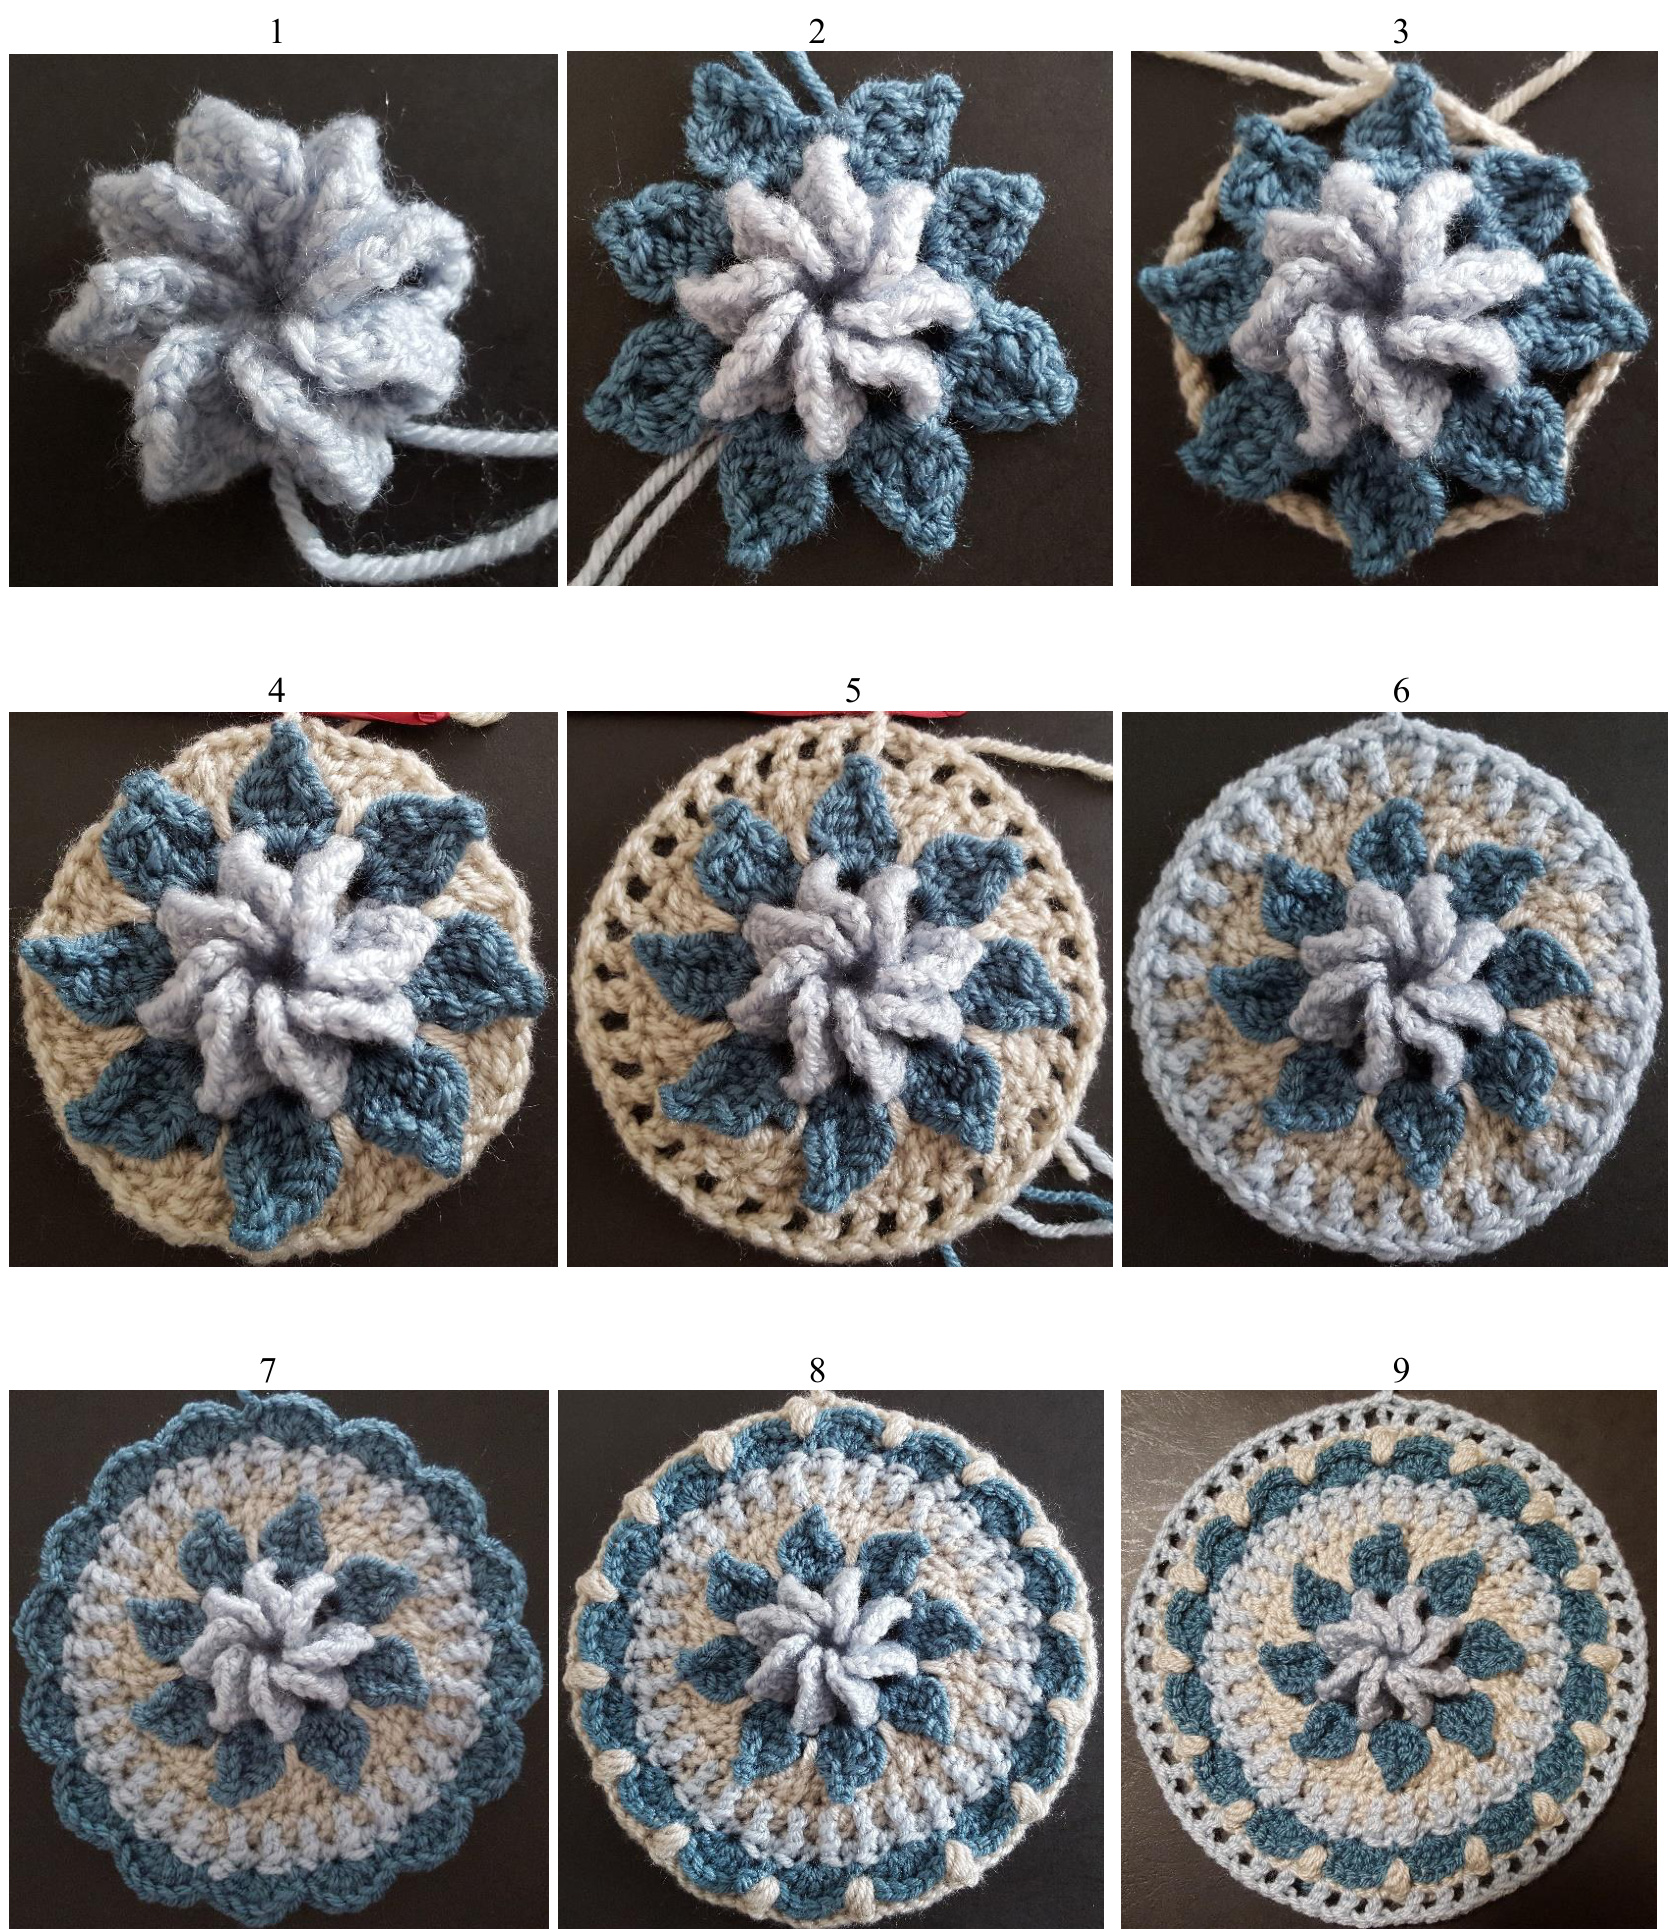
Note: \*\*See Page 11-12 for Round by Round photos\*\*
Round 1 - Flower
With Colour A, make a magic circle (alternatively: ch4 and join in last chain with sl st to form a ring). ch3 (counts as 1 dc here, and throughout), 2dc into circle, ch3. Turn. 1dc in same st, 2 dc in next st, 2 dc in top of ch3, ch2. Turn (1 petal made). \*Bring your hook behind the petal, then 3dc into circle, ch3. Turn. 1 dc in same st, 2 dc in each of next two st, ch 2. Turn. Repeat from \* 6 more times to create a total of 8 petals. Petals will appear twisted (See Figure 1). Join with sl st to the closest dc of first row of first petal. (See Figure 2) Fasten off and tighten magic circle.
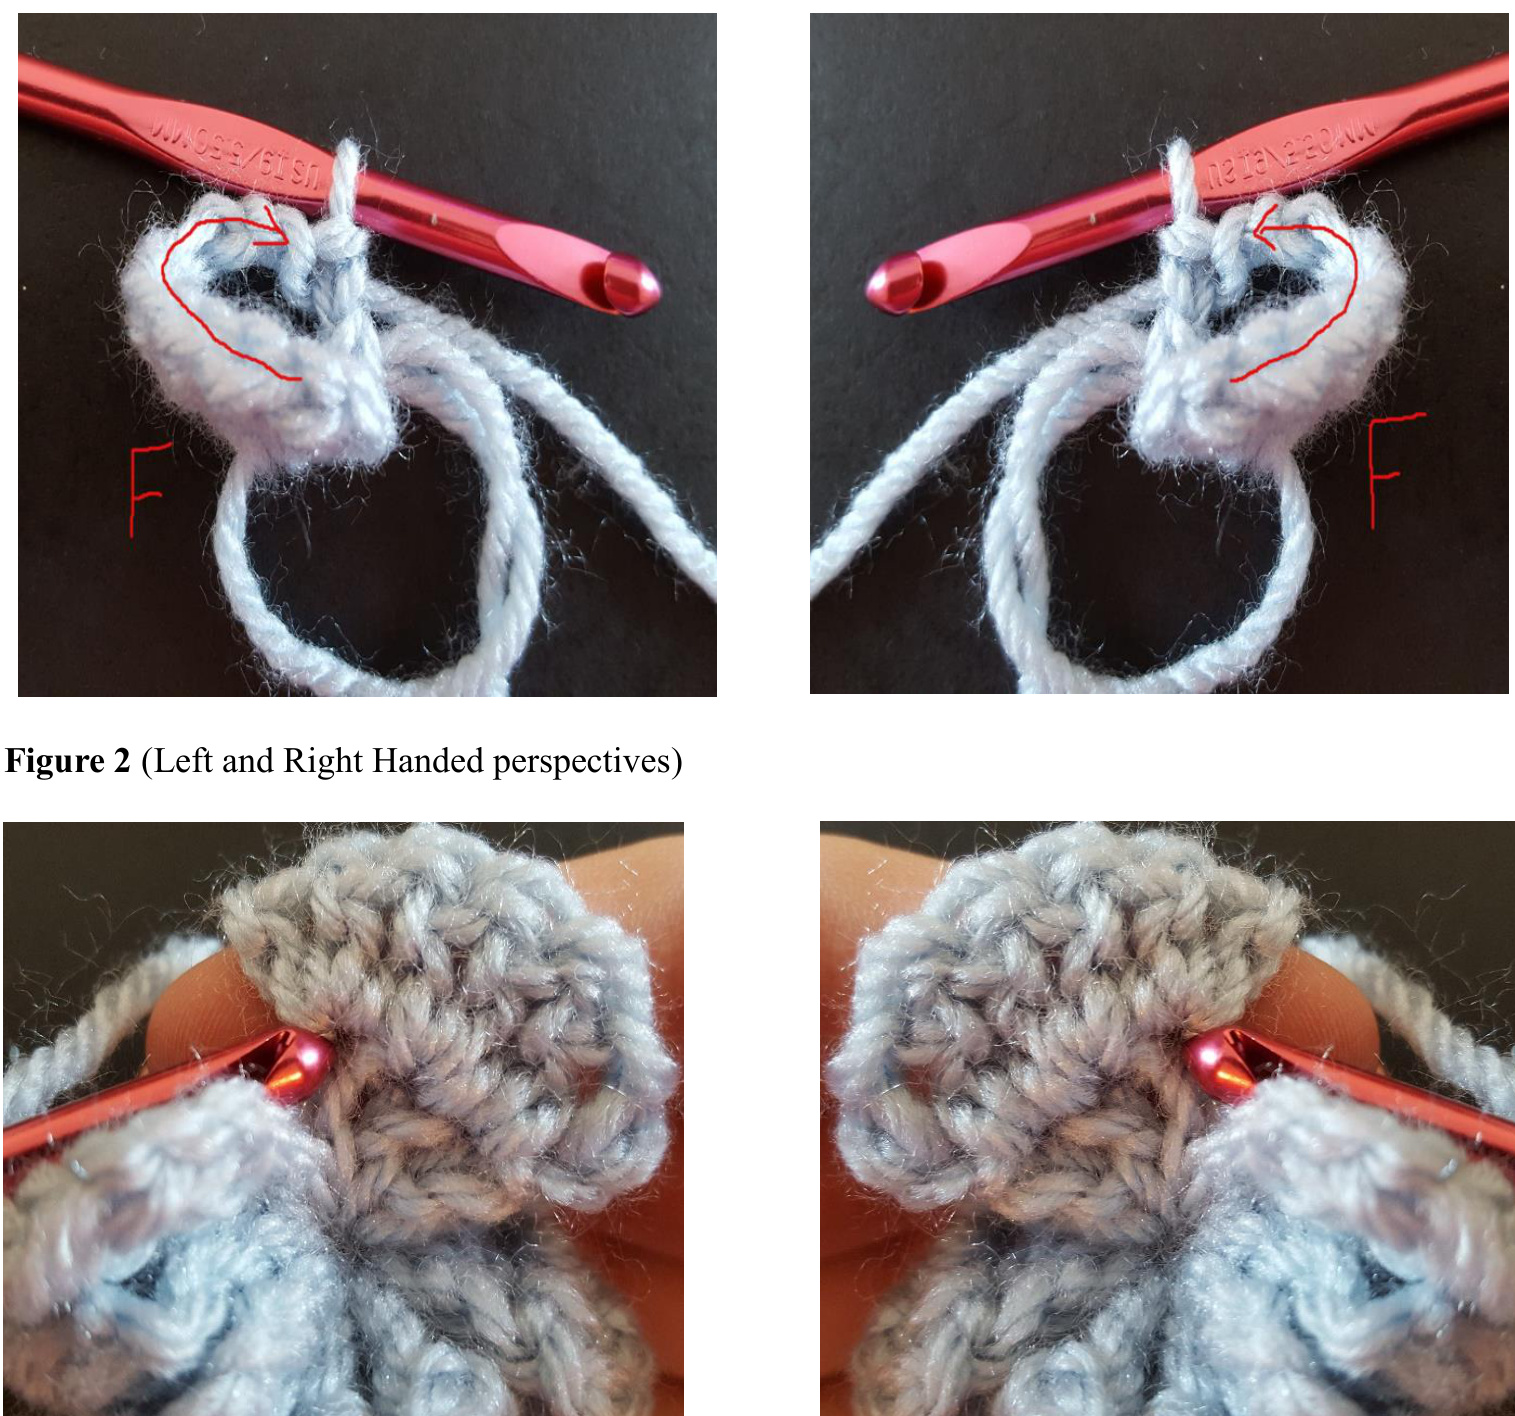
Figure 1 (Left and Right Handed perspectives. F=Front of work)
Round 2 - Leaves
With Colour B, join with sl st into any 2ch-space between petals. Ch3, tr, p, tr, ch3, join in same space with sl st. Ch 2. \*Sl st into next 2ch-space. Ch 3,tr, p, tr, ch 3, join in same space with sl st. Ch 2. Repeat from \* 6 more times. Join with sl st in 1st sl st. Fasten off. (8 leaves)
Round 3
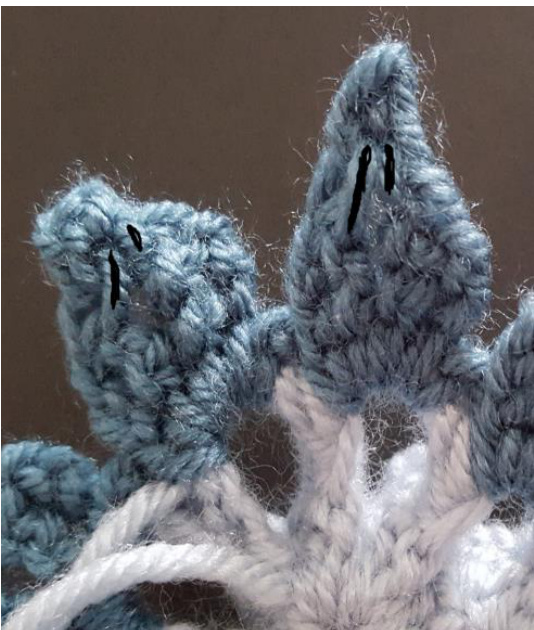
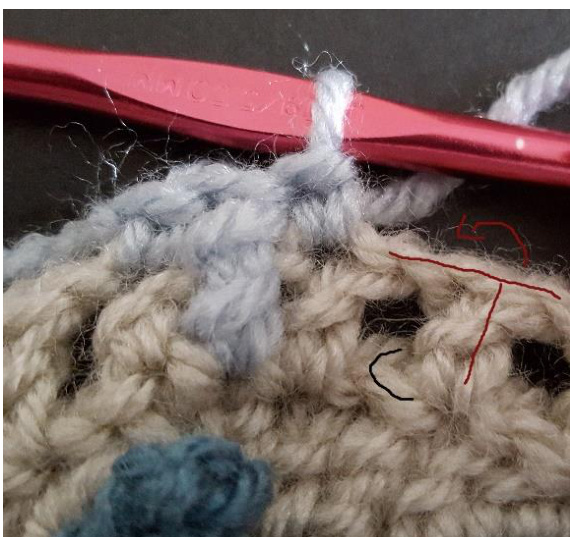
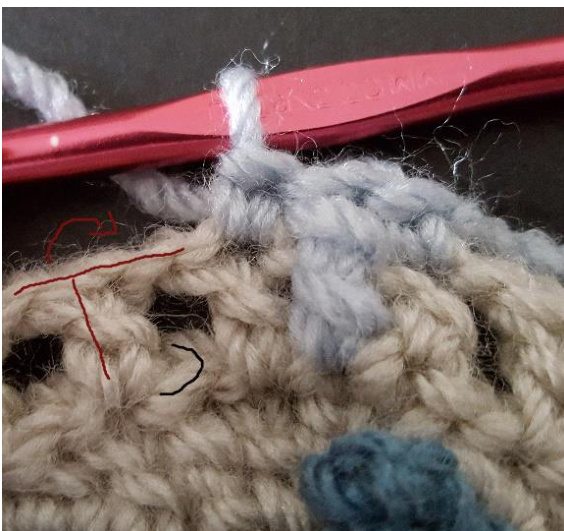
Note: This round can be worked with RS or WS facing. With Colour C, join with sl st to back of any leaf at the base of p. You should see two \*"bars" that are obvious and easy to join to. (see Figure 3 - black lines indicate where to insert hook). \*Ch 6, join with sl st to next leaf. Repeat 7 times. Join with sl st in 1st sl st. (8 Ch6 spaces). Do NOT fasten off. Figure 3
Round 4 - Filling in around the leaves
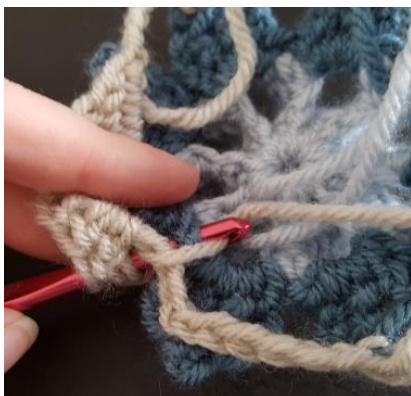
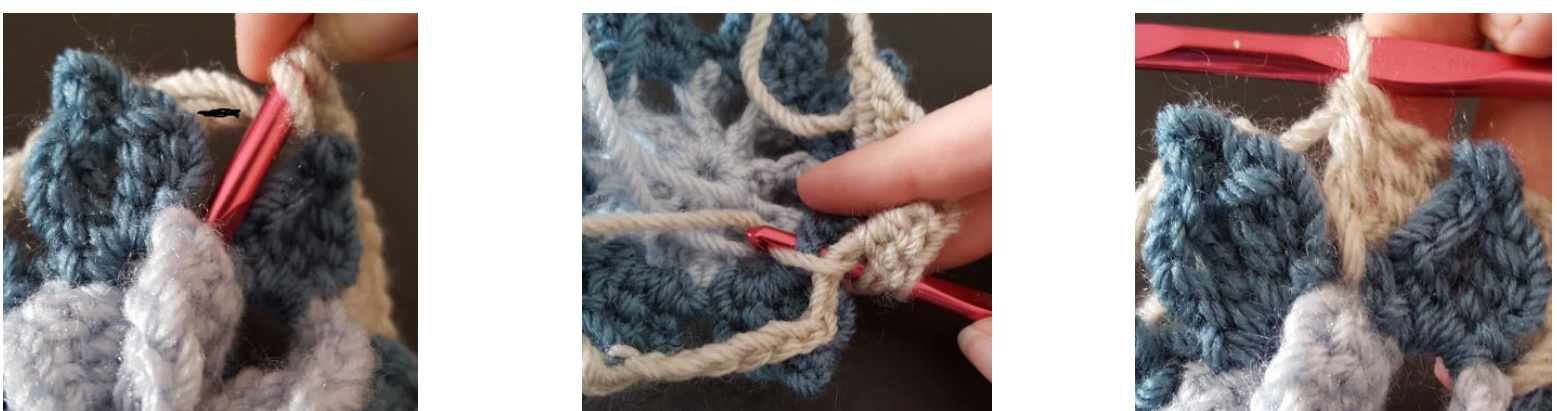
Note: You will be working into the sl st from this rnd in a future rnd, so make sure they are made loosely enough to work into later Sl st into 6ch-space. \*Work an sc, hdc, and dc around the ch6, tr into 2ch-space of Rnd 2 enclosing ch6 of Rnd 3 (see Figure 5 and note for a more detailed explanation), then work another dc, hdc, and sc around the ch6, sl st into next 6ch-space\*. Repeat 7 more times. Finish with sl st into 1st sc. Do NOT fasten off. (56 st) Figure 5 (Left [top 3 photos] and Right [bottom 3 photos] Handed perspectives) Note: yo twice, position hook so ch6 is behind hook (marked with black line in photo), insert hook into 2ch-space of previous round, yo (making sure that this action pins the ch 6 to the 2ch-space), pull up loop, yo, draw through 2 loops, yo, draw through 2 loops, yo, draw through 2 loops. This creates a V with the ch6 that fills in the gaps between the leaves.
@Stacey LW Lee, 2016. All Rights Reserved.
Round 5
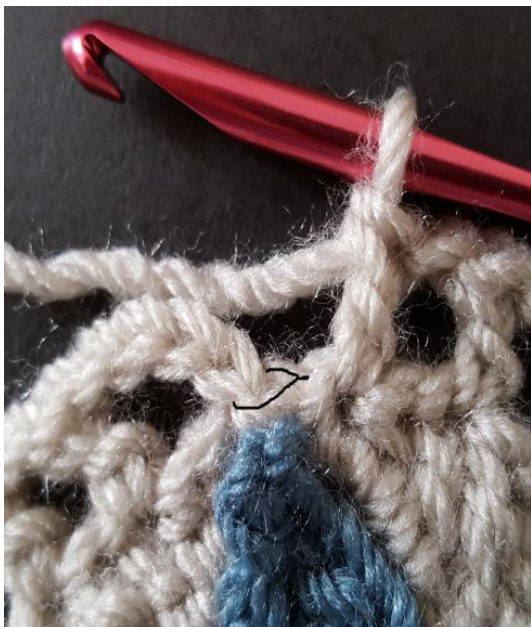
Note: 1)sl st loops from rnd 4 count as stitches for this round. 2)At the end of the round, it may seem like you are fudging the stitch counts, and you are, but that's ok, as long as you have the correct stitch count. For example, in Figure 5, you can see the stitch marked in black - when I worked the round, I counted this as a sk st. Ch4 (counts as 1 dc and ch1), \*sk 1 st, dc in next st, ch 1; repeat from \* around. Join with sl st in 3rd ch of beginning ch4. Fasten off. (32 dc, 32 ch-spaces).
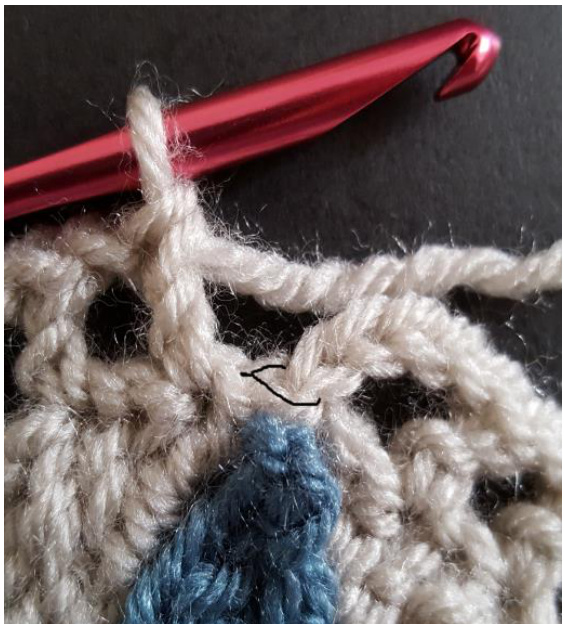
Figure 5 (Left and Right handed perspectives)
Round 6
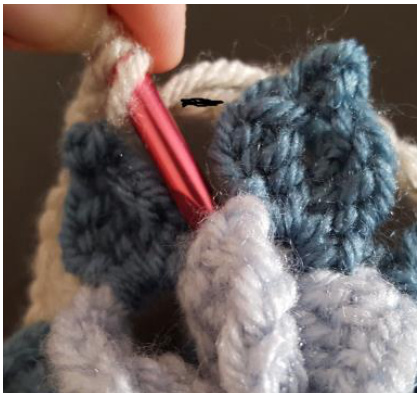
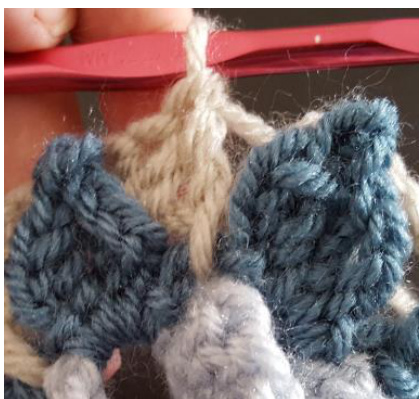
Note: Fold back Rnd 5 to make it easier to work into the sk st in Rnd 4. (See Figure 6) With Colour A, join with standing sc in any dc. Trskrnd4, being careful not to work the stitch around the ch 1 from rnd 5. \*sc in next dc, trskrnd4. Repeat from \* around. Sl st into standing sc to join. Fasten off. (32 sc, 32 tr = 64 st)
Figure 6 (Left and Right handed perspectives)
vill work into. Red = indicates which part of your work to fc
Gauge Check: Piece should measure approx. 6 inches (worsted), or approx. 5 inches (DK) after Rnd 6.
Round 7 - Scallops
With Colour B, join with standing dc in any sc, dc 4 more times in same st, sk1, sc in next st, sk1, \*5 dc in next stitch, sk1, sc in next st, sk 1; repeat from \* around. Join with sl st in top of standing dc. Fasten off. (16 scallops (80 dc), 16 sc)
Round 8 - Back Posts and Puffs
Notes: 1) Remember, the ch 1 that closes the puff stitch does not count as a separate stitch. It is part of the puf stitch. 2) It may feel like you are working into the sc stitches twice. Don't worry. You're not, technically. With Colour C, join with standing bptlsc around 1st dc of any 5dc cluster, bptlsc in next 4 dc, \*puff st in sc, bptlsc around next 5 dc. Repeat from \* around. Join with sl st in standing bptlsc. Fasten off. (80 bptlsc, 16 puffs) Gauge Check: Piece should measure approx. 7.5 inches (worsted), or approx. 6.25 inches (DK) after Rnd 8.
Round 9
Note: All dc stitches should fall in sc stitches. There should not be any stitches worked into the puff stitches at this point. With Colour A, join with standing dc in 1st sc after a puff st. Ch 1, sk1, \*dc in next st, ch1, sk1. Repeat from \* around. Join with sl st in standing dc. Fasten off. (48 dc, 48 ch1-sp)
Round 10
With Colour C, join with standing sc in a dc worked directly after a puff st. \*[trskrnd 8, sc in next de] twice. Tr in eye of puff stitch, sc in next dc\*. Repeat instructions in \*\* around. Join with sl st in standing sc. Fasten off. (96 st)
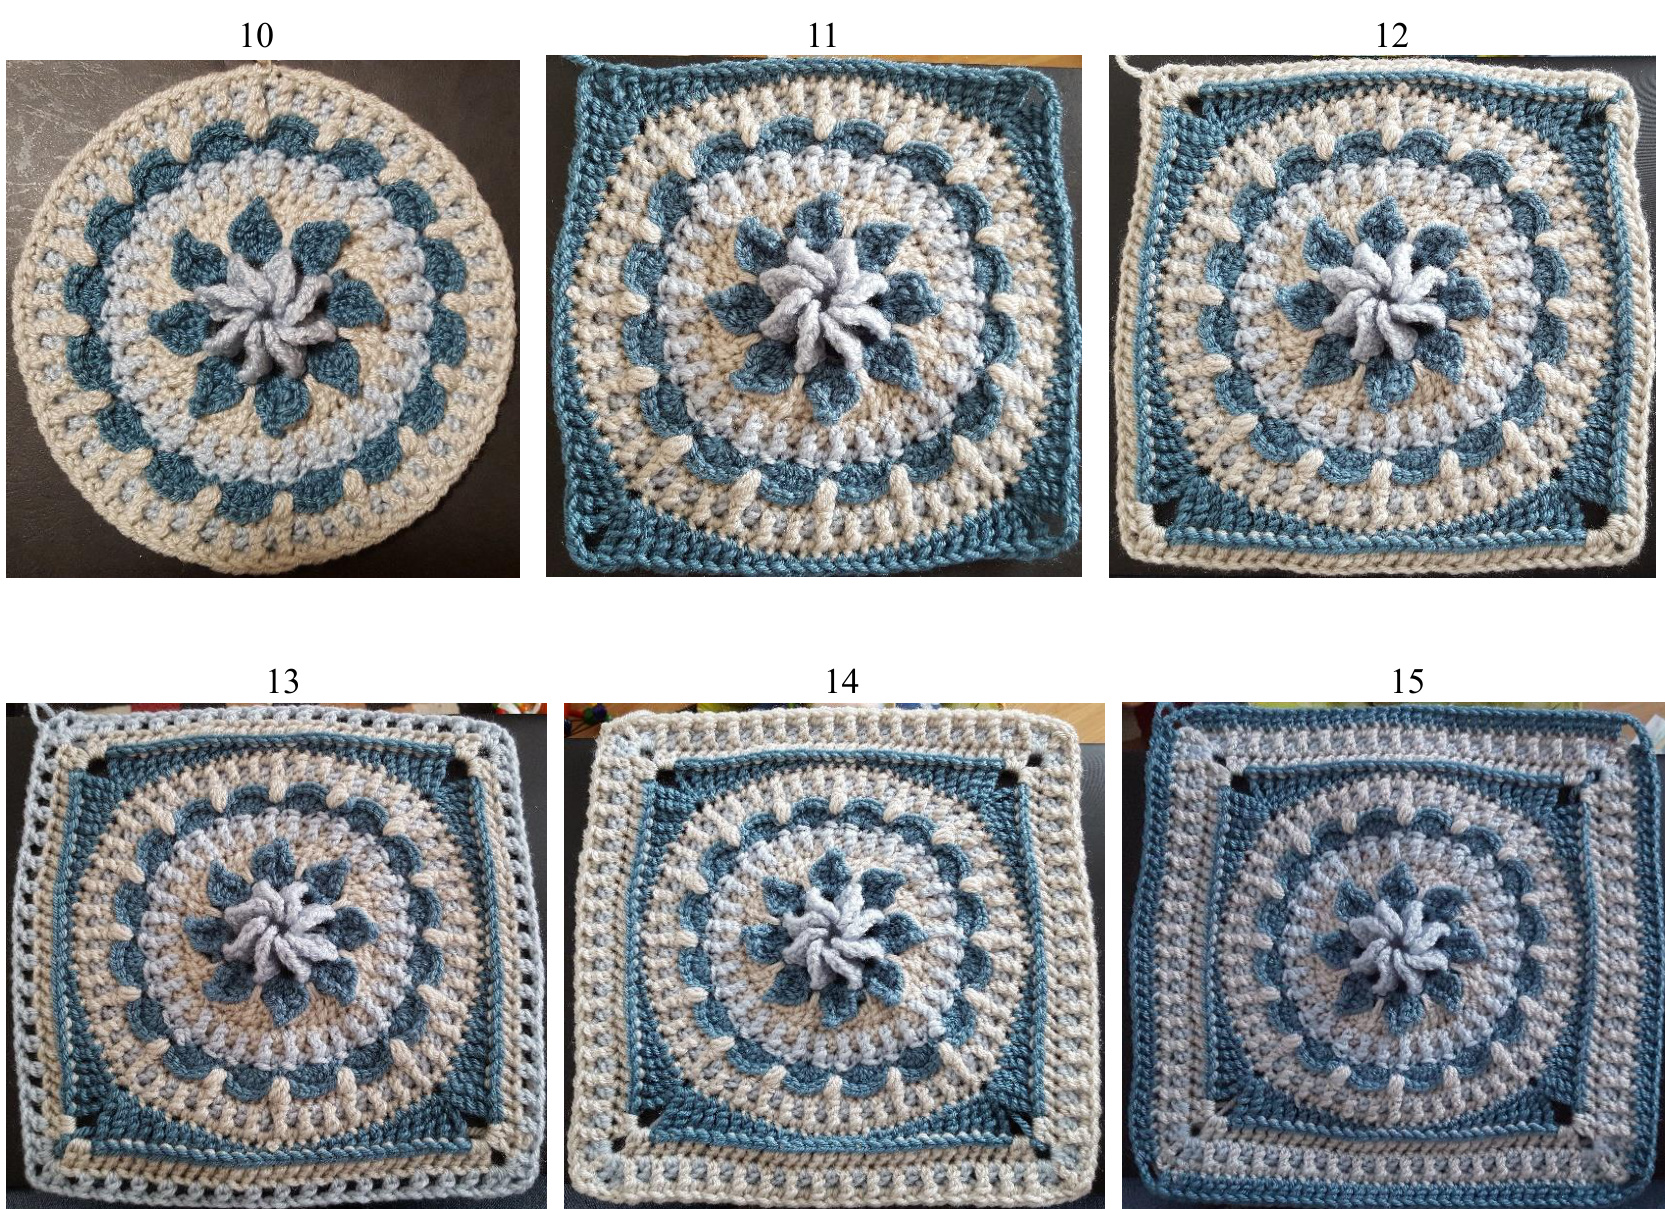
Round 11 - Squaring it off
Notes: 1)All corners should be worked in a dc that has been worked in a puff st. 2)It's important to start with the standing dtr as above, so that the next round appears seamless. 3)Stitch counts from this rnd onward do not include cornerch-sp. With Colour B, join with standing dtr in any dc that has been worked into a puff st. 1dtr in same st, tr in each of next 3 st, dc in each of next 3 st, hdc in each of next 3 st, sc in each of next 5 st, hdc in each of next 3 st, dc in each of next 3 st, tr in each of next 3 st, \*2dtr, ch3, 2dtr in next st; tr in each of next 3 st, dc in each of next 3 st, hdc in each of next 3 st, sc in each of next 5 st, hdc in each of next 3 st, dc in each of next 3 st, tr in each of next 3 st. Repeat from \* twice more. 2 dtr in first st, ch 3, join with sl st in standing dtr. Fasten off. (27 st per side = 108 st)
Gauge Check: Piece should measure 9 inches (worsted), or 8 inches (DK) after Rnd 11.
Round 12
With Colour C, join in corner with standing dc, ch 2, 2 dc in same corner space. \*Bptldc around each stitch to corner, 2 dc, ch 2, 2 dc in corner. Repeat from \* twice more. Bptldc around each stitch to corner, 1 dc in corner, join with sl st to top of standing dc. Fasten off. (31 st per side = 124 st)
Round 13
With Colour A, join with standing dc in any corner space, ch 2, 2 dc in same corner space, ch 1, sk 1, {\*dc in next st, ch 1, sk 1. Repeat from \* across to corner. 2 dc, ch 2, 2 dc in corner, ch 1, sk 1} three times. \*\*dc in next st, ch 1, sk 1. Repeat from \*\* across to corner, 1 dc in corner space. Join with sl st to standing dc. Fasten off. (19 dc, 16 ch1-sp per side = 76 dc, 64 ch1-sp) Gauge Check: Piece should measure a little less than 11 inches (worsted), or 9 inches (DK) after Rnd 13.
Round 14
With Colour C, join in corner with standing sc, tr into corner space of Rnd 12, sc in corner space of Rnd 13. Sc in each of next 2 st, {\*trskrnd12, sc in next dc. Repeat from \* to final 2 dc of side. Sc in each of next two dc. In corner space: sc, tr into corner space of Rnd 12, sc. Sc into each of next 2 dc} three times. \*\*Trskrnd12, sc in next dc, repeat from \*\* across; sc in each of remaining 2 dc. Join with sl st to standing sc. Fasten off. (37 st per side, 4 corner tr =152st) Gauge Check: Piece should measure 11 inches (worsted) or 9.5 inches (DK) after Rnd 14.
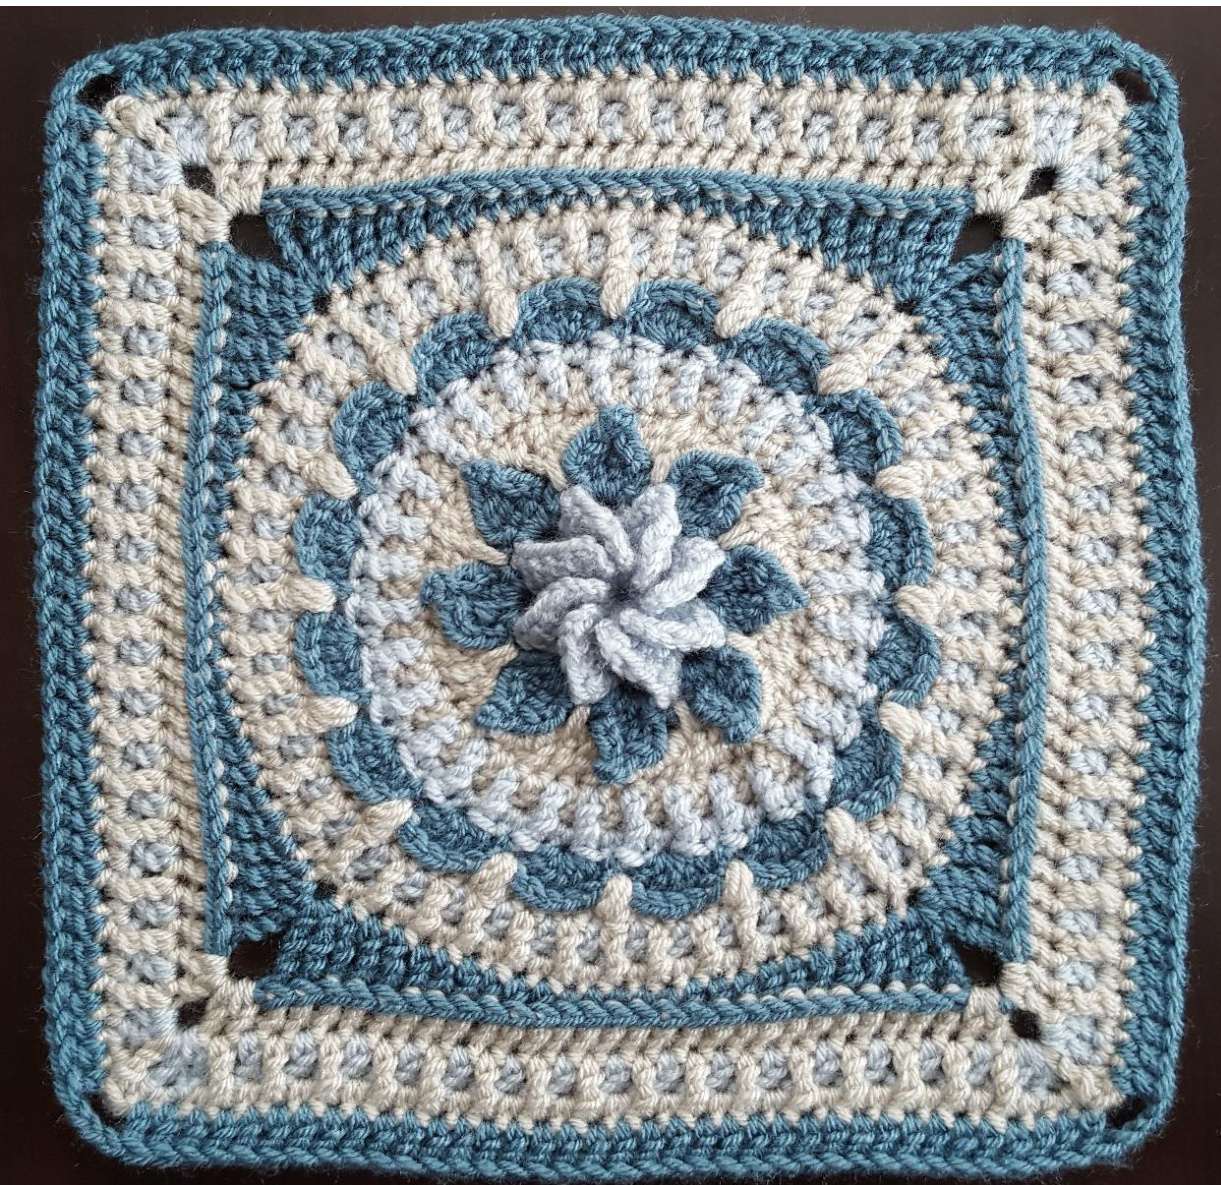
Round 15
With Colour B, join with standing dc in the sc before the tr in any corner. Ch 3, sk tr, dc in next sc, \*dc across to final sc of side. Ch 3, sk tr, dc in next sc. Repeat from \* twice more. Dc across to 1st corner, join with sl st to top of standing dc. Fasten off. (37 st per side = 148 st) Gauge Check: Finished piece should measure 12 inches (worsted) or 10.25 inches (DK). Weave in all ends. Block square to 12 inches if necessary.
Suggestions for modifications to achieve size:
To reduce (use any, or all, depending how much size reduction is necessary. Listed in order of omission priority): 1) Omit Rnd 15 2) Work Rnd 12 as hdc instead of dc 3) Work Rnd 13 as hdc and then work Rnd 14 with dc's into Rnd 12 4) Omit Rnd 14 5) Omit Rnds 13 and 14 \*\*Consult Round-by-Round photos on next two pages to see what will be removed fm your square by performing any of the above omissions\*\*\* To increase (use any, or all, depending how much size increase is necessary. Listed in order of addition priority): 1) As Rnd 16, work a rnd of bptlsc, bptlhdc, or bptldc (depending how much extra size you need) 2) If doing the above is not sufficient, as Rnd 17, add another rnd of sc, hdc, or dc (depending on how much extra sizeyou need) 3) Beyond doing the two extra rounds listed, add rnd(s) of whatever you think will work for your project and complement the established design of this square.